89
Marcas de Sequridad
(a) Estudie, entienda y siga todas las intrucciones antes de operar este aparato.
(b) No exceda la capacidad para la que ha sido diseñado.
(c) Utilice solamente en superficies duras y niveladas.
(d) Apoye adecuadamente el vehículo antes de comenzar reparaciones.
(e) La omisión de estas advertencias puede resultar en heridas personales o daños a la propiedad.
(f) El uso de este producto se limita al retiro, instalación, y al transporte en la posición
bajada, de transmisiones, de diferencial (caja de transferencia), y de caja de cambios.
Mensajes de Seguridad
(a) No deberán hacerse ningún tipo de alteraciones a este producto.
(b) Solamente los adaptadores y/o accesorios proporcionados por el fabricante deberán
ser utilizados.
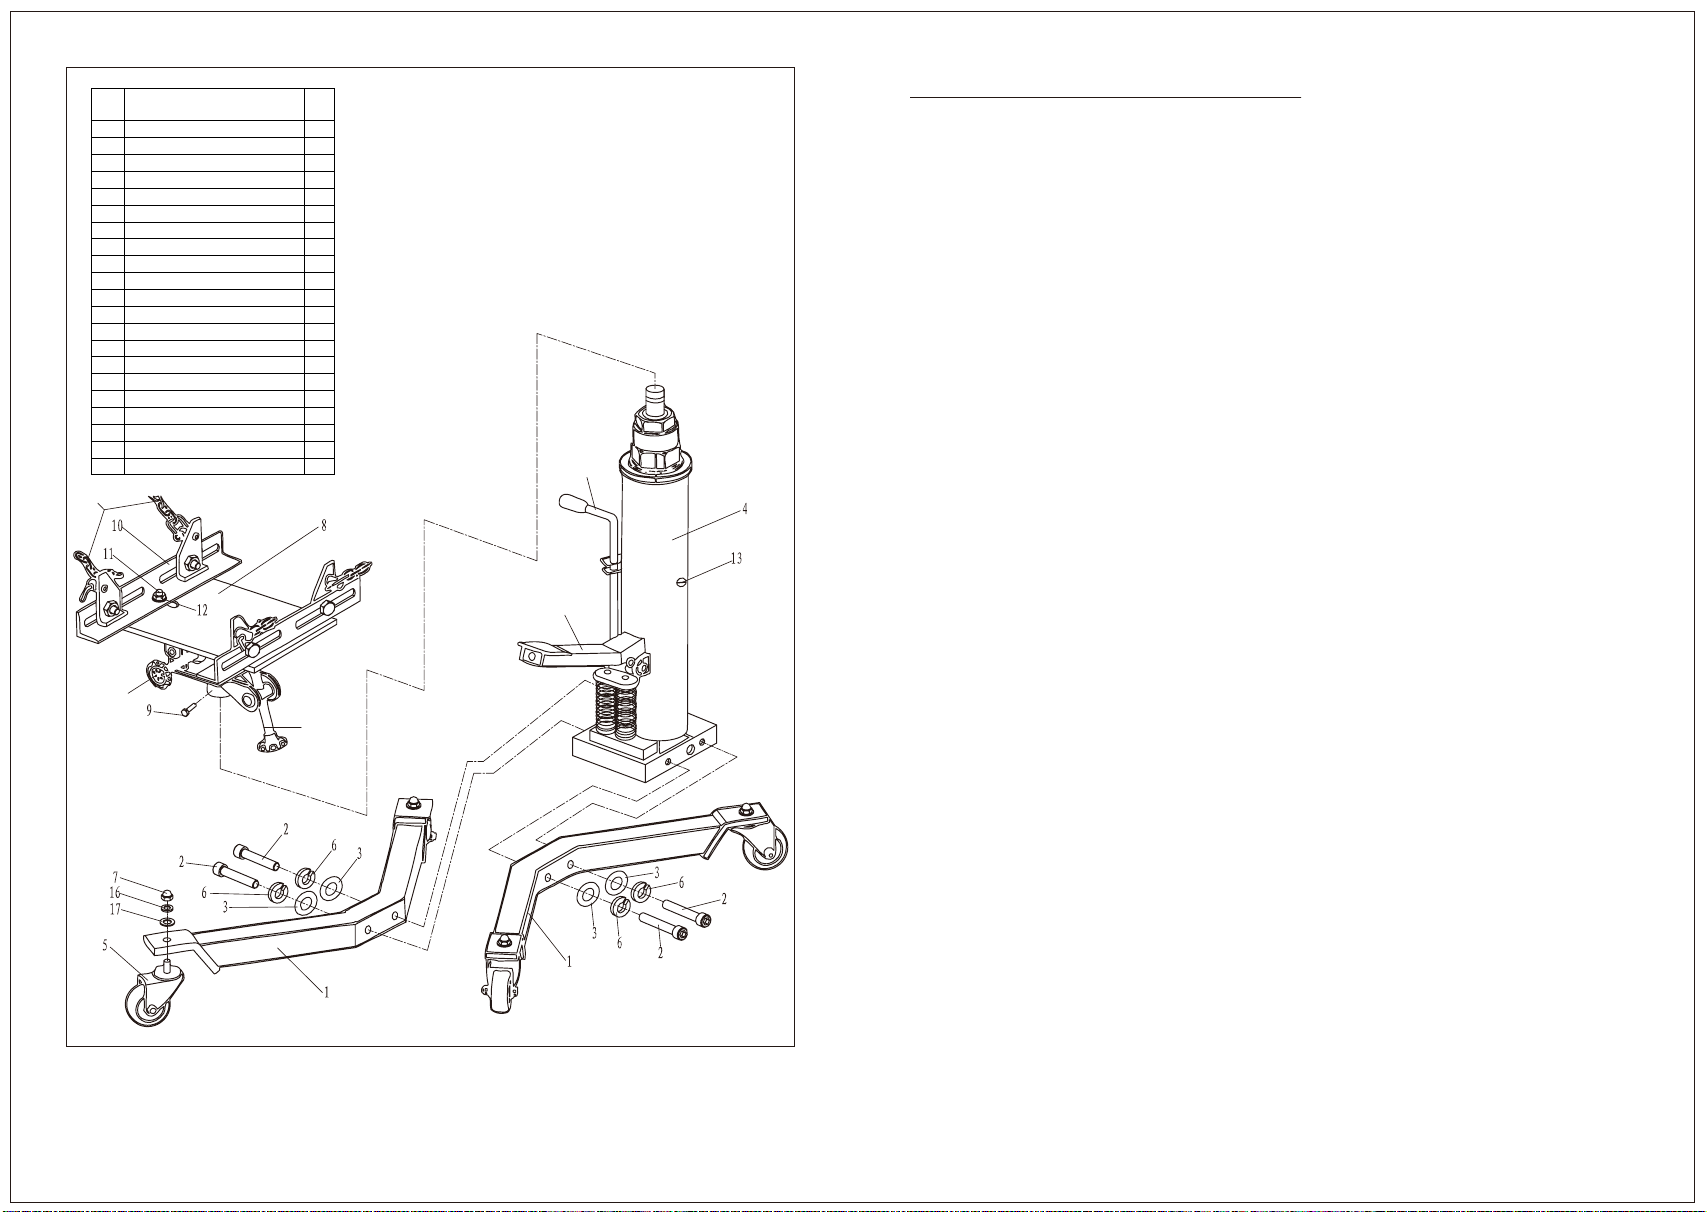
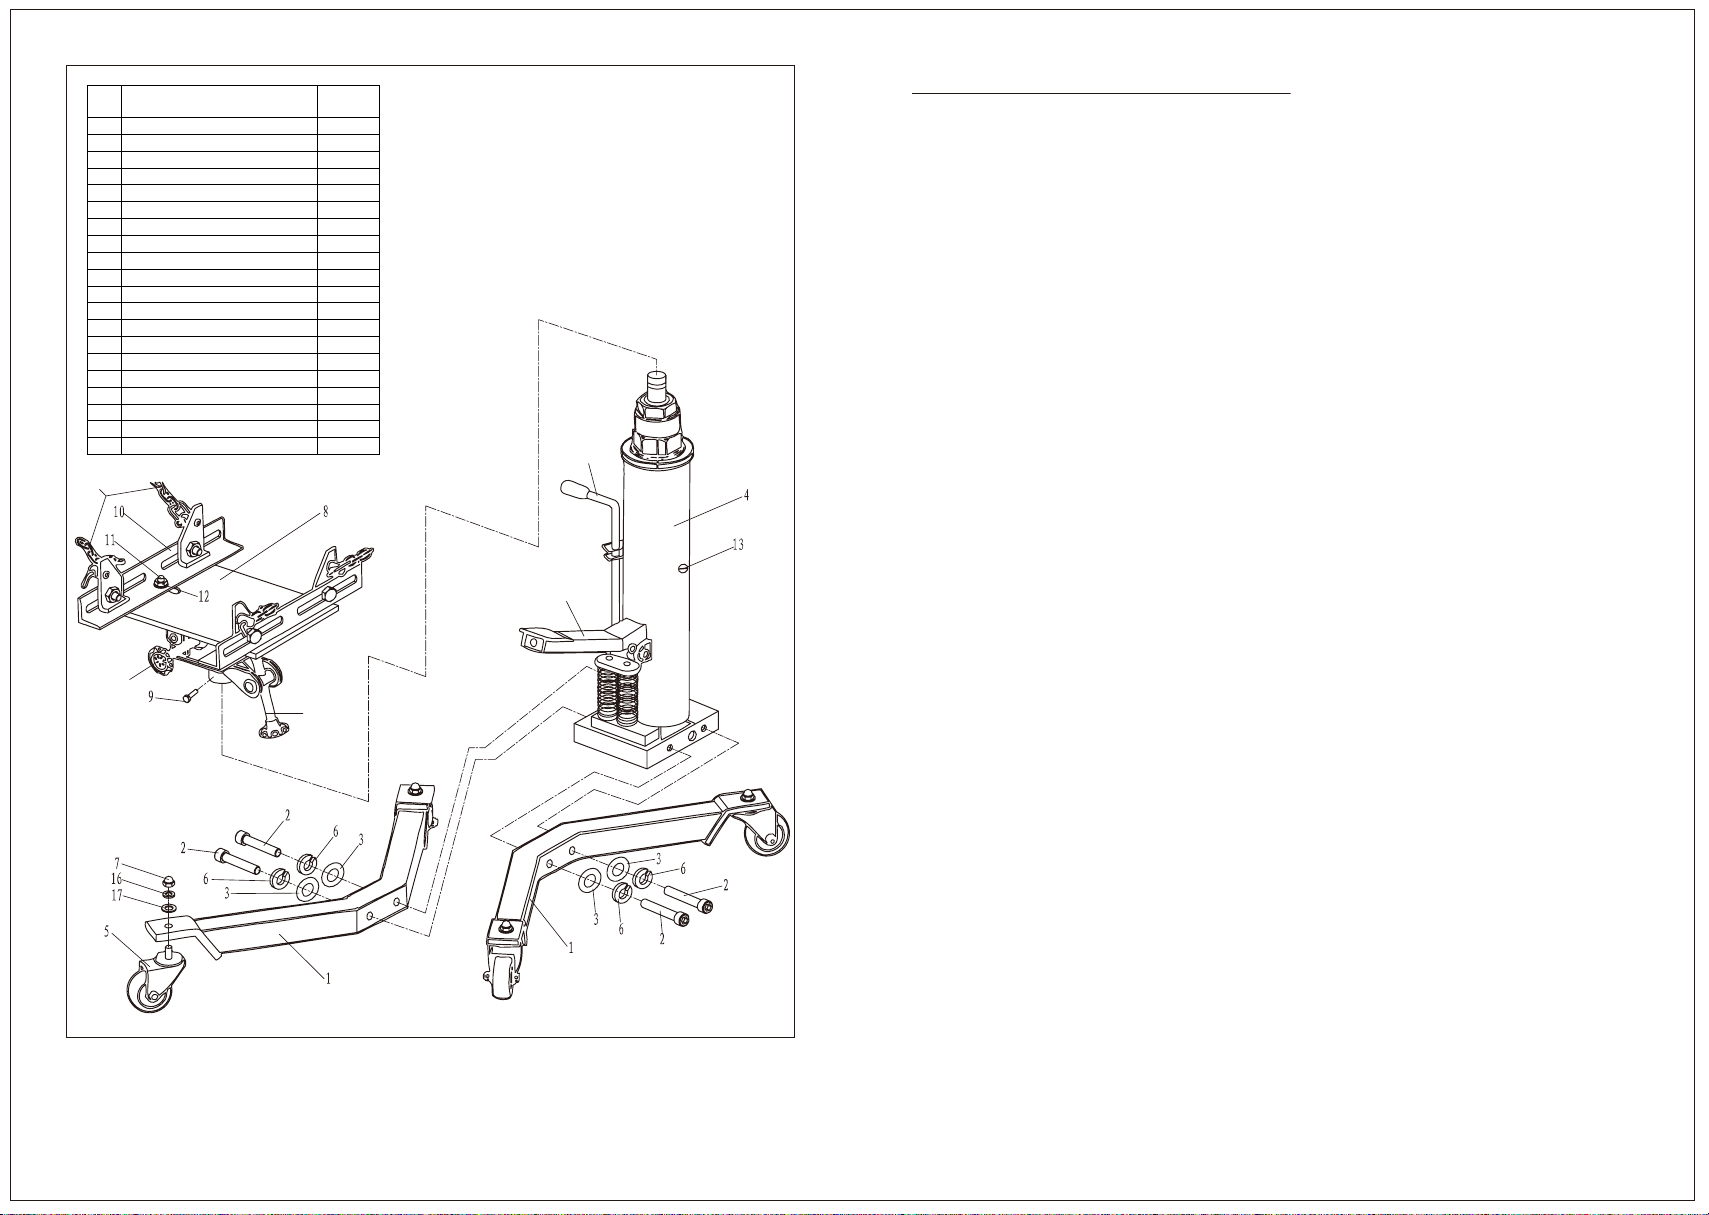
ANTES DE USAR
Quite el Tornillo del Tanque de Aceite (13), instalando el tornillo de respiración (13) del
paquete de piezas.Durante su maniobro y embarque, se puede atrapar aire en el sistema
hidráulico, causando que se malogre el gato. Para Soltar el Aire del Sistema Hidráulico:
1. De Hasta Dos Vueltas Siniestrógiras a la Válvula de Relevo.
2. Retire Tapón de Aceite del Cilindro.
3. Bombee la Palanca del Gato Rápidamente Varias Veces.
4. Reemplace el Tapón de Aceite y Compruebe Función.
5. Repita Este Procedimiento las Veces Que se Requieran.
No Se le Olvide Reemplazar el Tapón de Aceite.
ADVERTENCIA
Responsabilidad del Propietario y/o Usuario
El propietario y/o el usuario deberá(n) estudiar las instrucciones del producto y guardarlas
bien para referencia futura.
Operación
El propietario u operador deberán tener un conocimiento del producto, de sus
características de operación y de las instrucciones de seguridad antes de utilizar el APLV.
Se deben enfatizar y comprender los datos de seguridad. Si el usuario no habla el español
fluidamente, el comprador/propietario debe explicar las instrucciones de operación y
seguridad en su propio idioma, asegurándose que el usuario entienda su contenido.
Mantenimiento
El EPLV debe ser mantenido de acuerdo con las intrucciones del producto:
1. Cuando el gato mecánico no esta en uso, el brazo de levantamiento debe mantenerse
en la posición más baja.
2. Siempre mantenga límpio el gato mecánico y mantenga los tornillos y rulimanes
buen lubricados.
3. Mantenga límpias las partes que se pueden mover; lubrique estas partes móviles cada
3 meses.
Inspección
(a) Se debe hacer una inspección visual antes de cualquier uso del gato para condiciones
anormales, tales como soldadura partida, fugas de líquido, o piezas ausentes o dañadas.
(b) Se deben hacer otras inspecciones de acuerdo con las instrucciones.
(c) Cada APLV deberá inspeccionarse de manera inmediata si se cree que el aparato ha sido
sometido a un golpe o a una carga fuera de lo normal. Se recomienda que tal inspección
sea hecha en las instalaciones del mismo fabricante o proveedor.
(d) El propietario y/o usuario debe(n) entender que la reparación de este equipo puede
requerir conocimientos e instalaciones especializadas. Se recomienda que se lleve a
cabo una inspección anual del gato en las mismas instalaciones del fabricante o
proveedor y que cualquier piezas, calcomanías, o etiquetas de seguridad defectuosas
sean reemplazadas con refacciones autorizadas por el fabricante o proveedor. El
fabricante o proveedor puede proporcionar una lista de los lugares de instalaciones
aprobadas de reparación.
Equipos Dañados
Cualquier gato que parezca tener cualquier clase de daño, desgaste u operación anormal
SE DEBE RETIRAR DE SERVICIO MIENTRAS SE REPARE. Se recomienda que las debidas
reparaciones sean hechas en las instalaciones del fabricante o proveedor si es que el
fabricante o proveedor permite tales reparaciones.
Alteraciones
Como hay ciertos peligros que acompañan a esta clase de producto, no se permite que se
le haga ningún tipo de alteración o cambio.
Accesorios y Adaptadores
Sólo se deben usar los accesorios o adaptadores que sean proporcionados por el fabricante.
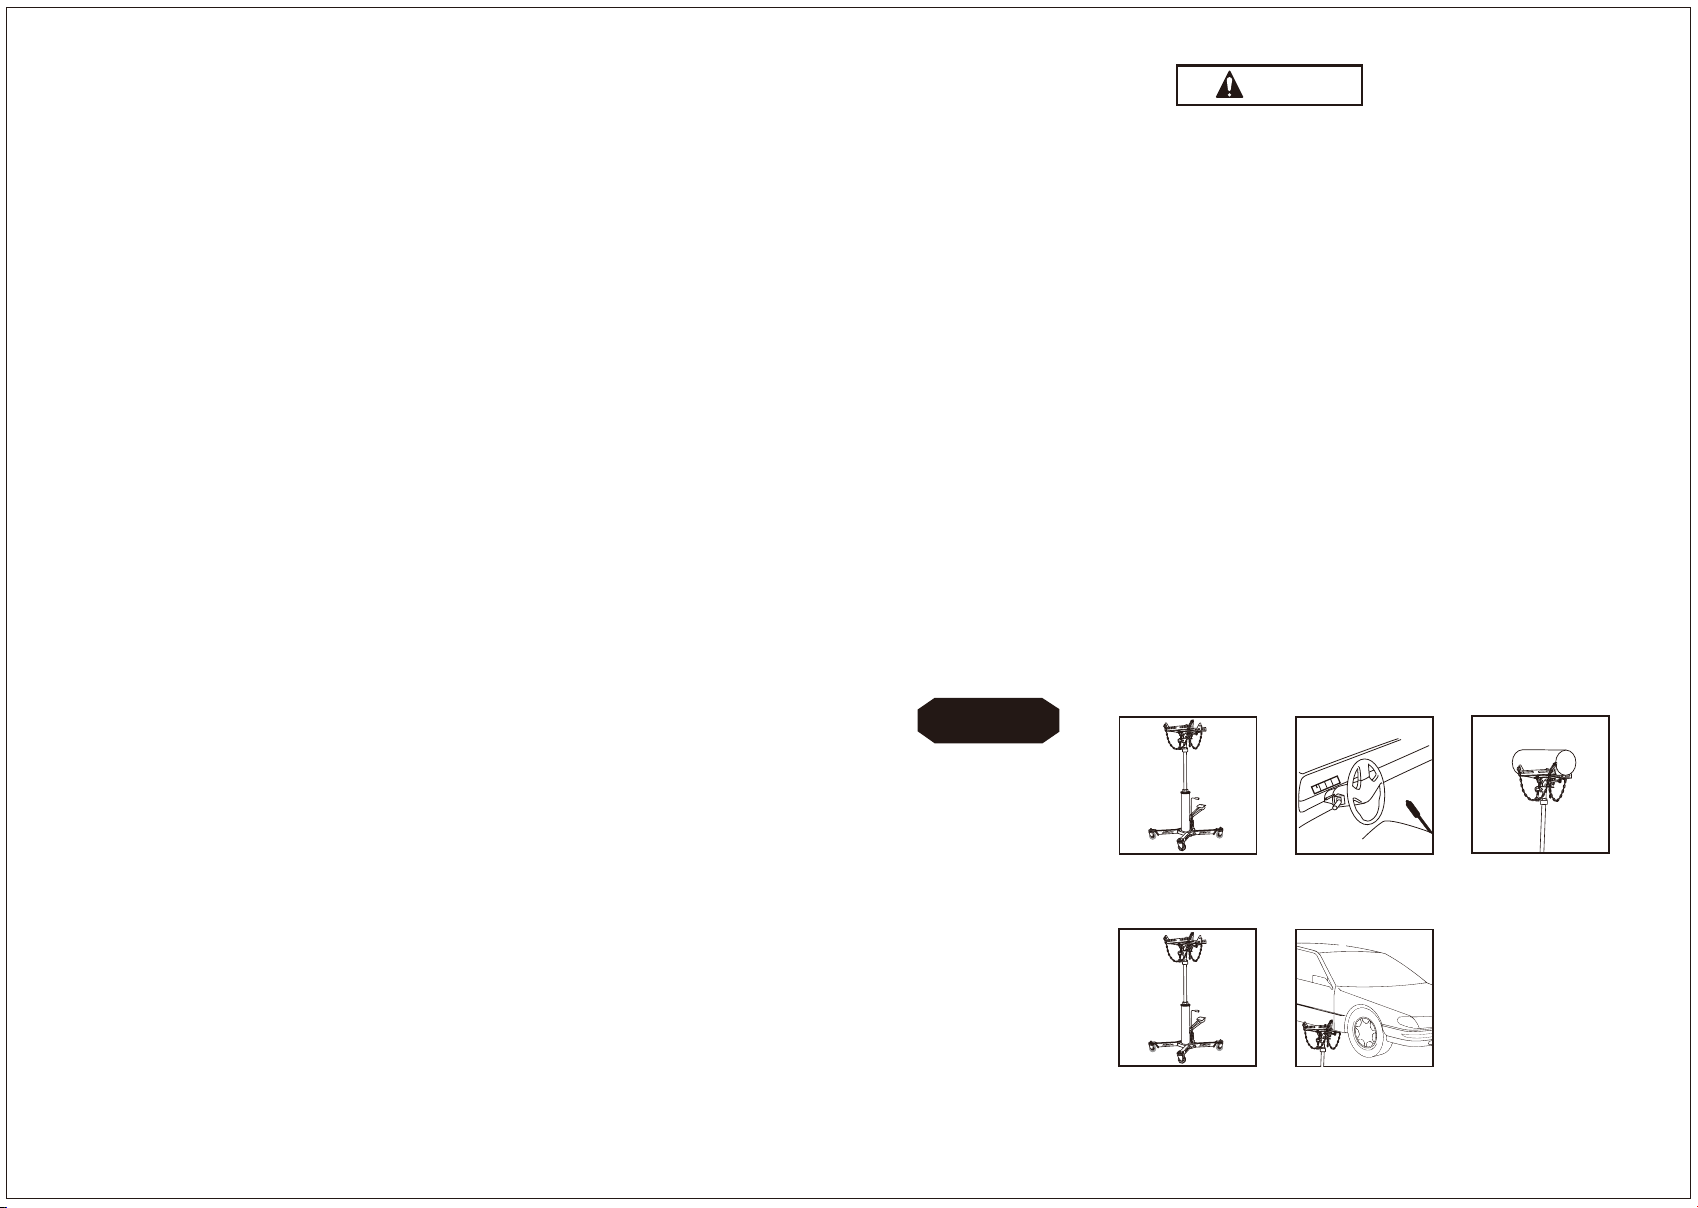
PRECAUCION : LA SEGURIDAD ANTE TODO
PRECAUCIONES
DE ELEVACION
Siempre aplique bien el
freno de emergencia.
PRND
El peso debe ser sopor-
tado por un juego de
sostenes para gatos de la
debida capacidad antes
de efectuar ningún trabajo
o inspección en el vehículo.
No exceda la capacidad
del gato, o pueden ocurrir
pérdidas de carga. Siempre
ajuste la carga al centro de
la monture del gato para el
mayor grado de estabilidad.
Use sólo para quitar, instalar
o transportar transmisiones
o diferenciales.
Cualquier gato que se
use debe ser usado solo
como dispositivo de
elevación.
Centre siempre el gato
usado debajo del eje o
una superficie plana y
reforzada del bastidor.