OoeratinolnstruclionsandPartsIVanual
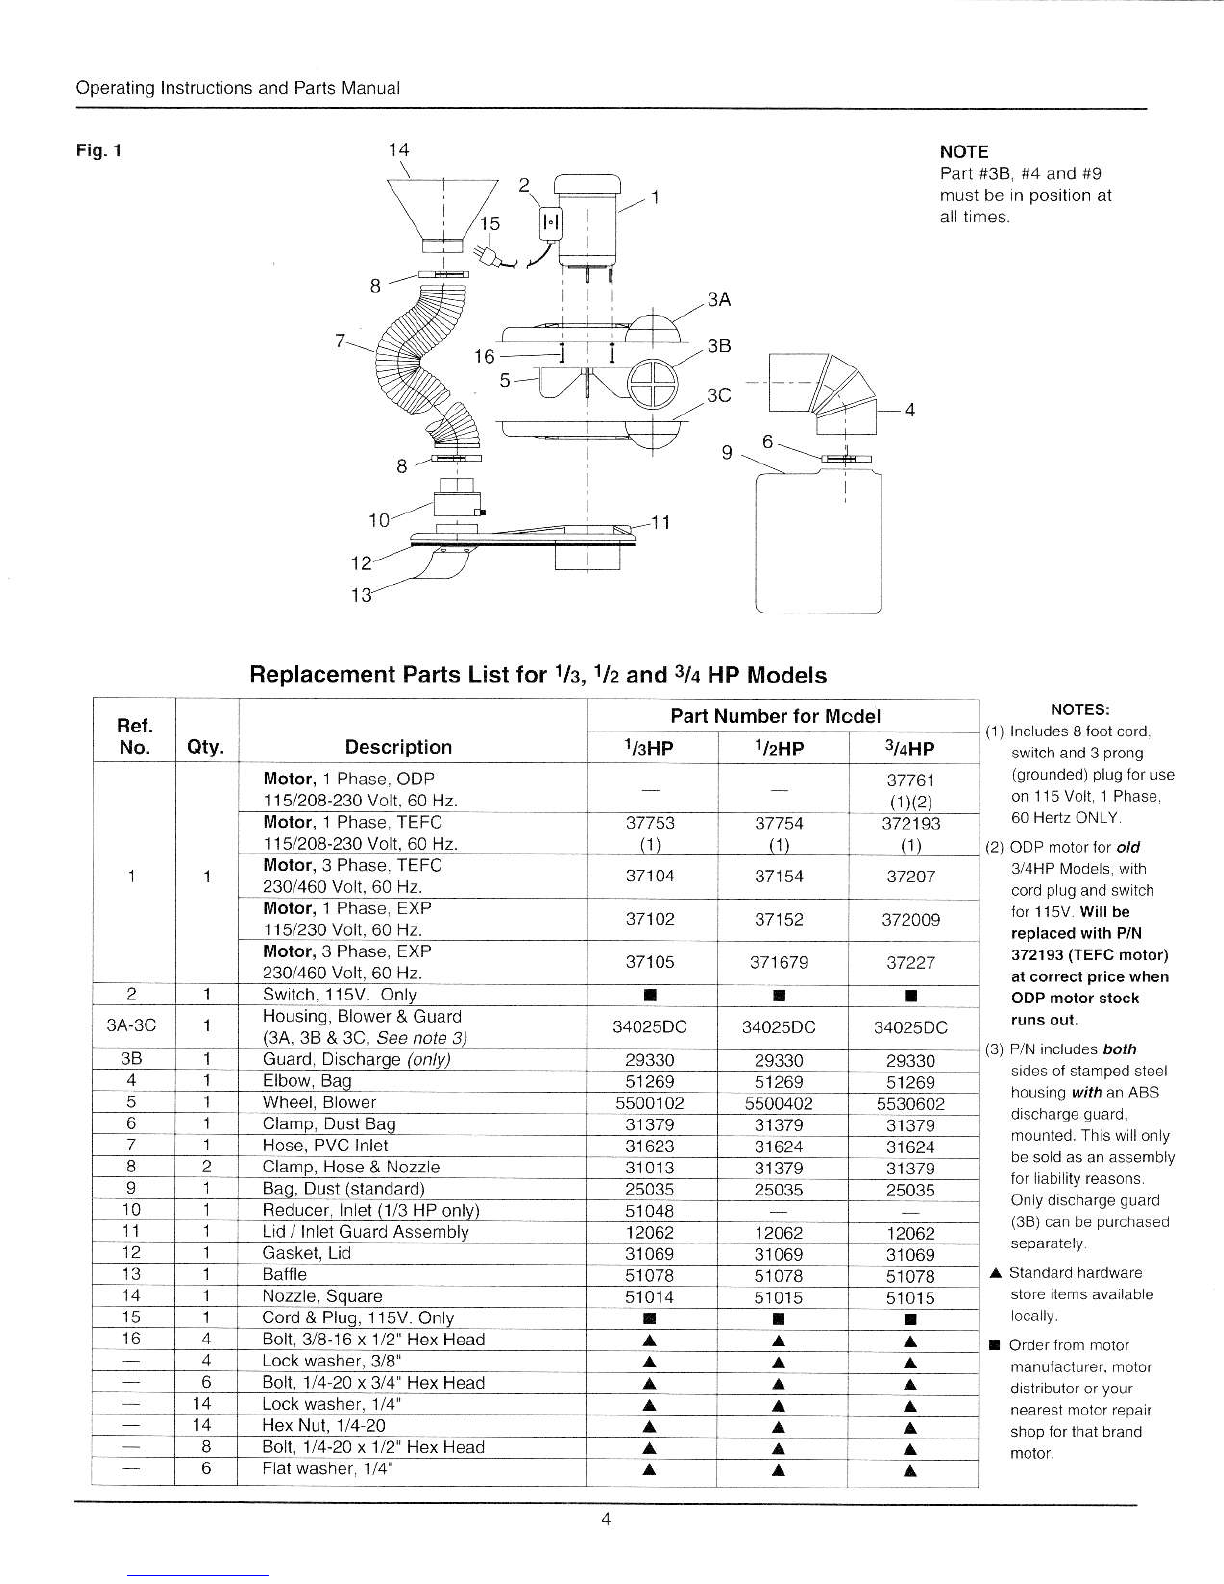
Assembly
%,%and %Models (SeeFlgure 1,Page4)
1.Assemblyincludeslhe lnslallationoi the a r ballle,sealng
gaskel,
dischargebagelbow,dustbag,hoseandnozzle.
2. Toinstalltheairbafileirndsealing
gaskel,place
ihe unit
upsidedownona cardboardcoveredtlalarea.
a. Atiachlhe air balfle
(13)
asshownusingincludedbots.
b. Removethepaperprotection
from
the siickysde ofthe
gaskel(12)
andinstallon lhe undersideofdrumld/guard
assembly
{11).
Sudaceshouldbecleananddrybelofe
3.Attachbagelbow,filierbag,hoseandnozzle.
a.Placethe unilright-side
uponyoLrr
conta
ner
andattach
thedischargebag
elbow
(4)
onthe dischargeol lhe
blowerasshown
inlhe illuslration.Insertandlightenlhe
includedsheetrnetalscrews.
b. CLamp
thedustbag(9)
ontheotherendoflhe elbow
usingtheclampenclosed
(6).
c. I\lo!nt sheelmelalreducing
adapler
(10)
to lhe inlel
on
iop ol drumlid/guard
assernblyusing
lhe squeeze
luglo
secure.
(x HP[4odelon]y).
d. Clampsuclionhose(7)10
reducing
adapteror inletwth
adjustableclarnp
(8)provided.
e. Clampnozzle
(14)to suction
hosewilh camp (8).
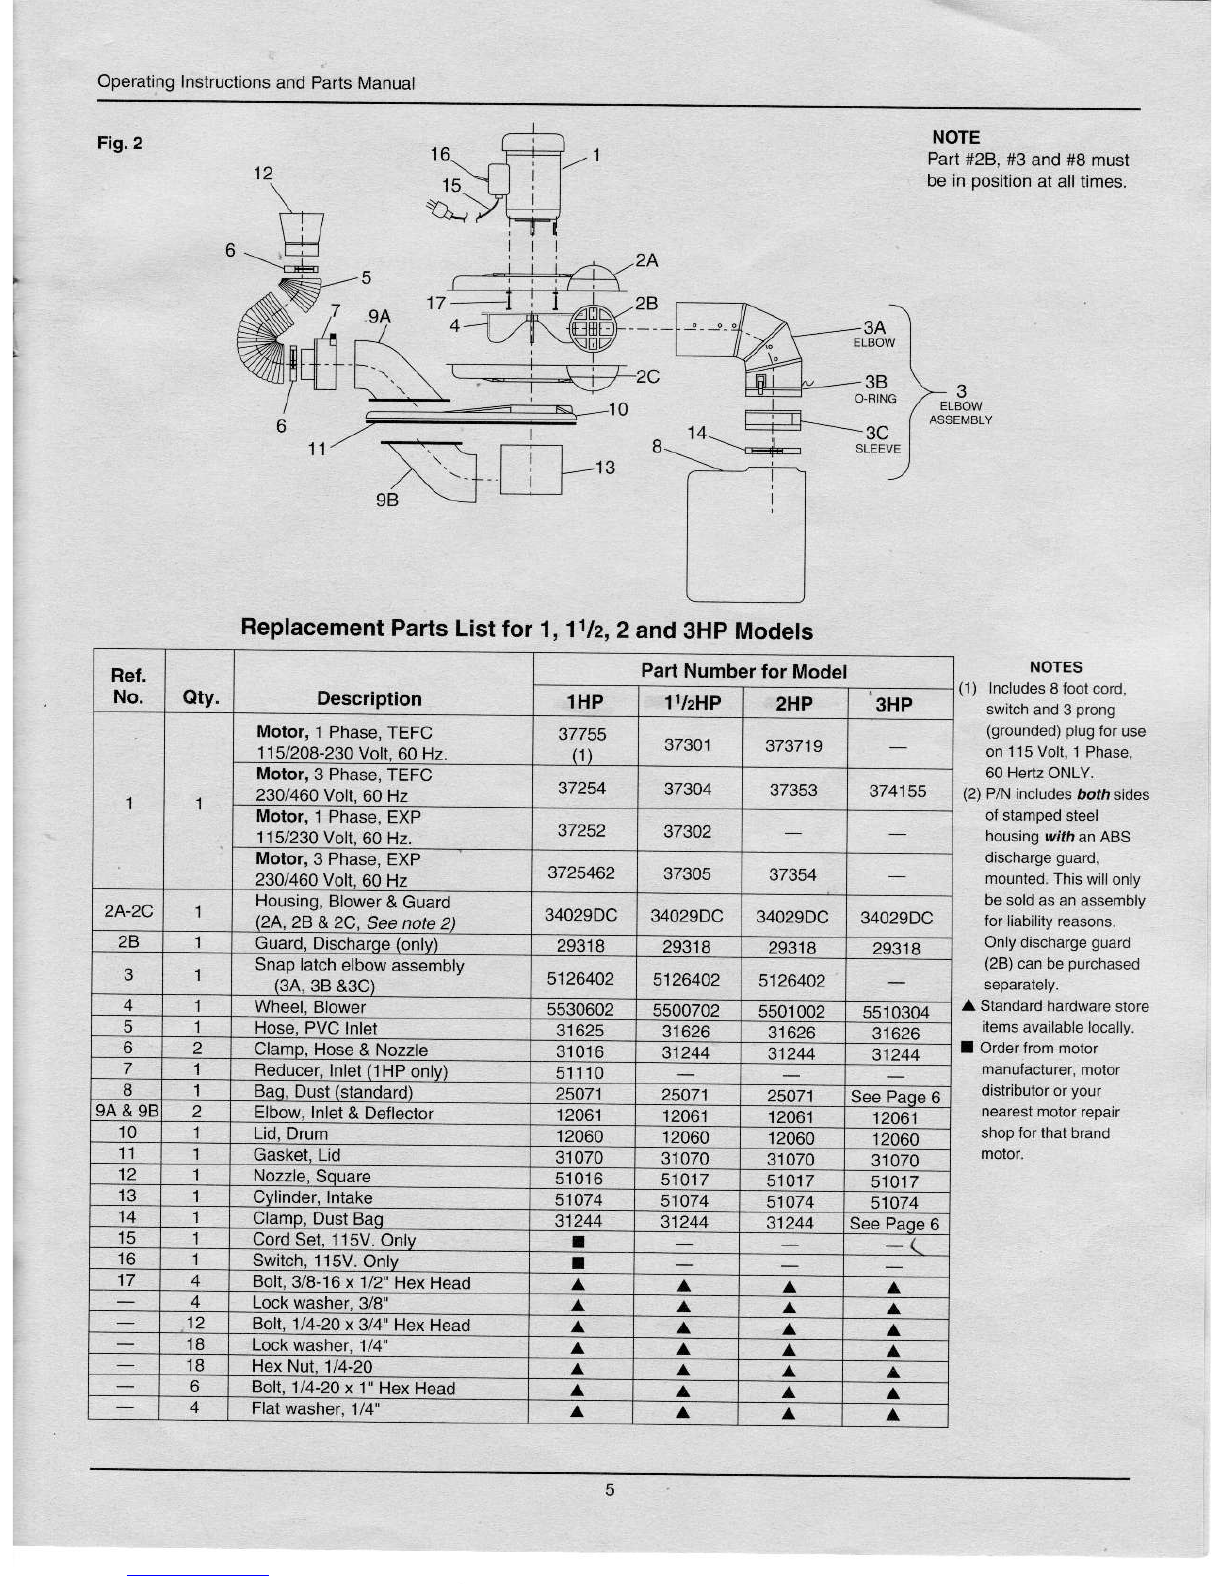
'1,
1x, 2 and 3HP Models(SeeFigure2,Page
5)
1.Assemblyncludesthe insrallationol lhe intakecylinder,
deflectorelbow,sealing
gaskel,
dischargebagelbow,dusl
bag,hoseand nozzle.
2.Toinsialltheintake
cylinder,delleclorelbowandsealing
gaskel,place
lhe unitupsidedo\,!nona cardboardcovered
a. Thedelleclorebow(98) isallachedas shownby
rcmovingthetwonuts nslalled
al lhelaclory,
b. The nrake
cyLinde'{13)is dhaLhedas shownLsirg
1/4-20
bollssupplied.
c.Bemovelhe paperproieciion
fromtheslickysideofthe
sealing
gaskel(11)
andinstallon lhe undersde of lhe
drumlld
(10).
3. Allachbagelbow,I lter
bag,hose
andnozzle
(excepl
3HPlVodel)'.
a.Placetheunitright-slde-up
onyour
containerandatlach
lhe discharcebagelbow
(3A)
on lhe dischargeoflhe
bower as showninthe illustration.Inserl
and
ilghlenihe
lncluded
sheelmelalscrews.
b.Theduslbag s atlachedlo lhe rernovable
elbowsleeve
(3C).(This
sleevesips
over
lhe endoftheelbow
andis
heldinplace
wilhsnap'atches.)Clarnplhe dusl bag(8)
tolhe sleev€
(3C)
usinglhe clamp
(14)
enclosed.
IMPORTANT!The
edgeof lhe dustbagshouldbe
approxirnately1/4'below lheflange
on lhe seeve sothat
thesnap-lalches
canclosecomplelely.
ltlheiabrlcistoo
closetotheflange,thesnap-latch
willrest
on iheiabric,
andnotfullyrerainrheduslbag.
Slipth€6 diamelerO-ring
(38)overtheendofthe
elbow
(3A)
andseatagainsllhe retainrngr b.Wilhsnap
latcheslna aised posilion,
slidethesleeve
(3C)wilh
attachedbagonlotheendoftheelbowwlh a slight
lwislingmorion
unliltghl aga
nsllhe oling. snap the
latchesdown.
(To
removelhe duslbaglorernptying,
snapuplhe lalchesandremoveihe seeve;reinsta
las
c. l,lounllhe sheel
meialreducngadapler
(7)
onthe inlet
elbow
(9A)
usingrhesqueezelugto secure.
(1HP
N4odelonly).
d. Clamplhe suclion
hose
i5) tothereducingadapleror
nletelbow
using
theadjustableclamp
(6)provided.
e. Clampnozzle
(12)to suclionhosewllhclamp
(6).
lnstallation
Pacelheassembleddusicollectoronrhe
correct
diameter
drum
(not
included).Plasticconlainersshouldnolbeused
aslheycannotsupportth€weightol lhe colleclor.
PaceX,l, andt1HPModelsonaconlainerhavingadiameter
ol19[''201'-Thisincludes3o-gallon
galvanizedgarbage
cans,or3035
gallon
openiopsieelorliberdrums.Donoluse
Place1,114,2and3 HPModelsonaconlainerhavinga
diameter€ngeof23"24',suchasastandard55-gallonsle€l
or
liber
drum.Donotuse
plastic
drums.
Checkmotorrotationon3-phase
power
connections;lhe
coolinglanonthemolorshouldtumclockwrseasobserved
ifom
above.Anelectriciancancoffectrolanonb?
interchanging
anytwo
(3-phase)
power
leadwlres.
Operation
Attachihedusicollectorinlelhosedireclytoiheconneclor
builtinlothedust
producing
lool.lfnobuilt-nconneclor,
poslion
a hoseendmounlednozzlewheret wil collecllhe
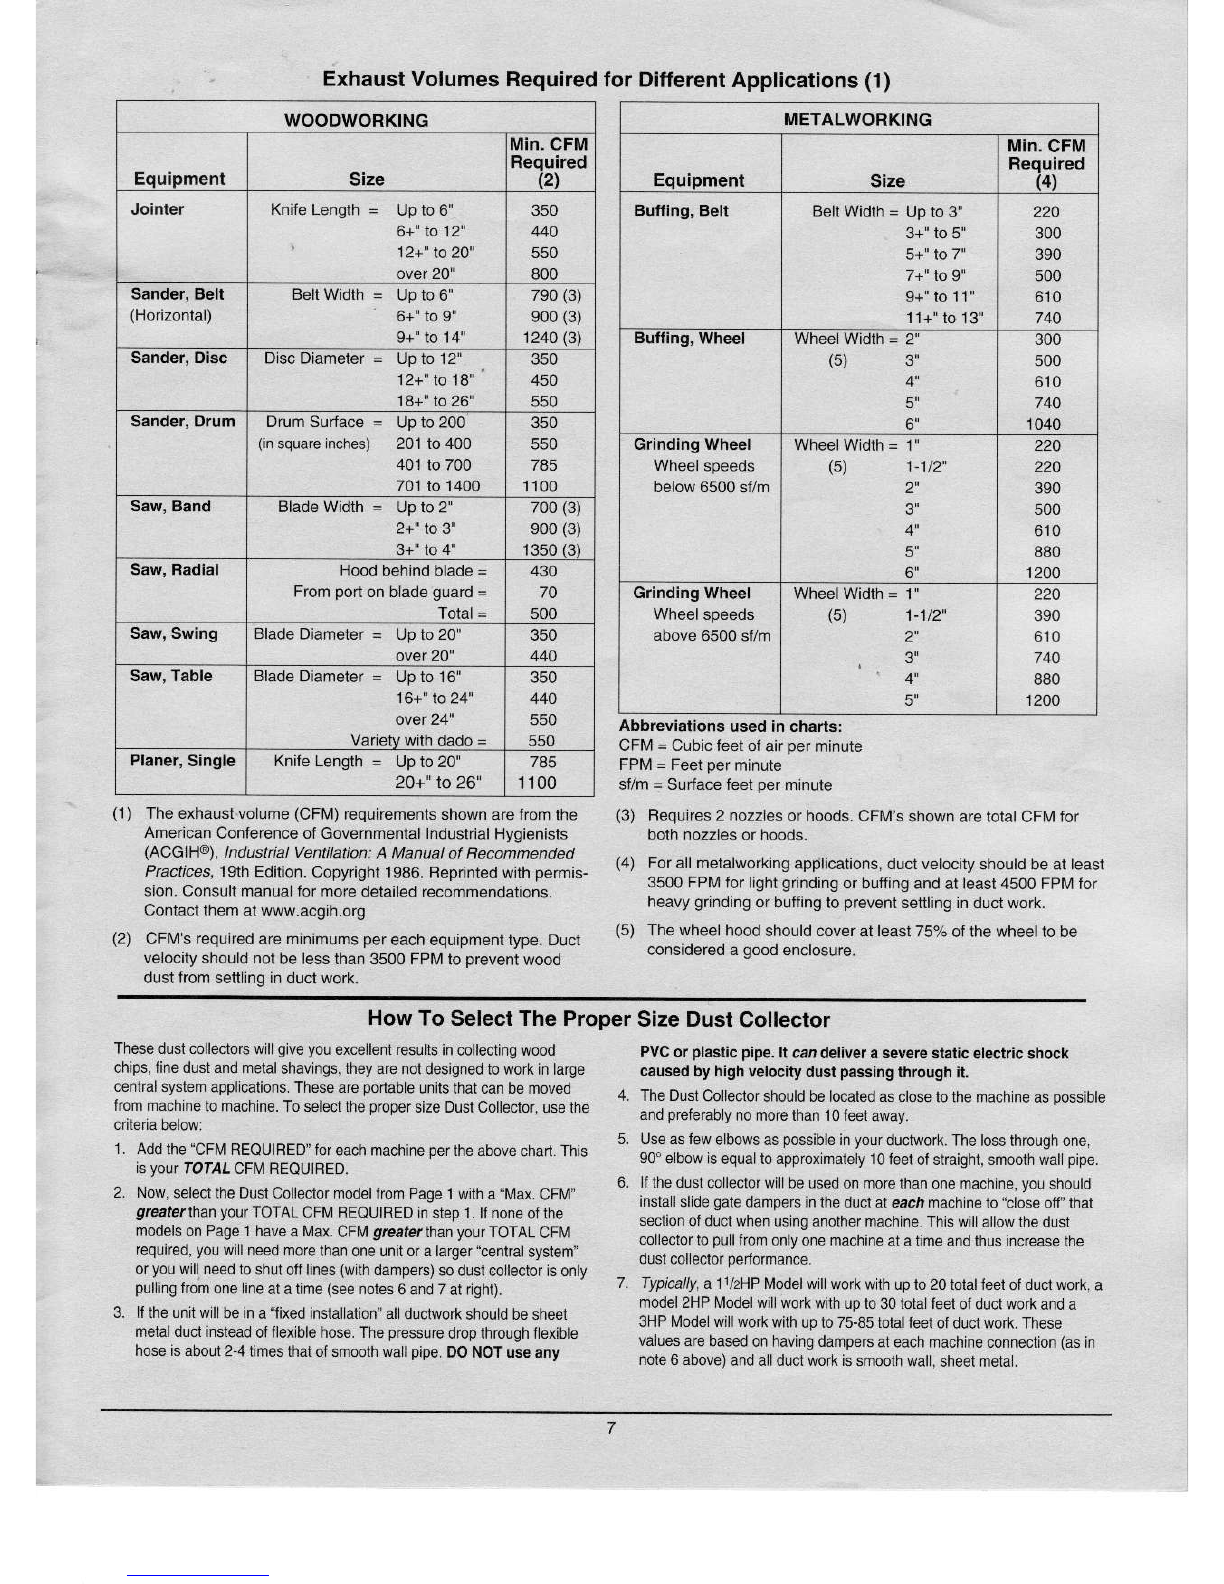
dusl.NOTE:Checklherecommendaionoflheloo
manufaclurerfor
therequiredCF[,4airllowTheCFMlisledin
lhespecificationslor
your
collectorshouldbe
greater
thanthe
required
CFI!'ltoensureduslcollection,See
page
7.
Emptythe
duslcollectiondrumwhenitbecomeshaffultiftoo
lull,
alldlst wlIbecarriedintothedustbag.
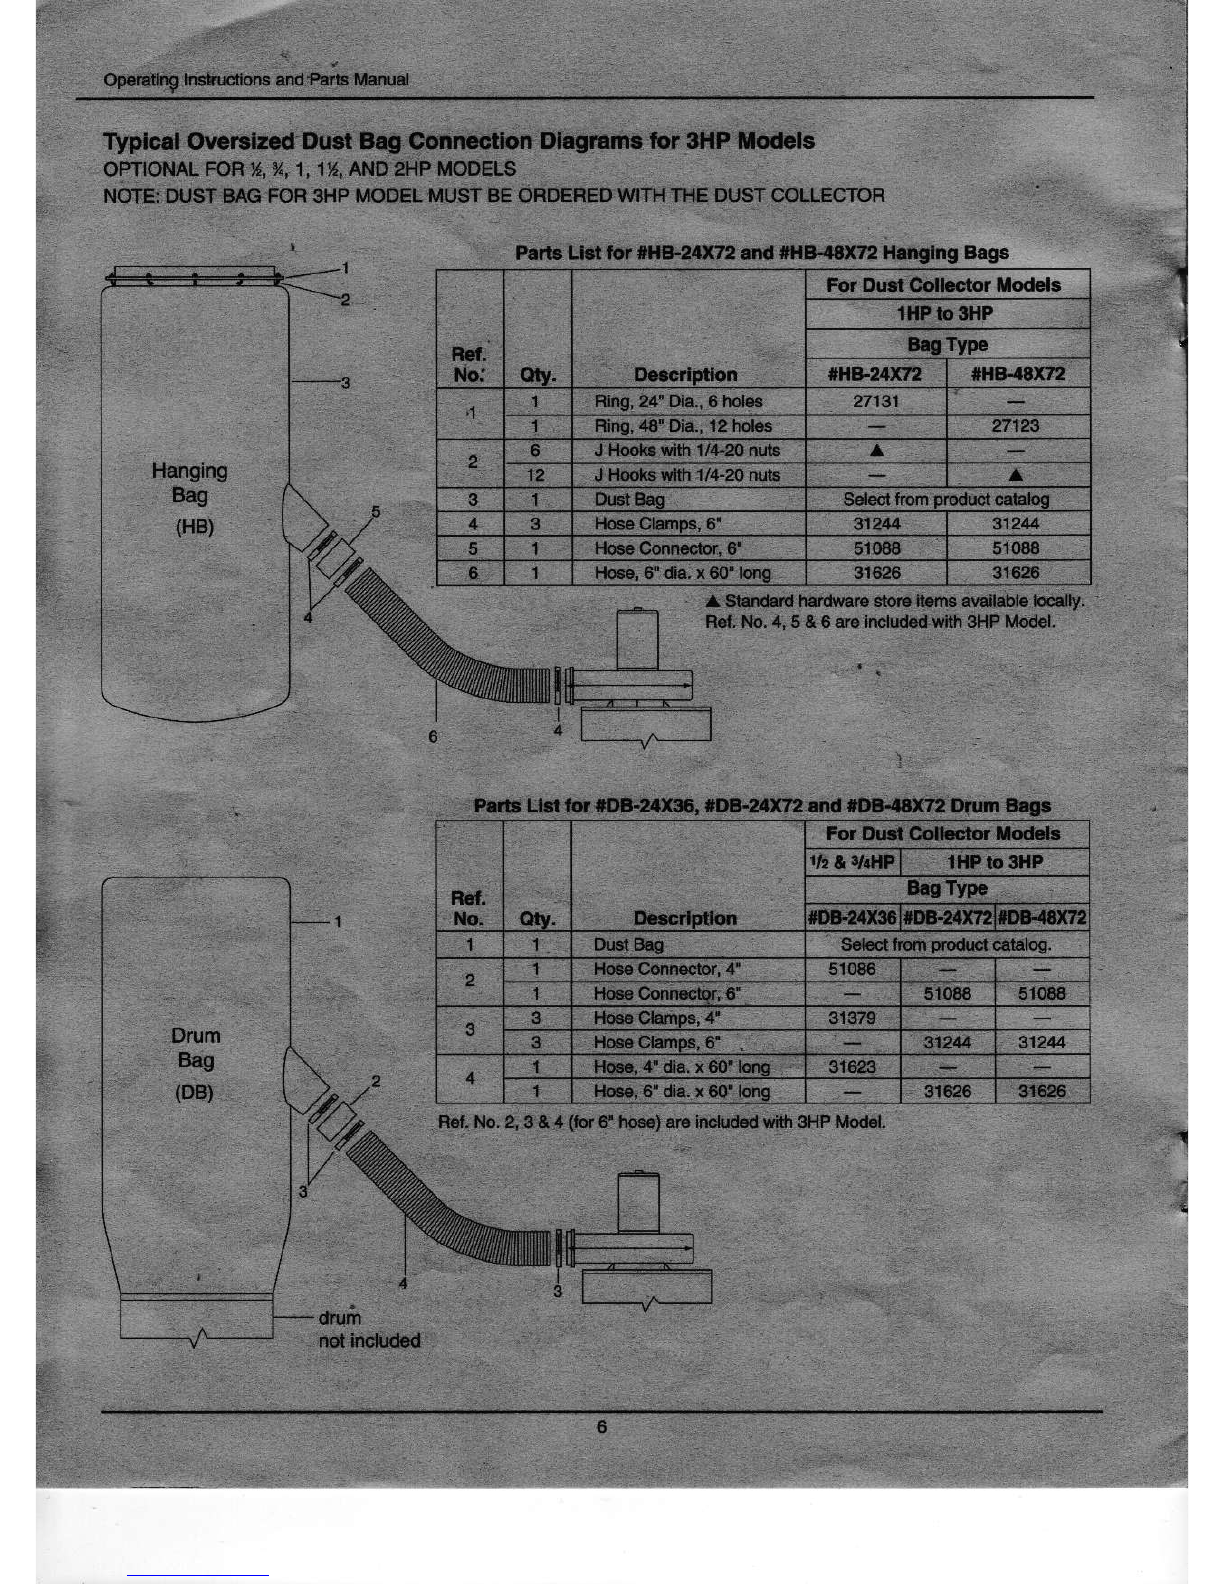
' See
page
6lorliler bagattachmentfor3HPlvodel.