manuals.online logo
Brands
  1. Home
  2. •
  3. Brands
  4. •
  5. Acer
  6. •
  7. Projector
  8. •
  9. Acer H7531D Series User manual

Acer H7531D Series User manual

Pb/Cb Pr/Cr
YS-VIDEO VGA IN HDMI 1 HDMI 2 AUDIO IN RS232 DC OUTVIDEO
USB
HDTV adapter
6
7
R B G
R B G
DVD player,
Set-top Box,
HDTV receiver
R
W
10
DVD player
HDMI
HDMI
4
D-Sub
D-Sub
3
5
2
USB
USB
Video Output
Y
Y
9
S-Video Output
8
RS232
RS232
6
11
R B G
7
RBG
1
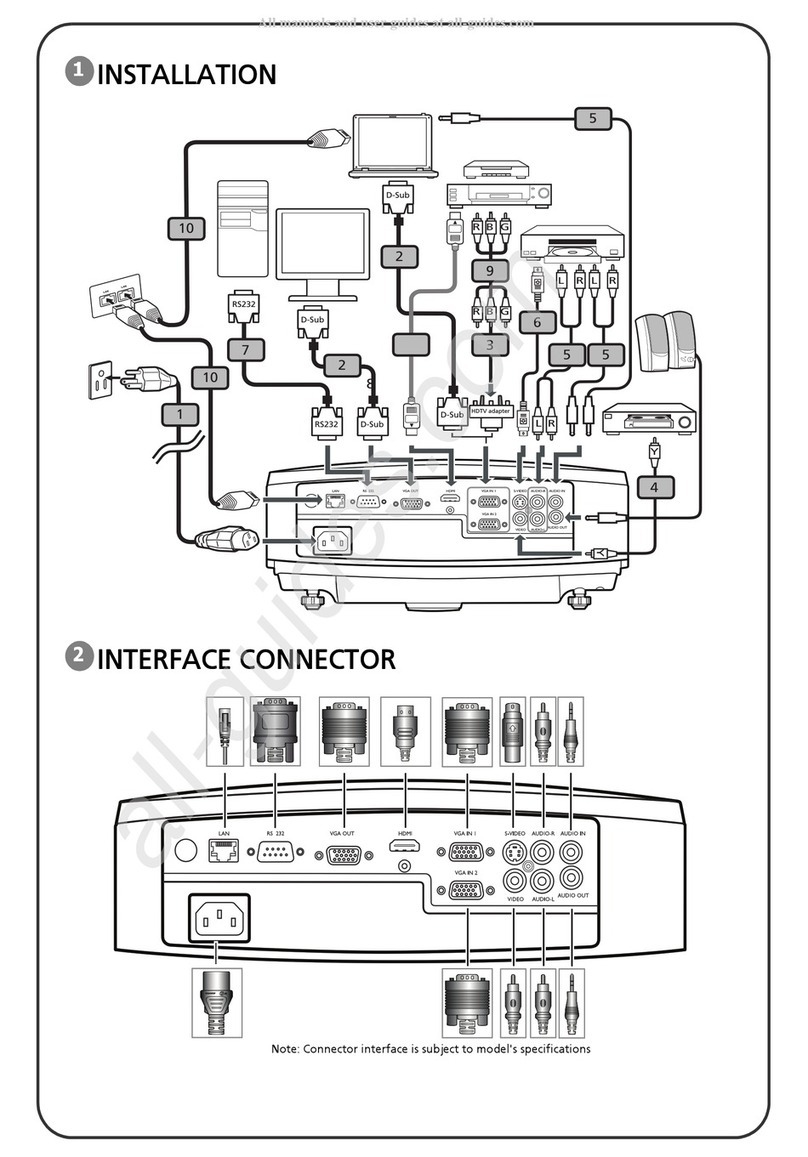
INSTALLATION
INTERFACE CONNECTOR
Note: Connector interface is subject to model’s specifications
Pb/Cb Pr/Cr
YS-VIDEO VGA IN HDMI 1 HDMI 2 AUDIO IN RS232 DC OUTVIDEO
USB
molex
E62405SP
R
All manuals and user guides at all-guides.com
Deutsch
INSTALLATION
Anschließen an einen computer
1. Gehen Sie sicher, dass Projektor und
Computer ausgeschaltet sind.
2. Schließen Sie das eine Ende des VGA-
Kabels an den „VGA IN“ -Anschluss
des Projektors an und das andere Ende
an den VGA-Anschluss des Computers.
Ziehen Sie die Schrauben fest.
3. Schließen Sie das eine Ende des
Netzkabels an den Netzanschluss des
Projektors und das andere Ende an
eine Netzsteckdose an.
Einschalten des Projektors
1. Entfernen Sie die Objektivkappe.
2. Schalten Sie erst den Projektor und
dann den Rechner ein.
3. Passen Sie die Position, die Schärfe
und den Zoom an.
4. Beginnen Sie mit lhrer Präsentation.
Ausschalten des Projektors
1. Drücken Sie zweimal auf die
Ein/Aus-Taste.
2. Trennen Sie erst dann das Netzkabel
von der Netzsteckdose, wenn der
Ventilator des Projektors ausgeschaltet
wurde.

SCHNITTSTELLEN-
ANSCHLUSS
SCHELLSTRART
1. Netzkabel
2. USB-Kabel
3. VGA-Kabel
4. HDMI Kabel
5. Audiokabelanschluss/ Anschluss
6. RS232-Kabel
7. 3 RCA Component-Kabel
8. S-Video Kabel
9. Composite Video-Kabel
10. Audiokabel mit Cinch-Anschluss
11. 12VDC-Kabel
Hinweis: Die Anschlussschnittstelle variiert je nach dem
Modell
English
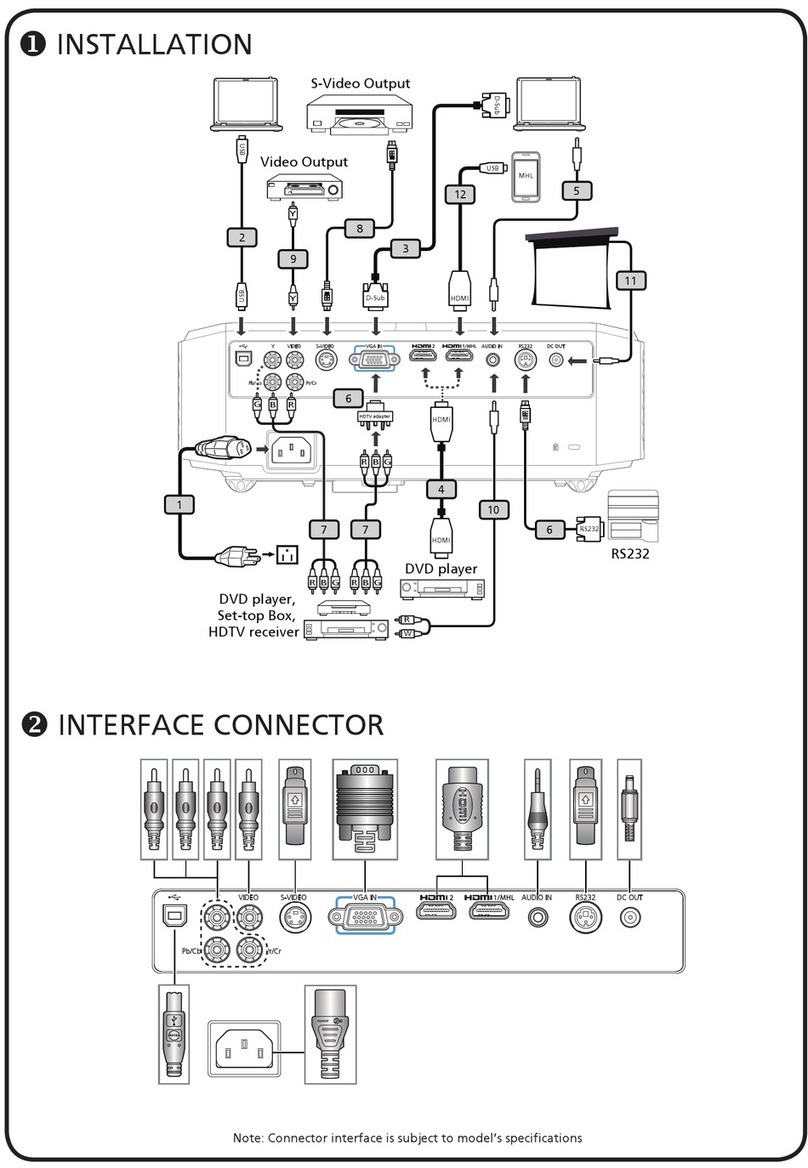
INSTALLATION
Connecting to a Computer
1. Ensure the projector and your
computer are turned off.
2. Connect one end of the VGA cable
to the “VGA IN” connector on the
projector; connect the other end to
the VGA connector on the computer
and tighten the screws.
3. Connect one end of the power cord
into the AC power socket on the
projector; connect the other end to an
electrical outlet.
Powering On the Projector
1. Remove the lens cap.
2. Turn on the projector first and then
the computer.
3. Adjust the position, focus and zoom.
4. Run you presentation.
Powering Off the Projector
1. Press the power button twice.
2. Do not remove AC power cord from
outlet until the projector fan shut
down.
INTERFACE CONNECTOR
Quick Start
1. Power Cord
2. USB Cable
3. VGA Cable
4. HDMI Cable
5. Audio Cable Jack/Jack
6. RS232 Cable
7. 3 RCA Component Cable
8. S-Video Cable
9. Composite Video Cable
10. Audio Cable Jack/RCA
11. 12V DC Cable
Note: Connector interface is subject to model’s specifications
All manuals and user guides at all-guides.com

Other manuals for H7531D Series

4

Other Acer Projector manuals

Acer PD PD116PD User manual

Acer

Acer PD PD116PD User manual

Acer U5200 Series User manual

Acer

Acer U5200 Series User manual

Acer H6555ABDKi Series User manual

Acer

Acer H6555ABDKi Series User manual

Acer H5350 Series User manual

Acer

Acer H5350 Series User manual

Acer X1183A User manual

Acer

Acer X1183A User manual

Acer XD1170D User manual

Acer

Acer XD1170D User manual

Acer H6510BD User manual

Acer

Acer H6510BD User manual

Acer P1101C Series User manual

Acer

Acer P1101C Series User manual

Acer X1529HP Series User manual

Acer

Acer X1529HP Series User manual

Acer PD311 series User manual

Acer

Acer PD311 series User manual

Acer P7270 Series User manual

Acer

Acer P7270 Series User manual

Acer PD723P User manual

Acer

Acer PD723P User manual

Acer X1525C User manual

Acer

Acer X1525C User manual

Acer S1213Hne Series User manual

Acer

Acer S1213Hne Series User manual

Acer TravelMate C200 Series User manual

Acer

Acer TravelMate C200 Series User manual

Acer P6605 Series User manual

Acer

Acer P6605 Series User manual

Acer VL7860 User manual

Acer

Acer VL7860 User manual

Acer V6815 User manual

Acer

Acer V6815 User manual

Acer K138STi Series User manual

Acer

Acer K138STi Series User manual

Acer H7532BD User manual

Acer

Acer H7532BD User manual

Acer V6510 User manual

Acer

Acer V6510 User manual

Acer S5201M Series User manual

Acer

Acer S5201M Series User manual

Acer P7290 User manual

Acer

Acer P7290 User manual

Acer F7200 Series User manual

Acer

Acer F7200 Series User manual

Popular Projector manuals by other brands

Christie CP42LH installation guide

Christie

Christie CP42LH installation guide

Epson PowerLite 765c parts manual

Epson

Epson PowerLite 765c parts manual

Epson PowerLite Pro Cinema 9500 UB brochure

Epson

Epson PowerLite Pro Cinema 9500 UB brochure

3M Multimedia Projector MP8749 Technical manual

3M

3M Multimedia Projector MP8749 Technical manual

Sony VPL-ES7 Service manual

Sony

Sony VPL-ES7 Service manual

Eiki LC-HDT2000 owner's manual

Eiki

Eiki LC-HDT2000 owner's manual

Barco FLM R20+ Performer user manual

Barco

Barco FLM R20+ Performer user manual

LG HS101 owner's manual

LG

LG HS101 owner's manual

AAXA Technologies P3X How to reset

AAXA Technologies

AAXA Technologies P3X How to reset

Sony VPL-CW255 Specifications

Sony

Sony VPL-CW255 Specifications

Barco FLM series Safety manual

Barco

Barco FLM series Safety manual

Dukane 6640W Quick setup guide

Dukane

Dukane 6640W Quick setup guide

Runco Video Xtreme VX-2ix Owner's operating manual

Runco

Runco Video Xtreme VX-2ix Owner's operating manual

Epson PowerLite 600p Product information

Epson

Epson PowerLite 600p Product information

Meridian 810 Brochure & specs

Meridian

Meridian 810 Brochure & specs

Sanyo WF10 - PLV WXGA LCD Projector owner's manual

Sanyo

Sanyo WF10 - PLV WXGA LCD Projector owner's manual

Epson EB-93e datasheet

Epson

Epson EB-93e datasheet

Microtek CX6 quick start

Microtek

Microtek CX6 quick start

manuals.online logo
manuals.online logoBrands
  • About & Mission
  • Contact us
  • Privacy Policy
  • Terms and Conditions

Copyright 2025 Manuals.Online. All Rights Reserved.