Acer UL6500 User manual

UL6500/RL350/LU-U500/SL550/FL-440/
F1P1702/UL5530/RL153/LU-U400/
SL450/FL-423/F1P1706/UL5510/RL150/
LU-U300/SL350/FL-420/F1P1710/
UL6300W/RL320/LU-W500/SL530/
FL-340/FWX1703/UL5330W/RL123/
LU-W400/SL430/FL-323/FWX1707/
UL5310W/RL120/LU-W300/SL330/
FL-320/FWX1711/UL6200/RL310/
LU-X500/SL510/FL-140/FNX1704/
UL5230/RL113/LU-X400/SL410/FL-123/
FNX1708/UL5210/RL110/LU-X300/
SL310/FL-120/FNX1712 Series
Laser Projector
User's Guide

1
Safety instructions
Read all of these instructions before you operate your projector and save for future
reference.
1. Read instructions
All the safety and operating instructions should be read before the appliance is
operated.
2. Notes and warnings
All notes and warnings in the operating instructions should be adhered to.
3. Cleaning
Unplug the projector from the wall socket before cleaning. Use a damp cloth for
cleaning the projector housing. Do not use liquid or aerosol cleaners.
4. Accessories
Do not place this product on an unstable cart, stand, or table. The product may fall,
causing serious damage to the product.
Keep the plastic packing materials (from the projector, accessories and optional
parts) out of the reach of children as these bags may result in death by suffocation.
Be particularly careful around the small children.
5. Ventilation
The projector is equipped with ventilation holes (intake) and ventilation holes
(exhaust).
Do not block or place anything near these slots, or internal heat build-up may
occur, causing picture degradation or damage to the projector.
6. Power sources
Check that the operating voltage of your unit is identical with the voltage of your
local power supply.
7. Servicing
Do not attempt to service this projector yourself. Refer all servicing to qualified
service personnel.
8. Replacement parts
When replacement parts are required, be sure that the replacement parts are
specified by the manufacture. Unauthorized substitutions may result in fire, electric
shock or other hazards.
9. Moisture Condensation
Never operate this projector immediately after moving it from a cold location to a
warm one. When the projector is exposed to such a change in temperature,
moisture may condense on the lens and the crucial internal parts. To prevent the
unit from possible damage, do not use the projector.
WARNING:
This is a Class A product. In a domestic environment this product may cause radio
interference in which case the user may be required to take adequate measures.

Table of Contents
2
Introduction ........................................................................................... 3
Projector feature .................................................................................................................................... 3
Package contents .................................................................................................................................. 4
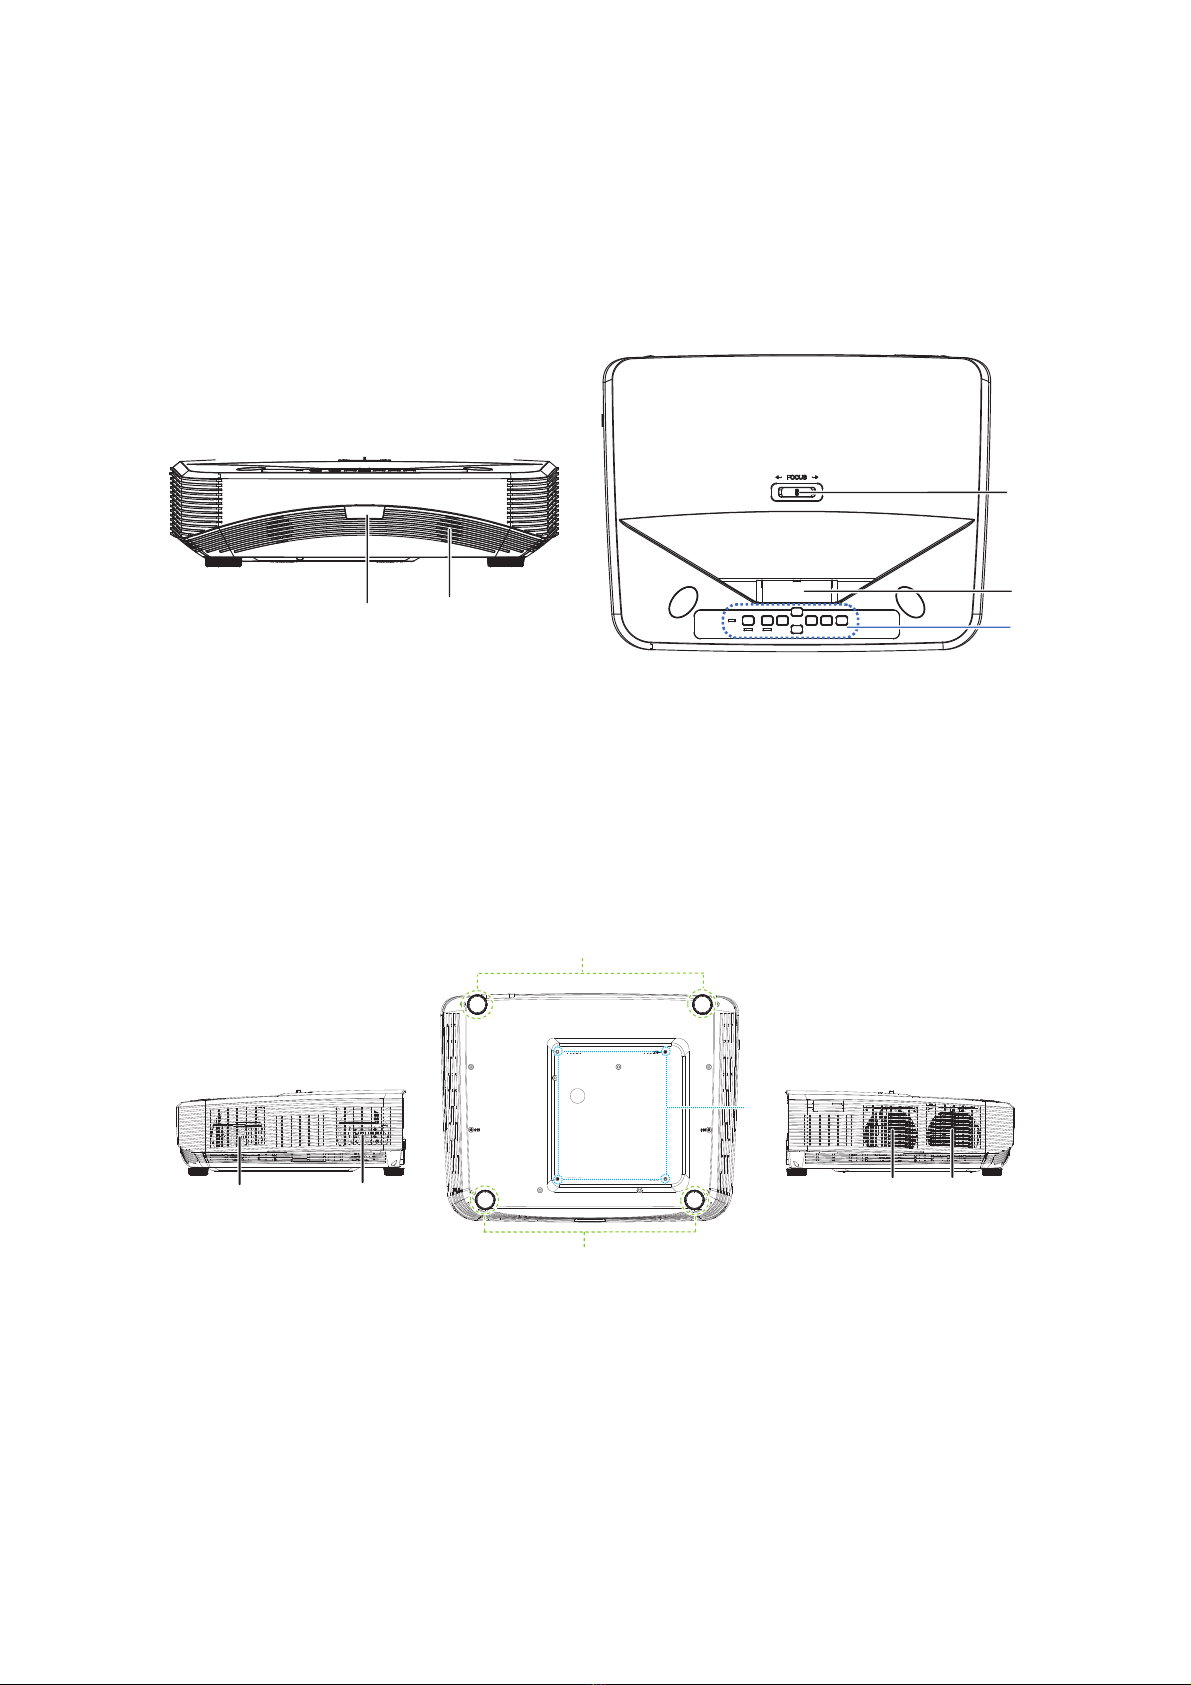
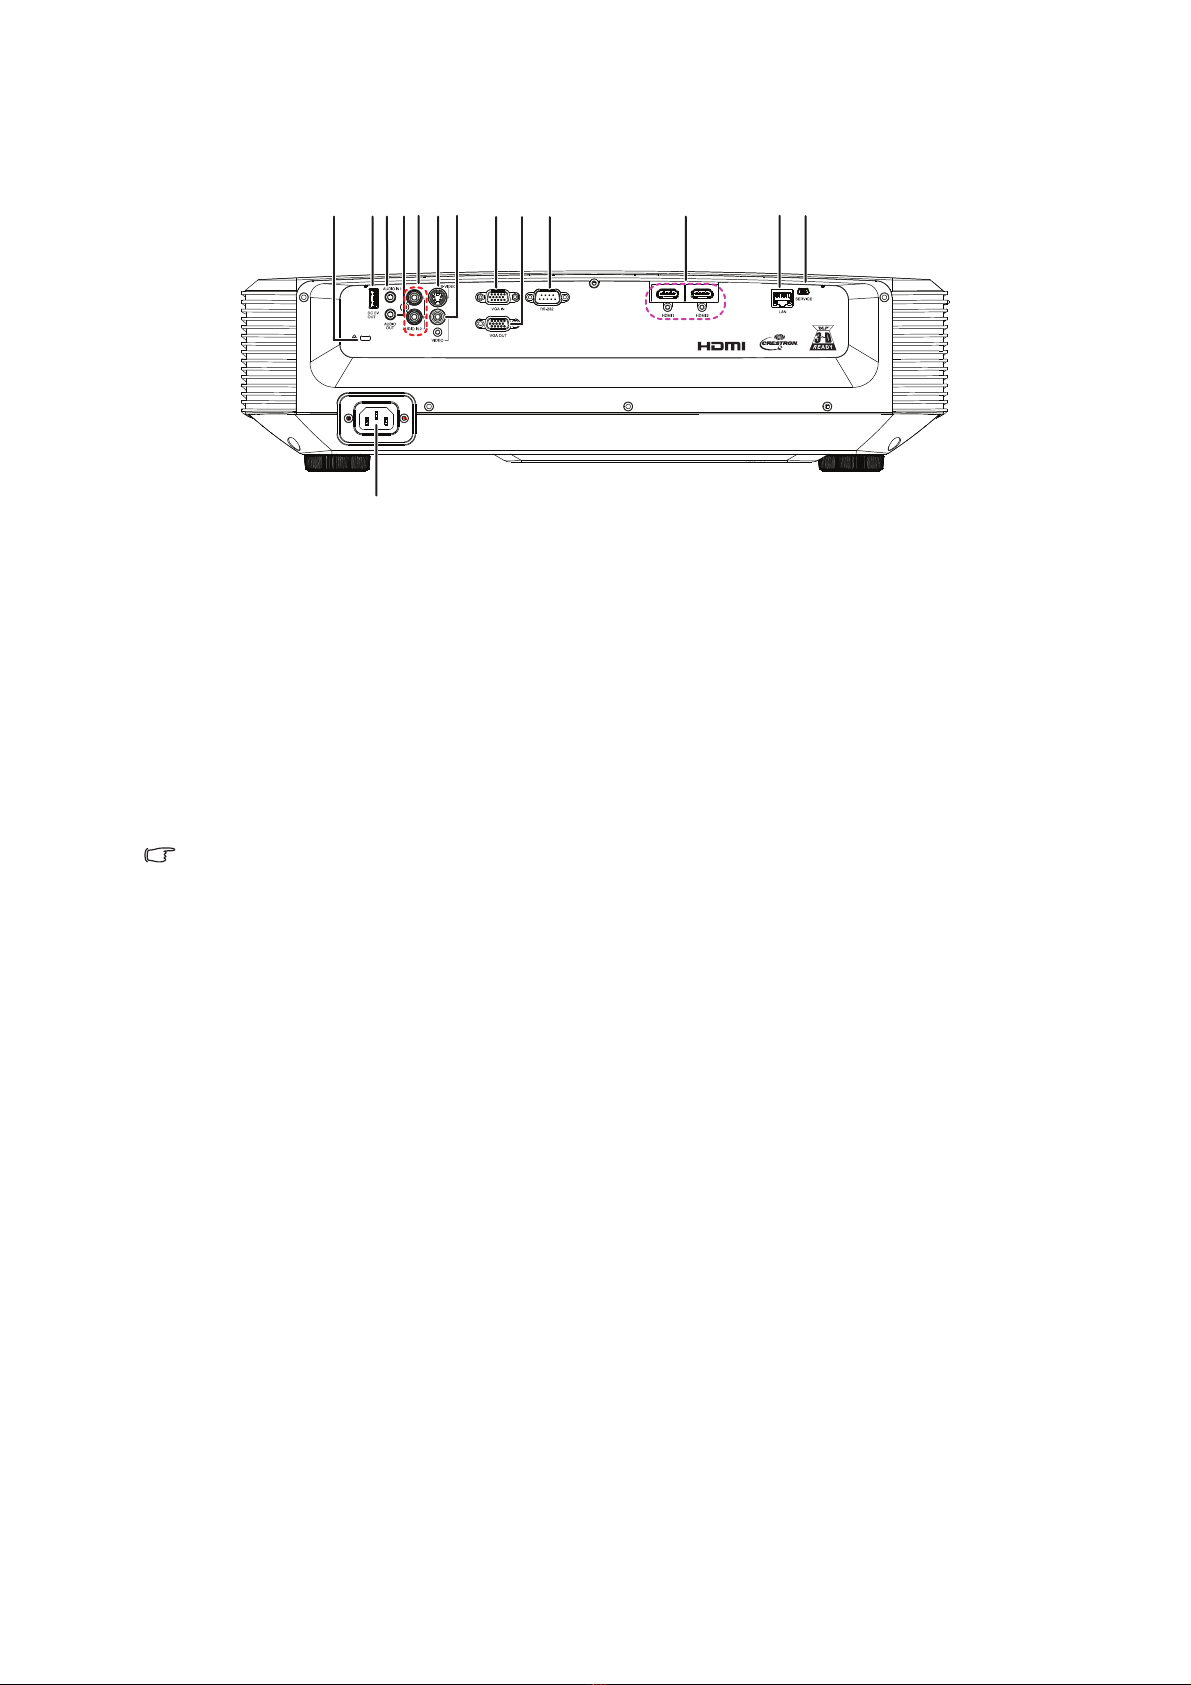
Product overview ................................................................................................................................... 5
Getting Started ...................................................................................... 9
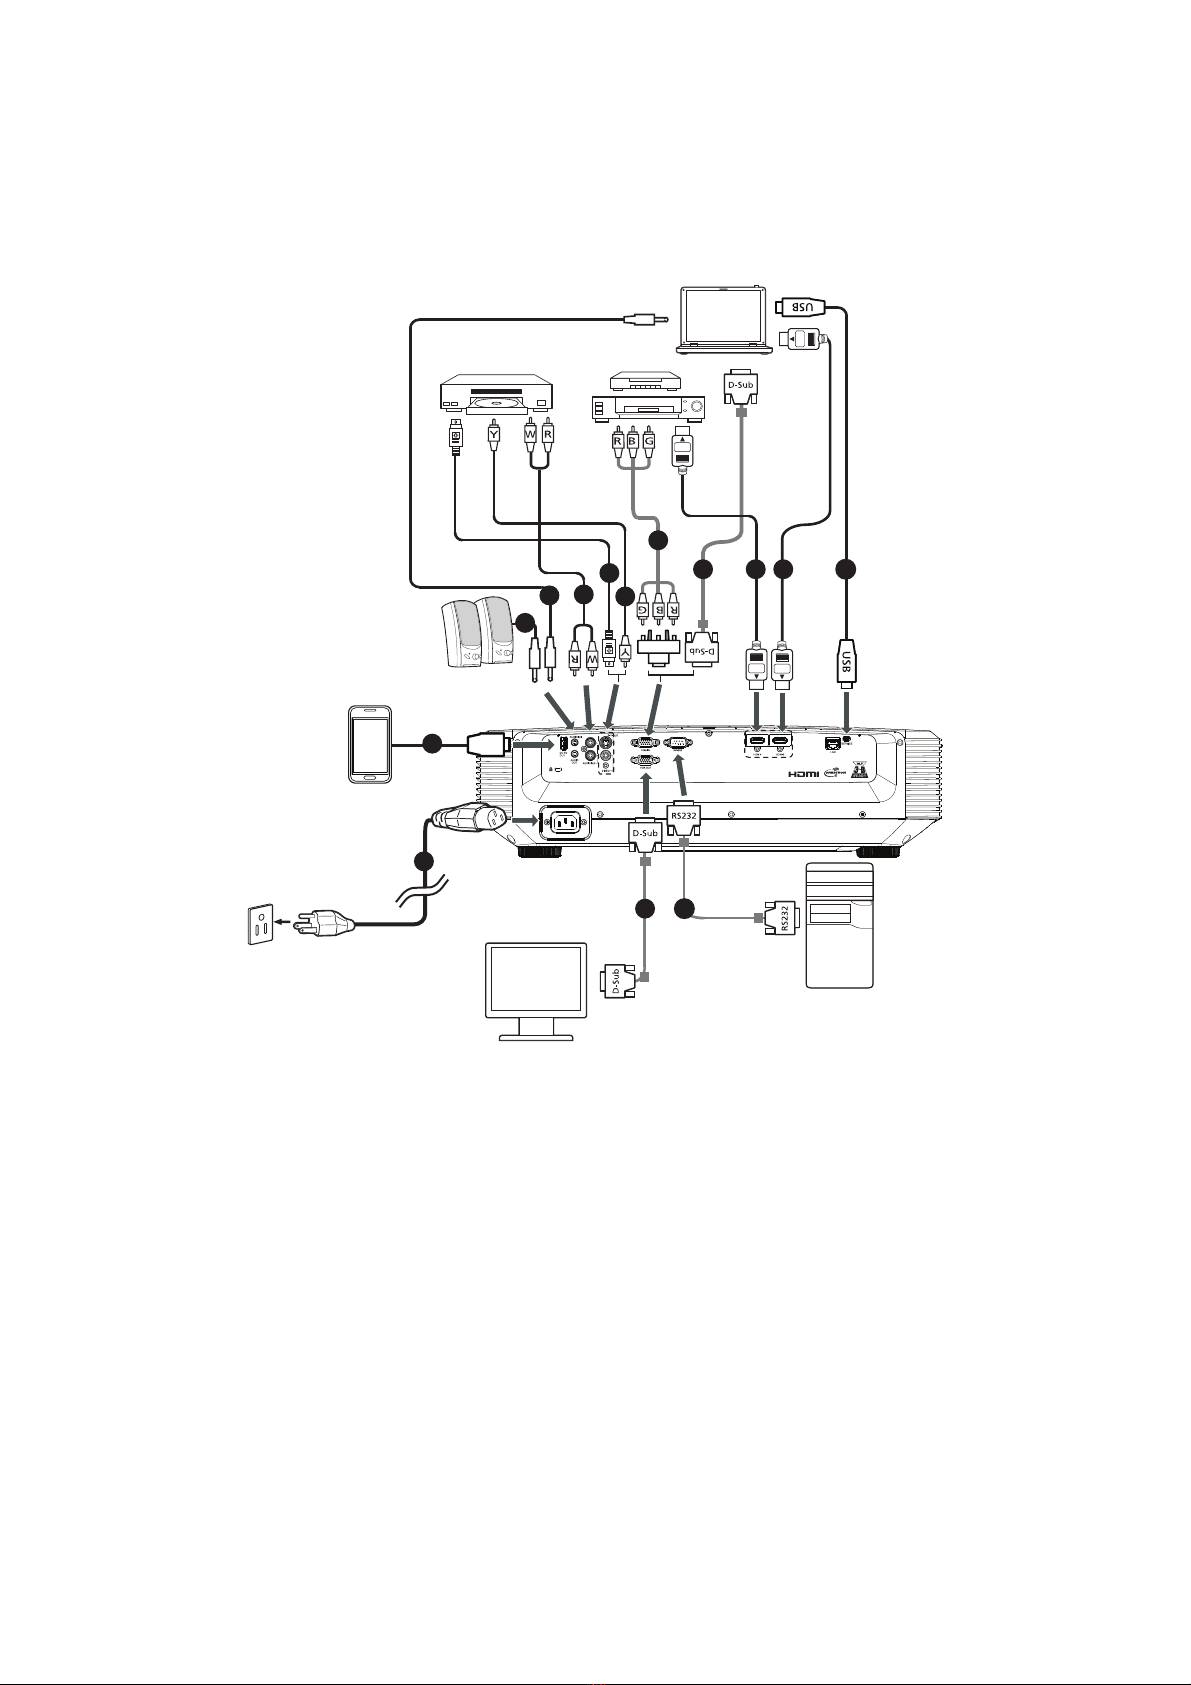
Connecting the Projector ....................................................................................................................... 9
Powering on/off the projector ............................................................................................................... 10
Adjusting the Projected Image ............................................................................................................. 11
User Controls ...................................................................................... 14
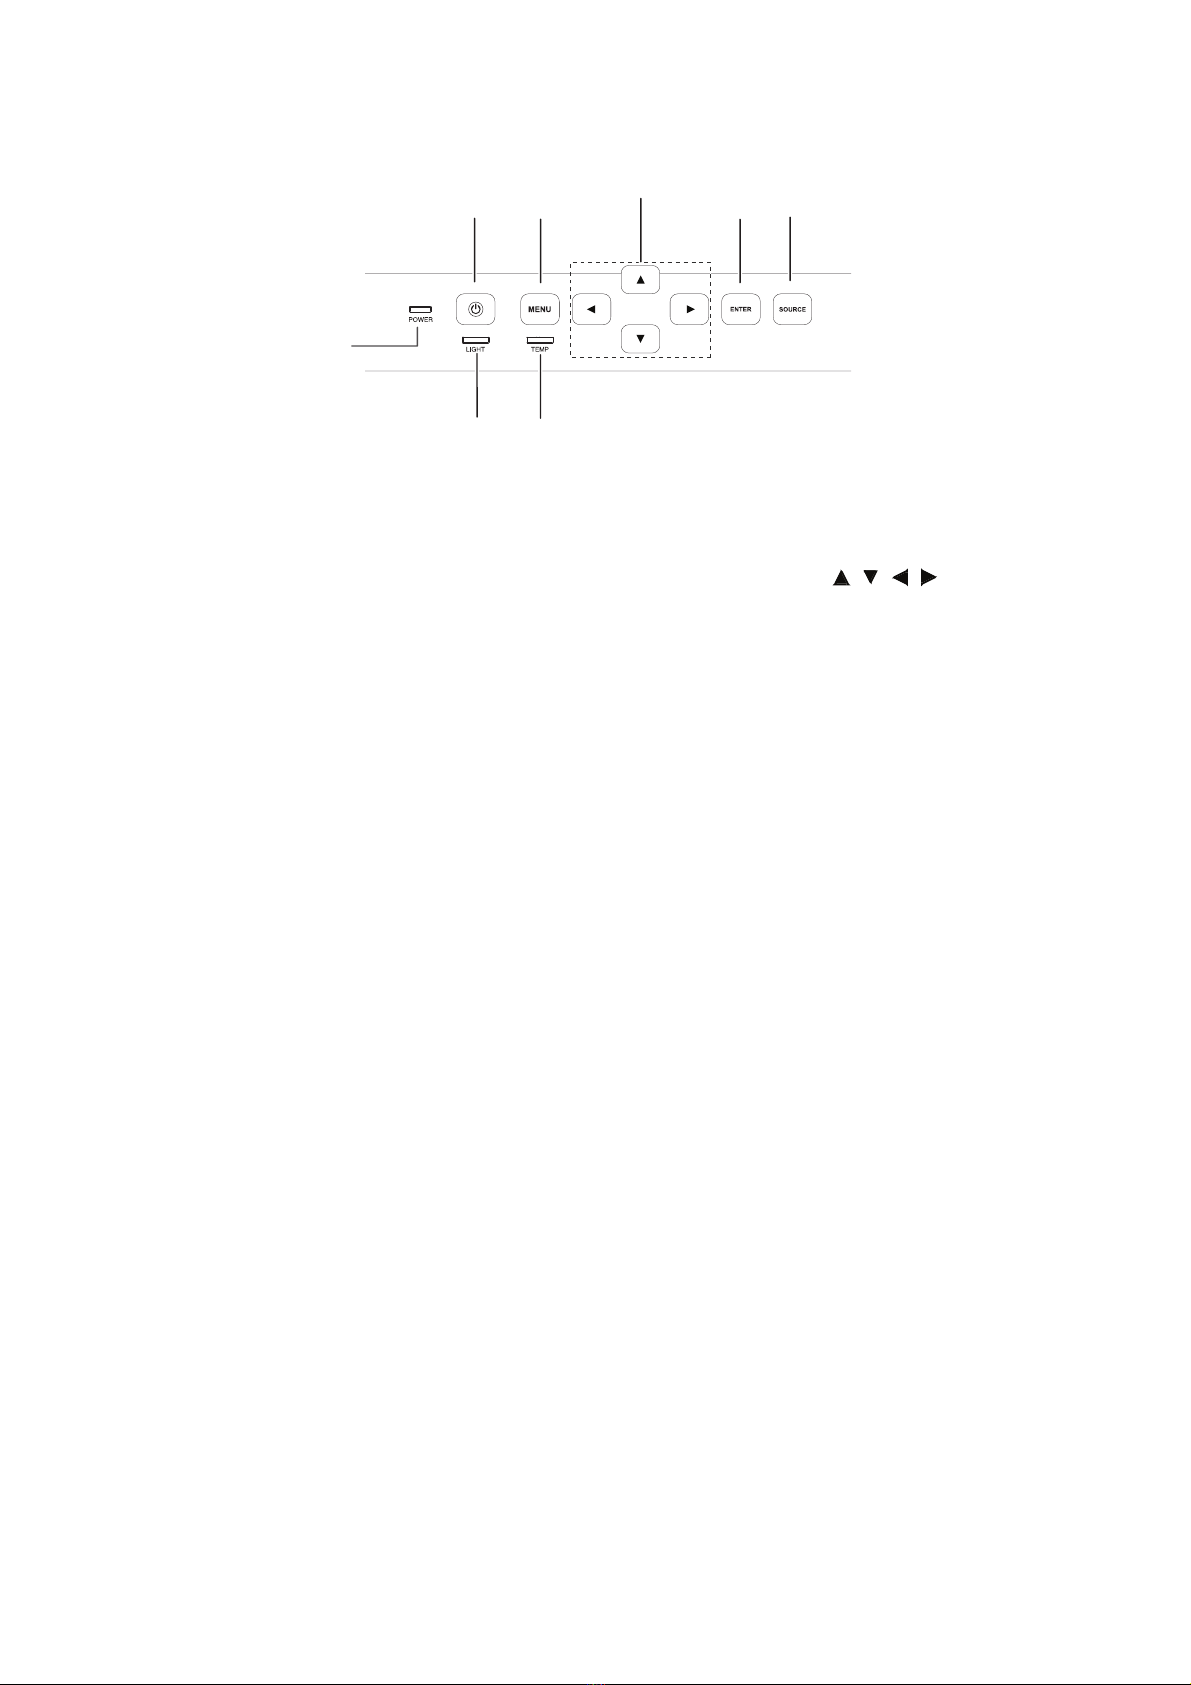
On-screen display menus .................................................................................................................... 14
Menu items .......................................................................................................................................... 15
Setting up the Projector Network Environment .................................................................................... 33
Controlling the Projector via LAN ......................................................................................................... 34
Controlling the Projector Using Crestron RoomView® ........................................................................ 37
Maintenance ........................................................................................ 42
Cleaning the projection window ........................................................................................................... 42
Cleaning the projector housing ............................................................................................................ 42
Specifications ....................................................................................................................................... 43
Dimensions .......................................................................................................................................... 45
Ceiling mount installation ..................................................................................................................... 45
Appendices.......................................................................................... 46
LED indicator messages ...................................................................................................................... 46
Compatibility Chart ............................................................................................................................... 48
Troubleshooting ................................................................................................................................... 49
RS-232C Specifications and Commands............................................................................................. 52

3
Introduction
Projector feature
The projector offers the following features:
• UL6500/RL350/LU-U500/SL550/FL-440/F1P1702/UL5530/RL153/LU-U400/
SL450/FL-423/F1P1706/UL5510/RL150/LU-U300/SL350/FL-420/F1P1710 series:
Native1920 x 1080 1080p resolution
• UL6300W/RL320/LU-W500/SL530/FL-340/FWX1703/UL5330W/RL123/LU-W400/
SL430/FL-323/FWX1707/UL5310W/RL120/LU-W300/SL330/FL-320/FWX1711
series: Native 1280 x 800 WXGA resolution
• UL6200/RL310/LU-X500/SL510/FL-140/FNX1704/UL5230/RL113/LU-X400/SL410/
FL-123/FNX1708/UL5210/RL110/LU-X300/SL310/FL-120/FNX1712 series: Native
1024 x 768 XGA resolution
• Laser-phosphor light source free from replacement
• Ultra-short throw (UST) projection lens delivers large images from a short projection
distance
• HDMI x 2 inputs
• H./V. Keystone for easy horizontal and vertical keystone correction
• 4 Corner Correction allows you to adjust four corners of the projected image
• Blu-Ray 3D function supported
• 3D Color Management allowing color adjustments to your liking
• Screen Color correction allowing projection on surfaces of several predefined colors
• Network settings allowing for controlling the Projector via LAN
Note
• The information in this manual is subject to change without notices.
• The reproduction, transfer or copy of all or any part of this document is not permitted
without express written consent.

4
Package contents
When you unpack the projector, make sure you have all these components:
Note
• Contact you dealer immediately if any items are missing, appear damaged, or if the unit
does not work.
• For maximum protection of the product, please save the original shipping carton and
packing materials and repack your product as it was originally packed at the factory if
you need to ship it.
Projector Remote control (IR) &
batteries (AAA *2 PCS) AC power cord
VGA cable (D-SUB to D-SUB)Quick start guide
RESYNC RATIO
MENU
ENTER
MODE KEYSTONE BACK
ZOOM VOL
ECO FREEZE HIDE
FUNCTION 3D
SOURCE

5
Product overview
Projector outlook
Front and top
Bottom and side
1. Focus switch 2. Projection window
3. Control pane 4. IR remote control sensor
5. Speaker
1. Adjuster feet 2. Ceiling mount holes
3. Ventilation holes (airflow out) 4. Ventilation holes (airflow in)
1
2
3
45
1
1
2
44
33

6
Rear
Note
• This projector can be used with a ceiling mount for support. The ceiling mount is not
included in the package.
• Contact your dealer for information to mount the projector on a ceiling.
1. Kensington anti-theft lock slot 2. 5V output for power charging
3. Audio input jack 4. Audio output jack
5. Audio (L/R) input jack 6. S-Video input jack
7. Video input jack 8. RGB (PC)/Component video (YPbPr)
signal input jack
9. RGB signal output jack 10. RS232 control port
11. HDMI input jack 12. RJ45 LAN input jack
13. SERVICE jack 14. AC power cord inlet
V
1234
5678910 11 1213
14

7
Control panel
1. Power LED indicator 2. Power button
3. Menu button 4. Adjustment buttons ( / / / )
5. Enter button 6. Source button
7. Temperature LED indicator 8. Light LED indicator
1
23
4
56
7
8

8
Remote control
1. ON button
For turning the power on.
2. STANDBY button
For putting the projector into the
Standby mode.
3. SOURCE buttons
For switching Input mode.
4. Adjustment buttons ( ///)
For selecting and adjusting menu
items.
5. MODE button
For selecting the appropriate
picture.
6. KEYSTONE button
For entering the Keystone Correction
mode.
7. ZOOM buttons
For enlarging/reducing part of the
image.
8. ECO button
For lowering the noise of the cooling
fan.
9. FUNCTION button
For operating and executing a
function assigned to "FUNCTION
Button".
10. RATIO button
For switching the picture size
(NORMAL, 16:9, etc.).
11. MENU button
For displaying adjustment and
setting screens.
12. RESYNC button
For automatically adjusting images
when connected to a computer.
13. ENTER button
For setting items selected or
adjusted on the menu.
14. BACK button
For returning to the previous menu
screen during menu operation.
15. VOL +/-(Volume) buttons
For adjusting the speaker sound
level.
16. HIDE button
For temporarily displaying a black
screen and turning off the sound.
17. 3D button
For displaying the 3D mode menu
screen.
18. FREEZE button
For freezing images.
RESYNC RATIO
MENU
ENTER
MODE KEYSTONE BACK
ZOOM VOL
ECO FREEZE HIDE
FUNCTION 3D
SOURCE
2
3
5
1
6
7
8
9
10
12
14
15
16
17
13
4
11
18

9
Getting Started
Connecting the Projector
1. Power cord 2. USB cable for charging device
3. 3.5mm Audio cable 4. Audio cable jack/RCA
5. S-Video cable 6. Composite video cable
7. Component Video to VGA (DSub)
adapter cable
8. VGA cable
9. HDMI cable 10. USB cable
11. RS232 cable
V
HDTV adapter
1
2
3
34
5
6
7
8 9 9 10
811

10
Powering on/off the projector
Powering on the projector:
Note that the connections to external equipment and power outlet should be done
before performing the operations written below.
Press Power on the projector or ON on the remote control.
• The power indicator illuminates green.
Warning
• Never look into the lens when the light is on. This can damage your eyes.
• This focal point concentrates high temperature. Do not place any object near it to avoid
possible fire hazard.
Powering off the projector:
Press Power on the projector or STANDBY on the remote control, then press
that button again while the confirmation message is displayed, to put the
projector into Standby mode.
• The projector cannot be turned on while cooling.

11
Adjusting the Projected Image
Adjusting the Height of Projected Image
The height of the projector can be adjusted using the adjuster feet.
When the screen is above the projector, the projection image can be made higher by
adjusting the projector.
1. Lift the projector to adjust its height.
2. Remove your hands from the adjuster feet of the projector after its height has been
finely adjusted.
Note
• When adjusting the height of the projector,
trapezoidal distortion occurs. Follow the
procedures in Keystone Correction to correct
tthe distortion.
Adjusting the Focus
You can adjust the focus with the focus ring on the projector.
Rotate the focus ring to adjust the focus while watching the projected image.
Adjuster feet
Focus ring

12
Screen Size and Projection Distance
• UL6500/RL350/LU-U500/SL550/FL-440/F1P1702/UL5530/RL153/LU-U400/SL450/
FL-423/F1P1706/UL5510/RL150/LU-U300/SL350/FL-420/F1P1710
16:9 Signal Input (Normal Mode)
• UL6300W/RL320/LU-W500/SL530/FL-340/FWX1703/UL5330W/RL123/LU-W400/
SL430/FL-323/FWX1707/UL5310W/RL120/LU-W300/SL330/FL-320/FWX1711
16:10 Signal Input (Normal Mode)
Picture (Screen) size Projection distance [L] H
Diag. [x] Width Height L1 L2
150" (381 cm) 332.1 cm 186.8 cm 44.8 cm 75.8 cm 44.5 cm
120" (305 cm) 265.7 cm 149.4 cm 28.8 cm 59.8 cm 37.5 cm
100" (254 cm) 221.4 cm 124.5 cm 18.2 cm 49.2 cm 32.9 cm
80" (203 cm) 177.1 cm 99.6 cm 7.5 cm 38.5 cm 28.2 cm
Picture (Screen) size Projection distance [L] H
Diag. [x] Width Height L1 L2
150" (381 cm) 323.1 cm 201.9 cm 46.6 cm 77.6 cm 39.8 cm
120" (305 cm) 258.5 cm 161.5 cm 30.2 cm 61.2 cm 33.7 cm
100" (254 cm) 215.4 cm 134.6 cm 19.4 cm 50.4 cm 29.7 cm
80" (203 cm) 172.3 cm 107.7 cm 8.5 cm 39.5 cm 25.7 cm
H
L1 L2
Screen side of
projector
Projector bottom
Center of projection window

13
• UL6200/RL310/LU-X500/SL510/FL-140/FNX1704/UL5230/RL113/LU-X400/SL410/
FL-123/FNX1708/UL5210/RL110/LU-X300/SL310/FL-120/FNX1712
4:3 Signal Input (Normal Mode)
x : Picture size (diag.) (in/cm)
L1: Projection distance from the screen side of the projector to the screen(cm)
L2: Projection distance from the center of the projection window to the screen (cm)
H: Distance from the projector bottom to the bottom of the image (cm)
Picture (Screen) size Projection distance [L] H
Diag. [x] Width Height L1 L2
125" (318 cm) 254.0 cm 190.5 cm 45.1 cm 76.1 cm 43.2 cm
100" (254 cm) 203.2 cm 152.4 cm 29.1 cm 60.1 cm 36.5 cm
80" (203 cm) 162.6 cm 121.9 cm 16.3 cm 47.3 cm 31.1 cm
65" (165 cm) 132.1 cm 99.1 cm 6.7 cm 37.7 cm 27.0 cm

14
User Controls
On-screen display menus
The projector has multilingual on-screen display menus that allow you to make image
adjustments and change a variety of settings.
How to operate
1. Press MENU to display the OSD menu.
2. Press or and select main menu item.
3. Press to enter sub menu.
4. Press or to select the item.
5. Press or to select the desired item or adjust the settings.
6. Press MENU, the screen will return to the main menu or go back to the upper level
of the menu.
7. Press MENU to leave and save the settings.
Sub menu
Settings
Main menu

15
Menu items
Main Menu Sub Menu Settings
DISPLAY
Wall Color
Off
Blackboard
Green
Whiteboard
Aspect Ratio
Auto
4 : 3
16 : 9
16 : 10
H./V. Keystone
4 Corner
Correction
Position
Phase
Frequency
Digital Zoom

16
PICTURE
Picture Mode
Standard
Presentation
Movie
Bright
Brightness
Contrast
Color
Temperature
Color
Temperature
Normal
Cool
Warm
R Gain
G Gain
B Gain
R Offset
G Offset
B Offset
Overscan
HDMI Settings
Signal Type
Auto
RGB
YPbPr
HDMI Color
Range
Auto
Full Range
Limited Range
Advanced
Tint
Color
Sharpness
Gamma
BrilliantColor™
Noise
Reduction
3D Color
Management
Primary color R/G/B/C/M/Y
Hue
Saturation
Value
Reset Picture
Setting

17
SOURCE
Source Selection Manual
Auto
3D
3D Mode
Auto
Off
Top and Bottom
Frame
Sequential
Frame Packing
Side By Side
3D L/R Invert Disable
Invert

18
SYSTEM
SETUP : Basic
Language
English
Deutsch
Español
Nederlands
Français
Italiano
Svenska
Português
Русскоий
polski
Magyar
Türkçe
汉语
한국어
日本語
Projection Mode
Front
Rear
Rear Ceiling
Ceiling
Menu Settings
Menu display
time
5 sec
10 sec
15 sec
20 sec
25 sec
30 sec
Menu position
Center
Upper Left
Upper Right
Lower Right
Lower Left
Background
Logo
Black
Blue
FUNCTION
Button
Information
Projection
Mode
Brightness
Contrast
Advanced
Test Pattern Off
On
Reminder
Message
Off
On

19
SYSTEM
SETUP :
Advanced
High Altitude
Mode
Off
On
Audio Settings
Volume
Power On/Off
Volume
Off
On
Closed Caption
Closed Caption
Enable
Off
On
Caption Version
CC1
CC2
CC3
CC4
Light Source
Settings
Eco Mode Off
On
Light Source
Hours
Auto Power Off
Disable
10Min
20Min
30Min
Quick Cooling Off
On
Standby Settings LAN Control Off
On
Network Settings
DHCP Client Off
On
IP Address
Subnet Mask
Default
Gateway
DNS Server
Advanced
Security
Settings
Change
password
Power on Lock Off
On
Keylock Off
On
All Reset
INFORMATION
SOURCE
Picture Mode
Signal Info
Signal Type
Light Source Hours
IP Address
MAC Address
Firmware Version
This manual suits for next models
53
Table of contents
Other Acer Projector manuals

Acer
Acer K330 User manual

Acer
Acer X1160P User manual

Acer
Acer PD-113P User manual

Acer
Acer X1161P User manual

Acer
Acer PD726 Series User manual

Acer
Acer V6510 User manual

Acer
Acer S1270Hn Series User manual

Acer
Acer P1101C Series User manual

Acer
Acer H8550BD Series User manual

Acer
Acer X1260 Serie User manual