Acon ON-CALL PRO User manual


ii
Thank you for choosing the On Call®Pro Blood Glucose Monitoring
System. The System will provide accurate blood glucose results in just a few
simple steps.
The On Call®Pro Blood Glucose Monitoring System uses an electrochemical
enzymatic assay for the quantitative detection of glucose in fresh capillary
whole blood from the fingertip, forearm or palm. It is intended for multiple
patient use by health care professionals in health care facilities as an aid to
monitoring the effectiveness of diabetes control programs. It should not be
used for the diagnosis of or screening for diabetes. Moreover, alternative Site
Testing (AST) should not be used to calibrate continuous glucose monitors
(CGMs) nor for use in insulin dose calculations.
To ensure accurate results from the On Call®Pro Blood Glucose Monitoring
System, please follow these guidelines:
• Use only On Call®Pro Blood Glucose Test Strips with the On Call®Pro
Blood Glucose Meter.
• For in vitro diagnostic use only.
• Test only fresh capillary whole blood samples with the On Call®Pro Blood
Glucose Test Strips and meter.
• For use with single-use auto-disabling safety lancets.
• Not intended for use on neonates.
• Not for use on critically ill patients, patients in shock, severely dehydrated
patients or hyperosmolar patients (with or without ketosis).
Following the instructions outlined in this User’s Manual, you will be able
to use the On Call®Pro Blood Glucose Monitoring System to monitor your
patients’ blood glucose and better manage their diabetes.
Blood Glucose Monitoring System

iii
Specifications
Feature Specification
Measurement Range 20 - 600mg/dL
Result Calibration Plasma-equivalent, calibrated
by using YSI (Model 2300 STAT
PLUS) Glucose Analyzer reference
instrument, which is traceable to
NIST reference standard.
Sample Fresh capillary whole blood
Minimum Sample Size 0.4 μL
Test Time 4 seconds
On/Off Source One (1) CR 2032 3.0 V coin
cell battery
Battery Life 1,000 tests for glucose testing
(not considering data transfer)
Glucose Units of Measure The meter is preset to mg/dL
when sold in the United States.
Memory Up to 300 records with time
and date
Automatic Shutoff 2 minutes after last action
Meter Size 85.0 mm × 49.0 mm × 16.4 mm
Display Size 35.0 mm × 32.0 mm
Weight 50.0 g (with battery installed)
Operating Temperature 41 - 113 ºF (5 - 45 ºC)
Operating Relative Humidity 10 - 90% (non-condensing)
Hematocrit Range 30 - 55%
Data Port 9600 baud, 8 data bits, 1 stop bit,
no parity
Contact Technical Support at 1-800-838-9502
24 hours a day, 7 days a week.

iv
Getting Started . . . . . . . . . . . . . . . . . . . . . . . . . . . . . . . . 1
Component Descriptions . . . . . . . . . . . . . . . . . . . . . . . . 2
On Call®Pro Blood Glucose Meter . . . . . . . . . . . . . . . . . . . 4
Meter Display . . . . . . . . . . . . . . . . . . . . . . . . . . . . . . 6
On Call®Pro Blood Glucose Test Strips . . . . . . . . . . . . . . . . 8
On Call®Pro Glucose Control Solution . . . . . . . . . . . . . . . . . 11
Installing the Battery. . . . . . . . . . . . . . . . . . . . . . . . . . . . . 13
Meter Setup before Testing . . . . . . . . . . . . . . . . . . . . . . . . .14
Performing the Quality Control Test . . . . . . . . . . . . . . . . . . . .19
Testing Blood . . . . . . . . . . . . . . . . . . . . . . . . . . . . . . . . .23
Step 1 – Getting a Drop of Blood . . . . . . . . . . . . . . . . . . . .23
Step 2 – Testing Blood Glucose. . . . . . . . . . . . . . . . . . . . . 27
“HI” and “LO” Messages. . . . . . . . . . . . . . . . . . . . . . . . . 29
“Hypo” and “Hyper” Messages . . . . . . . . . . . . . . . . . . . . .30
“Ketone?” Message . . . . . . . . . . . . . . . . . . . . . . . . . . .31
“Ctl” Message . . . . . . . . . . . . . . . . . . . . . . . . . . . . . .31
Using the Meter Memory. . . . . . . . . . . . . . . . . . . . . . . . . . . 33
Viewing Stored Records. . . . . . . . . . . . . . . . . . . . . . . . . 33
Clearing the Memory . . . . . . . . . . . . . . . . . . . . . . . . . . 35
Transferring Records . . . . . . . . . . . . . . . . . . . . . . . . . . 35
Maintenance. . . . . . . . . . . . . . . . . . . . . . . . . . . . . . . . . . 36
Replacing the Battery . . . . . . . . . . . . . . . . . . . . . . . . . .36
Cleaning and Disinfection . . . . . . . . . . . . . . . . . . . . . . . . 37
Suggested Testing Times and Target Goals . . . . . . . . . . . . . . . 40
Warranty . . . . . . . . . . . . . . . . . . . . . . . . . . . . . . . . . . . . 44
Table of Contents

1
Before testing, read the instructions carefully. Learn about all the
components of the On Call®Pro Blood Glucose Monitoring System.
Because the On Call®Pro is configured as a meter-only kit, you will need to
purchase some additional components of the system such as On Call®Pro
Control Solution, OptiLance™Safety Lancets or On Call®Pro Test Strips
separately (please contact your local distributor or Customer Support at
1-800-838-9502). Please check the list of contents on the outer box for
details on which components are included with the meter.
Getting Started
On Call®Pro
Blood Glucose Meter
On Call®Pro
Blood Glucose Test Strips
On Call®Pro
Glucose Control Solution
OptiLance™Safety Lancet

2
Component Descriptions
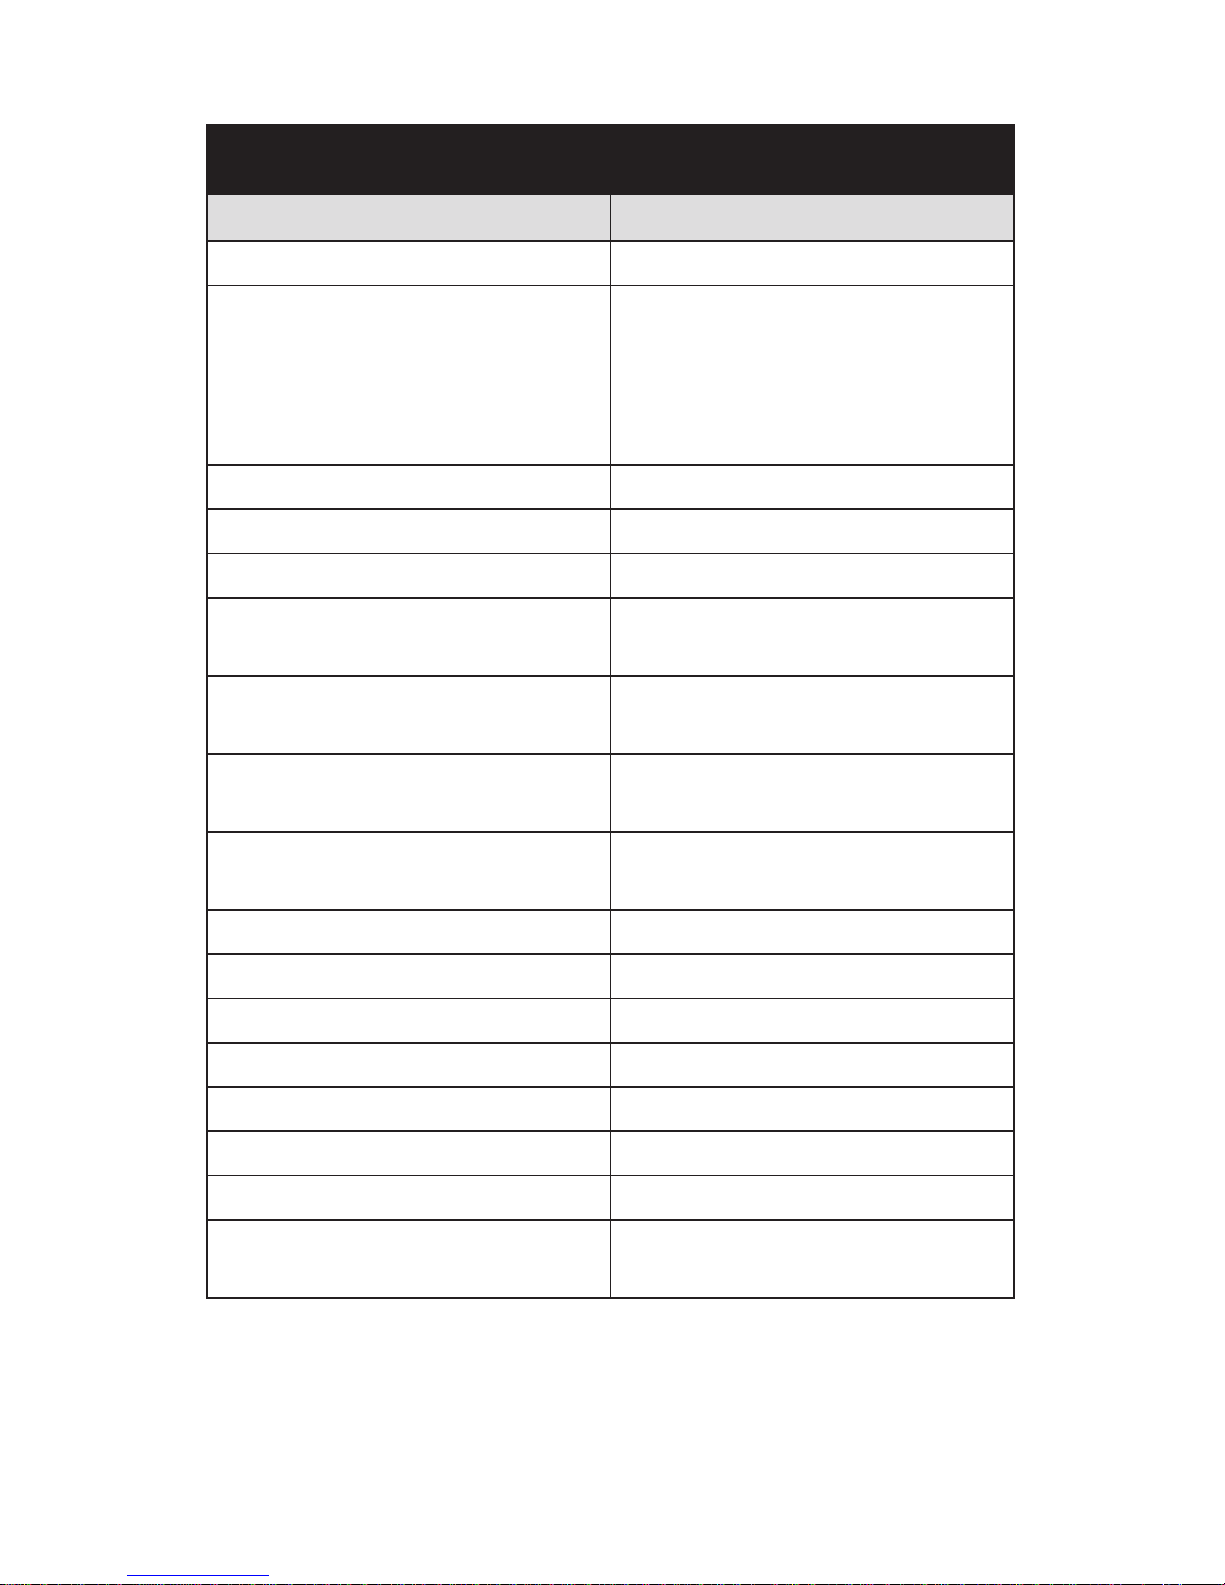
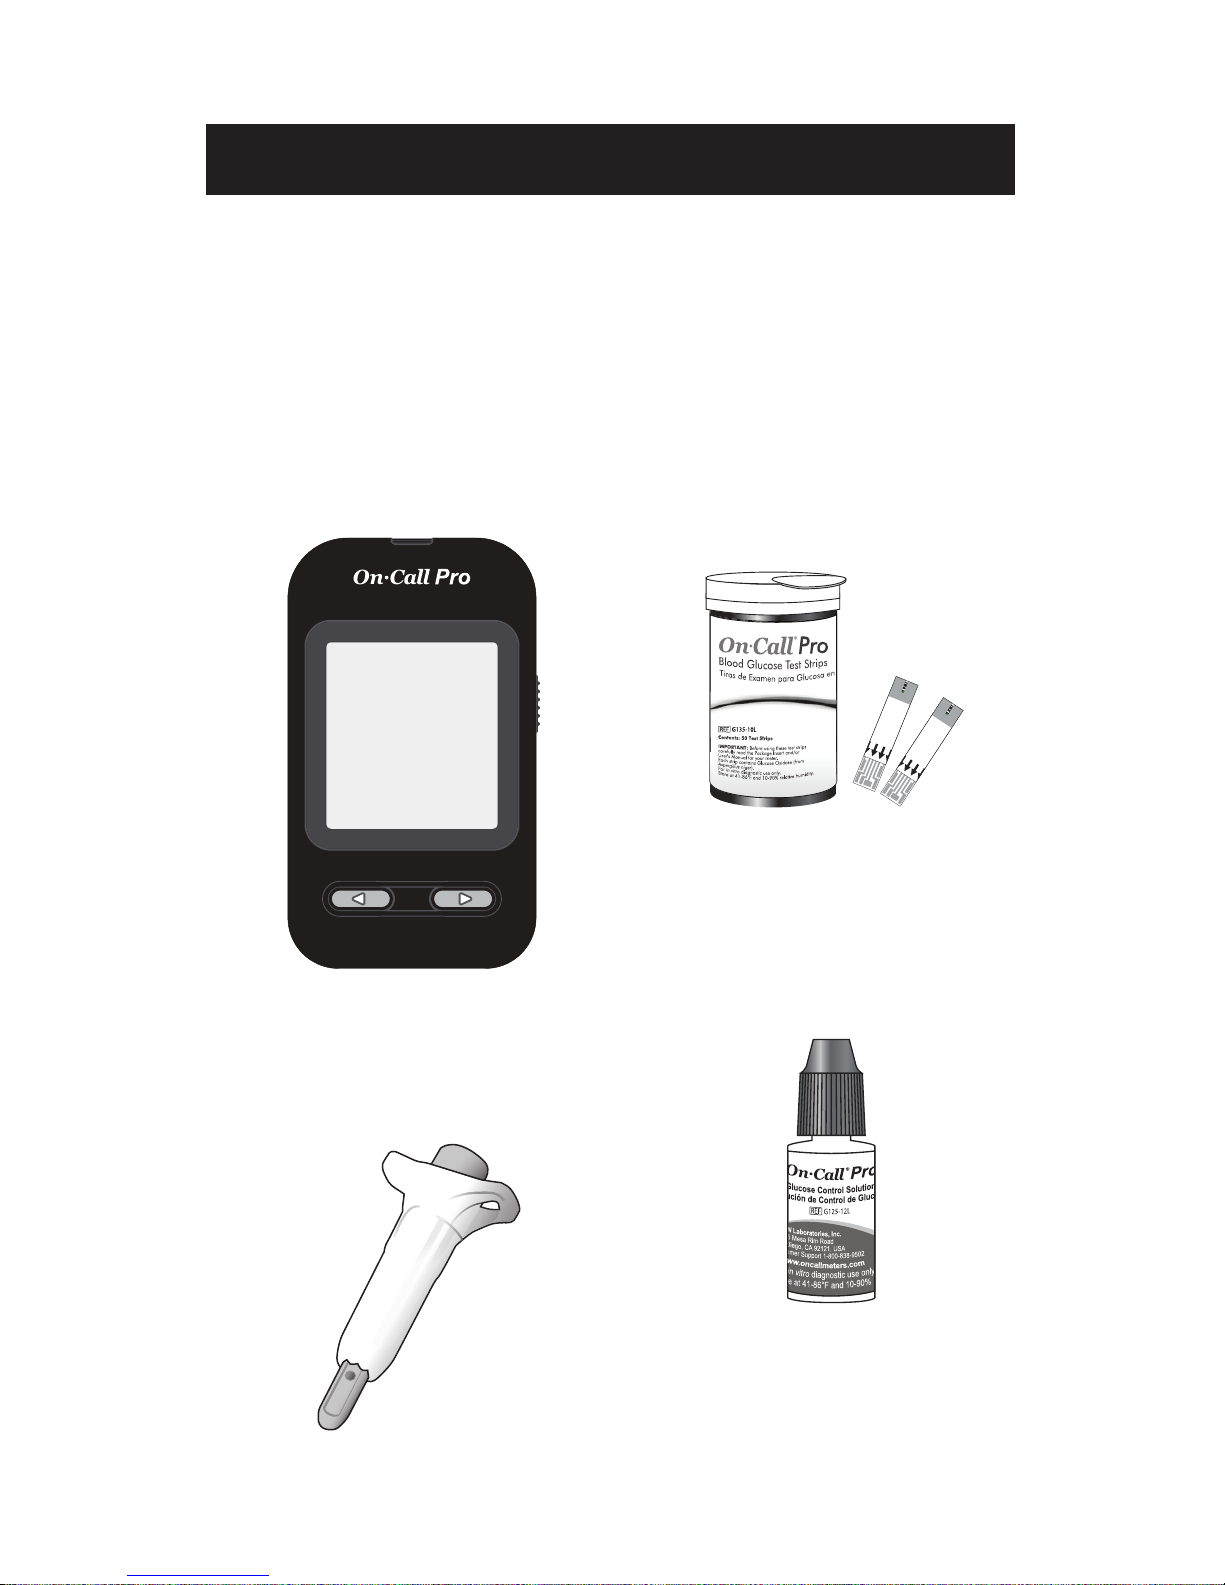
1. On Call®Pro Blood Glucose Meter: Reads the test strips and displays
the blood glucose level.
2. On Call®Pro Blood Glucose Test Strips: Equipped with a chemical
reagent system. They measure the glucose concentration in blood when
inserted into the meter. On Call®Pro Blood Glucose Test Strips are sold
separately. Please contact your local distributor or Customer Support at
1-800-838-9502.
3. OptiLance™Safety Lancets: Single-use, auto-disabling Safety Lancets
are used to obtain blood samples. Discard Safety Lancets properly after
a single use. Please contact your local distributor or Customer Support at
1-800-838-9502 for supplies of OptiLance™Safety Lancets. Or you can
consult with a physician or other healthcare professional at your institution
to obtain commercially available single-use auto-disabling safety lancets.
4. On Call®Pro Glucose Control Solution: Confirms that the blood
glucose monitoring system is properly working. Use this solution in place
of a blood sample to check the test strips and meter for a pre-calibrated
reading. Three levels of control solution are included in the On Call®Pro
Glucose Control Solution kit (sold separately). Control Solution 1 is all
you will need most of the time, but you should consult the policies of your
institution. Additional testing may be performed with Control Solution 0
and Control Solution 2 if you think your meter and test strips are not
working properly. Please contact your local distributor or Customer
Support at 1-800-838-9502 to order the On Call®Pro Glucose Control
Solution kit.
5. On Call®Pro User’s Manual: Provides detailed instructions on using the
blood glucose monitoring system.
6. On Call®Pro Warranty Card: Should be completed and returned to the
Warranty Center. Qualifies the meter for a 3-year warranty.

3
Note: Important Safety Instructions
1. All parts of the kit are considered bio-hazardous. They can
potentially transmit infectious diseases, even after you have
performed cleaning and disinfection. Please follow proper
precautions when handling the meter.
2. It may potentially cause Bloodborne Pathogens Transmission
between patients and healthcare professionals. For more
information, please refer to “Guideline for Isolation Precautions:
Preventing Transmission of Infectious Agents in Healthcare
Settings 2007” at the Centers for Disease Control website,
http://www.cdc.gov/hicpac/2007ip/ 2007isolationprecautions.html.
3. The meter should be disinfected after use on each patient.
This Blood Glucose Monitoring System may only be used for
testing multiple patients when Standard Precautions and the
manufacturer’s disinfection procedures are followed.
4. Only single use, auto-disabling safety lancets should be used
with this meter.

4
On Call®Pro
Blood Glucose Meter
The meter reads the test strips and displays the blood glucose concentration.
Use these diagrams to become familiar with all the parts of the meter.
Strip Port
Liquid Crystal
Display (LCD)
Right (u) Button
Strip Ejector
Battery Cover
Left (u) Button
Data Port

5
Liquid Crystal Display (LCD): Shows the test results. Helps you through
the testing process.
Left (◄) Button: Recalls previous test results from the meter memory and
performs other menu selection functions.
Right (►) Button: Selects meter settings and performs other menu
selection functions.
Strip Port: Test strips are inserted into this area to perform a test.
Strip Ejector: Slide the ejector forward to discard the used test strip.
Note: Dispose of blood samples and materials with care. Treat all blood
samples as if they are infectious materials. Follow proper precautions and
the guidelines of your institution. Obey all local regulations when disposing of
blood samples and materials.
Battery Cover: Remove the battery cover to install one CR 2032 coin
cell battery.
Data Port: Sends information to a computer via an optional data transfer
cable. Allows you to view, analyze and print stored data in the meter. The
data transfer cable is available for order as an optional add-on.

6
Meter Display
Test Result Area: Indicates test result.
Blood Drop / Strip Symbol: Wait for the Blood Drop / Strip Symbol to appear
before applying the sample. These two symbols appear at the same time.
Control Solution Symbol: Indicates a control test result. A pound sign (#) will
also be displayed when control solution symbol appears.
MEM: Shows a test result stored in memory.
Ketone?: Appears when the blood glucose concentration is above 300 mg/dL.
This simply suggests that a ketone test is recommended. Follow your
institution’s procedures for ketone testing.
Note: This symbol does not mean that the system has detected ketones.
It recommends that a ketone test should be taken.
Hypo Symbol: Appears when the blood glucose concentration is below the
“Hypoglycemia” (low blood sugar) target level that you have set.
Hyper Symbol: Appears when the blood glucose concentration is above the
“Hyperglycemia” (high blood sugar) target level that you have set.
Measurement Unit: Only mg/dL will be displayed on the meter. It cannot
be adjusted.
Battery Symbol: Warns when you should replace the battery.
After Meal Symbol: Appears when after-meal test results are displayed.
Before Meal Symbol: Appears when before-meal test results are displayed.
Test Reminder Symbol: Appears when reminding you to test blood glucose.
Pound Sign (#): Appears with the control solution test result or when you mark
an invalid result to prevent it from being included in the average.
Month Day MinutesHour
Test Result
Area
Blood Drop/
Strip Symbol
Control Solution
Symbol
Hypo SymbolKetoneMemory
Test Reminder Symbol
Pound Sign (#)
After Meal Symbol
Battery Symbol
Measurement Unit
Hyper Symbol
Before Meal Symbol

7
Meter Use and Precautions
• Wait for the Blood Drop / Strip Symbol to appear before applying
the sample.
• The meter is preset blood glucose concentration in mg/dL when sold in
the United States. This unit of measure cannot be adjusted.
• Meter will shut off by itself after 2 minutes of inactivity.
• Do not get water or other liquids inside the meter.
• Keep the strip port area clean.
• Keep the meter dry. Avoid exposing it to extreme temperature or humidity.
Do not leave it in a vehicle.
• Do not drop the meter or get it wet. If you do, check the meter by running
a quality control test. Refer to Performing the Quality Control Test on
page 19 for instructions.
• Do not take the meter apart. This will void the warranty.
• Refer to the Cleaning and Disinfection section on page 37 for details on
cleaning and disinfecting the meter.
• Keep the meter and all associated parts out of the reach of children.
Note: Follow proper precautions and all local regulations when disposing
of the meter and used batteries.
All Glucose Systems Preventive
Warnings with Regard to EMC:
1. This instrument is tested for immunity to electrostatic discharge as
specified in IEC 61000-4-2.
2. This instrument complies with the emission and immunity requirements
described in EN61326-1 and EN61326-2-6.

8
On Call®Pro
Blood Glucose Test Strips
The On Call®Pro Blood Glucose Test Strips are thin strips. The strips have
a chemical reagent system. They work with the On Call®Pro Blood Glucose
Meter to measure the glucose concentration in whole blood. After the strip is
inserted into the meter, blood is applied to the sample tip of the test strip. The
blood is then automatically absorbed into the reaction cell where the reaction
takes place. A transient electrical current is formed during the reaction. The
blood glucose concentration is calculated based on the electrical current
detected by the meter. The result is shown on the meter display. The meter
is set to display plasma equivalent results.
Sample Tip
Apply blood or control solution here.
IMPORTANT: Apply the sample only to the sample tip of the test strip. Do not
apply blood or control solution to the top of the test strip. This may result in
an inaccurate reading.
Hold the blood drop to the sample tip of the test strip until the check window
is completely full. The meter will then begin to count down. If you applied
blood but do not see the count down start, you may reapply a second drop of
blood within 3 seconds. If the check window does not fill and the meter starts
to count down, then do not add more blood to the test strip. If you do then you
may get an E-5 message or an inaccurate test result. In this case if the meter
begins to count down and the check window does not fill, discard the strip
and begin the test again with a new test strip.
Correct Incorrect
Check Window
Check to confirm that a sufficient
sample has been applied.
Contact Bars
Insert this end of the test strip
into the meter until it stops.

9
Storage and Handling
Please review the following storage and handling instructions:
• Store in a cool, dry place between 41-86 °F (5-30 °C) and 10-90 % relative
humidity and keep out of direct sunlight.
• Do not freeze or refrigerate.
• Do not store or use test strips in a humid place such as a bathroom.
• Do not store the meter, the test strips or control solution near bleach or
cleaners that contain bleach.
• The test strip should be used immediately after removing it from the container.
• Repeated insertion and removal of a test strip into the meter strip port may
result in reading errors.
Special Instructions for Test strips
in the Vial
• Do not use test strips after the unopened expiration date printed on the vial.
Note: All expiration dates are printed in Year/Month format. 2015/01 indicates
January, 2015.
• A new vial of test strips may be used for 6 months after being first opened.
After 6 months they will expire. Write the opened expiration date on the vial
label after opening.
• Test strips must be stored in the original vial with the cap tightly closed.
This keeps them in good working condition.
• Do not transfer test strips to a new vial or any other container.
• Close the cap on the test strip vial immediately after removing a test strip.
Correct Incorrect

10
Test Strip Precautions
• For in vitro diagnostic use. Test strips are to only be used outside the body
for testing purposes.
• Do not use test strips that are torn, bent, or damaged in any way. Do not
reuse test strips.
• Keep the test strip vial or the foil pouch away from children and animals.
• Not intended for the diagnosis of, or screening of, diabetes mellitus.
• Not for use on critically ill patients, patients in shock, severely dehydrated
patients or hyperosmolar patients (with or without ketosis).
• Not for use on neonates.
Consider alternate site testing when
• Your patient is in a fasting state.
• You are testing a patient before their meal.
• Two hours have passed since your patient’s last meal.
• Two hours have passed since your patient’s last insulin dosing.
• Two hours have passed since your patient’s last physical activity.
Use fingertip testing when
• It is less than two hours since your patient’s last meal.
• It is less than two hours since your patient’s last insulin dosing.
• It is less than two hours since your patient’s last physical activity.
• Your patient has a history of hypoglycemia, is experiencing signs of low
blood sugar, or suffers from hypoglycemic unawareness.
• Your patient is ill or feeling stressed.
• Your patient’s AST result is not consistent with how they feel.
See the test strip insert for more details.

11
On Call®Pro
Glucose Control Solution
The On Call®Pro Glucose Control Solutions contain known concentrations
of glucose. They are used to confirm that your On Call®Express Pro Blood
Glucose Meter and On Call®Pro test strips are working properly together.
They also confirm that you are performing the test correctly. It is important to
run a quality control test regularly to make sure you are getting correct results.
Control Solution 1 is all you will need most of the time, but you should consult
the policies of your institution. Additional testing may be performed with
Control Solution 0 and Control Solution 2 if you think your meter and test strips
are not working properly. Please contact your local distributor or Customer
Support at 1-800-838-9502 to order the On Call®Pro Glucose Control
Solution kit.
You should run a quality control test:
• Before you first use the meter, to familiarize yourself with its operation.
• Before using a new box of test strips.
• When you suspect that the meter or test strips are not working properly.
• When you suspect that the test results are inaccurate, or
if they are inconsistent with how the patient feels.
• When you suspect the meter is damaged.
• After cleaning the meter.
• At least once a week.
• According to the guidelines of your institution.
Refer to Perfomring the Quality Control Test on page 19
for instructions on running a quality control test.
Storage and Handling
Please review the following storage and handling instructions:
• Store in a cool, dry place between 41-86 °F (5-30 °C) and 10-90% relative
humidity and keep out of direct sunlight.
• Do not freeze or refrigerate.
• If the control solution is cold, do not use until it has warmed to
room temperature.
• Do not use control solution after the unopened expiration date printed on
the bottle. Note: All expiration dates are printed in Year/Month format.
2015/01 indicates January, 2015.
• Use control solution only for 6 months after you first open the bottle.
After 6 months it will expire. Write the opened expiration date on
the bottle label after opening.

12
Control Solution Precautions
• For in vitro diagnostic use. The control solution is only for testing outside
the body. Do not swallow or inject.
• Shake well before using.
• Control solution tests are designed to be accurate only when tested
between 50 and 104 °F (10-40 °C).
• The control ranges shown on the test strip vial (or on the foil pouch) are
not recommended ranges for the blood glucose level of a patient. Personal
blood glucose target ranges should be determined by a physician.
• Do not touch the test strip with the tip of the control solution bottle.
• Use only the On Call®Pro brand of control solution with the On Call®Pro
glucose meter.
Please contact your local distributor or Customer Support at
1-800-838-9502 to obtain more control solution materials. See the
control solution package insert for more details.

13
If the battery has been preinstalled in the meter, a plastic tab will be
protruding from the battery compartment. Simply pull on the tab to remove
the plastic strip.
An additional battery has been provided in the On Call®Pro meter box.
Please find the additional battery in the box and when a new battery is need-
ed, install it according to the following steps:
1. Turn over the meter. Slide the battery cover in
the direction of the arrow to open it.
2. Insert a fresh CR 2032 3.0V coin cell battery
with the plus (+) side facing up.
3. Close the battery cover until it snaps shut.
Installing the Battery

14
Before using the meter for the first time, you will need to adjust the settings
that are listed in detail below. Some features may not be suitable for
multiple patient use. Check with the guidelines of your institution before
performing meter setup.
1. Meter Setup Mode: When meter is off, in memory mode or in average
mode, press and hold the right (►) button for two seconds to enter meter
setup mode. The meter will automatically enter the setup mode when
turned on for the first time by any method.
2. Clock: Set the clock to 12 or 24 hour mode. Press the left (◄) button to
switch between the two settings. Then press the right (►) button to save
your choice. Now you can start to set the year, month and date.
Note: The clock needs to be reset after replacing the battery.
3. Date: The year will appear at the top of the display. Press the left (◄)
button to increase the year. Once you have selected the correct year,
press the right (►) button to save your choice and start setting the month.
Press the left (◄) button to increase the month. Then press the right (►)
button to save your choice and start setting the date. Press the left (◄)
button to increase the date. Then press the right (►) button to save your
choice and start setting the time.
4. Time: The hour will appear at the top of the display. Adjust the hour with
the left (◄) button until the correct hour is displayed. Press the right (►)
button to save your choice and set the minutes. Press the left (◄) button
to change to the correct minute. Press the right (►) button to save your
Meter Setup before Testing
OR
MonthYear Date

15
choice and move to set the meal marker feature.
5. Meal Marker: The meter comes with the meal marker feature disabled.
The meter allows the user to enable or disable this option. The words “On”
or “Off” will be displayed on the large center segments of the display. The
before meal symbol together with the after meal symbol will be displayed
as shown below.
Press the left (◄) button to switch between turning the meal marker “On”
and “Off”. Press the right (►) button to confirm your selection.
6. Audio Feature: The meter comes with the audio feature enabled. There
will be a short beep when it is turned on, after sample detection and when
the result is ready. The meter will sound three short beeps to sound a
warning when an error has occurred. Please check the error number on
the display to determine what kind of error has occurred.
Hour Hour
OR
OR
Minute Minute

16
Press the left (◄) button to turn the meter beep “On” and “Off”. Press the
right (►) button to confirm your selection.
7. Ketone Indicator: The meter comes with the Ketone indicator feature
disabled. Press the left (◄) button to switch between turning the Ketone
indicator “On” and “Off”. Press the right (►) button to confirm your selec-
tion. When the Ketone indicator is enabled, if the test result is higher than
300 mg/dL, the symbol of “Ketone?” will appear on the display
8. Daily Control Test Reminder: This feature is helpful to remind you to
perform a quality control test daily. This will help to ensure the system is
operating properly and will help you to abide by your institution’s quality
control procedures (if applicable). When set to “On”, the reminder will
prompt you to perform a control solution test every 24 hours. If a control
test has not been conducted within 24 hours of the previous test, “Ctl” will
flash on the screen along with the control solution symbol and test
reminder symbol.
Your meter is preset with the Daily Control Test Reminder disabled.
You must turn it on to use this feature.
• When you are in the setup for the Daily Control Test Reminder,
“Off” will display along with the Control Solution symbol and Test
Reminder Symbol.
• Press the left (◄) button to turn the Daily Control Test Reminder “On”
and “Off”. Press the right (►) button to confirm your selection.
This manual suits for next models
1
Table of contents
Other Acon Blood Glucose Meter manuals

Acon
Acon On Call Plus User manual

Acon
Acon Vivid Pal User manual

Acon
Acon On Call GK Dual User manual

Acon
Acon On-Call Express Voice User manual

Acon
Acon ON CALL VIVID User manual

Acon
Acon ON CALL VIVID User manual

Acon
Acon On-Call Extra Voice User manual

Acon
Acon On Call User manual

Acon
Acon on call vivid pal User manual

Acon
Acon On-Call OGM-212 User manual