Actidata Ti-NAS QT6 User manual

Quick Start Guide
Getting started with the
actidata Ti-NAS QT6, QT7, QT8
QSG_actidata_tinas-qt-english _Ver_01

actidata Storage Systems GmbH –D-44149 Dortmund –Wulfshofstr. 16
Table of Contents
1. Introduction
2. Overview: Components & Connections
3. Getting started
4. Access to BIOS and IPMI
5. Further Information
1. Introduction
Before starting any installation or additional configuration, please note:
1. Before unpacking, check boxes and systems on damages as well as double checking the
contents. If any damage is recognized inform your supplier immediately to protect
your rights of warranty.
2. Before starting, please check the scope of delivery:
a. 1x actidata System with the correct hardware content
b. 1x power cord
c. Documentation and Software-driver on USB-Stick, Service-Certificate and Quick
Start Guide
d. Optional HDDs / SSDs or/and LTO media
3. Only experienced experts should install and operate the system.
4. Use the system only in supported IT-environments.
5. Before starting check all connections, also Power Connection and correct power values.
6. All warranty disclaims in case of wrong mounting, wrong connecting, wrong operation,
or any use where the system is not built for.
7. Please take care of backups. actidata Storage Systems GmbH assumes no liability for
data loss.
Service-Registration:
Each system is supplied with a service certificate. We recommend to register the service online:
www.actidata.com
Contact to Our Technical Support
T: +49 (0) 2 31/96 36 32 –35 (Technical Support)
I: www.actidata.com

actidata Storage Systems GmbH –D-44149 Dortmund –Wulfshofstr. 16
2. Overview: Components and Connections
The components used in the actidata Ti-NAS QT6, QT7, QT8 are shown below. Depending on
the configuration, the actidata Ti-NAS system is equipped with a LTO-drive and HDDs, SSDs of
different sizes and numbers. The selection of component manufacturers can also vary.
On the back you will find the following system interfaces:
•Network Interfaces:
Dual 10Gb Ethernet SFP+
Dual 1Gb Ethernet RJ45
•Management-Interface:
1Gb Ethernet RJ45, IPMI 2.0 (Redfish)
•Keyboard+Mouse, VGA / USB 3.0
actidata Storage Systems GmbH –D-44149 Dortmund –Wulfshofstr. 16
SFP+ Transceiver:
SFP+ Transceivers are not part of the scope of delivery. It is recommended to use certified
SFP+ Transceivers which are compatible to your LAN switch.
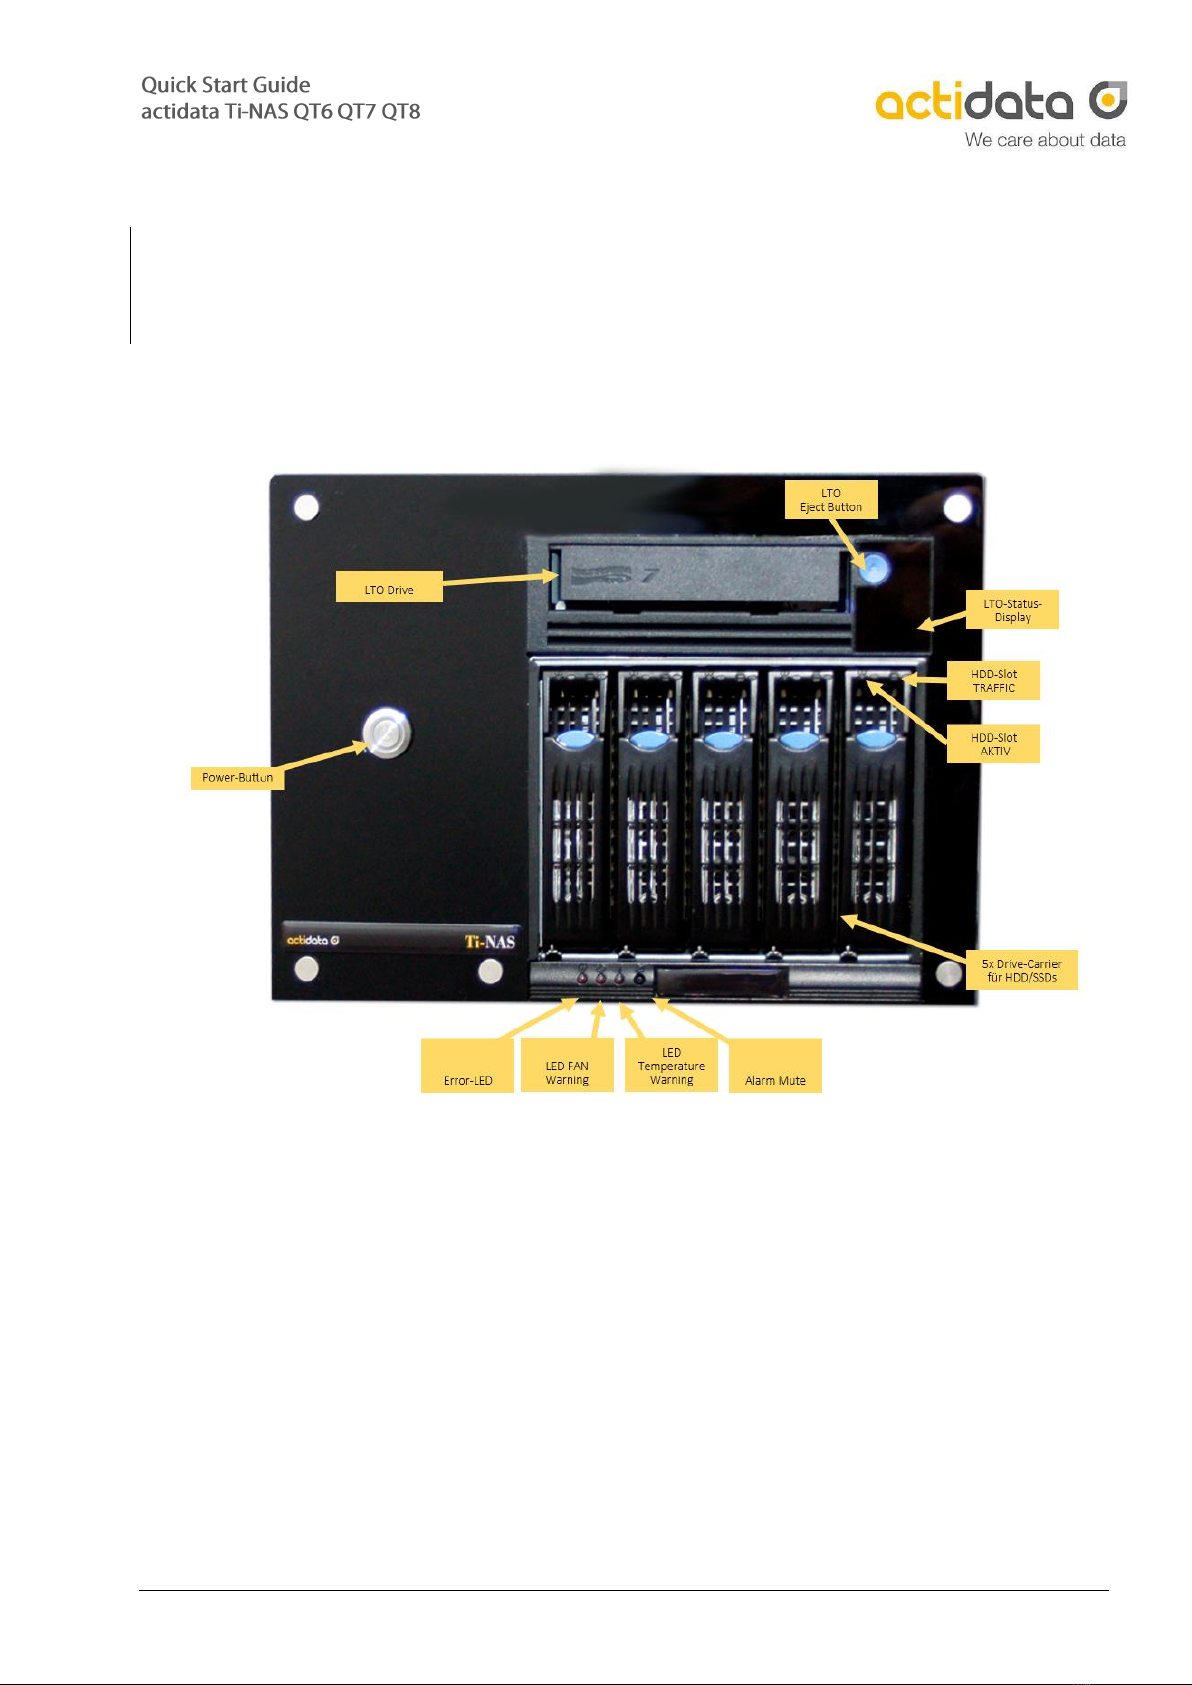
On the front you can find the following elements and displays:

actidata Storage Systems GmbH –D-44149 Dortmund –Wulfshofstr. 16
3. Getting started
After you have got the overview of the individual components and interfaces of the actidata Ti-
NAS QT, the system can be started. Therefore connect a monitor to the VGA connection on the
back of the actidata system. There are USB 3.0 interfaces for keyboard and mouse on the back.
After the system has been connected to power, the system can be put into operation. Set the
power supply on the rear to ON. The actidata system starts the power-on routines by pressing
the power-on switch on the front.
If an operating system (e.g. Windows Server for IOT) is installed, it is located internally on the
M.2 SSD. You can connect via RDP (Remote Desktop). The access data, the defined network IPs
can be found in the enclosed document „Important Information“, the license key is located on
the left side of the product.
If the Windows Storage Server for IOT operating system is pre-installed, the login screen
appears. After logging into Windows Storage Server, the system can now…
•… be integrated into the existing IT network.
•… manage the RAID-configuration of the installed hard drives. To do this, the
MegaRAID management program must be started.
Login / Password
administrator / <System-Password>
If no operating system is preinstalled, please refer to the information paper „OS installation“.
actidata Storage Systems GmbH –D-44149 Dortmund –Wulfshofstr. 16
4. Access BIOS and IPMI
4.a BIOS
You can open the System-BIOS by connecting keyboard and monitor to the system and pressing
[DEL] during Boot/Start-Up. After finishing the Power-On-Routines, the Bios will be loaded. For
example, you can define the IP-address of the IPMI-interface (static IP 172.16.0.2 by default).
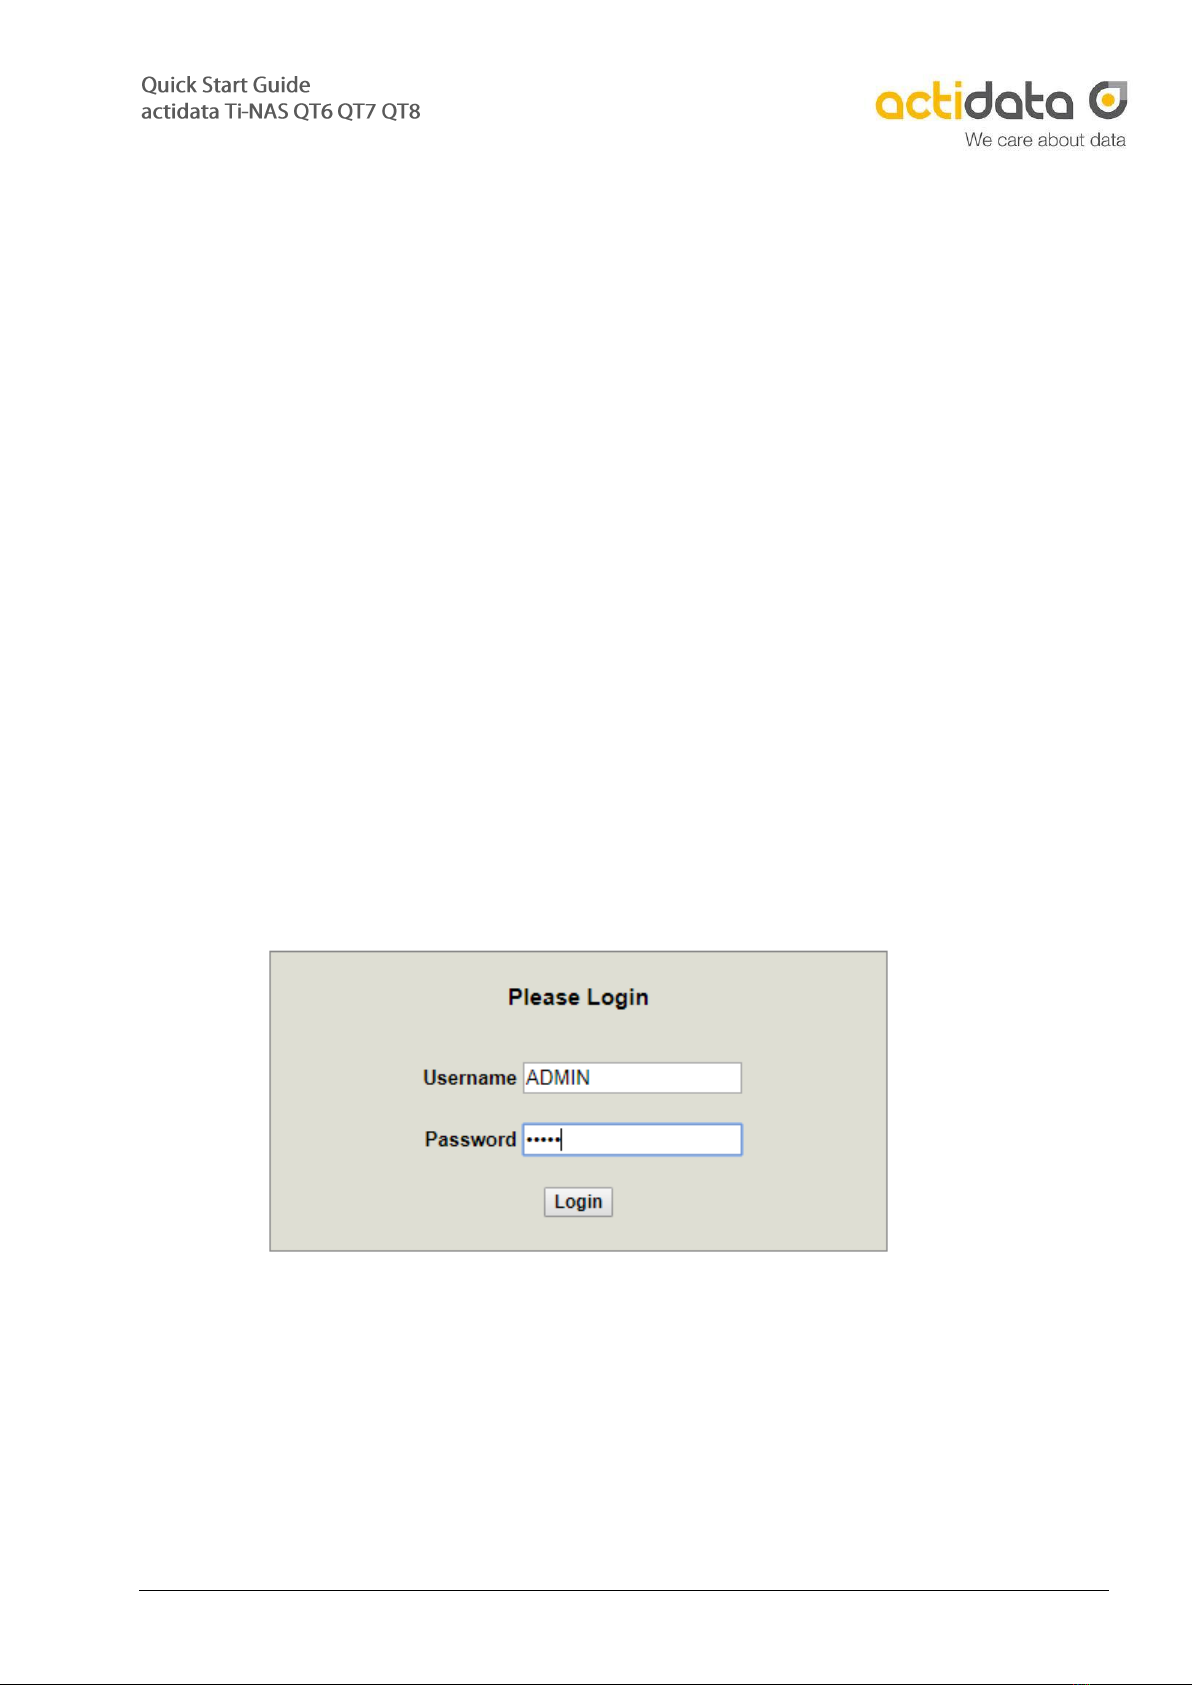
4.b. IPMI
You can access the IPMI via separated IPMI-RJ45 GbE NIC on the back of the NAS. There is a
separated, web-based GUI available:
Login Name / Default Password
ADMIN / ADMIN
The IPMI-GUI allows to check detailed temperature and fan information. You are able to Power-
On the NAS by remote as well. You can also download the IPMI-logs, by clicking the Button „Save
Event Logs“. Please change the password of the IPMI after the first access.
actidata Storage Systems GmbH –D-44149 Dortmund –Wulfshofstr. 16
5. Further Informations
Drive Carrier:
The drive carriers are ready for 2.5“ or 3.5“ HDDs or SSDs. To remove the drive carrier, press
the light-blue release button at the top so that the locking lever is opened. The Drive Carrier can
be removed from the system by carefully pulling the locking bar. The assembly is carried out
by carefully pushing the drive carrier into the free opening provided for it in the system (front).
The drive carrier is locked by closing the locking lever.
LTO drive:
In order to use the inserted LTO-drive, a Microsoft based backup software is needed (e.g. Veeam
Community Edition). You can unload LTO-media by using the eject button. Please only use
compatible Barrium-Ferrite LTO-media.
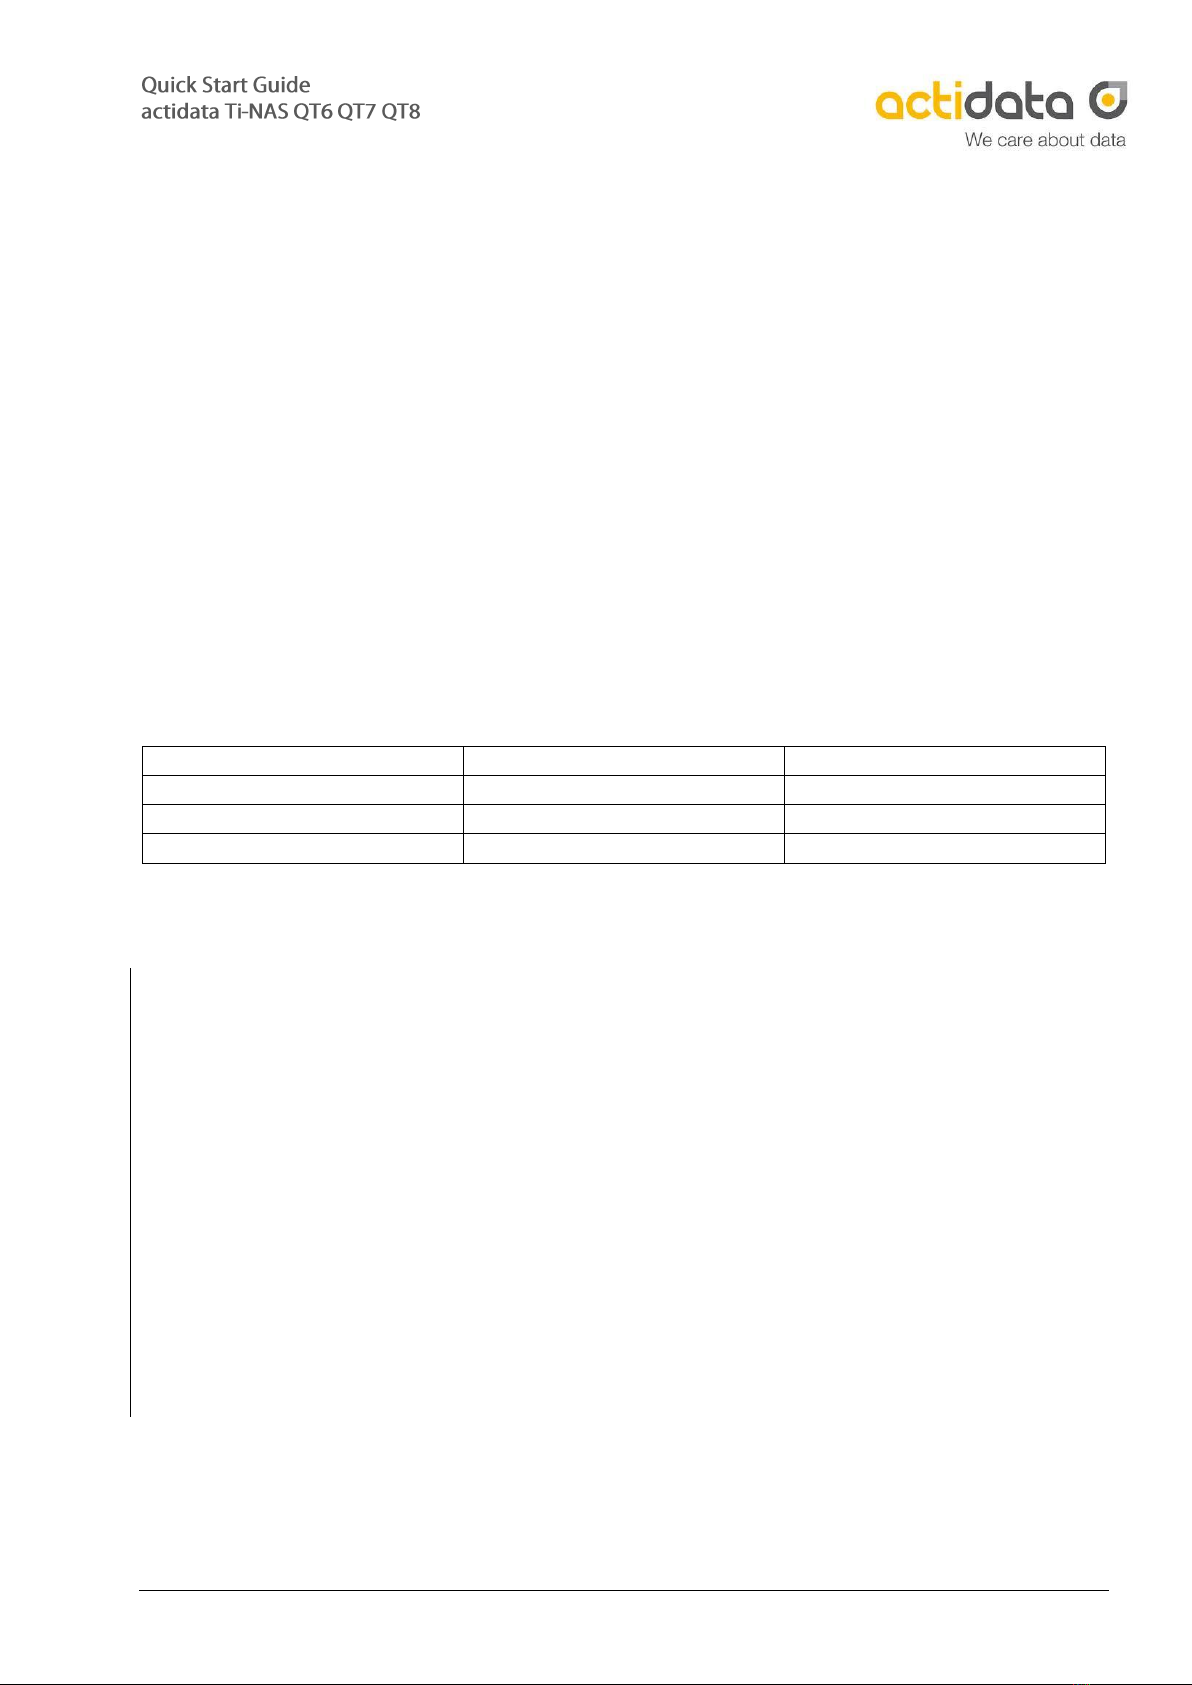
Ti-NAS QT6
Ti-NAS QT7
Ti-NAS QT8
LTO-4 Ultrium read
LTO-6 Ultrium read/write
LTO-7 Ultrium read/write
LTO-5 Ultrium read/write
LTO-7 Ultrium read/write
LTO-8 Ultrium read/write
LTO-6 Ultrium read/write
Important:
Removing and inserting the Drive Carrier requires little force. Excessive force or the use of any
tool can impair the function of the system or destroy the device. In these cases the guarantee is
no longer valid.
Important:
When re-equipping, only qualified screws are to be used for installing other HDD / SSDs. Using
the wrong screws can damage the system. In these cases the system guarantee expires.
Important:
When installing HDDs / SSDs, which are not qualified by the manufacturer, the function may be
restricted and / or malfunctions may occur that are not covered by the guarantee services of
actidata Storage Systems GmbH. The system guarantee is void in the event of improper
installation or installation / configuration of third-party components.

actidata Storage Systems GmbH –D-44149 Dortmund –Wulfshofstr. 16
Contact to manufacturer
actidata Storage Systems GmbH
Indupark
Wulfshofstr. 16
D-44149 Dortmund, (Germany)
T: +49 (0) 2 31/96 36 32 –0 (Switch Board)
T: +49 (0) 2 31/96 36 32 –35 (Service Hotline)
I: www.actidata.com
All right reserved
actidata Storage Systems reserved all rights on this document. Any copy in print or electronical
way or use outside the described use are forbidden. Changes will be done without any notice.
No liability in case of any mistake or error in this document.
This manual suits for next models
2
Table of contents
Other Actidata Server manuals


