Action S002147 User manual
ELLIPTICAL
TRAINER
Model Number: S002147
INSTRUCTION MANUAL

MODEL: S002147
AFTER SALES SUPPORT
1800 465 070 2
Contents
3General Information and Safety Instructions
6Assembly and Parts List
14 Workout Area
15 Console Operation
16 Functions/Features
17 Monitor Function
18 Program Introduction & Operation
21 Operation Guide
22 Error Message
23 Technical Data
26 Other Useful Information
27 Exploded Diagram
28 Warranty Information

MODEL: S002147
AFTER SALES SUPPORT
1800 465 070 3
General Information and Safety Instructions
Save These Instructions
WARNING! To ensure your safety, please do not attempt to use this product without reading this instruction
manual carefully. Failure to comply with this warning may result in injury or property damage.
WARNING! To ensure proper use and safety of the Elliptical Trainer, it is the responsibility of the owner to ensure
that all users are adequately informed of all warnings and precautions.
WARNING! This product is not intended for use by persons with reduced physical, sensory or mental capabilities;
or lack of experience and knowledge unless they have been given supervision or instruction concerning use of the
product by a person responsible for their safety.
WARNING! This product is not suitable for use by children.
Please make sure that all users read the Instruction Manual before use. Only use this Elliptical
Trainer in the manner as described in this manual. To reduce the risk of serious injury, read the
entire manual before you assemble the Elliptical Trainer. Please keep this manual in a safe place for
future reference.
Safe Disposal Of Product And Packaging
Unpacking
Unpack the unit where it will be used. Place the Elliptical Trainer carton on a level flat surface.
When unpacking the unit, remove any packaging materials from the interior. Keep the original
packaging carton and materials in a safe place. It will help prevent any damage if the product
needs to be transported in the future. Plastic wrapping can be a suffocation hazard, so please
ensure all packaging materials are kept safely away from children and babies.
Packaging Disposal
Government guidelines ask that we reduce the amount of waste material disposed of in land fill
sites. We therefore ask that you dispose of all packaging waste responsibly and recycle where
possible.
End of Life Disposal
We hope you enjoy many years of use from your Elliptical Trainer. However, a time will come
when your Elliptical Trainer will come to the end of its working life. You are responsible for the
appropriate disposal of your unit to a recognised public collection facility or council disposal
service.
At the end of its working life, do not throw this appliance out with your household rubbish.
Electrical and electronic products contain substances that can have a detrimental effect on the
environment and human health if disposed of inappropriately. Observe any local regulations
regarding the disposal of electrical consumer goods and dispose of it appropriately for recycling.
Contact your local authorities for advice on recycling facilities in your area.
Please keep the original packaging carton and materials in a safe place. It will help to prevent any
damage if the product needs to be transported in the future. In the event it is to be disposed of,
please recycle all packaging material where possible.
obtain an electronic copy.

MODEL: S002147
AFTER SALES SUPPORT
1800 465 070 4
General Information and Safety Instructions
(cont)
WARNING!
To reduce the risk of serious injury, read the entire manual before you assemble or operate this
equipment. In particular, please note the following safety precautions. Please keep this manual in a
safe place for future reference.
The safety level of this elliptical trainer can only be maintained if it is examined regularly for
damage and wear. Before each use and at least every two months pay particular attention to the
tightness of bolts and all connection points. This is particularly true for the attachment of the
handlebars, middle handlebars, footplates and front and rear bottom tubes.
1. Prior to assembly this elliptical trainer includes small parts/accessories that are not suitable for children under
3 years of age as they may cause a choking hazard.
2. This product should be assembled by two adults.
3. It is strongly recommended that you consult your physician prior to beginning an exercise program. If
dizziness, nausea, chest pains, or any other abnormal symptoms are experienced while using this equipment,
stop the workout at once and consult a physician immediately.
4. This elliptical trainer is not suitable for persons under the age of 15.
5. The maximum user weight for this elliptical trainer is 120kg.
6. It is the responsibility of the owner to ensure that all users of this elliptical trainer are adequately informed of
all warnings and precautions. This elliptical trainer is not intended for use by persons with reduced physical,
sensory or mental capabilities; or lack of experience and knowledge unless they are being supervised by the
person responsible for their safety. Keep unsupervised children away from the elliptical trainer at all times.
7. Only use this elliptical trainer in the manner as described in this manual.
8. Keep the elliptical trainer indoors, away from moisture and dust. Do not put the elliptical trainer in a garage,
outbuilding, covered patio or near water.
9. Place this elliptical trainer on a level surface with at least a 2m diameter of clear space surrounding the unit. To
protect your floor, it is recommended that you place a mat underneath the elliptical trainer.
10. Never allow more than one person to use the elliptical trainer at any time.
11. Always examine your elliptical trainer before use to ensure all parts are in working order and all the hardware
is fitted tightly.
12. The pulse sensor is not a medical device; various factors including the user’s movement may affect the
accuracy of the readings. The pulse sensor is intended as an exercise aid in determining heart rate trends in
general and is not suitable for high accuracy purposes.
13. Always wear appropriate exercise clothing when using the elliptical trainer, do not wear loose clothing that
could become caught. Always wear appropriate running shoes; never use the elliptical trainer with bare feet,
wearing only stockings or in sandals.
14. Care must be taken when liing or moving the equipment, so as not to injure your back. Always use proper
liing techniques.
15. Do not place the elliptical trainer in the vicinity of obstacles, paths, doorways or corridors. Only use on a level
surface.

MODEL: S002147
AFTER SALES SUPPORT
1800 465 070 5
16. WARNING!
Injuries to health may result from incorrect or excessive training. Excessive exercising may have
serious complications. If you feel faint, dizzy or short of breath, stop exercising immediately
and seek medical advice.
Care should be taken when getting on and off the Elliptical Trainer. To get onto the machine,
stand on the left side and ensure the left pedal is in the lowest position. Grip the handle bars,
place your left foot onto the left footplate and lift yourself onto the machine, stabilizing
yourself by gripping the stationary handles. Once you feel stable and secure, lift your right foot
over the machine and place it on the right foot plate. Before starting any movement, stand tall,
brace your midsection and balance yourself.
Start moving by pedaling the legs and moving the arms back and forth in time with the legs.
As you push down with your right leg, pull back with your right arm and vice versa. Keep your
eyes forward and upper body upright throughout the movement. To get off your elliptical
trainer you must first slow down until the machine comes to a complete stop. Then remove
yourself in the same manner you got onto the machine.t
17. This appliance is not intended for use by persons (including children) with reduced physical, Injuries to health
may result from incorrect or excessive training. Excessive exercising may have serious complications. If you
feel faint, dizzy or short of breath, stop exercising immediately and seek medical advice.
18. Replace defective components immediately and/or keep the equipment out of use until repair.
19. Give special attention to components most susceptible to wear, such as the handles.
20. WARNING! If any of the adjustment devices are le projecting, they could interfere with the user’s movement.
21. WARNING! Heart rate monitoring systems may be inaccurate. Over exercising may result in serious injury or
death. If you feel faint, stop exercising immediately.
General Information and Safety Instructions
(cont)

MODEL: S002147
AFTER SALES SUPPORT
1800 465 070 6
Assembly and Parts List
P.A - Pre-assembled
No. Description QTY No. Description QTY
1 Mainframe 1 30 Mushroom end cap 2
2 Rear end cap 2 31 Computer 1
3 Rear bottom tube 1 32 Protective guard 1
4 Allen bolt M8×90 (P.A) 2 33 Adaptor 1
5 Flat washer D10×Φ20×2 4 34 Flat washer D10×Φ20×2 4
6 Nylon nut M10 4 35 Waved washer 4
7 Plastic bushing Φ28×16×Φ16.1 4 36 Carriage bolt M8×45 4
8 Alloy bushing Φ18×Φ10×11 4 37 Hexagon bolt M8×45 (P.A) 6
9 D-shape washer 4 38 Hexagon bolt M10×55 2
10 Allen bolt M10x20 4 39L/R L/R pedal tube joint 1 each
11 Spring washer d10 4 40 End cap 2
12 Flat washer D8×Φ16×1.5 (P.A) 10 41 Foam grip 2
13 Nylon nut M8 10 42 Fixed handlebar 1
14L/R L/R pedal 1 each 43 Pulse wire (P.A) 2
15L/R L/R pedal support 1 each 44 Spring washer d8 (P.A) 8
16 Phillips pan head screw M5x10 4 45 Allen bolt M8x16 (P.A) 8
17L/R Protective guard 2 each 46 Handlebar post 1
18 Hex boltΦ12×M10×80 2 47 Protective guard 1
19 Axle bushing3 Φ12×Φ32×15 4 48 Cross screw ST4.2X18 10
20 Arc washer D8×Φ19×1.5×R30 (P.A) 6 49 Mast cover 1
21 Allen bolt M8×72 (P.A) 2 50 Connection wire (P.A) 1
22 Front end cap 2 51 Flat washer D12×Φ24×1.5 2
23 Front bottom tube 1 52 Long axle 1
24L/R L/R swing tube 1 each 53 Sensor wire (P.A) 1
25 Axle bushin4 Φ16×Φ31×23 6 54a/b Protective guard 2 each
26a/b Protective guard 1 each 55a/b Protective guard 1 each
27 Phillips tapping screw ST3.5×13 4 56L/R L/R crank 1 each
28L/R L/R handlebar 1 each 57 Phillips pan head screw (P.A) 4
29 Foam grip 2 58 Arc washer D8×2×Φ25×R39 (P.A) 2

MODEL: S002147
AFTER SALES SUPPORT
1800 465 070 7
Assembly Instructions (cont)
NOTE: Please note that some bolts are already pre-installed in the machine. In these instances, simply remove
hardware and reinstall parts where necessary.
NOTE: Please note bolts come labelled in blister packs and marked with what step they are required. This is for
easy assembly.
PREPARATION
It is strongly recommended this machine to be assembled by two or more people to avoid possible
injury.
Before you start assembly on your elliptical, please ensure you have a safe working space to build
your machine. Lay all parts out on the ground to ensure all parts are available and nothing is
missing.
Step 1
1. Using an allen key, remove bolts from cardboard tubing where front and bottom tubes are to be attached to the
main frame.
2. Place the front bottom tube (23) to the mainframe (1) with the allen bolts M8x72 (21) and arc washer (20). Then
attach the rear bottom tube (3) to the mainframe (1) with allen bolts M8x90 (4) and arc washers (58) are shown
in pictures below.
MODEL: S002147
AFTER SALES SUPPORT
1800 465 070 8
Assembly Instructions (cont)
Step 2
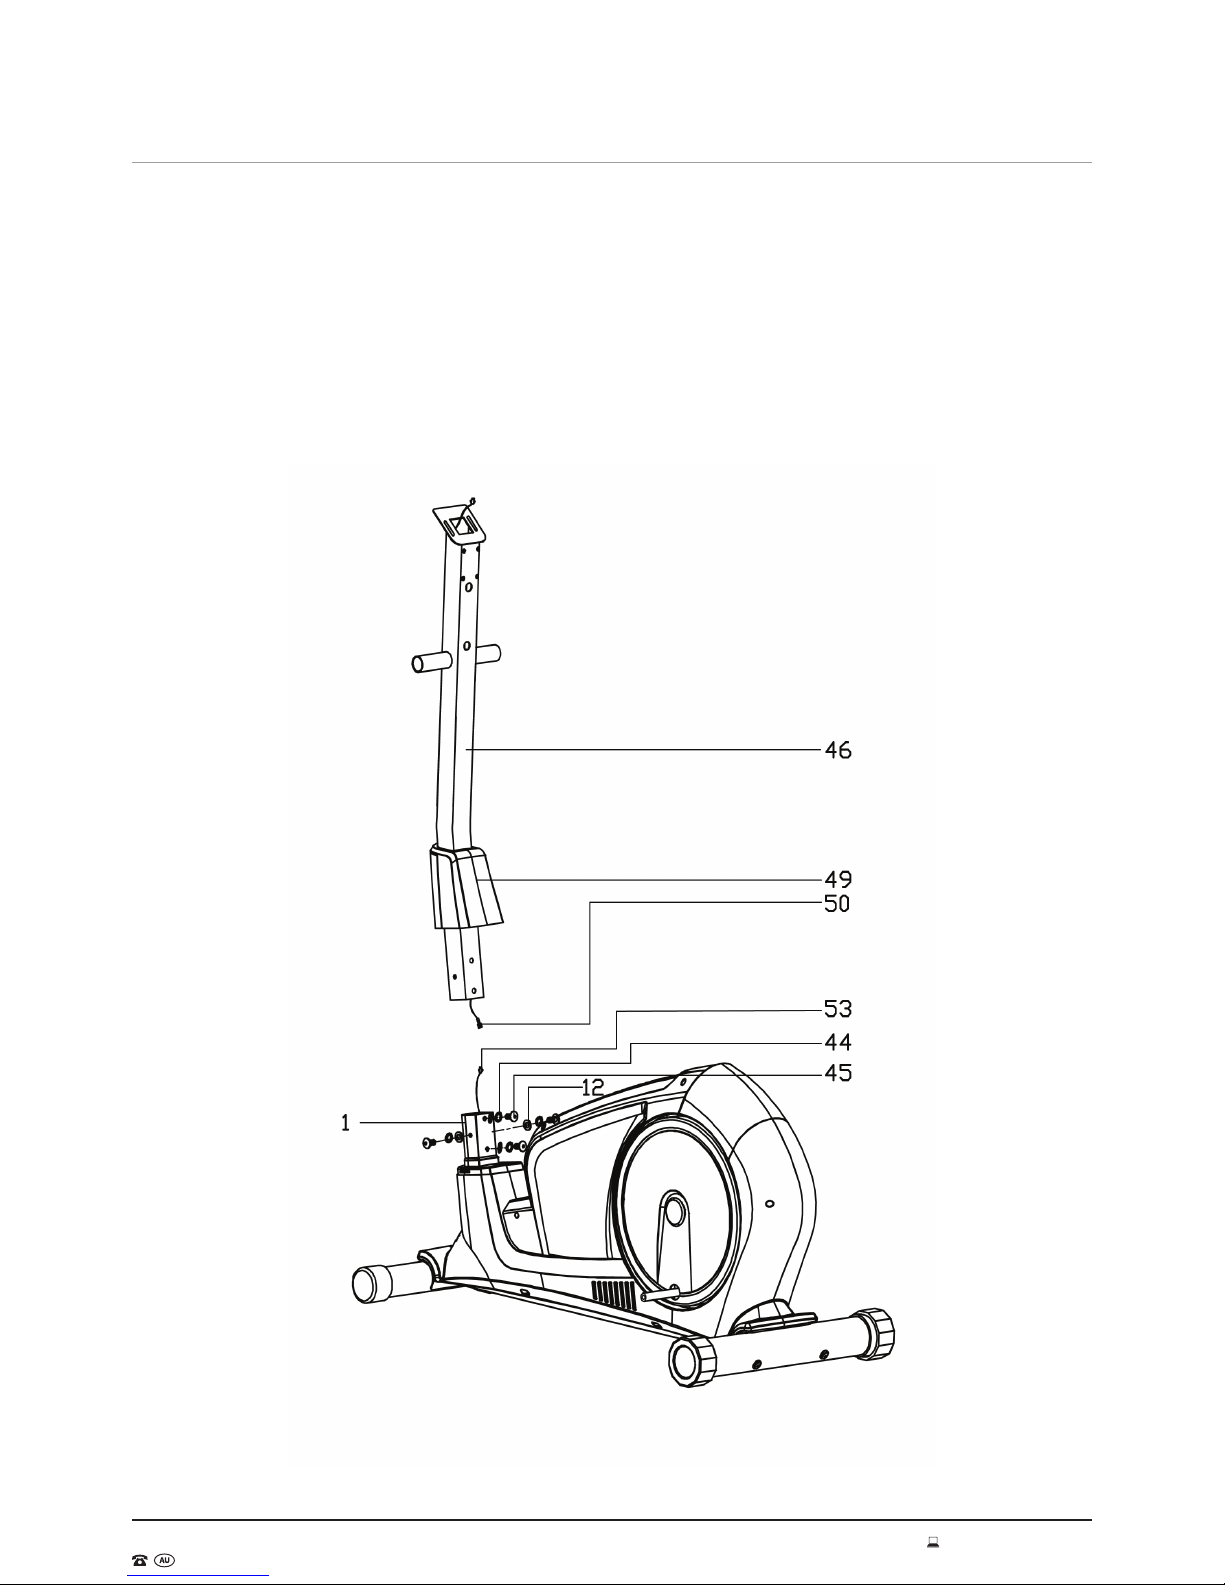
1. Remove 4 x allen bolts M8x16 (45) from mainframe (1). Slide the mast cover (49) onto the handlebar post (46).
2. Connect the connection wire (50) to the sensor wire (53) and then tighten the handlebar post (46) to the
mainframe (1) with allen bolts M8x16 (45), spring washers (44), and flat washers (12).
3. Slide down the mast cover (49) in position.
MODEL: S002147
AFTER SALES SUPPORT
1800 465 070 9
Assembly Instructions (cont)
Step 3
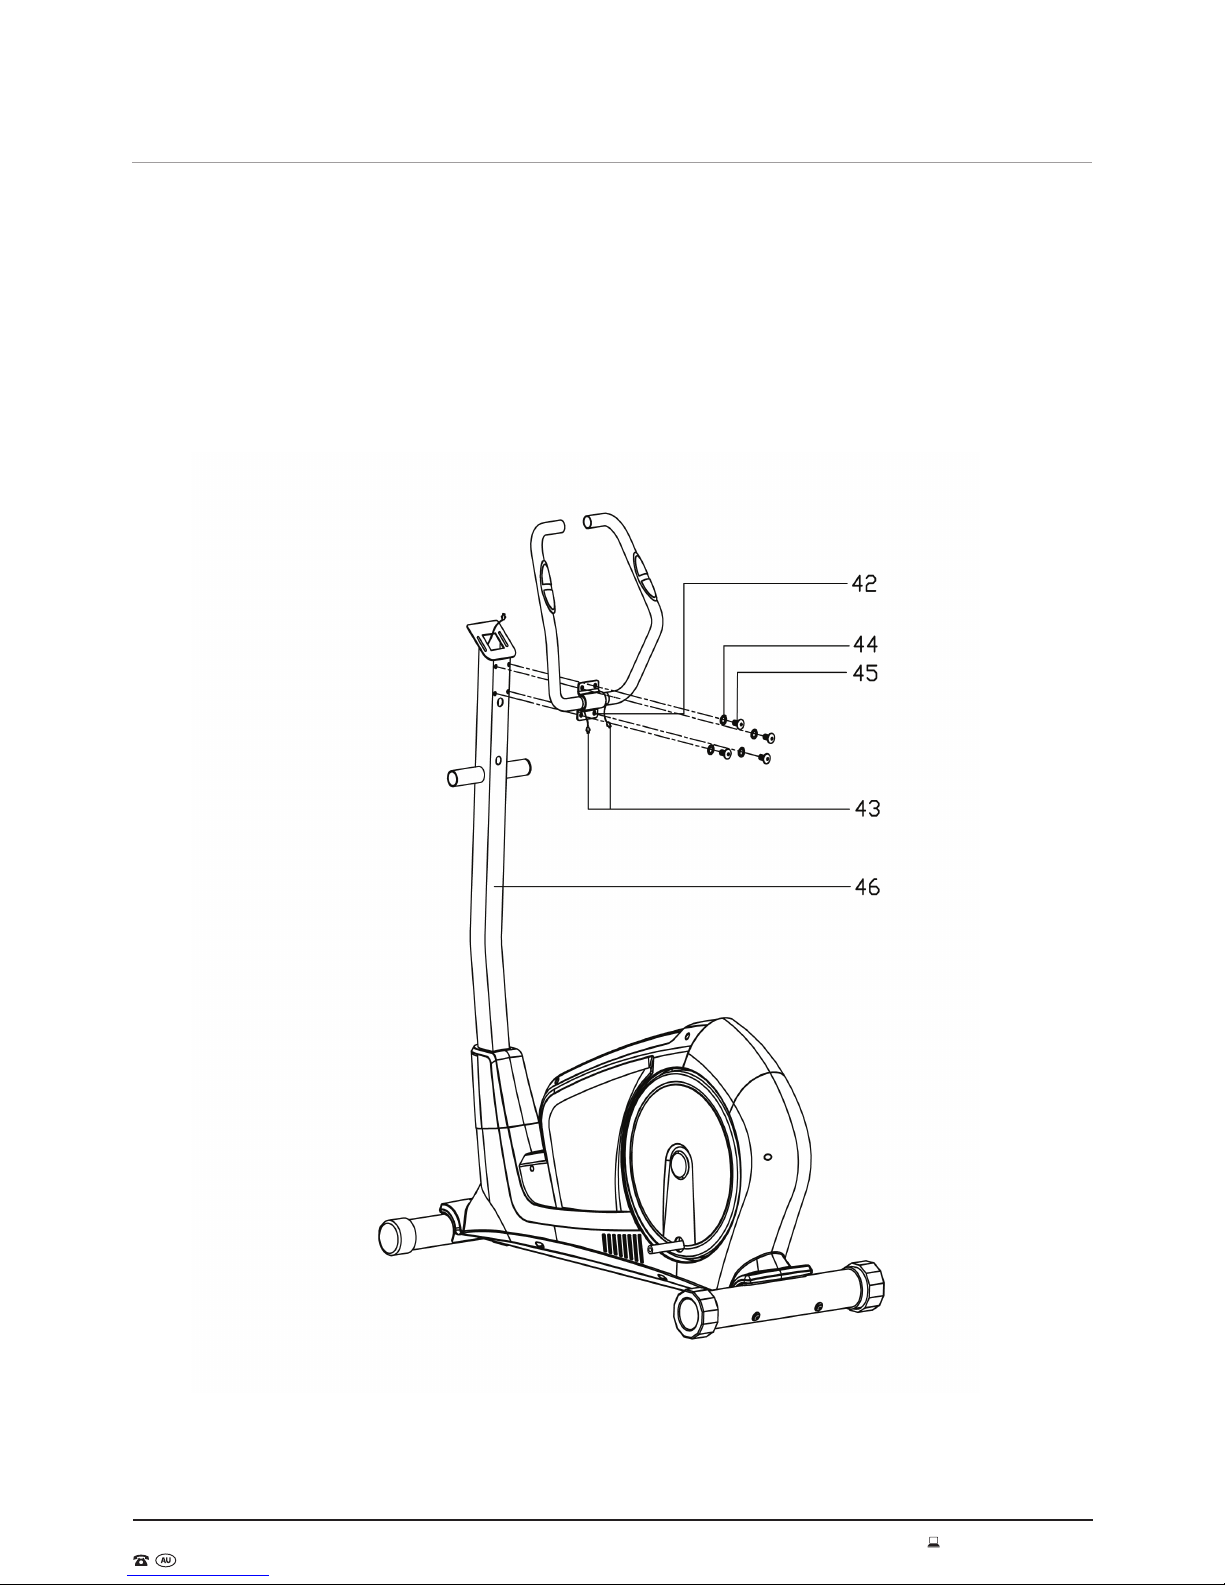
1. Remove pre-assembled 4 x allen bolts M8x16 (45) and spring washers (44).
2. Pass the pulse wire (43) through out of the computer bracket on top of handlebar post (46) as shown in the
picture.
3. Tighten the fixed handlebar (42) to the handlebar post (46) with allen bolts M8X16 (45) and spring washers (44).
MODEL: S002147
AFTER SALES SUPPORT
1800 465 070 10
Assembly Instructions (cont)
Step 4
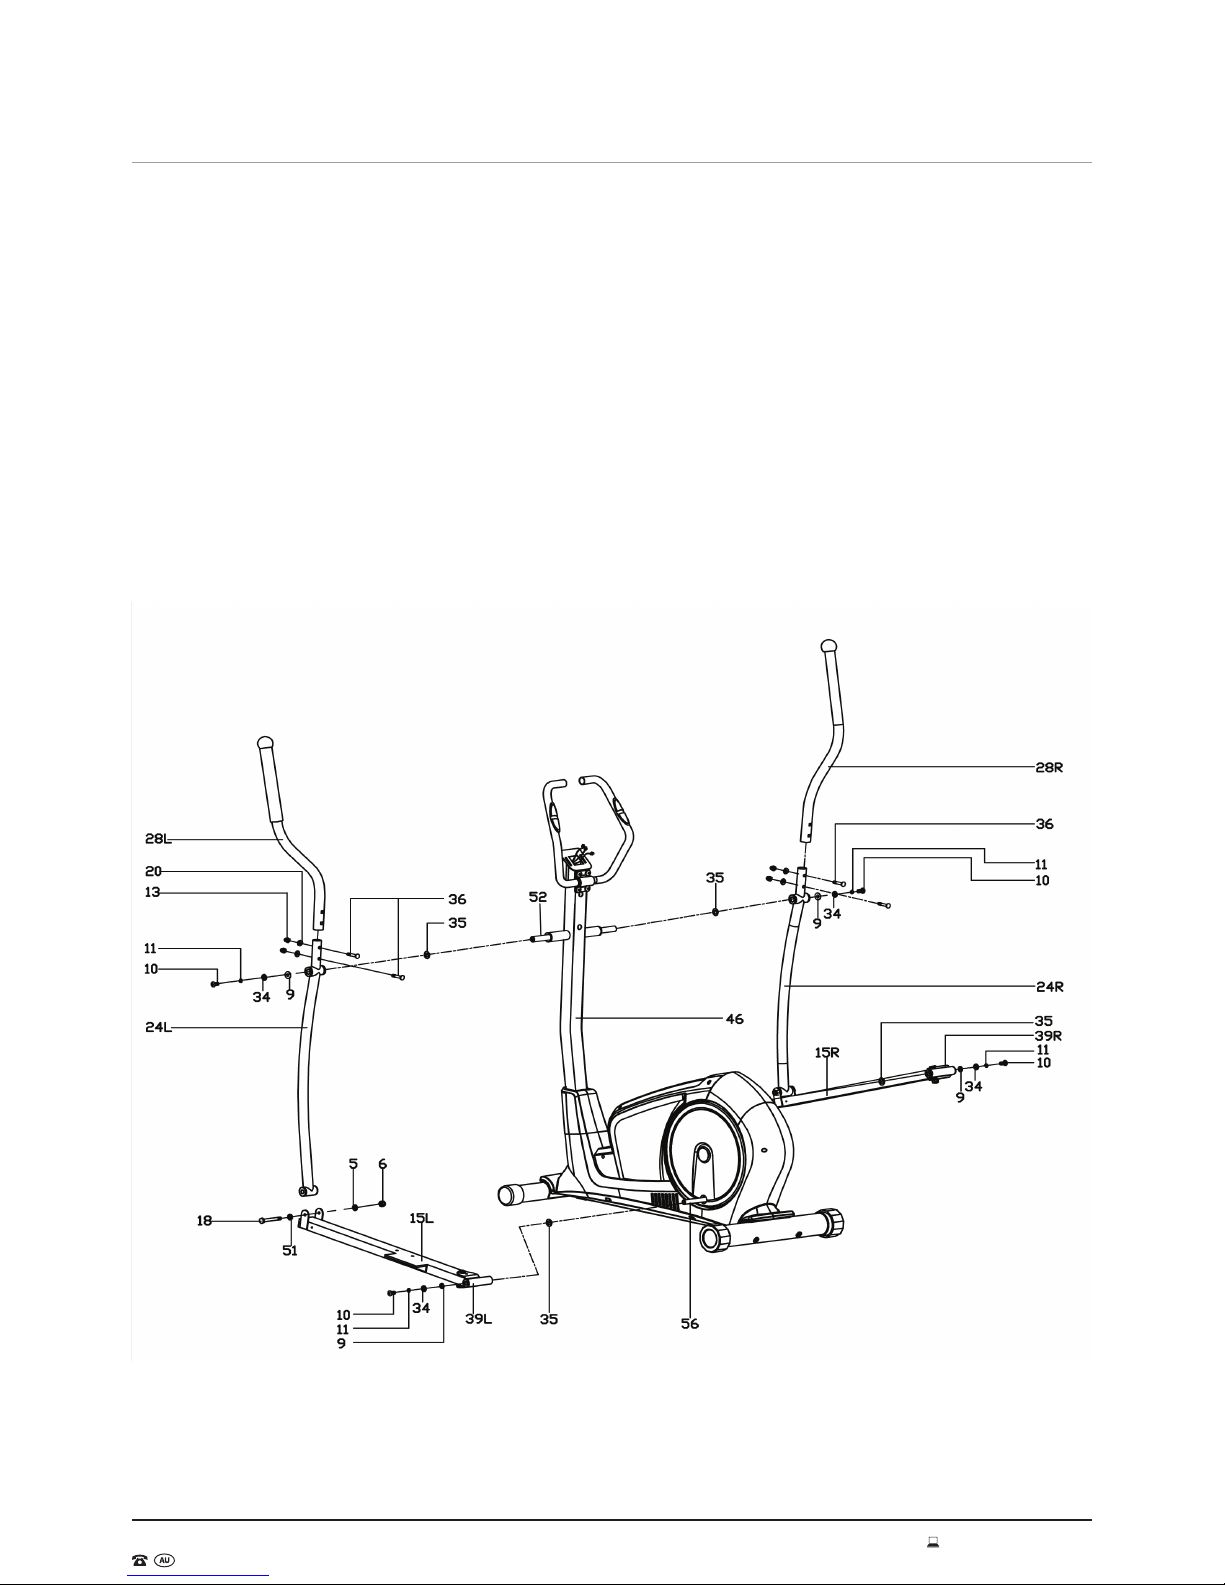
1. Fit the L/R swing tube (24L/R) to the long axle (52) on the handlebar post (46) with allen bolt M10x20 (10),
spring washer (11), d-shape washer (9), flat washer (34) and waved washers (35). These bolts are pre-
assembled to the machine.
2. Attach the L/R pedal tube joint (39L/R) to the L/R crank (56L/R) with allen bolt M10x20 (10), spring washer
(11), d-Shape washer (9), flat washer (34) and waved washers (35) as shown. These are located in the bolt
pack.
NOTE: Tighten all bolts once this assembly step is complete.
3. Joint L/R swing tube (24L/R) and pedal support (15L/R) with the hex bolt (18), flat washer (5) and flat washer
(51) and nylon nut (6) as shown. These are located in the bolt pack.
4. Fit the L/R Handlebar (28L/R) to the L/R Swing tube (24L/R) with the Carriage bolt M8×45 (36), arc washer (20)
and nylon nut M8 (13) as show. These are located in the bolt pack.
MODEL: S002147
AFTER SALES SUPPORT
1800 465 070 11
Assembly Instructions (cont)
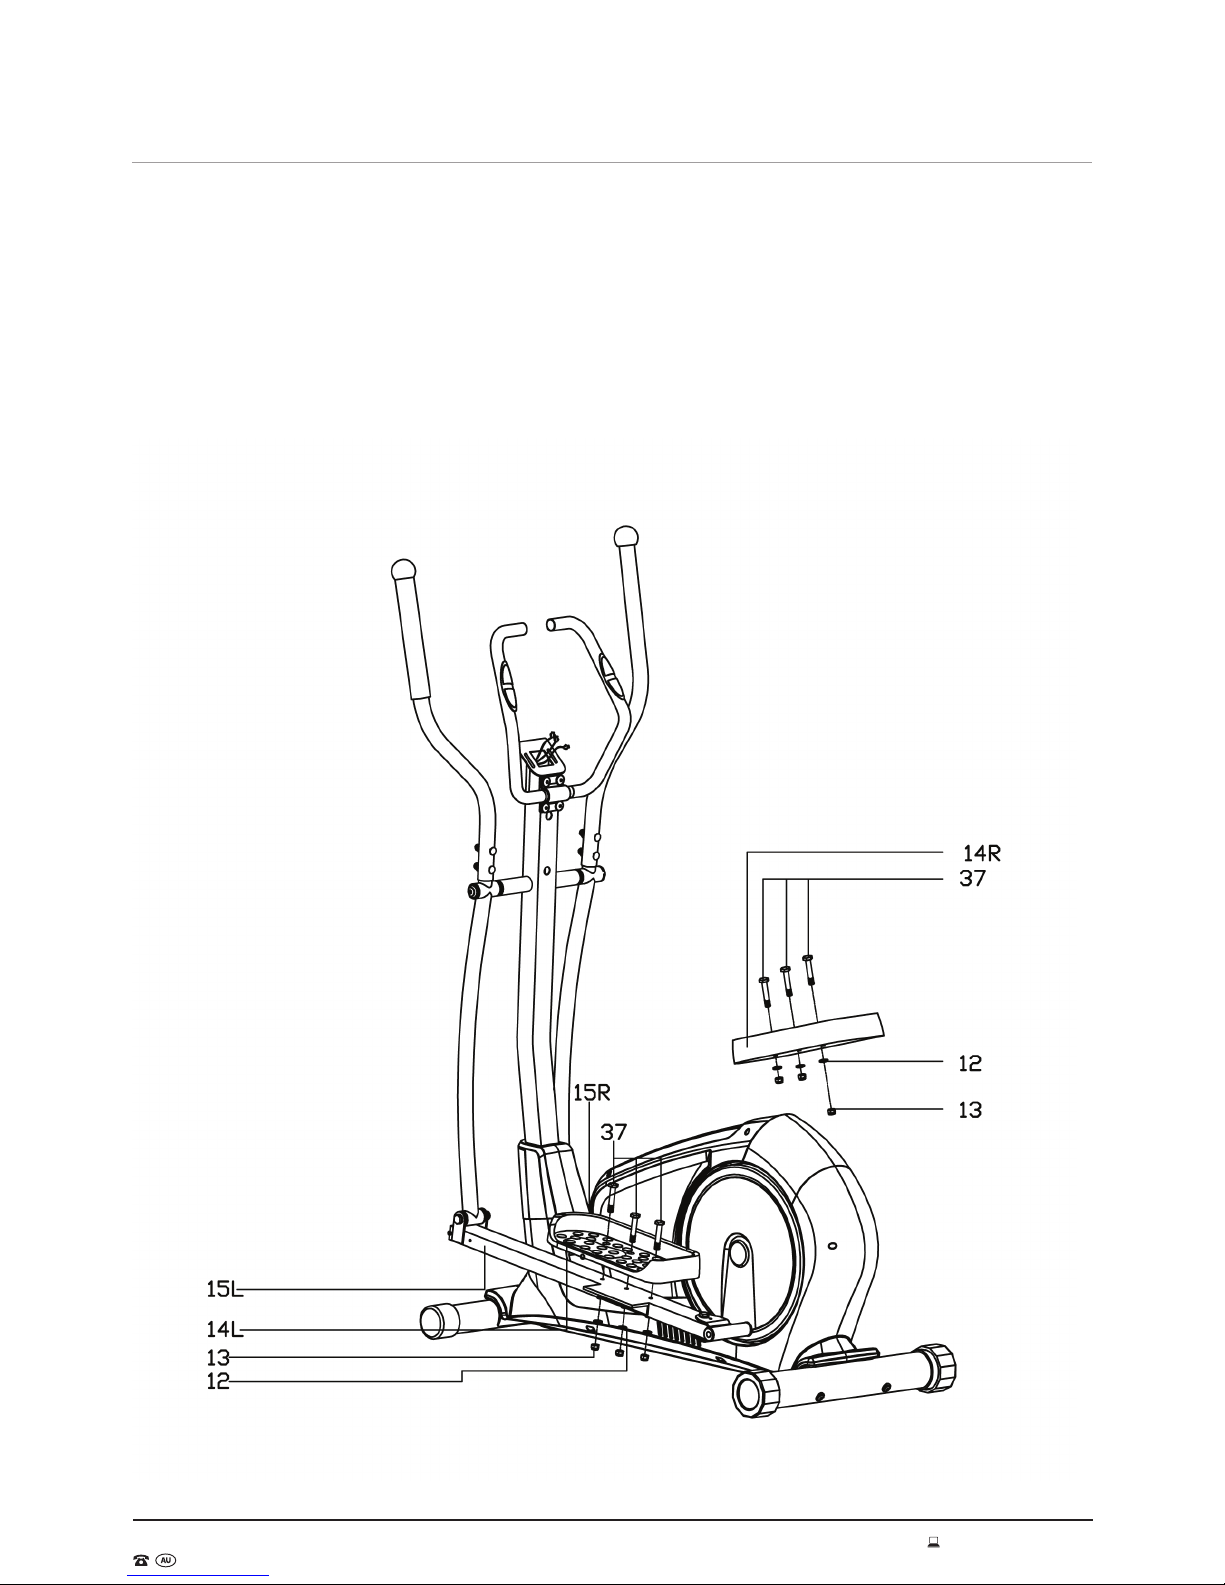
Step 5
Tighten the L/R pedal (14L/R) to the L/R pedal support (15L/R) with hexagon bolts M8×45 (37), flat
washers D8 (12) and nylon nuts M8 (13) as shown. These bolts are pre-assembled to the machine.
NOTE: The pedal has been labelled L for le & R for right.
MODEL: S002147
AFTER SALES SUPPORT
1800 465 070 12
Assembly Instructions (cont)
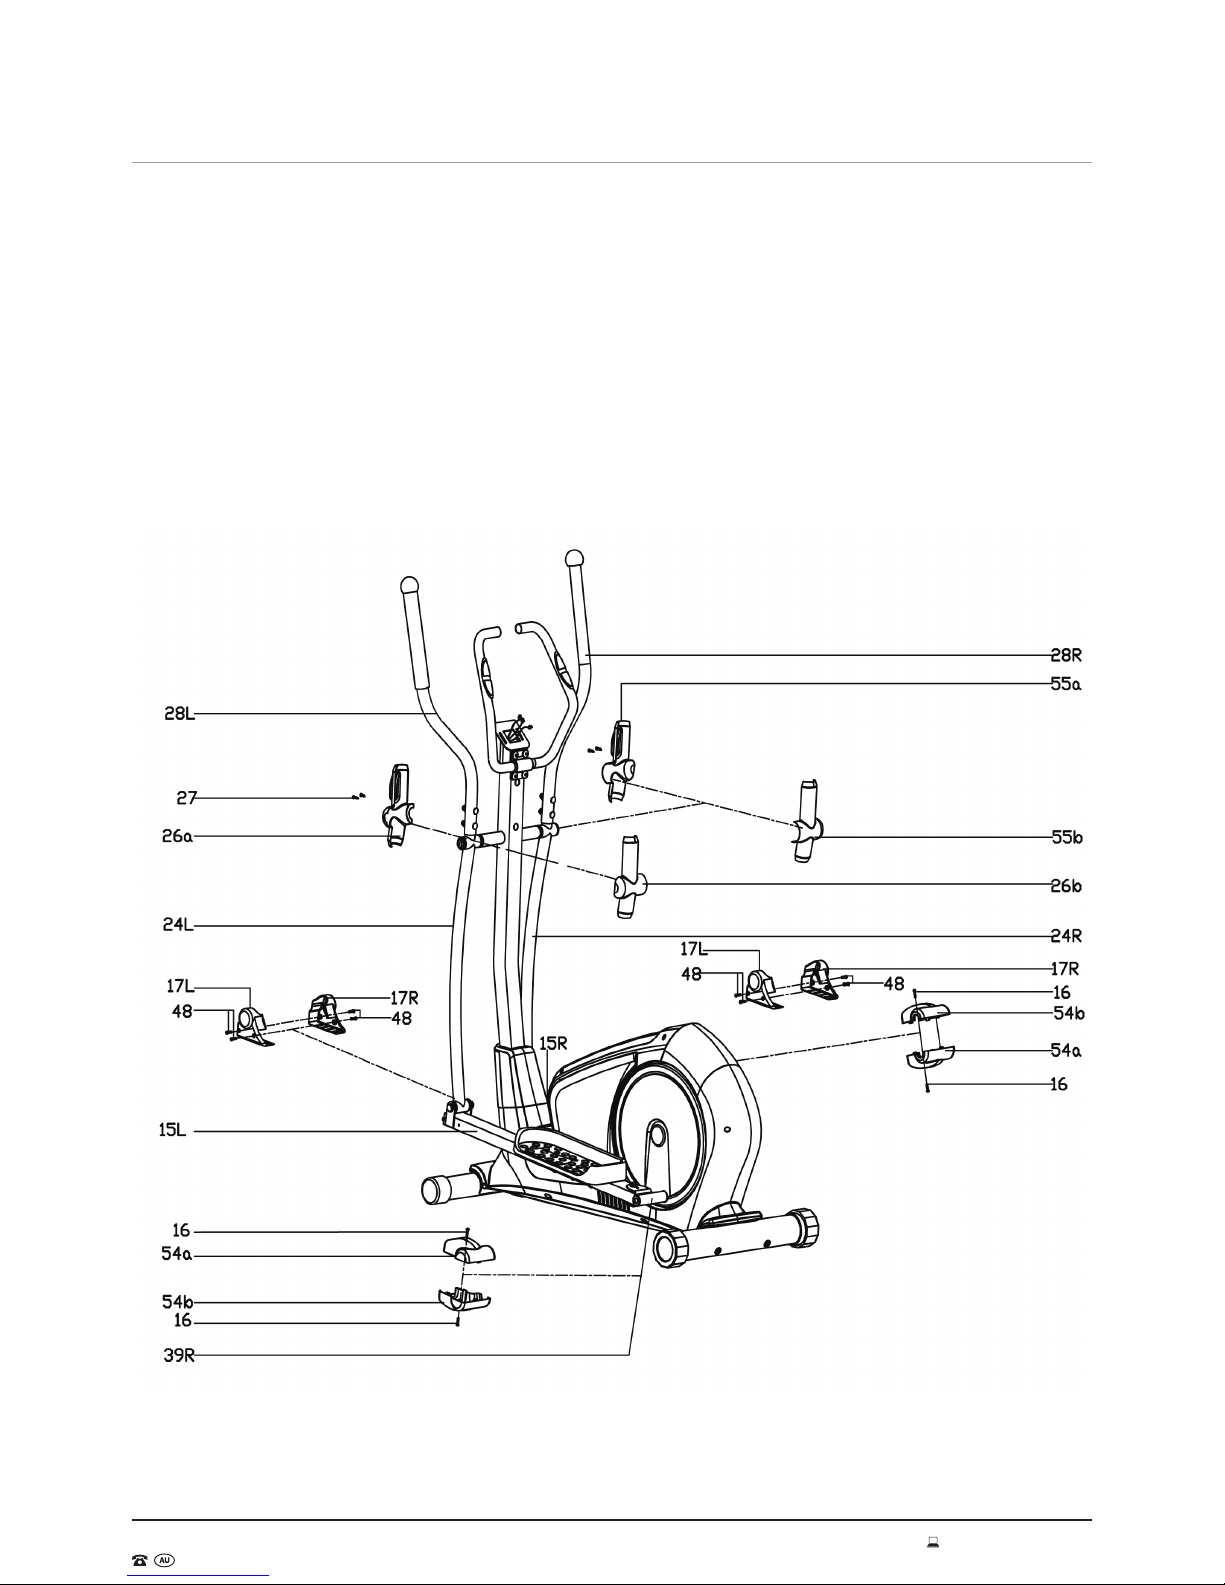
Step 6
1. Cover the joining part of L/R handlebar (28L/R) and L/R swing tube (24L/R) with the protective guard (26a/b) &
(55a/b). Secure guards into place with the tapping screws (27).
2. Fix the protective guard (17L/R) and (54a/b) to the L/R pedal support (15L/R) & L/R pedal tube joint (39L/R)
respectively with the cross screw (48) & pan head screws (16) as shown.
NOTE: Screws for the protective guards are either pre-installed in the guards or in the correct position on the
machine.

MODEL: S002147
AFTER SALES SUPPORT
1800 465 070 13
Assembly Instructions (cont)
Step 7
NOTE: Screws for the monitor are pre-installed and are located at the back of the monitor.
1. Connect the connection wire (50), pulse wires (43) to the computer wires, then fix the computer (31) onto the
computer bracket on the handlebar post (46). Then tighten the computer(31) with screws (57).
2. Fit the protective guard (32/47) to the handlebar post (46) with cross screw (48) as shown.

MODEL: S002147
AFTER SALES SUPPORT
1800 465 070 14
Workout Area
Free area and training area.
The free area should be no less than 0.6m greater than the training area in the directions
from which the equipment is accessed. The free area must also include the area for emergency
dismount.Where equipment is positioned adjacent to each other the value of the free area may be
shared.
MODEL: S002147
AFTER SALES SUPPORT
1800 465 070 15
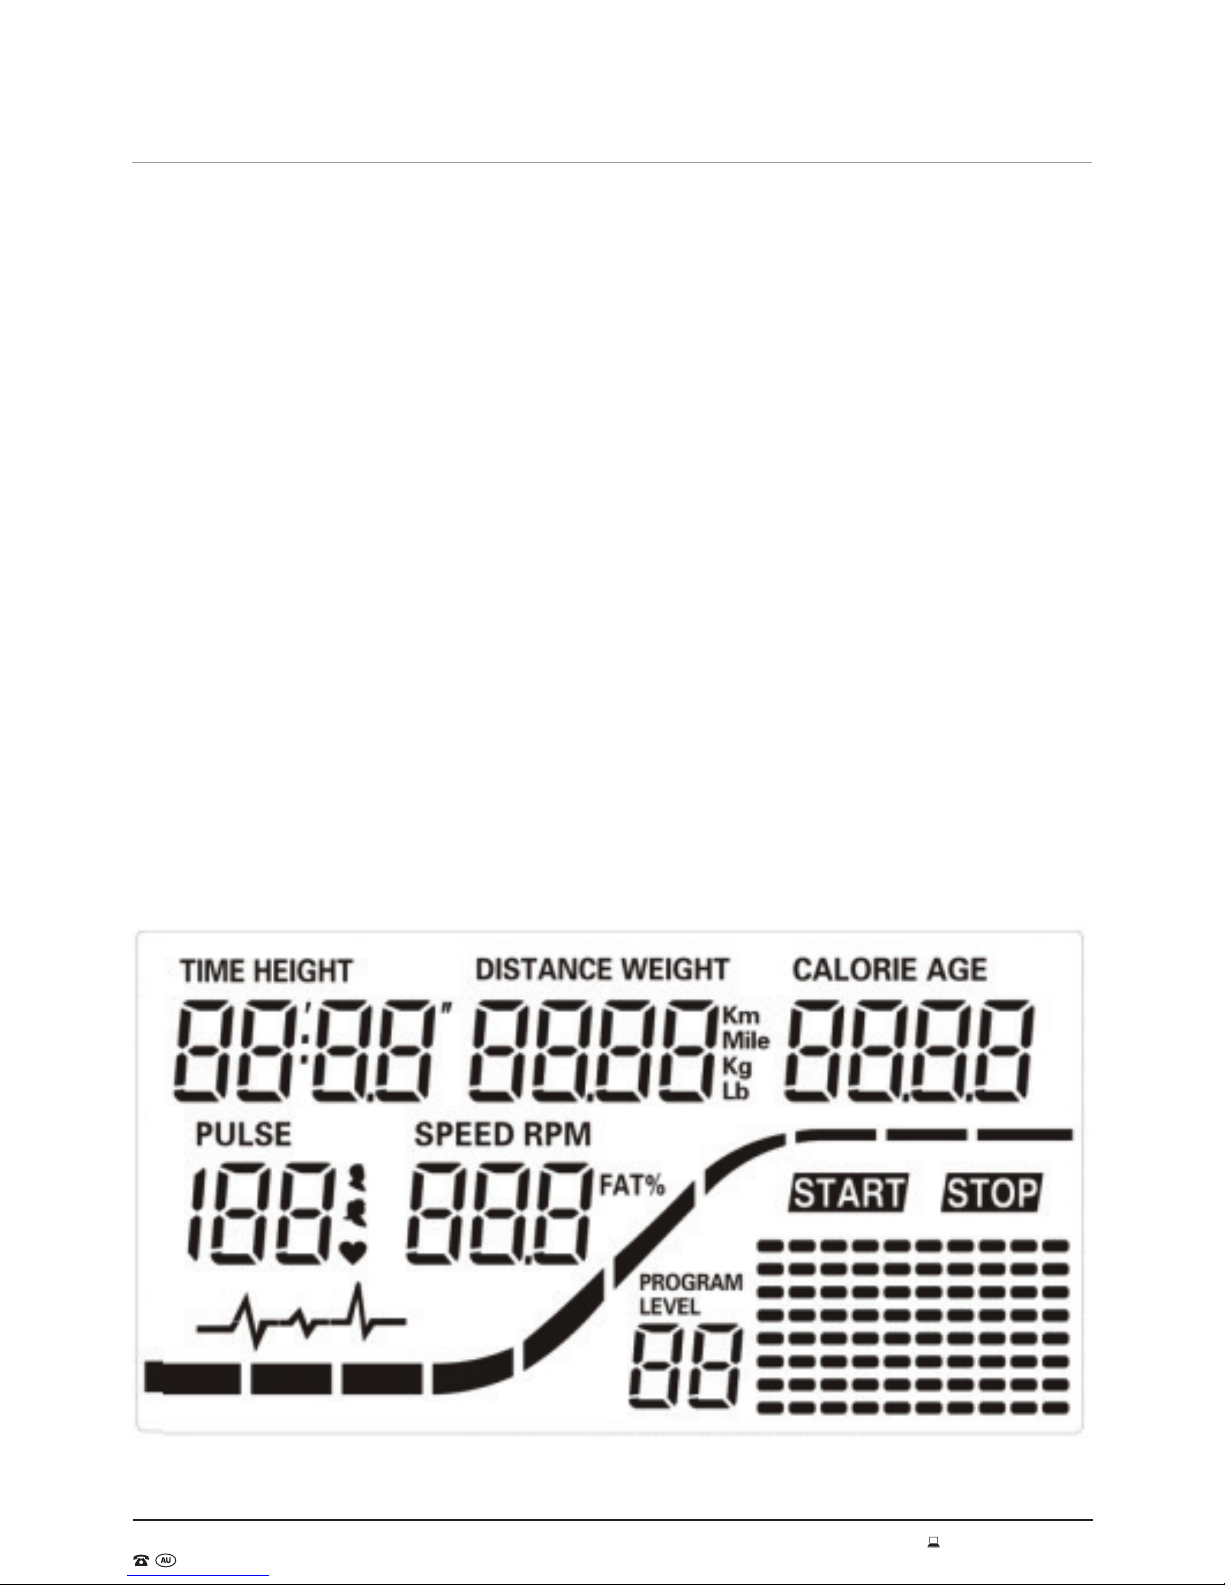
Console Operation
The things you should know before exercising
A. Input Power
Plug in the adaptor to the equipment then the computer will produce a beep sound and turn on
the computer at the manual mode.
B. Program select and setting value
1. Use the UP or DOWN to select program mode and then press ENTER to confirm your exercise mode.
2. Using manual mode, the computer will use the UP or DOWN to set up your exercise TIME, DISTANCE,
CALORIES, PULSE.
3. Press START/STOP to start exercise.
4. When you reach the target, the computer will produce beep sounds and then stop.
5. If you set up more than one target and you would like to reach next target, press START/STOP to continue
exercising.
C. Sleep Mode
The monitor will enter SLEEP mode (LCD off) when there is no signal input and no buttons being
pressed after 4 minutes. Press the screen to start the monitor.

MODEL: S002147
AFTER SALES SUPPORT
1800 465 070 16
Functions/Features
1. TIME: Shows your elapsed workout time in minutes and seconds. Your computer will automatically count up
from 0:00 to 99:59 in one second intervals. You can also program your computer to count down from a set
value by using the UP and DOWN. If you continue exercising once the time has reached 0:00, the computer will
begin beeping, and reset itself to the original time set, letting you know your workout is done.
2. DISTANCE: Displays the accumulative distance travelled during each workout up to a maximum of 999.0KM/
MILE.
3. RPM: Your pedal cadence.
4. SPEED: Displays your workout speed value in KM/MILE per hour.
5. CALORIES: Your computer will estimate the cumulative calories burned at any given time during your workout.
6. PULSE: Your computer displays your pulse rate in beats per minute during your workout.
7. AGE: Your computer is age-programmable from 10 to 99 years. If you do not set an age, this function will
always default to age 35.
8. TARGET HEART RATE (TARGET PULSE): The heart rate you should maintain is called your Target Heart Rate in
beats per minute.
9. PULSE RECOVERY: During the START stage, leave hands holding onto the grips and press “PULSE RECOVERY”
Time will start counting from 00:60 - 00:59 - - to 00:00. As soon as 00:00 is reached, the computer will show
your heart rate recovery status with the grade F1.0 to F6.0.
1.0 means OUTSTANDING
1.0 - 2.0 means EXCELLENT
2.0 - 2.9 means GOOD
3.0 - 3.9 means FAIR
4.0 - 5.9 means BELOW AVERAGE
6.0 means POOR
NOTE: If there is no pulse signal input, then the computer will show “P” on the PULSE window. If the computer
shows “ERR” on the message window, please re-press PULSE RECOVERY and make sure your hands are placed
well on the grips

MODEL: S002147
AFTER SALES SUPPORT
1800 465 070 17
Monitor Function
There are 6 functions on the Elliptical monitor.
1. START/STOP: a. Quick Start function: Allows you to start the computer without selecting a program. Manual
workout only. Time automatically begins to count up from zero
b. During the exercise mode, press to STOP exercise.
c. During the stop mode, press to START exercise.
2. UP: a. Press to increase the resistance during exercise mode.
b. During the setting mode, press to increase the value of Time, Distance, Calories, Age and
select Gender and Program.
3. DOWN: a. Press to decrease the resistance during exercise mode.
b. During the setting mode, press to decrease the value of Time, Distance, Calories, Age and
select Gender and Program.
4. ENTER: a. During the setting mode, press to accept the current data entry.
b. At the stop mode, by holding this for over two seconds, the user can reset all values to
zero or to the default value.
c. To set the Clock, press to set the current hour/minute.
5. BODY FAT: Press to input your height, weight, gender and age then to measure your body fat ratio,
6. PULSE RECOVERY: Press to activate heart rate recovery function.

MODEL: S002147
AFTER SALES SUPPORT
1800 465 070 18
Program Introduction & Operation
Manual Program: Manual
1. P1 is a manual program. User can start exercise by pressing START/STOP. The default resistance level is 5.
Users may exercise in any level of resistance by adjusting the UP/DOWN during the workout with a period of
time, number of calories or a certain distance.
Operations:
1. Use UP/DOWN to select the MANUAL (P1) program.
2. Press ENTER to enter MANUAL program.
3. The TIME key will flash and you can press UP or DOWN to set your exercise TIME. Press ENTER to confirm your
desired TIME.
4. The DISTANCE key will flash and you can press UP or DOWN to set your target DISTANCE. Press ENTER to
confirm your desired DISTANCE.
5. The CALORIES key will flash and you can press UP or DOWN to set the total amount of CALORIES you want to
burn. Press ENTER to confirm your desired CALORIES.
6. The PULSE key will flash and then you can press UP or DOWN to set your target PULSE ratio. Press ENTER to
confirm your desired PULSE.
7. Press START/STOP to begin exercise.
Preset Programs
PROGRAM 2 to PROGRAM 13 are preset programs. Users can exercise with different level of
loading in different intervals as the profiles show. Users may exercise in any desired level of
resistance by adjusting the UP/DOWN during the workout with a period of time, or a number of
calories or a certain distance.
Operations:
1. Use UP/DOWN to select one of the above programs from P2 to P13.
2. Press ENTER to enter your workout program.
3. The TIME key will flash and you can press UP or DOWN to set your exercise TIME. Press ENTER to confirm your
desired TIME.
4. The DISTANCE key will flash and you can press UP or DOWN to set your target DISTANCE. Press ENTER to
confirm your desired DISTANCE.
5. The CALORIES key will flash and you can press UP or DOWN to set the total amount of CALORIES you want to
burn. Press ENTER to confirm your desired CALORIES.
6. The PULSE key will flash and then you can press UP or DOWN to set your target PULSE. Press ENTER to
confirm your desired PULSE.
7. Press START/STOP to begin exercise.

MODEL: S002147
AFTER SALES SUPPORT
1800 465 070 19
User Setting Program
Programs 14 to 17 are the user setting programs. Users are free to create the values in the order of
TIME, DISTANCE, CALORIES and the resistance level in 10 columns. The values and profiles will be
stored in the memory after setup. Users may also change the ongoing loading in each column by
using
UP/DOWN, and they will not change the resistance level stored in the memory.
Operations:
1. Use UP/DOWN to select the USER program from P14 to P17.
2. Press ENTER to enter your workout program.
3. Column 1 will flash. Use UP/DOWN to create your personal exercise profile. Press ENTER to confirm your first
column of exercise profile.
4. Column 2 will flash. Use UP/DOWN to create your personal exercise profile. Press ENTER to confirm your
second column of exercise profile.
5. Follow the above description 5 and 6 to finish your personal exercise profiles. Press ENTER to confirm your
desired exercise profile.
6. The TIME key will flash and you can press UP or DOWN to set your exercise TIME. Press ENTER to confirm your
desired TIME.
7. The DISTANCE key will flash and you can press UP or DOWN to set your target DISTANCE. Press ENTER to
confirm your desired DISTANCE.
8. The CALORIES key will flash and you can press UP or DOWN to set the total amount of CALORIES you want to
burn. Press ENTER to confirm your desired CALORIES.
9. The PULSE key will flash and then you can press UP or DOWN to set your target PULSE. Press ENTER to
confirm your desired PULSE.
10. Press START/STOP to begin exercise.
Heart Rate Control Program
Program 18 to Program 22 is the Heart Rate Control Programs.
• Program 18 is the 55% Max H.R.C. - - Target H.R. = (220 – AGE) x 55%
• Program 19 is the 65% Max H.R.C. - - Target H.R. = (220 – AGE) x 65%
• Program 20 is the 75% Max H.R.C. - - Target H.R. = (220 – AGE) x 75%
• Program 21 is the 85% Max H.R.C. - - Target H.R. = (220 – AGE) x 85%
• Program 22 is the Target H.R.C. - - Workout by your target heart rate value.
Users can exercise according to your desired Heart Rate program by setting your AGE, TIME,
DISTANCE, CALORIES or TARGET PULSE. In these programs, the computer will adjust the resistance
level according to the heart rate detected. For example, the resistance level may increase every 20
seconds while the heart rate detected is lower than the TARGET H.R.C. Also the resistance level may
decrease every 20 seconds while the heart rate detected is higher than the TARGET H.R.C.
Program Introduction & Operation (cont)

MODEL: S002147
AFTER SALES SUPPORT
1800 465 070 20
Operations:
1. Use UP/DOWN to select one of the heart rate control program from P18 to P22.
2. Press ENTER to enter your workout program
3. The AGE key will flash at P18 to P21 programs and you can press UP or DOWN to set your AGE. The default
age is 35.
4. At program 22, the TARGET PULSE key will flash and you can press UP or DOWN to set your TARGET PULSE
between 80 to 180. The default TARGET PULSE is 120.
5. The TIME key will flash and you can press UP or DOWN to set your exercise TIME. Press ENTER to confirm your
desired TIME.
6. The DISTANCE key will flash and you can press UP or DOWN to set your target DISTANCE. Press ENTER to
confirm your desired DISTANCE.
7. The CALORIES key will flash and you can press UP or DOWN to set the total amount of CALORIES you want to
burn. Press ENTER to confirm your desired CALORIES.
8. Press START/STOP to begin exercise.
Body Fat Program
Program 23 is a special program designed to calculate users’ body fat ratio and to offer a specific
loading profile for users. There are 3 body types according to the FAT% calculated.
• Type 1: BODY FAT% > 27
• Type 2: BODY FAT% < 27 and > 20
• Type 3: BODY FAT % < 20
The computer will show the test results of FAT PERCENT, BMI and BMR.
Operations:
1. Use UP/DOWN to select the BODY FAT (P24) program.
2. Press ENTER to enter your workout program.
3. The HEIGHT key will flash and you can press UP or DOWN to set your HEIGHT. Press ENTER to confirm your
HEIGHT. The default HEIGHT is 170cm.
4. The WEIGHT key will flash and you can press UP or DOWN to set your WEIGHT. Press ENTER to confirm your
WEIGHT. The default WEIGHT is 70kgs.
5. The GENDER key will flash and you can press UP or DOWN to select your sex. Number 1 means male and
number 0 means female. Press ENTER to confirm your gender.
6. The AGE key will flash and you can press UP or DOWN to set your AGE. Press ENTER to confirm your AGE. The
default AGE is 35.
7. Press START/STOP to begin the body fat measurement. If E appears on the window, please make sure your
hands are attached to the grips tightly. Then press START/STOP again to begin body fat measurement.
8. Aer you have finished your measurement, the computer will show the values of BMR, BMI and FAT
PERCENTAGE on the LCD display. Furthermore, the computer will show your own exercise profile for your
body type.
9. Press START/STOP to begin exercise.
Program Introduction & Operation (cont)
Table of contents
Popular Elliptical Trainer manuals by other brands


biodex
biodex Semi-Recumbent Cycle Installation & operation manual

Precor
Precor Resolute RSL 310 Assembly guide

NordicTrack
NordicTrack NTCCEL16909.0 user manual

Skandika
Skandika ELSKLING E 520 Assembly instructions and user guide

Stamina
Stamina CT2.0 owner's manual

Horizon Fitness
Horizon Fitness EX-69 owner's manual


