ActionTec ScreenBeam SBT100U User manual

Wireless Display
Transmitter
User Guide
ScreenBeam USB
Transmitter
Model # SBT100U
rev. 1

Introduction 4
Features 5
System Requirements 5
Getting to Know the Transmitter 6
Connecting to a Receiver 7
Loading the Software 8
Pairing the Transmitter 11
Selecting a Wireless Channel 16
Setting Wireless Display Preferences 18
Preferences Window 18
Windows Viewing Conguration 21
Updating Software and Firmware 22
Frequently Asked Questions 28
2
Table of Contents

ScreenBeam USB Transmitter
Specications and Technical Support 32
Specications 32
Technical Support 34
3

Introduction
e ScreenBeam USB Transmitter (used in conjunction with a
ScreenBeam Series Wireless Display Receiver) wirelessly mirrors the
content on a Windows 7 or 8 computer to an HDTV monitor. With the
Transmitter, enjoy videos, photos, and movies on the best display
available, or share a laptop screen with a conference room projector. e
Transmitter supports up to 720p HD video, oering the convenience of
wireless technology without compromising the HD experience. And if the
computer being used does not support WiFi Miracast or Intel WiDi, the
Transmitter’s ScreenBeam Wireless Display soware supports computers
running Windows 7 and 8.
!
!
4

ScreenBeam USB Transmitter
Features
•Works with Windows 7 and 8 systems (see minimum system
requirements)
•Wirelessly streams movies, videos, photos, music, applications, etc.,
directly to an available HDTV monitor
•Beams presentations, spreadsheets, and collaboration projects directly
to an HDTV monitor or projector
•Directly connects with a ScreenBeam Receiver for better video quality;
does not interfere with existing Wi-Fi networks
•Operates in 5Ghz frequency for optimal mirroring experience
•Compatible with all models of ScreenBeam Receivers
•No existing wireless network or line of sight connection required
System Requirements
•Laptop or PC running Windows 7 or Windows 8 (32/64 bit)
•Minimum system requirements (for web browsing, presentations, or
slideshows):
✴Processor: AMD® A6 or Intel® Gen 3 Core™ i3 equivalent processor
✴Memory: 2GB RAM or more
✴Hard disk space: 150MB or more
✴Miscellaneous: available USB port
•Recommended system requirements(for video streaming):
✴Processor: AMD® A8 or Intel® Gen 3 Core™ i5 equivalent processor
✴Memory: 3 GB RAM or more!
5

Introduction
Getting to Know the Transmitter
e ScreenBeam USB Transmitter is used for non-Miracast or non-WiDi
laptops.
e USB Transmitter has a single USB connection, used to connect to a
USB port on a Windows 7/8 laptop computer not running Miracast or
WiDi. To connect with ScreenBeam Receivers, install the ScreenBeam
Wireless Display soware on the computer (see Loading the Soware on
page 8).
!
!
6

Connecting to a Receiver
If the computer being used does not have Miracast or WiDi enabled, the
ScreenBeam Wireless Display soware must be loaded onto the computer
connected the Transmitter, and then the Receiver must be paired to the
Transmitter. Make sure you have the following items handy:
●ScreenBeam USB Transmitter
●ScreenBeam Wireless Display soware CD
●A compatible computer running Windows 7 or 8
!
7

ScreenBeam USB Transmitter
Loading the Software
To load the ScreenBeam soware and connect the Transmitter to a
computer:
1. Insert the ScreenBeam CD into the CD drive of the computer.
2. An AutoPlay window appears. Click Run setup.exe, and then follow
the onscreen instructions.#
If the AutoPlay screen does not appear, locate the CD-ROM folder,
then double-click setup.exe. If the computer does not have a CD/
DVD drive, go to !
http://www.actiontec.com/products/sbupdate.php #
to download the soware.
3. A series of screens appears, detailing the steps to connect the
Receiver to an HDTV monitor. Click through them.
!
8

Connecting to a Receiver
4. When the screen shown below appears, insert the Transmitter into a
USB port on the computer. Click Next.
!
9

ScreenBeam USB Transmitter
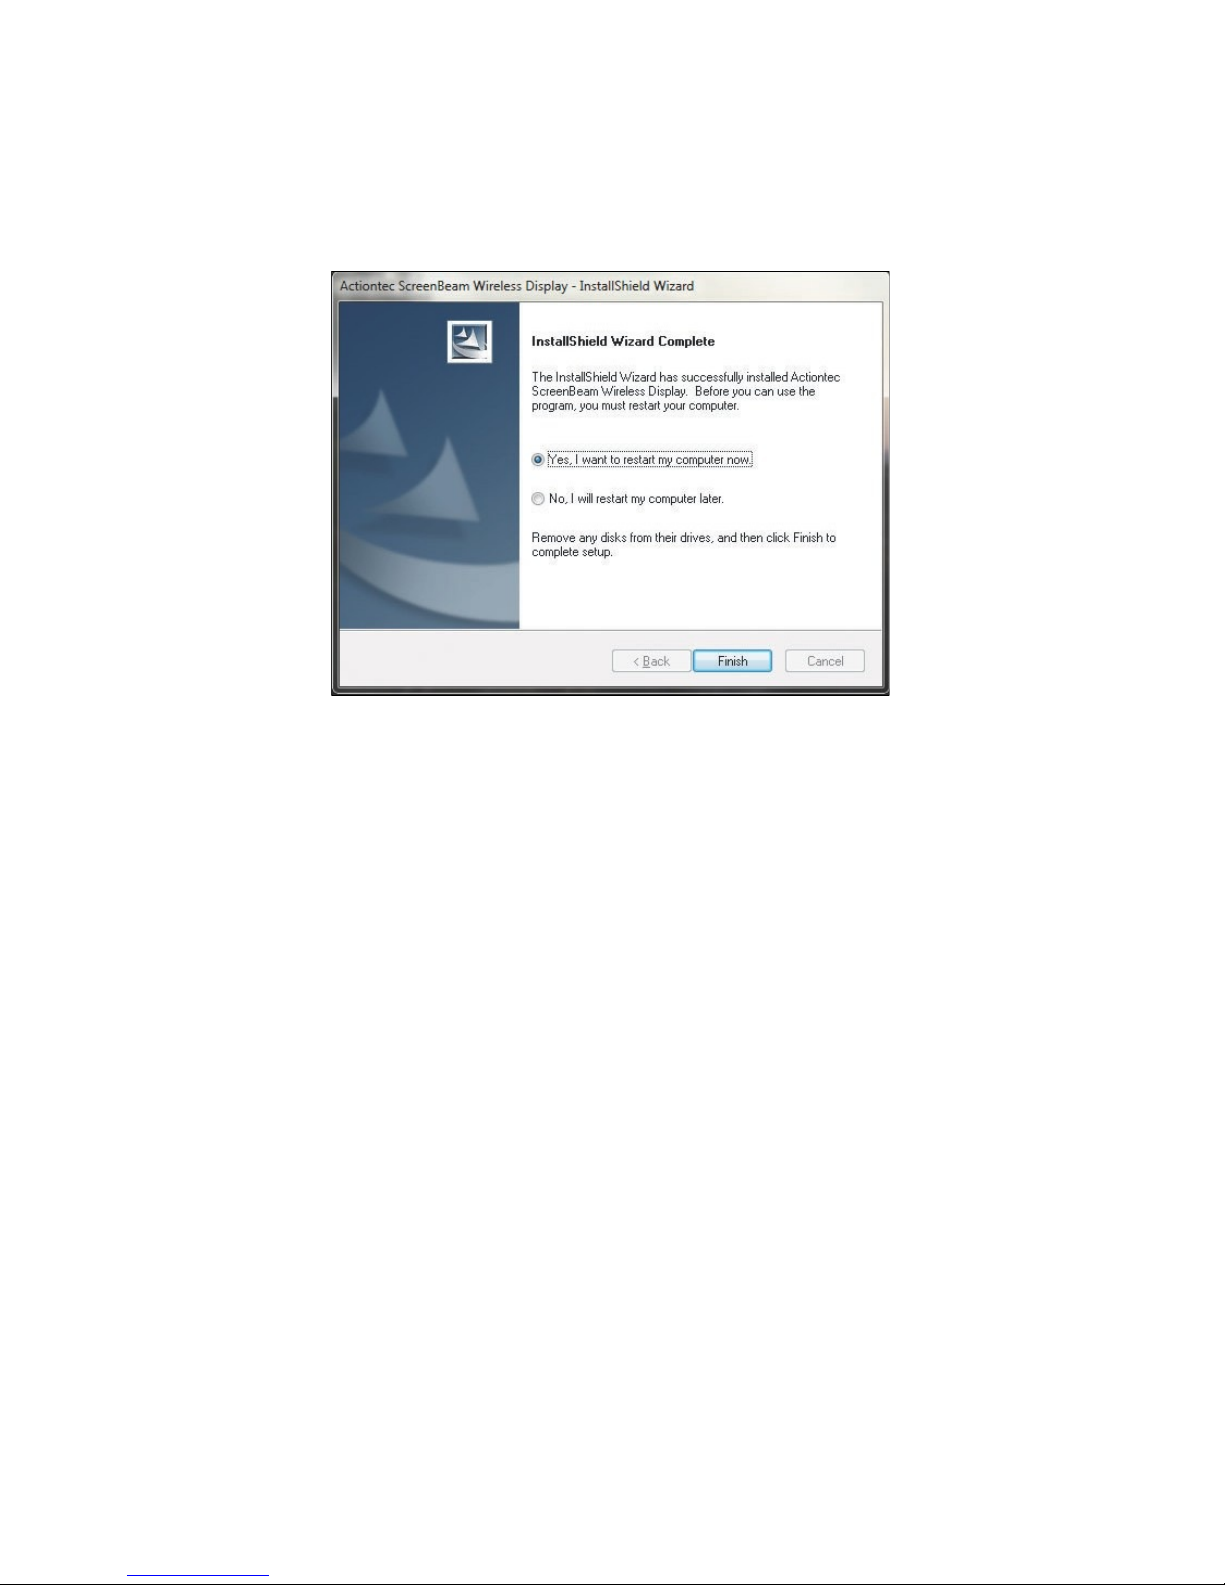
5. Click the button next to Yes, I want to restart my laptop/PC now, and
then click Finish.
e laptop/PC reboots. Aer it nishes rebooting, go on to the next
section.
!
10

Connecting to a Receiver
Pairing the Transmitter
Before pairing the Transmitter, make sure the Receiver is connected to an
HDTV monitor and powered on, and the Transmitter is connected to a
computer. To pair the Transmitter:
1. Aer the computer reboots, double-click the ScreenBeam Wireless
Display icon on the desktop.
!
11

ScreenBeam USB Transmitter
2. e ScreenBeam Wireless Display screen appears. Click Add a
Receiver.
Note: If the ScreenBeam Wireless Display screen is not displayed aer
the soware is launched, locate it in the Notication Area. Click the
ScreenBeam Wireless Display icon to display the main screen.
!
12

Connecting to a Receiver
3. e Add a ScreenBeam Receiver screen appears. Select the appropriate
Receiver, then click Connect.
!
13

ScreenBeam USB Transmitter
Note: A registration key may need to be entered before the Add a
ScreenBeam Receiver screen appears. e registration key is found in
the product packaging.
!
14

Connecting to a Receiver
4. A PIN (Personal Identication Number) appears on the HDTV
monitor connected to the Receiver. Enter the PIN in the Add a
ScreeBeam Receiver screen on the computer within 60 seconds, then
click Next.
e Receiver and Transmitter are now paired, and the computer’s screen
should be visible on the HDTV monitor.
15

ScreenBeam USB Transmitter
Selecting a Wireless Channel
e ScreenBeam soware provides wireless channel selection, which
allows the use of a specic channel (5GHz band) its for wireless
connection. To select a wireless channel:
1. Start the ScreenBeam Wireless Display soware, then click Add a
receiver from the main screen.
2. e Add a ScreenBeam Receiver window appears. Select a channel
from the Channel drop-down menu.
!
Note: When selecting a wireless channel, “Auto” is the
recommended choice. is setting allows the soware to
automatically select the clearest channel available.
4. Select the appropriate Receiver, then click Connect. e selected
channel will be used.
Note: is channel is used for adding a new Receiver.!
16

Connecting to a Receiver
Using Preferences
You can also dene a wireless channel from the Preferences window. To
select a wireless channel:
1. Make sure the computer is disconnected from the Receiver, then
open the ScreenBeam Wireless Display’s Preferences window.
2. Select the desired channel from the Wireless Channel list, then click
OK.
!
4. Reconnect the computer to the Receiver. e selected channel will
be used.
Note: e wireless channel conguration in the Preferences window
is used for persistence connection. Generally, “Auto” is
recommended.!
17

Setting Wireless Display
Preferences
is chapter details how to adjust the Transmitter’s wireless display
options. Most of these settings reside in the ScreenBeam Wireless Display
Preferences window.
Preferences Window
To open the ScreenBeam Wireless Display Preferences window, right-click
the ScreenBeam icon from the Notication Area of the computer’s
desktop. When the ScreenBeam options menu appears, click Preferences.
Note: Changing these preferences aects computers running Windows
7/8/8.1 only.
!
18

ScreenBeam USB Transmitter
Language
Select the language used by the ScreenBeam Wireless Display soware.
Wireless Channel
e wireless channel on which the Receivers operate can be changed here.
Auto is recommended; this setting automatically selects the clearest
channel available.
Display Content
Display Content allows Receivers to be congured for an optimal viewing
experience on the HDTV. By default, Video Playback is selected for
better video display. Select Presentation/Slideshow for a better still image
display.
Adjust Screen Size
Adjusting this slider changes the size of the picture on the HDTV
monitor. is is useful if the picture on the HDTV screen is
overscanned–that is, the picture looks too big to t on the screen. If this
occurs, adjust the slider until the entire picture appears on the HDTV
screen.
Enable Push Button Pairing
Activating this option allows devices or computers to connect with a
Receiver without having to enter a Personal Identication Number (PIN).!
19

Wireless Display Preferences
Enable Low Resolution Mode
Activating this option transmits a lower resolution picture to the HDTV
monitor, which can be useful when viewing video content (movies,
television shows, etc.).
Start ScreenBeam on Windows Startup
Activating this option causes the ScreenBeam Wireless Display soware
to start up anytime the laptop/PC is turned on or rebooted.
Restore Defaults
Click Restore defaults to reset all settings in the Preferences window to
their factory default settings.
Product Registration
Click Product Registration to display the Product Registration window.
Enter the correct information and click OK.
Note: e registration key can be found in the product packaging.
20
Table of contents
Other ActionTec Transmitter manuals
Popular Transmitter manuals by other brands

Altinex
Altinex DA1930CT user guide

Scott Instruments
Scott Instruments 4688IR Series Safety, Setup, Operation & Maintenance Manual

BFT
BFT PR2 installation manual

Cooper
Cooper Scantronic 735rEUR-50 installation guide

MTS Systems
MTS Systems LevelLimit Level Plus Operation manual

Sony
Sony DCC-FMT50U operating instructions

Endress+Hauser
Endress+Hauser HART iTEMP TMT182B operating instructions

Lightware
Lightware HDMI-TPS-TX210 user manual

Murphy
Murphy Pressure Transmitters PXT-01041B Specifications

Dometic
Dometic VT100WiFi Safety and installation instructions

Comet
Comet W0810P Instructions for use

Rosemount
Rosemount 8732E Quick installation guide