active fun HEALTH BOUNCE POD User manual
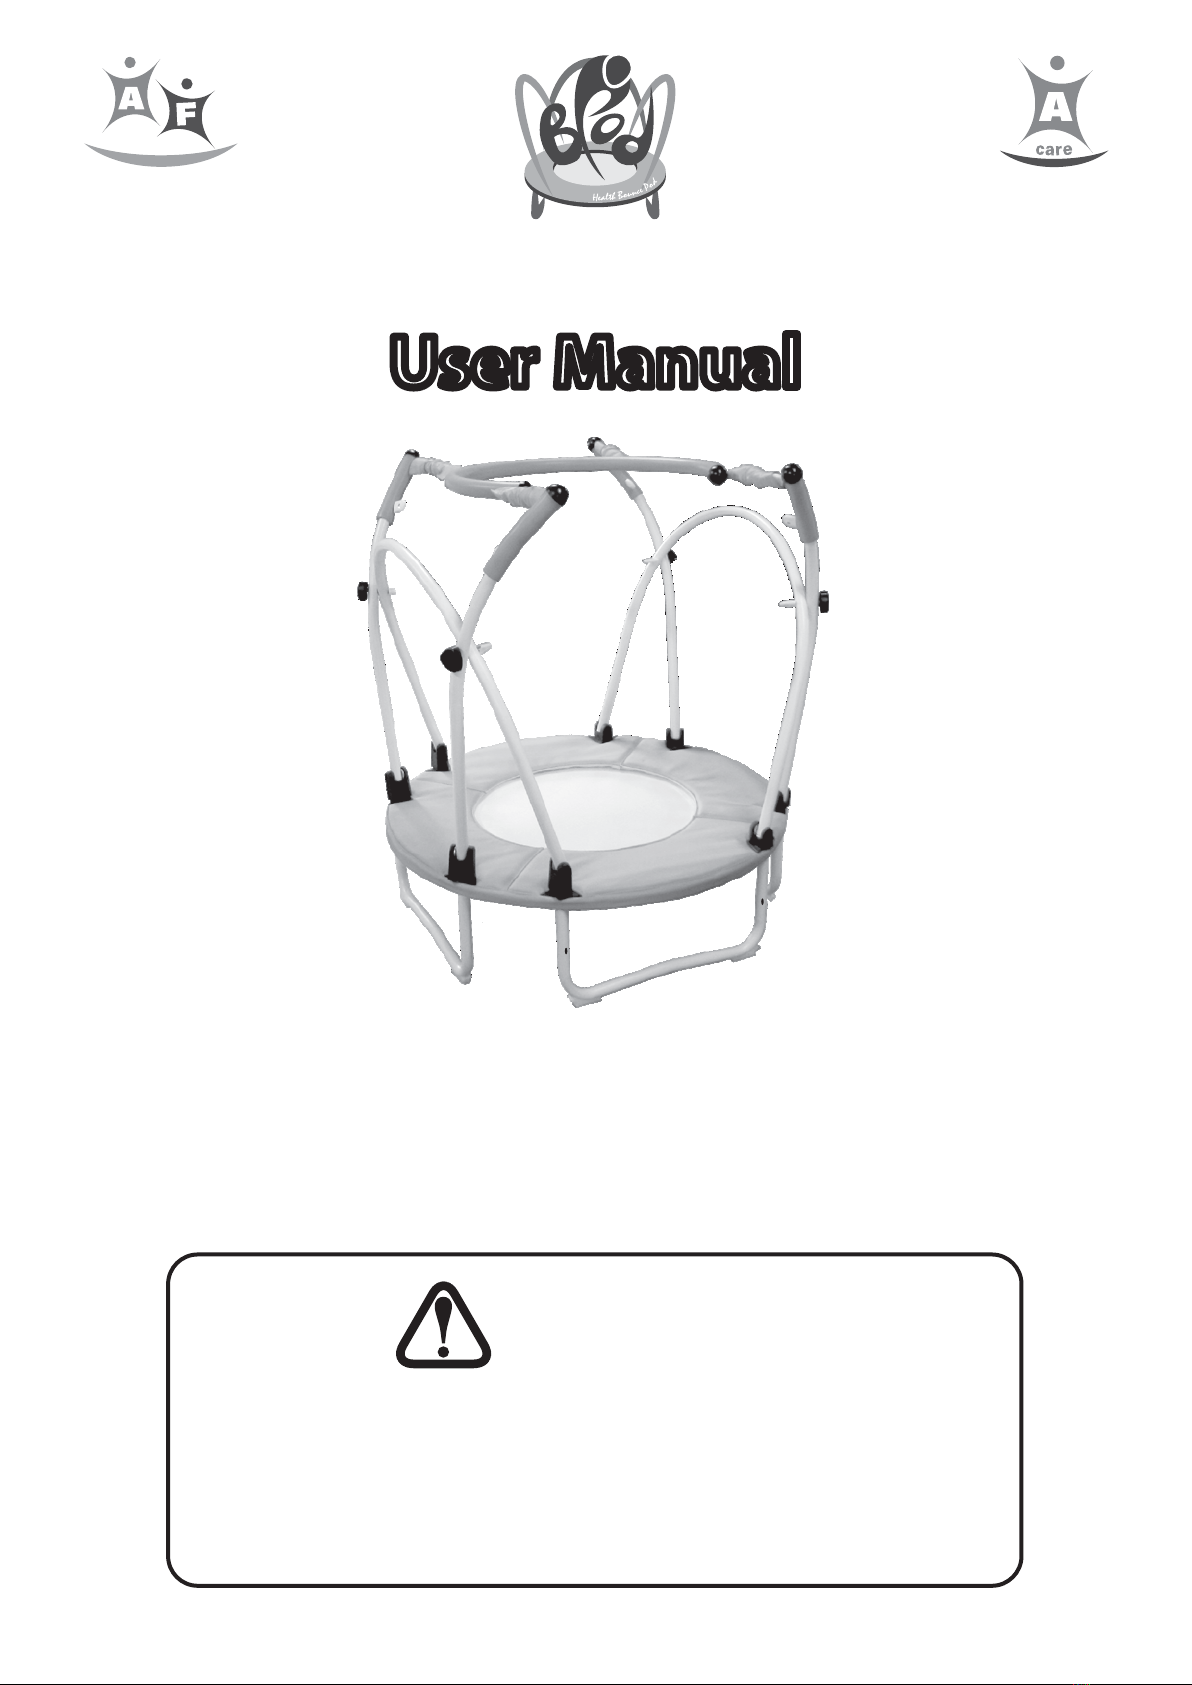
HEALTH BOUNCE POD™/ BPOD™
User Manual
WARNING
• Adult assembly required - small parts in the unassembled state.
• Choking hazard - small parts
THIS IS NOT A TOY. Keep away from children.
• Read these materials prior to assembling and using the Health
Bounce Pod™ / BPod™. Retain for future reference.
IMPORTANT: SAFETY INFORMATION IS CONTAINED IN THIS
MANUAL. PLEASE READ CAREFULLY TO AVOID INJURY.
REBOUND THERAPY
USE ONLY UNDER ADULT SUPERVISION.
ALSO AVAILABLE FROM ACTIVE CARE™ RANGE
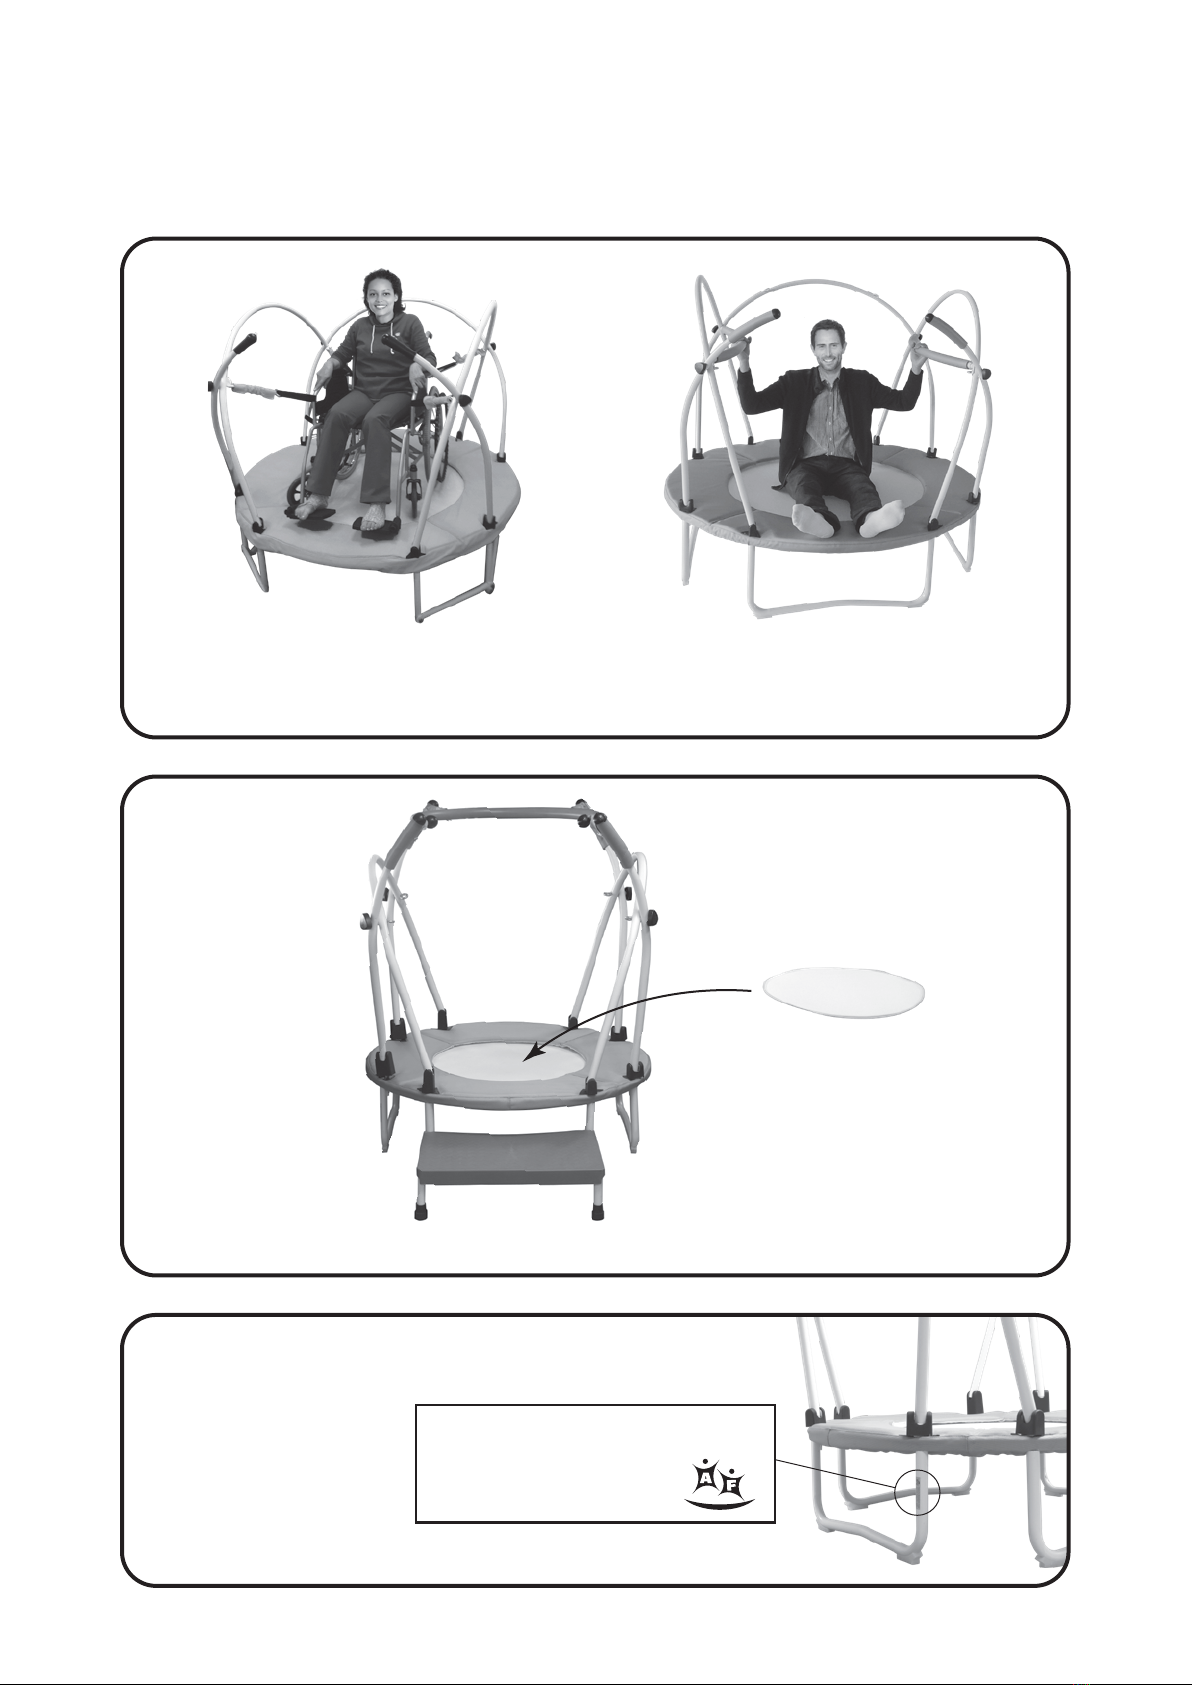
Suitable for wheelchair users.
Stepper
Removable surface snap-disc
Special construction for paraplegic users
HEALTH BOUNCE POD™ XL / BPOD™ XL: 5 feet diameter / maximum capacity 150 kg
ACCESSORIES FOR HEALTH BOUNCE POD™ / BPOD™
PROOF OF AUTHENTICITY
Your HEALTH BOUNCE POD™ /
BPOD™ has been
manufactured following very
strict requirements, using high
grade material. A UNIQUE
authentication number is
engraved on a plate, placed
along one of the U-shaped leg.
Do mention this code in case
of any question concerning
your HEALTH BOUNCE POD™ /
BPOD™.
CERTIFICATE OF AUTHENTICITY
ACTIVE FUN TRAMPOLINE
GEORGE NISSEN’S ORIGINAL
010007

CONTENTS
SAFETY INFORMATION 1
CARE & MAINTENANCE
USE 2
TOOLS 2
PARTS 2
ASSEMBLY 3-9
MAINTENANCE ADVICE
CHECKS BEFORE USE 10
VISUAL INSPECTION 10
TIGHTENING OF SCREWS & BOLTS 11
PLACING & ADJUSTING THE C-HOOP 13
EXERCISES & ROUTINES
POSITION YOURSELF ON THE HEALTH BOUNCE POD™ / BPOD™ 14
USEFUL TIPS and FAQ 16
EXERCISE DESCRIPTIONS 17
GETTING FAMILIAR WITH YOUR HEALTH BOUNCE POD™ / BPOD™
Starting position 18
1. C-Hoop Side Slide 18
2. C-Hoop Back Reach 18
3. Back Rest 18
4. Blind Rest 19
5. First Balance Exercise 19
6. Moving Around 19
BASIC EXERCISES
1. 2-Foot Bounce 20
2. Alternate Heel Lifts 21
3. Wide Leg Bounce 21
4. Side-to-Side Rocking 22
5. Low Jogging 22
6. Jumping Jacks 23
7. Low Kicks 23
SPECIAL EXERCISES
1. Standing 24
2. Sitting exercises 25
3. Standing Bouncing 26
COMBINED EXERCISES & ROUTINE EXAMPLES
1. Zen Jogging 27
2. Jog & Stretch 27
THE BENEFITS OF REBOUNDING: A SUMMARY 28

SAFETY INFORMATION
Consult with your physician prior to beginning this or any other exercise routine. Limit the time and
intensity of bouncing when rst starting. Slowly increase the amount of exercise over time. As with
any new form of exercise, muscles, joints, ligaments and tendons will adapt to new stresses slowly.
Hastening this process will result in injury.
1. Health Bounce Pod™ / BPod™ units are designed for exercise.
2. Health Bounce Pod™ / BPod™ is for use only under the supervision of a knowledgeable adult.
3. DO NOT attempt somersaults or other gymnastic/acrobatic type movements.
4. Permit only one individual at a time on the Health Bounce Pod™ / BPod™ unit.
5. DO NOT use the Health Bounce Pod™ / BPod™ unit under the inuence of drugs or alcohol.
6. In order to stop your bounce, ex your knees as your feet encounter the Health Bounce Pod™ / BPod™
jumping surface.
7. DO NOT use the Health Bounce Pod™ / BPod™ unit as a springboard to or from other objects.
8. Secure the Health Bounce Pod™ / BPod™ unit against unauthorized and unsupervised use.
9. Carefully enter the Health Bounce Pod™ / BPod™ unit. DO NOT JUMP ONTO OR OFF OF THE HEALTH
BOUNCE POD™ / BPOD™ UNIT.
10. DO NOT bounce too high or for too long. Always control your bounce.
11. THE PADDED C-HOOP HANDGRIP MUST ALWAYS BE ATTACHED WHEN USING THE HEALTH BOUNCE POD™
/ BPOD™ UNIT. Check to insure that all springs and eye bolts are in place and tightened securely.
12. ALWAYS hold on to the padded C-hoop handgrip when bouncing.
13. Caution! The C-hoop handgrip can help relieve some of the weight of the exerciser but is not designed
or tested to support full body weight in suspension.
14. Keep objects away that could interfere with user. Maintain adequate overhead clearance to avoid
injury. There must be no obstruction beneath the Health Bounce Pod™ / BPod™ unit.
15. Use only when the jumping surface is clean and dry. A wet surface is extremely slick and impedes the
controlled use of the unit. A worn jumping surface should be replaced immediately.
16. Wear footwear that will not slip on the jumping surface. Socks are not recommended since they may
slip on the jumping surface.
17. Take care to lift your feet when exiting the Health Bounce Pod™ / BPod™ to avoid catching feet on the
black surround padding.
18. Inspect the unit before each use and replace any worn, defective, or missing parts.
19. Springs on your Health Bounce Pod™ / BPod™ are high quality but they are subject to wear and tear.
This is dependent on the frequency of use and the weight of the person(s) using the Health Bounce
Pod™ / BPod™. You should monitor the performance of the mat and the C-hoop frame when exercising
and if you notice a drop in the spring tension, they should be replaced to keep your product safe and
peak performance.
20. It is the responsibility of the owner of the Health Bounce Pod™ / BPod™ unit to ensure that all
supervisors and users of the Health Bounce Pod™ / BPod™ unit are adequately informed of all warnings
and safety instructions.
21. Maximum weight permitted 120 kg.
22. Keep the Health Bounce Pod™ / BPod™ unit away from re and ames.
WARNING: Misuse and abuse of the Health Bounce Pod™ / BPod™ unit is dangerous and can cause
serious injuries. Using the Health Bounce Pod™ / BPod™ unit may expose you to the risk of serious
injury.
1

TOOLS
USE
(NOTE: After their use, remove the tools from any environment where children are likely to be present)
PARTS
Spring tool
Wrench Allen key
Middle level springs
and spring covers
x 4
Upper level springs
and spring covers
x 4
Knob
x 4
Plastic washer
x 12
U-shaped leg
x 3
Short leg
x 8
Allen screw
x 4
Eye bolt
x 4
Fig. 1
U-shaped leg with holes
x 1
CARE & MAINTENANCE
1. Always verify that the Health Bounce Pod™ / BPod™ jumping surface is clean and clear of any foreign
objects. The jumping surface may be cleaned using a damp towel. Dry the unit after cleaning.
2. Always replace any spring that has become stretched out of shape.
3. Springs on your Health Bounce Pod™ / BPod™ are high quality but they are subject to wear and tear.
This is dependent on the frequency of use and the weight of the person(s) using the Health Bounce
Pod™ / BPod™. You should monitor the performance of the mat and the C-hoop frame when exercising
and if you notice a drop in the spring tension, they should be replaced to keep your product safe and
peak performance.
4. Always make sure that the circular spring cover is attached securely to the frame. The spring cover may
be cleaned with soap and water. Dry the unit after cleaning.
5. Health Bounce Pod™ / BPod™ unit is for indoor use only. DO NOT USE OUTDOORS.
6. Make sure that spring covers are in place to avoid the possibility of pinching ngers.
1. DO NOT over-exercise. Slowly increase the amount of exercise over time.
2. Use the Health Bounce Pod™ / BPod™ as depicted in Figure 1 when exercising.
3. Always hold on to the padded C- hoop handgrip when bouncing.
4. DO NOT attempt somersaults, or any other gymnastic/acrobatic type
movements.
5. DO NOT jump too high or allow unit to tip.
Caution! The C-hoop handgrip can help relieve some of
the weight of the exerciser but is not designed or tested
to support full body weight in suspension.
2
ASSEMBLY
PRIOR TO ASSEMBLY:
1. The Health Bounce Pod™ / BPod™ must be placed on a level surface.
2. Adequate overhead and horizontal clearance of objects and any possible hazards must be
maintained.
3. Verify that there is absolutely no obstruction underneath the Health Bounce Pod™ / BPod™
unit.
4. It is recommended to use gloves to protect your hands during assembly.
Remove unit from box. Do not cut any of
the plastic ties that hold the arches and
support arms in place.
Place unit on oor so that springs face up.
Cut the plastic ties that hold the C-hoop
and Styrofoam packaging material in
place and remove the C-hoop.
Note that there are eight (8) nuts that hold
the arches & support arms in place.
These will be removed and discarded one
at a time in Step 2.
While holding the anchor bolt in place
with your index nger, remove one
corresponding nut with the wrench.
Continue to hold the bolt in place. Keep
the nuts for future transport.
Screw one short leg onto the anchor bolt
while holding the bolt in place.
Do not fully tighten short legs until
Step 12. Attach remaining 7 short legs.
Step 1
Step 2
3
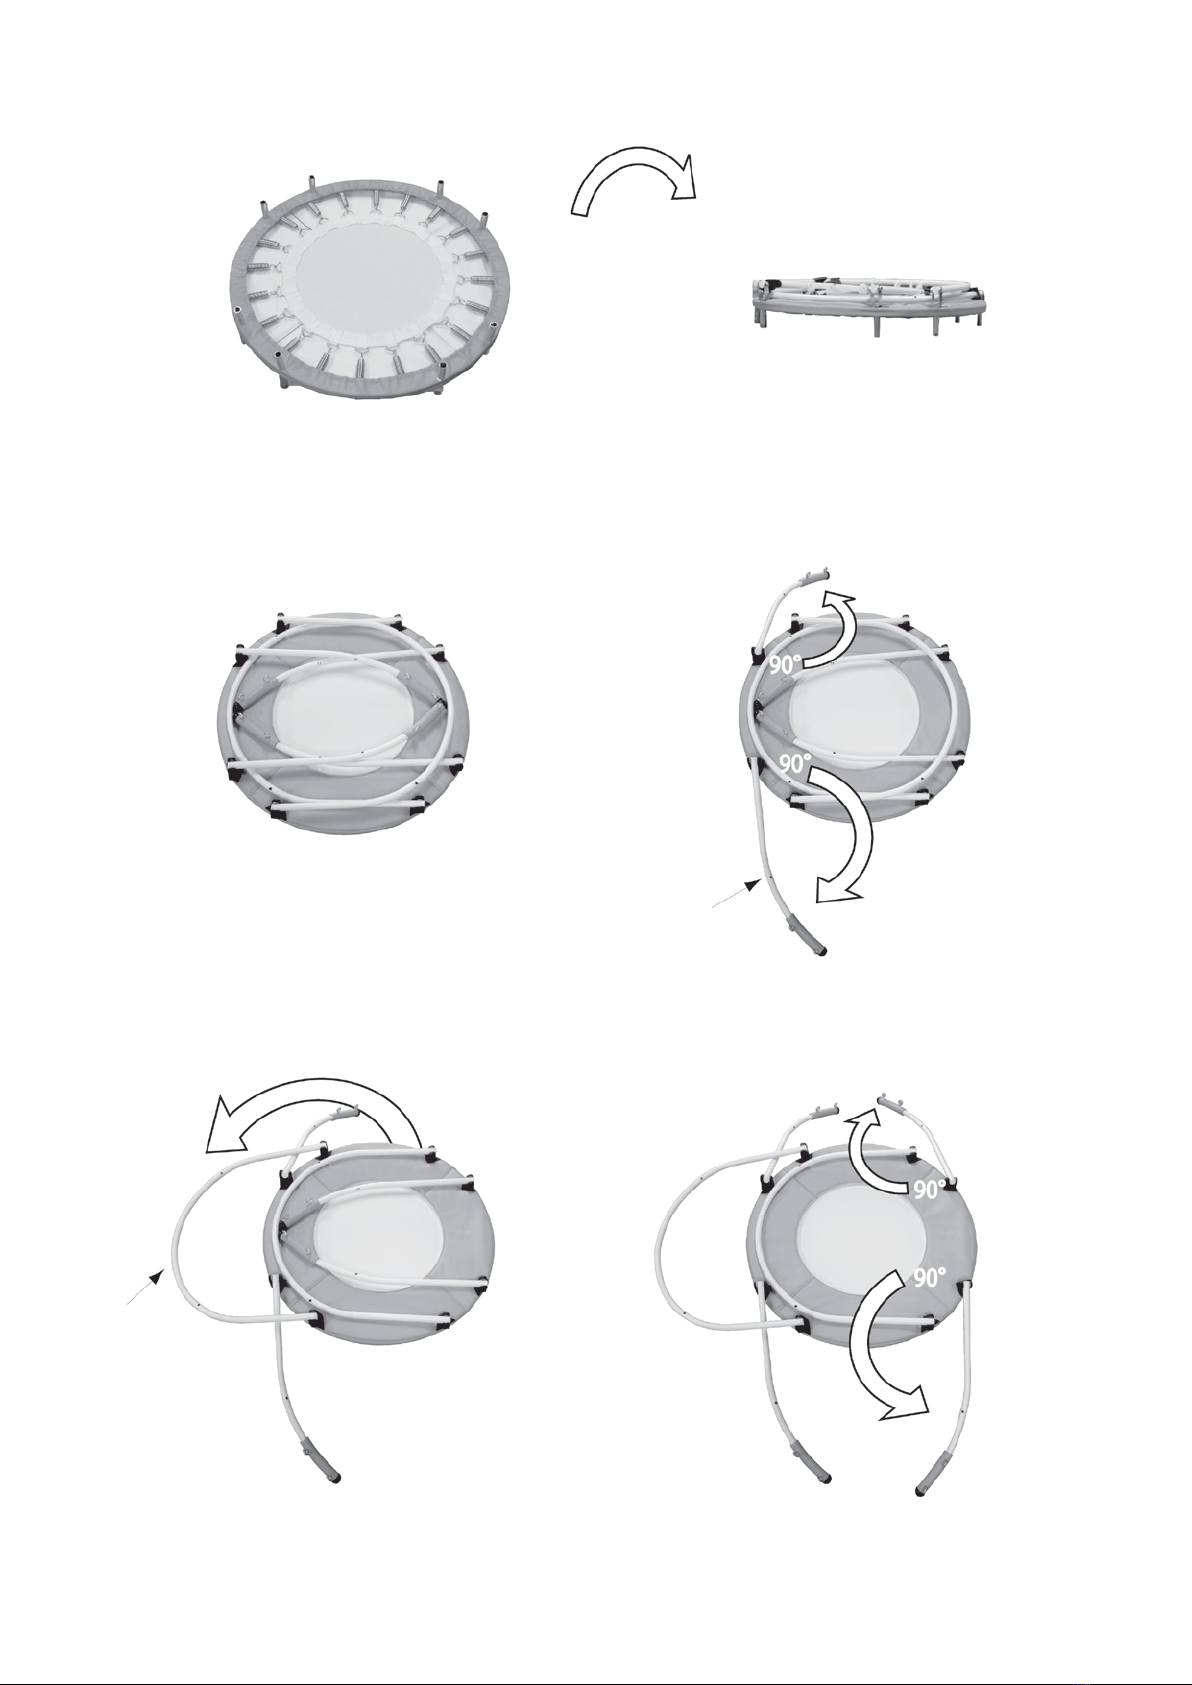
With 8 short legs attached, turn the unit over.
Remove the plastic ties that hold the
arches and support arms in place.
Lift topmost arch up and over.
Allow it to rest on top of the support arms.
Rotate the two remaining support
arms 90 degrees.
Rotate the two top
support arms 90
degrees.
Step 3
Step 4
Step 5
Support arm
Arch
4
Raise bottom arch to upright position.
Attach the support arm to the
arch with a bolt and knob.
Raise the other arm and align
its hole with the
corresponding arch hole.
Attach the support arm to the
arch with a bolt and knob.
Raise one support arm and align its hole with
the corresponding hole in the upright arch.
Knob is facing outward.
Step 6
Step 7
Step 8
5
To secure the connection, use
washers between eye bolt and
arch, arch and support arm,
support arm and knob.

Raise the other arch
and hold it in place.
Raise up one support
arm and hold it against
the upright arch.
Align the hole in the arm with the
corresponding hole in the arch.
Raise the remaining support arm and align its
hole with the corresponding hole in the arch.
Attach the support arm to the
arch with a bolt and knob.
Attach the support arm to the
arch with a bolt and knob.
Step 9
Step 10
Step 11
6
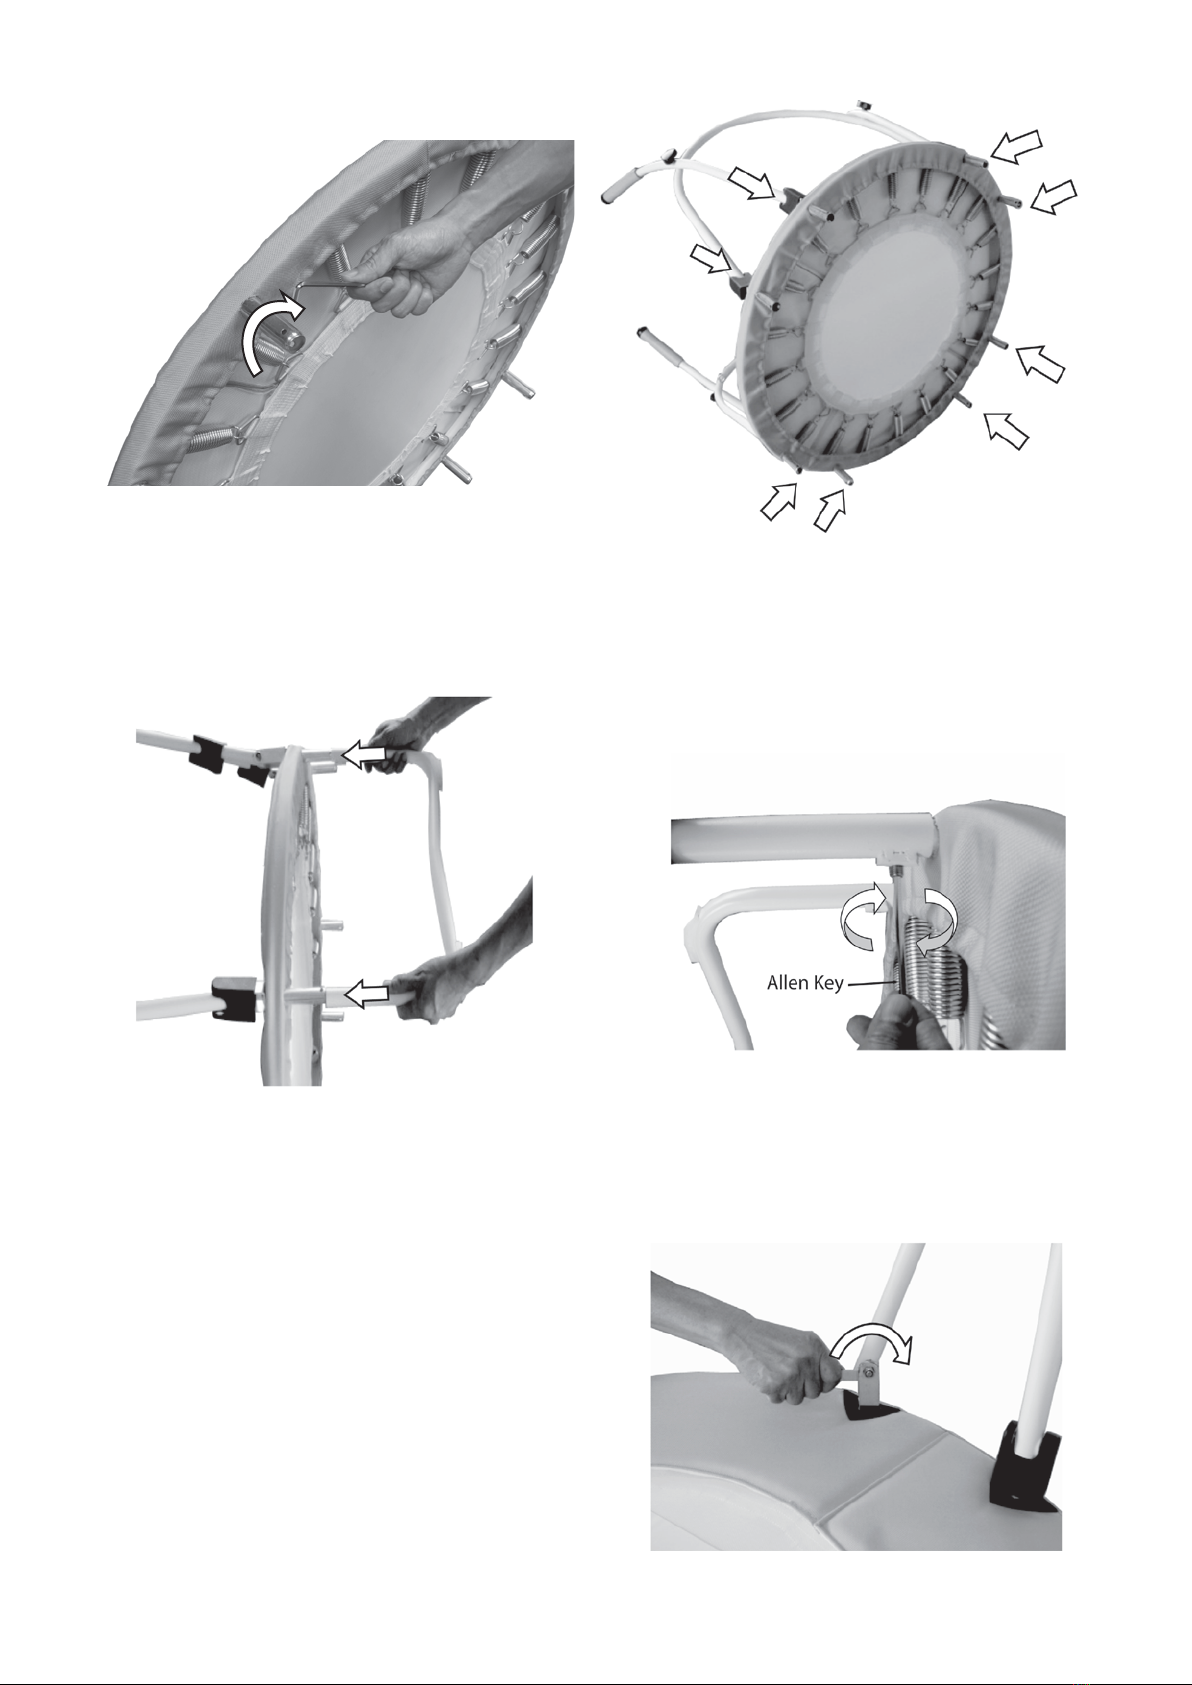
Tighten each short leg.
Insert the Allen key through the hole at
the bottom of the leg for added leverage.
Use the wrench to tighten the nuts on all hinges.
Insert U-shaped legs into short legs.
The U-shaped leg with holes, must be
placed at the opening.
Tighten the remaining 7 short legs.
With holes of Allen nuts facing inward, secure the
U-shaped legs to the short legs with Allen screws.
Step 12
Step 13
Step 14
7

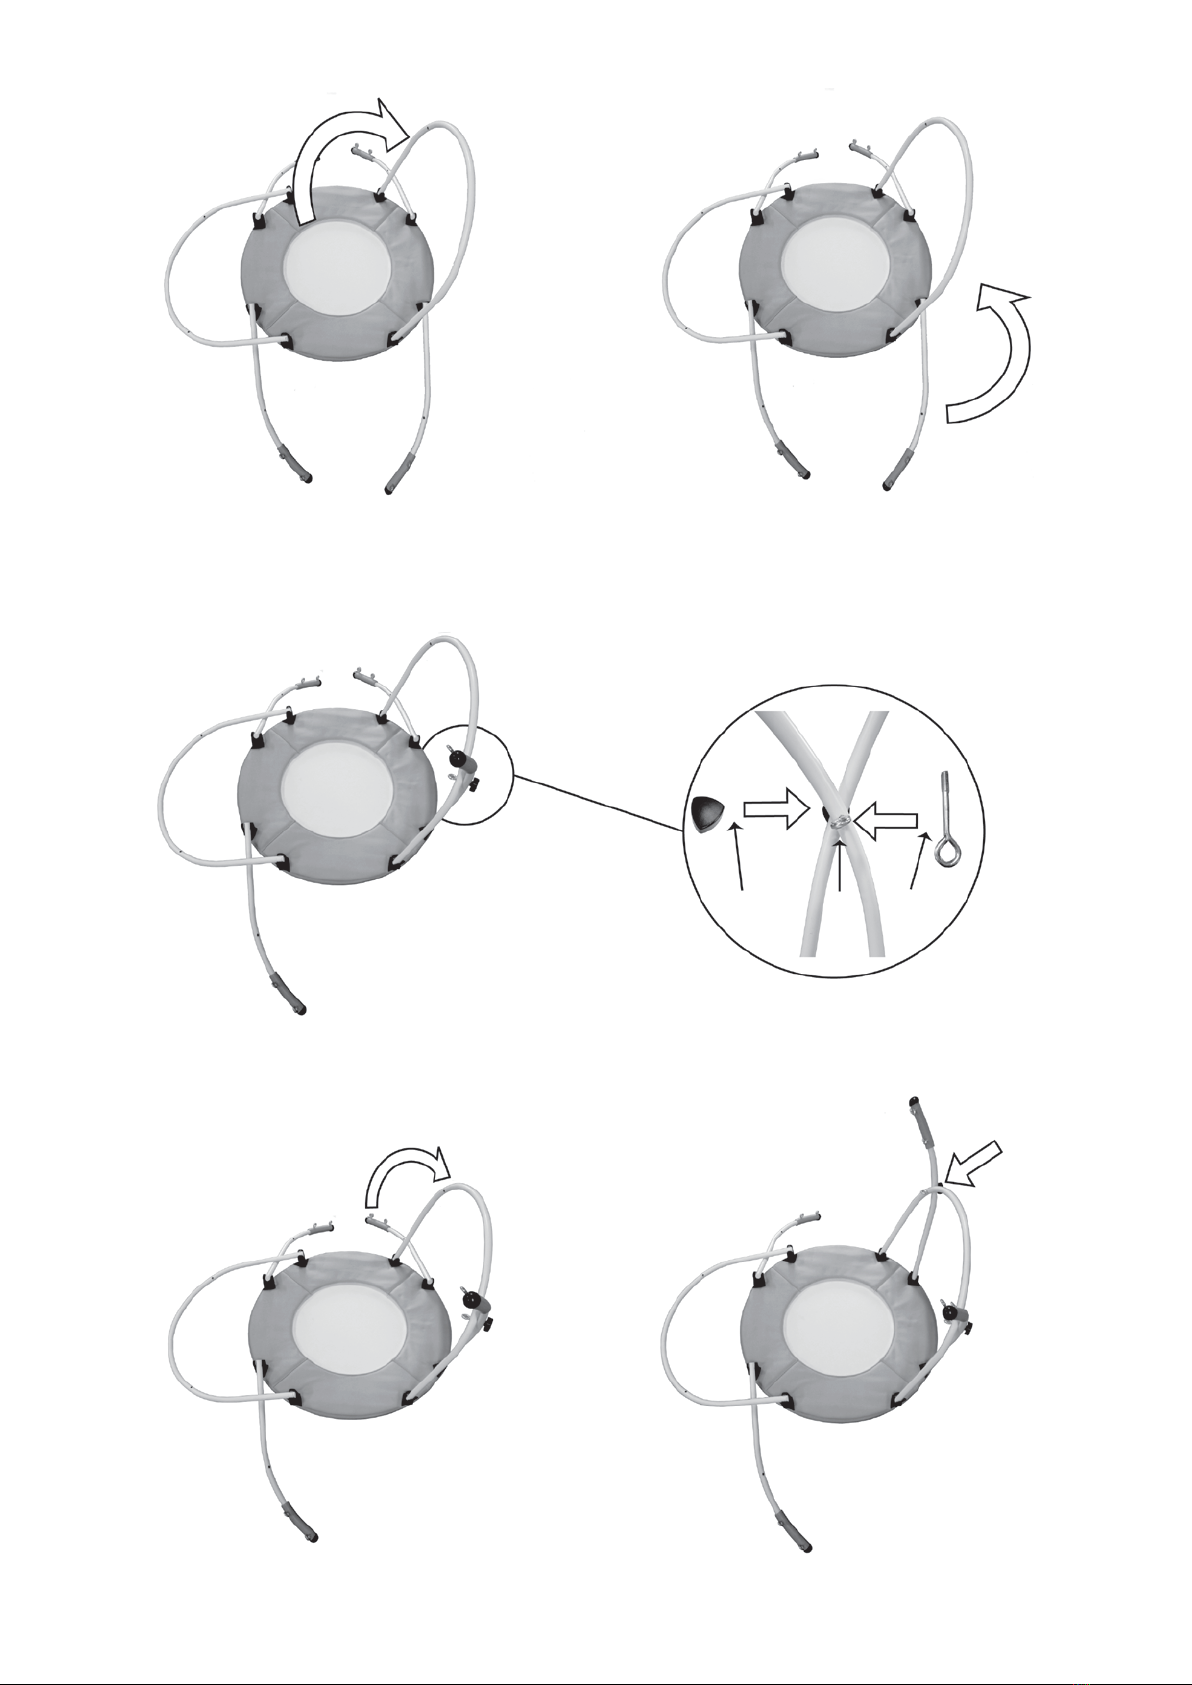
Slide a hinge cover down to cover a metal hinge.
Use two springs to attach the padded C-hoop
handgrip to the support arm rings.
Attach two springs to the ends of the C-hoop
handgrip and to the two other support arm rings.
Firmly grasp the spring (Pic 1)
OR
Use the spring tool (Pic 2) to attach the springs
Repeat for the remaining hinge covers.
Step 15
Step 16
Step 17
Pic 1
Pic 2
8
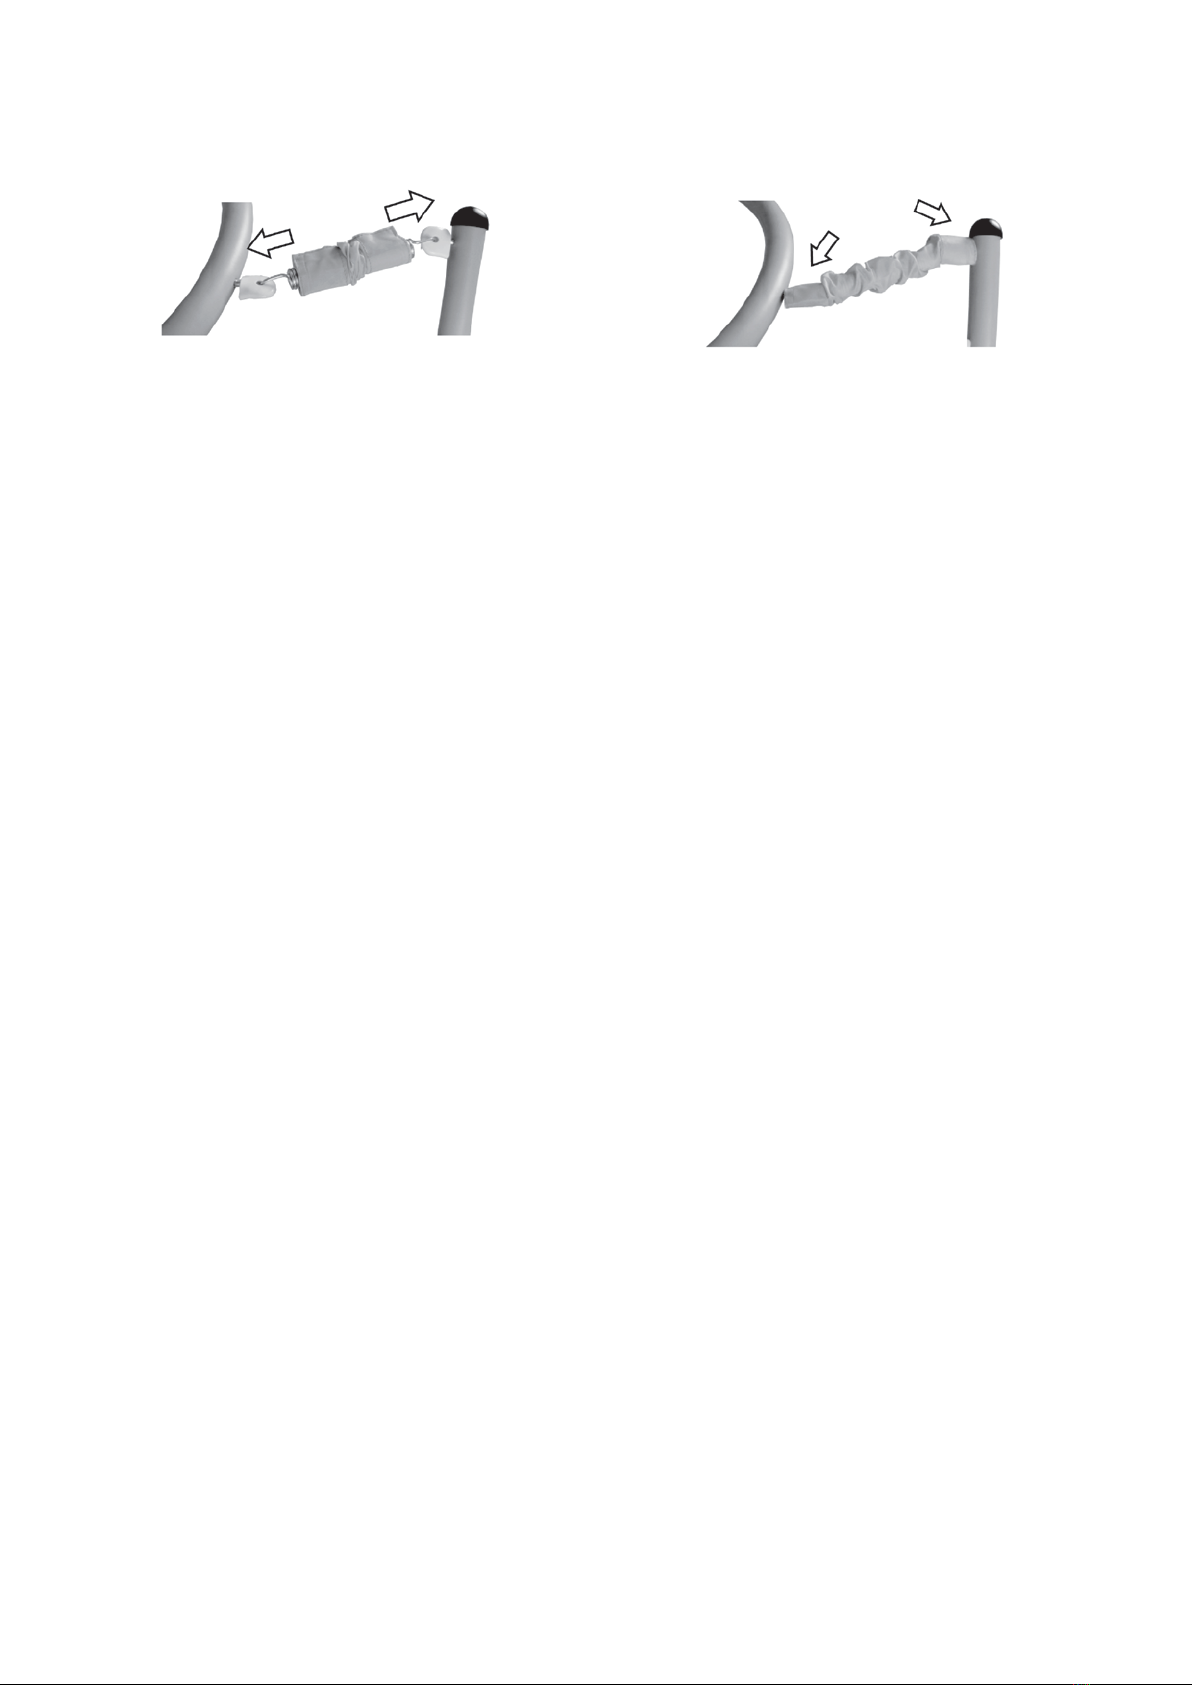
Slide the spring cover over the entire spring. Cover the rings on both the C-hoop handgrip and
the support arms. Repeat for all springs.
Step 18
After assembly, ensure all nuts, bolts, knobs and legs are fully tightened.
Diameter: 96 cm Overall height: 111cm Mat height: 27 cm
9

Please perform the following checks before using your Health Bounce Pod™ / BPod™.
Checks should be routinely performed. We suggest performing these checks thoroughly, especially
if you have not used your Health Bounce Pod™ / BPod™ for a while.
• Verify that your Health Bounce Pod™ / BPod™ is always set up in a at and stable area.
• Do your utmost to use suitable tools in order to prevent damage to any parts.
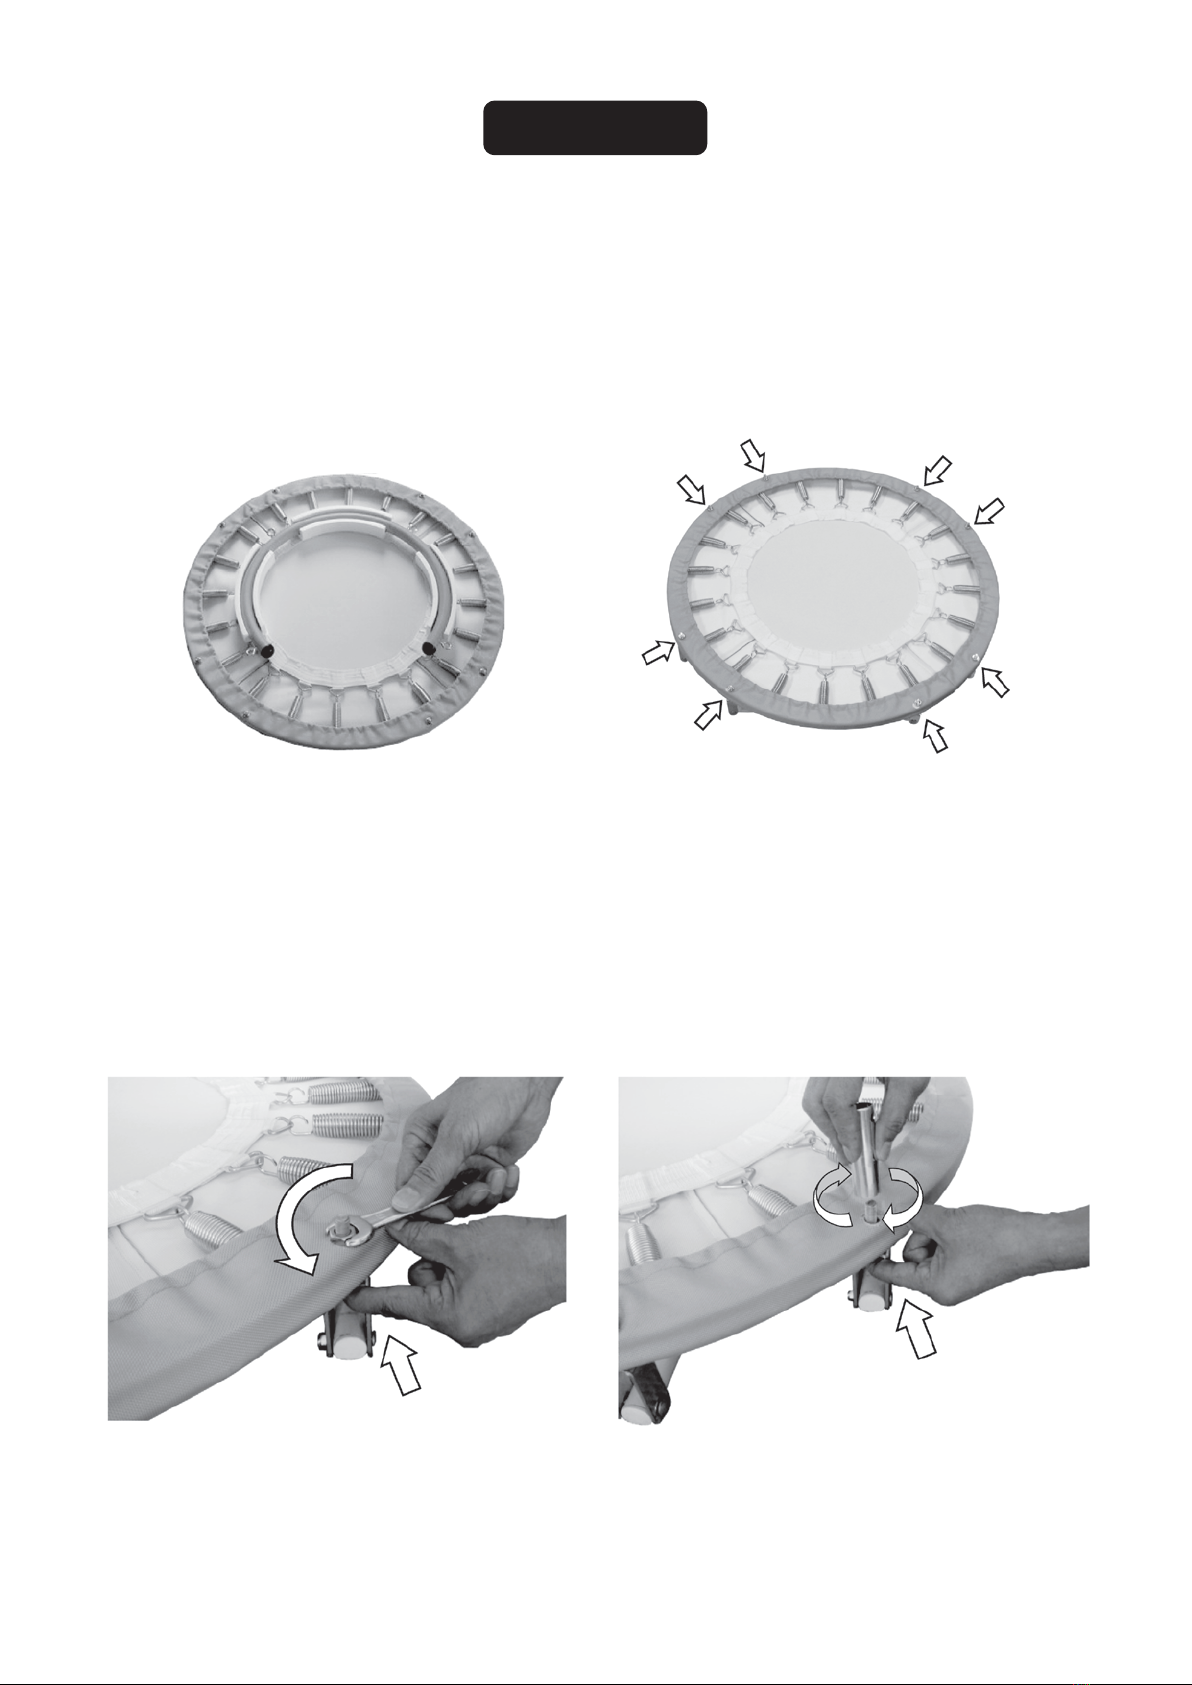
VISUAL INSPECTION
• Check that the bouncing mat is not damaged: in particular, check for cuts, and damaged
sewing thread.
Inspect both the top and bottom surfaces of the mat.
• Verify that no spring connectors are missing, broken or damaged.
• Check under the bouncing mat to ensure that no springs are broken or un-hooked.
10
Visual inspection
Spring connector
Spring
No tear or damage
MAINTENANCE ADVICE
CHECKS BEFORE USE

TIGHTENING OF SCREWS & BOLTS
• For your safety, as well as to ensure optimal comfort while using the Health Bounce Pod™ /
BPod™, please check that all screws and bolts are properly tightened.
Proceed in the order described below.
These checks are performed with the arches up and in place.
– Place the Health Bounce Pod™ / BPod™ on its side and undo the U-shaped legs by
removing the Allen screws (one screw per leg).
– Slide the U-shaped legs out.
Note: If you have not removed the legs for a while, the legs may be hard to remove: it is OK to use a
rubber mallet to assist in sliding the legs out of the short legs.
If you do not have a rubber mallet, you may use a regular hammer, but you must also place a
cloth on the surface of the tube at the point of impact to protect the tube and for a more
eective result.
Alternate blows from one side to the other, working progressively.
The legs will move slowly but steadily.
It is normal to experience resistance: it may be the result of a slight bend, leading to
misalignment that hinders sliding.
11
Use rubber mallet to dislodge
the U-shaped legs
Alternate blows from one side of
the U-shaped legs to the other.
It is recommend to use a cloth to
protect the tube when dislodging
Turn the bottom of unit to the
side for inspection
Remove Allen screws from U-shaped legs

Tighten the hinges at the
base of the arch.
Remember to put the
plastic covers in place.
– Once the legs are out, tighten the
short legs using the Allen key.
Do not hesitate to rmly tighten the
short legs.
– Once all the 8 short legs have
been tightened, put the
U-shaped legs back in place.
Remember to secure with Allen
screws, using the Allen key.
– Next, using the wrench, tighten
the hinges placed at the base of
the arches.
12
Use Allen key to
tighten the 8
short legs
– The next step is to tighten the 4 knobs and 8 eye bolts holding the C-hoop springs.
Hand tighten the 4 knobs and 8 eye bolts
Knobs
Knobs
Eye bolts
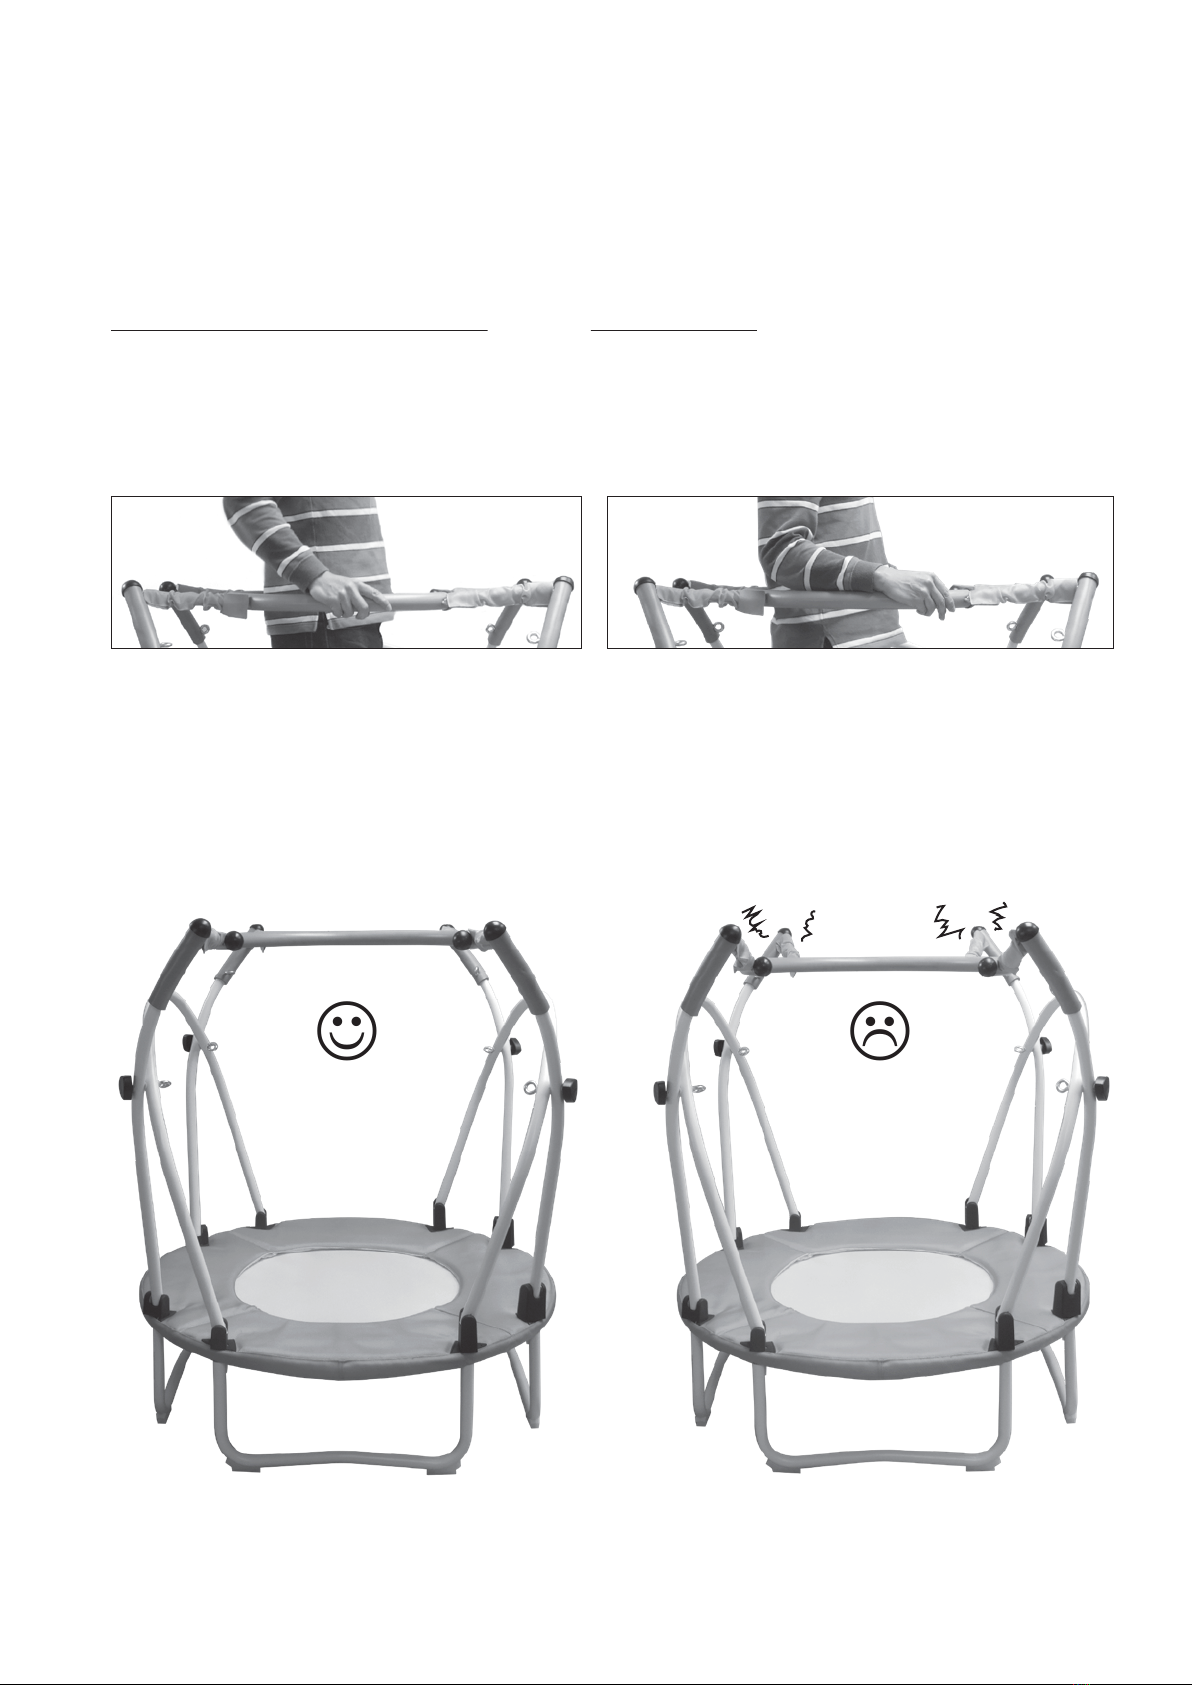
At this stage, the legs and arches should be tight. The structure should not feel at all wobbly.
PLACING & ADJUSTING THE C-HOOP
The C-hoop is a very important part of the Health Bounce Pod™ / BPod™, as it provides exible yet
rm support.
It helps the user maintain his or her balance, while providing excellent resting support. It is also a
solid anchor for more advanced bounces & stretches.
User may choose from 2 height levels, as well as 2 spring lengths.
There is no hard and fast rule for choosing height and spring length: the process is rather
trial-and-error and calls for some common sense to be applied.
Generally speaking, once in place, the hoop should either be below or level with the user’s elbow.
While tension is also a personal choice, it is generally advised to adjust the hoop to feel slightly
springy rather than loose.
When initially adjusting the C-hoop, rst use the shorter set of springs on the lower position
and/or the longer set of springs on the upper position.
13
C-hoop at elbow levelC-hoop below elbow
A good, rm tension is recommended
Place your hands on the opening arches. You can step on the protective padding to enter.
Your Health Bounce Pod™ / BPod™ is primarily a rebounder, designed to help you rebound in the
safest possible manner.
However, thanks to the resilient mat’s nature and properties, the Health Bounce Pod™ / BPod™ may
be used as an exercise station to perform basic stretching movements.
Some of the exercises and suggestions described below may not apply to users in peak physical
condition, for whom they may be too basic.
However, they are likely to be very suitable for users suering from pains in the joints and
articulation, or recovering from surgery.
In all cases, ONLY PERFORM PHYSICAL ACTIVITY IN ACCORDANCE
WITH YOUR LEVEL OF COMFORT AND CURRENT ABILITIES.
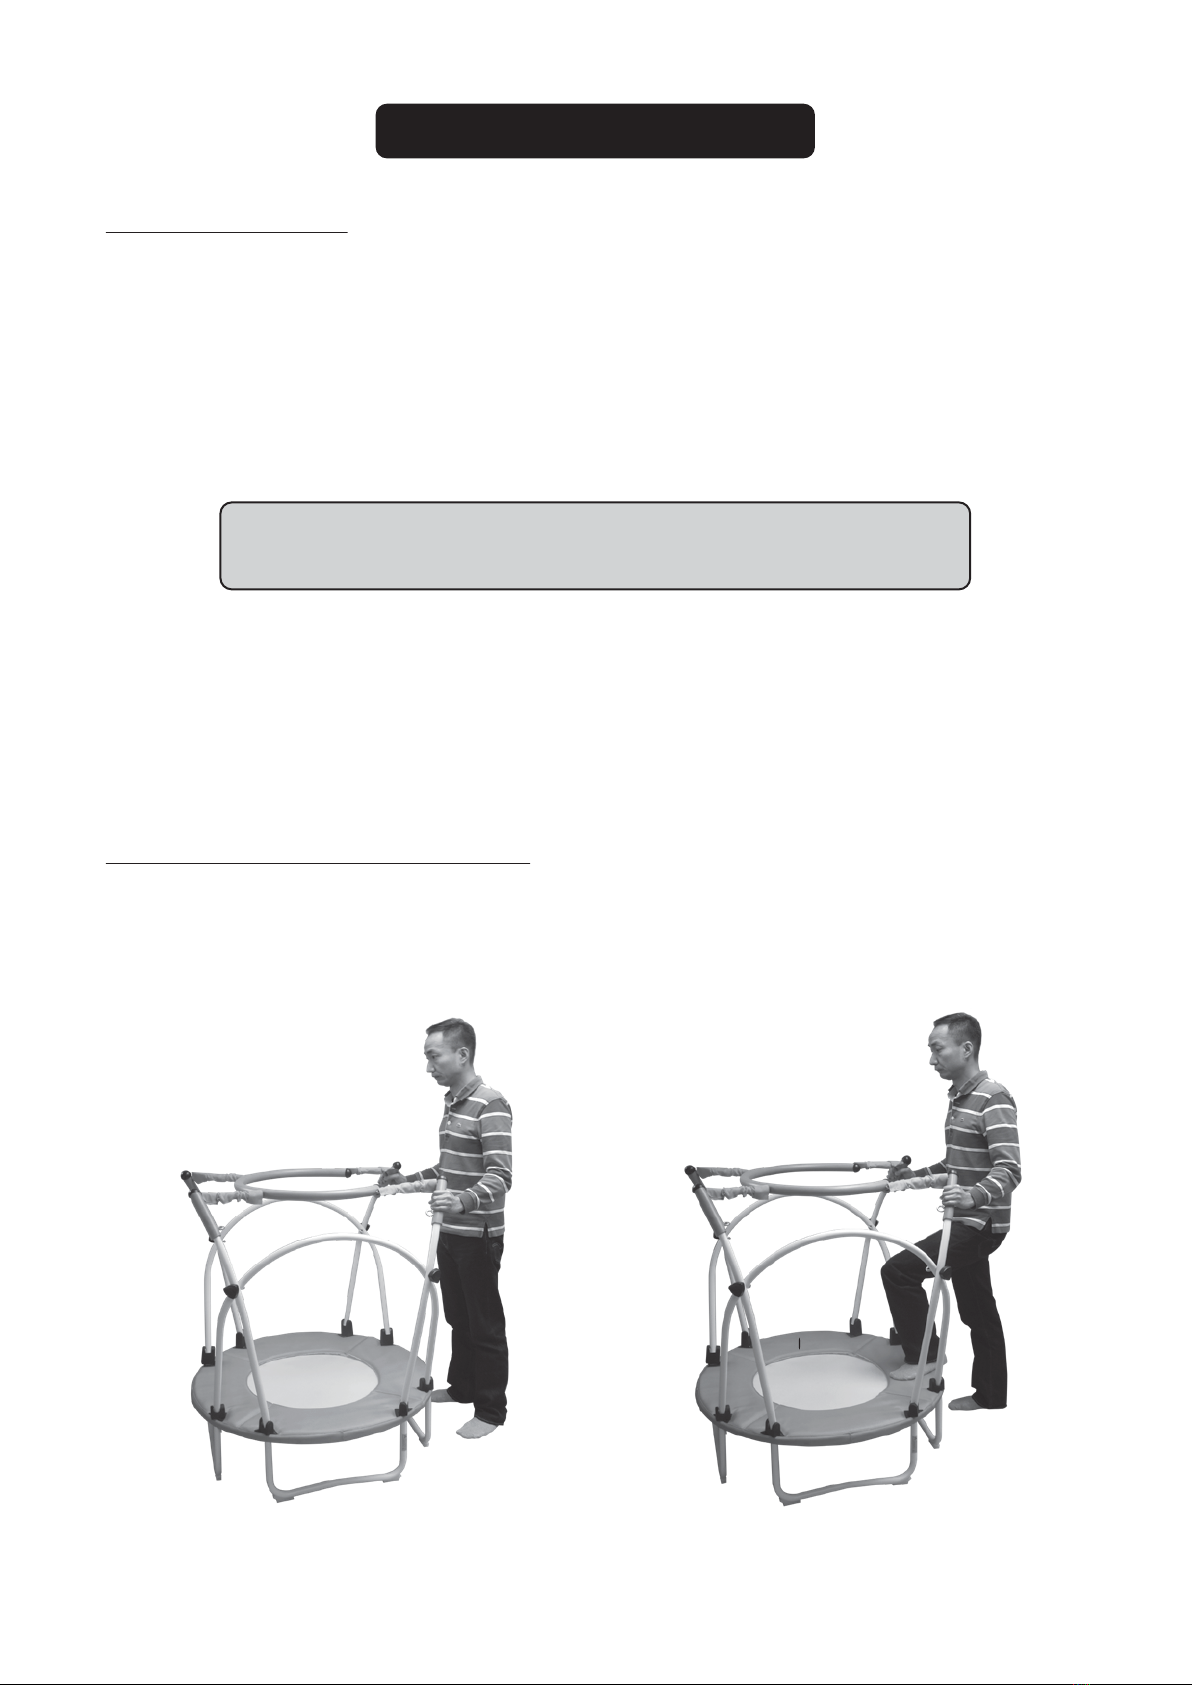
POSITIONING YOURSELF ON THE HEALTH BOUNCE POD™ / BPOD™
IMPORTANT: If your current physical condition requires supervision, ensure that someone will
assist you in getting ON and OFF the Health Bounce Pod™ / BPod™, as well as while you exercise.
Always use caution and common sense when exercising.
Entering the Health Bounce Pod™ / BPod™.
• Face the opening and place one hand on the end of each arch.
• Step up and move forward until you reach the center of the mat.
• If you nd it easier, you can step onto the protective padding.
14
EXERCISES & ROUTINES

Positioning yourself on the Health Bounce Pod™ / BPod™
• Once you are in the center of the mat, perform a 180-degree
rotation in order to face the opening.
• This is the recommended basic position, as it allows the user to exit
quickly or to be helped more easily.
• Of course, according to the exercises performed, the user may
choose the orientation that is most suitable for his/her activity.
• Remaining in the center of the mat will provide the best and safest
operations.
Exiting the Health Bounce Pod™ / BPod™
• Just as you entered, you exit by placing your hand on the end of
each arch.
• Next, approach the edge of the Health Bounce Pod™ / BPod™. The
unit is very stable and will remain balanced. Take care to lift your
feet to avoid catching feet on the black surround padding.
• Step down from the Health Bounce Pod™ / BPod™.
15
• User facing the opening
• Position in the center of the mat
• Hands holding the C-hoop evenly.
• Hold the arches, and then step down.
Users who experience diculties stepping forward may use a Health
Bounce Pod™ / BPod™ stepper for assistance. The Health Bounce Pod™
/ BPod™ stepper can be ordered from your distributor.
Any medical stepper may also be used.

USEFUL TIPS and FAQ
What are the best clothes to wear to exercise on a rebounder?
When exercising, it is always best to wear comfortable clothes, such as sportswear. However,
rebounding on a Health Bounce Pod™ / BPod™ is a low impact activity that can be performed in
your normal clothes.
What kind of footwear is recommended?
The best footwear would be non-slip socks, as they are safe and do not restrict movement.
However, depending on the intensity of your exercise, sport shoes (especially those with a soft
rubber sole, such as gymnastics footwear) are perfectly ne.
Those who prefer to go barefoot may also do so.
As a general rule, hard sole shoes are not recommended, as they may damage the mat.
However, some users may require footwear support to walk and/or stand: the Health Bounce Pod™
/ BPod™ mat is of high quality and durability, perfectly able to handle such footwear.
Wearing high heels during use would constitute a hazard and is absolutely not recommended.
Is it dangerous to wear jewelry?
Again, as a general rule, wearing jewelry is discouraged when engaging in any kind of physical
activity. This caution especially applies to activities that involve bouncing, as jewelry can dangle or
become snagged.
The same applies to all kinds of accessories, such as watches, glasses, hats and even loose items
contained in pockets, such as coins, keys or mobile phones.
Always use common sense when deciding on what to wear when exercising. However, bear in
mind that rebounding is a low impact exercise that may be practiced safely and easily over the
course of a day.
As you will note in the following pages, rebounding is as comfortable as taking a walk, but its
much lower impact on your joints and articulations makes it a safer activity.
Your Health Bounce Pod™ / BPod™ will allow you to engage in regular physical activity with
minimum inconvenience to your daily life.
The key factors here are the unit’s low impact and gentle action on your body: it enables you
to exercise stress-free with no damaging impact on your body.
16

EXERCISE DESCRIPTIONS
Apart from the general benets of rebounding (see the list of benets at the end of this manual),
rebounding on a Health Bounce Pod™ / BPod™ is particularly benecial for people who may think
that they can no longer exercise.
THE LACK OF EXERCISE, GENERALLY TRIGGERED BY A SPECIFIC PROBLEM, IS THE MAIN FACTOR IN
TRIGGERING MULTIPLE PROBLEMS AND COMPLICATIONS.
THE HEALTH BOUNCE POD™ / BPOD™ ALLOWS YOU TO CONTINUE EXERCISING.
IN TERMS OF EFFECT ON THE BODY, THERE IS A HUGE DIFFERENCE BETWEEN ZERO PHYSICAL
ACTIVITY, AND SOME LEVEL OF PHYSICAL EXERCISE, REGARDLESS OF THE AMOUNT.
Whenever you stand, walk or bounce on a rebounder, up to 85% of the impact on your body is
absorbed by the mat and the springs.
Rebounding is an activity with a low impact on the joints and articulations.
The slightly uneven surface of the Health Bounce Pod™ / BPod™ not only pushes the brain to exert
itself as it analyzes the situation and instructs the body's reaction, but also forces the core muscles
to contract and stabilize, giving the body a full work-out.
For a person in peak physical condition, rebounding may appear to be a non-physically
demanding activity, since it is mild and has a low impact on the body.
However, everyone, regardless of his or her physical conditioning level, can benet from exercising
on a rebounder, especially from regular practice.
Several exercise routines are described below. Some of them target specic situations.
WARNING:
While some users may consider preparation and pre-exercise routines to be overly cautious, and
while the physical condition of a user may be such that they will not be particularly relevant,
nonetheless we suggest that users perform them, at least once, prior to proceeding with their
more suitably challenging exercise routines.
17
This manual suits for next models
3
Table of contents
Popular Medical Equipment manuals by other brands


Getinge
Getinge Arjohuntleigh Nimbus 3 Professional Instructions for use

Mettler Electronics
Mettler Electronics Sonicator 730 Maintenance manual

Pressalit Care
Pressalit Care R1100 Mounting instruction

Denas MS
Denas MS DENAS-T operating manual

bort medical
bort medical ActiveColor quick guide

AccuVein
AccuVein AV400 user manual


