Active Motif EpiShear User manual

www.activemotif.com
EpiShear™ Cooled Sonication Platform
(version C1)
Catalog Nos. 53080 (1.5 ml), 53081 (15 ml) & 53082 (50 ml)
Active Motif North America
1914 Palomar Oaks Way, Suite 150
Carlsbad, California 92008, USA
Toll free: 877 222 9543
Telephone: 760 431 1263
Fax: 760 431 1351
Active Motif Europe
Avenue Reine Astrid, 92
B-1330 La Hulpe, Belgium
UK Free Phone: 0800 169 31 47
France Free Phone: 0800 90 99 79
Germany Free Phone: 0800 181 99 10
Telephone: +32 (0)2 653 0001
Fax: +32 (0)2 653 0050
Active Motif Japan
Azuma Bldg, 7th Floor
2-21 Ageba-Cho, Shinjuku-Ku
Tokyo, 162-0824, Japan
Telephone: +81 3 5225 3638
Fax: +81 3 5261 8733
Copyright 2014 Active Motif, Inc.

www.activemotif.com
Information in this manual is subject to change without notice and does not constitute a commit-
ment on the part of Active Motif, Inc. It is supplied on an “as is” basis without any warranty of any
kind, either explicit or implied. Information may be changed or updated in this manual at any time.
This documentation may not be copied, transferred, reproduced, disclosed, or duplicated, in
whole or in part, without the prior written consent of Active Motif, Inc. This documentation is
proprietary information and protected by the copyright laws of the United States and interna-
tional treaties.
The manufacturer of this documentation is Active Motif, Inc.
© 2014 Active Motif, Inc., 1914 Palomar Oaks Way, Suite 150; Carlsbad, CA 92008. All rights reserved.
All trademarks, trade names, service marks or logos referenced herein belong to their respective
companies.

www.activemotif.com
TABLE OF CONTENTS Page
Overview . . . . . . . . . . . . . . . . . . . . . . . . . . . . . . . . . . . . . . . . . . . . . . . . . . . . . . . . . . . . . . . . . . . . . . . . . . . . 1
Included Components................................................................2
Parts Diagram. . . . . . . . . . . . . . . . . . . . . . . . . . . . . . . . . . . . . . . . . . . . . . . . . . . . . . . . . . . . . . . . . . . . . . . .3
EpiShear Cooled Sonication Platform
A. Attachment of the Chimney ..................................................4
B. Placement of the Converter/Probe............................................5
C. Calibration of the Platform Counter ...........................................6
D. Alignment of the Platform Stand..............................................6
Using the Cooled Sonication Platform 8
Appendix
Section A. Attaching the Alternate Spring Bracket .................................9
Section B. Related Products ....................................................10
Technical Services ...................................................................12

1
www.activemotif.com
Overview
Active Motif’s EpiShear™ Cooled Sonication Platform was designed to improve sample-to-sample
reproducibility when using a probe sonicator to shear chromatin or DNA by enabling the tip of the
probe to be positioned at the same depth in the sample each sonication. The platform has been
machined out of stainless steel and aluminum, and includes a hand crank, a height counter and a
vertical alignment tool, so once you have determined the optimal settings for your probe, sample
volume and tube type, you can recreate your sonication conditions over and over.
Included with each platform is your choice
of a Tube Cooler that will hold 1.5-2.0 ml
microfuge, 15 ml or 50 ml tubes. The Tube
Coolers keep the sample cold during
sonication, so you don’t need move the
sample to and from an ice bucket during
sonication. With a programmable sonicator
like Active Motif’s EpiShear Probe Sonicator
(Catalog No. 53051), you can simply set the
duration of the On and Off pulses, place
the sample in the cooler, press Start, then
walk away. The cooler can keep the sample
cold for up to 2 hours of sonication. Each
cooler is also sold separately.
The platform is supplied pre-assembled
inside a sound enclosure. Also included are
an alignment tool and hex wrenches that
enable the platform height to be adjusted
to your ideal settings.
product format catalog no
EpiShear™ Cooled Sonication Platform, 1.5 ml 1 platform 53080
EpiShear™ Cooled Sonication Platform, 15 ml 1 platform 53081
EpiShear™ Cooled Sonication Platform, 50 ml 1 platform 53082
Benchtop 1.5 ml Tube Cooler 1 cooler 53076
Benchtop 15 ml Tube Cooler 1 cooler 53077
Benchtop 50 ml Tube Cooler 1 cooler 53078
EpiShear™ Probe Sonicator 110 V 53051
230 V 53052
As this manual contains many images, we recommend that you download its PDF version from our
website; the pictures will then be in color, and you will be able to zoom in for better detail.

2
www.activemotif.com
Included Components
The Cooled Sonication Platform is supplied with the following components.
• Sound enclosure with measurements of 28” H (with chimney) x 14.25” W x 12” D (711 mm x
362 mm x 305 mm)
• Probe chimney
• Sonication platform
• Choice of a 1.5 ml, 15 ml or 50 ml Tube Cooler
• Alignment tool
• 3 hex wrenches
• Alternate spring bracket with set screw (optional; see below)
Alternate spring bracket
The alternate spring bracket (shown below) is not normally needed. It was supplied in case you
need to remove the converter/probe bracket from the top of the rod. You would need to do this
only if your converter/probe is too large to be held by the bracket. See Appendix – Section A
for instructions on how to remove the converter/probe bracket and replace it with the alternate
spring bracket.
3
www.activemotif.com
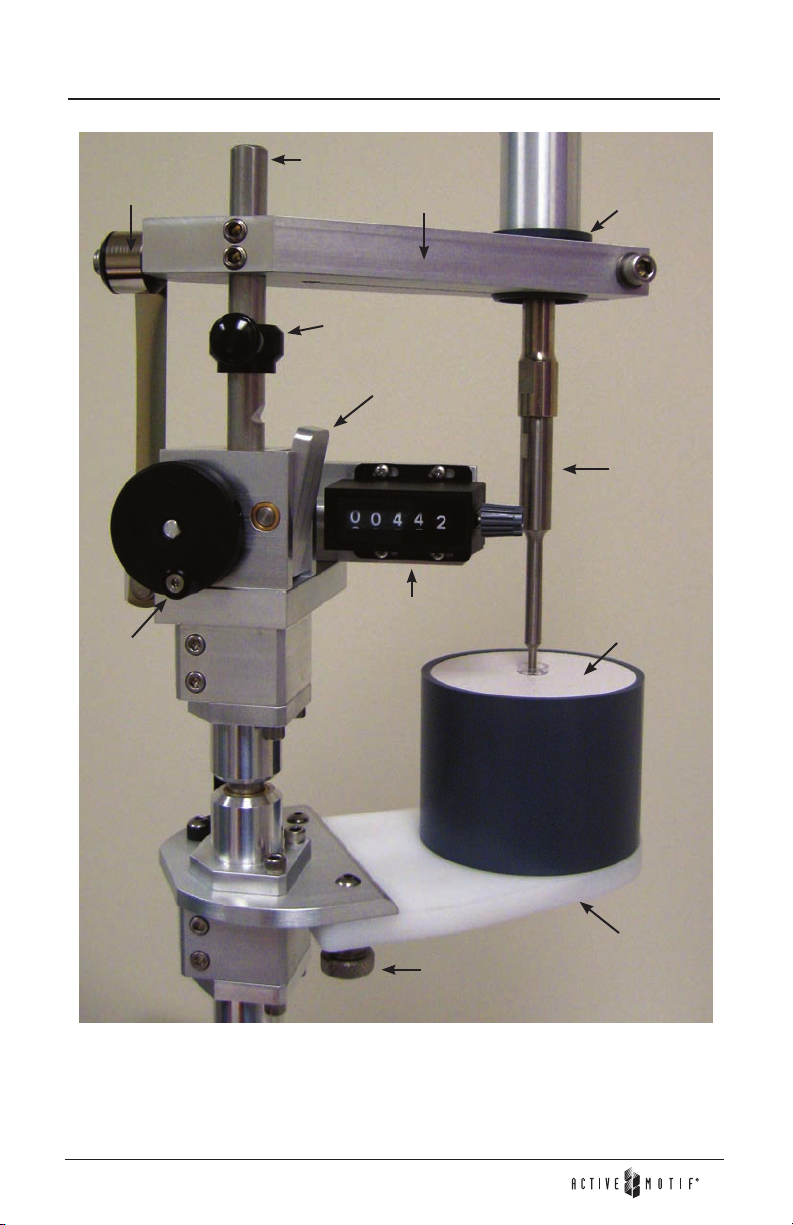
Parts Diagram
Latch
Hand
Crank
Platform
Probe
Thumbscrew
Counter
Stop
Collar
Tube
Cooler
Rod Converter/Probe
Bracket
Continuous
Force Spring
Converter Size
Adapter
The continuous force spring helps support the weight of the platform and enables it to move up
and down the rod smoothly, either using the latch or the hand crank. The stop collar is used to set
the highest point on the rod that the platform can be set. The two thumbscrews underneath the
platform enable you to change the platform position both forward/backward and left/right so
that the probe can be centered in the tube.

4
www.activemotif.com
EpiShear™ Cooled Sonication Platform
During shipment of the EpiShear Cooled Sonication platform, the probe chimney, tube cooler,
alignment tool and hex wrenches are placed inside of the sound enclosure. Carefully remove each
item and perform a visual inspection to detect any damage that may have occurred during ship-
ment. Before disposing of any packaging material, check carefully for small items.
A. Attachment of the Chimney
The chimney that will house the probe sonicator is shipped inside the sound enclosure and must
be secured to the top of the sound enclosure prior to use. To attach the chimney, rst remove the
three bolts from the screws on the top of the sound enclosure. Then, align the chimney onto the
screws with the chimney protruding from the unit. Finally, tighten the bolts onto the screws.

5
www.activemotif.com
B. Placement of the Converter/Probe
To ensure sample-to-sample consistency, the platform
has a bracket secured near the top of the rod that holds
the sonicator converter/probe. This bracket enables
you to x the placement of the probe tip. Depending
on the probe to be used, you may need to adjust where
the converter bracket is located vertically on the rod.
Typically, the black Stop Collar is placed on the top gear
of the rod, and the bracket is secured just above the
collar (right). (The Stop Collar is used to set how far up
the rod that the platform can be raised. Remove the pin
so that you can slide the collar to its desired height, then
reinsert the pin to x the collar at the chosen rod gear.)
Once you have determined where the bracket will be
placed, use the supplied hex wrench to loosen the set
screws. Adjust the bracket to its new height and use the
hex wrench to tighten the set screws so that the bracket
will not move on the rod.
You will also need to determine at what height in the
bracket the converter/probe will sit. It is suggested that
you place tape or some kind of marking on the converter
(right). This will enable you to return it to the exact same
position in the bracket in the event somebody moves
(or removes) the converter/probe from the bracket.
Once the converter/probe is placed into the bracket,
secure by tightening the screw to the converter size
adapter. DO NOT OVERTIGHTEN. The bracket should
rmly secure the converter/probe to the platform, but
care must be taken not to damage the converter.
Note: Depending on the size of your
converter/probe, you may want to
remove the converter/probe bracket
and replace it with the alternate spring
bracket. (See Appendix Section A)
6
www.activemotif.com
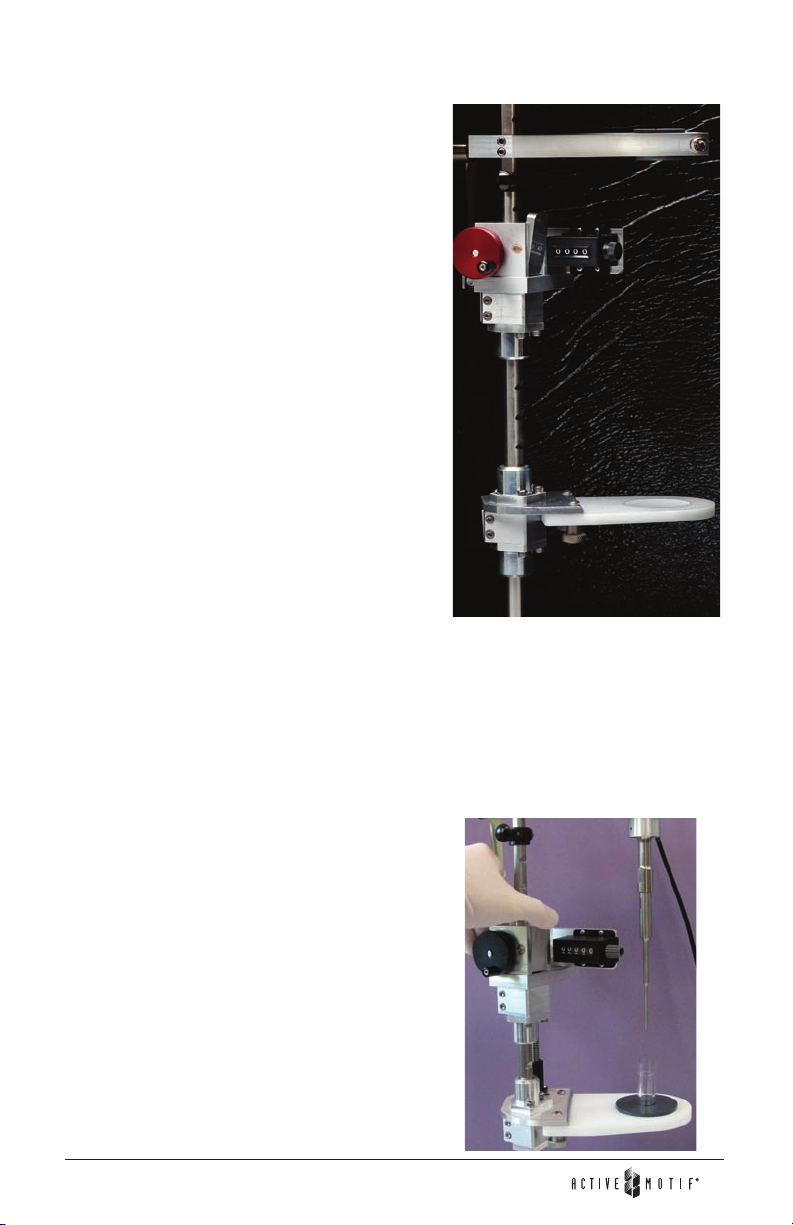
C. Calibration of the Platform Counter
The counter on the platform needs to be set to an
appropriate “zero” point to enable you to return the
platform to the same height consistently once you
have determined the appropriate height for your
purposes. We suggest that the “zero” point be set at
the bottom of the drive screw, meaning the lowest
point to which the platform can be cranked.
To set the platform to the bottom of the drive screw,
turn the crank clockwise until the platform base no
longer continues downward; then, turn the dial on the
analog counter clockwise to “0000” (right). From this
point on, a one unit increase in the counter equals a
0.1 mm increase in the height of the platform.
Note: If the platform goes too low, it may
not move upward when you begin to
turn the crank. Gently lift underneath
the platform as you crank to engage
the gears completely.
D. Alignment of the Platform Stand
The platform stand can be adjusted in both the horizontal (x-y) and vertical (z) planes, ensuring
that the probe is centered in the tube and that its tip is at the chosen depth in the sample. The
provided Alignment Tool is used to set an approximate alignment for the tube and probe. It is
included because when a tube is placed in a Tube Cooler, you cannot see the probe tip or its
position relative to the bottom of the tube.
The Alignment Tool is used to make initial settings, which
are rened using a tube in the Tube Cooler. (This prevents
possible damage to the probe that could occur if you
simply raised the platform without knowing how deep in
the tube the probe will go.)
You should have already placed your converter/probe in
the bracket and set the counter to “zero”, as described
above. To begin, lower the platform and place the
Alignment Tool in the hole on the stand. To lower the
platform, simply press in the latch located between the
counter and the crank (right). After placing the Alignment
Tool in the stand, move the entire platform up to the top
of the rod, against the Stop Collar.
7
www.activemotif.com
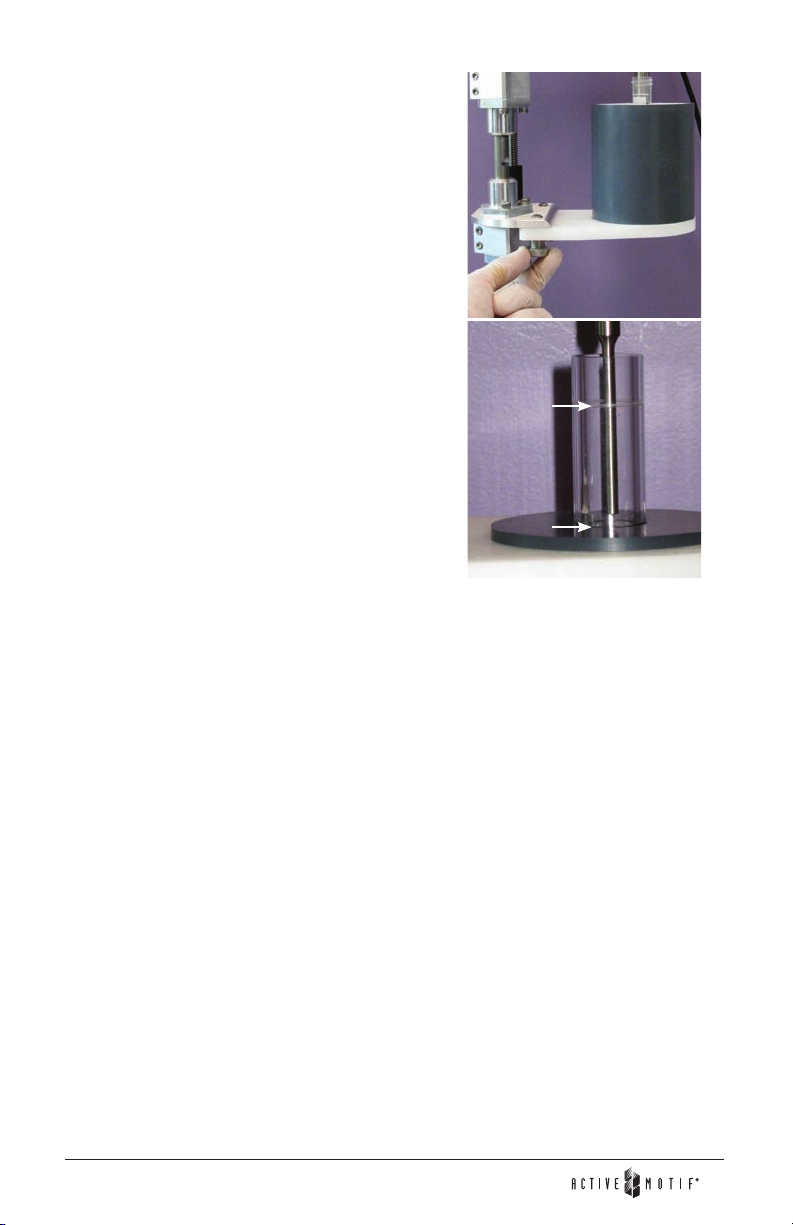
The crank is then turned to slowly raise the stand up the
rod. When the probe begins to enter the Alignment Tool,
you may need to adjust the position of the stand so that
the probe is centered in the tool. Simply loosen the two
thumb screws underneath the stand, use one hand to
move the stand forward/backward and left/right until
the probe is centered, then re-tighten the thumbscrews.
You may need to rene the position again slightly when
you test with a tube in the Tube Cooler (right).
Continue cranking the stand up in order to set the probe
to its chosen depth. The line that is etched into the
Alignment Tool is the approximate depth of a 1.5-2.0 ml
tube; the bottom of the Alignment Tool is the approxi-
mate depth of both a 15 ml and a 50 ml tube.
Gently crank until the tip of the probe is either even
with the etched line (if you will be sonicating in micro-
centrifuge tubes) or until it gently touches the bottom
of the Alignment Tool (if you will be sonicating in 15 ml
or 50 ml tubes, as shown to the right).
15 ml
setting
15 / 50 ml
settings
The platform is now set so that the probe will touch the bottom of the tube, which is not desired.
You must adjust the platform slightly so the probe does not touch the tube during sonication. Use
the crank to slightly lower the platform so the probe tip is the distance from the bottom of the
tube desired for your experiments. This level will depend on the volume of the samples that will
be sonicated, so you must set the nal depth based on the sonication protocol that will be used.
After the probe has been positioned to the desired depth, the settings should be rened using a
tube in the Tube Cooler. Because of slight variations in the shape and thickness of tubes from
various manufacturers, the Alignment Tool may not provide you with the exact settings that will
work with your tubes.
To rene the settings, press in the latch, lower the platform, remove the Alignment Tool, place a
tube that will be used for sonication in the Tube Cooler (being certain it is all the way in the cool-
er), then place the cooler in the stand. Raise the platform back up until it is against the Stop Collar.
You may now need to use the thumbscrews again to slightly re-adjust the stand so the probe is
centered exactly in the tube. Lift the tube up and move it around slightly to verify that the probe
tip is at the desired height from the bottom of the tube. Adjust the stand height if needed.
It is important that you now write down the number on the counter This setting will be used for
all experiments. While all you need to do to set the probe at this position is to move the platform
up and down, if another user raises or lowers the platform using the crank, or if they change
the counter, your positioning will be lost. By recording the counter value you can replicate your
desired settings. Simply re-zero the platform as before, then crank the platform up to your setting.

8
www.activemotif.com
Using the Cooled Sonication Platform
Benchtop Tube Coolers
The Benchtop Tube Coolers can keep the temperature of a sample at or below 4°C for up to
2 hours of sonication if the cooler has been placed in a -20°C freezer overnight. If a large amount
of time will pass between each sonication, return the cooler be to a -20°C freezer between
samples. Do not place coolers at -80°C for more than 30 minutes as they may be damaged.
Note: If the Tube Cooler was kept in a -20°C freezer overnight, it will be sufciently
cold to freeze your samples in about 5 minutes, unless you begin sonication.
Therefore, to prevent your sample from freezing, do not place it in the cooler
until you are ready to begin sonication. Keep your sample on ice and the cooler
in the freezer until all preparations for sonication have been completed.
Sonication
Ensure that the converter/probe is positioned properly in the converter/probe bracket and that
the platform settings are those that you determined to be appropriate for your tube type and
sample volume. If need be, reposition the converter/probe to the mark you placed on it and
re-zero the platform, then re-set it to its desired position.
Turn on your probe sonicator and adjust its settings to your preference. Press the latch and move
the platform down the rod. Place an open tube containing your sample in the Tube Cooler, then
place the cooler in the platform stand. Raise the platform until it is against the Stop Collar, and
ensure that the appropriate counter setting has been reached. Lift the tube up and move it around
slightly to verify that all is as expected. After verifying this, ensure that the tube is pressed down
all the way in the cooler. You are now ready to begin sonication following your protocol.
After sonication is complete, press the latch and lower the platform so that you can remove the
sample and place it on ice. Process additional samples, or clean the sonicator probe per your lab’s
standard practices, and return the Tube Cooler to the -20°C freezer.

9
www.activemotif.com
Appendix
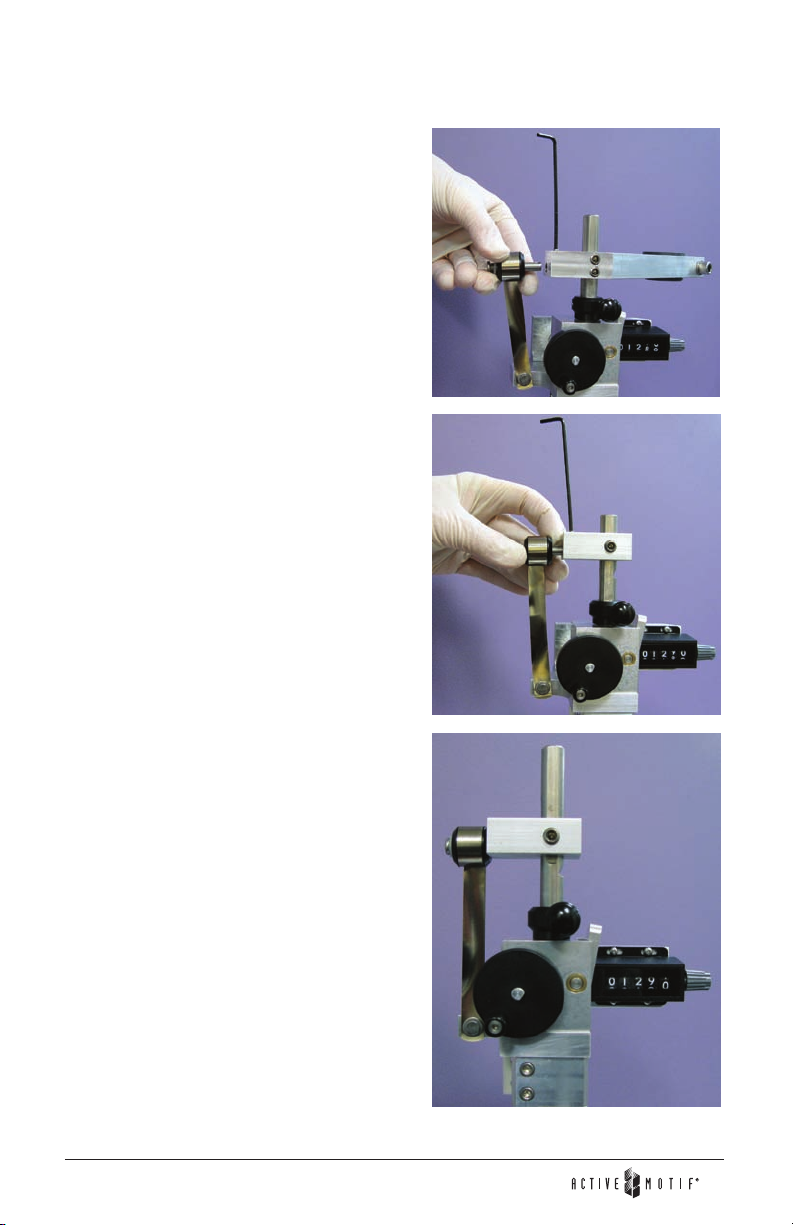
Section A. Attaching the Alternate Spring Bracket
The alternate spring bracket was provided in case you need to remove the converter/probe
bracket from the top of the rod, which you would need to do if your converter/probe is too large
to be held by the bracket. The alternate bracket enables you to reattach the continuous force
spring so that it can support the weight of the platform when it is moved up and down.
To replace the converter/probe bracket with the
alternate spring bracket, the rod and platform will
need to be removed from the sound enclosure. To
do this, lay the sound enclosure box at with the
door facing up and open.
Loosen the screw on the top of the box that holds
the rod in place using the supplied hex wrenches
(top image). Then remove the three screws and
bracket supporting the rod on the bottom of the
sound enclosure (bottom image). Gently slide the
rod down 1-2 inches through the hole in the bottom
of the sound enclosure to bring the top of the rod
below the interior insulation. Then angle the top
of the rod into the probe chimney and gently slide
the rod up until the entire platform is released from
the sound enclosure. With the platform removed
from the sound enclosure, follow the instructions to
replace the converter/probe bracket.
10
www.activemotif.com
Loosen the two set screws on the front of the
bracket, then loosen the small set screw on top of
the bracket. You can then slide out the bolt and
bobbin around which the continuous force spring
is wound (top image). Be sure to hold the spring as-
sembly rmly to prevent it from unwinding from the
bobbin, which could damage it. Take care with the
metal edges of the spring, as they could potentially
cut your nger.
While you are holding the spring/bobbin/bolt, slide
the converter/probe bracket off the top of the rod
and replace it with the alternate spring bracket. You
can put the spring assembly into the new bracket
(middle image).
Use one of the two large set screws that were in
the converter/probe bracket to secure the alternate
spring bracket to the rod. Likewise, use the small set
screw that was in the converter/probe bracket to
secure the spring in the alternate spring bracket.
You can then adjust the height of the bracket to
where you would like it to be and rmly secure the
set screw. If you will need to secure some other kind
of bracket to hold an oversized converter/probe,
you will need to place the bracket as low as it will
go on the rod (lower image).
To reassemble the platform back inside the sound
enclosure, angle the top of the rod into the probe
chimney. Gently slide the bottom of the rod
through the hole in the bottom of the sound enclo-
sure. Align the top of the rod into the designated
hole at the top of the sound enclosure. Make sure
the platform faces the interior of the box with
enough clearance for the door to close. Secure the
rod in place by tightening the screw on the top of
the sound enclosure and reassembling the three
screws and bracket on the bottom of the sound
enclosure. Set the EpiShear Cooled Sonication
Platform upright and proceed to Calibration of the
Platform Counter on page 6.

11
www.activemotif.com
Section B. Related Products
Sonication Format Catalog No
EpiShear™ Probe Sonicator 110V 53051
230V 53052
EpiShear™ 5/64” (2 mm) Sonicator Probe 1 probe 53056
EpiShear™ 1/8” (3.2 mm) Sonicator Probe 1 probe 53053
EpiShear™ 1/4” (6.4 mm) Sonicator Probe 1 probe 53057
EpiShear™ Cooled Sonication Platform, 1.5 ml 1 platform 53080
EpiShear™ Cooled Sonication Platform, 15 ml 1 platform 53081
EpiShear™ Cooled Sonication Platform, 50 ml 1 platform 53082
Support Stand / Converter Clamp 1 unit 53054
Sound Enclosure 1 enclosure 53060
Q800R Sonicator 110V 53062
230V 53063
ChIP-IT™ Kits Format Catalog No
ChIP-IT™ Express 25 rxns 53008
ChIP-IT™ Express Enzymatic 25 rxns 53009
ChIP-IT™ Express Shearing Kit 10 rxns 53032
ChIP-IT™ Express Enzymatic Shearing Kit 10 rxns 53035
ChIP-IT™ Express HT 96 rxns 53018
Re-ChIP-IT™ 25 rxns 53016
RNA ChIP-IT™ 25 rxns 53024
Chromatin IP DNA Purication Kit 50 rxns 58002
ChIP-IT™ Protein G Magnetic Beads 25 rxns 53014
Siliconized Tubes, 1.7 ml 25 tubes 53036
ChIP-IT™ Control Kit – Human 5 rxns 53010
ChIP-IT™ Control Kit – Mouse 5 rxns 53011
ChIP-IT™ Control Kit – Rat 5 rxns 53012
RNA ChIP-IT™ Control Kit – Human 25 rxns 53024
Ready-to-ChIP HeLa Chromatin 10 rxns 53015
Ready-to-ChIP Hep G2 Chromatin 10 rxns 53019
Ready-to-ChIP K-562 Chromatin 10 rxns 53020
Ready-to-ChIP NIH/3T3 Chromatin 10 rxns 53021
Bridging Antibody for Mouse IgG 500 µg 53017
ChIP-validated Antibodies
For an up-to-date list of over 125 ChIP-validated antibodies, please visit wwwactivemotifcom/chipabs.
ChIP Control qPCR Primer Sets
For an up-to-date list of over 30 qPCR Primer Sets, please visit wwwactivemotifcom/chipprimers.
Modied Histones Array Format Catalog No
MODied™ Histone Peptide Array 1 array 13001
Histone Antibodies
For an up-to-date list of over 150 antibodies against histones and modied histones,
please visit wwwactivemotifcom/histoneabs.

12
www.activemotif.com
Technical Services
If you need assistance at any time, please call Active Motif Technical Service at one of the
numbers listed below.
Active Motif North America
1914 Palomar Oaks Way, Suite 150
Carlsbad, CA 92008
USA
Toll Free: 877 222 9543
Telephone: 760 431 1263
Fax: 760 431 1351
E-mail: tech_service@activemotif.com
Active Motif Europe
Avenue Reine Astrid, 92
B-1330 La Hulpe, Belgium
UK Free Phone: 0800 169 31 47
France Free Phone: 0800 90 99 79
Germany Free Phone: 0800 181 99 10
Telephone: +32 (0)2 653 0001
Fax: +32 (0)2 653 0050
E-mail: eurotech@activemotif.com
Active Motif Japan
Azuma Bldg, 7th Floor
2-21 Ageba-Cho, Shinjuku-Ku
Tokyo, 162-0824, Japan
Telephone: +81 3 5225 3638
Fax: +81 3 5261 8733
E-mail: japantech@activemotif.com
Visit Active Motif on the worldwide web at http://wwwactivemotifcom
At this site:
• Read about who we are, where we are, and what we do
• Review data supporting our products and the latest updates
• Enter your name into our mailing list to receive our catalog, MotifVations newsletter and
notication of our upcoming products
• Share your ideas and results with us
• View our job opportunities
Don’t forget to bookmark our site for easy reference!
This manual suits for next models
3
Table of contents
Other Active Motif Medical Equipment manuals

Popular Medical Equipment manuals by other brands


Getinge
Getinge Arjohuntleigh Nimbus 3 Professional Instructions for use

Mettler Electronics
Mettler Electronics Sonicator 730 Maintenance manual

Pressalit Care
Pressalit Care R1100 Mounting instruction

Denas MS
Denas MS DENAS-T operating manual

bort medical
bort medical ActiveColor quick guide

AccuVein
AccuVein AV400 user manual


