ActronAir ACM-1 User manual

ACTRONCONNECT MODULE
INSTALLATION & COMMISSIONING GUIDE
Copyright © 2015 Actron Engineering Pty. Ltd. All rights reserved.
This manual is a controlled document which contains confidential and proprietary information.
Distribution, modification, copying and/or reproduction are prohibited without written consent from ActronAir.
Please Read This Guide
Congratulations on your purchase of an
ActronConnect Module. This unit has been
designed and manufactured with the highest
quality standard in mind.
Please read this guide thoroughly and keep it
in a safe place for future reference.
ActronConnect Module
ACM-1

2ActronConnect Installation & Commissioning Guide - Website
Doc. No.9590-1001 Version No.3.0 150901C
TABLE OF CONTENTS
Introduction ....................................................................
Kit Contents List ............................................................
Items to Consider ..........................................................
Safety Instructions .........................................................
Codes, Regulations & Standards ..................................
Specifications ................................................................
Installation Instructions
Power Supply Installation Procedures ...........................
ActronConnect Module Installation Procedures ............
Requirements for ACM Optimum Signal Performance...
Commissioning Instructions
ActronConnect Commissioning .....................................
Wiring Diagram ..............................................................
3
3
3
3
3
4
5
8
9
12
20
INTRODUCTION
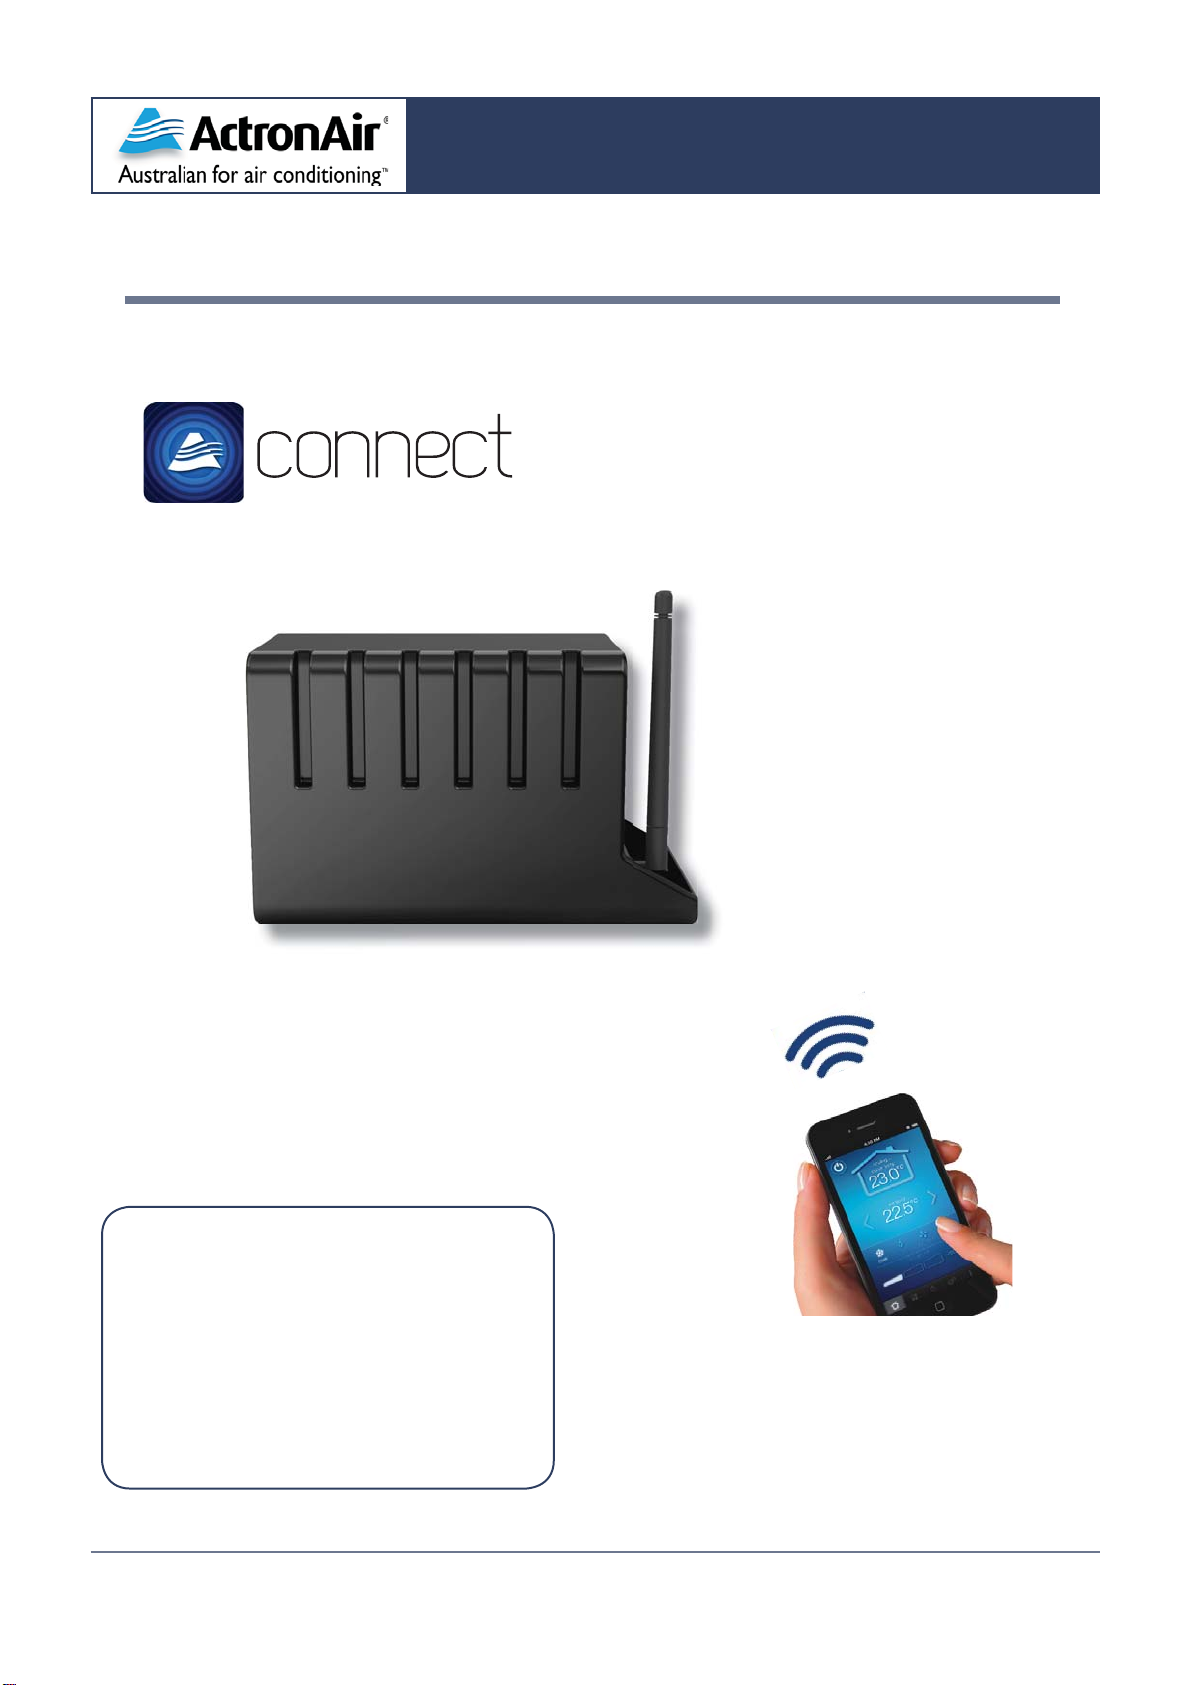
CONGRATULATIONS on your purchase of an
ActronConnect Module! This has been designed and
engineered to give you total control of your ActronAir
ducted air conditioner, whether you are at home or
away. By using either the ActronConnect App on your
Apple iOS devise or through supported web browsers
from any smart phone, tablet or PC/Mac, you can now
monitor and control your air conditioner from wherever
you have internet connectivity.
The procedures outlined in this guide are provided
to correctly & safely install the ActronConnect
Module (ACM) to an appropriate ActronAir ducted air
conditioning system. Failure to follow these procedures
may result in personal injury, damage to the air
conditioner, damage to the ActronConnect module or
incorrect operation of the air conditioning system. Such
failure could render your warranty null and void.
KIT CONTENTS LIST
1 Pc - ActronConnect Wi-Fi Module
(ActronAir Part No. ACM-1)
1 Pc -ActronConnect Antenna
1 Pc - Power Supply pre-wired with
Power & Data cables - Sold as Spare Part Kit
(ActronAir Part No. 2020-200K)
1 Pc - Adhesive Back Wiring Diagram label
(ActronAir Document No. WD0904)
1 Pc - Installation & Commissioning Guide
(ActronAir Document No. 9590-1000)
1 Pc -Quick Start Guide
1 Pc -Double Sided Tape (50 x 30 x 2mm)
2 Pcs-M3 x 4mm Pan Head Screws
2 Pcs- #6 x 30mm Pan Head Needle Point Screws
1 Pc -Shipping Carton
ITEMS TO CONSIDER
Carefully unpack the ActronConnect Module from its•
packaging and ensure that all parts are included.
Fully check the contents of your ActronConnect•
Module kit against the content list upon receiving
your shipment. Inspect the module, components and
accessories for any sign of shipping damage. If there
is any damage to the contents, contact ActronAir
Customer Care Department immediately on:
1300 135 995.
Make certain that the ActronConnect module is•
compatible with the ActronAir air conditioning system
you plan to install it on. (See FAQs about the product).
Take time to thoroughly read the installation &•
commissioning instructions before proceeding with the
installation.
SAFETY INSTRUCTIONS
Safety instructions and warnings provided on this
installation manual are in-exhaustive and given as
a guide only. Prevailing
a guide only. Prevailing WH&S regulations must
be observed and will take precedence to the safety
instructions contained in this manual. Safe work
practices and environment must be of paramount
importance in the performance of all service
procedures.
Ensure that all safety work procedures & Instructions•
are adhered to at all times in order to prevent personal
injury or damage to the equipment.
Only licensed service persons are allowed to perform•
the procedures described in this manual.
The indoor (evaporator) unit electrical panel has•
230VAC electrical components inside. PLEASE
ISOLATE THE INCOMING POWER SUPPLY BEFORE
COMMENCING WORK. Supply can be isolated at the
Main Isolator located near the Air Conditioner (if fitted)
or at the Main Supply Circuit Breaker in the Distribution
Board supplying the Air Conditioner. Correct Lock Out
& Tag Out procedures should be followed to ensure
Power Supply is not re-energized accidently.
The ActronConnect Module is IP20 Rated - NOT•
FOR OUTDOOR USE. Install your ACM away from
excessive dust, heat and moisture.
The ActronConnect Module is not a toy, keep away•
from children and ensure that they are not allowed to
play or tamper with the device.
The air conditioning electrical panel & the Actron•
Connect module/kit contain static sensitive electronic
components. Careful handling & correct anti-static
procedures must be followed to prevent damage of the
equipment. Failure to protect the electronic components
from static electricity may cause unrepairable damage,
which is NOT COVERED for replacement under
Warranty.

3ActronConnect Installation & Commissioning Guide - Website
Doc. No.9590-1001 Version No.3.0 150901C
The instructions herein refer to work involving a Computer CPU•
Chip & Electronic CPU Board, please ensure all Instructions are
followed accurately so as to prevent damage to these fragile & delicate
components.
CODES, REGULATIONS & STANDARDS
The installer and/or contractor assumes responsibility to ensure that
ActronConnect Module installation and commissioning comply with the
relevant council, state/federal codes, regulations and building code
standards. All electrical wiring must be in accordance with current
electrical authority regulations and all wiring connections to be as
per electrical diagram provided with the unit.
SPECIFICATIONS
ActronConnect Module Part No. ACM-1
Wi-Fi Protocol 802.11b/g/n
Operating System Requirement IOS 6.1.3 or later version
Security Protocol Web-128, WPA-PSK, WPA2-PSK
Hardware Voltage 9VDC - 15 VDC
Max. Operating Temperature 60oC
IP Rating IP20
Max Cable Length from ACM to
Power Supply Kit 10 metres
Access Point Distance*15 metres
Wi-Fi Range 70m line of sight
*The maximum distance that can be established between ACM and mobile device
(i.e. iphone, ipad, laptop) if the mobile device is acting as an access point.
Power Supply Part No. 2020-200K
Output Ratings 12VDC 1.3A 15.6W
Input Ratings 85~264VAC 120~370VDC
- Frequency Range 47~63Hz
- Inrush Current Cold Start 65A / 230VAC
- Efficiency (Typical) 81%
- AC Current (Typical) 0.35A / 115VAC
0.25A / 230VAC
Working Temperature -20~+70oC
Working Humidity 20-90% RH
non-condensing
Overload Protection Above 105% Rated Power
O/L Protection Type Hiccup mode, auto recovery after
fault condition is removed
Over Voltage Protection 13.8-16.2V
O/V Protection Type Shut-Off o/p voltage, clamping by
zener diode

4ActronConnect Installation & Commissioning Guide - Website
Doc. No.9590-1001 Version No.3.0 150901C
INSTALLATION INSTRUCTIONS
1.0 ActronConnect Power Supply & Module Installation Procedures:
1.1 Power Supply Installation Procedures:
Step 1.1.1. Isolate electrical power to the air conditioner at isolator or main switchboard.
Step 1.1.2. Remove lid from indoor unit electrical panel.
Lid- Electrical
Panel
Indoor Unit
Step 1.1.3. Mount the ActronConnect power supply kit, using either of the two options below, to the base of
the electrical panel as shown below:
Option 1 (Using the 2x4mm M3 screws):
2x4mm M3
Mounting Screws
NOTE: Use mounting screws when holes
are existing in Electrical Panel base.
Ensure that the earth ring terminal is pointing towards
the right side (looking at the electrical panel)
Power Supply Kit
(Pre-wired Supplied)
“PLUG C” (RJ45 Data) & Cable
to ActronConnect Module
Ensure the power supply ventilation
holes are NOT covered by the excess
cables or other foreign matter.
Option 2 (Using the Double Sided Tape):
Double Sided
Tape
Power Supply Kit
(Pre-wired Supplied)
“PLUG C” (RJ45 Data) & Cable
to ActronConnect Module
Ensure that the earth ring terminal is pointing towards
the right side (looking at the electrical panel)
NOTES: Use double sided tape where there are no holes in the Electrical Panel base.
Make sure that the base of the electrical panel and the power supply are
clean and free of dirt or dust in order to provide a strong tape adhesion.
Ensure the power supply ventilation
holes are NOT covered by the excess
cables or other foreign matter.

5ActronConnect Installation & Commissioning Guide - Website
Doc. No.9590-1001 Version No.3.0 150901C
Step 1.1.4. Refer to the wiring diagram for the cable connections on pages 29 - 33.
Step 1.1.5A. Step 1.1.5B.
(Classic, ESP Plus & ESP Platinum Plus Models) (ESP Ultima & ESP Platinum Ultima Only)
“PLUG A”
2 Pin Power
Connector
P1
2 Pin Socket
“PLUG A” 2 Pin Power
Connector
P1
2 Pin Socket
Auxiliary Power
Socket
Ultima Power
Connector
Connect “PLUG A” (2 Pin Power Connector) for the
230VAC of the power supply into the corresponding
2 Pin Socket labelled “P1 (240VAC)” on the Indoor
PCB AMIB. (This plug only goes in one way, ensure
it is in correct orientation before pushing it all the
way in).
Unplug Ultima 2 Pin Power Connector from “P1”
and connect “PLUG A” as in Step 5A above.
Then, plug the Ultima power connector into the
auxiliary power socket.
Step 1.1.6. Connect “EARTH RING LUG” to the earthing bolt of the indoor unit electrical panel. Unscrew
the nut, remove the washer & slide the EARTH RING LUG over the bolt making sure all of the existing
earthing lugs remain connected. Replace earthing washer & nut and tighten the nut securely.
ACM
Earth Wire
Existing
Earth Wires
Earthing Bolt
& Washer
Step 1.1.7. Connect “PLUG B” (4 Pin JST) for the data of ActronAir Connect Module into the
corresponding 4 Pin Socket labelled “J4 DATA” on the Indoor PCB AMIB. (This plug only goes in one
way, ensure it is in correct orientation before pushing it all the way in).
ACM
“PLUG B”
(4 Pin JST)
J4 DATA
(4 Pin Socket)
DATA
DATA
Indoor
PCB AMIB

6ActronConnect Installation & Commissioning Guide - Website
Doc. No.9590-1001 Version No.3.0 150901C
Step 1.1.8. Take the “PLUG C” (RJ45 Data) for the ActronConnect Module & run it out from the indoor
electrical panel via the large cable gland on the right side of the electrical panel. Feed the data cable all
of the way out so that only a minimum cable length remains inside the panel. Using cable ties, secure the
cable to the electrical panel and into the zone cables exiting from the same cable gland.
Large
Cable Gland
Run the ACM data
cable out from the
electrical panel
NOTE: For optimum performance & module communication integrity, keep the ActronConnect
Module data cable as far as possible from the 230VAC mains.
Step 1.1.9. Take the wiring diagram with adhesive back, peel off adhesive protection strip & stick the wiring
diagram unto the front the electrical panel lid.
Indoor Unit
Lid- Electrical
Panel
Electrical Panel
Wiring Diagram
Step 1.1.10. Check all connections and screw lid back onto indoor electrical panel.

7ActronConnect Installation & Commissioning Guide - Website
Doc. No.9590-1001 Version No.3.0 150901C
1.2 ActronConnect Module Installation Procedures:
IMPORTANT NOTE: ActronConnect Module CANNOT be installed on the sheet metal
part of the indoor unit (particularly at the top) as the performance & integrity of the
wireless signal will be greatly reduced.
Step 1.2.1. Install the ActronConnect Module to a suitable secure location, like a roof joist or similar using
the supplied screws. Keep the module at least 0.5m away from the roof line and 1m from the indoor
unit, large metal objects or other sources of interference (e.g. antennas, exhaust fans, duct work, etc.).
Also ensure it is kept away from potential sources of dust, heat & moisture (i.e. light fixtures, heaters,
bathroom exhaust fan outlets, etc.)
NOTES:
1. Maximum Allowable Cable Length between the indoor unit and the ActronConnect module is 10m. This can be
achieved with the use of a 2-Way Joiner PN: 2045-121 (Sold Separately) and a 7m ACM extension cable PN: 4070-027
(Sold Separately). TheActron Power Supply kit comes pre-wired with 3m cable. Do not run ACM cable in parallel with the
240V power supply cable and keep 300mm minimum distance from other cables (mains, data, antenna, etc).
2. DO NOT USE Actron CAT5E zone cables to extend ACM cables.
3. Locate the ActronConnect Module as close as possible to the ceiling and the manhole for ease of access, ensuring that
LED is facing towards the manhole and that the roof insulation does not come into contact with the module.
4. Do not install ActronConnect Module in roof cavities where temperature can exceed 60oC. In the event where you require
to install the Actron Connect Module below the ceiling line (Eg. Storage cabinet), please ensure you use an appropriate
plastic enclosure (supplied by others) that complies with all relevant safety codes, regulations and standards.
DETAIL - “A”
Roof Joist
Securely run cables along the roof
joist and at least 300mm away from
any other installed cable (i.e. power,
lights, PC data, TV antenna, etc.)
ActronConnect
Module
Secure the ActronConnect
Module to the roof joist using
the supplied screws.
ACTRONCONNECT MODULE INSTALLATION DIAGRAM
Manhole
1m>
Do Not Install the ActronConnect
Module on top of the indoor unit
ActronConnect Module
Roof
0.5m>
A
Indoor Unit
w.i.r
Install the ActronConnect Module 1m
away (or greater) from the Indoor unit.
Install the ActronConnect Module 0.5m
away (or greater) from the roof line.
See notes 3 & 4 for
ActronConnect Module
location requirements.
Return
Air Grille

8ActronConnect Installation & Commissioning Guide - Website
Doc. No.9590-1001 Version No.3.0 150901C
Requirements for ActronConnect Module Optimum Signal Performance:
The ACM optimum signal performance depends on the mounting orientation of the unit and the positioning of the
antenna in relation to the Wi-Fi router.
Mounting Orientation
As much as possible, install the module in a direct line of sight with the router and keep the antennas parallel.
BEST POOR
ACCEPTABLE WORST
Location/Positioning
Do not locate the module where the signal will be blocked by any large metal, concrete structure or objects
with high water content. People, animals and plants are composed mostly of water. Make sure that these do
not interfere with the module signal. Maintain at least 0.5m distance between the ACM & router antennas.
Avoid getting the antenna in direct contact with any metal or near power supply.
NO BLOCKING OBJECTS ALLOWED
Typical Home Installation Examples:
Single Level Dwelling
As much as possible, install the ACM
with the antenna parallel and in direct
line of sight with the router antenna
Two Level or Multi-Level Dwelling
As much as possible, install the
ACM with the antenna parallel
and in direct line of sight with
the router antenna.

9ActronConnect Installation & Commissioning Guide - Website
Doc. No.9590-1001 Version No.3.0 150901C
Step 1.2.2. Do not place the ActronConnect module where it can be easily damaged by accidentally
stepping on it or where it can be covered by ceiling insulation.
Step 1.2.3. Refer to the module mounting diagram - Requirements for ACM Optimum Signal Performance,
for the best mounting direction of the module based on your particular installation requirement.
Step 1.2.4. Refer to the wiring diagram for the cable connections on pages 29 - 33.
Step 1.2.5. Take the ActronConnect module 3m Grey Data Cable running from the indoor electrical panel
& run it to the installed module, ensuring it is in a position where it cannot be easily damaged and it is at
least 300mm away from any other installed cables (i.e. power, lights, PC data, TV antenna, etc.). If it is
impossible to avoid running the ACM data cable close to the other cables, run it across the other cables
at 90 degree (do not run in parallel).
Run the ACM data
cable from the Indoor
Unit to the ACM
3m ACM
Data Cable from the
Indoor Unit
ActronConnect
Module
Step 1.2.6. Secure the 3m Grey Data Cable to the timber roof joist or similar with the cable ties or other
suitable cable fixing fasteners. Do not loop any excess cable in a tight loop. Leave it loose.
Strong possibility of communication problems.
The “loops” can cause an electro-magnetic
interference, upsetting data communication.
No electro-magnetic interference.
Keep communication cable at least 300mm
from high voltage cables.
Do NOT loop excess cable RUN data cable as straight
and short as possible
NOT RECOMMENDED RECOMMENDED

10 ActronConnect Installation & Commissioning Guide - Website
Doc. No.9590-1001 Version No.3.0 150901C
Step 1.2.7. Connect “PLUG C” (RJ45 Data Plug) into ACM “Socket C” (labelled communication to indoor
board). This plug only goes in one way, ensure it is in correct orientation before pushing it all the way to
“lock” it in. Ensure there is an adequate slack on the cable so that no undue strain is placed on the RJ45
plug. Then screwAntenna into ACM socket and align as per instructions on Appendix A - Requirements
for ACM Optimum Signal Performance.
ACM
Data Socket
ACM
Antenna Socket
Antenna
ACM
Data Socket
“PLUG C”
(RJ45 Data Plug)
Antenna
ACM
Data Socket
Label - ACM
Data Socket
Step 1.2.8. Check all connections & cables to ensure correct connections and cables are secured properly.
Step 1.2.9. Power-up the air conditioner by turning-On the main isolator or at the Main Supply Circuit
Breaker in the Distribution Board. Ensure that the air conditioner powers up and operates correctly.
Step 1.2.10. Perform ActronConnect Module commissioning.

11 ActronConnect Installation & Commissioning Guide - Website
Doc. No.9590-1001 Version No.3.0 150901C
COMMISSIONING INSTRUCTIONS
2.0 ActronConnect Commissioning
Ensure that your home Wi-Fi network is switched-on and there is power to your air conditioner
before setting up your ActronConnect system,
Step 2.1 Download the ActronConnect app from the Apple app store.
1
2
Step 2.2 Open the ActronConnect app and press “no account? create one” to create your ActronAir
account.
1
2

12 ActronConnect Installation & Commissioning Guide - Website
Doc. No.9590-1001 Version No.3.0 150901C
Step 2.3 The Terms & Conditions page will appear, ensure that you read the Terms & Conditions and if you
accept, press “Accept” to proceed with commissioning.
SCROLL DOWN
to read the
Terms & Conditions
and Accept
NOTE:
Visit www.actronair.com.au/privacy for•
the updated Privacy Policy.
Step 2.4 Fill-in the details in the required fields of the registration page (i.e. your email address, password
& post code). You may also enter your details on the optional fields to help troubleshooting in the event
you need to contact our Technical Support team in the future. Then press “submit” to register your details.
NOTES: 1. You can chose any password, which is not necessarily the one you use for
your email access.
2. It is also advisable to create a different password for yourActronConnect
account, for your extra security.
3. Non-alphanumeric characters, i.e. %, #, $, space or &may be used for
stronger password security.
1
2

13 ActronConnect Installation & Commissioning Guide - Website
Doc. No.9590-1001 Version No.3.0 150901C
Step 2.5 Set up your air conditioning type & number of zones. Then press “next” to proceed.
3
4
56
1
2

14 ActronConnect Installation & Commissioning Guide - Website
Doc. No.9590-1001 Version No.3.0 150901C
Step 2.6 When the Welcome page appear, exit the ActronConnect app and go to your iOS device (iphone,
ipad, ipod etc...) “Setting” menu, click on “Wi-Fi”.
Step 2.7 Under devices, select the “ActronConnect” Wi-Fi network. Press “Join Anyway” to proceed.
NOTE: You may need to Turn-On your Wi-Fi, if it is Turned-Off.
1
2

15 ActronConnect Installation & Commissioning Guide - Website
Doc. No.9590-1001 Version No.3.0 150901C
IMPORTANT INFORMATION:
Wait for the Wi-Fi signal ( ) to appear before proceeding to the next step (it can take up to 1 minute).
If it hasn’t appeared, continue with the set up process.
wait for
approximate
1 minute
Wi-Fi signal
Step 2.8 After establishing your air conditioner’s Wi-Fi network (after connecting to ActronConnect),
re-open the ActronConnect app and press “next”.
1
2

16 ActronConnect Installation & Commissioning Guide - Website
Doc. No.9590-1001 Version No.3.0 150901C
Step 2.9 Set up your air conditioner network connection to your router by selecting your SSID (your
Wi-Fi network name) and typing your Passphrase (your Wi-Fi network password).
Illustrations below show how to select your SSID and how to enter and verify your Passphrase:
1
Scroll Up/Down to select your
Wi-Fi network name.
(Example “Your Network Name”)
2
NOTES: 1. SSID - Service Set Identifier, the name of the wireless network. All of the wireless
devices on a wireless local area network (WLAN) must employ the same SSID in order
to communicate with each other.
2. Passphrase - Password for your Wi-Fi network.
5
3
4/6
7
8

17 ActronConnect Installation & Commissioning Guide - Website
Doc. No.9590-1001 Version No.3.0 150901C
Step 2.10 Wait for the system to finish encrypting your air conditioner for access.
Once your air conditioner Wi-Fi access is
established, the screen below will be displayed
Do not
press “home”
Step 2.11 Close the ActronConnect app, then go to “Settings” and connect to your router.
1
2
NOTES: 1. You are now connected to ActronConnect network.
2. You must be within 15 meters between the installed ActronConnect Module
and the configuration device (iphone, ipod, PC...), to ensure optimum
communication signals.

18 ActronConnect Installation & Commissioning Guide - Website
Doc. No.9590-1001 Version No.3.0 150901C
Step 2.12 Re-open the ActronConnect app and press the “home” button.
After you established the air conditioner and iOS network
connectivity, the ActronConnect home page (as shown above)
will appear and you are now set to remotely operate and
control your air conditioner by using your iOS device.

19 ActronConnect Installation & Commissioning Guide - Website
Doc. No.9590-1001 Version No.3.0 150901C
WIRING DIAGRAM
R
This drawing remains the intellectual property of Actron Engineering Pty Ltd.
Reproduction,modification and/or distributionareprohibited withoutwritten consent.
Revision
Description:
A5
Size:
Base
Model No: Variation:
Variation Code:
Drawing No:
Drawn: Date:
Approved: Date:
Rev. Description Date
By
PCR
ORIGINAL
A
SCRN
COM
PWR
KEY
COM
DATA
EARTH
NEUT
ACT
COIL IN
SENSOR
EC CONTROL
COIL OUT
SENSOR
EXV
+V
-V
N
A
AC IN DC OUT ADJ
ACM POWER SUPPLY
(240VAC - 12VDC 1.3A)
IMPORTANT:
DO NOT MOUNT ACM DIRECTLY
ON INDOOR UNIT
- FOR OPTIMUM PERFORMANCE OF
WIFI SIGNAL MOUNT MINUMUM OF
1 METRE AWAY & NOT ABOVE
EVAPORATOR
- MOUNT MINIMUM 1 METRE BELOW ROOF
ACTRON
CONNECT
MODULE
(ACM)
E2
RST MODE
ETH AC PWR
P1
BROWN
BLUE
GREEN / YELLOW
BRN / WHITE (GREEN)
BROWN
BROWN
BLUE
ANTENNA
3G LPW WIFI ETH
B
WD0904
SRG/V/M
14-07-2013
MJH
MJH 20-07-2013
M-SERIES INDOOR BOARD WITH ACTRON CONNECT
ACM MODULE & AUX POWER SUPPLY
ACTRON CONNECT
BMINOR NOTE REVISIONS 31-10-13
MJH
N/A
IMPORTANT :
DO NOT MOUNT ACM DIRECTLY ON INDOOR
UNIT.
- FOR OPTIMUM PERFORMANCE OF Wi-Fi
SIGNAL MOUNT 1 METRE AWAY (OR GREATER)
AND NOT ABOVE THE INDOOR UNIT.
- MOUNT MINIMUM 0.5 METRE BELOW ROOF
LINE.

20 ActronConnect Installation & Commissioning Guide - Website
Doc. No.9590-1001 Version No.3.0 150901C
WIRING DIAGRAM
R
This drawing remains the intellectual property of Actron Engineering
Pty Ltd. Reproduction, modification and/or distribution are prohibited
without written consent.
Revision
Description:
Drawing No: B
WD0903
Rev. Description Date
By
PCR
ORIGINAL A4
Size:
Base
Model No: Variation:
Variation Code:
A
SRG/V EVAPORATOR WITH EC FAN MOTOR
& OPTIONAL ACM WIFI MODULE & POWER SUPPLY
IMPORTANT:
DO NOT MOUNT WIFI MODULE
DIRECTLY ON EVAPORATOR UNIT
- FOR OPTIMUM PERFORMANCE OF
WIFI SIGNAL MOUNT 1 METRE AWAY
& NOT ABOVE EVAPORATOR
- MOUNT MINIMUM 1 METRE BELOW
ROOF
WIFI
MODULE
3G LPW WIFI ETH
E2
RST MODE
ETH AC PWR
P1
OPTIONAL
SENSOR 1 OPTIONAL
SENSOR 2
EXV
NEUT ACT RLY
SCRN
COM
PWR
KEY
COM
DATA
EARTH
NEUT
ACT
INDOOR
COIL OUT
SENSOR
INDOOR
COIL IN
SENSOR
EXV
IF-1
1 EC
EC CONTROL
ECM
CONTROL
MODULE
ZONE 1 ZONE 2 ZONE 3 ZONE 4
FIELD WIRING BY
INSTALLER
FIELD WIRING FOR M-SERIES
CONTROLS ONLY
2A
TX
20VA
SEE JUMPER PIN POSITION
TABLES ON UNIT WIRING DIAGRAM
FOR CORRECT POSITION
SENSOR WIRING
FIELD WIRING BY INSTALLER -
CABLE MUST BE 2 CORE SHIELDED CABLE WITH SHIELD WIRE
CONNECTED TO THE SCREEN / COMMON TERMINAL
(EITHER 2C 14/0.20 SHIELDED OR 2C TWISTED PAIR 7/0.30 SHIELDED CABLE ACCEPTABLE)
TO OUTDOOR UNIT
INDOOR FAN (IF)
INTERNAL AUTO RESET
OVERLOAD PROTECTION FERRITE
F1
RJ45 SOCKETS FOR ACTRON AIR
CAT5E ZONE CABLES
EMC-1
E
N
A
N
A
IF FITTED
(DEPENDANT ON
MODEL VARIANTS)
POWER
COM
KEY
SENSOR
DO NOT
CONNECT
SCREEN
AT WALL
CONTROL
SCREEN
WIRES
POWER
COM
KEY
SENSOR
BROWN
BLUE
ANTENNA
+V
-V
N
A
AC IN DC OUT ADJ
ACM POWER SUPPLY
(240VAC - 12VDC 1.3A)
BROWN
BLUE
GREEN / YELLOW
BRN / WHITE (GREEN)
BROWN
LEGEND
AMIB
ACM
EXV
IF
IFRC
TX
WC
EMC
F
AMZ-24V
02-07-2013MH
Drawn: Date:
Approved: MJH Date: 05-11-2013
BLAYOUT CHANGES, ADDED SRV DETAILS 05-11-13
MJH
N/A
IMPORTANT :
DO NOT MOUNT ACM DIRECTLY ON INDOOR UNIT.
- FOR OPTIMUM PERFORMANCE OF Wi-Fi SIGNAL
MOUNT 1 METRE AWAY (OR GREATER) AND
NOT ABOVE THE INDOOR UNIT.
- MOUNT MINIMUM 0.5 METRE BELOW ROOF LINE.
Table of contents
Other ActronAir Controllers manuals

ActronAir
ActronAir QUE QZW-100 User manual

ActronAir
ActronAir LM7-2W User manual

ActronAir
ActronAir QTW-1000 Guide

ActronAir
ActronAir LM7-2W User manual

ActronAir
ActronAir MWC-B01CS User manual

ActronAir
ActronAir LR7-1W User manual

ActronAir
ActronAir LM-ZC-2W User manual

ActronAir
ActronAir LR7-1W User manual

ActronAir
ActronAir MGW-BACCS User manual

ActronAir
ActronAir LC7-2W User manual
Popular Controllers manuals by other brands

LOVATO ELECTRIC
LOVATO ELECTRIC ATL600 instruction manual

Meilhaus Electronic
Meilhaus Electronic USB-GT Series manual

Agromatic
Agromatic N Series Installation and operating manual

IBM
IBM SAN Volume Controller 2145-8F4 installation guide

FASTRON.
FASTRON. VISION Series Programming guide

Grifco
Grifco E138G quick start guide