ACU-RITE MILLPWR G2 Technical manual

January 4, 2017
MILLPWRG2 2 & 3 Axis
Release of Version R5
NOTE: HEIDENHAIN Corporation recommends making a backup of the control with the
included USB Recovery Drive before updating the control software. Please refer to the manual
included with the drive for the backup procedure
R5 is a complete software update.
If a special PLC for AMI functions was created for your MILLPWR system. The PLC for R5 may
need to be modified in the same manner. The PLC project has been updated, and rebased on
the Basic-NCK-V10 project. Any OEM/User customizations to the PLC will need to be
reintegrated into the new PLC project.
Users of auxiliary machine function interface (AMI) will need to first check two configuration
settings in their current system. Make note of the values described below so that they can be
restored manually after the R5 update, via the Machine Functions menu.
A special password provided by your authorized dealer is required to access the Advanced
Configuration from Installation Setup in order to view these settings:
System -> PLC -> CfgOemBool -> NP_MG_guard_inactive – [value]
If the setting is FALSE, then in R4SP1 they should set “Guards” to “Enabled”
Axes -> ParameterSets -> PS_1 -> CfgAxisAnalog – [unipolar]
If the setting is “off”, then in R4SP4 they should set “Polarity” to “Bipolar”
All users can verify your software version from the DRO screen by pressing SETUP. If one of
your soft keys is labeled More Commands, you have release 1 (R1) software. If one of your soft
keys is labeled Install Setup, press this key. Enter the password 8891 and press Enter. The
installed software version will be displayed at the bottom left of your screen.
If any issues are encountered, please contact your service representative for assistance.
You can download the software release update free of charge from our web site at www.acu-
rite.com. If you wish to purchase the software and operation manual from ACU-RITE, contact
your authorized dealer to place an order.
Installing the software onto your MILLPWRG2 system:
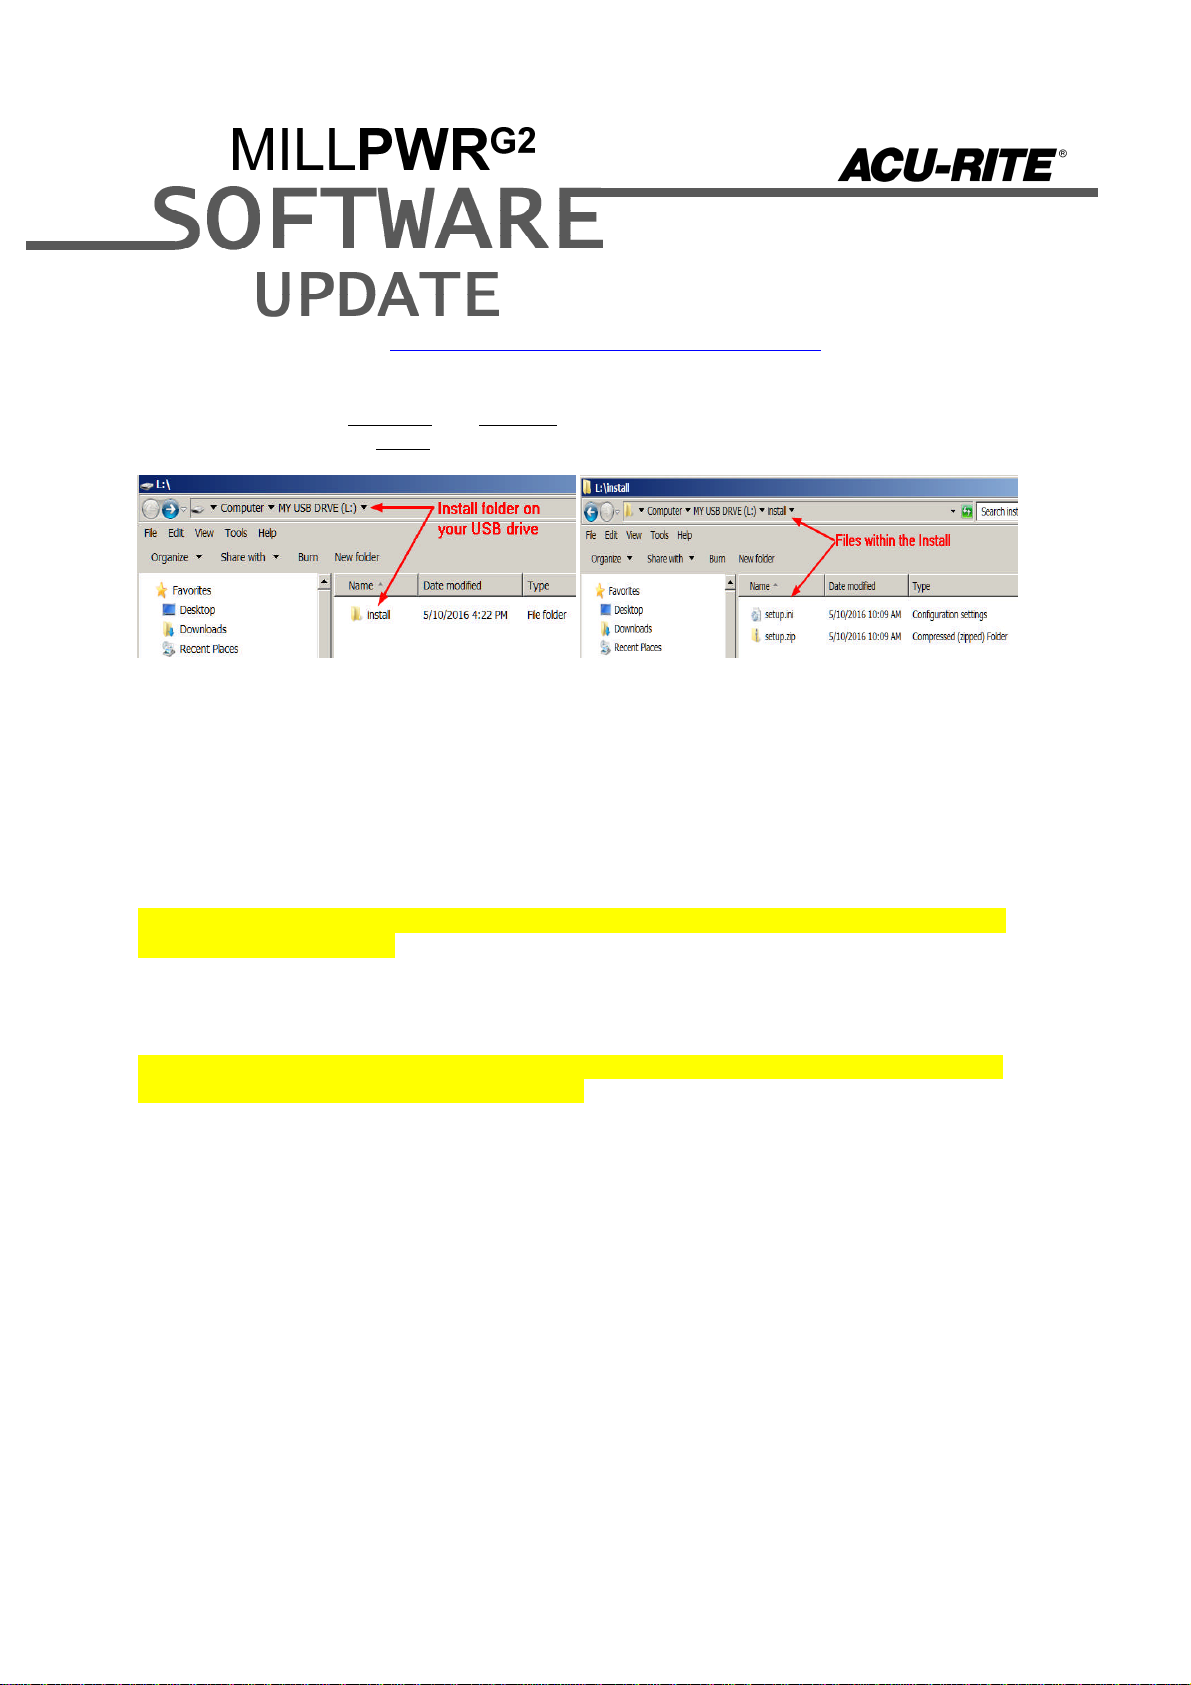
Use a blank USB memory stick (1 GB or larger) to update the software. Do not use any memory
stick with a smaller storage capacity. The software installation files are required for updating the
software. When a USB memory device in placed in a USB port prior to boot up with the update
files setup.zip, and setup.ini located within a folder named “install”, at boot up your G2 control
will detect the upgrade software files and proceed to install.
Procedure for downloading the update files and placing them on a USB drive.

Download the update from http://www.acu-rite.com/software-updates.html found under the
Controls Tab.
Unzip the downloaded archive insuring the target is the root level of your USB drive.
Insure the files setup.zip and setup.ini are transferred to a folder at the root level of your
USB drive named install, //MY USB DRIVE/install/
Procedure for updating the software
Shut down the control software using the normal method of pressing the Shutdown soft
key and then confirming the shutdown by pressing Yes.
Wait for the screen message which indicates that it is safe to switch off power, or restart.
Insert the USB memory device containing the folder named “install” on the USB memory
device.
Press ENTER to restart the system.
The software update will now be done automatically, taking approximately 10 - 20
minutes.
! A confirmation box will appear. If necessary, use the LEFT or RIGHT ARROW keys to select
Yes and then press ENTER.
When the update is complete, it will prompt you to remove the USB drive and restart. At this
time, remove the USB drive and press ENTER to restart. If the USB memory stick used for
installation is not removed, then the prompt to install the software will continue to appear on
subsequent power cycles.
! After installation and upon restart, you may receive a message prompt to confirm a firmware
update, accept the changes and RUN UPDATE.
-(Note: This particular NC startup screen can take several minutes to display. Please be
patient. Do not shutdown control and reboot.)
After the system has restarted, it will start up normally to the control software.
- Confirm that your count directions are correct.
- Press the SETUP hard key, then the “Install Setup” soft key, enter passcode 8891, press
ENTER
- In the “Installation” dialogue, scroll down to the last option “Machine Functions” and
press ENTER
- Configure the dialog to match your machine Note:(only required if special machine
function options are installed like demo, ami, guards, etc.)
- Press the USE hard key, then press the “Save Changes” soft key
- After a moment, you will get a reboot prompt
- Acknowledge the reboot and you are all done at the next startup.

MILLPWRG2 Recovery Drive Compatibility
MILLPWRG2 software release R5 requires a change to the CFast partition structure which the
existing USB ID# 680480-03 and 1114023-01 cannot provide. As such, an improved USB ID#
680480-04 Recovery Drive Kit ID# 1127022-01 will be made available as a replacement which
will provide this and other enhanced capabilities. The new USB recovery drive will look
physically different from the old drives to avoid confusion.
Console ID#
and Software
Revision Recovery Drive
ID# 1114023-01
Recovery Drive
Kit ID# 1127022-
01
USB ID#
680480-03
Recovery Drive
Kit ID# 1127022-
01
USB ID#
680480-04
745604-NN Yes Yes No
R1 Yes Yes No
R2 Yes Yes No
R3 Yes Yes No
R4 Yes Yes No
R4 SP4 Yes Yes Yes
1113777-NN No Yes Yes
R1 No Yes Yes
R2 No Yes Yes
R3 No Yes Yes
R4 No Yes Yes
R4 SP4 No Yes Yes
R5 No No Yes
Post R5 No No Yes

Console ID # 745604-NN Console ID # 1113777-NN
Recovery drive 1114023-01 only supports 745604-NN and all software versions
supported by those consoles. Attempting to make a backup on 1113777-NN will fail.
Recovery drive kit 1127022-01 with USB ID# 680480-03 supports 745604-NN and all
software versions supported by those consoles, as well as 1113777-NN consoles with all
software versions prior to R5. Attempting to make a backup on 1113777-NN with R5 or
higher will fail.
The new drive kit 1127022-01 with USB ID# 680480-04 supports all MILLPWRG2
consoles and all software versions to date or planned for the near future.
These enhancements/changes were made:
Users now have the ability to mark a step to be "skipped" when running program.
The Job Clock was improved to show the number of days when the number of hours exceeds
24.
Added Fine Rough parameter to Rough Mill cycle. Options are Retract (default) and Contour.
The contour option is only possible if the radius of the fine roughing tool is more than the half of
the radius of the coarse tool; otherwise, Retract is used regardless of setting.
Improved the startup/shutdown views and messages
The following functionality has been restored to run options:
1. "Graphics Only" button added to Run Options menu.
2. Pause and display OIM messages.
3. Support limited VIEW dialog functionality.
Added separate side & bottom finish amounts in the Contour step.
Added the ability to define basic islands using the contour of standard cycles. The supported
cycles are: rectangle, circle, slot, radial slot, and ring. These cycles now have a new parameter
that specify if the step is a pocket or just a contour. Locate the step immediately before the
associated custom pocket cycle choose contour if it is to be used as an island.

For AMI Spindle Control systems, spindle information is now displayed below the Z axis field in
the DRO screen. Also, the active/programmed spindle RPM can be quickly set by pressing the
black axis key directly to the right of the spindle display area.
Added ability to edit G code values for addresses R, D, U & W in drilling cycles; previously, it
was not possible to edit the values for addresses.
It is now possible to send remote assistance requests from a MILLPWRG2 system to a service
agent whom use Remote Diagnostics PC software.
Enhanced the Repeat step to also support array and frame patterns.
A Redraw softkey (F6) has been added when in the View form dialogue. Redraw performs the
same as the decimal point hot-key. In addition, both methods now re-draw graphics when
pressed.
Enhanced the Change Steps feature to allow changes to Z Pass and Z Peck.
All of the settings in the View dialog are now saved and restored upon reboot, with the
exception of Pan, Zoom, Rotate, and Dry Run Speed.
Programming of the "staging" point for custom pockets is now optional. Moves to this point are
eliminated when no location is provided. If the "staging" point is programmed, moves to this
location at the start and end of the step are still executed.
The PLC has been updated. Any OEM/User customizations to the PLC will need to be
reintegrated into the new PLC project.
The graphics ruler is now also displayed while running a program in the 2D Line View.
Added support for setting a datum during single cycles.
Soft travel limit messages updated to indicate which limit was exceeded.
The NcKernel base was updated to Milestone 10 Service Pack 4.
These errors have been corrected:
Corrected possible tool path issues when using repeat/rotate/mirror steps.
Removed the option to delay the required reboot after changing settings in the Network Settings
dialog, as delaying it could cause unexpected issues.
AUX Function step does not break path continuity when it neighbors a Blend step.

The max feedrate override setting in Job Setup now correctly enforces the acceptable range of
150% to 200%.
The programmed tool field in step forms and on the status bar shows the correct programmed
tool for a tool that is programmed in custom pocket sub-cycles.
Corrected an issue which enabled the user to move the cursor in the active program step listing
while the program is running.
Improved block-form calculation for G-code programs.
The tool now arcs off of the Radial Slot's outer pass when there is no side finish specified.
If not set to “Require Change”, a tool change prompt is suppressed unless the programmed tool
does not match the current tool.
When starting a program, the tool path (and tool) graphical display was delayed if the program
had previously been stopped at the tool prompt.
Corrected an issue in which the file system partition settings for a max scheduled disk check
interval were lower than the actual interval at which the check would occur. This could prevent
the ability to create a clone image of the system using the new HC Clone Drive. To ensure
proper settings and checking, a disk check is now forced after every software update.
When starting a program from a step that does not have a programmed tool step associated
with it: 1. The active tool is the last tool mounted. 2. Spindle settings remain OFF.
Improved operational and program management functionality.
Improved spindle direction and speed performance In G-code programs when speed and
direction are within the same block.
If any issues are encountered, please contact your service representative for assistance or
Other manuals for MILLPWR G2
5
This manual suits for next models
2
Table of contents
Other ACU-RITE Music Mixer manuals

ACU-RITE
ACU-RITE MILLPWR G2 Technical manual

ACU-RITE
ACU-RITE MILLPWR G2 Technical manual

ACU-RITE
ACU-RITE MILL PWR G2 Technical manual

ACU-RITE
ACU-RITE MILL PWR G2 Technical manual

ACU-RITE
ACU-RITE Mill PWR G2 Technical manual

ACU-RITE
ACU-RITE MILLPWR G2 Technical manual

ACU-RITE
ACU-RITE MILL PWR G2 Technical manual

ACU-RITE
ACU-RITE MILL PWR G2 Technical manual

ACU-RITE
ACU-RITE MILL PWR G2 Technical manual

ACU-RITE
ACU-RITE MILL PWR G2 Technical manual