Acuity Brands Lighting RUBIK 9CS User manual

WARNING: Please read the“important safetyinstructions” priorto installation of thisproduct. The mounting instructions can be found inside the
mounting kitsor downloaded from www.marklighting.com
INSTALLATION INSTRUCTIONS
These installation instructions are used for installing the following luminaires and kits:
Luminaire Fixture Type
RUBIK 9CS, RUBIK 5CC, RUBIK 3CL Recessed -Planar Grid Solution
A) LED Important Safety Instructions………………………………………………………………………………………..……Page 1
B) Identification of Recessed Rubik Luminaire...................................................................................................................Page 2
C) Overview of Rubik Installation........................................................................................................................................Page 2
D) E10W and EMG Instructions……………………………………………………………………………………………………Page 3
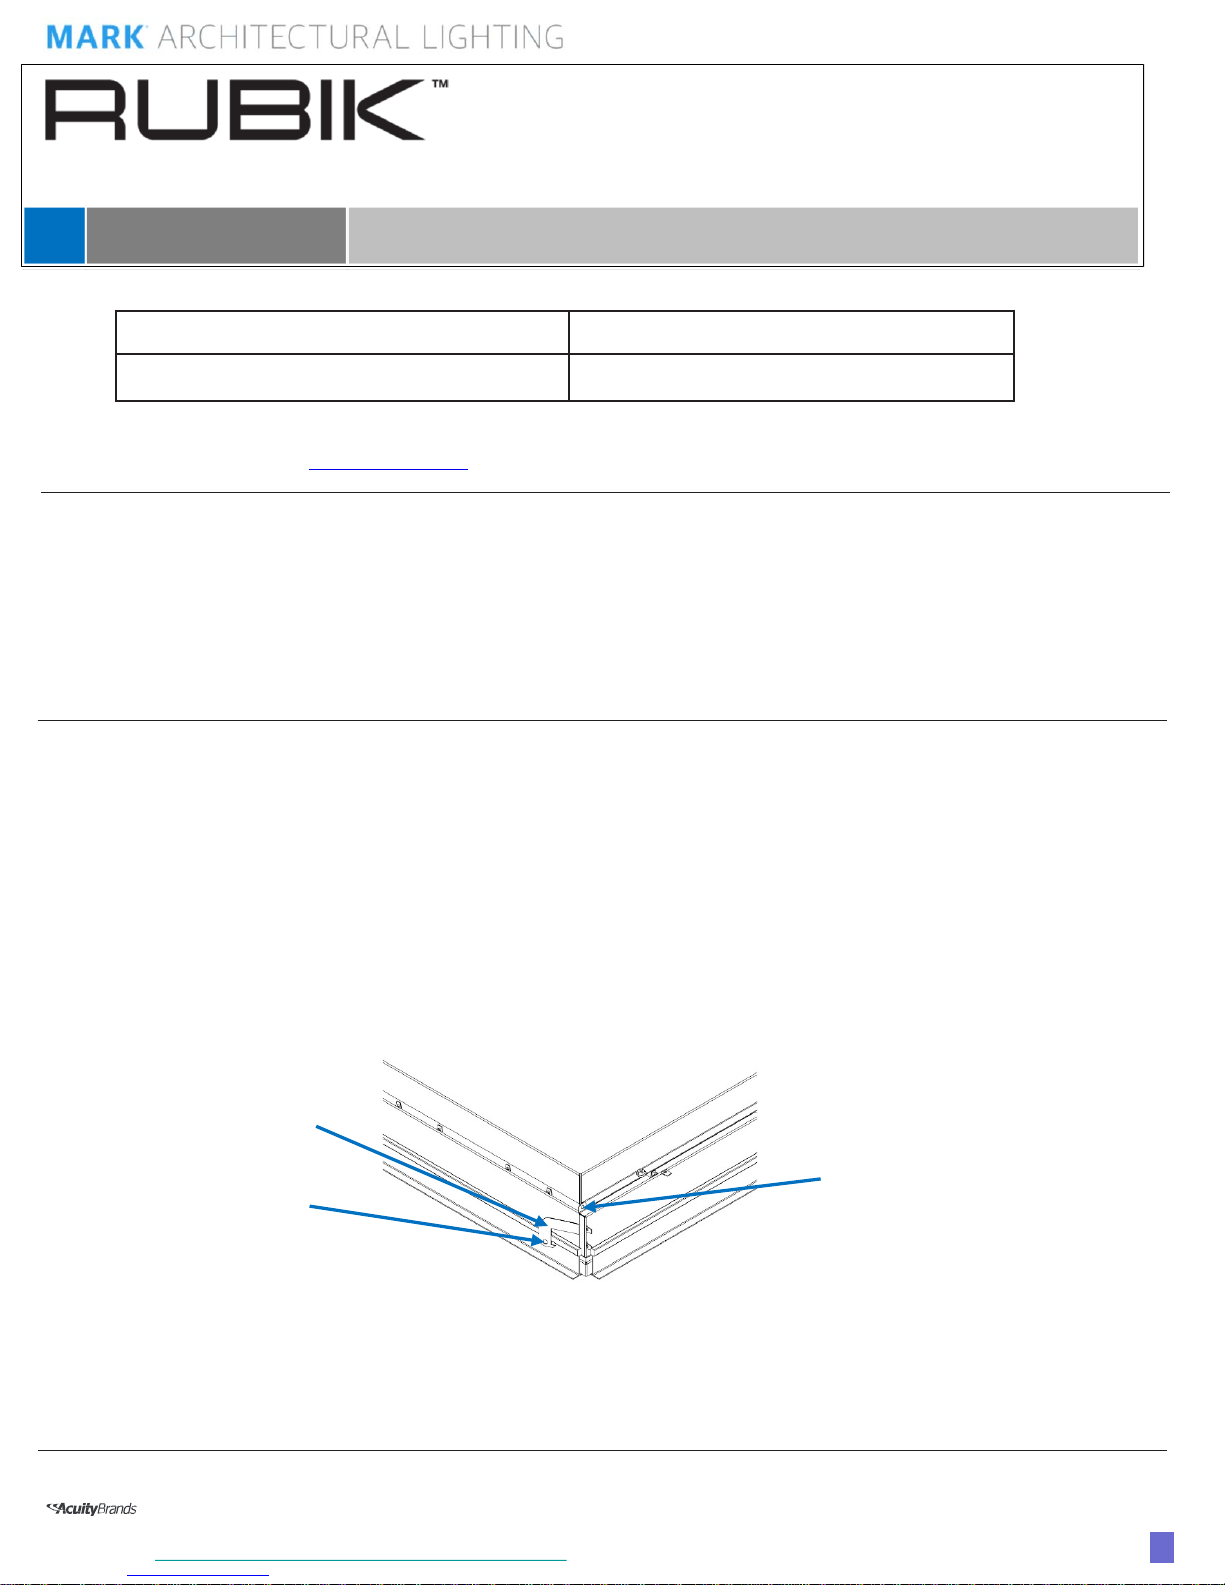
E) Typical nLight Network Layout………………………………………………………………………………………………….Page 4
F) Ceiling Trim……………………………………………………………………………………………………………………….Page 5
One Lithonia Way, Conyers, Georgia 30012 •Phone: 888-834-5684 •www.marklighting.com
2. Bend the built in T-Bar clips to secure the fixture to the T-Bar ceiling, or use hanger wire hole (see Figure 1). Optionally secure
T-Bar clips to the T-Bar ceiling with fasteners (not provided)
**Caution: MAKE SURE LUMINAIRE IS MOUNTED TO A SECURE STRUCTURE. USE APPROPRIATE MOUNTING
HARDWARE TO INSTALL FIXTURE RATED FOR YOUR APPLICATION. FAILURE TO MOUNT FIXTURE CORRECTLY COULD
RESULT IN SERIOUS INJURY.
Installation Instructions
ABOVE CEILING ACCESS REQUIRED
KEEP THESE INSTALLATION INSTRUCTIONS
1. Place the fixture in the appropriate T-Bar ceiling structure.
BEND OUT HOOK TO
ENGAGE T-BAR WITH
ALL T-BAR CLIPS
HANGER WIRE
ATTACHEMENT
POINT (secure to
appropriate structure
for weight)
Part Number 2400471 –Rev. A
1
OPTIONALLY SCREW
INTO T-GRID
Rubik InstallationInstructions
©2016 Acuity Brands Lighting, Inc. All Rights Reserved.
We reserve the right to change design, materials and finish in any way that will not alter installed
appearance or reduce function and performance.
www.AcuityBrands.com/CustomerResources/Terms_and_Conditions.aspx
Figure 1.

INSTALLATION INSTRUCTIONS
Rubik InstallationInstructions
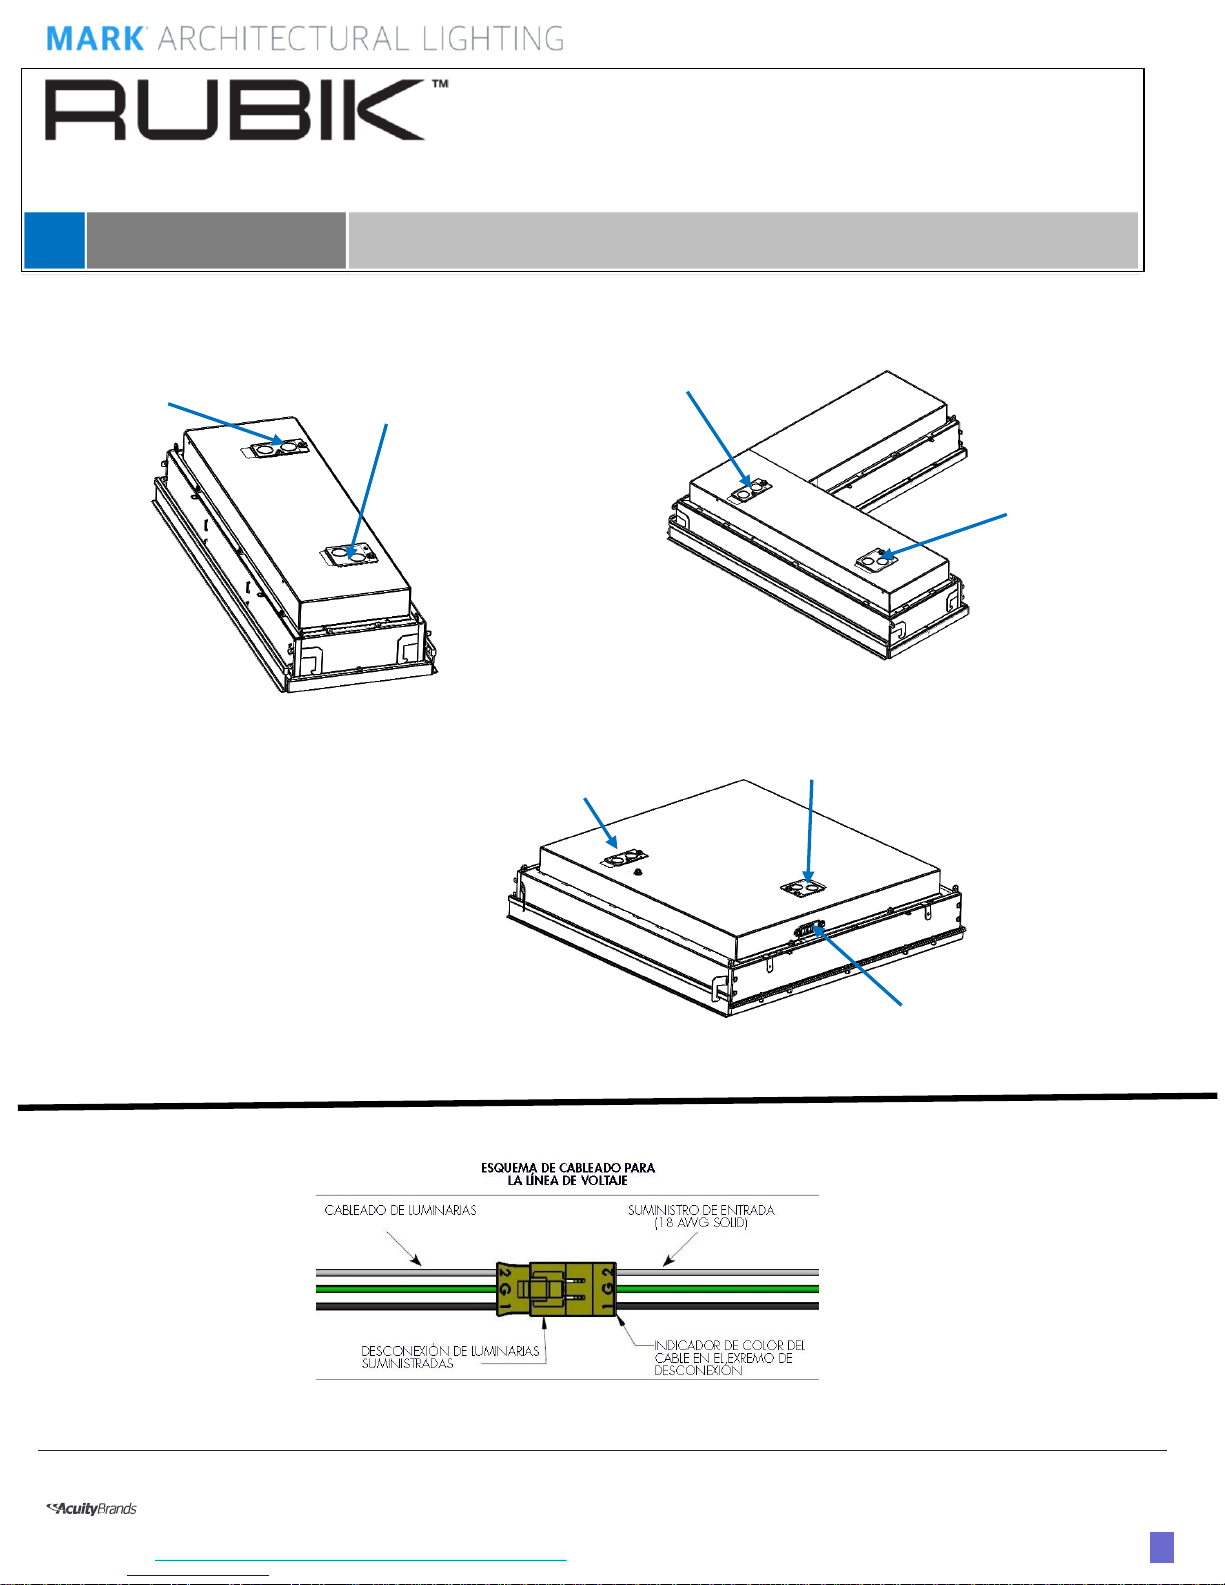
3. Remove access plate and make electrical connections from supply and properly ground as local codes dictate.
4. Reinstall access plate.
Part Number 2400471 –Rev. A
2
Dimming Access Plate
Power Access Plate
RUBIK 3CL
Weight: 12 lbs.
RUBIK 5CC
Weight: 18 lbs.
Dimming Access Plate
Power Access Plate
Power Access Plate
Dimming Access Plate
RUBIK 9CS
Weight: 25 lbs.
One Lithonia Way, Conyers, Georgia 30012 •Phone: 888-834-5684 •www.marklighting.com
©2016 Acuity Brands Lighting, Inc. All Rights Reserved.
We reserve the right to change design, materials and finish in any way that will not alter installed
appearance or reduce function and performance.
www.AcuityBrands.com/CustomerResources/Terms_and_Conditions.aspx
Port for Cat5 data
connections

INSTALLATION INSTRUCTIONS
Part Number 2400471 –Rev. A
3
Rubik InstallationInstructions
E10W OPTION INSTALLATION INSTRUCTIONS
EMG FIELD WIRING DIAGRAM
One Lithonia Way, Conyers, Georgia 30012 •Phone: 888-834-5684 •www.marklighting.com
©2016 Acuity Brands Lighting, Inc. All Rights Reserved.
We reserve the right to change design, materials and finish in any way that will not alter installed
appearance or reduce function and performance.
www.AcuityBrands.com/CustomerResources/Terms_and_Conditions.aspx
INSTALLATION INSTRUCTIONS
Part Number 2400471 –Rev. A
4
Rubik InstallationInstructions
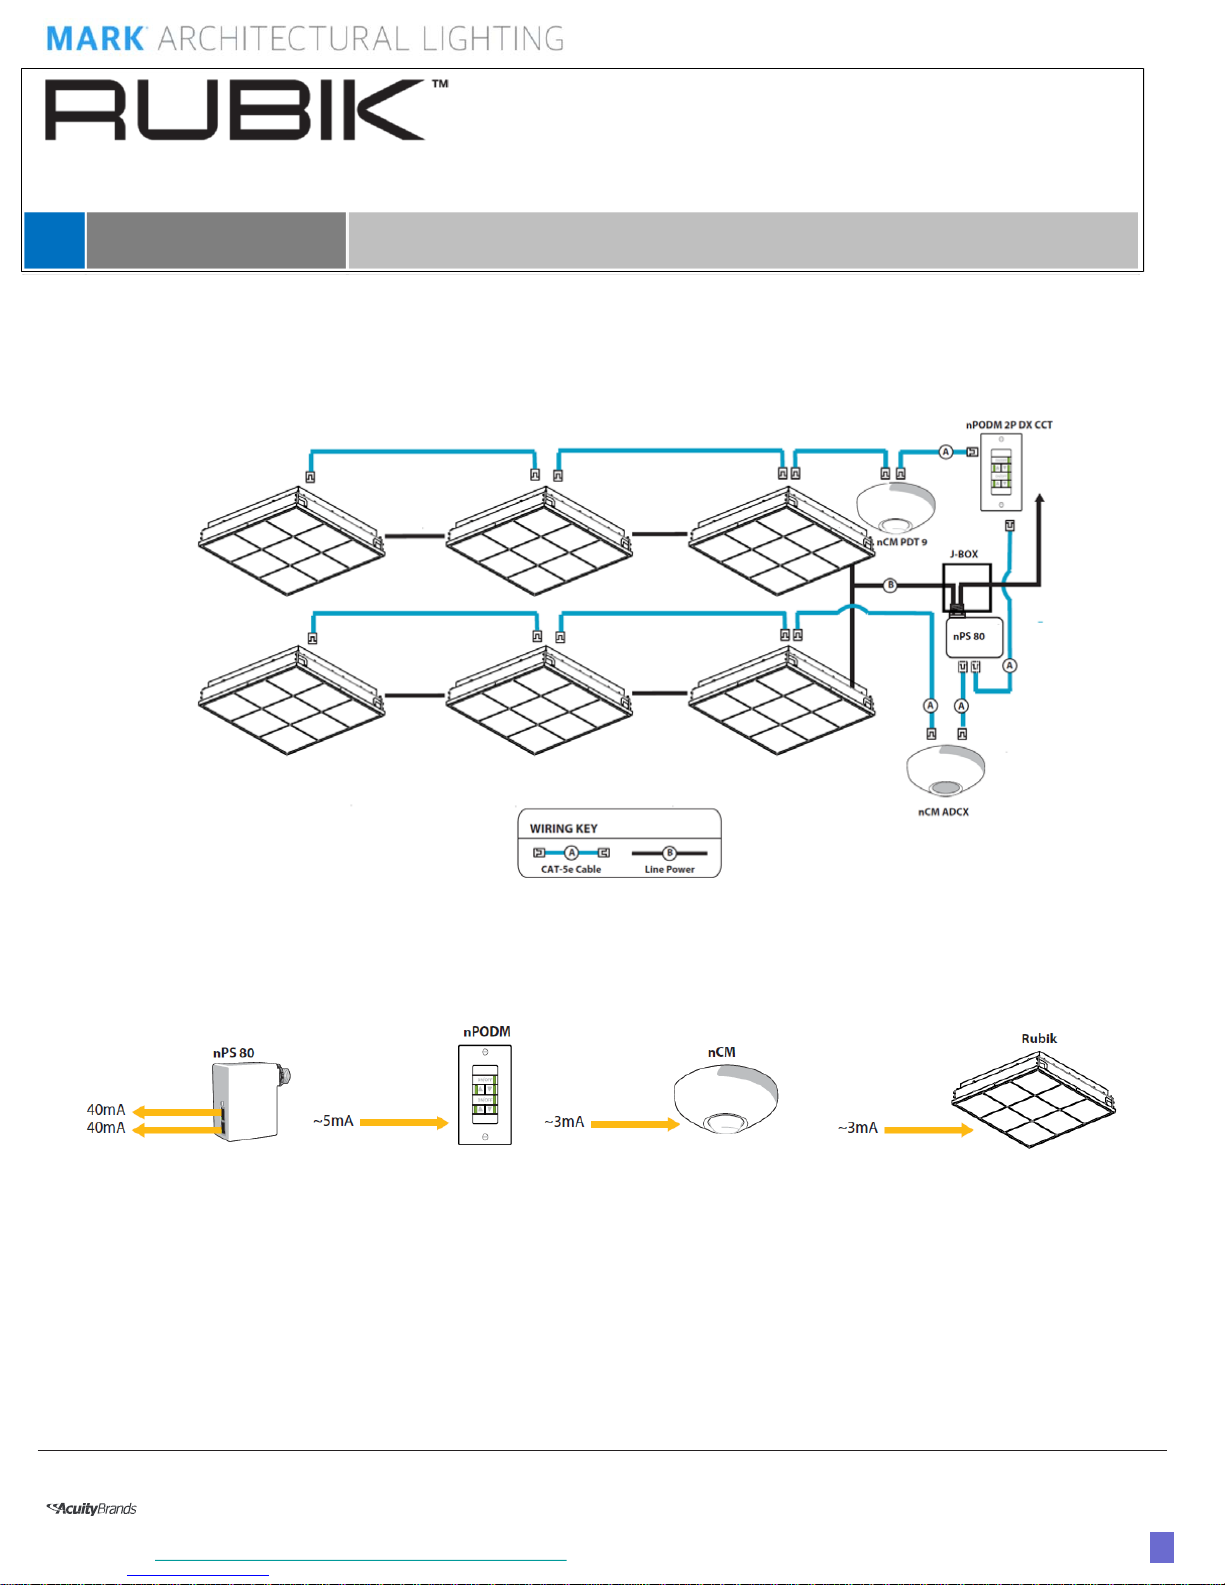
TYPICAL nLight NETWORK LAYOUT
One Lithonia Way, Conyers, Georgia 30012 •Phone: 888-834-5684 •www.marklighting.com
©2016 Acuity Brands Lighting, Inc. All Rights Reserved.
We reserve the right to change design, materials and finish in any way that will not alter installed
appearance or reduce function and performance.
www.AcuityBrands.com/CustomerResources/Terms_and_Conditions.aspx

INSTALLATION INSTRUCTIONS
Part Number 2400471 –Rev. A
5
Rubik InstallationInstructions
One Lithonia Way, Conyers, Georgia 30012 •Phone: 888-834-5684 •www.marklighting.com
©2016 Acuity Brands Lighting, Inc. All Rights Reserved.
We reserve the right to change design, materials and finish in any way that will not alter installed
appearance or reduce function and performance.
www.AcuityBrands.com/CustomerResources/Terms_and_Conditions.aspx
INSTALLATION INSTRUCTIONS
Part Number 2400471 –Rev. A
6
Rubik InstallationInstructions
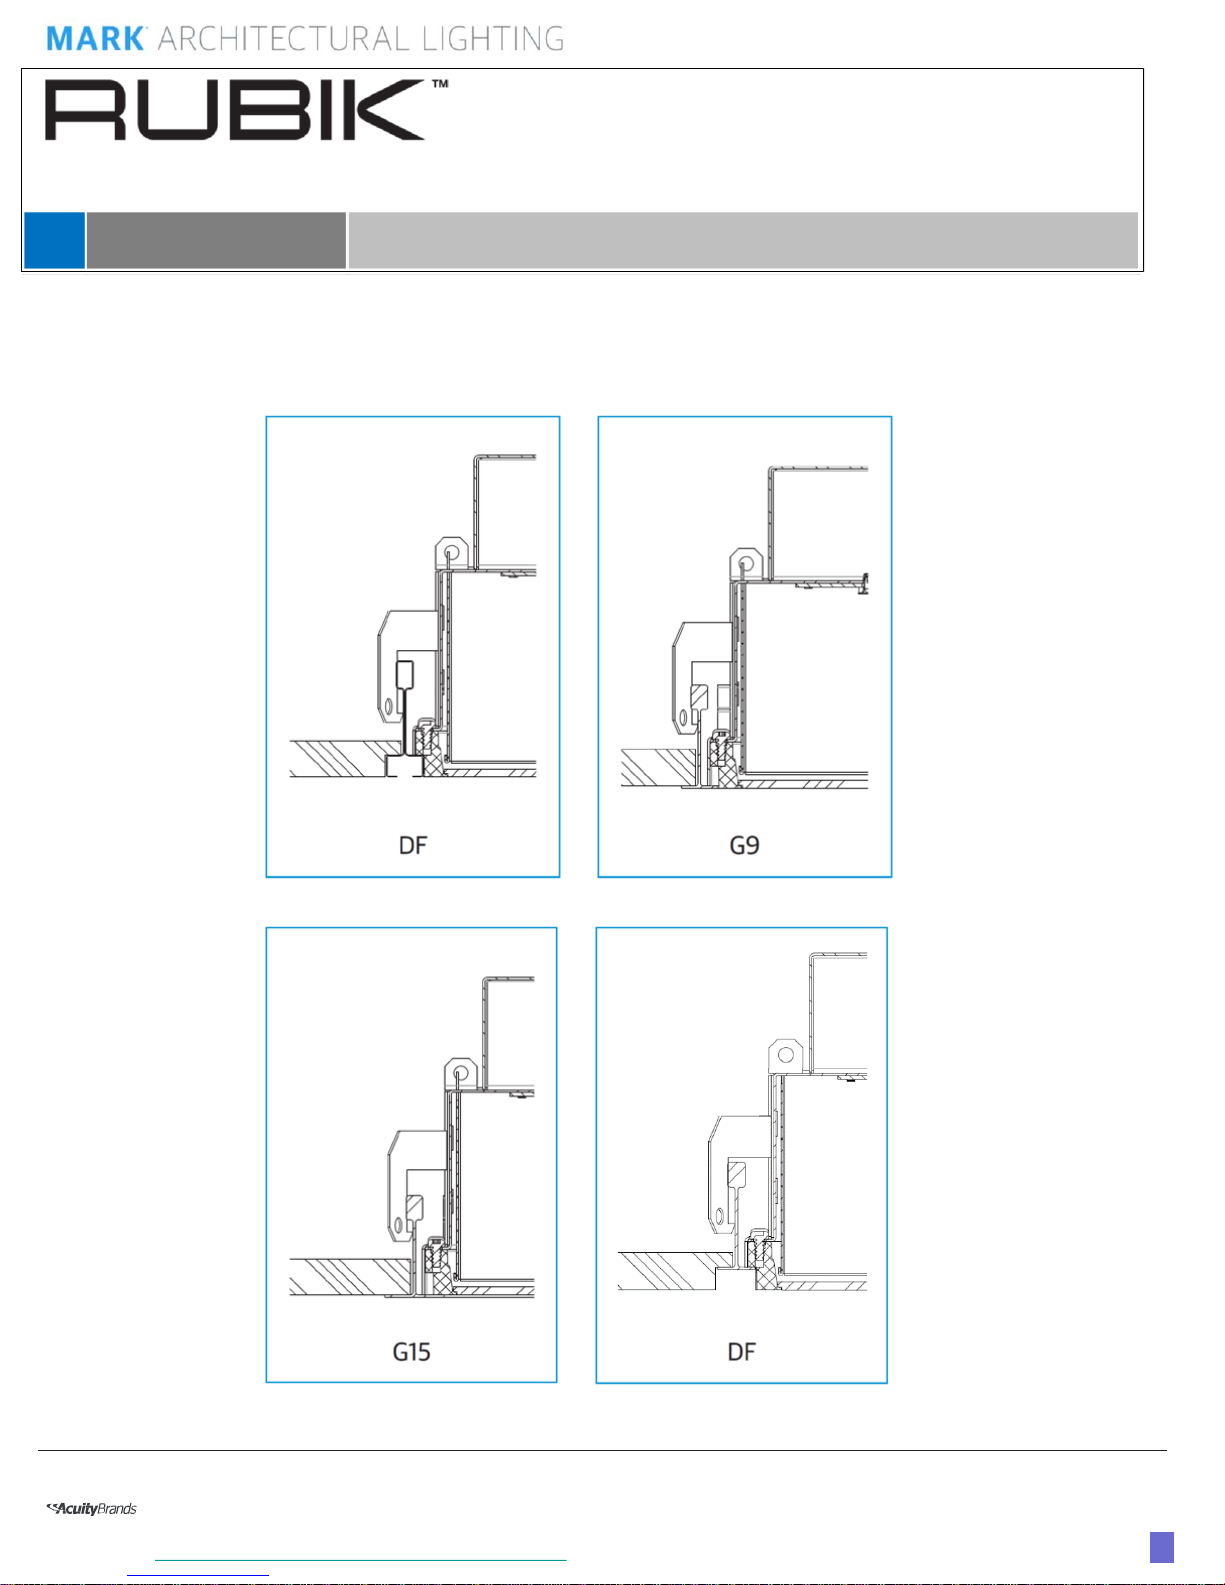
CEILING TRIM
One Lithonia Way, Conyers, Georgia 30012 •Phone: 888-834-5684 •www.marklighting.com
©2016 Acuity Brands Lighting, Inc. All Rights Reserved.
We reserve the right to change design, materials and finish in any way that will not alter installed
appearance or reduce function and performance.
www.AcuityBrands.com/CustomerResources/Terms_and_Conditions.aspx
Shown with
9/16” slot grid
and tegular tile
Shown with
15/16” inverted
tee grid and flat
tile
Shown with
9/16” inverted
tee grid and flat
tile
Shown with
9/16”inverted tee
grid and tegular
tile
INSTALLATION INSTRUCTIONS
Part Number 2400471 –Rev. A
7
Rubik InstallationInstructions
One Lithonia Way, Conyers, Georgia 30012 •Phone: 888-834-5684 •www.marklighting.com
©2016 Acuity Brands Lighting, Inc. All Rights Reserved.
We reserve the right to change design, materials and finish in any way that will not alter installed
appearance or reduce function and performance.
www.AcuityBrands.com/CustomerResources/Terms_and_Conditions.aspx
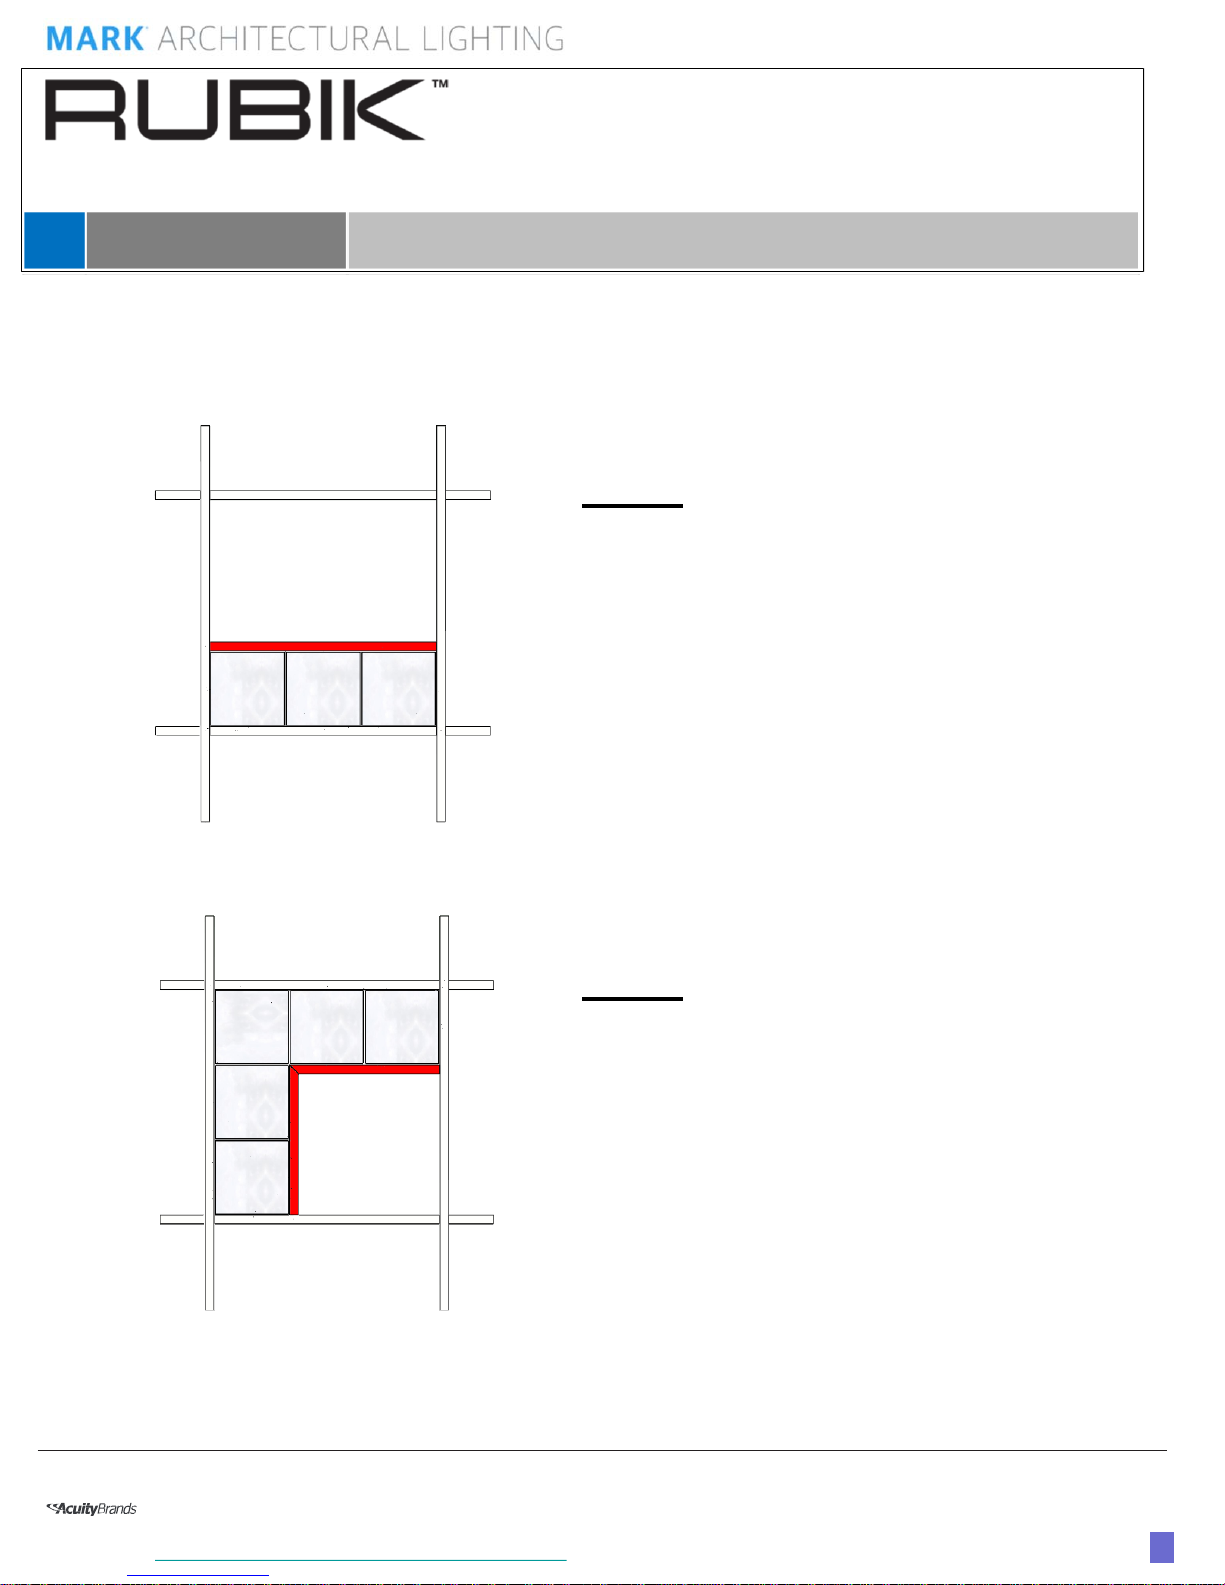
3 Cell
•Measure width of fixture
•Measure length of needed
t-grid, highlighted in red.
•Secure grid in a method
that is in accordance NEC
and local codes
5 Cell
•Measure width of fixture
•Measure length of needed t-
grid, highlighted in red.
•Secure grid in a method that is
in accordance NEC and local
codes


ADVERTENCIA: Lea las "instrucciones de seguridad importantes” antes de instalar este producto. Las instrucciones de montaje se pueden
encontrar en el interior de los juegos de montaje o pueden descargarse de www.marklighting.com
Estas instrucciones de instalación se utilizan para instalar las siguientes luminarias y equipos:
Luminarias Tipo de luminaria
RUBIK 9CS, RUBIK 5CC, RUBIK 3CL Empotrada - Solución de rejilla plana
A) Instrucciones de seguridad importantes sobre el LED…………………………………………………….. Página 1
B) Identificación de luminaria Rubik empotrada......................................................................................... Página 2
C) Resumen de la instalación de Rubik..................................................................................................... Página 2
D) Instrucciones E10W y EMG .................................................................................................................. Página 3
E) Disposición típica de la Red nLight………………………………………………………………………….. Página 4
F) Recorte de techo………………………………………………………………………………………………. Página 5
One Lithonia Way, Conyers, Georgia 30012 •Teléfono: 888-834-5684 •www.marklighting.com
2. Doble los clips de barra en T incluidos para asegurar la iluminaria al techo de barra en T, o utilice un agujero de alambre de suspensión
(véase la Figura 1). Opcionalmente asegurar clips de barra en T para el techo tipo barra en T con sujetadores (no incluidos)
**Precaución: ASEGÚRESE DE QUE LA LUMINARIA ESTÉ MONTADA EN UNA ESTRUCTURA SEGURA. UTILICE UN
COMPONENTE DE MONTAJE APROPIADO PARA INSTALAR LA LUMINARIA SELECCIONADA PARA SU APLICACIÓN. UN
MONTAJE INCORRECTO DE LA LUMINARIA PUEDE PROVOCAR LESIONES GRAVES.
Instrucciones de instalación
SE REQUIERE ACCESO AL TECHO SUPERIOR
GUARDE ESTAS INSTRUCCIONES DE INSTALACIÓN
1. Coloque la luminaria en la estructura de techo del tipo barra en T apropiado.
DOBLE EL GANCHO
PARA ENGRANAR LA
BARRA EN T CON LOS
CLIPS DE LA BARRA EN T PUNTO DE
ENGANCHE DE
CABLE DE
SUSPENSIÓN
(asegurar a la
estructura adecuada
para el peso)
Número de pieza 2400471 –Rev. A
1
OPCIONALMENTE
ATORNILLAR EN LA
REJILLA EN T
©2016 Acuity Brands Lighting, Inc. Todos los derechos reservados.
Nos reservamos el derecho de cambiar el diseño, los materiales y el acabado de cualquier manera
en la que no se altere la apariencia instalada ni se reduzca el funcionamiento y el rendimiento.
www.AcuityBrands.com/CustomerResources/Terms_and_Conditions.aspx
Figura 1
INSTRUCCIONES DE INSTALACIÓN
InstruccionesdeinstalacióndeRubik
INSTRUCCIONES DE INSTALACIÓN
3. Retire la placa de acceso y haga conexiones eléctricas desde el suministro y conecte a tierra apropiadamente como dictan los códigos locales.
4. Vuelva a instalar la placa de acceso.
Número de pieza 2400471 –Rev. A
2
Placa de acceso de
atenuador
Placa de acceso de energía
RUBIK 3CL
Peso: 12 lb.
RUBIK 5CC
Peso: 18 lb.
Placa de acceso de atenuador
Placa de acceso de energía
Placa de acceso de energía
Placa de acceso de atenuador
RUBIK 9CS
Peso: 25 lb.
One Lithonia Way, Conyers, Georgia 30012 •Teléfono: 888-834-5684 •www.marklighting.com
©2016 Acuity Brands Lighting, Inc. Todos los derechos reservados.
Nos reservamos el derecho de cambiar el diseño, los materiales y el acabado de cualquier manera
en la que no se altere la apariencia instalada ni se reduzca el funcionamiento y el rendimiento.
www.AcuityBrands.com/CustomerResources/Terms_and_Conditions.aspx
Puerto para conexiones
de datos Cat5
InstruccionesdeinstalacióndeRubik

INSTRUCCIONES DE INSTALACIÓN
Número de pieza 2400471 –Rev. A
3
INSTRUCCIONES DE OPCIONES DE INSTALACIÓN PARA E10W
ESQUEMA DE CABLEADO DE CAMPO EMG
One Lithonia Way, Conyers, Georgia 30012 •Teléfono: 888-834-5684 •www.marklighting.com
©2016 Acuity Brands Lighting, Inc. Todos los derechos reservados.
Nos reservamos el derecho de cambiar el diseño, los materiales y el acabado de cualquier manera en
la que no se altere la apariencia instalada ni se reduzca el funcionamiento y el rendimiento.
www.AcuityBrands.com/CustomerResources/Terms_and_Conditions.aspx InstruccionesdeinstalacióndeRubik

INSTRUCCIONES DE INSTALACIÓN
Número de pieza 2400471 –Rev. A
4
DISPOSICIÓN TÍPICA DE RED nLight
One Lithonia Way, Conyers, Georgia 30012 •Teléfono: 888-834-5684 •www.marklighting.com
©2016 Acuity Brands Lighting, Inc. Todos los derechos reservados.
Nos reservamos el derecho de cambiar el diseño, los materiales y el acabado de cualquier
manera en la que no se altere la apariencia instalada ni se reduzca el funcionamiento y el
rendimiento.
www.AcuityBrands.com/CustomerResources/Terms_and_Conditions.aspx
InstruccionesdeinstalacióndeRubik
Cable CAT-5e
CLAVE DE CABLEADO
Línea de energía

INSTRUCCIONES DE INSTALACIÓN
Número de pieza 2400471 –Rev. A
5
One Lithonia Way, Conyers, Georgia 30012 •Teléfono: 888-834-5684 •www.marklighting.com
©2016 Acuity Brands Lighting, Inc. Todos los derechos reservados.
Nos reservamos el derecho de cambiar el diseño, los materiales y el acabado de cualquier
manera en la que no se altere la apariencia instalada ni se reduzca el funcionamiento y el
rendimiento.
www.AcuityBrands.com/CustomerResources/Terms_and_Conditions.aspx
InstruccionesdeinstalacióndeRubik
INSTRUCCIONES DE INSTALACIÓN
Número de pieza 2400471 –Rev. A
6
RECORTE DE TECHO
One Lithonia Way, Conyers, Georgia 30012 •Teléfono: 888-834-5684 •www.marklighting.com
©2016 Acuity Brands Lighting, Inc. Todos los derechos reservados.
Nos reservamos el derecho de cambiar el diseño, los materiales y el acabado de cualquier manera
en la que no se altere la apariencia instalada ni se reduzca el funcionamiento y el rendimiento.
www.AcuityBrands.com/CustomerResources/Terms_and_Conditions.aspx
Se muestra
con rejilla de
ranura y
baldosa
tegular de
9/16"
Se muestra
con rejilla en T
invertida y
baldosa plana
de 15/16"
Se muestra con
rejilla en T
invertida y
baldosa plana
de 9/16"
Se muestra con
rejilla en T
invertida y
baldosa tegular
de 9/16"
InstruccionesdeinstalacióndeRubik

INSTRUCCIONES DE INSTALACIÓN
Número de pieza 2400471 –Rev. A
7
InstruccionesdeinstalacióndeRubik
One Lithonia Way, Conyers, Georgia 30012 •Teléfono: 888-834-5684 •www.marklighting.com
©2016 Acuity Brands Lighting, Inc. Todos los derechos reservados.
Nos reservamos el derecho de cambiar el diseño, los materiales y el acabado de cualquier manera
en la que no se altere la apariencia instalada ni se reduzca el funcionamiento y el rendimiento.
www.AcuityBrands.com/CustomerResources/Terms_and_Conditions.aspx
3 celdas
•Mida el ancho del
accesorio
•Mida la longitud de la rejilla
en T necesaria, resaltada
en rojo.
•Asegure la rejilla con un
método que esté de
acuerdo con el Código
Eléctrico Nacional (NEC) y
los códigos locales.
5 celdas
•Mida el ancho del accesorio
•Mida la longitud de la rejilla en
T necesaria, resaltada en rojo.
•Asegure la rejilla con un
método que esté de acuerdo
con el Código Eléctrico
Nacional (NEC) y los códigos
locales.


AVERTISSEMENT: Veuillez lireles« consignes de sécurité importantes »avant l’installation ce produit. Les instructions de montage peuvent se
trouver dans les kits de montage ou téléchargées sur www.marklighting.com
INSTRUCTIONS D’INSTALLATION
Ces instructions d’installation servent àinstaller les luminaires et les ensembles suivants :
Luminaire Type de luminaire
RUBIK 9CS, RUBIK 5CC, RUBIK 3CL Solutions pour dispositif encastré –treillis
plans
A) Instructions de sécurité importantes concernant les DEL…………………………………………………………… Page 1
B) Identificationdu luminaire encastré Rubik............................................................................................................ Page 2
C) Vue d’ensemble del’installation Rubik................................................................................................................. Page 2
D) Instructions concernant le E10W et le EMG …………………………………………………………………………. Page 3
E) Disposition type du réseau nLight……………………………………………………………………………………… Page 4
F) Profilé de plafond………………………………………………………………………………………………………… Page 5
One Lithonia Way, Conyers, Georgia 30012 •Téléphone : 888 834-5684 •www.marklighting.com
2. Repliez les pinces de la barre en T pour fixer adéquatement le luminaire aux barres en T du plafond, ou utilisez l’ouverture du fil
de suspension (Figure 1). Il est aussi possible de fixer les pinces de la barre en T à la structure du plafond avec des attaches
(non fournies)
**Attention : ASSUREZ-VOUS QUE LE LUMINAIRE EST MONTÉ SUR UNE STRUCTURE SÉCURISÉ. UTILISEZ LE
MATÉRIEL DE MONTAGE APPROPRIÉ POUR INSTALLER LE LUMINAIRE CORRESPONDANT À L’APPLICATION UNE
INSTALLATION INAPPROPRIÉE PEUT ENTRAÎNER DE SÉRIEUSES BLESSURES.
Instructions d’installation
ACCÈS AU HAUT DU PLAFOND REQUIS
CONSERVEZ CETTE NOTICE D’INSTALLATION
1. Placez le luminaire sur la barre en T de la structure du plafond.
PLIEZ LES CROCHETS
POUR ENGAGER LA
BARRE EN T DANS
TOUTES LES PINCES
POINTS D’ATTACHE
DES FILS DE
SUSPENSION
(sécurisés pour
soutenir le poids de la
structure)
Numéro de pièce 2400471 –Rév. A
1
VISSAGE FACULTATIF
DANS LA STRUCTURE
EN T
Instructions d’installation Rubik
©2016 Acuity Brands Lighting, Inc. Tous droits réservés.
Nous nous réservons le droit de modifier la conception, les matériaux utilisés et la finition du
produit sans altérer l’apparence de l’installation finale ou réduire les performances ni les
fonctionnalités du dispositif.
www.AcuityBrands.com/CustomerResources/Terms_and_Conditions.aspx
Figure 1.

INSTRUCTIONS D’INSTALLATION
Instructions d’installation Rubik
3. Retirez la plaque d’accès et effectuez les connexions au réseau électrique ainsi que la mise à la terre conformément aux
exigences des codes d’électricité en vigueur.
4. Revissez la plaque d’accès.
2
Plaque d’accès du gradateur.
Plaque d’accès du circuit
d’alimentation.
RUBIK 3CL
Poids : 12 lb
RUBIK 5CC
Poids : 18 lb
Plaque d’accès du gradateur.
Plaque d’accès du circuit
d’alimentation.
Plaque d’accès du circuit
d’alimentation.
Plaque d’accès du gradateur.
RUBIK 9CS
Poids : 25 lb
One Lithonia Way, Conyers, Georgia 30012 •Téléphone : 888 834-5684 • www.marklighting.com
©2016 Acuity Brands Lighting, Inc. Tous droits réservés.
Nous nous réservons le droit de modifier la conception, les matériaux utilisés et la finition du
produit sans altérer l’apparence de l’installation finale ou réduire les performances ni les
fonctionnalités du dispositif.
www.AcuityBrands.com/CustomerResources/Terms_and_Conditions.aspx
Port des connexions de
données du Cat5
Numéro de pièce 2400471 –Rév. A

INSTRUCTIONS D’INSTALLATION
3
Instructions d’installation Rubik
INSTRUCTIONS D’INSTALLATION DE L’OPTION E10W
SCHÉMA DE CÂBLAGE EMG DE TERRAIN
One Lithonia Way, Conyers, Georgia 30012 •Téléphone : 888 834-5684 • www.marklighting.com
©2016 Acuity Brands Lighting, Inc. Tous droits réservés.
Nous nous réservons le droit de modifier la conception, les matériaux utilisés et la finition du
produit sans altérer l’apparence de l’installation finale ou réduire les performances ni les
fonctionnalités du dispositif.
www.AcuityBrands.com/CustomerResources/Terms_and_Conditions.aspx
Numéro de pièce 2400471 –Rév. A
This manual suits for next models
2
Table of contents
Languages:
Other Acuity Brands Lighting Lantern manuals


Popular Lantern manuals by other brands


shada
shada 1000436 instruction manual

BEGA
BEGA 84 036 Instructions for use

BEGA
BEGA 33 596 Instructions for use

Dale Tiffany
Dale Tiffany GT701162 Assembly instructions

Wagan
Wagan Brite Nite Pop-Up USB Lantern user manual

Eaton
Eaton Crouse-Hinds Pauluhn DLLA M2 Series Installation & maintenance information