Adagio JTC-100 Maintenance manual

User Care and
Maintenance Guide
Model # JTC-100
Clarinet

Congratulations
Adagio is proud to introduce our new Adagio Clarinet, con-
ceived, designed and built with care and quality to offer musi-
cians and music lovers an instrument of quality to start you
on your new adventure in music.
The clarinet is one of the most refined
wind instruments. It makes a sound by
the vibration of a reed on its mouth-
piece. Like many wind instruments, it
has a very unique tone and sound for
which many great orchestral works
have been composed. It is equally at
home in the orchestra, a jazz ensem-
ble, a pop or big band, and has a most
distinctive sound in dixieland music. You are now becoming
part of that tradition.
Lessons will help you advance more rapidly. The sooner you
begin, the more fun you will have. This is not a difficult instru-
ment to play, and in no time you will be playing along to your
favourite songs and making some of your own.
You must be very careful when handling your new Adagio Clarinet, espe-
cially when putting it together and taking it apart. Ideally, you should have
your music teacher or another musician show you how to do this the first
time. You’ll get the idea very quickly.
This brochure is your first step to becoming familiar with your new in-
strument so read it through carefully. Remember, this instrument was
carefully designed and built. Never force the parts together or apart, and
always keep it clean so that you will have years of enjoyment from it.
How to assemble your New Adagio Clarinet
1To open the case, place it on a table facing you as shown in this
diagram. Make sure that you see the Adagio Logo on top. If you
don’t, then you most likely have the case upside down and should
not open it as your clarinet may fall out.
Your New ADAGIO Clarinet
22 3
2
Open the case by unzipping the zipper and lifting the
lid. Note that your case can be carried by hand or
over your shoulder. Your Adagio Clarinet has 5 dif-
ferent sections that must be CAREFULLY unwrapped.
These five sections will fit together in order for you to
play the instrument.
3Unwrap each section of the clarinet and put each back into its place
as you remove the protective wrapping.
Small plastic pieces have been inserted to protect the keys during ship-
ping. These can now be removed and discarded.
There are five parts to your new clarinet
1
3
2
4 5
1. The mouthpiece, mouthpiece
cap, and ligature (to hold the
reed to the mouthpiece)
2. The barrel
3. The upper joint
4. The lower joint
5. The bell
Adagio has also provided a small container of
cork grease (more about this later) and a
cleaning cloth)
This Illustration shows you what your
clarinet will look like when it has
been completely assembled.
This is a
carefully
crafted
instrument.
It is your
friend. Take
care of it.
Adagio has also included these ac-
cessories for your new clarinet:
1. One extra reed
2. Cleaning cloth
3. Cork grease

4 5
Identify and remove the mouthpiece, lower joint and upper joint from
the Case. Put a very small amount of cork grease (from the container
provided) on your index finger. Spread a very small amount of grease on
the 4 areas where there is cork (at the ends of the upper joint, the end
of the lower joint, and the mouthpiece.) This will make the parts easy to
slip into each other.
Put the sections back into the case once you have greased them.
Attach the Bell to the Lower Joint
Locate the bell in your case and remove it. Remove the lower joint from
the case. Now, push the cork section (that you have just greased) of the
lower joint into the bell with very little pressure and some slight twisting
action to allow it to seat itself easily.
CAREFULLY twist the sections back and forth until the Lower Section
is all the way inside the Bell. DO NOT turn the parts all the way
around. Just back and forth.
Be careful! DO NOT force the sections together!
Slowly move them back and forth and be careful not to squeeze the
lower joint as you could possibly bend some of the rods and keys.
Now attach the upper joint to the two parts you have just
assembled.
Identify the Upper Joint in the Case and remove it. The Upper Joint has
a Bridge Key (as shown.) Push this Key down. This will raise the Bridge.
Place the Cork end of the Lower Joint into the end of the Upper Joint and
SLOWLY push them together using a back and forth motion.
Slowly push the 2 sections together using a back and forth motion being
careful to line up the bridge keys as shown
BE VERY CAREFUL not to squeeze any of the rods or keys. Use gentle
pressure and actions to put the parts together.
Now attach the Barrel
Locate the Barrel in the Case and remove this section. Hold your clarinet
upright, DO NOT lay it down.
Push the barrel into the cork end of the upper Joint using the same slow
twisting motion as you did with the other sections. Now, all that remains
is the mouthpiece.
Last step: Attach the Mouthpiece
Identify the mouthpiece in the case and remove this section. The mouth-
piece has a cap and a ligature on it. The ligature is used to attach the
reed to the mouthpiece. Remove the cap and place it back in the case.
Loosen the ligature screws, and remove it. Stand the clarinet upright
and slowly push in the mouthpiece into the barrel as shown using the
same back and forth motion as before.
The flat part of the Mouthpiece
and the octave key on the Up-
per Joint should be lined up as
shown. The octave key is the
small key on an arm that you will
use with your left thumb once
holding the instrument to play.
Your New ADAGIO Clarinet
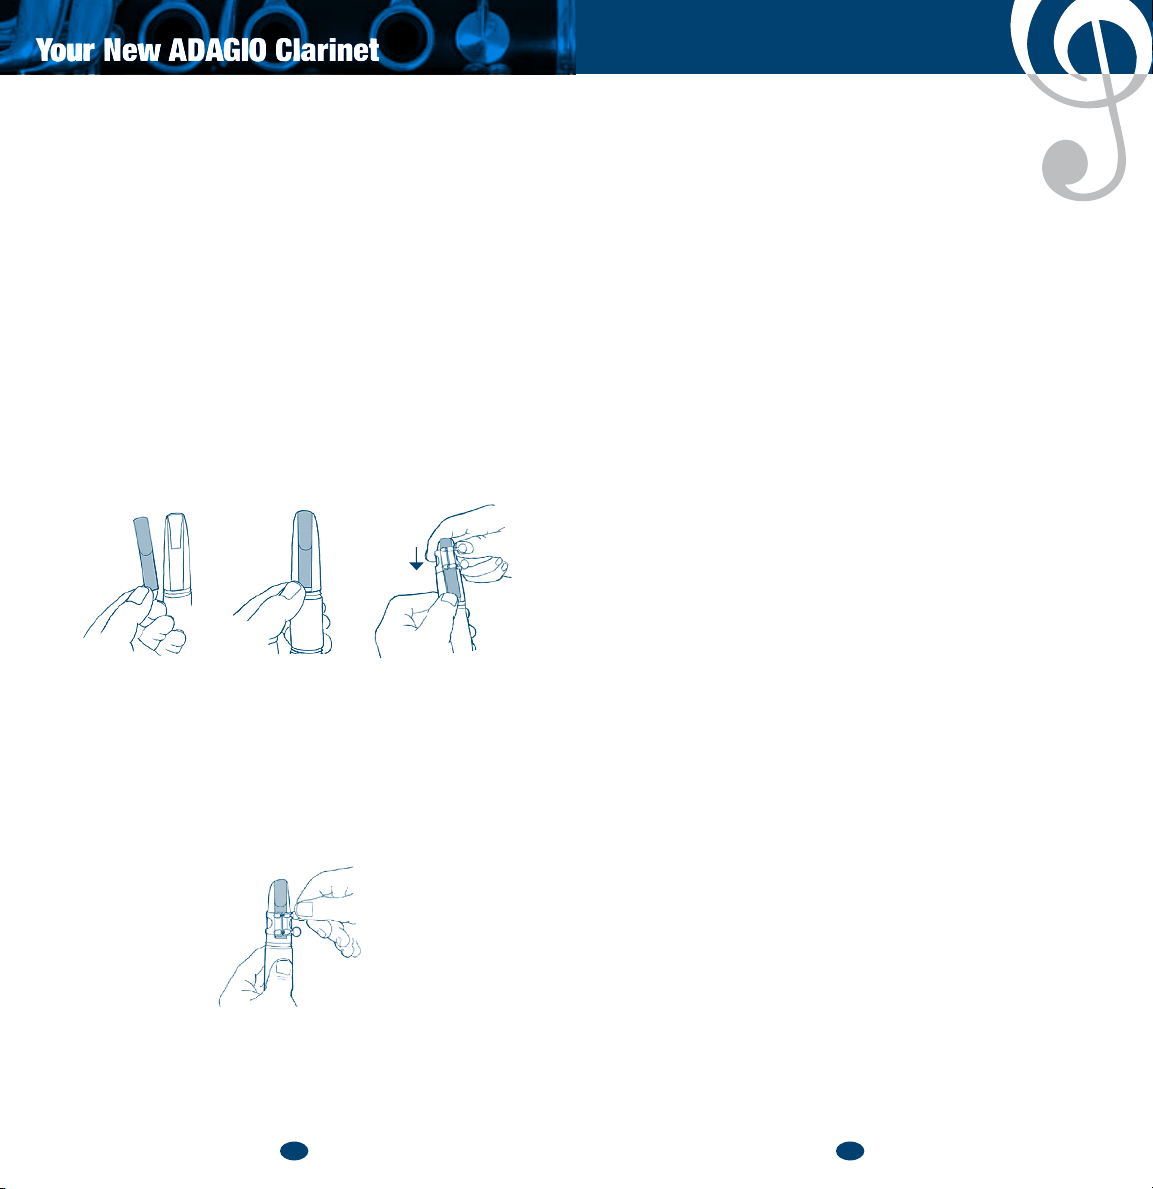
Setting up your reed to your mouthpiece
Identify and remove the reed holder from the storage compartment in
yout case.
Carefully take out a reed from the holder and place the reed in your mouth
for a minute. The reed needs to be moistened before you can place it on
the mouthpiece. Some people prefer to place it in a small glass of water,
but it is best to place it in your mouth.
(TIP: You can place the reed in your mouth when you begin to assemble
your clarinet. By the time you get the parts together, the reed should be
moist enough to put onto your mouthpiece.)
Now place the FLAT side of the moistened Reed on the FLAT side of the
Mouthpiece. Look carefully at the top of the mouthpiece to see that the top
edge of the reed (the thin edge) is even with the edge of the mouthpiece.
Take the ligature out of the case. Make sure the screws are loose so that
you can slip it over the reed.While holding the Reed in position with your left
thumb, CAREFULLY place the ligature over the mouthpiece and reed. DO NOT
TOUCH THE THIN PART OF THE REED as this may render it useless for play-
ing. Push the ligature down on the mouthpiece so that it covers the smooth
part of the Reed. Slowly tighten the screws on the ligature until they are
snug, but not too tight. This will hold the Reed in place while you are playing.
Your clarinet is now completely assembled and should look like the draw-
ings in this brochure. All the logos should be lined up in exactly the same
position. No single logo should be off to the left or right of the center of
your clarinet. This will ensure that you will be able to play without difficulty.
Taking care of your reed
We have provided you with an extra reed for your instrument.
The reed is the very heart of the instrument. A reed is made
of cane or wood. Like most woods, it is affected by dryness
and moisture. Your reed will be moist all of the time you are playing your
instrument. Care should be taken not to hit the tip (the thin end) of the reed
so that it will last you over a longer period of time. It is not possible to tell
how long a reed will last as it depends upon how often you play, how you
take care of it and how you store it. However, when you see that the reed is
split, you should change it. Also, when it begins to get difficult to play notes
(they either squeak or seem to be harder to blow) it usually means that the
reed is getting too soft, or it is split. This is the time to change it and you
will notice an immediate difference when playing with a new reed. Reeds
are not expensive, and you should always have 1 or 2 spare ones in your
storage compartment.
When finished practicing
Loosen the ligature. Carefully remove the reed. Dry it with the cleaning cloth
(supplied with your new Adagio Clarinet) starting at the thick end moving
towards the tip. Be very careful at the tip. Return it to the Reed Holder. Take
off the Ligature and remove the mouthpiece.
Put the Ligature back on the mouthpiece and tighten it slightly to keep it there.
Put the cap over the mouthpiece and return it to the case. The cap is used to
protect the mouthpiece, but can also be used when you have a reed on the
mouthpiece to protect the reed should you not be playing at that moment and
setting your instrument down.
Remove the barrel next. Hold the upper joint near the top with one hand while
handling the barrel with your other hand. Slowly twist the barrel back and forth
until it comes off and put it back in its place in the case. Wipe out the inside
with the cleaning cloth. Separate the upper and lower joints. Press down on
the bridge key of the upper joint so the bridge is raised. Slowly and carefully
twist the sections back and forth until they come apart. DO NOT turn them
around and around! Wipe out this section with the cleaning cloth.
Return the upper joint to the proper compartment in the Case. Hold the bottom
joint in one hand and the bell in the other hand. Slowly twist the Bell back and
forth until it is separated from the lower joint. Wipe out the joint and the bell
with the cleaning cloth.Return the lower joint and bell to the Case.
Your New ADAGIO Clarinet
6 7
Reed Align the
reed with the
top of the
mouthpiece
Mouthpiece

Some good tips:
• Be careful when handling your clarinet. Adagio has nely crafted this
instrument to high standards.
• Always clean and dry your clarinet after playing.
• Place each section back in the correct compartment in the Case.
• Use cork grease on each tenon before assembling your clarinet. DO NOT
overdo it however.
• Use a gentle back and forth motion when putting together or taking apart
your clarinet sections.
• Place the Cap over the Mouthpiece after you have removed the reed.
• DO NOT force the sections into the Case.
• DO NOT close the lid if it seems difcult. Something is not in its proper place.
• DO NOT eat while playing. A small bit of food you may not even notice
can get lodged under a key and prevent it from closing properly which
will render your clarinet either out of tune, or not playable.
• DO NOT turn the clarinet sections around and around. This will accomplish
nothing but possibly damage a part. Always use a twisting back and forth
motion to seat the sections together.
• DO NOT press hard on the keys or rods when handling them. They should
close easily.
• DO NOT touch the tip of the Reed. If you damage it, you will have to replace
it. Playing with a damaged reed will either not play, or make squeaky sounds.
When playing with other musicians
The best musicians are those that can master their instrument to express
themselves. Being a good listener is also one of the best assets a musi-
cian can have. If you play with others, listen to what they are also playing
so that you can find your “fit” and blend in to the music you are all making
together. Making Music is one of the most rewarding things you can do
for yourself
Adagio is happy to help you, Have fun.
CALL THIS NUMBER FIRST IF YOU HAVE
ANY PROBLEMS
DO NOT RETURN THE PRODUCT TO THE STORE
WE WILL BE HAPPY TO HELP:
1-800-343-0353
2165 46th Ave., Lachine
Quebec Canada H8T 2P1
www.kaysound.com
www.adagiopianos.com
5 Coton Lane
Champlain, NY 12919
Other Adagio Musical Instrument manuals


