Adagio GDP-8850 User manual

OWNER SMANUAL
GDP-8850 DIGITALPIANO

2
IMPORTANT SAFETYINSTRUCTION
CAUTION:Useof controlsoradjustmentsor performance ofproceduresother thanthose
specifiedhereinmay result inhazards radiation exposure.
Pleasecarefullystudythismanualandalwayskeepitavailable. Thereare, however,some
installation andoperationprecautionswhichshouldbeawareof:
1) Readtheseinstructions.
2) Keeptheseinstructions.
3) Heedall warnings.
4) Follow allinstructions.
5) Do not usethis apparatusnear water.
6) Cleanonlywith drycloth.
7) Do not block any ventilation openings. Install in accordance
with the manufacturer sinstructions.
8) Do not install nearany heat sources such as radiators, heat
registers, stoves,or other apparatus(including amplifiers) that
product heat.
9) Do not defeat the purposeof the polarized or grounding-typeplug.
A polarized plug has two blades with one widerthat the other. A
groundingtype plug has two blades anda thirdgrounding prong.
The wide blade or the third prong areprovidedfor your safety.
If the providedplug does not fit intoyour outlet, consult an
electrician forreplacement of the obsolete outlet.
10) Protect thepower cord from being walked on or pinched
particularlyatplugs, convenience receptacles, and the point
wheretheexit from the apparatus.
11) Onlyuse the attachments/accessories specified by the
manufacturer.
12) Useonly with the cart, stand, tripod, bracket, or table
specifiedbythe manufacturer, or soldwith the apparatus. When a
cart is used, use cautionwhen movingthe cart/apparatus combination
to avoid injuryfrom tip-over.
S3125A
13) Unplug thisapparatus during lightning storms or whenunusedfor
long periodsoftime.
14) Referallservicingto qualified service personnel. Servicing is
required when the apparatus has been damaged in any way such as
powersupplycord or plug is damaged,liquid has beenspilled or
objects havefallen into the apparatus,the apparatushas been
exposed to rainormoisture, does notoperatenormally, or has
been dropped.
15) Apparatusshall notbe exposed to dripping or splashing andno
objects filled with liquids, such as vases, shall be placed on
the apparatus.
16) Warning –To reduce the risk of fire or electric shock, donot
expose this apparatus to rain ormoisture.
3
INSTRUCTIONS PERTAININGTOARISKOFFIRE,ELECTRICSHOCK ORINJURY:
Thelightning symbolinside a triangle isintendedto alerttheuserto the presence ofuninsulatedor danger-
ousvoltage”that couldconstitute arisk of electric shock.
Theexclamationpoint insideatrinagleisintended to alert theuserof importantoperation andmaintenance/
servicing instructions.
CAUTION: Anychangesormodificationsinconstruction of thisdevicewhicharenot expresslyapproved by
thepartyresponsibleforcompliancecouldvoid thewarrantyand theabilityto operate the equipment.
NOTE:Thisequipment hasbeen tested and found to complywith the limitsfora Class Bdigitaldevice,
pursuanttoPart15ofthe FCCRules.These limitsaredesigned to provide reasonableprotection against
harmfulinterferencein aresidentialinstallation.Thisequipment generates,uses,and canradiateradio
frequency energyand, ifnot installed and used inaccordancewith theinstructions,maycauseharmful
interference toradiocommunications.However,thereisnoguarantee that interferencewillnotoccurin a
particularinstallation. If thisequipment doescause harmfulinterferenceto radio ortelevision reception, which
canbedetermined byturning theequipment off andon,theuseris encouraged to tryto correct theinterfer-
encebyone ormoreof the following measures:
-Reorientorrelocatethereceivingantenna.
-Increasetheseparationbetweentheequipmentandreceiver.
-Connect the equipment into anoutlet on a circuit differentfrom that to whichthereceiverisconnected.
-Consultthedealeroranexperienced radio/TVtechnicianforhelp.”
GENERALPRECAUTIONS
CAUTION
RISKOFELECTRICSHOCK
DONOTOPEN
CAUTION:TOREDUCETHERISK OFELECTRIC SHOCK,
DONOTREMOVECOVER ORBACK
NOUSER-SERVICEABLEPARTSINSIDE
REFERSERVICINGTO QUALIFIEDSERVICEPERSONNEL
!
!
T
H
I
S
D
E
V
I
C
E
C
O
M
P
L
I
E
S
W
I
T
H
P
A
R
T
1
5
O
F
T
H
E
F
C
C
R
U
L
E
S
.
OPERATIONISSUBJECTTOTHEFOLLOWINGTWOCONDITIONS:
(1)THISDEVICEMAYNOTCAUSEHARMFULINTERFERENCE,AND
(2)THISDEVICEMUSTACCEPTANYINTERFERENCERECEIVED,INCLUDINGINTERFERENCE
THATMAYCAUSEUNDESIREDOPERETION.

4
TAKE CARE OFYOUR PIANO
Thisdigitalpiano will supplyyou with years of musicalenjoyment ifyou follow thesimple ruleslisted below.
WARNING
When using electricalproducts, basicsafety
precautionsshouldalwaysbefollowed,
includingthefollowing:
SAFETY
PowerSource -Theproductshouldalwaysbe
connectedto apowersupply only of the type
describedinthe operatinginstructionsoras
markedontheproduct.
PeriodsofNonuse -The power-supplycordof
theproductshouldbeunpluggedfromthe
outletwhenleftunused fora long period of
time.
SERVICEANDMODIFICATION
Thisproduct shouldbe serviced byqualified
servicepersonnelwhen,
•thepowersupplycord orthe plughasbeen
damaged,
•liquidhasbeen spilledinto the unitorit has
beenexposedtorain,
•theinstrumentdoesnotappearto operate
normally orexhibitsa markedchange in
performance.
•theinstrumenthasbeen droppedorthe cabinet
hasbeendamaged.
•Do notattempt to open the pianoormakeany
change inthe circuitsorpartsofthe unit.
HANDLINGANDTRANSPORT
•Neverapplyexcessive force to the controls,
connectorsorotherpartsof the instrument.
•Always unplug cablesbygripping the plug
firmly, not bypulling on the cable.
•Disconnectall cablesbeforemoving the
instrument.
•Physicalshocks caused bydropping,
bumping, orplacing heavyobjectson the
instrument can resultinscratchesand/ormore
seriousdamage.
•Carefullycheckthe amplifiervolume control
before starting to play. Excessive volume can
causepermanenthearingloss.
CLEANING
•Forthehigh-polishfinishes,clean thecabinet
andpanelwithasoftnonabrasivedry cloth.
Thisclothshouldbe forHighGlossLacquer
FinishFurniture.Awaxbased polishspecifi-
cally forHighGloss LacquerFinish Furniture
maybe used on the cabinet. Do not usepaint
thinnerorpetrochemicalbasedpolishes.
LOCATION
Do not expose the instrument to the following
conditionstoavoiddeformation, discoloration, or
moreseriousdamage:
-directsunlight (nearawindow)
-high temperatures(nearaheatsource,outside,
ornearawindow)
-rainorexcessivehumidity
-excessivedust
-strongvibration
•Leave enough space around thepiano foritto
beproperlyventilated.
•Thisinstrument containsdigitalcircuitry and
maycause interferenceifplaced too closeto
radioortelevision receivers.If interference
occurs,movethe instrumentfurtherawayfrom
theaffected equipment.
•Avoidplacing vinylobjectson topof the
instrument, vinylcan stick to and discolorthe
surface.
•The instrument shall not be exposedto dripping
orsplashing andno objectsfilled with liquids,
such asvases, shall be placed on the
instrument.
POWER
•The instrument shouldbe placed whereit is
easytounplug thepowerplug
•Theinstrument is unplugged thepowerplug
duringlightningstorn,cleaning ornotunused
forlong periodsof time.
•Turnthe powerswitchoff when the instrument is
not in use.
•Toavoiddamageto the instrumentand other
devicesto whichitisconnected, turnthe power
switchesof all related devicesoff priorto
connection ordisconnection of MIDI cables.
•Turn thepoweroff ifthemain cable isdamaged
orthe instrument isspatteredwith liquid.
•Do not switch the unit on and off in quick
succession,this placesan undue load on the
electroniccomponents.
•Avoidpluggingthe ACpowercordinto the same
ACoutlet asapplianceswithhighpower
consumption, suchaselectricheatersor
refrigerators.
ForVeneerStyleWood finishastandardpolish
similarto pledge”is acceptableoruseadry
antu-static”cloth.
•To maintainthe lusterof the keysand buttons
wipe with a clean,slightlydampcloth, and then
polish with a soft drycloth.

5
TABLEOFCONTENTS
ASSEMBLY ................................................................................7
PANELCONTROLS................................................................ 10
DEMO .......................................................................................20
KEYBOARDVOICES...............................................................21
Voice Selection.......................................................................21
Layer(dual).............................................................................22
Lower(split)............................................................................22
RHYTHMSECTION ..................................................................24
Rhythm StyleSelect...............................................................24
AdjustingtheTempo...............................................................25
Starting andStopping the Rhythm Style..................................26
Variation..................................................................................27
Fill-In.......................................................................................27
Metronome..............................................................................27
AUTOACCOMPANIMENT (AUTOBASECHORD)................28
Single......................................................................................28
Fingered..................................................................................29
Piano......................................................................................30
Manual Bass Chord................................................................30
AutoHarmony.........................................................................30
SDCARD .................................................................................31
Enterthe SD Cardmode........................................................31
Save.......................................................................................32
Playall songs.........................................................................34
Load........................................................................................34
Solo........................................................................................36
Mute........................................................................................39
Delete.....................................................................................40
FUNCTION ...............................................................................41
Drum Kit Selecting (KeyboardPercussion).............................42
ReverbLevel..........................................................................42
ChorusLevel..........................................................................43
TouchResponse....................................................................43
SplitPointforLowerVoice......................................................44
Split PointforAutoAccompaniment........................................44
AutoHarmony Type Selecting................................................45
MasterTune............................................................................45
Equalization............................................................................46
ReverbType...........................................................................46
Chorus Type...........................................................................47
VocalGrading.........................................................................47
Local........................................................................................47
FactorySetting.......................................................................47

6
TABLEOFCONTENTS
RECORD ..................................................................................48
Recording...............................................................................48
Playback.................................................................................49
REGISTRATIONMEMORY ......................................................51
PLAYALONG SONGS ............................................................52
iPOD DOCK ................................................................................. 54
MIDI ...........................................................................................55
MIDI IMPLEMENTATIONCHART ............................................57
VOICELIST ..............................................................................58
STYLELIST ..............................................................................61
DRUM KITLIST ........................................................................62
PEDALS....................................................................................65
SPECIFICATIONS ....................................................................66

7
Removethepiano bodyfromthepackingcarton.
Hardwareforinstallation islisted below.
Youcanfindthemintheaccesorytray
Removethepedalassemblyand piano legs
fromthepackingcarton.
1.Bolt M12X45 8
2. TappedScrew4X10(Brass)8
3.Wahser12 8
4.PowerChord 1
5.PhilipsScrewDriver 1
6.Wrench 1
ASSEMBLY
Pedalassembly
Pedalsupportrods
Accessories
Legs

8
ASSEMBLY
Installlegstothebottomofthepianowithbolt andwasher.Tightentheboltsusing
wrenchprovided.
Plug pedalcableintothecablesocketinthebottomof thepiano.
Pedalcabelsocket
Powercordreceptacle
Install thepedalassemblypedalwithboltand washer.Tightenthe boltsusing wrench
provided. Then,installthesupportrodsbytappedscrews.Tighten the screwsusing
screwdriverprovided.
9
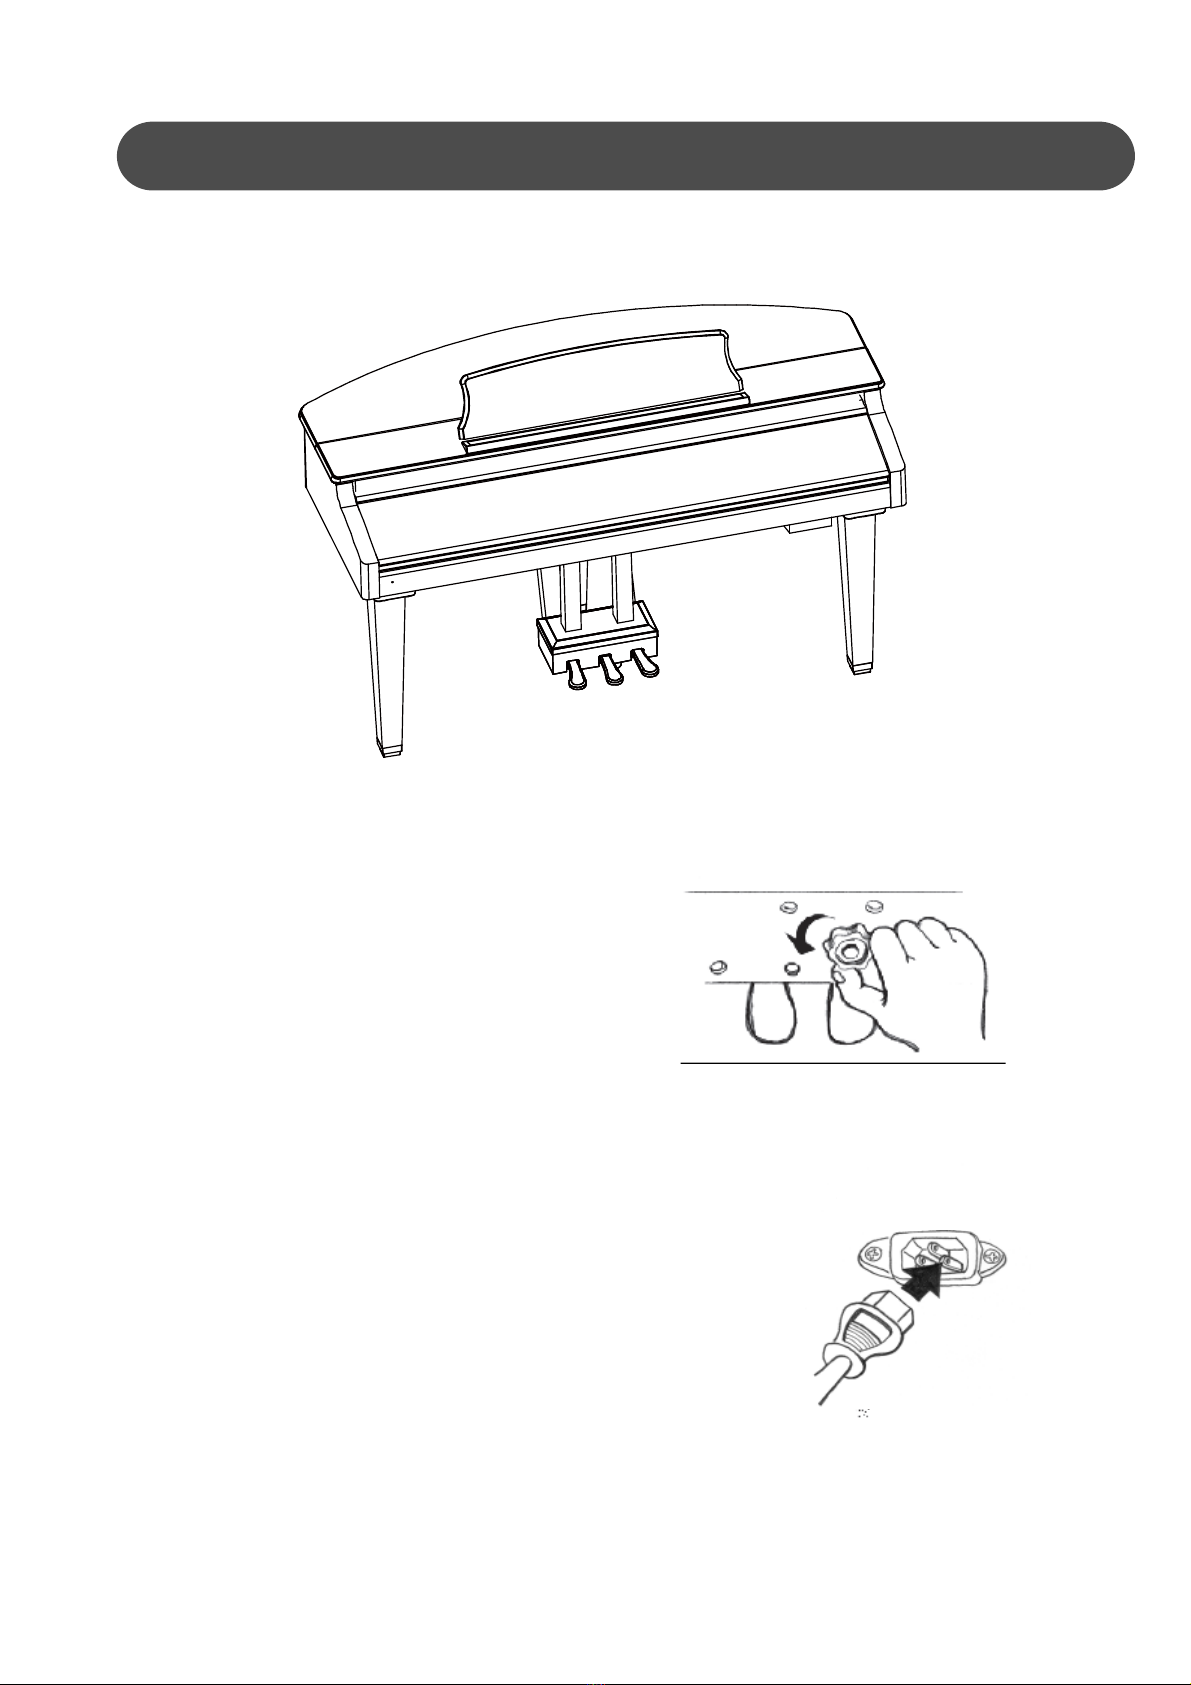
ASSEMBLY
LocatethePowerCordand plug itintotheReceptacleonthebottomofthePiano. Plugthe
PowerCordintoanappropriatewall socket.
2. Placethepianoinitsfinalposition,onthebottomthepedalboardisa
turndownknob.TurnthePedalBraceKnobdowntofirmlytouchthe
floor.
3. LocatethePowerCordandplugitintotheReceptacleonthebottomof
thePiano.PlugthePowerCordintoanappropriatewallsocket.
FRONT HolesforHeadphone
HangerClipto
attachtothe
bottomofthepiano
Placethe pianoinitsfinalposition, on the bottomthe pedalassemblyisaadjustableknob.
TurntheKnobdowntofirmlytouchthefloor.
The pianoassemblyisfinished
10
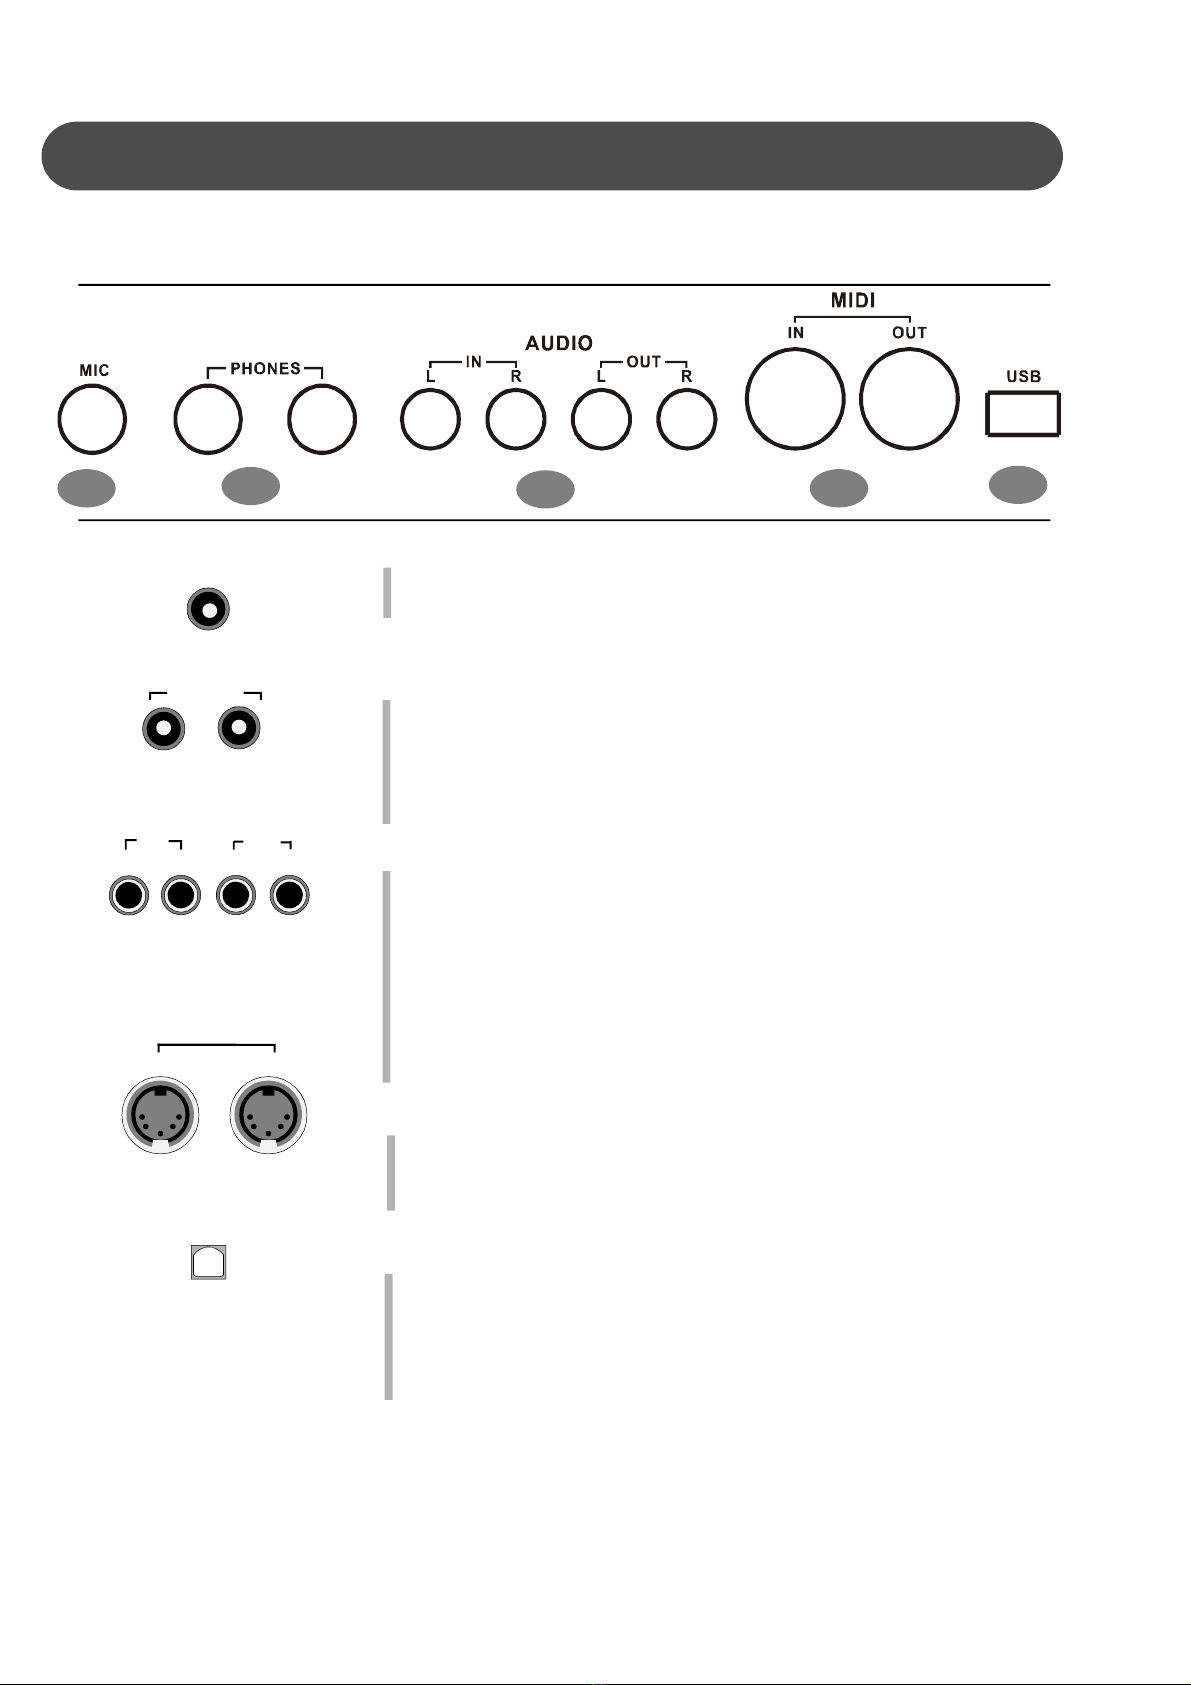
CONNECTORPANEL
2. PHONE1 / PHONE2 -You can playin totalsilence,withoutdisturbing
othersinthe room,bypluggingasetofheadphonesinto one of the
appropriate sockets.When headphonesarepluggedintoeitherofthese
jacksthe mainspeakersystemisturnedoff.Two setsofheadphones
maybe used simultaneously.
3LINEIN -Thesestereoaudioinput jacks willamplifythesuppysignal
through the internalsounddeliverysystem.Theycanbe usedto hook
up itemssuchasahomestereo, PAsystemorotherstand alone
amplifiers.
LINEOUT -Thesestereo audiooutput jackssuppliesthepiano soutput
signalto externalamplification, such asa home stereo,PAsystemor
otherstand aloneamplifiers.
4MIDI IN /MIDIOUT -This pianocontainsMIDIin andMIDI output ports.
MIDIjacksallowcommunicationwith otherproductsequippedwithMIDI
interfaces. Please seetheMIDIsection of this manualforfurtherdetails.
5USB -The USB connectorallowsyou to connectthe piano directlyto your
computer.Thepiano canbeconnectedwithcomputerwithoutdriver
installation undertheWindowsXPenvironment.Thepiano willbe recog-
nizedasan USBAudiodevicethat receivesandtransmitsMIDI
messages.
Thisconnectorpanel, with itsvariousjacks, islocated on the bottom left ofthe piano,underthe keybed.
PHONES
AUDIO
IN OUT
IN OUT
MIDI
USB
L L
R R
MIC
23 4 5
1
1Microphone -Plugina microphone to talk/singthrough yourpiano
speakers.

11
SINGLE
FINGERED
PIANO
ACCOMPVOLUME
–TEMPO+ HARMONY LAYER LOWER
SYNCHSTART
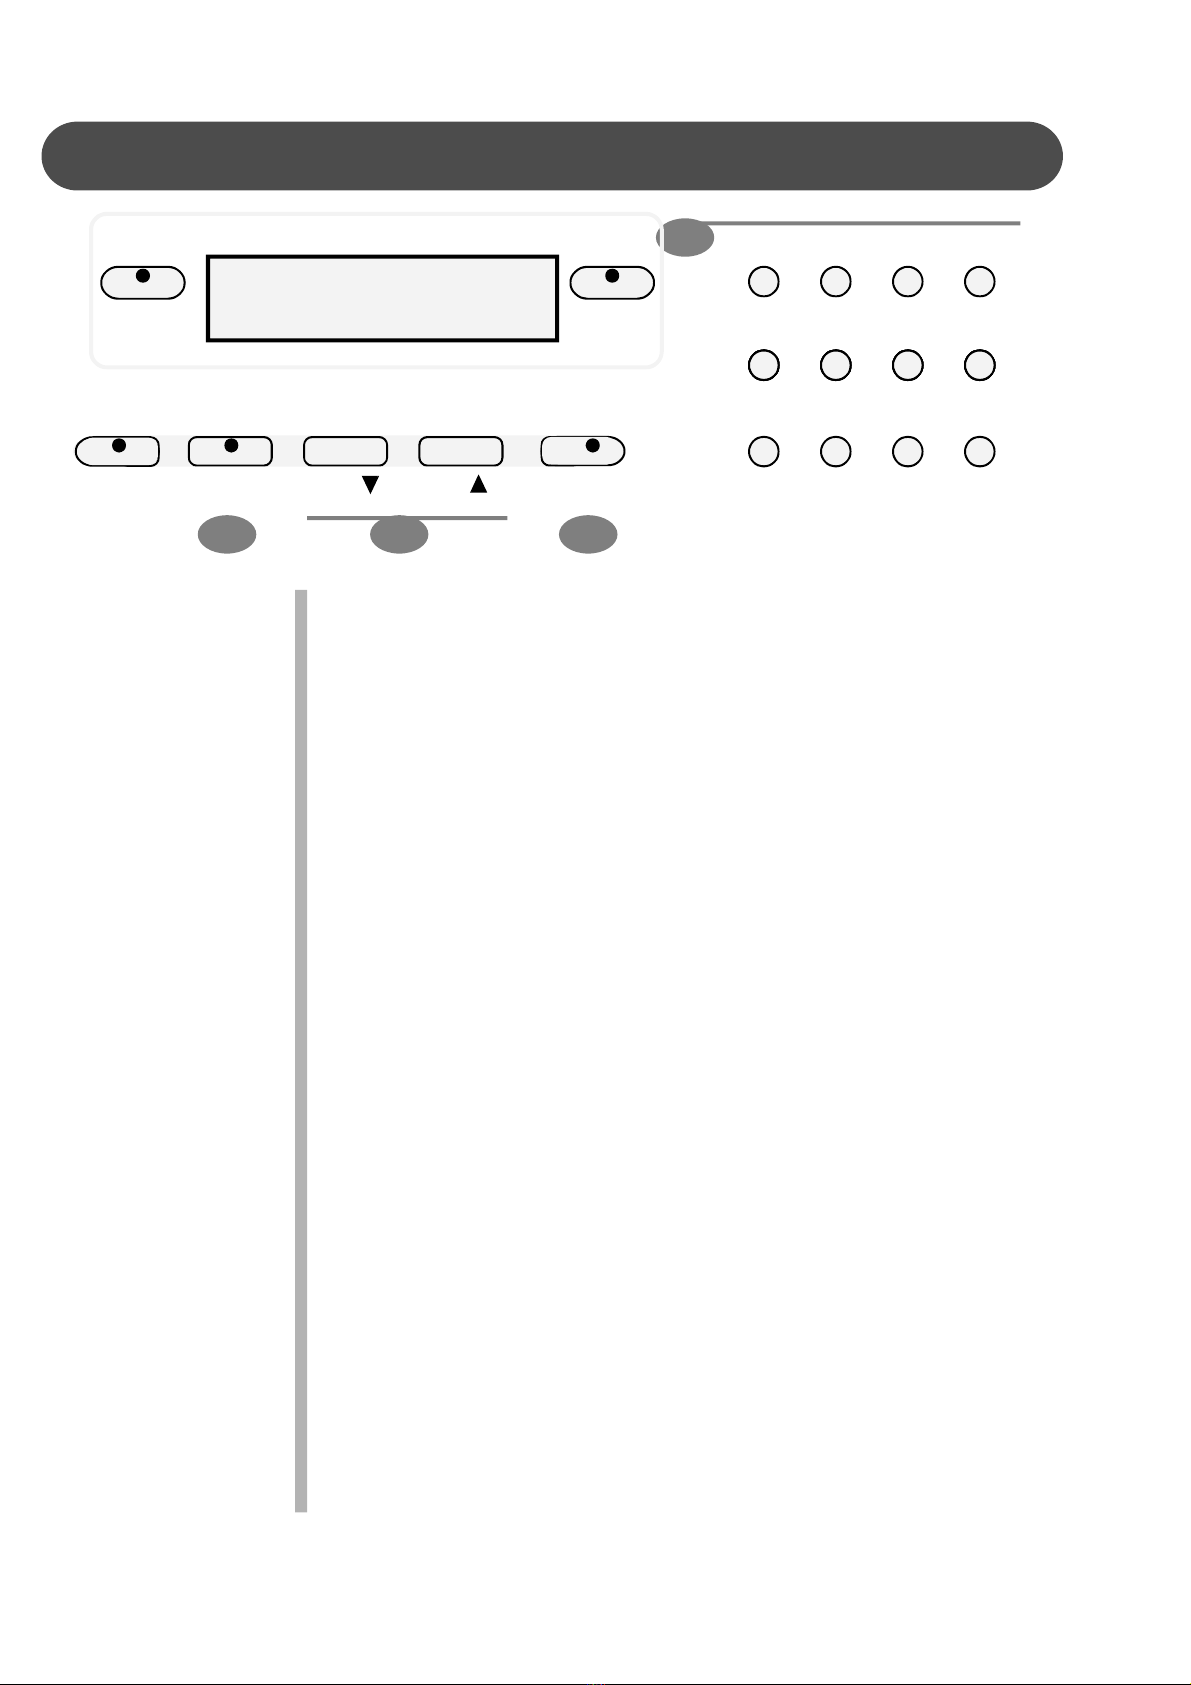
PANELCONTROLS
The elegantcontrolpanelisdivided intoseveraldistinctsections. The following isabrief
descriptionof allthe featureslocatedonthe controlpanel.
1
2
3
4
MINMAX
MASTERVOLUME
MINMAX
START/STOP INTRO/ENDING ACCOMP
FILLIN VARIATION
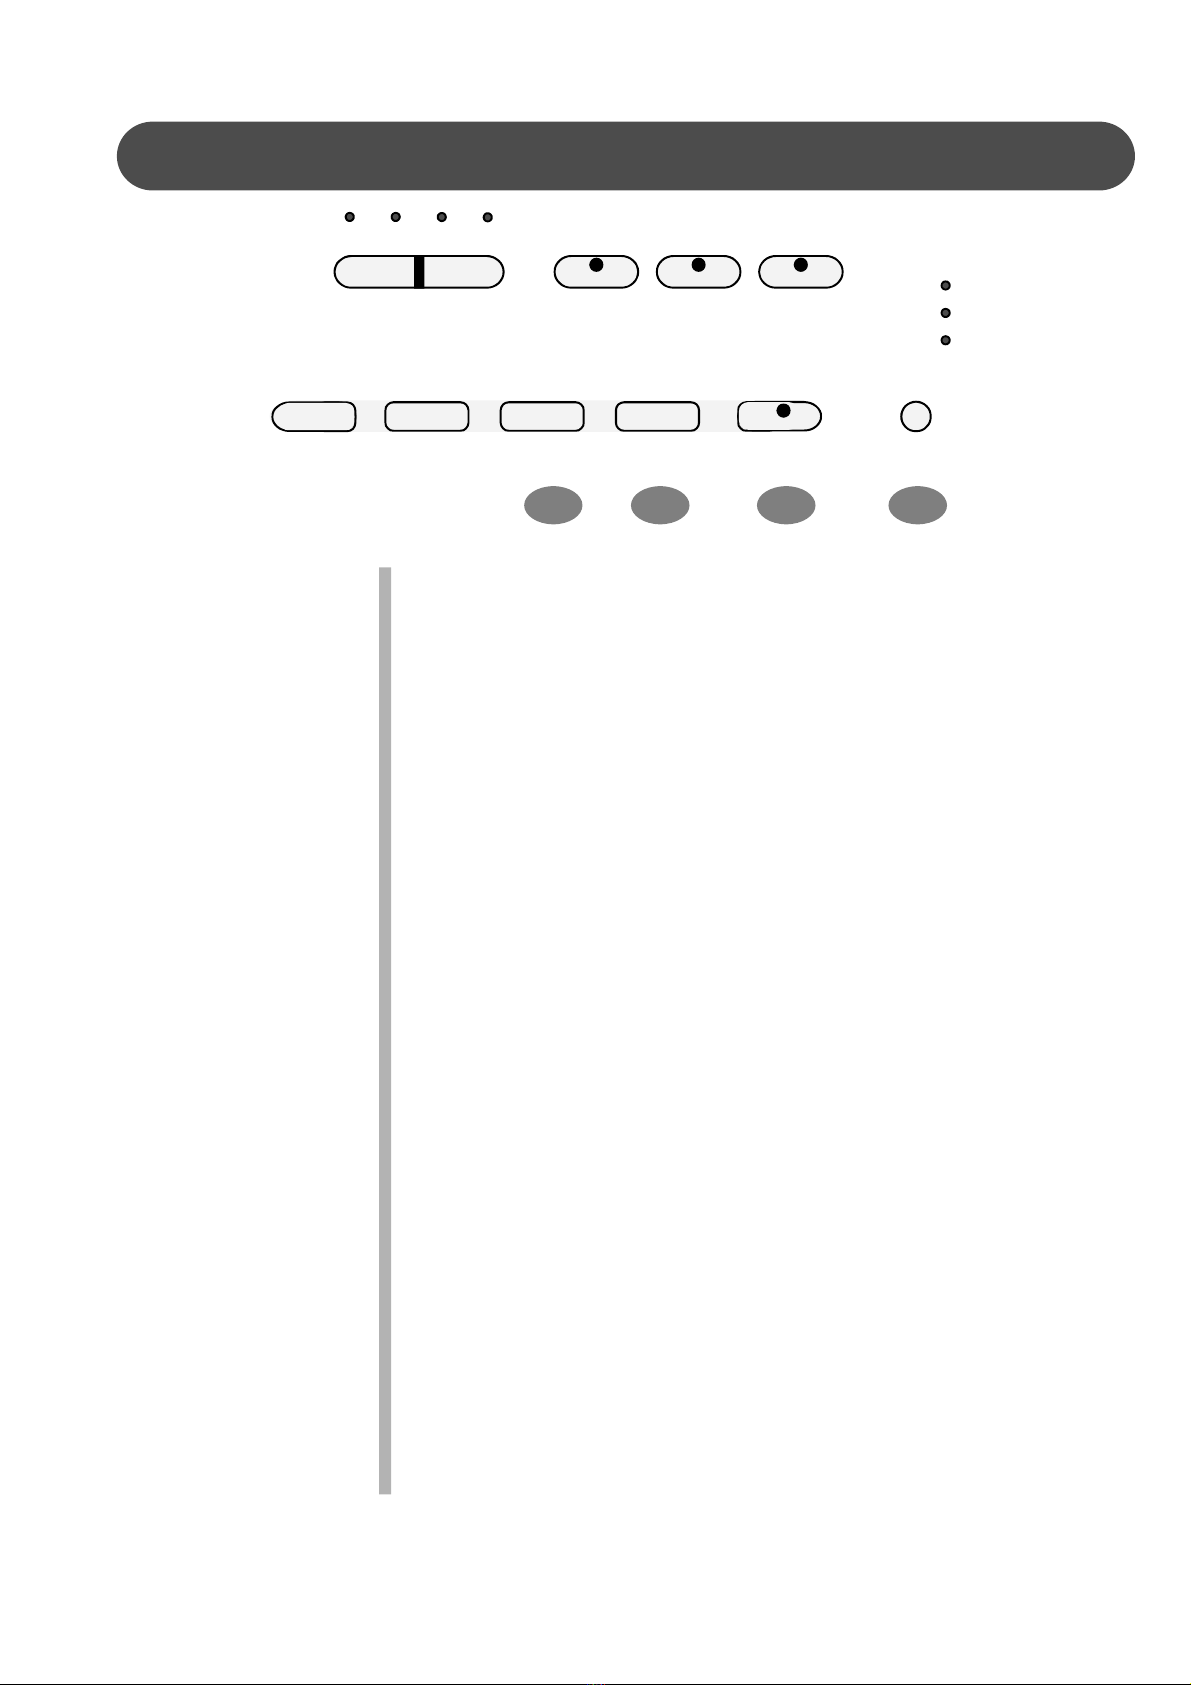
1. MASTERVOLUME -Usethissliding controlbuttontoadjustthe
overall volumeofthe keyboard.
2. ACCOMPVOLUME- Slide thiscontrollertoadjustthe volumeof
theautoaccompaniment,metronomeandtheleftsection ofthe
playalongsong, thekeyboardinstrumentvoicewill not be
affected.
3. TEMPO -Press oneoftheTEMPObuttons,thecurrenttempo
value will appearonthedisplay.You can usethe TEMPO +,
TEMPO –buttons,orthe +/YESand –/NObuttonstochangethe
tempovaluerangefrom40 to240 bpm(beatsperminute).
PresstheTEMPO+orTEMPO –buttonsorthe+/YESand
–/NObuttonssimultaneouslytorecallthe defaulttemposettingfor
theselectedrhythmstyle.Afterthreesecondsthetempowin-
dowwill exsitautomatically.
Thereisafour-dotbeatindicatorabovethe tempobuttons.It
indicatesthetempoandbeatfortheaccompaniment thatis
playing.
4. HARMONY -When selected, the singlenoteplayed intheright-
hand section of thekeyboardwill sound withadditionalauto
harmonynotes.Thenoteplayedintheuppersectionof the
pianodeterminestherootkeyoftheharmony.It isrecom-
mendedthatone notebe playedatatime.If morethanonenote
isplayed onlythe highestnotewilladd harmony.
Autoharmonyisonlyavailablewhentheautoaccompani-
mentisengaged.Theharmonytypeselectionisassignedin
theFunctionmenu.Useittoselectthe typeofharmony,Duet,
CloseHarmony,OpenHarmony,orOctave.SeetheFunction
sectionformoreinformation.

12
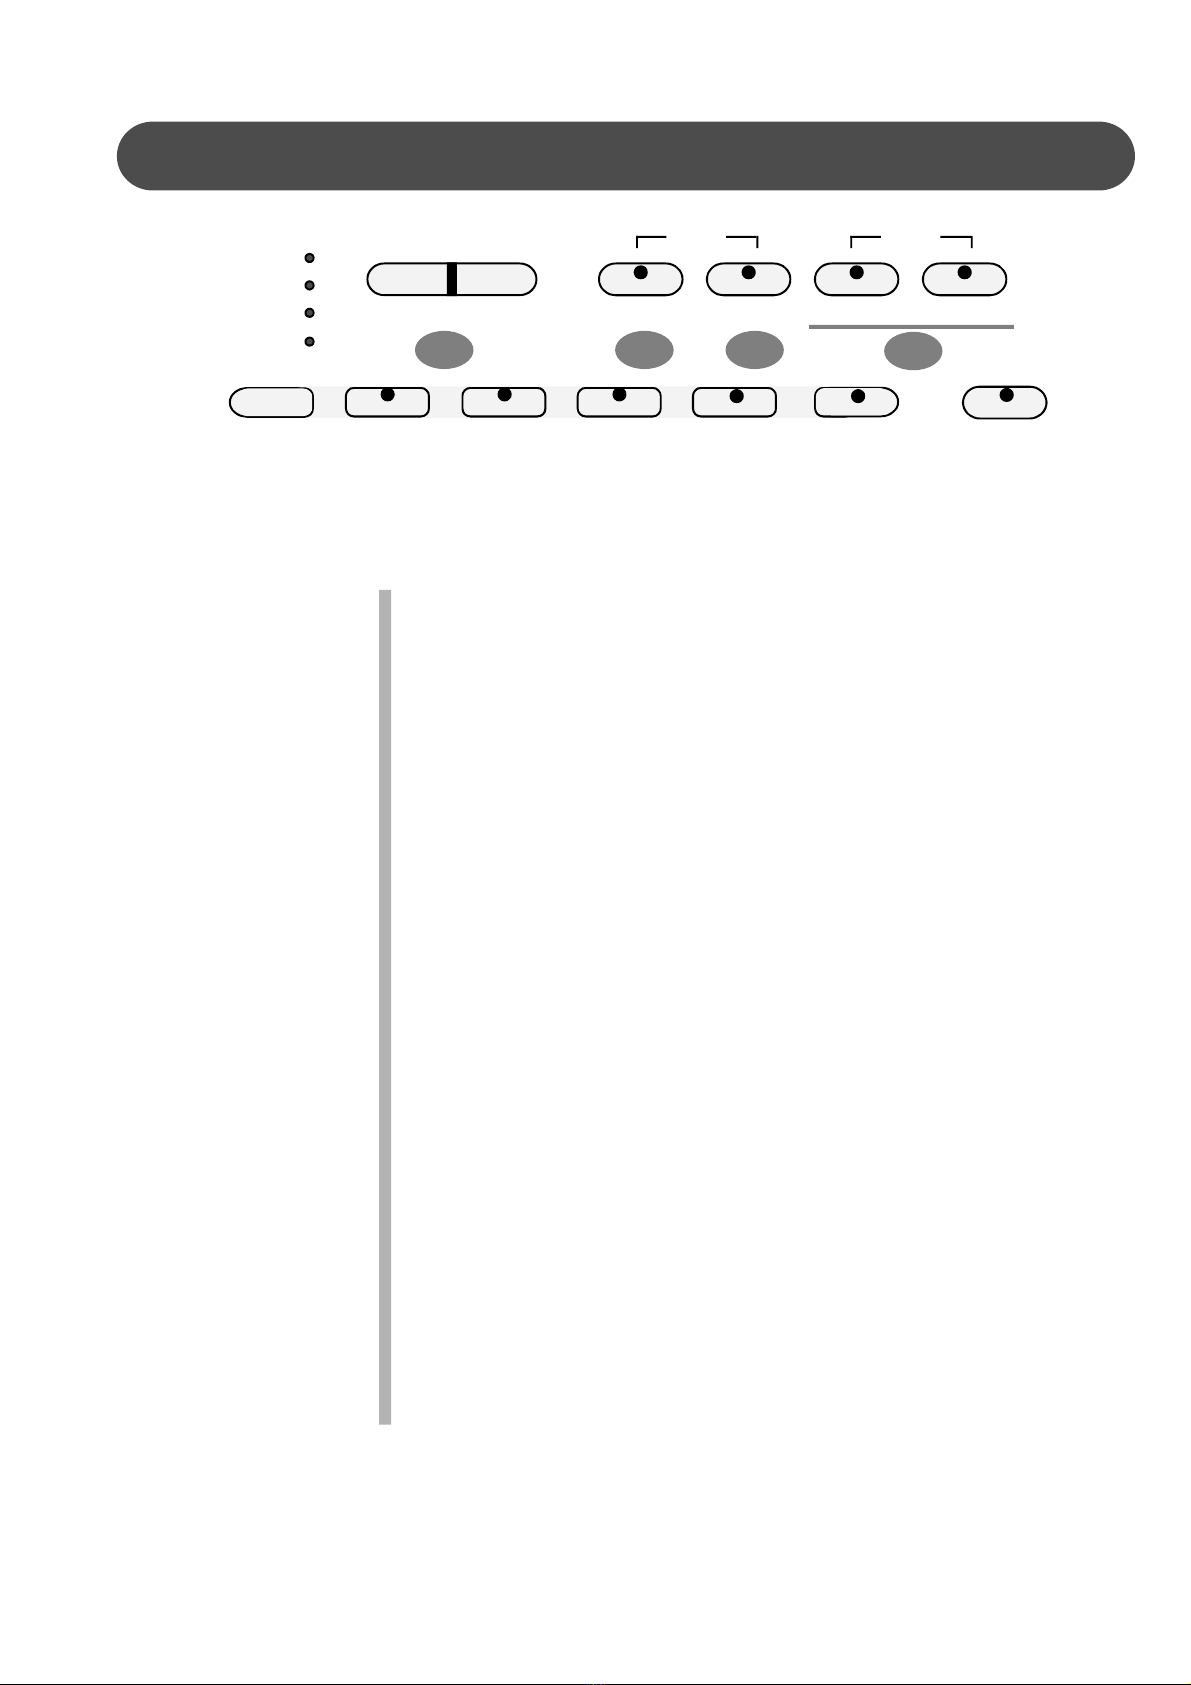
PANELCONTROLS
7
65
8
SINGLE
FINGERED
PIANO
–TEMPO+ HARMONY LAYER LOWER
MINMAX
MASTERVOLUME
MINMAX
ACCOMPVOLUME START/STOP INTRO/ENDING ACCOMP
FILLIN VARIATION
SYNCHSTART
5. LAYER -Pressing theLAYERbutton will putthe keyboardinthe
layer, ordual,mode. Layer,ordual,referstoanadditionalvoice
thatistone mixedwiththe selectedkeyboardvoice.Theassigned
layervoicewill be heardwiththeoriginalvoice. Toselect anew
layered instrument voiceusthe+Yesor-Nobuttonswithin4
secondsaftertheLayerbuttonhasbeenpressed.
6. LOWER -WiththeLOWERfeatureengagedthekeyboardoperates
insplitmode.Insplit mode the keyboardisdividedintotwo
sections. Inthe right hand sectionthe originalorlayered voicewill
sound,andinthe lefthandsectionadifferent voicecan be
assigned. Toselect anewLowerinstrumentvoiceusethe+Yes
or-Nobuttonswithin4secondsaftertheLowerbuttonhasbeen
pressed.
7. SYNCSTART -SynchronizedStart modesetsthe autoaccompani-
mentintostandbymode. When the SYNCSTARTbutton is
pressedtheindicatorlightsabovethetempowillflashtothe
Tempoofthe selected rhythmstyle.Therhythmstylewill start
assoonasyouplay intheautoaccompanimentsection of
thekeyboard. Theautoaccompanimentwill startwiththe first
recognizedchordplayedintheautoaccompaniment section ofthe
keyboard, depending onwhichfingeringmodeisselected. Press-
ing the SYNC STARTbutton againwill stop theautoaccompani-
mentandputthekeyboardbackintostandbymode.
8. START/STOP -Thisbuttonstartsorstopsthe selected rhythm
style.The autoaccompanimentwillstartwiththe firstrecognized
chordplayed intheautoaccompanimentsectionofthekeyboard,
13
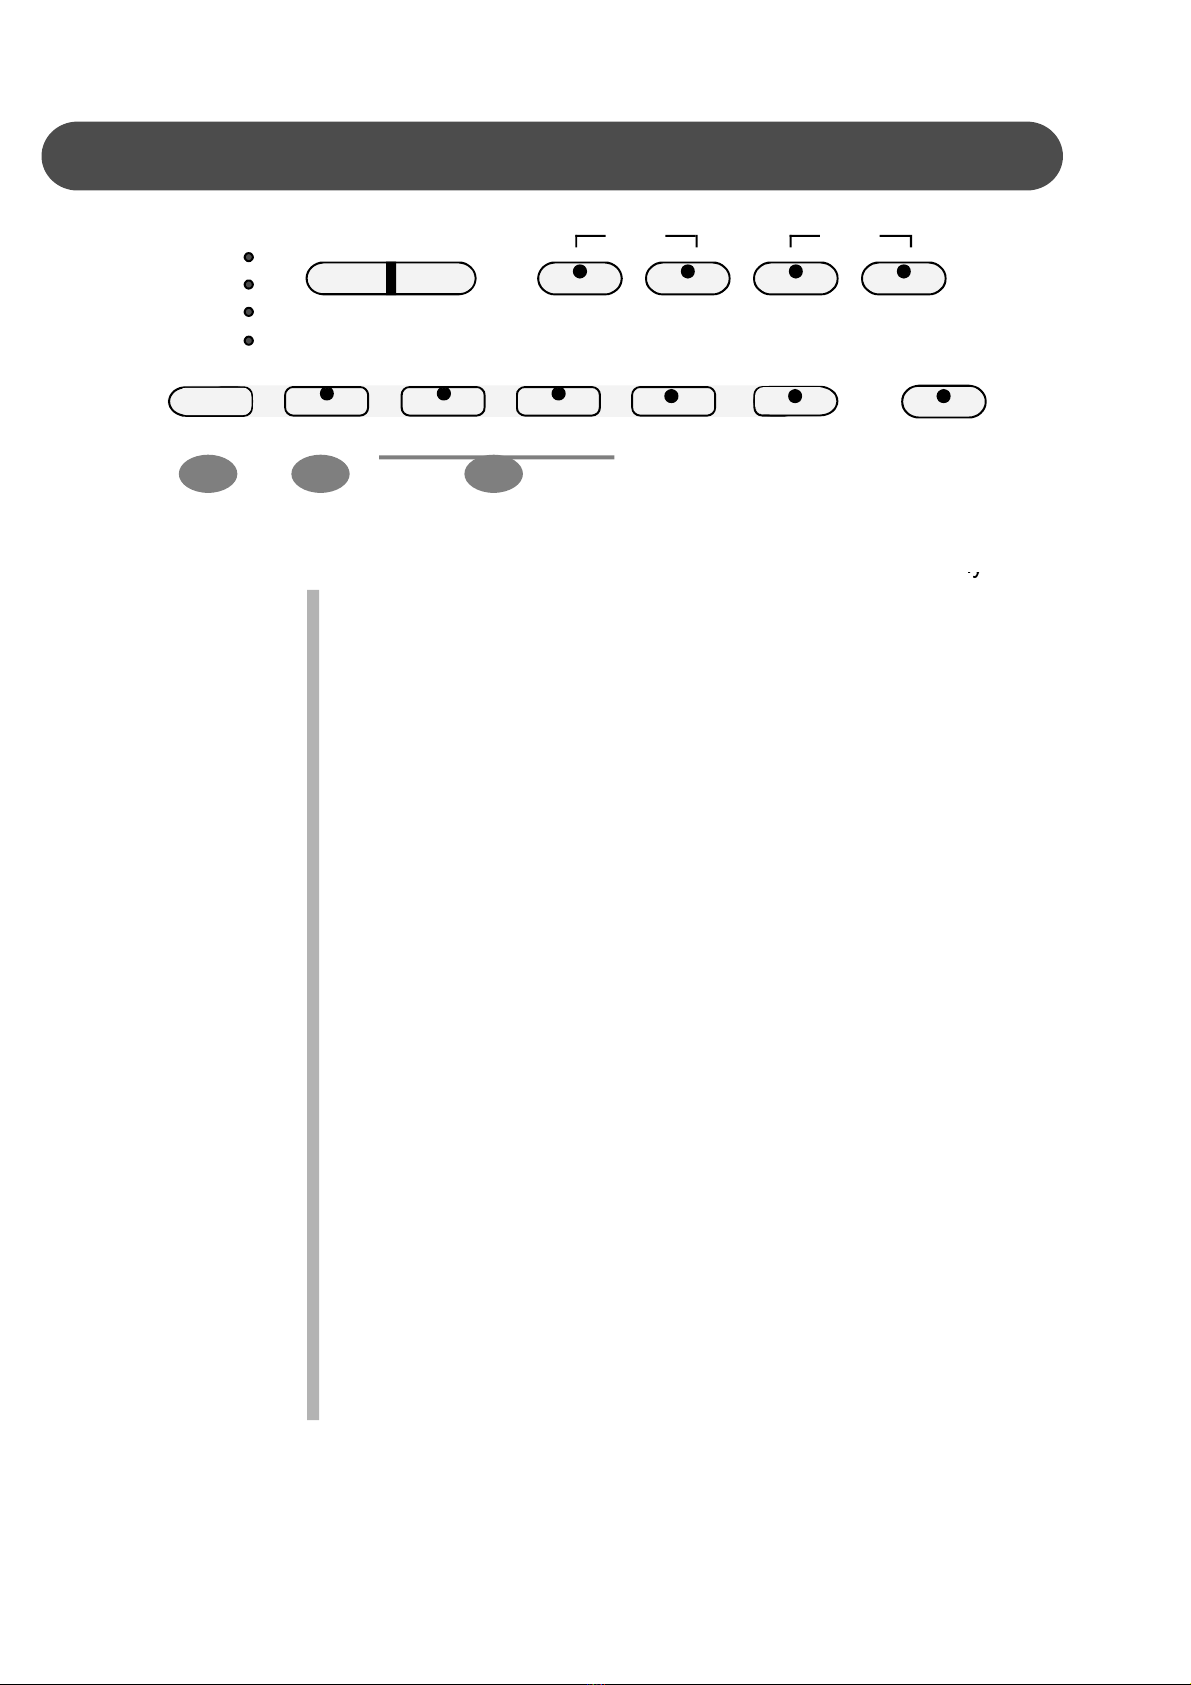
PANELCONTROLS
11 1210
SINGLE
FINGERED
PIANO
–TEMPO+ HARMONY LAYER LOWER
9
START/STOP INTRO/ENDING ACCOMP
FILLIN VARIATIONSYNCHSTART
depending onthefingering mode selected.
9. INTRO/ENDING -Allof the100rhythmstylescanbestartedor
finishedwithaunique introduction orendingpattern.When
selected,an introductionof thestylewillstartfollowedbythemain
stylepattern.
Witharhythmoraccompaniment patternalreadyengagedtheac-
companimentcan beprofessionallycompleted withan ending
patternfromthenextmeasurebypressingtheINTRO/ENDING
button.Ifyoupressthefill-inbuttonduringtheendingpatternit
willreturntothemainaccompaniment pattern.
10. FILL IN -Thefill-inprovidestheaccompanimentwithashortrhythm
patternofoneortwomeasuresforeachstyle.PresstheFILLIN
buttonatanytimewhilethe accompaniment isplaying toadd afill-
in.If youholddowntheFILLINbutton,thefill-inpatternwill
repeat untilthebuttonisreleased,then the mainpatternwillplay
fromthebeginningof thenextmeasure.
11. VARIATION -Allof the100rhythmstylesincludeavariationof that
stylethatcan beplayed simplybypressing the VARIATION
button. PresstheVARIATIONbuttonagaintodisengageand
returntothe mainpattern.
12. ACCOMP -Eachrhythmstylehasafullyorchestrated autoaccom-
panimentpattern.Theseaccompanimentsarededicatedtothe
selectedrhythmstyle,andwillcreaterhythm, bassandchord
accompaniments.TheACCOMPbuttonselectstheautoaccom-
panimentmode.Withthisfunctionengaged, thekeystotheleft
sideofthesplitpoint aretheautoaccompanimentsection of the
keyboard, whilethekeystothe rightareavailablefornormal
playing.

14
PANELCONTROLS
13. A/BBUTTON -The fivequick select voiceand fivequickselect
stylebuttonsareeachassignedtoalineA and lineB.Pressthe
A/Bbutton toalternatebetween thetwoselection lines. The
indicatorlight will be lit when selection lineB isactive.Please
seethequickselectbuttonsbelowformoreinformation.
14. QUICK SELECTVOICE -Thereareten instrument voicesthatcan
be selected quicklybypressing one ofthefivevoiceselect
buttons.ThesevoicesareassignedtolineAandlineB.Eachof
theseselectionlinesconsistsof fivevoices. Thevoicenamein
theline Aisprintedabovethevoiceselectbutton and thevoice
nameonlineBisbeneaththebutton.PresstheA/Bbuttonto
selectthe voicelineof yourchoice.When the indicatorlightislit
theBlineorbottomlineisactive. Theselected voicenameand
itsnumberwillbe shownonthe display.Pleaseseethe Key-
boardVoicessectionofthismanualformoreinformation.
15. QUICK SELECTSTYLE BUTTONS -Thereareten RhythmStyles
thatcanbeselectedquicklybypressingoneofthe fiveRhythm
select buttons.TheseRhythmStylesareassigned tolineAand
line B. Eachoftheseselectionlinesconsistsoffiverhythmstyles.
TheStylenameinlineAisprintedabovetheStyleselect button
andtheRhythmstylenameonlineB isbeneaththebutton.Press
theA/BbuttontoselecttheRhythmStylelineofyourchoice.
WhentheindicatorlightislittheB line orbottomlineisactive.
Theselected rhythmnameand itsnumberwill beshownon the
display.PleaseseetheRhythmStylessectionofthismanualfor
moreinformation.
1314
15
SINGLE
FINGERED
PIANO
ACCOMP
PIANO E.PIANO ORGAN
GUITAR
USER1
STRINGS
HARPS.
TRUMPET FLUTE USER2
METRONOME
A /B
BOSSANOVA ROCK POP BALLAD USER1
LOUNGE BLUES JAZZ GOSPEL USER2

15
PANELCONTROLS
19
16
METRONOME
A /B
SONG FUNCTION USERREGPAGEPAGE
17 18
VOICE
STYLE
DEMO/SONG
16. METRONOME -Pressthe METRONOMEbuttontoengagethe
metronome.Iftheautoaccompanimentisplayingthemetronome
sound will replacethepercussiverhythmsoundimmediately.If the
autoaccompanimentisnotengaged,press theMETRONOME
buttontostartthemetronome,andagaintostopit. Timesignature
andvolumeof themetronomecanbe adjusted. Pleaseseethe
Rhythmsectionofthismanualformoreinformation.
17. INSTRUMENTVOICE -Thereare128GM(GeneralMIDI)instru-
ment voices, plusten Asian folkinstrumentvoicesavailableon this
piano.Youcaninstantlyselectan instrumentvoicebypressing one
ofthe voiceselectbuttons.OrpresstheVOICEbuttontoengagethe
voiceselection mode.Whileitsindicatorlightislit,you can usethe
numberpadtoselectall 138voiceslistedinthe backofthe
manual.Pleaseseethe Voicesection ofthismanualformore
information.
18. STYLE -PresstheSTYLE buttontoengage the styleselection
mode. Whileitsindicatorlightislit, usethe numberpadstoselect a
style.Thereisacompletelist of all100 rhythmaccompaniment
styleslistedinthebackofthe manual.Pleasesee theRhythm
sectionof thismanualformoreinformation.
19. DEMO/SONG -Thisisadualfunction button.Thefirstpressing
engagesdemonstration song mode withared indicatorlighting.The
second pressing engagestheteachingmode withagreen indicator
lighting.
The musicteacher”featurecan beused asanaidtolearnthe50
songsbuiltintothispiano. PleaseseetheTrainingsection ofthis
manualformoreinformation.
Thispianohastendifferentdemonstrationsongs. Thedemomode
will playback all ten demosongsorselectthe song individually.
16
parametersofanumberofsettings.Reverblevel,choruslevel,
touch,splitpoint forvoice,autoaccompanimentsplitpoint,tuning,
drumkitselection,theautoharmonytype andlocaloffareallset
fromthe functionmenu.PleaseseetheFunctionsectionofthis
manualformoreinformation.
21. PAGE -ThePAGEbuttons(upanddown)areusedtoaccessthe
differentmenusinthe Functionfeature.When theFUNCTION
buttonhasbeen pressedusethe PAGE andPAGE ttoaccess
theFunctionmenuselections.
22. USERREG -USERREG isused tostorekeyboardsettings. Press
theUSERREGbuttontoengagetheregistrationmemorymode,
theindicatorwill lightup. Press oneof thenumericbuttons1-9,
andthestored settingwillbe recalled instantly.Pleasesee the
Registration Memorysectionofthemanualformoreinformation.
23. NUMERICPAD -Usethe+/YES, –/NO orthenumericpadtoinput
numbersdirectlywhileusingthevoice,styleorfunctionsettings.
Thesebuttonsarealsousedtoaccessoraltermanyofthefunc-
tion featuresorwhereevernumericalinputisnecessary.
24. TRANSPOSE -Thetransposefeaturecan shift the pitchof the
keyboardupordowninsemitoneintervalsuptoamaximumof24
semitones. Press oneoftheTRANSPOSE buttonsandthe cur-
rent transposevaluewill appearon the display. Usethe TRANS-
POSE +orTRANSPOSE –buttonstosetthetransposevalue
rangefrom –12,oneoctavelower,to12,oneoctavehigher. Press
the+and –valuebuttonssimultaneouslytorecall thedefault
valueof0. Afterthreesecondsthedisplaywillreturntothe
PANELCONTROLS
21 22
23
VOICE
SONG FUNCTION USERREGPAGEPAGE
20
STYLE
12 3 +/YES
0
456
789–/NO
20. FUNCTION -The FUNCTIONbuttonisused toaccess the function
menu.Thefunctionmenucanbeused toadjustorchangethe
17
1
2
3
4
USERSONG ACCOMP MELODY1 MELODY2 REC PLAY/STOP CARD
–TRANSPOSE+ REVERB CHORUS LEFT RIGHT
EFFECT SONG
PANELCONTROLS
25 2624
PLAYALLLOADSAVE UTILITYPLAY/STOP
27
currentlyselectedinstrumentvoice.Transposedoesnotaffect
notesthatarecurrentlyplaying.Transposedoesnot affectthe
percussion.
25. REVERB -Thereverbeffectisengagedautomaticallywhenthe
poweristurned on. Reverbsimulatesthe effectof playingina
bigroomorhall wherethe sound reverberatesoff thewallsand
ceiling.PresstheREVERBbuttontoturnoffthereverbeffect.
Youcanswitchthereverbfeatureon andoffbypressingthe
REVERBbutton. Thereverbsettingdoesnotaffecttheauto
accompaniment. Reverbdepthcan be changedinthe function
menu ReverbLevel”. Pleasesee the FunctionSection for
moreinformation.
26. CHORUS -The Choruseffect addsdepthand spaciousnessto
theselectedkeyboardvoice.Press theCHORUSbutton to
engagethechoruseffectand theindicatorwill lightup.Press
thebutton againtoturnoff thechoruseffect.The chorussetting
doesnotaffecttheautoaccompaniment. Chorusdepthcanbe
changed inthe functionmenu ChorusLevel”.Pleaseseethe
FunctionSectionformoreinformation.
27. SONGLEFT ,SONG RIGHT -Thesebuttonsareusedincon-
junctionwiththeSONG button. Itallowstheplayertoplay
along withthe prerecorded traditionalsongscontainedwithin
thispiano.The LEFT button will playthe righthandofthe
selectedsong,sotheusercanpracticetheLeftHandportionof
thesong.The RIGHTbutton will playtheLeft Handof the
selectedsong,sothat the usercanpracticetheRightHand
portionofthesong.
18
1
2
3
4
USERSONG ACCOMP MELODY1 MELODY2 REC PLAY/STOP CARD
–TRANSPOSE+ REVERB CHORUS LEFT RIGHT
EFFECT SONG
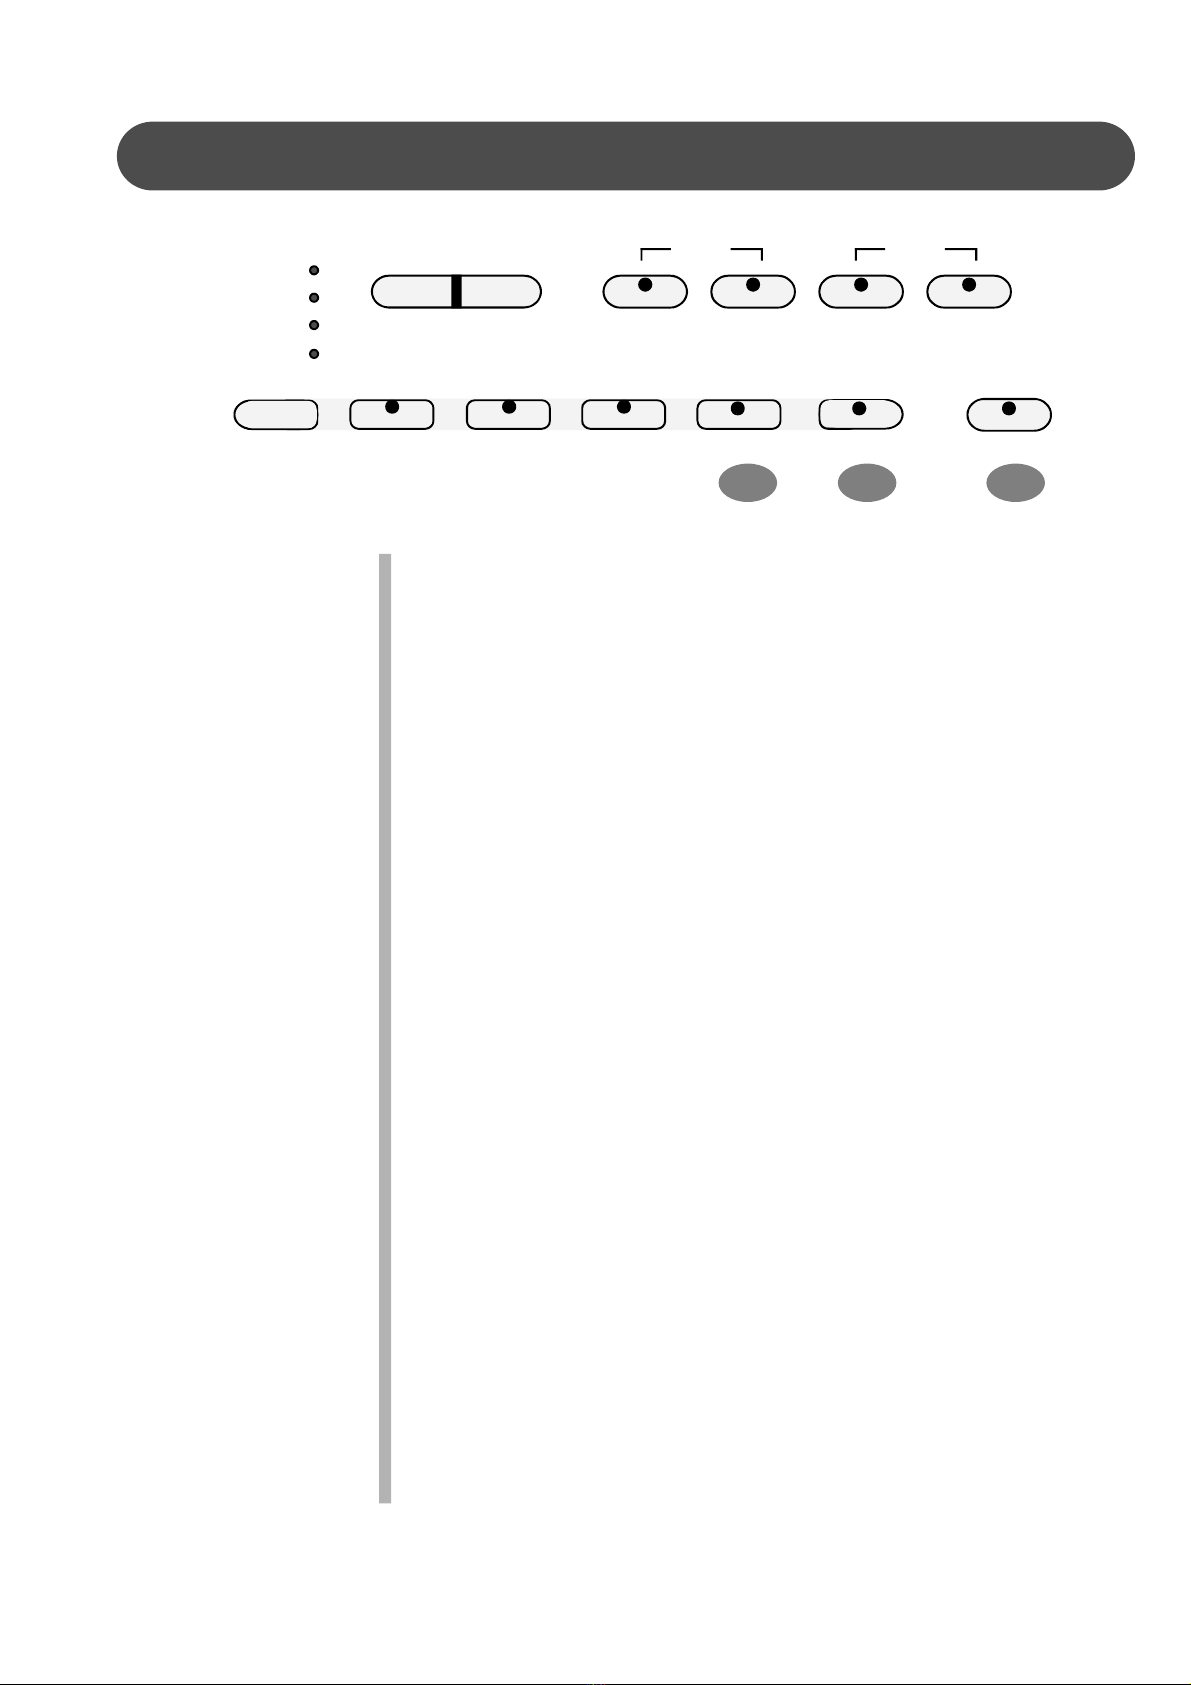
PANELCONTROLS
28 29 30
Whenengaging theLEFTandRIGHTbuttonssimultaneously
onlythe accompaniment (if available)willbe heardasthe user
shouldplayboththeLeft andRightportionsoftheselectedsong.
Pleasesee the PlayAlongSongsectionofthismanualformore
information.
28. USERSONG -TheUSERSONGbutton accessesone ofthefour
availablesong settingsforrecordingorplayback. Usethe +/
YES, –/NObuttonstoselect thesongyouwish,ifthereisre-
corded informationon anyofthethree trackstheirindicatorlights
willlight up.Pleasesee the Recordsection ofthismanualfor
moreinformation.
29. ACCOMP/PLAYALL -ThisisadualfunctionbuttonforRecord
andSDCardmodes.
Inthe Recordmode,thisbutton isusedtoselectthe autoaccom-
panimenttrack ofasongforrecording orplayback.
IntheSDCardmode,pressthisbuttontoplayallMIDIfiles
storedinthe SDCard.
PleaseseetheRecordand SDCardsectionsof thismanualfor
moreinformation.
30. MELODY1/LOAD,MELODY2/SAVE -Thesearedualfunction
buttonsforRecordandSDCardmodes.InRecordmode,there
aretwotracksforrecordingmelody,whichareassignedbythe
MELODY1andMELODY2buttons.
Inthe SDCardmode, MELODY1/LOADbuttonisusedtoload
MIDIfilefromthe USB Drive;MELODY2/SAVE buttonisused to
saverecordedsongtoSDCardinMIDIfileformat.
PleaseseetheRecordand SDCardsectionsof thismanualfor
moreinformation.
PLAYALLLOADSAVE UTILITYPLAY/STOP
19
1
2
3
4
USERSONG ACCOMP MELODY1 MELODY2 REC PLAY/STOP CARD
–TRANSPOSE+ REVERB CHORUS LEFT RIGHT
EFFECT SONG
PANELCONTROLS
3331 32
31. REC/UTILITY -Thisisadualfunctionbutton forRecordandSD
Cardmode.
Thisunitisabletorecordfoursongs, eachwitha3-track
sequencer.It will recordallnoteeventsand theaccompaniment
patternsexactlyastheyareperformed.Thisrecordedinformation
isnonvolatileand thereforewill notbe lostwhen the poweris
turnedoff. ToRecordpressand holddowntheRECORDbutton
thenpressthe trackbutton(s)youwanttorecordon. Recording
beginsassoonasyoustart toplayonanysectionofthekeyboard.
Press the RECORD button againtostop recording.
IntheCardmode, itfunctionsasutilityaccessbuttonwhichin-
cludessolo, muteanddeleteforaselectedsong inthe SDCard.
Pleaseseethe RecordandSDCardsectionsofthemanualfor
moreinformation.
32. PLAY/STOP -Thisisadualfunction buttonforRecordandSD
Cardfeatures.IntheRecordmode,pressthePLAY/STOPbutton
tohearselected tracksthatyouhaverecorded on.Pressthe
PLAY/STOPbutton againtostoptheplayback.
IntheSDCardmode, itfunctionsasalsoplay/stopswitchfora
selected song intheSDCard.
PleaseseetheRecordandSDCardsectionofthismanualfor
moreinformation.
33. SDCARD -Thispiano isequipped withamass storage device
using popularSDCard.Theusercanread andplayMIDI fileson
theSDCardeitherinformat0orformat1andsavetherecorded
musicintotheSDCardastheMIDIfileinformat1. Theusercan
alsodeletethe MIDIfilesintheSDCard.PresstheCARD button
toengage theSDCardmodeand the indicatorwilllightup.Press
thebuttonagaintoexitthismode.
PLAYALLLOADSAVE UTILITYPLAY/STOP
Pleasesee the Recordand SDCardsectionsofthismanualfor
moreinformation.

20
DEMO
1. PLAYALL DEMOSONGS -Press the DEMO/SONG, theindicator
lightsup withred color.Thefirstdemosong will playback
instantly. Thisunithasten demosongs.Allsongswill play
repeatedlyuntil youpress theDEMO/SONGbuttonagaintostop
thedemonstrationandturnstotheteachingsongmode.
2. PLAY ASINGLEDEMO SONG -Usethe+/YESorthe-/NObut-
tonstochange songswhilethe demoisplaying,orenterasong
numberdirectlybyusingthe numericpad.Pleasenotethattwo
digitsarerequiredforselectingasongnumber, forexample,to
selectsong No. 9enter 09”.The song will playrepeatedlyuntil
youpressthedemobuttonagaintostop.
Thereare50songsforthemusicaltrainingcoursethatcanalsobe
playedback fordemonstration. Pleasesee the Trainingsection of
thismanualformoreinformation.
PLAYINGTHEDEMOSONGS -Thispianohas13 differentdemonstrationsongsthatare
designed toshowcasethe different sampled voicesthat areavailable. The displaywillshow
thesong numberwitha d”prefix.Whenplaying allthesongs, ALL”will appearon the
displayinitially,and will changetothedemosongnumberasitplays. Afterexiting the dem-
onstration mode the displaywill revert toitsinitialdata.
TheDEMO/SONG buttonisadualfunctionbutton used forbothDemoandplayalongsong
withvariation ofindicatorcolor.
DEMO/SONG
ALL:DemoSong
d-9:Demo Song
DEMO/SONG
1 2 3 +/YES
3456
7 8 9 –/NO
VOICE STYLE
VOICE STYLE
Table of contents
Other Adagio Musical Instrument manuals


