Adam,Rouilly AR253 User manual

Instruction Manual
AR253/AR253-B SKIN AND VEIN KIT

2
Do not mark the skin with ink from ball point pens, marking pens or newsprint
as these cannot be removed.
Safety and Precautions
Thank you for purchasing this AR253/AR253-B Skin and Vein Kit for our AR251/AR251-B
Venepuncture and Infusion Arm.
Please read this instruction manual carefully and retain it for future reference.
Contents
Lubricant supplied contains a dilute solution of bactericidal detergent and
water (50 ml)
Causes skin irritation
Causes serious eye damage
Wear eye protection
Wear protective gloves
Wash hands thoroughly after handling
IF IN EYES: rinse cautiously with water for several minutes. Remove contact
lenses if present and easy to do so.
If eye irritation persists: get medical advice/attention.
IF ON SKIN: wash with plenty of soap and water.
If skin irritation occurs: get medical advice/attention.
Parts 3
Replacing the Skin and Veins
- Remove the Old Skin
- Identify Your Arm Core
5
5
Vein Kit Installation for Cores with Fingers 7
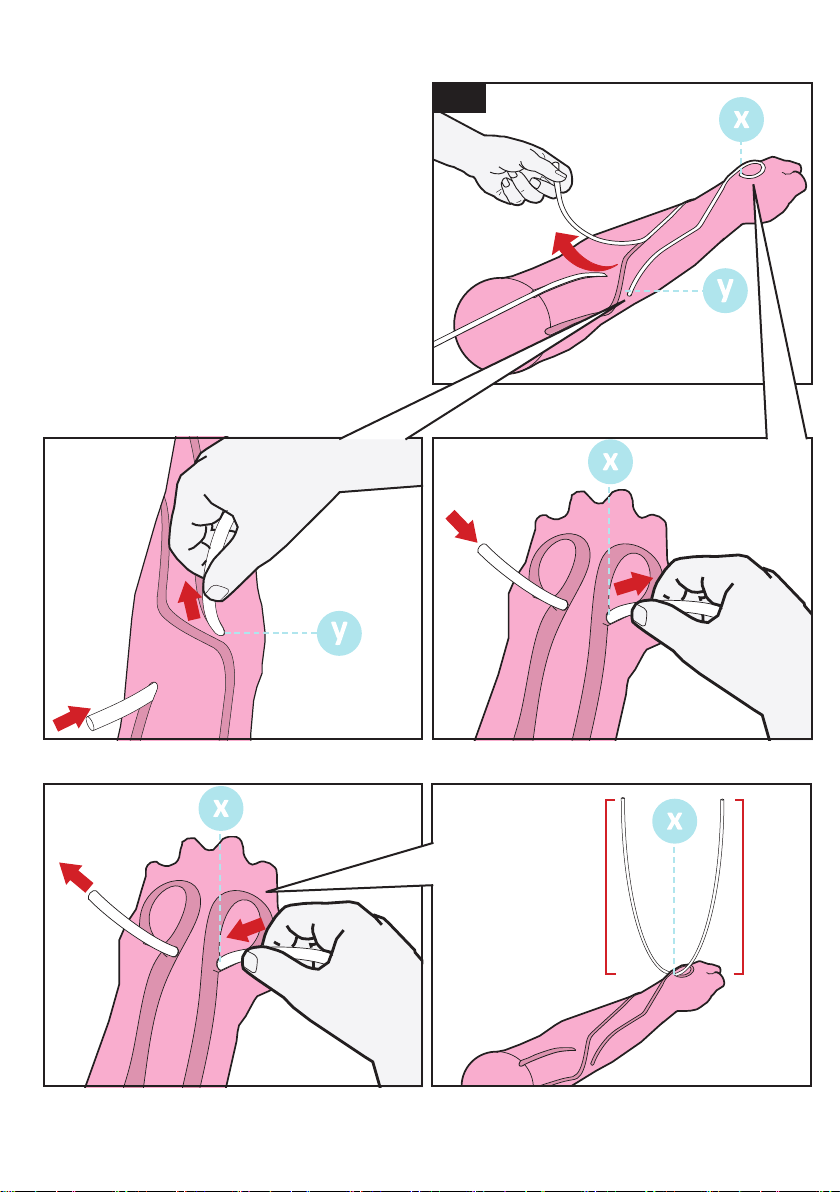
Vein Kit Installation for Cores with One Vein Loop 9
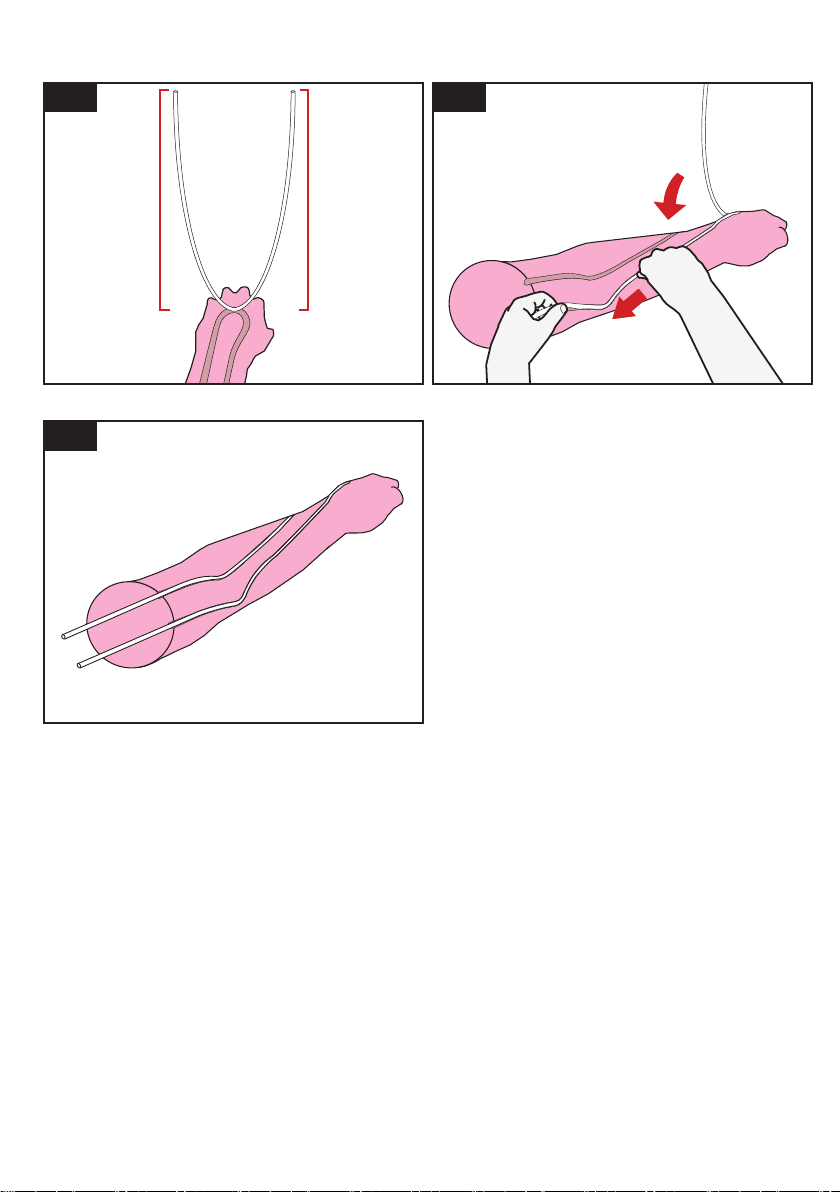
Vein Kit Installation for Cores with Two Vein Loops 11
Installing the New Skin 15
The veins in this arm contain natural latex which may cause an allergic
reaction to some individuals. If a reaction occurs, discontinue use immediately
and seek medical advice.

3
a
Parts
aArm skin
c
c
Latex vein
bLubricant spray
b
Scan the QR code to access the product video.
https://youtu.be/or1dsIFGunA

4
Replacing the Skin and Veins
1b
1c
1a
x2
1d 2
iii iii

5
Pull the old arm skin o the inner arm core and throw away.
Remove the Old Skin
Identify the Core
1. Remove the Old Skin and Vein System
The veins in this arm contain natural latex which may cause an allergic
reaction to some individuals. If a reaction occurs, discontinue use immediately
and seek medical advice.
1b
1c
1a
1d
Remove the two blue vein connectors from each arm vein.
Keep these safely for re-fitting onto the new vein set later.
Detach the white end cap from the shoulder of the arm and pull off from the two
veins completely.
Detach the white end cap from the shoulder of the arm and pull off from the two
veins completely.
ii
Depending on which version of the AR251 core you have, preparation for the new
skin and vein set varies slightly.
Identify which arm core you have after removing the skin by looking at the back of
the hand on the core (note that the core colour may vary also):
iii For arm cores with two vein loops go to Step 3.3a, Page 11
For arm core hands with a single vein loop go to Step 3.2a, Page 9
iFor arm core hands with fingers go to Step 3.1a, Page 7

6
Removing the Fingers (for Arm Cores with Fingers)
3.1a 3.1b

7
Remove the Old Vein System and Cut off the Fingers
3.1a
3.1b
Remove the old vein system from the core by carefully removing it from the
channel in the arm core. Using a sharp knife or scissors, cut the fingers off close to
the knuckles of the hand.
With the fingers removed, the arm core is now ready for the new vein set to be
installed. Go to Step 3.2a, next page.
The new skin supplied in this kit now has solid fingers already integrated.
Before fitting the new skin the fingers from the core will need to be removed.
iThis step is for arm core hands with fingers

8
Inserting the New Vein (for Arm Cores with a Single Vein Loop)
3.2a
1/21/2
3.2b
3.2c

9
Remove the old vein system from the core by carefully removing it from the
channel in the arm core.
Take the new vein and halve it exactly. Place the halfway point in the loop channel
on the back of the hand.
Install the new Vein System
3.2a
3.2b Press each half of the new vein into its corresponding channel in the arm core.
The arm is now ready for the new skin to be fitted. Please see Step 4, Page 14
iThis step is for arm core hands with fingers (now removed)
ii This step is for arm core hands with a single vein loop
3.2c

10
Inserting the New Vein (for Arm Cores with Two Vein Loops)
3.3a
1/2
1/2

11
3.3b
Excessive force during vein removal may cause damage to the core.
1. Remove the Old Skin and Vein System
Remove the old vein system from the core by carefully removing it from the
channels in the arm core.
Be sure to remove the veins carefully from tunnels and so that the core is
not damaged.
3.3a
2. Insert the New Vein System
To insert the new vein, first loop it through tunnel in the back of the hand.
Pull the vein through so that there are equal halves on each side of the tunnel.
iii This step is for arm cores with two vein loops
Continues, please see next page...

12
Inserting the New Vein (for Arm Cores with Two Vein Loops)
3.3c
3.3d 3.3e
3.3f

13
3.3e
3.3f
3.3d
3.3c
2. Insert the New Vein System (Continued)
With the back of the core facing you, loop the first half vein around the right
channel in the back of the hand and down the arm to tunnel
Insert the vein through tunnel
Loop the other half of the vein around the left channel in the back of the hand.
Insert the rest of the vein system into its corresponding channels in the arm core,
keeping the two ends of remaining vein out of the way during installation of the
new arm skin.
The arm is now ready for the new skin to be fitted. Please see Step 4, Page 14

14
Installing the New Arm Skin (for All Arm Cores)
4a
4b
4c 4d
4e
x2

15
Apply the supplied lubricant liberally down the inside of the new skin and work it
down by rubbing sides together.
4c
4d
4b With the end of the arm core facing you, slide the arm core over the hand end of
the core, all the way to the shoulder.
Be sure that the new vein system is still in the vein channels in the arm core. If the
vein is not in the channel in the core it can be pushed back into the channel through
the skin.
Replace the end cap by threading both ends of the vein through the two holes,
pushing firmly into place
4a
3. Installing the New Arm Skin
Please observe the warnings on the lubricant label.
4e Replace both blue vein connectors in each end of the new vein system.
The arm is now ready for use again.
Ensure that the veins are kink free and pulled fully through the end cap.
ii
iii
i
This step is for all arm cores.

As part of our policy of continual product development, the specification of
products may alter without prior notice.
Adam,Rouilly has over 100 year’s experience in providing quality medical
models and simulators.
Should you require any further information please contact our Sales
Department who will be pleased to help with your enquiry.
Adam,Rouilly Limited
Castle Road
Eurolink Business Park
Sittingbourne
Kent
United Kingdom
ME10 3AG
T: +44(0)1795 471378
F: +44(0)1795 479787
www.adam-rouilly.co.uk
©Copyright 2020 S0014 NBY M5
2 Year Guarantee
All products manufactured by Adam,Rouilly are covered by our full 2 Year
Guarantee. This guarantee applies to models which have been used correctly and
covers durability and functionality.
This manual suits for next models
1
Other Adam,Rouilly Educational Equipment manuals
Popular Educational Equipment manuals by other brands

Pitsco Education
Pitsco Education Desk Jockey user guide

Horizon Fitness
Horizon Fitness HYDROFILL user guide

SMART
SMART SBM600 quick start guide

adafruit learning system
adafruit learning system Velociraptor Voice manual

Copernicus
Copernicus Tech Tub Premium Assembly guide

UTS
UTS iSandBOX Standard installation manual

laerdal
laerdal SimNewB user guide

Sunny
Sunny FRESH ART EASEL C053.002.00 instruction manual

Educational Insights
Educational Insights Wireless Eggspert Teachers guide

Reality Works
Reality Works Swine Breeder artificial insemination... quick start guide

Reality Works
Reality Works Joint Model Set quick start guide

educo
educo E523326 quick start guide