Adaptec VideOh! CD AVC-1100 User manual

R
VideOh! CD
AVC-1100
Getting Started
DISCLAIMER: This product may be designed to assist you in reproducing materials. In doing
so, you must have permission from the copyright owner of the materials to avoid violating
copyright law and being subject to payment of damages and other remedies.
AVC_1100_QSG.book Page -1 Monday, January 20, 2003 1:41 PM

© 2003 Adaptec, Inc. All rights reserved. Adaptec, VideOh!, and the Adaptec logo are
trademarks of Adaptec, Inc., which may be registered in some jurisdictions. Microsoft,
Windows 98SE, Windows Me, Windows 2000, and Windows XP are registered trademarks of
Microsoft Corporation in the U.S. and other countries, used under license.
Sonic and MyDVD are registered trademarks of Sonic Solutions in the U.S. and other countries,
used under license.
All other trademarks are the property of their respective owners.
Adaptec, Inc.
691 South Milpitas Boulevard
Milpitas, CA 95035 USA
R
Part Number:513430-06UK, Ver. AA LOC01/03
AVC_1100_QSG.book Page 0 Monday, January 20, 2003 1:41 PM

1
English
Overview
Congratulations on the purchase of your Adaptec VideOh! CD
Video Converter Kit. With this kit, you can convert your analog
videos into digital format and create your own Video CDs (VCDs).
Using the AVC-1100, Adaptec Video Capture utility (AV Capture),
you can capture your favorite video footage. Together with the
Sonic®MyDVD®software, you can organize and customize the
video footage to suit your imagination, then burn them onto your
CD. Then they’re ready to share.
Sonic MyDVD lets you be creative. You can add backgrounds to
your videos, and menus for easy navigation. And if you want to
perform even more sophisticated editing, like adding music,
transitions, and titles, you can use MyDVD’s companion software,
ArcSoft® ShowBiz™.
What’s in the Kit
Your Adaptec VideOh! CD Video Converter Kit includes:
You will need to use the proprietary cable that comes with your
analog video device (such as a camcorder or VCR).
VideOh AVC-2200
Installation CD, including
drivers and software
AVC-1100
This Guide
1.8m USB cable
15 cm audio Y cable
AVC_1100_QSG.book Page 1 Monday, January 20, 2003 1:41 PM

2
English
Three Simple Steps
Getting up and running with VideOh! involves three main steps:
■Connect - install your hardware and software
■Create - capture your video, customize it a bit, then burn it
■Share! Your VCD can be played on any compatible DVD player
or CD-ROM player on your computer. Recordable media
playback compatibility varies between DVD player models.
Consult your DVD player manual for more information.
These steps are described in the rest of this document. For more
details, see the User’s Guide included on the CD or go to the online
help system when you’re using the software.
Connect
Follow these steps to install your VideOh! hardware and software:
1Insert the VideOh! Installation CD into your CD-ROM drive.
The VideOh! installation screen appears. If it doesn’t, use
Windows Explorer to display the CD contents, then click
autorun.exe.
2Plug one end of your video device cable into the Audio In and
Video In ports of your AVC-1100, using the Y cable if required.
Plug the other end into your analog video device.
Note: To ensure that your videos are captured successfully,
unplug any other USB devices you may have connected to
your computer.
Connect yellow
video plug to
yellow video
port
Connectwhite
audio plug to
white audio
port, and red
to red
AVC_1100_QSG.book Page 2 Monday, January 20, 2003 1:41 PM

3
English
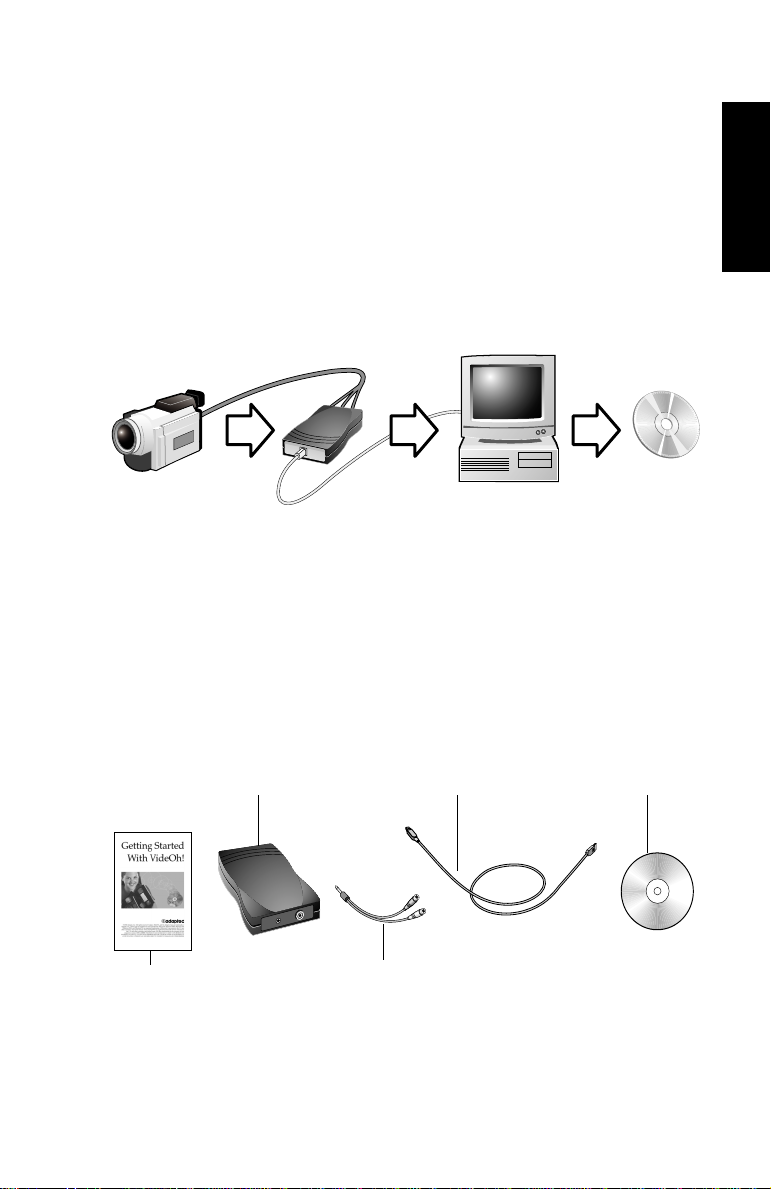
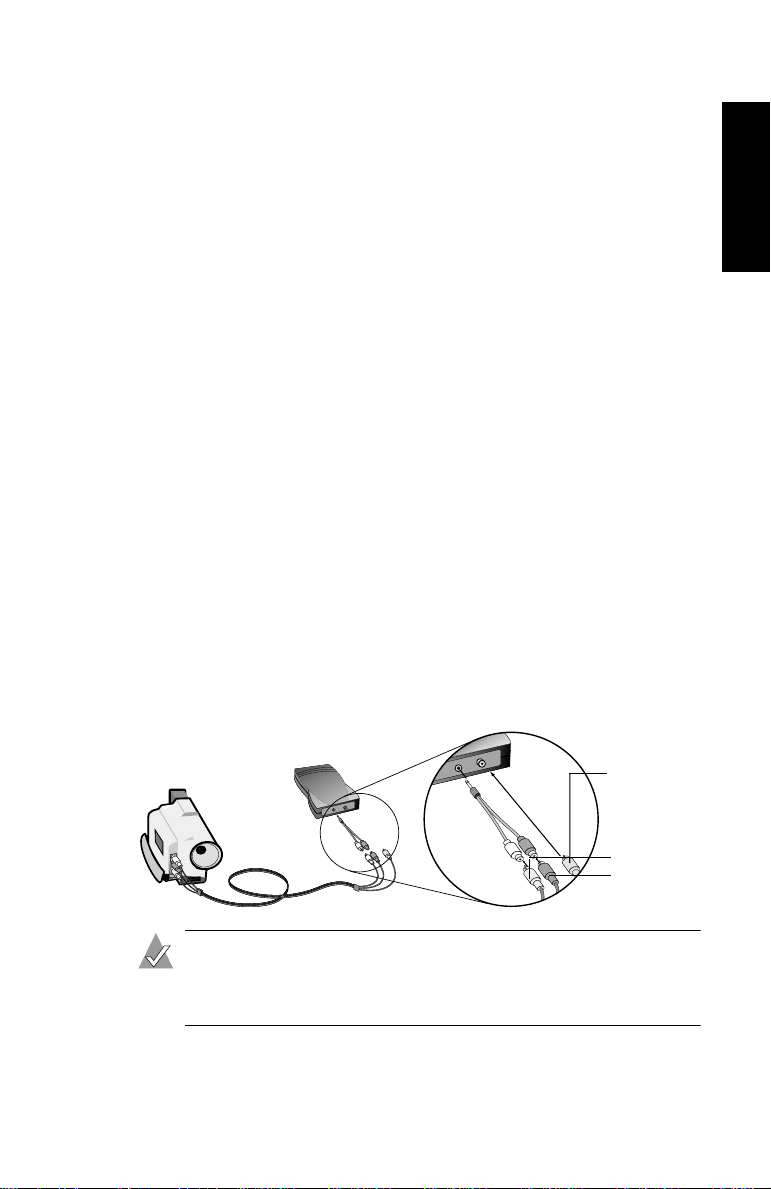
3Connect the AVC-1100 to your computer using the provided
USB cable.
When you connect the AVC-1100 to your computer, Windows
detects it and starts the Found New Hardware wizard. This
wizard steps you through the process of installing the necessary
drivers.
4Follow the on-screen instructions.
■If you are using Windows 98SE, you may need your
Windows 98SE CD to complete the installation.
■If you are using Windows 98SE and the driver file being
installed from the VideOh! installation CD is older than the
existing driver file, you may get a version conflict message.
Select to keep the newer driver file.
■You may see a warning message about Microsoft Windows
logo or signature certification. Click Continue Anyway.
5When the driver installation is complete and you’ve clicked
Finish, you may see a message asking you to restart your
computer. Wait until all of your software is installed, before
restarting your computer.
You are now ready to install the AV Capture utility.
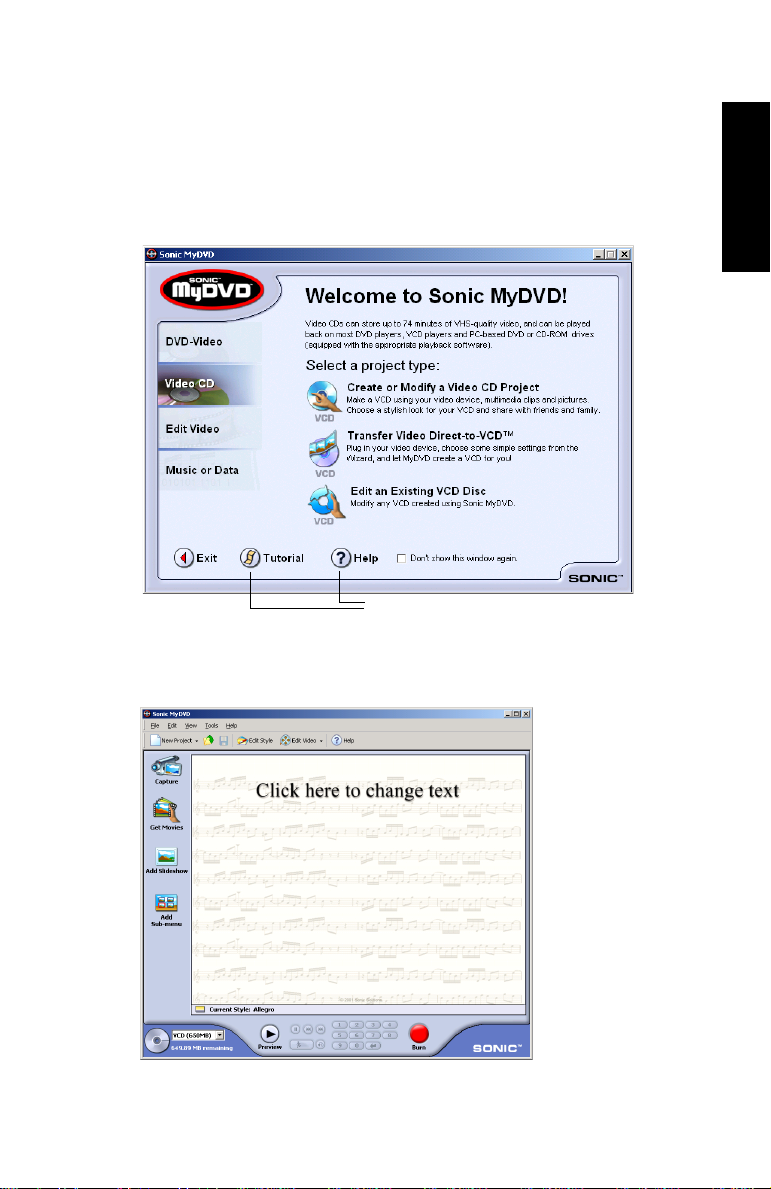
6From the main VideOh! Installation screen, click Install
Software, then click AV Capture.
If the VideOh! installation screen doesn’t appear, use Windows
Explorer to display the CD contents, then click autorun.exe.
7Follow the on-screen instructions.
AV Capture will install on your system. You are now ready to
install the Sonic MyDVD Software.
AVC_1100_QSG.book Page 3 Monday, January 20, 2003 1:41 PM

4
English
8From the Install Software menu, click MyDVD.
9Follow the on-screen instructions.
Sonic MyDVD and ArcSoft ShowBiz software will install on
your system.
10 Restart your computer to complete the installation.
Now you’re ready to CREATE.
Create
These instructions give you the basic steps for capturing your
video, trimming it, and then burning it to a CD.
To get more information, refer to the online tutorial included with
Sonic MyDVD. Or, at any time while you’re using this software,
click ? or Help, to display detailed information about any step you
want to perform.
Before you begin creating:
■Make sure your analog video device (such as a camcorder or
VCR) is connected to the AVC-1100 and switched on.
■Use AV Capture to transfer your videos onto your computer in
digital format.
■If you have an external CD/DVD recorder, make sure it is
connected to your computer and switched on. The
CD-Recordable drive can burn a Video CD that you can play
back on a DVD player.
AVC_1100_QSG.book Page 4 Monday, January 20, 2003 1:41 PM

5
English
Capture Your Video
To successfully capture your video, make sure you complete each
step in the order given. For more information see the Adaptec
AVC-1100 User’s Guide found on the VideOh! Installation CD.
1Start AV Capture by clicking the AV Capture icon on your
desktop, or by clicking Start->Programs (or All Programs)->AV
Capture.
2Click on Options then select Preview so that you can preview
the video while capturing it. The Preview window will go
black.
3Click on Capture and select Start Capture. A Ready to Capture
window will appear.
Video Preview area
AVC_1100_QSG.book Page 5 Monday, January 20, 2003 1:41 PM

6
English
4Click on Create New File. A Set Capture File window will
appear.
Note: You can save your video clip in the My Documents
folder or any folder you choose.
5Type in a file name for your video clip and click Open. This will
start capturing your video.
6Press Play on your analog video device. You will see video on
the Preview screen. You can see the time counter started at the
bottom left of the window.
Note: With Preview turned on, while you’re capturing
video you can view the picture in the Preview window but
the sound is muted. The resulting captured file will
contain both video and audio.
7When you want to stop capturing your video, click on Capture
and select Stop Capture. Then pause or stop your analog video
device.
AVC_1100_QSG.book Page 6 Monday, January 20, 2003 1:41 PM

7
English
Preparing a VCD With MyDVD
Now that you’ve captured some video footage, you can use
MyDVD to organize or edit your Video clips for your Video project.
1Start MyDVD by clicking the Sonic MyDVD icon on your
desktop. The Welcome window appears.
2Move the mouse pointer over Video CD on the left side of the
window, then click Create or Modify a Video CD Project. The
Main project window appears.
3Click the Get Movies icon on the left side of the window.
Click here for more information
AVC_1100_QSG.book Page 7 Monday, January 20, 2003 1:41 PM

8
English
4Browse for video clips then Click Open, or drag and drop video
clips from your saved location.
Trim Your Video
Now that you’ve imported some video footage, you can trim it. For
example, you can change your Start and End points. You can also
choose the specific video frame that you want to use as the
thumbnail picture that is displayed in your Main project window.
1From the Main project window, double-click the thumbnail
button for the video clip you want to trim.
2Use the controls in the Trimming window to trim your video.
3Click OK when finished.
Thelayoutshown inthe
MyDVD Main Project
Window is what your
VCDmenuwilllooklike
on your TV
To rename your file,
you can click on the
video clip title and type
a new title.
Drag the green bracket to choose a Start Frame
Drag the thumb to choose a Thumbnail image
Drag the red
bracket to
choose an
End Frame
You can trim
out unwanted
video footage
AVC_1100_QSG.book Page 8 Monday, January 20, 2003 1:41 PM

9
English
Preview Your Project
It’s a good idea to see how your VCD project will look before you
burn it to the disc. To preview your project, press Preview at the
bottom of your Main project window, then Click the thumbnail clip
you want to look at.
When you have previewed your project, press Stop.
■If playback appears fuzzy and unclear (for example, the edges
of objects, especially objects in motion, are feathered) it is
because of a difference between how televisions and computer
monitors display video. This effect is not noticeable when you
play back the finished VCD disc on your TV.
■If your computer’s processing speed is less than 800 MHz or if
you are using a slower video card, your preview video in the
MyDVD Preview window may appear choppy. However, the
finished VCD, played back on your TV, will be fine. Updating
the drivers for your computer’s video and/or audio card may
minimize this problem. Check your video or sound card
manufacturer’s website for driver updates.
Burn Your VCD
When you are satisfied with how your VCD project looks, you are
ready to burn it onto a recordable CD.
1Insert a recordable CD into your computer’s CD or DVD
recorder.
2On the Main project window, click Burn.
3Follow the on-screen instructions.
You will be notified when your VCD is successfully completed.
On average, a 30 minute VCD can take from 1 to 2 hours to burn
(depending on the speed of your computer).
AVC_1100_QSG.book Page 9 Monday, January 20, 2003 1:41 PM

10
English
Share!
Now that you’ve captured your video and burned it to a CD,
you’re ready to share it. You can play your newly created VCD on
any compatible DVD/CD-ROM drive or DVD player.
To play a VCD, you need to select the video clip you want to view
by using the number pad on the video player remote control. If you
have more than 6 video clips, you can navigate between menu
screens by using the skip forward and back controls.
Finding More Information
To learn more about how to use Sonic MyDVD and ArcSoft
ShowBiz:
■In the MyDVD Welcome window, click the Help button or
Tutorial button.
In the project window, click the Help menu and select MyDVD
Help or Tutorial.
■In Showbiz, click on the question mark icon on the ShowBiz
main screen to open the online Help and Learn the Basics
tutorial. Right-click on any screen item to open context-sensitive
Help.
Registering Your VideOh! CD Video Converter
Kit
To make sure that you’re eligible for support and upgrades, and to
qualify for future promotions, please register your VideOh! CD
Video Converter Kit by going to the Adaptec website at
register.adaptec.com.
Need Help with Your AVC-1100?
■Ensure that your analog video device is connected, powered on,
and the play button is pressed.
■Double-check all cable connections.
■Try connecting to a different USB port on your computer. In
doing so, you will need to reinstall the drivers.
AVC_1100_QSG.book Page 10 Monday, January 20, 2003 1:41 PM

11
English
■If your AVC-1100 is connected to a USB hub, try connecting it
directly to your computer’s USB port. You will also need to
reinstall the drivers.
■Remove all other USB devices from your computer.
■Ensure that the AVC-1100 is properly connected and that the
drivers are correctly installed.
Need Help Capturing Your Video?
■Do not attempt to capture videos using MyDVD or ArcSoft
ShowBiz. Your Adaptec VideOh! CD Converter Kit supports
video capture only by using AV Capture.
■AV Capture has a set default capture time limit of 10 minutes.
Adaptec recommends that you do not change this time limit.
Changing it may result in an audio video out of sync condition.
■Set your computer monitor’s screen resolution to 1024 x 768 or
higher for optimum viewing.
Need Help Playing Your VCD?
■You need to select the video clip you want to view by using the
number pad on the video player remote control. If you have
more than 6 video clips, you can navigate between menu
screens by using the skip forward and back controls.
■If you trim the beginning of a captured video clip in MyDVD,
the resulting VCD may have audio and video out of sync. To
correct this problem, undo the trimming of the video clip and
re-burn the CD.
AVC_1100_QSG.book Page 11 Monday, January 20, 2003 1:41 PM

12
English
Getting Help from Adaptec
If you have questions about installing or using your Adaptec
product, check this document first—you will find answers to most
of your questions here. If you need further assistance, use the
support options listed below.
■Search the Adaptec Support Knowledgebase (ASK) at
ask.adaptec.com for articles, troubleshooting tips, and
frequently asked questions for your product.
■For support via Email, submit your question to Adaptec's
Technical Support Specialists at ask.adaptec.com.
■To order Adaptec products, including accessories and cables,
visit www.adaptec.com/buy-cables.
Before contacting Technical Support, you need your unique
12-digit TSID number. The TSID number is included in your
package on two white, bar-coded labels, like the example below.
Affix a TSID label to your AVC-1100 for safe-keeping.
Europe
■Visit our Web site at www.adaptec-europe.com.
■English: Search the Adaptec Support Knowledgebase (ASK) at
ask.adaptec.com for articles, troubleshooting tips, and frequently
asked questions for your product.
■For support via e-mail, submit your question to Adaptec's
Technical Support Specialists at ask.adaptec.com.
■German: Search the Adaptec Support Knowledgebase (ASK) at
ask-de.adaptec.com for articles, troubleshooting tips, and
frequently asked questions for your product.
AVC_1100_QSG.book Page 12 Monday, January 20, 2003 1:41 PM

13
English
■For support via e-mail, submit your question to Adaptec's
Technical Support Specialists at ask-de.adaptec.com.
■French: Search the Adaptec Support Knowledgebase (ASK) at
ask-fr.adaptec.com for articles, troubleshooting tips, and
frequently asked questions for your product.
■For support via e-mail, submit your question to Adaptec's
Technical Support Specialists at ask-fr.adaptec.com.
Australia and New Zealand
■Visit our Web site at www.adaptec.com.au.
■For support via e-mail, submit your question to Adaptec's
Technical Support Specialists at ask.adaptec.com.
Hong Kong and China
■Visit our Web site at www.adaptec.com.
■Fax Technical Support at +852 2869 7100.
Singapore
■Visit our Web site at www.adaptec.com.
Japan
■Search the Adaptec Support Knowledgebase (ASK) at
ask.adaptec.co.jp
■Visit our Web site at www.adaptec.co.jp
AVC_1100_QSG.book Page 13 Monday, January 20, 2003 1:41 PM

R
VideOh! CD
AVC-1100
Erste Schritte
HAFTUNGSAUSSCHLUSS: Dieses Produkt kann dafür verwendet werden, Videomaterial zu
reproduzieren. Hierzu brauchen Sie allerdings die Zustimmung des Inhabers der Urheberrechte
an diesem Material. Sonst verletzen Sie das Urheberrecht und müssen möglicherweise
Schadensersatzansprüche bezahlen oder können mit anderen Strafen belegt werden.
AVC_1100_QSG.book Page -1 Monday, January 20, 2003 1:41 PM

© 2003 Adaptec, Inc. Alle Rechte vorbehalten. Adaptec, VideOh! und das Adaptec-Logo sind
Warenzeichen von Adaptec, Inc., die in einigen Ländern eingetragen sind. Microsoft, Windows
98SE, Windows Me, Windows 2000 und Windows XP sind eingetragene Warenzeichen der
Microsoft Corporation, die nur mit Lizenz genutzt werden dürfen.
Sonic und MyDVD sind Warenzeichen von Sonic Solutions, die in den USA und anderen
Ländern eingetragen sind. Sie dürfen nur mit Lizenz genutzt werden.
Alle anderen Warenzeichen sind Eigentum der jeweiligen Inhaber.
Adaptec, Inc.
691 South Milpitas Boulevard
Milpitas, CA 95035 USA
R
Part Number: 513430-06GE, Ver. AA LOC01/03
AVC_1100_QSG.book Page 0 Monday, January 20, 2003 1:41 PM

1
Deutsch
Übersicht
Herzlichen Glückwunsch zum Erwerb Ihres Adaptec VideOh!
Video Converter-Kits. Mit diesem Kit können Sie Ihre analogen
Videos digitalisieren und Ihre eigenen Video-CDs (VCDs) erstellen.
Mit dem Adapter AVC-1100 und dem Dienstprogramm AV
Capture von Adaptec können Sie Ihre Lieblingsvideos
aufzeichnen. Zusammen mit dem Programm®MyDVD®, einer
Software von Sonic, haben Sie die Möglichkeit, Videomaterial nach
Ihren Vorstellungen zu ordnen, individuell zu bearbeiten und auf
CD zu brennen. Anschließend können Sie Ihr Werk sofort Ihrer
Familie und Ihren Freunden vorführen.
Sonic MyDVD bietet viel Raum für Kreativität. Sie können
Hintergrundeffekte in Ihre Videos einbauen sowie Menüs für eine
einfache Navigation. Und wenn Sie Ihre Filme noch
anspruchsvoller gestalten möchten, zum Beispiel mit
Hintergrundmusik, Übergängen und Titeln, können Sie hierzu die
Begleitsoftware von MyDVD verwenden, ArcSoft® ShowBiz™.
Lieferumfang
Das Adaptec VideOh! Video Converter Kit enthält folgende
Komponenten:
Sie benötigen außerdem das modellspezifische Kabel, das zu Ihrem
analogen Videogerät wie Camcorder oder VCR gehört.
VideOh AVC-2200
Installations-CD mit
Treibern und Software
AVC-1100
Dieses Handbuch
USB-Kabel (ca. 1.8 m)
Audio-Y-Kabel (ca. 15 cm)
AVC_1100_QSG.book Page 1 Monday, January 20, 2003 1:41 PM

2
Deutsch
Drei einfache Schritte
Um VideOh! einzurichten und anzuwenden sind nur drei Schritte
nötig:
■Anschließen - Installieren Sie die Hard- und Software.
■Erstellen - Überspielen Sie das Video, passen Sie es an Ihre
Wünsche an und brennen Sie es.
■Genießen! Sie können Ihre VCD auf jedem kompatiblen CD-
ROM-Computerlaufwerk oder DVD-Player abspielen. Die
Qualität der Wiedergabe kann aber je nach Modell des DVD-
Players schwanken. Weitere Informationen hierzu finden Sie in
der Dokumentation zu Ihrem DVD-Player.
Diese Schritte werden im Folgenden beschrieben. Wenn Sie mehr
wissen möchten, schauen Sie ins Benutzerhandbuch auf der CD
oder in das Online-Hilfesystem für die Anwendung der Software.
Anschließen
Gehen Sie folgendermaßen vor, um die VideOh! Hard- und
Software zu installieren:
1Legen Sie die VideOh! Installations-CD in das CD-ROM-
Laufwerk ein.
Der Installationsassistent von VideOh! wird eingeblendet.
Verwenden Sie andernfalls den Windows Explorer, um den
Inhalt der CD anzuzeigen, und klicken Sie auf autorun.exe.
2Schließen Sie das eine Ende des Kabels von Ihrem Videogerät
an den Audio- und den Videoeingang des AVC-1100 an und
benutzen Sie gegebenenfalls das Y-Kabel. Stecken Sie das
andere Ende am analogen Videogerät ein.
Stecken Sie den
gelben
Videostecker in
den gelben
Videoausgang.
Stecken Sie den
weißen
Audiostecker in
den weißen und
den roten
Audiostecker in
den roten
Videoausgang.
AVC_1100_QSG.book Page 2 Monday, January 20, 2003 1:41 PM
Other manuals for VideOh! CD AVC-1100
2
Table of contents
Languages:
Other Adaptec Media Converter manuals

Adaptec
Adaptec VideOh! AVC-2310 User manual

Adaptec
Adaptec VideOh! CD AVC-1100 User manual

Adaptec
Adaptec VideOh! DVD AVC-2200 User manual

Adaptec
Adaptec VideOh! AVC-2410 User manual

Adaptec
Adaptec VideOh! DVDAVC-2210 User manual

Adaptec
Adaptec VideOh! PCI AVC-2000 User manual

Adaptec
Adaptec VideOh! DVD AVC-2200 User manual

Adaptec
Adaptec VideOh! PCI AVC-2010 User manual

Adaptec
Adaptec VideOh! AVC-2310 User manual

Adaptec
Adaptec VideOh! PCI AVC-2000 User manual