Adaptivation VoicePal User manual

1
VOICEPAL MAX
INSTRUCTIONS
Please Read This Manual
Before Operating
The World at a Touch
800-723-2783
ADAPTIVATION
INCORPORATED
2225 W. 50th St., Suite 100
Sioux Falls, SD 57105
2
CONTENTS
INTRODUCTION ................................................................................ 3
SUMMARY OF FEATURES ................................................................... 3
VOICEPAL MAX DIAGRAM .............................................................. 5
QUICK START GUIDE ....................................................................... 6
RECORDING MESSAGES ..................................................................... 6
PLAYING MESSAGES ......................................................................... 7
DIRECT SELECTION .......................................................................... 7
SCANNING SELECTION ...................................................................... 8
DETAILED OPERATING INSTRUCTIONS ............................................... 9
BASIC FEATURES .............................................................................. 9
BATTERIES ....................................................................................... 9
DIP SWITCHES ...............................................................................10
MESSAGE CONFIGURATION .............................................................. 11
RECORDING MESSAGES ...................................................................13
REPEAT MODE ...............................................................................14
DELAYED ACTIVATION .....................................................................14
SCANNING OPERATION ....................................................................15
TWO SWITCH SCANNING .................................................................16
VISUAL SCANNING ..........................................................................16
SCANNING CYCLE MODE (AFTER MESSAGE ACTIVITY) .....................17
TWO BUTTON SCANNING .................................................................19
AUDITORY SCANNING ......................................................................19
STANDARD AUDITORY SCANNING .....................................................20
CUE WORD AUDITORY SCANNING ...................................................21
RECORDING CUE WORDS ................................................................22
SEQUENTIAL MESSAGING ................................................................23
TWO BUTTON SEQUENTIAL MESSAGING ..........................................24
RELAY OPERATION .........................................................................25
FACTORY SETTINGS ........................................................................30
OVERLAYS ......................................................................................31
ADDITIONAL OPTIONS .....................................................................31
KEYGUARDS ...................................................................................31
CARRYING CASE .............................................................................31
EXTERNAL SCANNING OVERLAY ......................................................32
TROUBLESHOOTING .........................................................................32
DIP SWITCH SETTINGS ...................................................................35

3
INTRODUCTION
Congratulations on purchasing your VoicePal Max.
It is one of the most affordable and functional digital
communication aids available. Adaptivation strives to
offer our clients products and follow-up support that
meets the highest quality standards in the assistive
technology field. Feel free at any time to contact our
offices for assistance on using your new VoicePal Max.
These instructions begin with a Quick Start Guide
for those who want to use the VoicePal Max right out of
the box. Only the essentials are covered so you can
operate the VoicePal Max in its most basic configuration.
Detailed Operating Instructions follow to configure your
VoicePal Max for a specific application. Illustrative
examples are given.
The VoicePal Max can record and playback up to
10 natural voice messages for a total recording time of
60 or 90 seconds. Messages can be activated in any of
three ways: 1) Directly by the keypad on top of the
VoicePal Max, 2) Directly by plugging in external
switches, and 3) Through scanning input, both visual and
auditory.
SUMMARY OF FEATURES
•Total of 60 or 90 seconds of speech generation, depend-
ingonmodel.
•User selectable 2, 3, 4, or 10 messages.
- 2 messages, 30 or 45 seconds each
- 3 messages, 20 or 30 seconds each
- 4 messages, 15 or 23 seconds each
- 10 messages, 6 or 9 seconds each
•10 front panel buttons select prerecorded natural voice
messages.
4
•Message selection using external switches including
Adaptivation’s Taction Pads and Pal Pads.
•Front pouch allows insertion of customized overlays.
•When 2, 3, or 4 message selection is used, front panel
buttons are combined to form physically larger buttons.
•Variable delayed activation of messages.
•Automatically goes to “sleep” after a message repeats
10 consecutive times to save batteries.
•Scanning allows selection of a message from a choice of
2, 3, 4, or 10 messages, using a single button.
•Four modes of initiating scanning and selecting a
message: Inverse scanning, Positive scanning, Step
scanning, and Two Switch scanning.
•Visual and Auditory scanning.
•Sequential messaging.
•Three visual scan rates.
•A “pillow speaker” or headphones (included), or
external auditory amplifier is activated during auditory
scanning.
•Standard and Cue Word auditory scanning.
•Interauditory Pause: 4 auditory scan rates.
•VoicePal Max can be programmed so after a message
has played, scanning will stop, restart automatically with
message 1, or continue with the next message.
•Scanning will stop if a message is not selected by the
time 4 or 8 scanning cycles are completed.
•Four AA alkaline batteries last up to 6 months with
normal use. Heavy use in auditory scanning will result
in a shorter battery life.
•Internal microphone to record messages.
•Internal amplified speaker with volume adjustment.
5
•External speaker jack for use with headphones, speaker
or audio amplifier.
•Two programmable relays control external battery
operated devices when messages are selected.
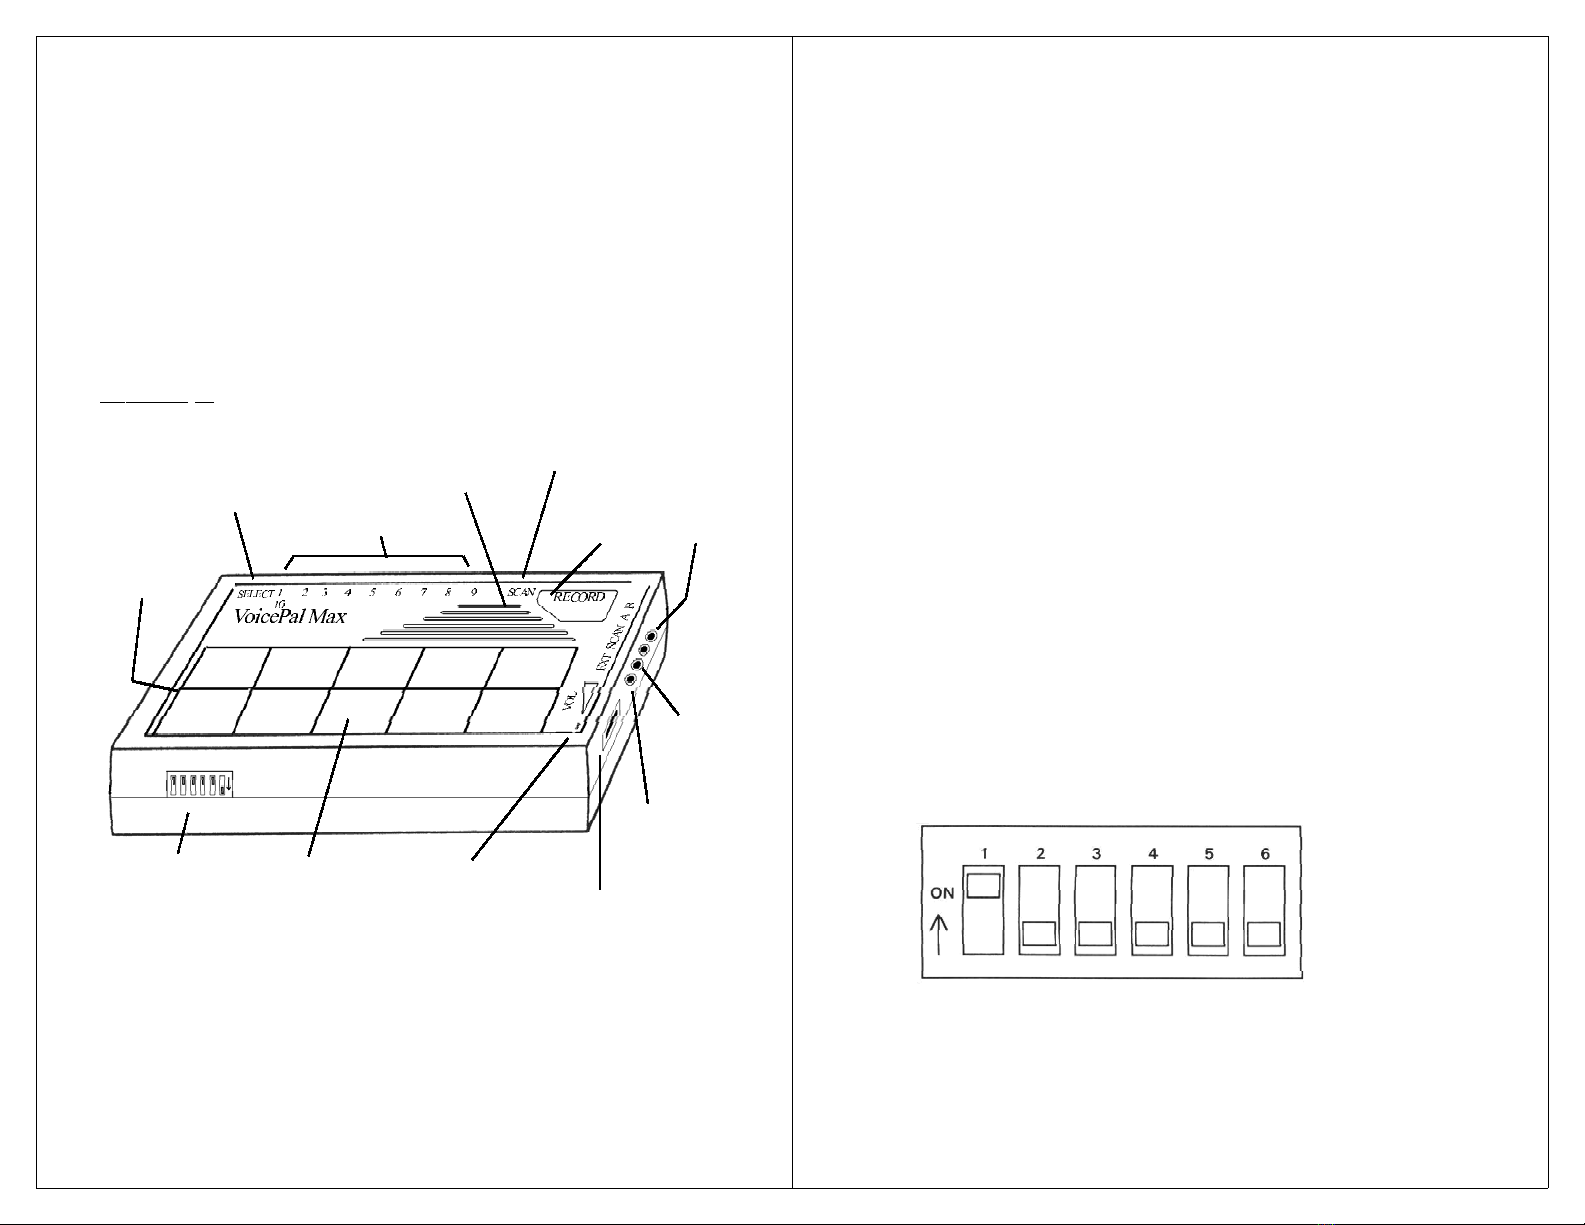
VOICEPAL MAX DIAGRAM
Diagram 1 shows the VoicePal Max with each of
the major features identified.
DIP Switches
On/Off/Volume
Knob
Record
Button
Select Jack External Switch
Jacks
Speaker
Microphone
Relay
Jacks
Keypad
Buttons
External
Speaker
Jack
Scan
Speaker
Jack
Template
Pouch
Scan Jack
Diagram 1.
6
QUICK START GUIDE
This document uses the word “button” to refer to
a specific physical button on the keypad. Any action
involving buttons one through ten can also be performed
by plugging in an external switch to the corresponding
jack on the top edge of the VoicePal Max. DIP Switches
refer to the small slide switches numbered 1 through 6
located on the lower edge of the VoicePal Max. “LED”
is short for light emitting diode. It refers to the small red
lights on the VoicePal Max.
1. Blank 10 message templates are included with your
VoicePal Max. Make an overlay with symbols appropri-
ate for your application, then insert it into the pouch on
the top of the VoicePal Max. If you have a scanning
version, punch holes in the overlay so the LEDs show
through. Boardmaker, by Mayer-Johnson, Inc. can also
be used to create overlays for the VoicePal Max. See the
section on Overlays for more information.
2. Insert four AA alkaline batteries included with your
VoicePal Max. Make sure the batteries are installed
correctly.
3. Configure the VoicePal Max to supply 10 messages. Set
the DIP switches as shown below.
RECORDING MESSAGES
1. Press and hold the record button firmly. The Record
7
LED will begin to flash. Continue holding the Record
button until the Record LED goes solid (about two
seconds), then release. The VoicePal Max is now in
record mode. If the LED for button #10 is lit, press
and immediately release the Record button to turn
LED #10 off. When LED #10 is lit, the VoicePal Max
will record cue words for auditory scanning, which is
discussed later in this manual.
2. Get ready to talk, then press and hold button #1. Speak
clearly about 12 inches away from the VoicePal Max
microphone (MIC).
3. When you are done talking, release button #1. (Note:
As long as you touch the button or external switch, the
VoicePal Max will be recording whether you are talking
or not.)
4. Repeat step 2 and 3 to record other messages. (The
messagescanberecordedinanyorder. Alsoyoucan
rerecord one message without having to rerecord any
other messages.)
5. Press and hold the Record button firmly. The Record
LED will begin to flash. Continue holding the Record
button until the Record LED goes out (about two
seconds), then release. The VoicePal Max is no longer
in record mode.
PLAYING MESSAGES
DIRECT SELECTION
1. Make sure the Record LED is not lit. If it is, press and
hold the Record button until the Record LED turns off.
2. Make sure the volume knob is turned up.
3. Press button #1 on the keypad or external switch
plugged into Jack #1. The message will play.
4. Repeatstep3withotherkeypadbuttons.
8
SCANNING SELECTION
1. Connect an external switch into the Scan jack.
2. Press and release the switch to activate scanning.
3. When the LED corresponding to the desired message is
lit, press the scan switch again. The selected message
will play on the built-in speaker.
4. Repeat steps 2 and 3 to select more messages.
CONFIGURE TO SUPPLY ONLY TWO MESSAGES
1. 2 message templates are included with the VoicePal
Max. Make an overlay with appropriate symbols or
pictures and slide it into the pouch.
2. Set the DIP switches as shown below.
3. Buttons #1, #2, #6 & #7 act as one large button activat-
ing message 1. Likewise buttons #4, #5, #9, and #10
activate message 2. There is a natural “dead space” in
theareaofbuttons#3and#8.
4. Record new messages as described earlier on page 6.
Note: When switching between 2, 3, 4, and 10 message
modes, it is best to rerecord the messages since the
VoicePal Max re-configures its memory each time.
Please remember the Quick Start Guide is only
intended to let you begin using the VoicePal Max. To
become familiar will all the features and use it to its
full potential you must read the “Detailed Operating
Instructions.”

9
DETAILED OPERATING INSTRUCTIONS
BASIC FEATURES
The VoicePal Max provides a total of 60 or 90
seconds of recording time, depending on the version.
The recording time can be divided among two, three,
four, or ten messages. There are two main methods of
selecting messages for playback: direct selection and
scanning selection.
With direct selection, the ten front panel buttons
are used to select the desired message. Button 1 is in the
upper left corner. Button 2 is the second one from the
left on the top row and so on. Button 10 is in the lower
right corner. There are ten jacks corresponding to
Buttons 1 through 10 that accept either external switches
or Adaptivation’s Taction Pads. Messages can be
directly selected using these external switches in addition
to the front panel buttons. Scanning capabilities are
described later in this manual.
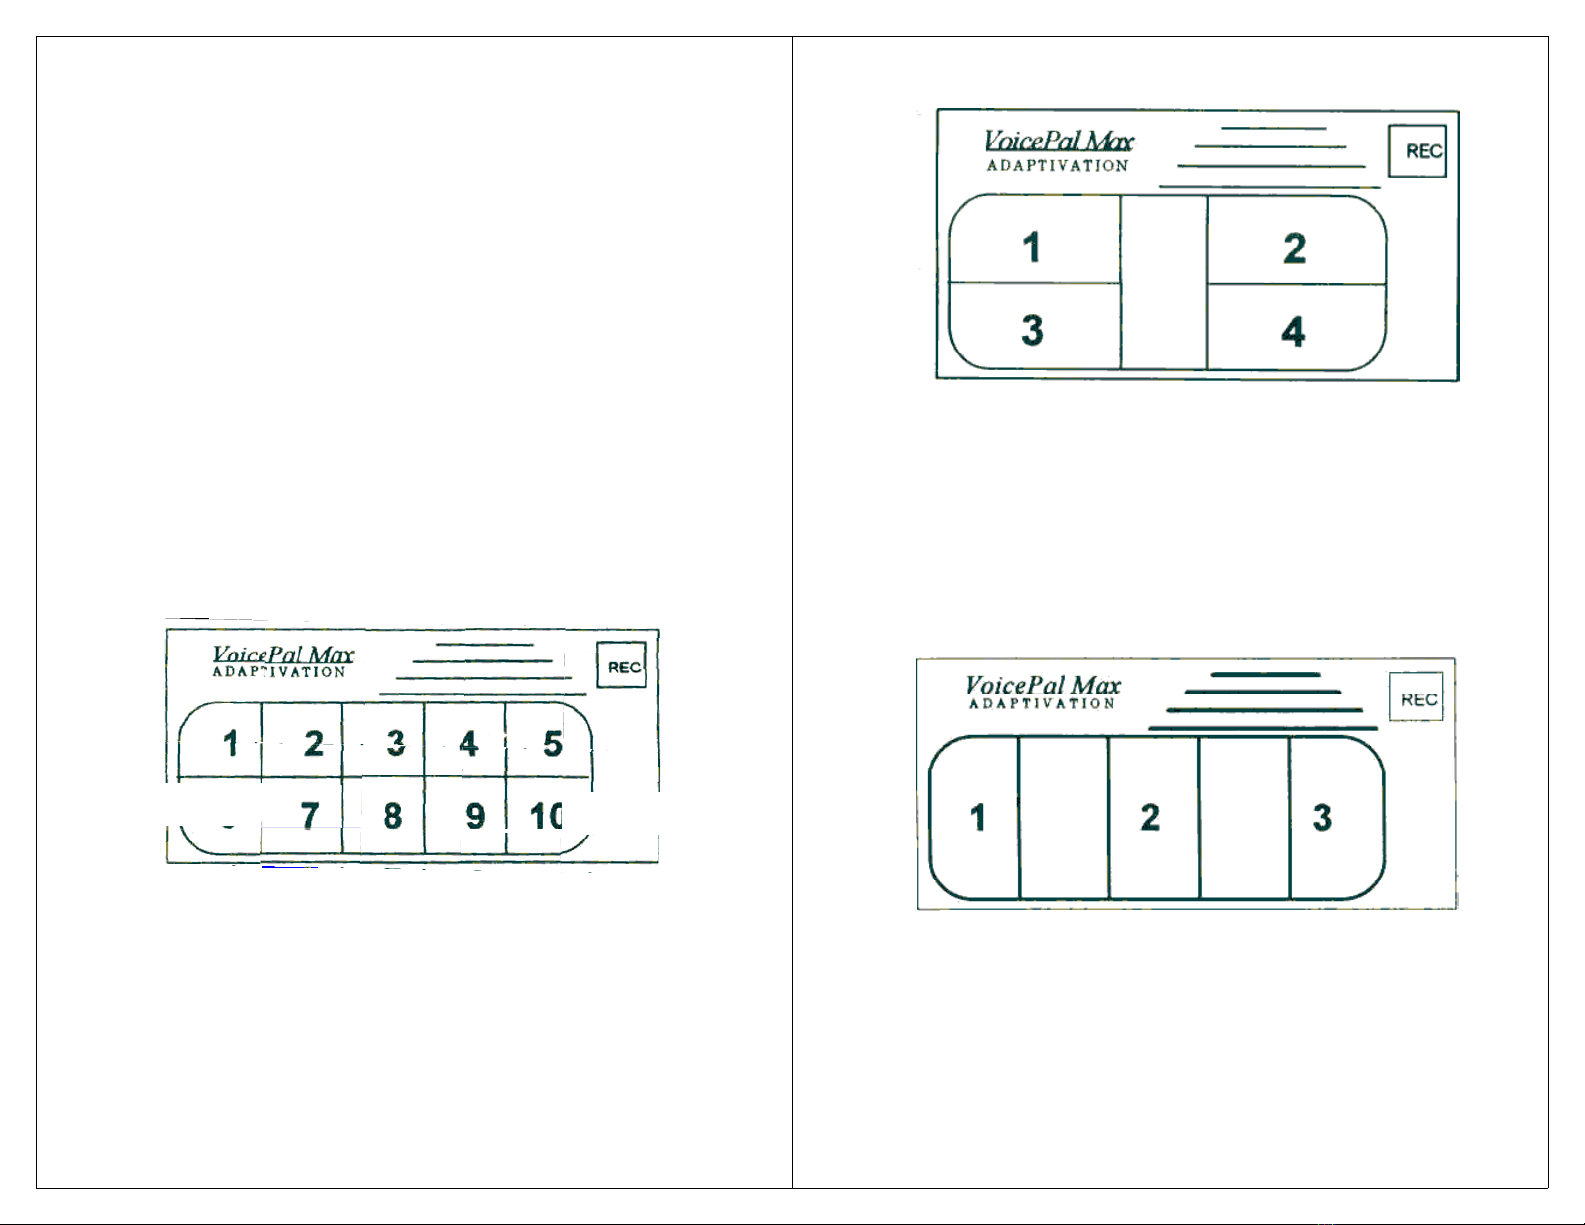
You can custom create your own symbol or picture
overlays and slip them in the VoicePal Max’s pouch.
Templates are provided for each configuration to help
you position pictures and punch out holes in your
overlays so the LEDs are visible.
BATTERIES
The VoicePal Max operates on four AA batteries.
Alkaline, rechargeable alkaline or rechargeable NiMH
batteries are recommended. Under normal use, alkaline
batteries can be expected to last up to 6 months using
direct selection and up to four months when using
scanning.
10
DIP SWITCHES
There are six DIP switches on the VoicePal Max,
designated as SW1 through SW6. These switches are
used to configure various features on the VoicePal Max.
The meanings of these features are summarized on page
35 of this manual. The VoicePal Max can be in one of
two states: Setup state, and Active state. The Setup state
is used to program various options that affect the way the
VoicePal Max operates. The VoicePal Max is placed in
the Active state by placing SW1 in the ON position. To
record messages or to play them back, the VoicePal
Max must be in the Active state. The VoicePal Max is
placed in the Setup state by placing SW1 in the OFF
position.
The following chart contains DIP switch settings
and can be found on the back of your VoicePal Max.
This chart can be used as a quick reference guide to
programming.
ACTIVE STATE Switch1 = ON SETUP STATE: Switch1 = OFF’
SW2 SW3 SW4 SW5 SW6 Function
SW2 Two Button Scanning Delayed Activation
ON ON ON ON ON ON ON 0 Sec *
OFF OFF ON ON ON OFF ON ½ Sec
ON ON OFF ON ON 1 Sec
SW3 SW4 Keypad Configuration ON ON OFF OFF ON 1½ Sec
ON ON 2 messages Scan Speed - Visual Scanning
ON OFF 3 messages ON ON ON ON OFF Sequential Messaging
OFF ON 4 messages ON ON ON OFF OFF 1 Sec *
OFF OFF 10 messages ON ON OFF ON OFF 2 Sec
ON ON OFF OFF OFF 4 Sec
SW5 Repeat message? Inter-auditory Pause
ON No ON ON ON ON OFF 0 Sec
OFF Yes ON ON ON OFF OFF 1 Sec *
ON ON OFF ON OFF 2 Sec
SW5 Scanning Selection ON ON OFF OFF OFF 4 Sec
ON INVERSE (touch-release)/STEP After Message Activity
OFF POSITIVE(touch-touch) ON OFF ON ON OFF Stop scanning *
ON OFF ON OFF OFF Cont scan w/ mess one
SW6 Auditory Scan ON OFF OFF ON OFF Cont scan w/ next mess
ON ON No. of Scanning Cycles BeforeShutdown
OFF OFF OFF OFF OFF ON OFF 4 cycles *
OFF OFF OFF OFF OFF 8 cycles
Clear all relays from selected message(s) ²
ON OFF OFF OFF OFF
*Factory Default Settings Relay A Control ³
¹To memorize settings in SETUP STATE OFF ON ON ON ON Duration of Message
press REC button until it lights up. OFF ON ON OFF ON 0 sec delay
²Press button 1-10 to disconnect all OFF ON OFF ON ON 2 sec delay
relays from corresponding messages. OFF ON OFF OFF ON 4 sec delay
³Press button 1-10 to attach selected Relay B Control ³
relay to corresponding message. Press ON OFF ON ON ON Duration of message
REC to detach selected relay from ON OFF ON OFF ON 0 sec delay
all messages. ON OFF OFF ON ON 2 sec delay
ON OFF OFF OFF ON 6 sec delay
OFFONONONOFFCueWordScanning
OFF ON ON OFF OFF Standard Scanning
11
MESSAGE CONFIGURATION
The VoicePal Max can be configured to supply
either two, three, four, or ten messages, depending on the
operator’s needs. Message configuration is adjusted in
the Active state. If you wish to switch between 2, 3, 4,
and 10 message modes you should record new messages.
For beginning operators, it may be necessary to config-
ure the VoicePal Max to supply only two messages. As
the operator becomes proficient with two messages, the
VoicePal Max can be configured to supply three mes-
sages, then four, then ten.
TEN MESSAGES
SW1= ON (Active state), SW3= OFF, SW4= OFF.
Pressing Button 1 selects message one. Pressing Button
2 selects message two, etc. Each message can be up to 6
seconds (9 seconds with the 90 second model).
FOUR MESSAGES
SW1= ON (Active state), SW 3= OFF, SW4= ON.
Pressing button 1 or 2 selects message one. Pressing
button 4 or 5 selects message two. Pressing button 6 or 7
selects message three. Pressing button 9 or 10 selects
message four. Each message can be up to 15 seconds (22
seconds with the 90 second model). The space between
12
the right and left halves is intentional dead space.
THREE MESSAGES
SW1= ON (Active state), SW3= ON, SW4= OFF.
Pressing button 1 or 6 selects message one. Pressing
button 3 or 8 selects message two. Pressing button 5 or
10 selects message three. Each message can be up to 20
seconds (30 seconds for the 90 second model). The
space between 1, 2, and 3 is intentional dead space.
TWO MESSAGES
SW1= ON (Active state), SW3= ON, SW4= ON.
Pressing button 1, 2, 6, or 7 selects message one. Press-
ing button 4, 5, 9, or 10 selects message two. Each
message can be up to 30 seconds (45 seconds with the 90
second model). The space between messages 1 and 2 is

13
intentional dead space.
RECORDING MESSAGES
Recording messages is done while in the Active
state (SW1= ON). To place the VoicePal Max in record
mode:
Step# Action to Take Result
Step 1 Firmly press and hold Led will begin to flash.
REC button. After about two seconds
of pressing the REC
button, the LED turns
solid.
Step 2 Release the REC You are now in record
button. mode.
Step 3 To record a message
press and hold the
desired front panel Release the button when
button and begin the message is complete.
speaking.
Step 4 Press and hold the
REC button until the The VoicePal Max is
flashing LED turns now in playback mode.
off.
REPEAT MODE
14
When a message is selected, usually one releases
the button once the message begins playing. If the
operator holds the button through the end of the message,
the message will continue repeating. The repeat mode is
controlled by SW5 in the Active state. SW5= ON, the
message will repeat only once whether the button or
switch is continually held or released. SW5= OFF, the
message will continue to repeat (up to 10 times) until the
button or switch is released.
DELAYED ACTIVATION
Typically when a keypad or external switch is
pressed, the corresponding message plays back immedi-
ately. A 1/2, 1, or 1 1/2 second delay can be added. This
means the keypad button or external switch must be held
down for the length of the delay before a message plays.
This is particularly helpful for two reasons. First, in the
case of Taction Pads stuck to objects, the person has time
to feel each object to identify if it is the one of choice.
When the desired object is found, the person holds his or
her hand on it for the predetermined delay period.
Delayed activation is also helpful if a person drags their
hand across the keypad before reaching the button of
choice. A message will play only if the person’s hand
stays on the button for the delay period. Delayed
activation has no effect in Record mode. Delayed
activation is adjusted while in the Setup state (SW1=
OFF).
The following example shows how to configure the
VoicePal Max for a 1/2 second delay.
Example 1: Set delayed activation for 1/2 second.
Step# Action to take Result

15
Step 1 Note the current settings
of SW2 through SW6 for
later use.
Step 2 Set SW1= OFF Places Max in the Setup
state.
Step 3 Set SW2 through SW6
=ONONONOFFON
Step 4 Press the Record button Sets delayed activation to
once. The LED will flash. 1/2 second.
Step 5 Return SW2 through SW6
to previous settings. Returns Max to Active state.
Press and hold a button for at least 1/2 second to
activate a message. The same procedure would be used
to configure for other delayed activation times.
SCANNING OPERATION
Scanning allows the user to select any message
with the touch of a single external switch. Two-message,
three-message, four-message, and ten-message scanning
can be selected. See page 35 above for message configu-
ration. There are two kinds of scanning: visual and
auditory scanning. Related to scanning is sequential
messaging which is discussed later. There are four ways
to select messages when using scanning: Positive
scanning selection, Inverse scanning selection, Step
scanning selection, and Two Button scanning selection.
An external switch must be plugged into the jack marked
SCAN to activate scanning.
SCANNING SELECTION
Scanning selection is adjusted while in the Active
state.
16
POSITIVE SCANNING SELECTION
SW5= OFF. Scanning begins when the external
scan button is pressed and then released. When the scan
button is pressed again, a message is selected.
INVERSE SCANNING SELECTION
SW5= ON. Scanning begins when the scan switch
is pressed and held. When the scan switch is released, a
message is selected.
STEP SCANNING SELECTION
SW5= ON. Scanning begins when the scan button
is pressed. Repetitively tapping the scan switch causes
the VoicePal Max to cycle to the next message. To select
a message, release the scan button for at least 3/4 of a
second. Step scanning works best with visual scanning.
TWO SWITCH SCANNING
SW2= ON. An external switch must be plugged
into the jack marked SCAN and also another switch must
be plugged into the jack marked SELECT. Scanning
begins by pressing the scan switch and tapping the
switch until the desired LED is lit. The message is
selected by touching the select switch.
VISUAL SCANNING
SW6= OFF, (SW2= OFF for single button scan-
ning). During visual scanning, there is an LED associ-
ated with each keypad button. These LEDs light up,
indicating that the corresponding message can be
selected. In two message mode, there are four LEDs lit
at one time. LEDs 1, 2, 6, and 7 are lit when message
one can be selected, and LEDs 4, 5, 9, and 10 are lit
when message two can selected.

17
SCAN SPEED
One of three visual scan speeds can be selected.
Scan speed is set while in the Setup state.
Scan Speed DIP switch settings
SW2 SW3 SW4 SW5 SW6
1 second= fast ON ON ON OFF OFF
2 seconds= medium ON ON OFF ON OFF
4 seconds= slow ON ON OFF OFF OFF
Example 2: Set visual scan rate to two seconds per
message (medium speed).
Step# Action to Take Result
Step 1 Memorize the current settings
of SW1 through SW6.
Step 2 Set SW1= OFF Places Max in the Setup
state.
Step 3 Set SW2 through SW6
=ON ON OFF ON OFF
Step 4 Press Record button. The Sets scan rate to 2 seconds
Record LED will flash. per message.
Step 5 SW1= ON Returns the Max
to Active
state.
Step 6 Return SW2 through SW6
to previous settings.
SCANNING CYCLE MODE (AFTER MESSAGE ACTIVITY)
Scanning cycle mode (after message activity)
controls the activity of the VoicePal Max after a scanning
message has played.
In Positive Scanning, the after message activity can
either restart scanning with message 1, continue scanning
with the next message, or stop scanning.
In Inverse scanning, after the message has played
one of two things will happen. If the operator is not
pressing the scan switch, the VoicePal Max will stop
18
scanning. If the operator is pressing the scan switch
before the end of the message, the VoicePal Max will
either start with message 1 or continue with the next
message.
Example 3: Set scanning cycle mode so scanning
will continue with the next message.
Step# Action to Take Result
Step 1 Note the current settings of
SW1 through SW6.
Step 2 Set SW1= OFF Places Max in Setup state.
Step 3 Set SW2 through SW6
=ONOFFOFFONOFF
Step 4 Press the Record button. Sets Scanning Cycle Mode
to
Record LED will flash. “Continue scanning with
next
message.”
Step 5 Set SW1= ON Returns Max to Active state.
Step 6 Return SW2 through SW6
to previous settings.
Press and release the scan button to begin scanning.
Press the scan button again to select a message. After
the message is done playing, scanning will continue with
the next message. You can stop the scanning by select-
ing a message, doing nothing and letting the unit go to
“sleep,” or by pressing the keypad.
INACTIVITY SHUTDOWN
Once scanning begins, the VoicePal Max will wait
for the operator to select a message. If the operator does
not select a message, scanning will continue for either 4
or 8 complete cycles.
Example 4: Set inactivity cycling to scan up to 4
times when a user does not select a message.

19
Step # Action to Take Result
Step 1 Note the current settings of
SW1 through SW6.
Step 2 Set SW1= OFF Places Max in Setup state.
Step 3 Set SW2 through SW6
=OFF OFF OFF ON OFF Sets inactivity cycling to 4
cycles.
Step 4 Press Record button.
Record LED will flash.
Step 5 Set SW1= ON Returns Max to Active state.
Step 6 Return SW2 through SW6
to previous settings.
Activate scanning, but do not select a message.
The VoicePal Max will cycle through all the messages 4
times, then stop without playing a message.
TWO BUTTON SCANNING
Two button scanning allows two switches to be
used. One switch for initiating scanning and the other
switch for selecting the desired message. It is often used
where the two phases of scanning (initiation and selec-
tion) need to be broken up whether for cognitive or
physical reasons. Two button scanning works with
visual scanning, both types of auditory scanning and
with sequential messaging. Two button scanning is
turned on while in the Active state using SW2. If SW2=
ON, two button scanning is on. An external switch must
be plugged into the SCAN jack and another switch
plugged into the jack marked SELECT. The switch
plugged into the SCAN jack will start the scan and also
advance the scan to the next message by repetitively
tapping the switch. The switch plugged into the SE-
LECT jack will stop the scan and activate the desired
message.
20
AUDITORY SCANNING
SW6= ON, (SW2= OFF- Single button scanning).
There are two types of auditory scanning: whole message
or standard and cue word. Auditory scanning type is
selected in the Setup state (SW1= OFF).
STANDARD AUDITORY SCANNING
With standard auditory scanning, each message
plays one-by-one, quietly, privately through a headphone
or pillow speaker (included with your VoicePal Max).
The headphones or pillow speaker plug into the jack
marked SCAN SPK. The volume level played through
the headphones cannot be adjusted using the Volume
knob. When the operator hears the desired message, he
or she can then select it by pressing the external scan
switch. This causes the message to play loudly over the
built-in amplified speaker. The LEDs illuminate during
scanning as each message plays.
INTERAUDITORY PAUSE
This feature applies only to auditory scanning. The
VoicePal Max can be programmed with a pause between
each message, thus changing the scan speed. This gives
the operator more time to select a message. The
interauditory pause can be 0, 1, 2, or 4 seconds.
Example 5: Set interauditory pause to four seconds.
Step# Action to Take Result
Step 1 Note currents settings of
SW2 through SW6.
Step 2 Set SW1= OFF Places Max in Setup state.
Step 3 Set SW2 through SW6
=ONONOFFOFFOFF
Step 4 Press Record button. Sets interauditory pause to
Record LED will flash. 4 seconds.

21
Step 5 Set SW1= ON Returns Max to Active state.
Step 6 Return SW2 through SW6
to previous settings.
Note: SW6 must be ON in auditory scan mode.
Activate auditory scan, and there will be a four
second pause between messages.
Interauditory Pause Speed Settings
SW2 SW3 SW4 SW5 SW6
0 seconds ON ON ON ON OFF
1 seconds ON ON ON OFF OFF
2 seconds ON ON OFF ON OFF
4 seconds ON ON OFF OFF OFF
CUE WORD AUDITORY SCANNING
With cue word auditory scanning, each message
has a separate cue word or phrase associated with it.
When the external scan switch is pressed, each cue word
plays one-by-one, quietly, privately through a headphone
or pillow speaker. When the user hears the desired cue
word, he or she can then select it by pressing the scan
switch. This will cause the entire message associated
with the cue word to play loudly over the built-in
speaker. It is best to rerecord your messages and cue
words when using cue word auditory scanning.
Example 6: Configuring for Cue Word Scanning
Step# Action to Take Result
Step 1 Note current settings of
SW2 through SW6.
Step 2 Set SW1= OFF Places Max in Setup state.
Step 3 Set SW2 through SW6
=OFF ON ON ON OFF
Step 4 Press the Record button. Sets Max to cue word
Record LED will flash. scanning.
Step 5 Set SW1= ON Returns Max to Active state.
22
Step 6 Return SW2 through SW6
to previous settings.
Step 7 Make sure SW6 is ON. Continue on next page for
recording.
RECORDING CUE WORDS
The VoicePal Max re-configures its memory to
reserve space just for cue words. To eliminate any
message confusion when switching from Standard to Cue
Word scanning, it is best to rerecord your messages and
cue words. The chart below shows various message
lengths based on model and configuration.
Keyboard Configuration
TotalRecordCue23410
Time Word Mes Mes Mes Mes
60 Seconds 2 28 18 13 4
90 seconds 2 42 27 20 6
Follow these steps to record cue words.
1. Press and hold the record button. The Record LED will
flash. Continue to hold the Record button until the
Record LED goes solid (about 2 seconds), then release.
The VoicePal Max is now in record mode. Now press
the Record button once and LED #10 lights up. When
LED #10 is on, the VoicePal Max will record cue words.
When it is off, it will record regular messages.
2. Record cue words the same way you recorded messages
as described in the “Recording Messages” section.
3. You will need to rerecord the actual messages as well.
Press the Record button once and LED #10 will turn off,
but still leaving the Record LED on. You may now
record actual messages.
4. Turn the Record LED off by pressing and holding the
Record button. The Record LED will flash. Continue
holding until the LED goes out, then release.

23
Plug an external headphones or pillow speaker into
the jack marked SCAN SPK. Plug an external switch
into the jack marked SCAN. Press the external switch to
start scanning. Each cue word will play into the head-
phones. When the unit plays the desired cue word, press
the scan switch and the actual message will play loudly
through the built-in speaker.
Direct selection of messages still works when cue
word scanning is turned on.
Example 7: Returning the VoicePal Max to Stan-
dard Auditory Scanning.
Step# Action to Take Result
Step 1 Note current settings of
SW2 through SW6
Step 2 Set SW1= OFF Places Max in Setup state.
Step 3 Set SW2 through SW6
=OFF ON ON OFF OFF
Step 4 Press Record button. Sets Max to standard
Record LED will flash. auditory scanning.
Step 5 Set SW1= ON Returns Max to Active state.
Step 6 Return SW2 through SW6
to previous settings.
Step 7 Make sure SW6= ON
Step 8 Rerecord your messages.
SEQUENTIAL MESSAGING
Sequential Messaging allows each message to be
played one after another each time the scan button is
pressed. It can be used in the 2, 3, 4, or 10 message
configurations. It is very useful in many activities where
the special needs student administers a math or spelling
test, participates in book or theatrical reading, or partici-
24
pates in other oral turn taking activities. Sequential
Messaging is set while in the Setup state (SW1= OFF).
Example 8: Turn Sequential Messaging on.
Step# Action to Take Result
Step 1 Note current settings of
SW2 through SW6.
Step 2 Set SW1= OFF Places Max in Setup state.
Step 3 Set SW2 through SW6
=ONONONONOFF
Step 4 Press the Record button. Turns Sequential Messaging
Record LED will flash. on.
Step 5 Set SW1= ON Returns Max to Active state.
Step 6 Return SW2 through SW6
to previous settings.
Step 7 Plug external switch into jack
marked SCAN.
Now press the scan switch once. Message one
plays. Press it again. Message two plays, then three, and
four and so on. After the last message plays, it starts over
with message one.
The keypad buttons are still active during sequen-
tial messaging. You must get out of Sequential Messag-
ing before returning to any other scan functions. To
return to a scanning mode, program the VoicePal Max to
a scan speed in the Setup state.
TWO BUTTON SEQUENTIAL MESSAGING
SW2= ON. With two button Sequential Messaging,
the SCAN jack activates the next message, and a switch
plugged into the SELECT jack will repeat the last
message played. This is useful in a setting such as a
classroom where the disabled student is administering an
oral math or spelling test. The question can be repeated
if a student in the class taking the test asks to have the

25
question again.
RELAY OPERATION
GENERAL
The VoicePal Max has two internal relays that act
as switches to turn battery operated devices on and off.
These relays can be set to activate in any message
configuration, and utilizing any mode (direct selection,
external switches, scanning, and sequential messaging.)
The relays can be set to activate devices while the
message plays, immediately following the message, or
after a preset delay following the message (reinforcement
delay).
Environmental control units such as the
FreeSwitch, FreeHand, and switch, latch, timing devices
such as the Linkswitch can be used to give the relays
latch and timing capabilities.
NOTE:
A distinction is made between button number and
message location number. Button number refers to the
10 active areas on the keypad used for assigning mes-
sages to the relay. Message location number refers to the
area on the keypad in which the message can be found
when activating the relay. This will vary depending on
the message configuration (2, 3, 4, 10) of the VoicePal
Max.
It may be helpful to know what message configura-
tion you intend to use before you begin programming.
This will aid in correctly matching the button number to
the message location you intended. If the message
configuration is changed, the VoicePal Max will auto-
matically re-assign the relay to its new location in that
configuration. The diagrams under “Message Configura-
tion” show the message location number for each
26
configuration.
CLEARING RELAYS
It is a good idea to clear relays before you begin to
program. This will ensure that all previous programming
is eliminated and won’t interfere with your attempts to
program the relays.
To clear the relays:
1. Place the Max in the Setup state (SW1= OFF)
2. Set SW2 through SW6= ON OFF OFF OFF OFF
3. Press all the buttons (1-10) once.
REINFORCEMENT DELAY
This refers to the amount of time between the end
of the message played and the activation of the device.
The delay can be set for 2, 4, or 6 seconds.
If no delay is desired, the relay can be set to
activate the device immediately as soon as the message
starts, or as soon as the message ends. The table at the
end of this manual and on the back of your VoicePal Max
will show the correct settings for programming the
relays.
CONNECTING EXTERNAL DEVICES
The upper right hand corner of the VoicePal Max
has two jacks labeled “A” and “B.” Plug the device
which you intend to activate utilizing a standard 1/8”
(3.5mm) plug into the jack corresponding to the relay
being utilized.
Remember the FreeSwitch, FreeHand, and
Linkswitch can be used to enhance timing and latching
capabilities.
The following diagram illustrates a typical relay
setup using the VoicePal Max hooked into a LinkSwitch,
and also plugged into a battery adapted toy.

27
PROGRAMMING RELAYS
The order in which features are programmed does
not make a difference. The following examples assume
that the VoicePal Max has been configured, a mode of
operation (direct selection, scanning, external switch)
has been programmed, and the messages are recorded.
Example 9: Program Relay A to be activated by
message 1. The relay will activate an adapted toy for the
duration of the message.
Step# Action to Take Result
Step 1 Plug toy into relay A. Use a cable connector if
necessary.
Step 2 Note current settings of SW1
through SW6.
Step 3 Set SW1= OFF Places Max in Setup state.
Step 4 Clear relays by setting Erases any previous relays.
SW2 through SW6=
ON OFF OFF OFF OFF
Press each button (1-10)
Step 5 Set SW2 through SW6= Sets Relay A to duration of
OFFONONONON message.
Step 6 Press button 1. Attaches Relay A to message
Record LED will flash. 1.
Step 7 Set SW1= ON Places Max in Active state.
Step 8 Return SW2 through Returns Max to desired
SW6 to previous settings. configuration.
When message 1 is activated, the device being used
will activate until the message is completed, then stop.
28
Example 10: Program two relays to be operated by
two separate messages. Message 1 will activate an
environmental control (e.g. Adaptivation’s FreeSwitch)
which will activate a clock radio immediately after the
message plays. Message two will activate a battery
operated toy for the duration of the message.
Step# Action to Take Result
Step 1 Plug the Environmental control unit (ECU) into Relay A
and
also into the clock radio. Plug the battery operated toy into
Relay B.
Step 2 Note the current settings of
SW2 through SW6.
Step 3 Set SW1= OFF Places Max in Setup state.
Step 4 Clear relays.
Step 5 Set SW2 through SW6= Sets Relay A for 0 second
OFF ON ON OFF ON delay.
Step 6 Press button #1. Attaches Relay A to message
Record LED will flash. 1.
Step 7 Set SW2 through SW6= Sets Relay B for duration of
ON OFF ON ON ON message.
Step 8 Press button #2. Attaches Relay B to message
Record LED will flash. 2.
Step 9 Set SW1= ON Returns Max to Active state.
Step 10 Return SW2 through SW6
to previous settings.
When message 1 is activated, the message will play
and immediately after Relay A will activate the ECU and
turn the radio on. Message 2 will turn on the toy for as
long as the message plays.
Example 11: Program message 1 to activate an
ECU with a radio immediately following the message.
Message 2 will also activate the same ECU only there
will be a four second delay following the end of the
message. Relay A will be used.

29
Step# Action to Take Result
Step 1 Plug an ECU into Relay A and ECU into the radio.
Step 2 Note current settings of
SW2 through SW6.
Step 3 Set SW1= OFF Places Max in Setup state.
Step 4 Clear Relays
Step 5 Set SW2 through SW6= Sets Relay A for 0 second
OFF ON ON OFF ON delay.
Step 6 Press button 1. Attaches Relay A to message
Record LED will flash. 1.
Step 7 Set SW2 through SW6= Sets Relay A for a 4 second
OFFONOFFOFFON delay.
Step 8 Press button #2. Attaches Relay A to message
Record LED will flash. 2.
Step 9 Set SW1= ON Places Max in Active state.
Step 10 Return SW2 through SW6
to previous settings.
When message 1 is activated, the message will
play, then Relay A will activate the ECU turning the
radio on. When message 2 is activated, the message will
play, then four seconds after the message is over Relay A
will activate the ECU turning the radio on. From this
example, you can see one relay can be assigned to two
different messages.
Example 12: Program message 4 to turn on an
adapted toy using a switch latch timer box (e.g.
Adaptivation’s Linkswitch) with a six second delay.
Step# Action to Take Result
Step 1 Plug the Switch latch timer into Relay B and also the
adapted
toy.
Step 2 Note the current settings of
SW2 through SW6.
Step 3 Set SW1= OFF Places Max in Setup state.
Step 4 Clear previous relays.
Step 5 Set SW2 through SW6= Sets Relay B for 6 second
30
ON OFF OFF OFF ON delay.
Step 6 Press button #4. Attaches Relay B to message
Record LED will flash. 4.
Step 7 Set SW1= ON Places Max in Active state.
Step 8 Return SW2 through SW6
to previous settings.
When message 4 is selected, the message will play
and 6 seconds later Relay B will activate the switch latch
timer and the toy.
FACTORY SETTINGS
The factory defaults are as follows:
-Visual scan rate: 1 second per message.
-Standard Auditory Scanning
-Interauditory pause: 1 second
-Scan cycle mode: Stop scanning after message selected
-Inactivity shutdown: Repeat scan four times.
You may program as many of the features de-
scribed at a time as you wish. When the batteries are
removed, all options programmed in the Setup state will
revert to factory defaults. Any recorded messages will
not be lost.
EXTERNAL SPEAKER JACK
This jack will allow you to plug in an additional
speaker. This may be an amplified speaker for situations
when a very loud volume is needed, or a set of head-
phones when a quiet message is needed. The VoicePal
Max's internal speaker will automatically shut off when
an external speaker is used.

31
OVERLAYS
The VoicePal Max has a built-in pouch which
enables you to easily slide in custom overlays with
pictures or symbols. Included with the VoicePal Max are
templates for the 2, 3, 4, and 10 message modes. These
templates also have punch outs for the scanning LEDs.
Boardmaker from Mayer-Johnson is a popular program
which allows you to make custom overlays with many
symbols to choose from. If you have Boardmaker, pre-
sized templates are available. Use the following steps to
open Adaptivation templates.
1. Open Boardmaker
2. Under File menu, Open
3. Open the Pre-made folder
4. Open the folder named “Adaptiv”
5. Choose the template you wish to use.
ADDITIONAL OPTIONS
KEYGUARDS
The VoicePal Max has keyguards available to help
theoperatorzeroinonthedesiredkeypadbutton. The
keyguard helps prevent inadvertent activation of the
keypad. Keyguards are available in 2, 3, 4, and 10
message formats.
CARRYING CASE
The VoicePal Max has a custom designed carrying
case available to help protect it from bumps, spills, and
other hazards. The carrying case can be hung over the
shoulder, worn around the waist to provide easy access.
32
EXTERNAL SCANNING OVERLAY
External visual scanning is possible with the
VoicePal Max using the External Scanning Overlay.
Objects such as glasses, toys, utensils, or large photos or
symbols can be scanned by placing the four large LED
lights on the objects to facilitate very concrete scanning
capability.
TROUBLESHOOTING
Voice Pal Max records but does not play back.
Is volume turned up?
Are batteries in correctly?
Batteries may be too low. Try new ones.
If external speaker is used, does it work?
Is Delayed Activation being used? If so press the button
for required length of time.
Are you in Auditory scan mode without a scanning
speaker plugged in?
Do you have any relays programmed with reinforcement
delay?
Is the VoicePal Max programmed for 2, 3, or 4 message
mode? Keep in mind that some keypad buttons and
corresponding external switch jacks are intentional dead
spaces and won’t activate messages.
VoicePal Max will not go into RECORD mode.
Firmly press the record button for two to three seconds
until the flashing Record light comes on solid, then
release.
Make sure SW1= ON.
Make sure batteries are fresh.
Make sure ON/OFF Volume switch is on.

33
The VoicePal Max will not go into Record mode until
the message currently playing ends.
You can get into record mode but messages won’t record.
Are you in 2, 3, or 4 message mode? These modes have
intentional dead spaces and will not record in those
areas.
Release the Record button after the Record LED comes
on. Do not press the Record button and the keypad
buttons at the same time.
Are you recording cue words or regular messages?
When LED 10 is on while in record mode, you will be
recording cue words.
Messages are quiet or have too much background noise.
Speak clearly and loudly, no less than 12 inches away
from the unit.
Batteries may be too low.
Areyounearasourceofelectricalnoise?Suchas:
Power lines, automobiles, electrical motors, air condi-
tioner. If so, increase the distance of the VoicePal Max
from these sources.
While using relays, you hear the relay clicking but the
battery operated device does not turn on.
Is your battery operated device turned on?
Are the batteries fresh in the battery operated device?
Does the device work if you plug a conventional switch
directly into it?
Did you plug the battery operated device into the correct
jack?
34
Record stays on when unit is off.
If the VoicePal Max is turned off while in record mode,
the Record LED will not turn off. It will simply dim.
Take the VoicePal Max out of record mode by pressing
and holding the Record button until the flashing Record
LED goes out. Then turn the VoicePal Max off.
Auditory scanning is not working.
Make sure SW6= ON.
Make sure the volume knob is turned up.
Make sure the headphones or pillow speaker are
plugged into the jack marked SCAN SPK.

35
DIP SWITCH SETTINGS
ACTIVE STATE Switch1 = ON SETUP STATE: Switch1 = OFF’
SW2 SW3 SW4 SW5 SW6 Function
SW2 Two Button Scanning Delayed Activation
ON ON ON ON ON ON ON 0 Sec *
OFF OFF ON ON ON OFF ON ½ Sec
ON ON OFF ON ON 1 Sec
SW3 SW4 Keypad Configuration ON ON OFF OFF ON 1½ Sec
ON ON 2 messages Scan Speed - Visual Scanning
ON OFF 3 messages ON ON ON ON OFF Sequential Messaging
OFF ON 4 messages ON ON ON OFF OFF 1 Sec *
OFF OFF 10 messages ON ON OFF ON OFF 2 Sec
ON ON OFF OFF OFF 4 Sec
SW5 Repeat message? Inter-auditory Pause
ON No ON ON ON ON OFF 0 Sec
OFF Yes ON ON ON OFF OFF 1 Sec *
ON ON OFF ON OFF 2 Sec
SW5 Scanning Selection ON ON OFF OFF OFF 4 Sec
ON INVERSE (touch-release)/STEP After Message Activity
OFF POSITIVE(touch-touch) ON OFF ON ON OFF Stop scanning *
ON OFF ON OFF OFF Cont scan w/ mess one
SW6 Auditory Scan ON OFF OFF ON OFF Cont scan w/ next mess
ON ON No. of Scanning Cycles BeforeShutdown
OFF OFF OFF OFF OFF ON OFF 4 cycles *
OFF OFF OFF OFF OFF 8 cycles
Clear all relays from selected message(s) ²
ON OFF OFF OFF OFF
*Factory Default Settings Relay A Control ³
¹To memorize settings in SETUP STATE OFF ON ON ON ON Duration of Message
press REC button until it lights up. OFF ON ON OFF ON 0 sec delay
²Press button 1-10 to disconnect all OFF ON OFF ON ON 2 sec delay
relays from corresponding messages. OFF ON OFF OFF ON 4 sec delay
³Press button 1-10 to attach selected Relay B Control ³
relay to corresponding message. Press ON OFF ON ON ON Duration of message
REC to detach selected relay from ON OFF ON OFF ON 0 sec delay
all messages. ON OFF OFF ON ON 2 sec delay
ON OFF OFF OFF ON 6 sec delay
OFF ON ON ON OFF Cue Word Scanning
OFF ON ON OFF OFF Standard Scanning
36
Vo i c e Pa l M a x
1 Year Limited Warranty
Your Adaptivation VoicePal Max was carefully tested and inspected before it
was shipped from the factory. We warrant this product to be free from defects in
materials and workmanship under normal use and service for one (1) year from
thedateofpurchase. Intheeventofadefectinmaterialsorworkmanship,we
will either repair or replace without charge, at our option, any part which in our
judgment shows evidence of such defect within one (1) year of purchase. Tac-
tion Pads are warranted for six months from the original date of purchase.
This warranty does not apply if the Vo i c e P a l M a x or Taction Pads have been
misused, abused, altered, or tampered with. At the end of the warranty period,
Adaptivation shall be under no further obligation expressed or implied.
This warranty gives you specific rights, and you may also have other rights
which vary from state to state.
For repair service, contact Adaptivation's technical dept. to receive a
required RMA# (return material authorization number) prior to the
return of the device.
Adaptivation, Inc.
2225 W. 50th St. Suite 100
Sioux Falls, SD 57105
1(800)-723-2783, (605) 335-4445, Fax: (605) 335-4446, e-mail:
info@adaptivation.com, Web Page: www.adaptivation.com
Please make sure your VoicePal Max is clean before returning it to Adaptivation
for service.
This is not a medical device. It should not be used where incorrect or
faulty operation could reasonably be expected to result in injury or
worse!
11/99
Other manuals for VoicePal
1
Table of contents
Other Adaptivation Conference System manuals


Popular Conference System manuals by other brands

Televic
Televic D-CERNO Quick user guide

AVIRE
AVIRE DCP quick start guide

Polycom
Polycom SoundStation 7000 Integration guide

Redline Communications
Redline Communications RedCONNEX AN-80i PTP user manual

Omnia
Omnia MPX Node Quick start installation guide

HAMTRONICS
HAMTRONICS T301 Installation operation & maintenance

Albrecht
Albrecht AE 500S operating manual

Avaya
Avaya IX CU360 using manual

RGBlink
RGBlink ASK nano user manual

StarLeaf
StarLeaf GT Mini 3330 installation guide

AudioCodes
AudioCodes High Definition IP Phones Series User & Administrator Guide

Samsung
Samsung iDCS 16 System administration and special features guide


