AudioCodes High Definition IP Phones Series Service manual

User's & Administrator’s Manual
AudioCodes High Definition IP Phones Series
RX-PANEL Meeting Room
Scheduler
Version 2.2


User's Manual Contents
Version 2.2 3 RX-PANEL
Table of Contents
1Introduction..................................................................................................................7
1.1 Highlights ........................................................................................................................ 7
1.2 Specifications.................................................................................................................. 7
2Getting Started.............................................................................................................9
2.1 Before Getting Started .................................................................................................... 9
2.2 Positioning ...................................................................................................................... 9
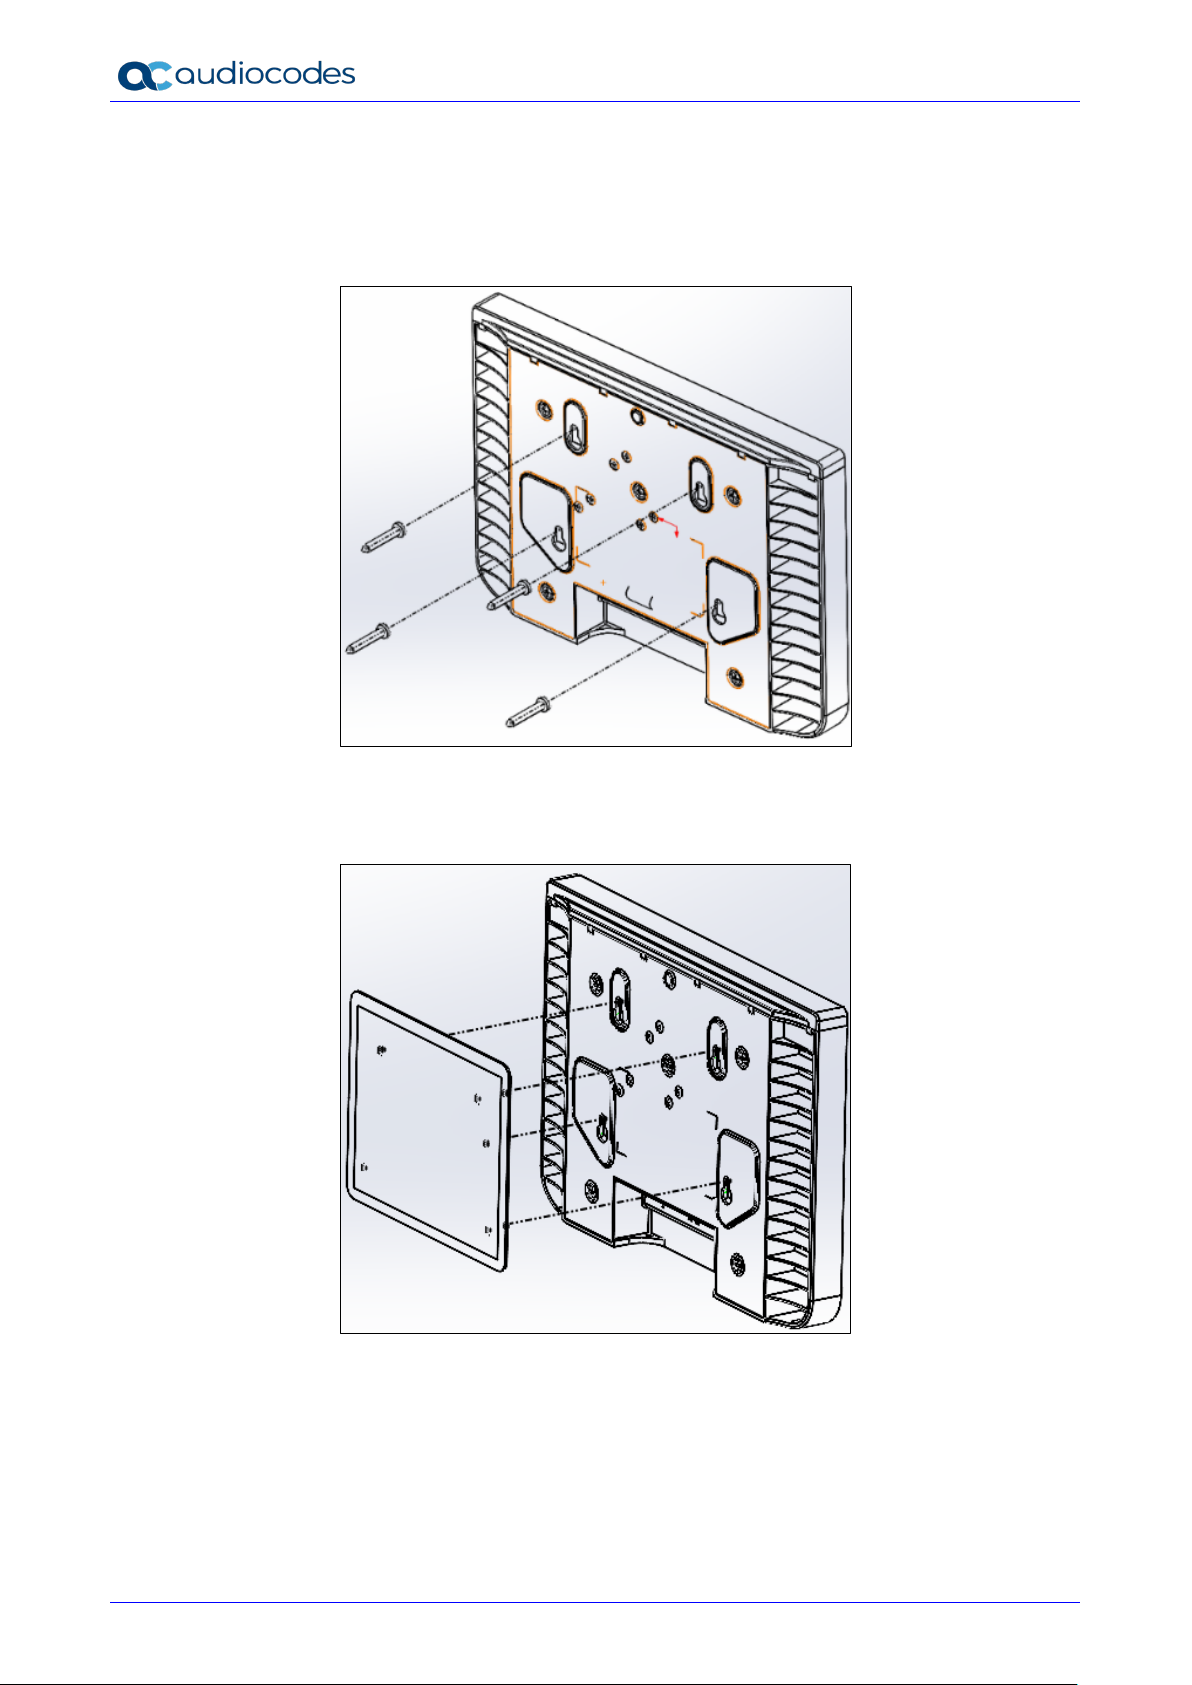
2.3 Mounting ....................................................................................................................... 10
2.4 Cabling.......................................................................................................................... 11
2.5 Powering up.................................................................................................................. 11
2.6 Managing RX-PANEL ................................................................................................... 11
3Using RX-PANEL .......................................................................................................13
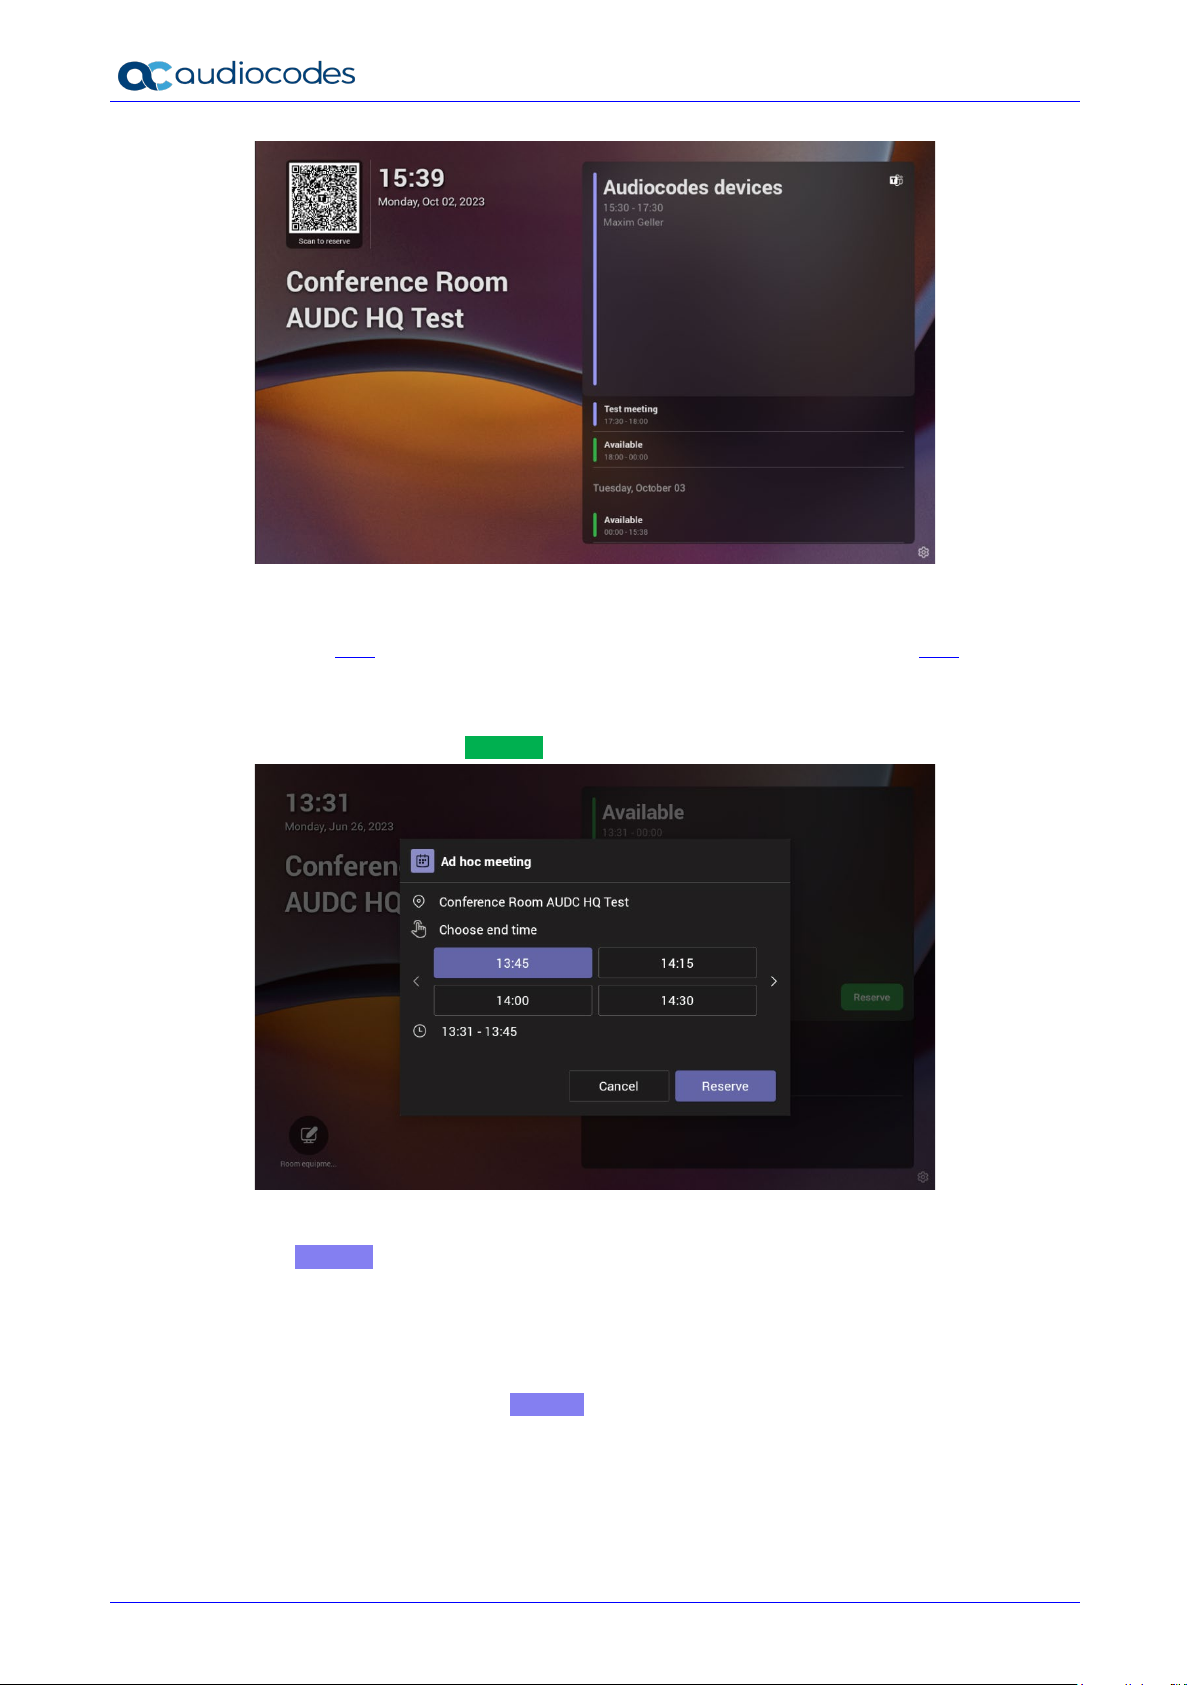
3.1 Reserving a Meeting ..................................................................................................... 13
3.2 Managing a Reservation ............................................................................................... 14
3.3 Checking in ................................................................................................................... 15
3.4 Configuring User Settings ............................................................................................. 16
3.4.1 Configuring Accessibility ....................................................................................................16
3.4.2 Rebooting the Device.........................................................................................................17
3.4.3 Viewing Device Information ...............................................................................................17
3.5 Configuring Admin Settings........................................................................................... 18
3.5.1 Configuring Device Administration.....................................................................................18
3.5.2 Configuring Display Settings..............................................................................................19
3.5.3 Configuring Date and Time ................................................................................................20
3.5.4 Configuring Wi-Fi ...............................................................................................................21
3.5.5 Configuring Bluetooth ........................................................................................................22
3.5.6 Configuring USB ................................................................................................................23
3.5.7 Configuring Power Saving .................................................................................................23
3.5.8 Configuring Security...........................................................................................................24
3.5.9 Configuring Language & Input ...........................................................................................24
3.5.10 Modifying Network .............................................................................................................26
3.5.11 Configuring 802.1x Settings...............................................................................................27
3.5.12 Configuring VLAN Settings ................................................................................................28
4Debugging..................................................................................................................31
4.1 Log Settings.................................................................................................................. 31
4.2 Voice Record ................................................................................................................ 33
4.3 Remote Logging............................................................................................................ 33
4.4 Diagnostic Data............................................................................................................. 34
4.5 Reset configuration ....................................................................................................... 34
4.6 User Data Reset ........................................................................................................... 35
4.7 Restart Teams App ....................................................................................................... 35
4.8 Debug Recording .......................................................................................................... 35
4.9 Erase all data (Factory Reset)....................................................................................... 36
4.10 ADB .............................................................................................................................. 37
4.11 SSH .............................................................................................................................. 37
4.12 Screen Capture............................................................................................................. 37
4.13 Remote Packet Capture................................................................................................ 37
4.14 Enabling Advanced Meeting Functions ......................................................................... 37

RX-PANEL
User's Manual 4 Document #: LTRT-18290
This page is intentionally left blank.

User's Manual Contents
Version 2.2 5 RX-PANEL
Notice
Information contained in this document is believed to be accurate and reliable at the time of printing.
However, due to ongoing product improvements and revisions, AudioCodes cannot guarantee accuracy
of printed material after the Date Published nor can it accept responsibility for errors or omissions.
Updates to this document can be downloaded from https://www.audiocodes.com/library/technical-
documents.
This document is subject to change without notice.
Date Published: Oct-02-2023
Trademarks
AudioCodes Ltd. All rights reserved. AudioCodes, AC, HD VoIP, HD VoIP Sounds Better, IPmedia,
Mediant, MediaPack, What’s Inside Matters, OSN, SmartTAP, VMAS, VoIPerfect, VoIPerfectHD,
Your Gateway To VoIP, 3GX, VocaNom, AudioCodes One Voice and CloudBond are trademarks
or registered trademarks of AudioCodes Limited All other products or trademarks are property of
their respective owners. Product specifications are subject to change without notice.
WEEE EU Directive
Pursuant to the WEEE EU Directive, electronic and electrical waste must not be disposed of with
unsorted waste. Please contact your local recycling authority for disposal of this product.
Customer Support
Customer technical support and services are provided by AudioCodes or by an authorized
AudioCodes Service Partner. For more information on how to buy technical support for AudioCodes
products and for contact information, please visit our Web site at
https://www.audiocodes.com/services-support/maintenance-and-support.
Stay in the Loop with AudioCodes
Abbreviations and Terminology
Each abbreviation, unless widely used, is spelled out in full when first used.
Documentation Feedback
AudioCodes continually strives to produce high quality documentation. If you have any comments
(suggestions or errors) regarding this document, please fill out the Documentation Feedback form
on our Web site at http://online.audiocodes.com/documentation-feedback.
Related Documentation
Document Name
RX-PANEL Meeting Room Scheduler Datasheet
RX-PANEL Meeting Room Scheduler Quick Guide
One Voice Operation Center (OVOC) Release Notes
One Voice Operation Center (OVOC) User’s Manual
Device Manager Administrator’s Manual

RX-PANEL
User's Manual 6 Document #: LTRT-18290
This page is intentionally left blank.

User's Manual 1. Introduction
Version 2.2 7 RX-PANEL
1 Introduction
The AudioCodes PANEL-RX Meeting Room Scheduler is a purpose-built Microsoft Teams Panel
with an intuitive touchscreen display. Neatly installed right at the entrance to the meeting room, the
RX-PANEL’s brightly colored status LED enables users to quickly see the meeting room’s
availability from a distance. Users can also view the meeting details on its sleek and clear LCD
screen and reserve a meeting room on the spot.
1.1 Highlights
RX-PANEL supports the following features:
Utilizes plug-and-play simplicity to boost the meeting room experience with a dedicated
panel showing the meeting details and room availability.
Easily reserve the room for ad-hoc meetings.
Unique, clearly-visible status LED indicating meeting space availability.
Glass and wall mountable for a professional and spotless appearance.
Dedicated special touch buttons (Home and Back).
High-resolution 8-inch touchscreen.
Runs Android 12 for improved security.
Can be managed by AudioCodes Device Manager.
Part number: TEAMS-RX-PANEL– MSRP
1.2 Specifications
The following table shows the RX-PANEL specifications.
Feature Description
LCD •
High resolution touch LCD, anti fingerprints, 1280 x 800
Built-in keys •
Dedicated touch keys – Home and Back
Power •
PoE Class 3 or external power supply
Connectivity •
Dual Band Wi-Fi
•Bluetooth 5.0
•PoE Class 3
•
Ethernet
LED •
RGB Status LED
Dimensions (W x H x D mm) 223.4 x 155.9 x 24.4
Weight (kg) 0.8
Mounting Wall and glass mount (the glass option should be ordered separately)
Certifications Microsoft Teams Rooms – coming soon Q3 2003
Compatibility Works with Android and Windows based meeting room devices

RX-PANEL
User's Manual 8 Document #: LTRT-18290
This page is intentionally left blank.

User's Manual 2. Getting Started
Version 2.2 9 RX-PANEL
2 Getting Started
The figure below shows the physical appearance of AudioCodes’ RX-PANEL Meeting Room
Scheduler.
See here for more information about the device.
2.1 Before Getting Started
Make sure you received the following in the shipped box:
Ethernet cable
4 screws, 4 wall anchors, 1 template (for concrete wall mount)
Glass-mounting bracket (for glass partition mount)
Note: Power Supply (PS) is not supplied but can be ordered separately.
2.2 Positioning
Position the device at the entrance to a conference room. Mount the device on a:
concrete wall -or-
glass partition
Note: Note that the device is suitable for mounting at a height no more than 2m.

RX-PANEL
User's Manual 10 Document #: LTRT-18290
2.3 Mounting
Concrete wall (see figure below)
Use the supplied template to mark locations for 4 wall anchors; insert the 4 screws into
them.
Glass partition (see figure below)
Remove the bracket’s adhesive strip cover, fix the bracket on the glass and hang RX-
PANEL on it.

User's Manual 2. Getting Started
Version 2.2 11 RX-PANEL
2.4 Cabling
The figures below show the RX-PANEL rear connector ports.
# Description
1
•
The figure above left shows the ports’ location (concealed view).
•
The figure above right shows the exposed view.
2
DC jack for 12V power supply
3
Reset (Insert pin, unplug PoE, keep pin inserted, plug in PoE, keep pressing for 10 seconds)
4
Ethernet LAN/PoE GbE, RJ-45
5
USB Type C connector (for maintenance purposes) (see the User’s & Administrator’s Manual)
2.5 Powering up
Connect the RX-PANEL LAN/PoE to any PoE Ethernet switch; the unit powers up.
2.6 Managing RX-PANEL
RX-PANEL is managed by AudioCodes’ One Voice Operations Center | Device Manager.
Management includes:
Firmware management / upgrade
Alarm management
APK upgrade
1
2
4
5
3

RX-PANEL
User's Manual 12 Document #: LTRT-18290
This page is intentionally left blank.

User's Manual 3. Using RX-PANEL
Version 2.2 13 RX-PANEL
3 Using RX-PANEL
Use the table below as reference to the following figure.
Use this table as reference to the preceding figure:
L-R Description
1
Space availability status LED, viewable from a distance:
Green = meeting space available; optionally reserve it right now
Red or purple = meeting space unavailable
Flashing red is a system status alert indicating, for example, recovery mode.
Flashing green and blue indicates restore to defaults.
2
Meeting details; meeting time | date | organizer
3
Meeting space availability status
4
‘Back’ button; Tap to return to the screen previously accessed
5
All meeting spaces and availability statuses
6
Tap to reserve an available meeting space for an ad hoc meeting
7
Tap to return to the home screen from any screen.
Long-press to access Settings.
Note: Admin can change background wallpaper | color of status indicator | text contrast, etc.
3.1 Reserving a Meeting
You can reserve an ad hoc meeting when the LED is green.
To reserve an ad hoc meeting:
1. Activate RX-PANEL.
2
3
5
4
6
7
1

RX-PANEL
User's Manual 14 Document #: LTRT-18290
•Reserve a room using the QR Code in the home screen. RX-PANEL allows people to
reserve the meeting room using the QR code. For more information about the feature,
see here. For information about reserving a room using QR code, see here. This feature
is enabled by default and can be disabled under Device settings > Admin
settings > Meetings.
•[When RX-PANEL is paired with a Microsoft Teams Room on Android device (RXV81 -
OR- RXV200), tap Reserve.
2. Tap <or >to navigate to the end time.
3. Tap Reserve.
3.2 Managing a Reservation
To manage reservation:
1. Activate RX-PANEL and tap Manage.

User's Manual 3. Using RX-PANEL
Version 2.2 15 RX-PANEL
2. Tap Check out and in the verification prompt, tap Check out; this ends your room reservation.
3. Optionally, tap Extend room reservation.
4. Choose the end time and then tap Reserve.
3.3 Checking in
To check in:
1. Activate RX-PANEL.
2. Tap Check in

RX-PANEL
User's Manual 16 Document #: LTRT-18290
3.4 Configuring User Settings
Note: Long-press the button on the device.
3.4.1 Configuring Accessibility
RX-PANEL features an accessibility service that allows low-vision users to interact with the device
without difficulty. The feature improves the experience of these users.
To configure Accessibility:
1. Under ‘User’ settings, tap Accessibility.
2. Adjust the font size according to preference.
3. Adjust the contrast according to preference.
4. Adjust the color correction according to preference.

User's Manual 3. Using RX-PANEL
Version 2.2 17 RX-PANEL
3.4.2 Rebooting the Device
You can reboot the device.
To reboot the device:
1. Under ‘User’ settings, tap the Reboot setting.
2. Tap Reboot and in the verification prompt displayed, tap OK.
3.4.3 Viewing Device Information
You can view information about the device.
To view information about the device:
1. Under ‘User’ settings, tap About device.
2. Tap More to display more information.

RX-PANEL
User's Manual 18 Document #: LTRT-18290
3. Tap Status.
3.5 Configuring Admin Settings
3.5.1 Configuring Device Administration
To configure device administration:
1. Under ‘Device admin settings’, tap Device Administration.
2. Tap Login, enter your password using the virtual keyboard displayed, and then tap OK.

User's Manual 3. Using RX-PANEL
Version 2.2 19 RX-PANEL
3. Tap Logout user to log out.
4. Tap Account Signout to sign out from Teams.
5. Tap Change password to replace your old password with a new one. Use the virtual keyboard
displayed to define the old and the new.
3.5.2 Configuring Display Settings
To configure display settings:
1. Under ‘Device admin settings’, tap Display.
2. Tap the Brightness level scale to decrease or increase screen brightness.
3. Tap Screen timeout.
4. Tap the option of your choice and then tap ← to go back to the previous screen.
5. Tap Font size to make the text on the screen smaller or larger than the default and then tap
← to go back to the previous screen.
6. Tap Screen saver.

RX-PANEL
User's Manual 20 Document #: LTRT-18290
7. Tap Off to activate (or On to deactivate).
8. Tap Current screen saver to change Clock > Colors or Colors > Clock depending on your
preference and then tap ← to go back.
3.5.3 Configuring Date and Time
To configure date and time:
1. Under ‘Device admin settings’, tap Date & time.
2. Activate Set time automatically for date and time to automatically be retrieved from the
deployed Network Time Protocol (NTP) server. If this setting is activated, the following two
settings (Date and Time) will be read only.
3. Tap Date to manually set the date in the calendar that is displayed.
4. Tap Time to manually set the time on the clock that is displayed.
5. Activate Set time zone automatically for the time zone to automatically be detected. If this
setting is activated, the following setting (Time zone) will be read only.
This manual suits for next models
2
Table of contents
Other AudioCodes Conference System manuals

AudioCodes
AudioCodes RXV100 Quick reference guide

AudioCodes
AudioCodes AC-HRS User manual

AudioCodes
AudioCodes RXV100 Quick reference guide

AudioCodes
AudioCodes RXV80 Quick reference guide

AudioCodes
AudioCodes RXV80 Quick reference guide

AudioCodes
AudioCodes RXV80 User manual

AudioCodes
AudioCodes RXV81 Quick reference guide

AudioCodes
AudioCodes RXV81 User manual

AudioCodes
AudioCodes RX-PANEL User manual