ADE FL82-Cool User manual

Meat mincer with cooling and patty maker
attachment – FL82-Cool
(FL-Cool-200629-Re 003-UM-en)
ADE Germany GmbH & Co. KG
Hammer Steindamm 27–29
22089 Hamburg/GERMANY
+49 40 432 776-0
Fax +49 40 432 776-10
E-mail: info@ade-germany.de
IMPORTANT
READ CAREFULLY BEFORE USE
AND KEEP FOR FUTURE REFERENCE
OPERATING MANUAL
Machines for Meat Processing

1 FL-Cool-200629-Re 003-UM-en
Table of Contents
Table of Contents ............................................................................................................................................... 1
Safety information ............................................................................................................................................... 2
General safety instructions ............................................................................................................................. 2
Personal safety ............................................................................................................................................... 2
Safety of the de ice ........................................................................................................................................ 2
Work area safety ............................................................................................................................................ 3
Safety during maintenance ............................................................................................................................. 4
Residual risks ................................................................................................................................................. 4
Intended use ....................................................................................................................................................... 5
Installing and setting up the meat mincer ........................................................................................................... 5
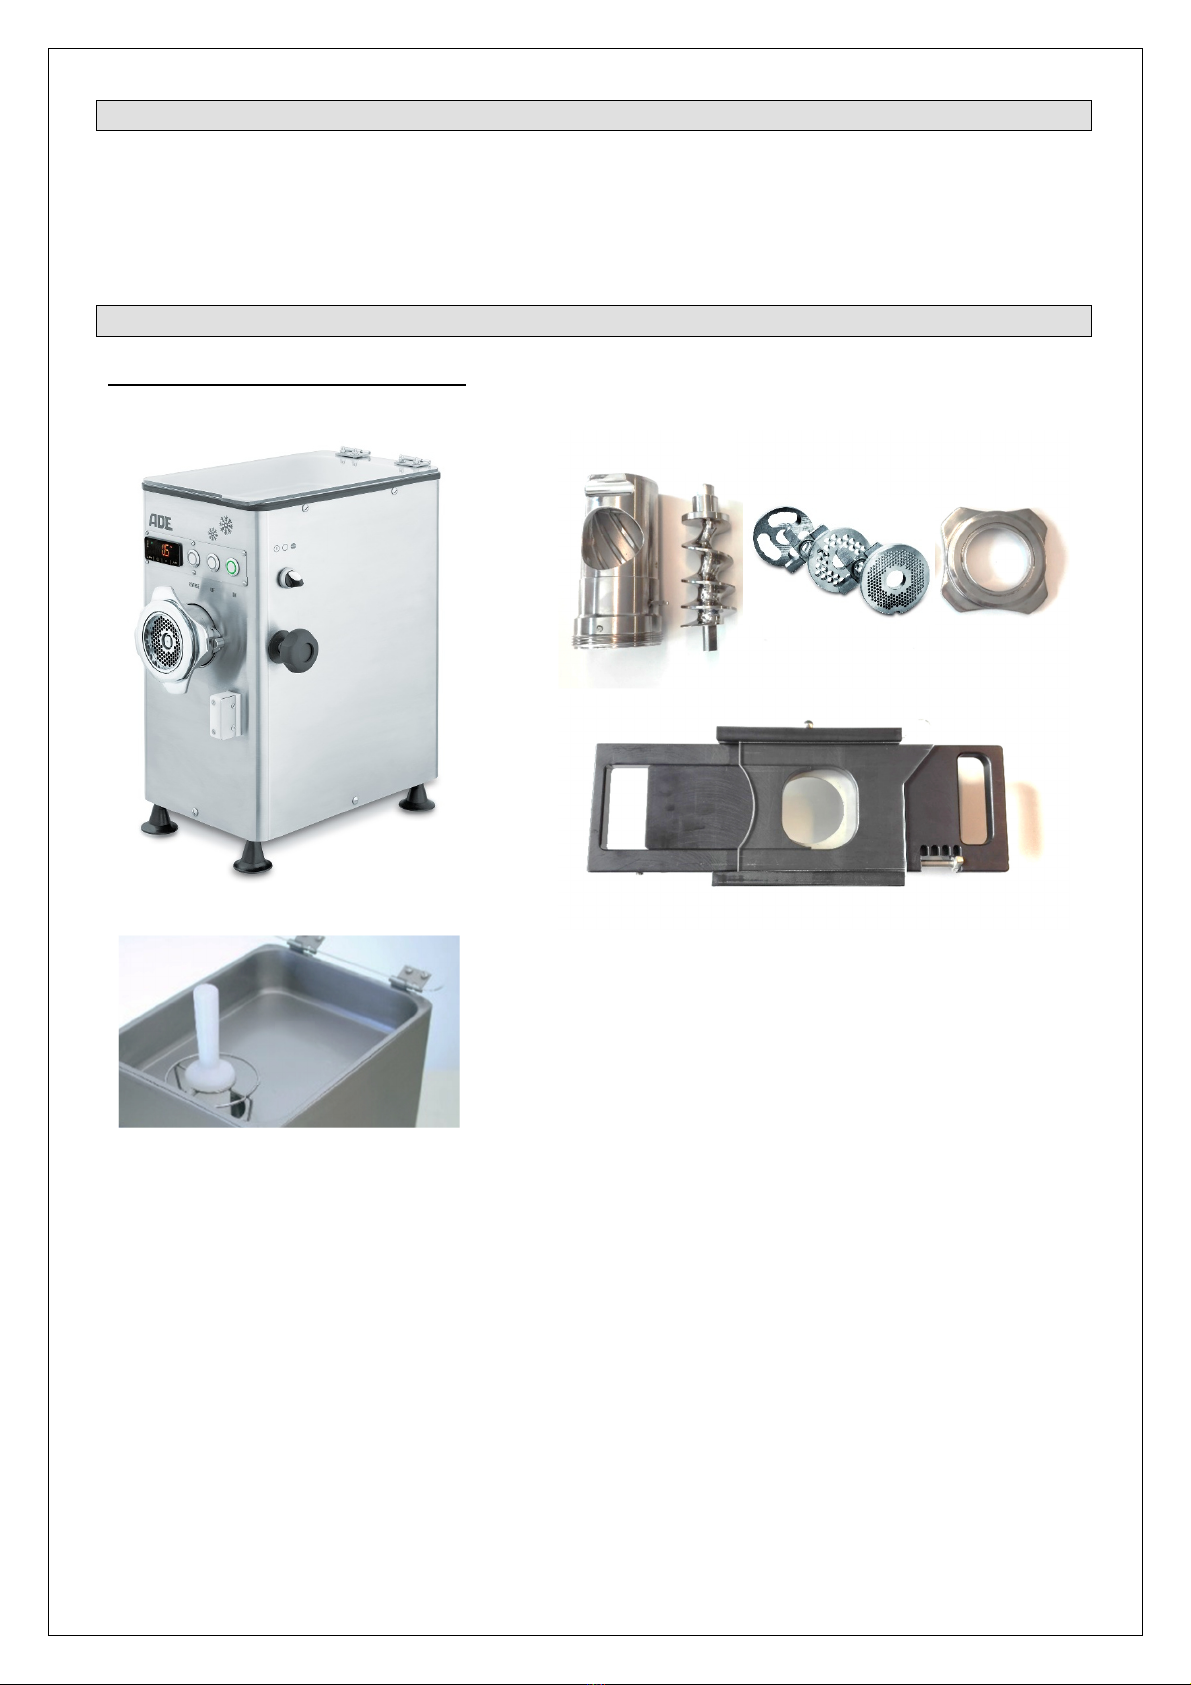
Inspecting the contents of the box ................................................................................................................. 5
Installing the meat mincer .............................................................................................................................. 6
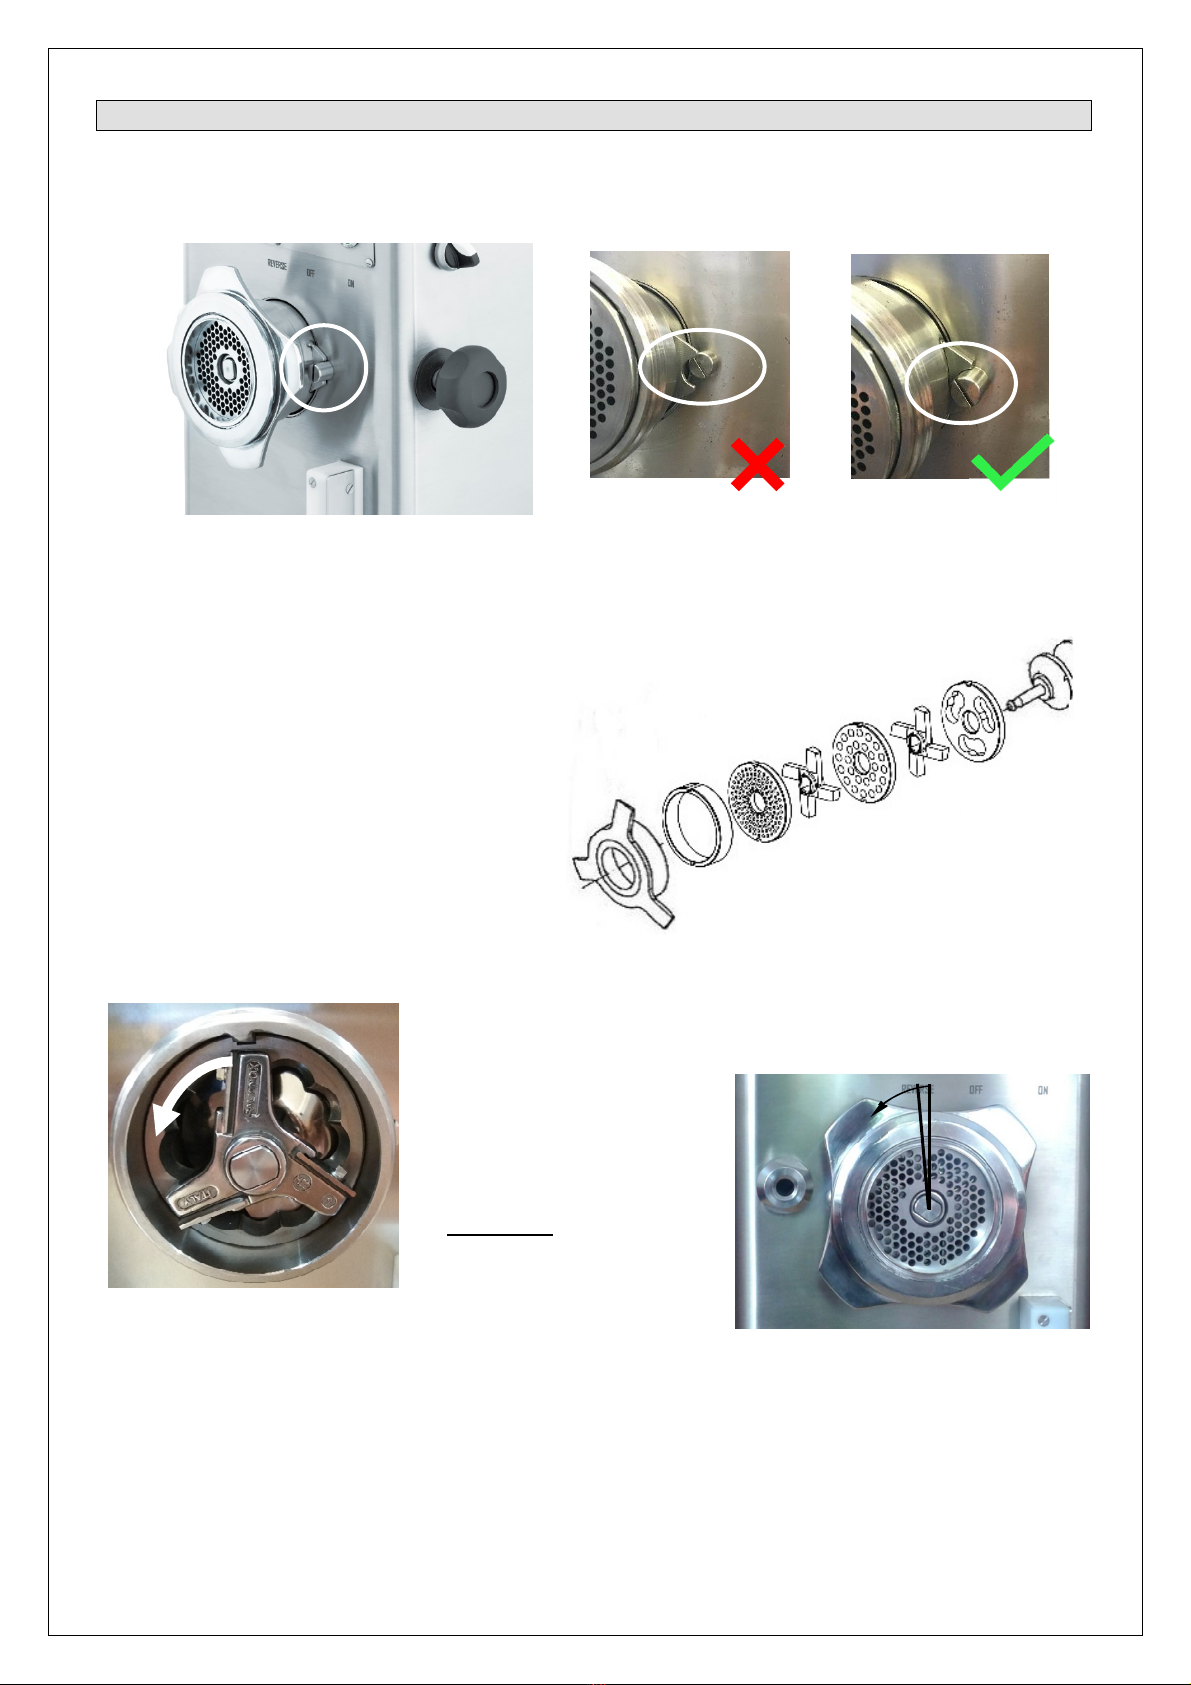
Inserting the cutting set ...................................................................................................................................... 7
Changing the cutting set ................................................................................................................................. 8
START-UP .......................................................................................................................................................... 8
Operating the meat mincer ................................................................................................................................. 8
Switching on ................................................................................................................................................... 9
Switching off ................................................................................................................................................... 9
In operation..................................................................................................................................................... 9
Using the cooling system .................................................................................................................................... 9
Thermostat for cooling system ....................................................................................................................... 9
Control buttons of the thermostat ................................................................................................................. 10
Status displays of the thermostat ................................................................................................................. 10
Operating the thermostat .............................................................................................................................. 10
Presetting the cooling alue ......................................................................................................................... 11
Patty maker operation....................................................................................................................................... 11
Mounting the patty maker attachment .......................................................................................................... 11
Operating the patty maker attachment ......................................................................................................... 11
Cleaning, maintenance and ser icing, disposal ............................................................................................... 12
Disassembling the meat mincer for cleaning ............................................................................................... 12
Cleaning ....................................................................................................................................................... 12
Troubleshooting ................................................................................................................................................ 13
Storage and Transport Conditions ............................................................................................................... 13
Warranty ....................................................................................................................................................... 13
Disposal ........................................................................................................................................................ 13
CE marking and declaration of conformity ....................................................................................................... 14
Technical data .................................................................................................................................................. 15
Exploded iew ................................................................................................................................................... 16
Spare parts list .................................................................................................................................................. 17
Block diagram ................................................................................................................................................... 18

FL-Cool-200629-Re 003-UM-en 2
Safety information
ADE shall not assume any responsibility for personal injury and material damage
resulting from non-compliance with this operating manual and its safety
instructions!
General safety instructions
- Read this operation and maintenance manual carefully before operating the meat mincer.
- Carefully read the labels with the safety information attached to the de ice and follow the
instructions.
- Only properly trained persons may use the meat mincer.
- The user training must include all information regarding the hazards associated with the use of the
de ice and the precautions to be obser ed.
- The user must be properly informed about the protection and safety de ices. Furthermore, the
user must be trained to carry out regular inspections of these protection and safety de ices.
- The user must NEVER lea e the meat mincer unattended during operation.
- This meat mincer must be operated only by one user.
- The de ice offers both optimal safety and utmost performance.
- The manufacturer assumes NO liability for damage caused by unauthorised modifications to the
de ice.
- Do not use the meat mincer under the influence of alcohol, drugs or medicines.
The optimal safety is in your hands, because the use of any electrical de ices is
dangerous!
Dismantling the protecti e equipment is not allowed!
In case of damage to the protecti e equipment, the machine must be immediately
put out of operation and must be handed o er to your customer ser ice for
renewal or replacement deli ery.
Personal safety
- The user must read and understand this manual before operating the meat mincer. Your eyes are
the best safety de ice: first look and then mo e and act!
- Experience has shown that some items worn by the user can cause accidents: remo e rings,
watches, wristbands and bracelets before using the de ice; button or tie up slee es securely
around the wrist; remo e the tie, which can hang down and get caught in the de ice; pin up or bind
your hair with a cap, rubber bands, hairpins, etc.
Follow all internationally accepted and recommended safety and accident
pre ention measures!
Safety of the de ice
- Thoughtfully inspect the de ice before operation and carry out regular inspections of the protection
and safety de ices.
- ALWAYS close the protecti e co ers properly before turning on the de ice.
- NEVER process large pieces of meat, i.e. those exceeding the de ice capacity.
- DO NOT process pieces of meat with bones.

3 FL-Cool-200629-Re 003-UM-en
- Do not press in the meat with your hands during processing.
- The protecti e co ers must be attached when the meat mincer is turned off.
- ALWAYS unplug the power cord from the mains outlet before assembling or disassembling any
de ice parts.
- ALWAYS disconnect the de ice from the power supply before performing any maintenance work
on it.
- Use the meat mincer ONLY with properly fitted and fully functional protecti e co ers. Do not use
the de ice if these conditions are not met.
- NEVER try to remo e pieces of meat from the running meat mincer.
- The power cord must be replaced immediately once it is damaged, e en slightly. It must be free
of cracks, damages, bulges, etc.
- NEVER pull on the power cord to unplug it from the mains outlet.
- If you hear any abnormal noises, immediately turn off the meat mincer.
Safe operation is no longer guaranteed:
- If the mains plug or the mains cable is isibly damaged.
- If the mains plug is no longer working.
- After prolonged storage in humid areas.
- If the thread of the worm housing and/or the dri e pins of the worm show damage.
- If the keypad/on-off switch shows damage.
- If perforated discs thinner than 5 mm are used.
In these cases, contact your dealer or your ser ice partner for your own safety.
Work area safety
- The work area where the meat mincer is used must be sufficiently lit and large enough to allow all
operations to be carried out smoothly and without risk to the user.
- The installation site must be FREE of any water, processing residues or other residual products.
The work surface must be kept in perfect condition, with any possible slipping, catching or
entanglement hazards being eliminated. The installation site must be kept free of any other loose
materials.
- ONLY the operator responsible for the meat processing must be present in the meat mincer work
area.

FL-Cool-200629-Re 003-UM-en 4
Safety during maintenance
- The meat mincer must be turned off before cleaning, maintenance, assembly or disassembly of
the de ice parts: Unplug the power cord from the mains outlet!
- The general cleaning of the meat mincer is an important safety factor.
- Once any faults or damages to the de ice or protecti e co ers ha e been disco ered, they must
be reported to the person responsible for the meat mincer and the de ice must be turned off.
Residual risks
A meat mincer presents a residual risk of injury despite sensible accident
protection de ices. Therefore, special caution is required in this type of work!
- Ne er bend o er the machine with loose clothing (such as ties) or loose long hair.
- Ne er reach into the filling opening with your fingers or any unsuitable objects (such as forks,
kni es, etc.)!
- Do not tamper with the electrical installation or the safety de ices! Always ha e electrical defects
repaired by a specialist.
- Always disconnect the mains plug prior to an inter ention!
- Wear safety glo es during maintenance work if possible!

5 FL-Cool-200629-Re 003-UM-en
Intended use
Your ADE meat mincer with cooling is a quality product that is manufactured for use in industrial
kitchens and preparations such as canteens and commercial kitchens.
It is a meat mincer for processing unfrozen meat products without bone. Other goods such as fruits,
egetables, bread, nuts etc. may not be processed.
The machine may only be used in its original condition and with original parts.
Installing and setting up the meat mincer
Inspecting the contents of the box
1
4
2
5
3
9 10
5
11
12
7
6
8

FL-Cool-200629-Re 003-UM-en 6
No. Meaning
1 Meat mincer of FL-Cool series in stainless steel housing
2 Lock screw for worm housing
3 Programme selector: For normal mincing or patty making
4 Integrated control unit
5 Blocking ring (hand wheel)
6 Integrated filling bowl
7 Pusher
8 Worm housing
9 Worm
10 5-piece Unger cutting set
incl. precutter
incl. cross blade (2x)
incl. two perforated discs (Hole diameter 3 and 8 mm)
distance rings
11 Patty maker attachment
Operating manual with declaration of conformity
Installing the meat mincer
The meat mincer is deli ered in a stable packaging box that is strong enough for transport.
Take the meat mincer out of the packaging. Due to its weight, this should be done by two adult
persons.
Place the machine on a working surface that pro ides sufficient strength and stability to ensure
adequate safety, taking into account the machine's own weight.
Depending on the size of the operator, the machine should not be too high to allow comfortable and
effortless operation!
Wait at least four hours after switching on the de ice so that the cooling liquid in
the cooling system can be fully distributed.

7 FL-Cool-200629-Re 003-UM-en
Inserting the cutting set
Before inserting the cutting set, first insert the worm housing and lock it with the lock screw (1). Pay
attention to correctly placing when inserting the worm housing (2).
The worm shaft (15+16) is introduced so that the shaft is first introduced with the dri e shaft in the
worm housing. It is pushed backwards and the worm shaft is rotated until it engages with its dri e
shaft at the rear end in the uniform slot of
the dri e.
Now, the precutter (68) is pushed onto the
stub shaft and rotated so that the
rectangular recess slides on the disc edge
o er the same shaped ridge of the worm
housing.
It follows the first cross blade (20). It is
important to ensure that the knife blades
are aligned counter-clockwise.
Then, place the perforated disc (17a) on
the stub shaft.
This is followed by the second cross knife
(20). Make sure that it is in the correct position again (cutting edges point in the direction of
rotation).
Then the second perforated disc (17b) is added.
Then, place the spacer ring (69) in this way, that the nose of the
spacer ring engages the notch
of the perforated disc (17b)
pro ided for this purpose.
The hand wheel (6) forms the
end, which is first slightly
tightened and then released
by approx. 5°. The latter is
particularly important because
the worm shaft must ha e
some clearance in the
longitudinal direction for proper functioning of the mincer.
NOTE for use of distance rings:
For use of 5-piece UNGER cutting set narrow distance ring and for use of 3-piece cutting set wide
distance ring has to be mounted.
5°
1
2
3
15+16
68
20
69
17(b)
6
17(a)
20

FL-Cool-200629-Re 003-UM-en 8
Changing the cutting set
A ersatile use is ensured by the possibility of changing indi idual perforated discs - depending on
the desired cutting effect. In any case, the hand wheel must be set up as the last part.
It must be ensured that the cutting set is assembled according to the order
specified in the manufacturer's instructions.
For the perforated disk, which is the last perforated disk to be inserted into the
worm housing, only perforated disks with a hole diameter of less than 8 mm may
be used for safety reasons!
The perforated discs must not be ground thinner than 5 mm!
START-UP
The machine is deli ered as standard with red CEE plug (16 A).
Check the oltage indicated on the nameplate with the local power supply.
Then insert the plug into a suitable three-phase socket and the machine is ready for operation.
In three-phase machines, a re erse run may occur due to the different layout of
the local power grids. 2 of the 3 power phases in the plug must then be swapped
by a specialist!
The worm must turn counter-clockwise when switched on!
The plug
may only be replaced by a qualified person!
Operating the meat mincer
No. Description Meaning
1 Programme
selection
Switch for turning on the de ice
Switch on the de ice
Switch off the de ice
Patty maker operation
2 ON Power switch (green light edge) - to turn on the mincer unit
3 OFF Breaker (red light edge) - to turn off the mincer unit
4 REVERSE Re erse mode switch (white light edge) - to turn on the re erse
rotation of the mincer unit
5 Thermostat Display of the cooling temperature
1
3
4
5 2

9 FL-Cool-200629-Re 003-UM-en
The re erse mode switch should only be acti ated when required, e.g. when a small bone has entered
the worm together with the meat and has become entangled.
Make sure that the cutting set and worm are properly positioned in the worm housing. Check the seat
of the hand wheel again. To ensure safe operation of the cutting set, first tighten the hand wheel
slightly and then loosen it by approx. 5° counter-clockwise.
Switching on
For the standard operation of the meat mincer, turn the programme selector to the left to the “I”
position.
Now start the operation of the worm by pressing the “ON” button (green light edge lights up). The
worm now starts to turn counter-clockwise.
Switching off
To stop the worm, press the “OFF” button (red light edge).
To turn off the de ice, turn the programme selector to the “O” position.
In operation
Turn on both the machine and the thermostat (see the following section) and wait about 10 minutes
for the set cooling temperature to be reached.
Make sure the cutting set is installed correctly and the hand wheel is seated as described in “Setting
up the meat mincer”.
Open the filler pan co er and fill in the pieces of meat. If necessary, cut the meat into pieces of
suitable size.
Switch on the meat mincer and push the meat in the feed funnel to reach the worm using the pusher.
Feed the meat e enly and by applying little pressure into the funnel. A oid o erstuffing.
Ne er operate the meat mincer at idle without meat in order to pre ent
o erheating of the cutting set or worm housing leading to irreparable damage.
Ne er reach into the filling shaft with your hands or insert other objects such as
sticks, cooking utensils, etc.
into the fillin
g shaft! There is a risk of injury!
Using the cooling system
The cooling temperature is usually preset during commissioning thanks to the thermostat. The
optimum temperature is determined indi idually and can be determined by the passage of arious
samples through the cooled worm housing and gradually optimised. The thermostat allows alues to
be set between -50 °C and +99 °C. The recommended preset alue of cooling temperature is +2 °C.
When the de ice is connected to the local power supply, the cooling system is initially off and the
thermostat display shows the “OFF” symbol .
Thermostat for cooling system

FL-Cool-200629-Re 003-UM-en 10
Control buttons of the thermostat
Button
symbols
Meaning
SET
Switch the thermostat on and off
Decrease the cooling temperature
Increase the cooling temperature
Status displays of the thermostat
Indicator Meaning Status
LED compressor LED on: Compressor is on.
LED flashes: Setting done in the setpoint operation
is running or protection of the compressor has
been triggered.
°C LED degrees Celsius LED on: Unit of measure for temperature is degree
Celsius.
°F LED degrees Fahrenheit LED on: Unit of measure for temperature is degree
Fahrenheit.
LED On/Standby LED on: De ice switched off/on standby.
LOC LOCK Keyboard is blocked.
UnL UNLOCK Keyboard is unlocked.
--- The desired function is not a ailable.
Operating the thermostat
To turn on the cooling system, press and hold the “On/Off” button on the thermostat for 4 seconds.
The display will now show the current temperature, which is usually the room or ambient temperature,
as well as the star-shaped ice symbol indicating that the cooling system is on and working.
The system will now cool down until the preset temperature is reached and then shut off automatically.
As soon as the temperature rises to + 4°C (e.g. due to external influences such as the ambient
temperature), the cooling system automatically switches on again.
When finished, turn off the cooling system by pressing and holding the “On/Off” button on the
thermostat again for 4 seconds.
The cooling system is switched off and the star-shaped ice symbol disappears from the display,
while the “OFF” symbol lights up on the display.
For a long life of the cooling system as well as to achie e optimal mincing results,
it is ad isable not to choose the cooling temperature either extremely low or
extremely high.

11 FL-Cool-200629-Re 003-UM-en
Presetting the cooling alue
To preset a fixed cooling alue, briefly press the “SET” button. The LED flashes and the current
preset cooling temperature is displayed. Press or button within 15 seconds to change the
cooling alue. After you ha e selected your desired cooling temperature, briefly press the “SET”
button again. The LED stops flashing and the currently reached cooling temperature is
displayed.
To exit the temperature setting without sa ing the modified cooling temperature, briefly press the
On/Off button.
Patty maker operation
The meat mincer with cooling is suitable to produce patties (“hamburgers”) of different sizes and
weights in a semi-automatic way using the patty maker attachment.
Mounting the patty maker attachment
Mount the patty maker attachment before the ejection of the worm housing.
To do this, pull out the latch on the top of the patty maker attachment and position the attachment in
front of the de ice so that the guide pin is inserted into the guide holder and the lower holder engages
around the hand wheel.
Then release the latch so that the snap mechanism on the upper side also engages around the hand
wheel.
Check the patty maker for a firm fit.
Operating the patty maker attachment
For approximated alues note 100 g, 130 g, 155 g und 170 g, whereby these weights could differ
because of different influences like processed meat, temperature of the meat, quantity in filler neck
and worm, part of water or ice etc. De iations up to 10-15% are possible.
The adjustment is made using the le er on the patty maker attachment (2). When the le er is
positioned in the left outer notch, the largest possible patties are produced. Similarly, a preset in the
right outer notch means positioning for the smallest patties.
First close the compartment of the attachment by pushing it to the left until it stops.
Now turn the programme selector (1) to the right ( ). This acti ates the patty mode. In this mode,
the worm automatically starts to turn counter-clockwise and transports the meat into the patty maker
attachment.
As soon as the compartment in the attachment is filled in the preset size, the de ice switches off
automatically.
2: Le er for presetting the
patty size
1: Programme selector
Patty maker attachment

FL-Cool-200629-Re 003-UM-en 12
Now pull the compartment to the right and remo e the patty.
When the compartment is closed again, the machine will automatically start and refill the
compartment.
To disassemble, pull the latch upwards and remo e the patty maker attachment.
The de ice can also be used with a mounted patty maker attachment as a pure meat mincer whilst
the plexiglas disc is opened.
Cleaning, maintenance and ser icing, disposal
In principle, the machine must be switched off before cleaning, maintenance and
ser ice and the power plug must be disconnected from the mains.
Disassembling the meat mincer for cleaning
The hand wheel can be unscrewed by turning it to the left. Thereafter, the perforated disc is remo ed.
By pulling on the worm shaft, the worm can now be remo ed completely with the cutting set.
If only the cross blade is remo ed, special care is required. There is a risk of injury
(cutting injury).
Now remo e the worm housing. After loosening the lock screw, the worm housing can be pulled out
of the housing.
Cleaning
Before first use, thoroughly clean the machine with a damp cloth and lukewarm water.
Depending on the load and frequency of use, the machine must be cleaned regularly – at least after
each daily work sequence.
All parts and ca ities that come into contact with meat, where deposits can form, must be cleaned.
Use a damp cloth (preferably a brush for some parts) and approx. 60° warm water for cleaning. For
cleaning and disinfecting, choose only products or accessories that are food-grade and appro ed for
this purpose. Follow the instructions for using these materials.
It is strictly prohibited to clean the slicing machine with products that can damage the health of the
operator or the customer.
After remo ing the meat residues, all components must be cleaned with water and disinfectants.
Rinse with warm water and rub the components up to drying.
Make sure that the parts do not hit one another to a oid damage.
For better and more effecti e disinfection, it is recommended to place the parts in a bath containing
3% NaCl hypotonic solution for about 30 minutes, then rinse with warm water and rub dry.
After such treatment, rinse with clean drinking water. Before assembling, ensure that all residues from
the dri e mechanism, including the housing wall, ha e been wiped out and that all parts ha e been
completely rubbed dry.
All remo able parts must also be cleaned in the dishwasher.
Howe er, regular cleaning of the kni es in the dishwasher can cause them to dull faster and thus
require more frequent sharpening.
The machine must in no way be treated with a water jet or a steam pressure
cleaner!
Likewise, the machine must not be submerged in a water basin.
Water must ne er be sprayed directly into the dri e!

13 FL-Cool-200629-Re 003-UM-en
Troubleshooting
The table below shows the main problems that may occur during operation.
FAULT
CAUSES
REMEDY
The motor does not rotate and
the worm shaft has stopped
Check whether the machine is
connected to the mains Connect it to the mains
Check whether the connection
of the three-phase plug +
ground + neutral is correct.
Ensure proper connection
The worm shaft does not
rotate
Foreign object in the mincing
section Remo e the foreign object
The running worm shaft makes
noise
The hand wheel is o er-
tightened Slightly loosen the hand wheel
The worm shaft is not latched
into the slot Insert the worm shaft correctly
Disc and blade are worn out Sharpen or replace the disc
and blade
Oil under the meat mincer Possible leak in the oil seal of
the motor
Replace the oil seal of the
motor
Display shows Pr1 Error of room temperature
probe
Check the connection of the
probe to the de ice.
Check room temperature.
Contact the ser ice partner, if
possible.
Display shows Pr2 Error of e aporator probe or
error of condenser probe
Check the connection of the
probe to the de ice.
Contact the ser ice partner, if
possible.
Storage and Transport Conditions
Keep all parts of the packaging in case you need to return the shipment to a oid possible damage
during transportation.
Warranty
ADE will repair or replace this product if it has failed within 1 year from the date of purchase (proof of
purchase is required) due to poor workmanship or defecti e material.
All mo ing parts, such as cables, cross blades, perforated discs, etc., are excluded from this warranty.
Warranty does not apply to normal appearance of usage or sign of wear or any damages caused by
accidents or misuse.
The warranty will not apply for de ices that ha e been opened by unauthorised persons.
This warranty agreement does not affect the customer's legal rights in any manner.
The dealer from whom you purchased the machine is responsible for complaints.
Disposal
Waste electrical equipment do not belong in household waste. Please dispose of
defecti e or old de ices according to the legal and country-specific regulations!

FL-Cool-200629-Re 003-UM-en 14
CE marking and declaration of conformity
Declaration of conformity by the manufacturer
This product has been manufactured in accordance with the harmonised European standards. They
conform to the regulations of the EC-directi es listed below:
- Machinery directi e 2006/42/EC
- EMC Directi e 2014/30/EU
- Low oltage directi e 2014/35/EU
- RoHS Directi e 2011/65/EC
- 1935/2004/EC to food contact materials
- 10/2011/EU to food contact materials (plastic)
in the currently alid ersions.
The declaration will be oid if a change that was not agreed with us has been made on the
machine.
Hamburg, June 2020
ADE Germany GmbH & Co. KG
Hammer Steindamm 27–29
D-22089 Hamburg
Manufacturer: ADE Germany GmbH & Co. KG.
Hammer Steindamm 27–29
22089 Hamburg / Germany
+49 40 432 776 - 0
Fax +49 40 432 776 - 10
E-mail: [email protected]

15 FL-Cool-200629-Re 003-UM-en
Technical data
Model
FL 82-Cool
Perforated disc Ø:
82
mm
Capacity:
280kg
Dimensions:
270 x 410 x 54
5
mm
Power:
1.1kW
Type of
current:
400
V
Net weight:
43
kg
Information about the cooling system
Power:
0.14kW
Frequency:
230V/50
Hz
Cold gas:
R134a
–
80
g
- Housing, worm and worm housing made of stainless steel.
- Adjustable patty maker attachment made of plastic for arious patty weights
(about 100g/130g/155g/170g – de iations of 10-15% are possible)
- Powerful motor with forward and re erse.
- Easy remo al of worm housing, worm and cutting set for easy cleaning.
- Including pusher.
- 5-piece Unger cutting set with precutter, cross blades, perforated discs (hole Ø 3 and 8 mm).

FL-Cool-200629-Re 003-UM-en 16
Exploded iew
68
20
69
17(
b)
6
17(a)
20

17 FL-Cool-200629-Re 003-UM-en
Spare parts list
No.
Description Spare part number
FL82-Cool
2 Worm housing H4327-0021
5 Lock screw H4327-005
6 Hand wheel H4327-006
15 Worm shaft H4327-015
16 Pins for worm shaft H4327-016
17a Perforated disc (Ø 7,8 mm) H4305-028
17b Perforated disc (Ø 3 mm) H4305-027
19 Foot H4327-019
20 Cross blade H4307-002
23 Plastic lid for filling bowl H4327-023
27 Display H4327-027
36 Gear H4327-036
46 Motor H4327-046
47 Re erse button H4327-047
48 Off button H4327-048
49 On button H4327-049
51 Pusher H4327-051
61 Circuit board H4327-061
68 Precutter H4327-001
69 Spacer Ring 18mm H4305-026

FL-Cool-200629-Re 003-UM-en 18
Block diagram

19 FL-Cool-200629-Re 003-UM-en
Distributor:
Table of contents