ADENDORFF Mac Afric GCHARG/108 User manual

DIGITAL BATTERY CHARGER 12V 8A
GCHARG/108
Rated Voltage: AC 220-240V Rated Current: 0.60 Amp
Output: DC 12V 2Amp / 8Amp
IMPORTANT SAFETY INSTRUCTIONS
1. This appliance is not intended for use by persons (including children) with reduced physical,
sensory or mental capabilities, or lack of experience and knowledge, unless they have been
given supervision or instruction concerning use of the appliance by a person responsible for
their safety. Children should be supervised to ensure that they do not play with the appliance.
2. Working in vicinity of a lead-acid battery is dangerous. batteries generate explosive gases
during normal battery operation. For this reason, it is of utmost important that each time
before using your charger, you read this manual and follow the instruction exactly.
3. To reduce risk of battery explosion , follow these instructions and those published
by the battery manufacturer and manufacturer of any equipment you intend to use
in vicinity of battery. Review cautionary markings on these products and on
engine
4. Use the charger in door only , do not expose it to rain.

GENERAL SAFETY
1. Use charger for charging LEAD-ACID
battery only.
Do not use battery charger for other
types of batteries, these may burst and
cause injury to persons and damage to
property.
2. Use output socket for supply power to
appliance with rated voltage DC12V and
rated current less than 12A only.
3. Use only attachments recommended or
sold by manufacturer. Use of
non-recommended attachments may result
in fire, electric shock, or injury.
4. When disconnecting the battery charger,
pull by the plug not by the cord. Pulling
on the cord may cause damage to cord or
plug .
5. Do not operate charger with damaged
cord or plug. Have cord replaced
immediately.
6. Do not operate charger if it has received a
sharp blow, been dropped , or otherwise
damaged in any way. Take it to a qualified
professional for inspection and repair.
7. Do not disassemble charger. Take it to a
qualified professional when service or
repair is required. Incorrect reassembly
may result in electric shock or fire.
8. To reduce risk of electric shock, unplug
charger from outlet before attempting any
maintenance or cleaning.
9. Do not use an extension cord unless
absolutely necessary. Use of an improper
extension cord could result in fire or
electric shock. If an extension cord must
be used, make sure that:
• Pins on plug of extension cord are the
same number, size, and shape as those of
plug on charger.
• Extension cord is properly wired and in
good electrical condition.
• Wire size is large enough for AC ampere
rating of charger
10. Always charge battery in a well
ventilated area. NEVER operate in a
closed-in or restricted area without
ad-equate ventilation. WARNING: Risk
of explosive gas.
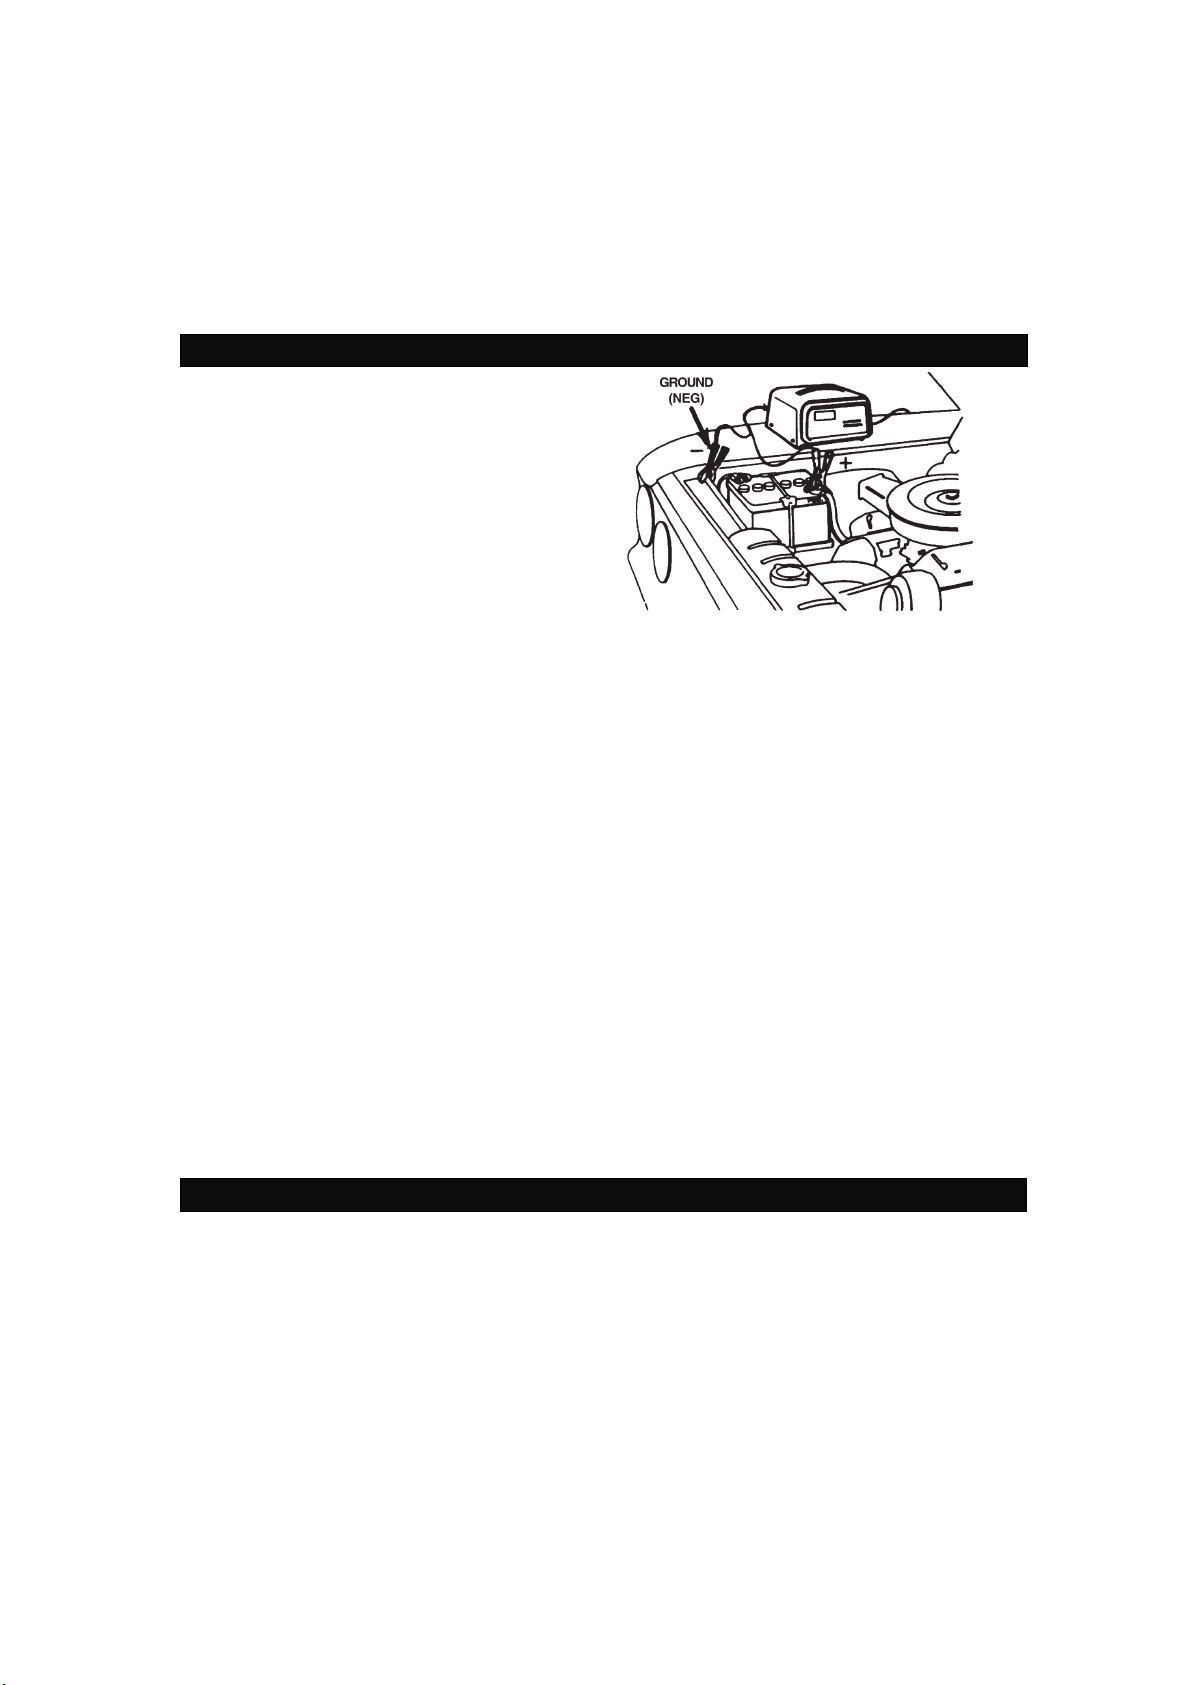
11. Locate charger as far away from battery as
DC charger cable’s permit.
12. Do not expose charger to rain or snow.
13. NEVER charge a frozen battery. If battery
fluid (electrolyte) is frozen, bring into a
warm area to thaw before charging.
14. NEVER allow battery acid to drip on
charger when reading specific gravity or
filling battery.
15. NEVER set a battery on top of charger.
16. NEVER place charger directly above
battery being charged. Gases from battery
will corrode and damage charger.
17. NEVER touch the battery clips together
when the charger is energized.
18. NEVER crank engine with charger
attached to battery.
PERSONAL PRECAUTIONS AND SAFETY
1.WARNING: Wear complete eye protection
and clothing protection, when working with
lead-acid batteries.
2.Make sure someone is within range of your
voice or close enough to come to your aid
when you work with or near a lead-acid
battery.
3.Have plenty of fresh water and soap nearby
for use if battery acid contacts skin,
clothing, or eyes. If battery acid contacts
skin or clothing, wash immediately with
soap and water.

4.Avoid touching your eyes while working
with a battery. Acid particles (corrosion)
may get into your eyes! If acid enters your
eye, immediately flood eye with running
cold water for at least 10 minutes. Get
medical attention immediately.
like) to metal, causing a severe burn.
5.Remove all personal metal items such as
rings, bracelets, neck laces, and watches
when working with a lead-acid battery. A
lead-acid battery can produce a short-circuit
current high enough to weld a ring (or the
6.Take care not to drop a metal tool or other
metal onto the battery. Metal may cause
sparking or short circuit the battery or
another electrical devise. Sparking may
cause an explosion.
7.Always operate battery charger in an open
well ventilated area.
8.NEVER smoke or allow a spark or flame in
the vicinity of the battery or engine.
Batteries generate explosive gases!
BATTERY TYPES AND SETTINGS
This charger can easily be configured to charge many different types of 12V lead-acid batteries;
wet
batteries,
MF, AGM and most
GEL-batteries.
The following recommendations should, however, only be seen as guidelines. When in doubt,
always consult
the
battery manufacturer for further
instructions.
Settings are made by pressing the “MODE-button” and stepping forward by pressing the button
one step at a
time,
releasing the button when the required mode is
reached.
HOW TO USE

To select charging mode or re-set during charging.
Fault
light on in case of short circuit , reverse polarity , bad battery
Battery is during charging
Battery is full
Mode :14.4V/2.0A
This mode is normally used for all types of batteries <40Ah
Mode :14.4V/8.0A
This mode is normally used for all types of batteries <160Ah
Mode :desulfation
If battery’s voltage is bellow 10.5V and no capacity to absorb
charging current, charger will automatically rise output voltage
up to 17V to recover the battery. If battery can’t be recovered
after 2 hour, “Fault” light will on and the battery maybe spent.
Mode :14.7V/8.0A
This setting is recommended for batteries at temperatures below
5°C. It is also recommended for many AGM batteries. This
setting is not recommended for maintenance charging when the
temperature at times exceeds +5°C. In this case, the 14.4V/8A
mode is recommended.
Mode :13.5V 5Amp output
DC power supply for use 12V appliance in home.
Max output power is 80W.
PREPARING TO CHARGE
1.Determine voltage of battery by referring to car owner s manual.
2.if it is necessary to remove battery from vehicle to charge, or to clean terminals, always remove
grounded terminal from battery first. Make sure all accessories in the vehicle are off, so as not to
cause an arc.
3.Clean battery terminals. Be careful to keep corrosion from coming in contact with eyes.
4.Add distilled water in each cell until battery acid reaches level specified by battery manufacturer.
This helps purge excessive gas from cells. Do not overfill. For a battery without cell caps,

carefully follow manufacturers recharging instructions.
5.Study all battery manufacturers specific precautions such as removing or not removing cell caps
while charging and recommended rates of charge.
6.Be sure area around battery is well ventilated while battery is being charged. Gas can be force
fully blown away by using a piece of cardboard or other nonmetallic material such as a fan.
7.Make sure the initial charging rate is not over battery manufacturers suggestion.
START TO CHARGE
1. When you are sure the battery leads are correctly placed, connect the power cord to the power
outlet to begin charging. If the battery leads are wrongly connected, The fault lamp
will light.
2. Set the proper charging mode for the battery by pushing the Mode button until the correct
setting is lit.
3. The charging lamp now light on indicating charging .
The maintenance lamp will light when the battery is fully charged and now is in
trickle charge. If the voltage drops the charger sends current to the battery. The charger can be
connected for months.
4. If battery is slightly sulphated , charger will try to repair it.
Set charger at repair mode , the lamp will blinking. Repairing may take 0.5-2hour.
Charger will turn to to 12V 2Amp mode () when battery is recovered. If battery can’t
be recovered , fault lamp will light and charge stops.
5. Charging can be stopped at any time by disconnecting the supply cord or by push mode
button .
6. If fault lamp is on during charging , the reason for this is due to:
• An interruption during charging, due to a loose connection or because the battery has ceased
to work.
• The battery has become severe sulphated or dead and needs to be replaced.

• The battery has a high self-discharge rate and may need to be replaced.
WARNING: DO NOT attempt to charge a frozen battery.
DO NOT leave the charger to battery without main power connected.
OPERATING INSTRUCTIONS: CHARGING BATTERY IN VEHICLE
1. Position AC and DC cords to reduce risk of
damage by hood, door, or moving engine
part.
2. Stay clear of fan blades, belts, pulleys, and
other parts that can cause injury to persons.
3.Check polarity of battery posts. POSITIVE
(POS, P, +) battery post usually has larger
diameter than NEGATIVE (NEG, N,-) post.
4.Determine which post of battery is grounded
(connected) to the chassis.
If negative post is grounded to chassis (as
in most vehicles), connect POSITIVE
(RED) clip from battery charger to
POSITIVE(P05, P, +) ungrounded post of
battery. Connect NEGATIVE (BLACK) clip
to vehicle chassis or engine block away
from battery. Do not connect clip to
carburetor, fuel lines, or sheet-metal body
parts. Connect to heavy gauge metal part of
the frame or engine block
If positive post is grounded to the chassis,
connect NEGATIVE (BLACK) clip from
battery charger to NEGATIVE (NEG, N, -)
ungrounded post of battery. Connect
POSITIVE (RED) clip to vehicle chassis or
engine block away from battery. Do not
connect clip to carburetor, fuel lines, or
sheet-metal body parts. Connect to a heavy
gauge metal part of the frame or engine
block.
5.When disconnecting charger, disconnect AC
cord first, remove clip from vehicle chassis,
and then remove clip from battery terminal.
6.Do not charge the battery while the engine is
operating.
OPERATING INSTRUCTIONS: CHARGING BATTERY OUT OF VEHICLE
When charging battery out of vehicle, take care to determine the battery type. To reduce risk of a
spark near battery, follow these steps when battery is outside vehicle.
WARNING: A spark near the battery may cause battery explosion.
WARNING: When removing battery from vehicle or boat, disconnect grounded pole first. When
disconnecting, make sure all accessories are off, so as not to cause an arc.
NOTE: A marine (boat) battery must be removed and charged on shore. (To charge on board
requires special equipment designed for marine use.)
WARNING: When reinstalling battery, attach the ground post first.
1.Check polarity of battery posts. Battery case will be marked by each post: POSITIVE (POS, P, +)
and NEGATIVE (NEG,N, -). NOTE: The positive battery post usually has a larger diameter than

the negative post.
2.Connect POSITIVE (RED) charger clip to POSITIVE (POS,P, +) post battery. Connect
NEGTIVE (BLACK) charger clip to NEGTIVE (BLACK,N, - ) post battery.
Rock clip back and forth to make good connection.
WARNING: Do not face battery when making final connection.
5. Plug charger AC cord into a 220 volt main supply.
6. Switch on charger and then select amperage (See Controls Section).
WARNING: Be sure area around battery is well ventilated while battery is being charged. Gas
can be forcefully blown away by using a piece of card board or other non-metallic material as a
fan.
5.Continue charging battery until charger's LCD displayer shows “FUL”.
6.When battery is fully charged, unplug charger from AC power source first. then. (1) remove clip
from Negative post, and (2)remove clip from Positive battery post.
7.Clean and store battery charger.
TERMINALS
1. Clamps: for all kind of battery terminals
2. Eyelet: for long time trickle charge , connect with battery by bolt
3. Cigarette lighter : make sure that cigarette lighters stay on with the key OFF , then
you can wire the charger to cigarette lighter fittings and just plug it into the
cigarette lighters to keep battery in full.

4. Cigarette socket: Make sure continuous power consumption of 12V appliance is
less than 72W.
CARE AND MAINTENANCE
With only minimal maintenance, this Battery Charger will deliver years of dependable service.
Follow these simple steps to maintain the charger in optimum condition: After each use, clean the
battery charger clamps - be sure to remove any battery fluid that will cause corrosion of the copper
clamps. Clean the outside case of the charger with a soft cloth and, if necessary, mild soap solution.
Keep the charger cords loosely coiled during storage to prevent damage to the cords. Do not use
the charger if cords or clamps have been damaged in any way.
If the power supply cord is damaged, it must be replaced by the manufacturer, it’s service agent or
qualified person in order to avoid a hazard.
Table of contents