ADIR ADIKI300-01 Series User manual
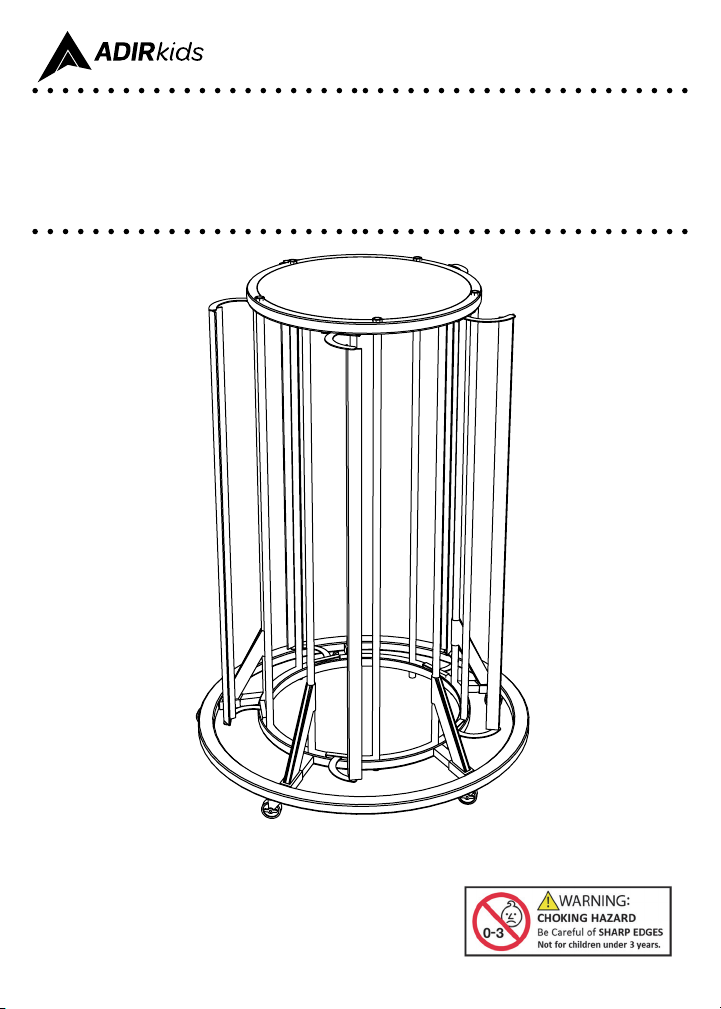
(5-ROLLS)
PAPER ROLL DISPENSER
USER GUIDE
ADIKI300-01-SERIES

Thank you for your
purchase.
AdirKids commits to delivering
safe and quality children’s
products.
We pride ourselves on creating uniquely exquisite
products for your children that they will enjoy for many
years to come. Furnishing your child’s room or classroom
can be expensive and stressful, but we’ll help make the
process aordable and stress-free. Every product is
designed to the highest standards, with safety being the
top priority, and we oer a broad range of aesthetics,
ensuring to fit your classroom or child’s style. Plus, our
expert team makes sure everything you need works as
eciently as possible.

Table of Contents
2
3
4
13
14
15
Parts
Hardware
Assembly Instructions
Loading Paper
Cutting Paper
Warranty

2
Parts
A
D
G
J
B C
E F
H I
Bottom Frame
Top Spring Arm
(x5)
Vertical Pole
(x5)
Bottom Bracket
(x5)
Bottom Spring Arm
(x5)
Caster Wheel (x5)
Cutter Blade (x5)
Top Frame
Roll Rest (x5)
Paper Roll Rod (x5)
3
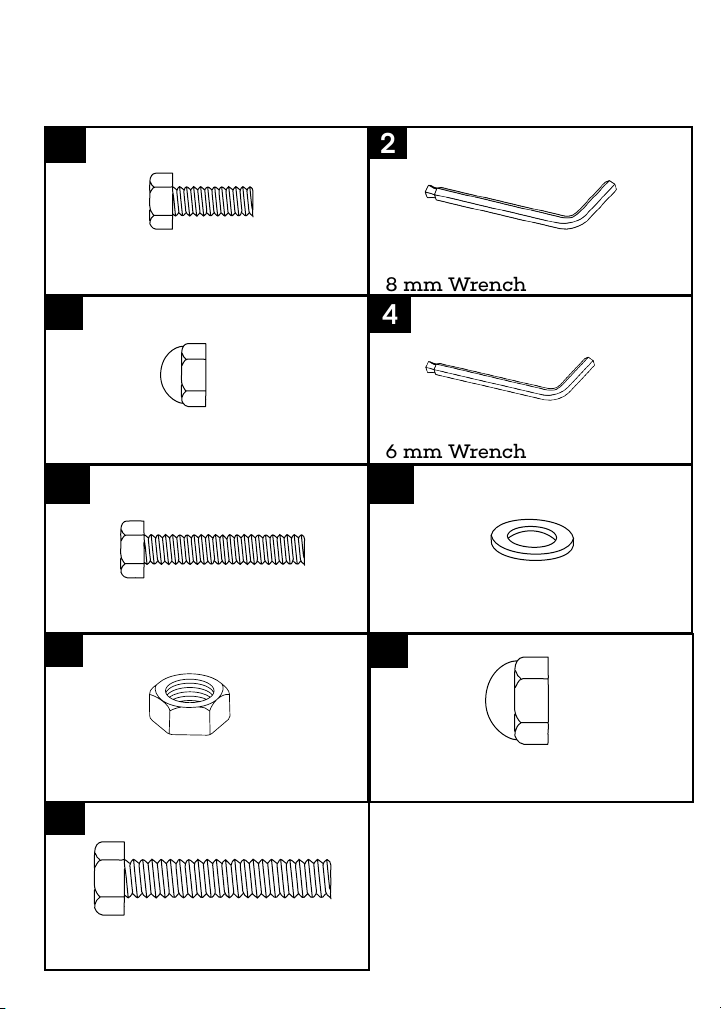
Hardware
1
3
5
7
2
4
6
Screw (M6*10) (x25)
M6 Capped Screw Nut (x10)
Screw (M6*35) (x10)
M8 Screw Nut (x5)
8 mm Wrench
6 mm Wrench
Washer (x10)
8
M8 Capped Screw Nut (x5)
9
Screw (M8*80) (x5)

4
Assembly Instructions
A. LocateBottomFrame(A)andplaceitonaat,clean
surface.
B. Take one of the Bottom Spring Arms (B) and attach it
to the Bottom Frame (A) with two Screws (M6*10) (1).
a. Use the 6 mm Wrench (4) that was included to
secure the screw in place
C. Repeat this for the other four Bottom Spring Arms (B).
Step 1:
A
4
B
1

5
A. Locate the Top Frame (C) and a Top Spring Arm (D).
B. Attach one of the Top Spring Arm’s (D) to the Top
Frame (C) with two Screws (M6*10) (1) .
a. Use the 6 mm Wrench (4) that was included to
secure the screws in place.
D. Repeat this for the other four Top Spring Arms (D).
Step 2:
C
1
4

6
A. LocatetheCasterWheels(E),andthesewillbeafxed
to the Bottom Frame (A).
B. Take one of the wheels and insert it into the predrilled
holelocatedontheouterringoftheBottomFrame,as
pictured.
C. AfxitusingM8ScrewNut(7);secureitinplacewith
the included 6 mm Wrench (4).
D. Repeat these steps for the remaining Caster Wheels
(E).
Step 3:
A
E
7
4
7
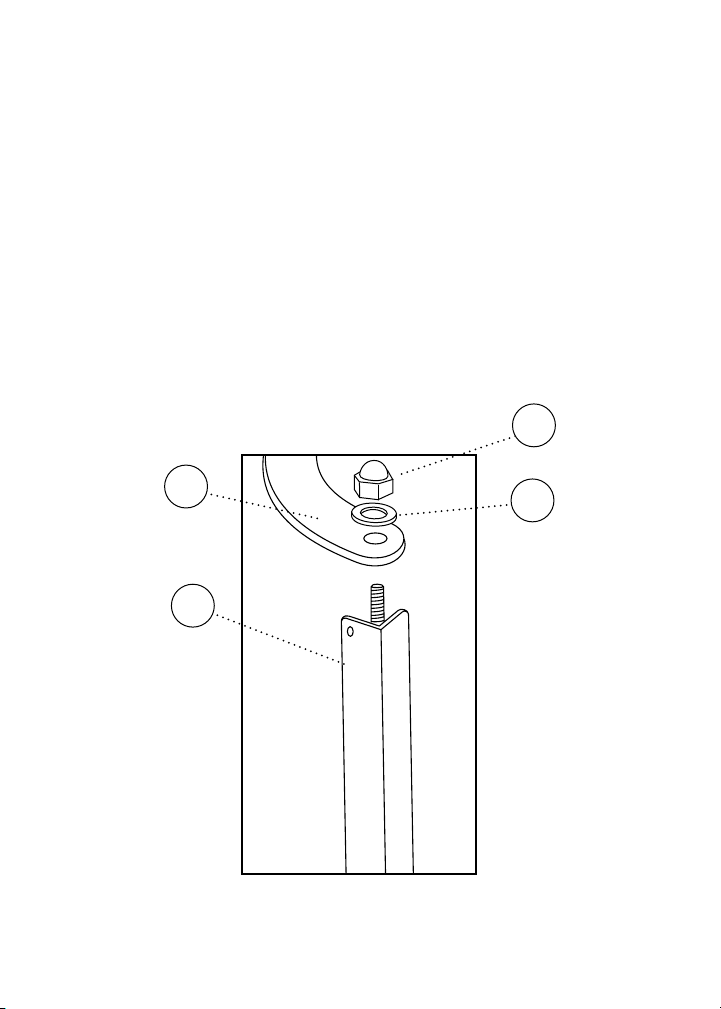
A. Locate a Roll Rest (F) and place it on the inner ring of
theBottomFrame,aspictured.
a. EachRollRest(F)willgobetweenwhereeach
VerticalPole(G)willbeinstalled.
B. AfxittotheframeusingaScrew(M8*80)(9),anM8
ScrewNut(7),anM8CappedScrewNut(8),andthe
included8mmWrench(2).
C. Repeat this step for the remaining four Roll Rests (F).
Step 4:
A
8
A
F
9
2
8
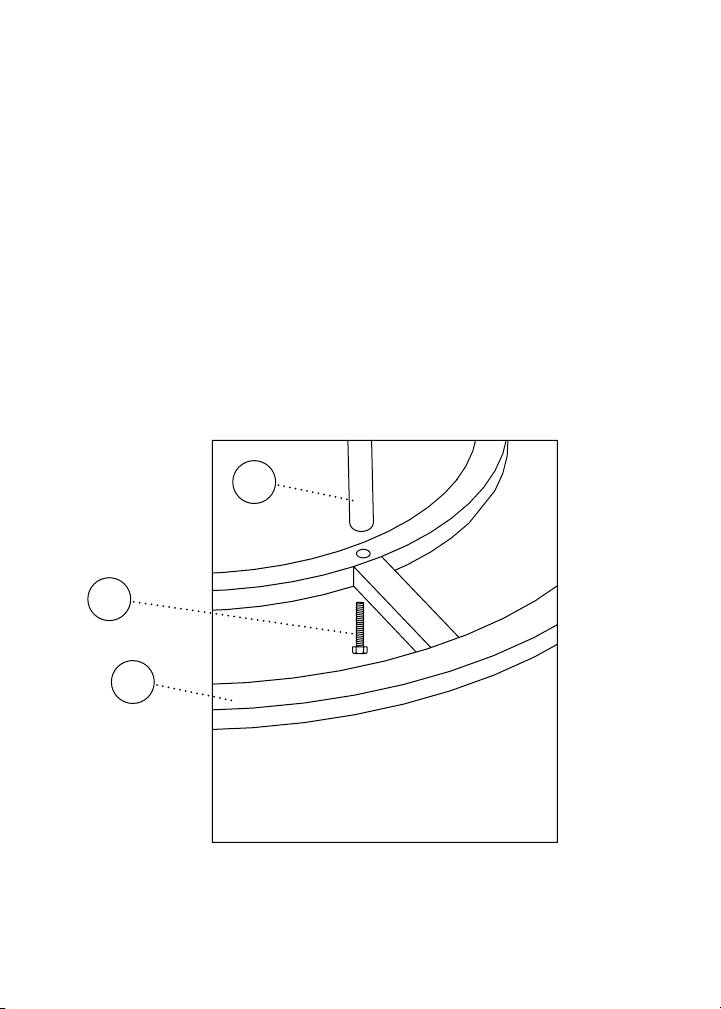
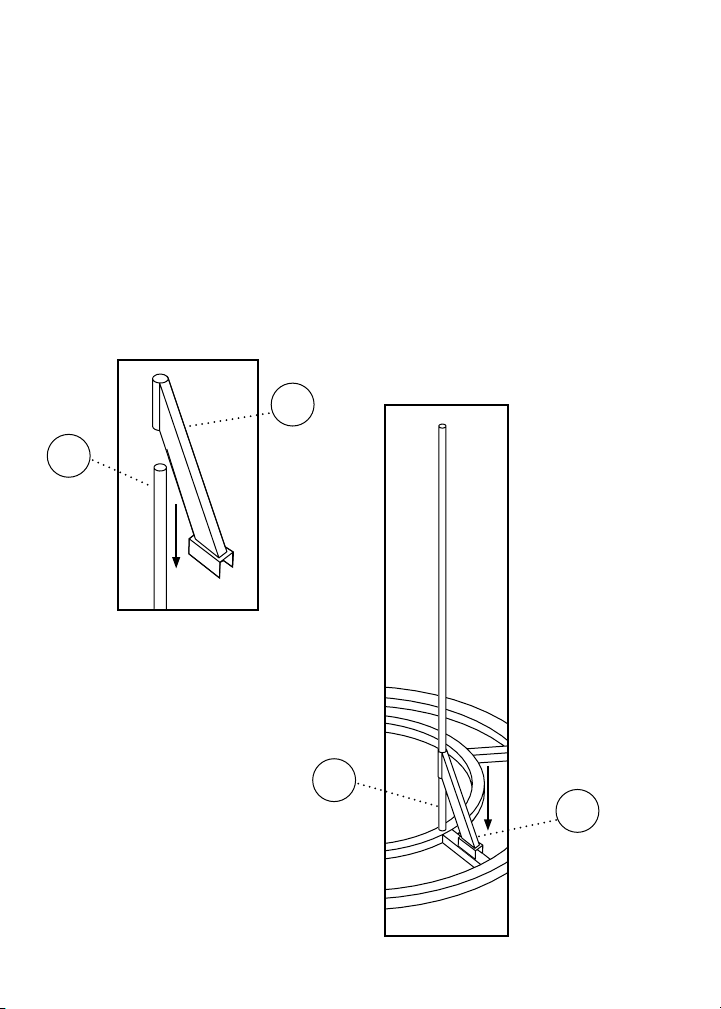
A. LocateaVerticalPole(G):thiswillbeinstalledinone
ofthepredrilledholesontheinnerring,adjacentto
thecrossbarconnectingtheouterring.
B. AfxtheVerticalPole(G)withaScrew(M6*35)(5)
using the included 6 mm Wrench (4).
C. Repeat this step for the remaining four Vertical Poles
(G).
Step 5:
A
5
G
9
G
G
J
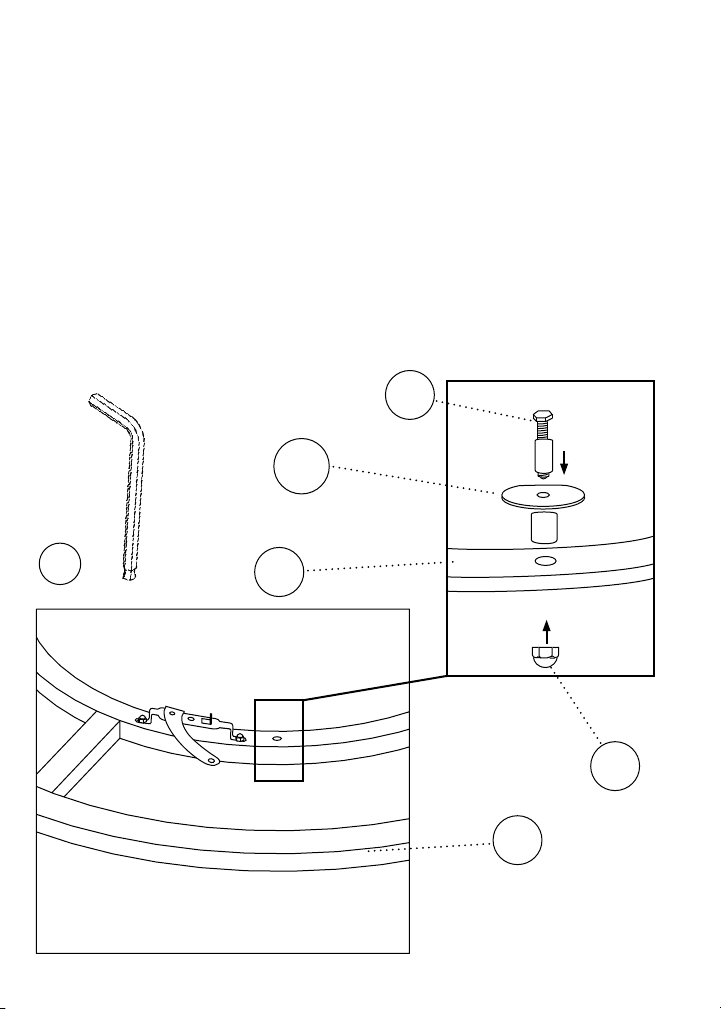
A. Take a Bottom Bracket (J) and slide it down the
Vertical Pole (G).
B. The horizontal piece of the Bottom Bracket (J) should
befacingouttowardstheouterring.
C. Pushdownrmlysothatitissecureonthecrossbar
andtightenthescrewonthebracket.
Step 6:
J

10
A. Take the Top Frame (C) and place it on top of the
Vertical Poles (G).
B. AfxtheVerticalPoles(G)totheTopFrame,aligning
them with the smaller predrilled holes.
C. UsingveScrews(M6*35)(5),securetheminplace
with a 6 mm Wrench (4).
Step 7:
C
G
5
4
11
H
D
3
6
A. Handlingwithcare,takeaCutterBlade(H),and
attach it to the Top Spring Arm (D) and Bottom Spring
Arm(B),aspictured.
B. SecureitinplacewithanM6CappedScrewNut(3),
and utilize the 6 mm Wrench (4).
C. Repeat this step for the remaining four Cutter Blades
(H).
D. Repeatthisstepatthebottomendtoensureboththe
topandbottomhavethescrewstoafxtheblade.
Step 8:

12
A. InsertthevePaperRollRods(I)intotheTopFrame
(C),aspictured.
B. YourPaperRollDispenserisnowreadytobeused.
Step 9:
I
C
13
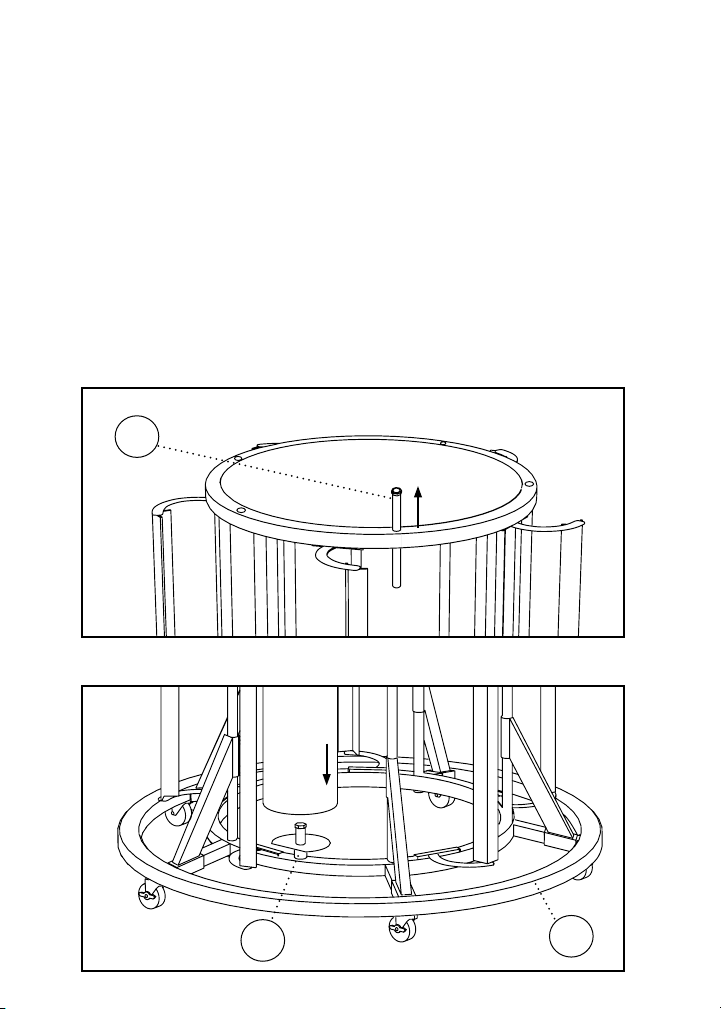
I
FA
A. RemoveoneofthePaperRollRods(I)andposition
yourpaperrollontopoftheRollRest(F)locatedon
the Bottom Frame (A).
B. Theholeinthepaperrollshouldbeplacedontopof
theshort,uprightspindlelocatedontheRollRest(F).
a. Thiswillanchorandpositionyourrollforcutting.
Paper Roll
Step 1:
Loading Paper

14
A. Insert the Paper Roll Rod (I) through the Top Frame
(C) and into the top end of the paper roll.
B. Ifneeded,repeattheabovestepsfortheremaining
Paper Roll Rods (I).
A. Tocutyourpaperroll,ensuretheCutterBlade(H)is
positionedsothatbothpointsoftheV-shapedblade
make contact with the roll.
a. Ifneeded,youcanswivelthebladeintoposition.
B. Startfromthebottom,fornewerpaperrolls,andpull
upforanice,cleancut.
a. Forlessfullpaperrolls,youcanstartfromthetop
andpulldowntoachieveacleanslice.
Step 2:
Step 1:
Cutting Paper
H
Paper Roll

15
Warranty
Adir Corp (the “Company” or “Tiger Companies”) warrants to the purchaser that the product
will be free from defects in workmanship and materials for a period of 1 year from the
date of purchase. The warranty period is not extended if we repair, replace, exchange, or
provide a refund for the product (as determined in our sole discretion). We may change the
availability of this limited warranty at our discretion, but any changes will not be retroactive.
These warranties are not assignable or transferable to any other person, including, without
limitation, any subsequent owner or other transferee of the product.
This Warranty does not apply to: (a) damage caused by misuse, tampering, abuse, neglect,
or accident; (b) damage caused by improper installation, modication, or service; (c)
alteration of the serial number; or (d) use that violates the instructions furnished by the
Company will void this warranty.
The sole responsibility of the Company shall be limited to (a) the repair or replacement (in
its sole discretion) of any component of the product which fails to conform to this; (b) a
refund the purchase price of such product (in its sole discretion), at no cost to the purchaser
for the period of the warranty, or (c) an exchange for a similar product, comparable in
function and price.
Contact the Company directly at 1-(800)-805-1790 to obtain service under this warranty. If
it becomes applicable to send a defective product to the Company, a Return Authorization
Number must rst be obtained from the Company. In order to obtain service under this
warranty, purchaser may be required to provide the Company with the following items
(a) proof of purchase, (b) photographs and or videos (of the damage, and (c) a written
testimonial describing the defect.
Products shipped without prior Return Authorization and Return Authorization Number may
not be accepted, and the Company will not be responsible for their disposition and/or cost
of return to the owner.
The Company will not assume any responsibility for any loss or damage incurred in shipping
and or delivery.
The product(s) must be returned within 14 calendar days of receiving the return
authorization from the Company and must include the original proof of purchase for the
warranty to be honored.
Any implied warranties that the purchaser may have are limited to the duration of the
warranties described above. There are no further warranties that extend or apply beyond
the face hereof, and the Company expressly disclaims and excludes any and all warranties
of merchantability or tness for a particular purpose. Some states do not allow limitations
on how long an implied warranty lasts, so the above limitation may not apply to you.
THE REMEDIES DESCRIBED ABOVE ARE YOUR SOLE AND EXCLUSIVE REMEDIES AND
THE COMPANY’S ENTIRE LIABILITY FOR ANY BREACH OF THIS LIMITED WARRANTY. OUR
LIABILITY SHALL UNDER NO CIRCUMSTANCES EXCEED THE ACTUAL AMOUNT PAID BY
YOU FOR THE DEFECTIVE PRODUCT, NOR SHALL WE UNDER ANY CIRCUMSTANCES BE
LIABLE FOR ANY CONSEQUENTIAL, INCIDENTAL, SPECIAL OR PUNITIVE DAMAGES OR
LOSSES, WHETHER DIRECT OR INDIRECT. SOME STATES DO NOT ALLOW THE EXCLUSION
OR LIMITATIONS OF INCIDENTAL OR CONSEQUENTIAL DAMAGES, SO THE LIMITATION
MAY NOT APPLY TO YOU.
This warranty gives you specic legal rights, and you may also have additional rights which
vary from state to state.
1.
2.
3.
4.
5.
6.
7.
8.
9.
10.
11.

ADIKI300-01-SERIES
© 2023 AdirCorp
adircorp.com
Table of contents
Popular Dispenser manuals by other brands

lancer
lancer SERIES 1500 POSTMIX Installation and service manual

CAB
CAB EOS4 P Operator's manual

Bartscher
Bartscher MultiTherm A200050 instruction manual

Wagner Ewar
Wagner Ewar WP1300 Series Manual instructions for use

COX
COX Airflow 3 Instructions for use

ASI
ASI EZ FILL Troubleshooting and maintenance guide


Helvex
Helvex UMB-1102-AIB installation guide

Edbak
Edbak PROCLEAN1 instruction manual

lancer
lancer 2300 Series Installation and service manual

Cornelius
Cornelius 2232 installation instructions

Mac Faucets
Mac Faucets PYOS-L124 installation manual

CBS
CBS B822 Series COMPONENT MAINTENANCE MANUAL WITH ILLUSTRATED PARTS LIST