Adler START-40/1 User manual


PARAMETRS:
Model
START-40/1
START-50/1
Voltage
230V/50Hz
230V/50Hz
Power (min/max)
0,8/2,5kW
0,8/3,6kW
Charging Voltage
12/24V
12/24V
Max. Charging Current
30A
40A
Fast Charge
yes
yes
Max. Starting Current
160A (1V/e)
180A (1V/e)
Battery Capacity
(min/max) Ah 15h
30÷500
max –120 Ah 15h
(min/max) Ah 15h
40÷700
Overcharge Protection
16A
16A
Isolation Class
H
H
Protection Class
IP20
IP20
Weight
13kg
14kg
Dimensions
31x29,5x20cm
31x29,5x20cm

WARNINGS:
Electric Shock
Poisonous Fumes
Danger of Explosion
Non-Ionizing Radiation
Face Shield and Eye Protection
Personal Protection Equipment
General hazard
Separation of electrical and electronic appliances for refuse collection.
The user is not allowed to dispose of these appliances as solid, mixed
urban refuse, and must do it through authorised refuse collection
centres
PLEASE, CAREFULLY READ THIS MANUAL BEFORE OPERATION

1. FRONT PANEL
2. GENERAL APPLICATION
This battery charger is dedicated for regular and boost charging and starting engine-driven vehicles
(petrol and diesel), equipped with free electrolyte lead acid batteries (WET).
The body has an IP 20 protection class and is protected from indirect contact by grounding (for class
I equipment)
WARNING! Before you start the charger, make sure the available power supply voltage corresponds
with the battery charger rating plate. Always use plugs with the earth protection.
3. SAFETY RULES
- During the charge the battery produces explosive gases - avoid formation of flames and sparkes. DO
NOT SMOKE.
- Position the batteries to be charged in a well-ventilated place.
- Inexperienced and untrained people should be properly instructed before using the appliance.
- People (children included) whose physical, sensoric or mental capacities would prevent them from
using the appliance correctly, must be supervised by a person who is responsible for their
safety while the appliance is in use.
- Use the battery charger only indoors and make sure that you start it in airy places. DO NOT SET IN
THE RAIN OR SNOW.
- Disconnect the mains cable before connecting to or disconnecting the charging cables from the
battery.
- Do not connect or disconnect the clamps to or from the battery with the battery charger operating.
- Never use the battery charger inside the car or in the bonnet.
- Substitute the mains cable only with an original one.
- Do not use the battery charger to charge batteries which are not rechargeable.
- To prevent damaging the vehicle electronics, scrupulously respect warnings given by the producer of
the vehicle or the batteries used.
- This battery charger has components such as switches and relays which can cause arcs or sparks.
Therefore when using it in a garage or in a similar place set the battery charger in a suitable case.
- Repair or maintenance of the inside of the battery charger can be executed only by skilled
technicians.
- WARNING: ALWAYS DISCONNECT THE POWER SUPPLY CABLE FROM THE MAINS BEFORE
CARRYING OUT ANY SIMPLE MAINTENANCE OPERATION ON THE BATTERY CHARGER.
1. Main switch
2. Charging current switch
3. Charge/start switch
4. Ammeter
5. Fuse
6. Cable with clamp (-)
7. Charging terminal (+) 24V
8. Charging terminal (+) 12V
9. Power supply
1
2
3
4
5
6
7
8
9

4. GETTING READY
- Before charging, make sure the capacity of the battery (Ah) corresponds to the range given on the
rating plate.
- Remove tha caps of the battery (if present) to let the fumes out.
- Check that the level of electrolyte covers the plates of the battery. You can add distilled water
following marks on the battery. The most accurate to test the state of charge of a battery is to
determine the specific gravity of the battery electrolyte. The higher gravity, the higher charge.
Please see reference value (kg/l at 20
C):
1.28 = battery fully charged
1.21 = half-charged battery
1.14 = discharged battery
WARNING!
USE THE MAXIMUM CAUTION DURING THIS OPERATION, AS ELECTROLYTE IS A HIGHLY
CORROSIVE ACID.
5. PANEL
B - Switch –charging current/boost
C - Switch - charging (upper pos.) / starting (lower pos.)
D –Main switch (ON/OFF)
6. CHARGING
Connect the red charge clamp to the positive terminal of the battery (+ symbol). If the symbols are
indistinguishable, remember that the positive terminal is the one not connected to the vehicle chassis.
- Connect the black charge clamp to the negative terminal of the battery (- symbol). Connect the power
supply.
The ammeter will show charging current. You may notice the indicator goes down to reach low values,
depending on the type of battery.
Once the WET battery is being charged, you may note the liquid inside starting to “boil”. It is
recommended to stop charging to prevent damage of the battery.
6.1 REGULAR CHARGING (three stage)
- Select charging voltage and assemble the cable to 12V or 24V socket.
- Select charging mode switch "C” in „charging” position (upper).
- Select charging mode switch "B" in MIN. pos.
- Adjust main switch ‘’D” in ON pos and start charging.

6.2 BOOST CHARGING
- Select charging voltage and assemble the cable to 12V or 24V socket.
-Select charging mode switch "C” in „BOOST” position (lower).
- Select charging mode switch "B" in BOOST (boost charging in ca. 10-15 min).
- Adjust main switch ‘’D” in ON pos and start charging.
6.3 SIMULTANEOUS CHARGING OF SEVERAL BATTERIES
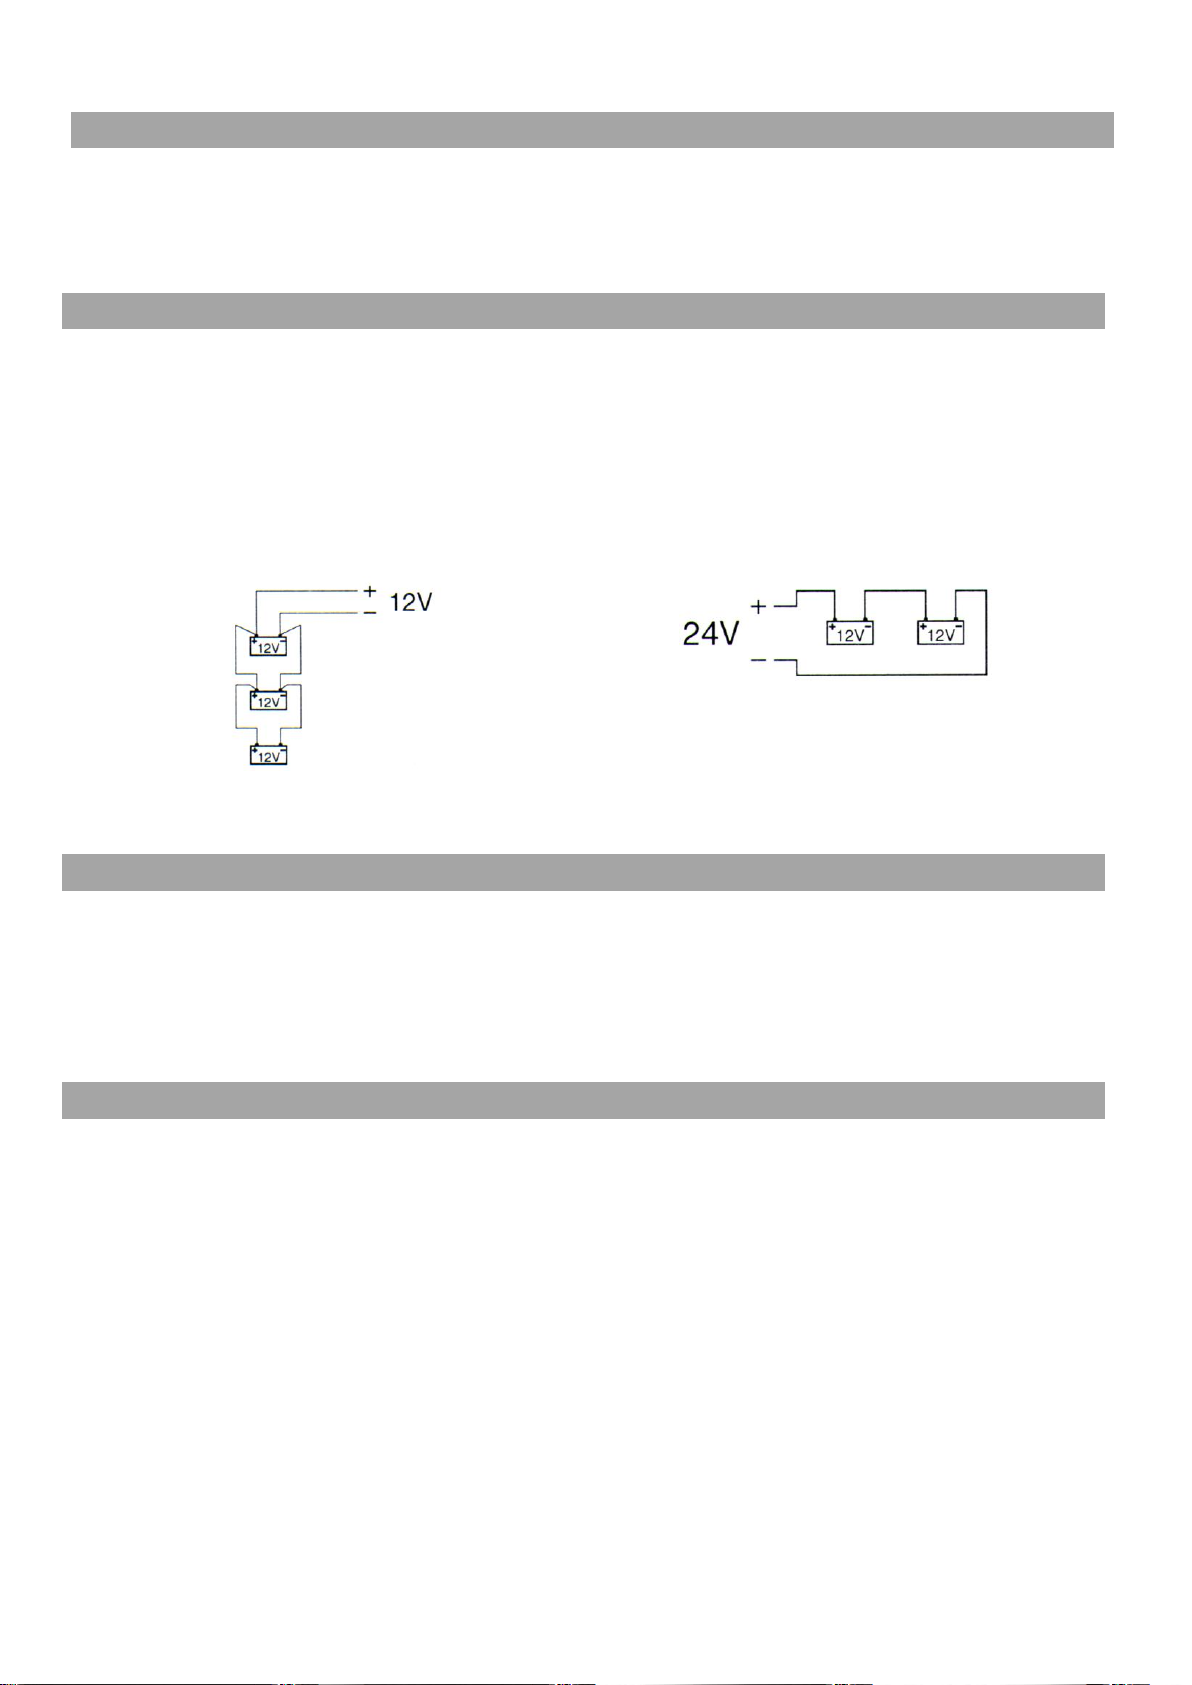
If you have to charge more than one battery at the same time, you can connect them “in series” or “in
parallel. For “parallel” connection batteries must have the same nominal voltage (Volt), which
corresponds to the battery charger output voltage, and the total of Ah must be within the charge range
of the battery charger. For “serial” connection, batteries must have the same capacity (Ah) and the sum
of the nominal voltages of all the batteries must correspond to the battery charger output voltage.
WARNING!
In serial connection of two 12V batteries, switch charging voltage to 24V.
Parallel connection Serial connection
6.4 END OF CHARGE
- Remove the power supply from the battery charger by turning the switch to OFF and/or removing the
power supply cable from the mains outlet.
- Disconnect the black charge clamp from the chassis of the vehicle or from the negative terminal of
the battery (- symbol).
- Disconnect the red charge clamp from the positive terminal of the battery (+ symbol).
- Store the battery charger in a dry place.
7. STARTING THE ENGINE
WARNING: Before proceeding with starting, follow the vehicle manufacturer’s instructions carefully!
Make sure the power line is protected by fuses or automatic circuit breakers with sizes as indicated on
the rating plate.
You can start your vehilce with this bartery charger if your battery does not have enough energy to start
the engine by itself. You can use the power supply, selecting the mode switch to “starting” position.
Make sure the battery is connected properly to the respective (+ and -) terminals, and that it is in good
condition (not sulphated or dud). Never ever start vehicles with the batteries disconnected from their
respective terminals; the presence of the battery is essential for the elimination of possible overvoltage.
With the battery charger at OFF, plug in the power cable.
- Turn the switch ON.
- Turn the switch to START and turn the ignition key to start up the engine.
If the engine does not start within a few seconds, switch back to BOOST mode. After one minute take
on starting again.

END OF STARTING
- Disconnect the power to the battery charger by turning the switch to OFF and remove the power cable
from the mains.
- Disconnect the black crocodile clip from the negative battery terminal (- symbol) and the red
crocodile clip from the positive battery terminal (+ symbol).
- Store the battery charger in a dry place.
8. PROTECTION
The battery charger protects itself from:
- Overcharge (too much current supplied to the battery).
- Short-circuit (loading clips placed in contact with each other).
- Polarity inversion on the battery clamps.
WARNING!
For appliances fitted with fuses, when replaced, always use the same kind of fuse with the same rated
size. For the same reason, never ever replace the fuse with a bridge in copper or other material. The
power supply cable should always be DISCONNECTED from the mains supply while the fuse is being
changed. When replacing the ribbon fuse, if present, carefully fasten the nuts.
9. USEFUL ADVICE
- Control electrolyte level.
- If the terminals are incrusted with oxide, clean them to ensure good contacts with the clamps.
- never ever allow the two clamps to come into contact when the battery charger is connected to the
mains. In this case the fuse will blow.
- If the battery, to which this battery charger is to be connected, is permanently installed in the vehicle,
disconnect the positive cable that connects the vehicle installation.
- Check the battery voltage and the polarity.
- After operation, disconnect the charger from the power suppy, disconnect the clamps from the
battery.
- Store the battery charger in a dry and clean place.
This manual suits for next models
1
Table of contents
Other Adler Batteries Charger manuals