LEAB 12100 User manual

LEAB Automotive GmbH
Thorshammer 6
DE-24866 Busdorf
User Manual
Version: V1.5
Issue date: 17.01.2020
ABC Charger
12100, 1260, 2440, 2450, 2460, 3640, 4830
Microprocessor-controlled battery charger
User Manual

Installation Instructions About this Manual
Page 1 of 14
Table of Contents
1About this Manual .................................................................................. 1
2General Safety......................................................................................... 2
3About the Battery Charger...................................................................... 3
4Package Contents.................................................................................... 3
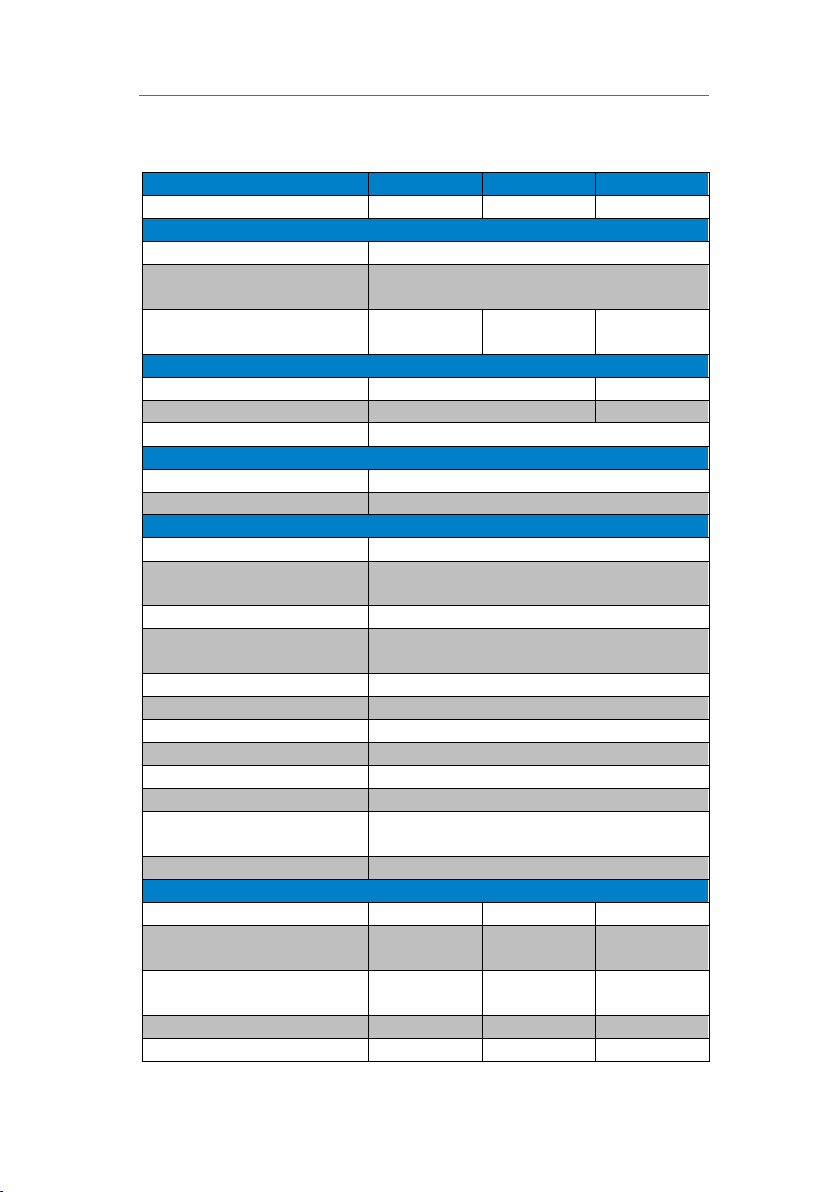
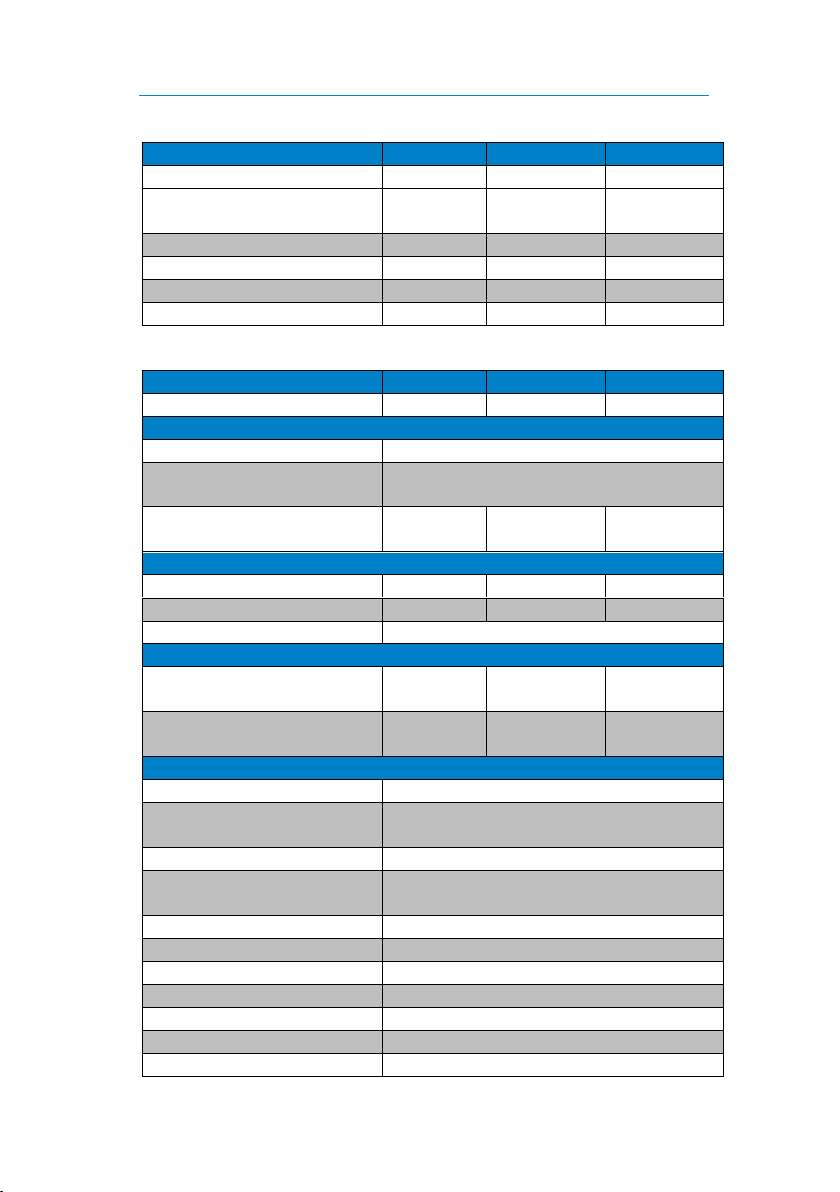
5Technical Specifications ..........................................................................4
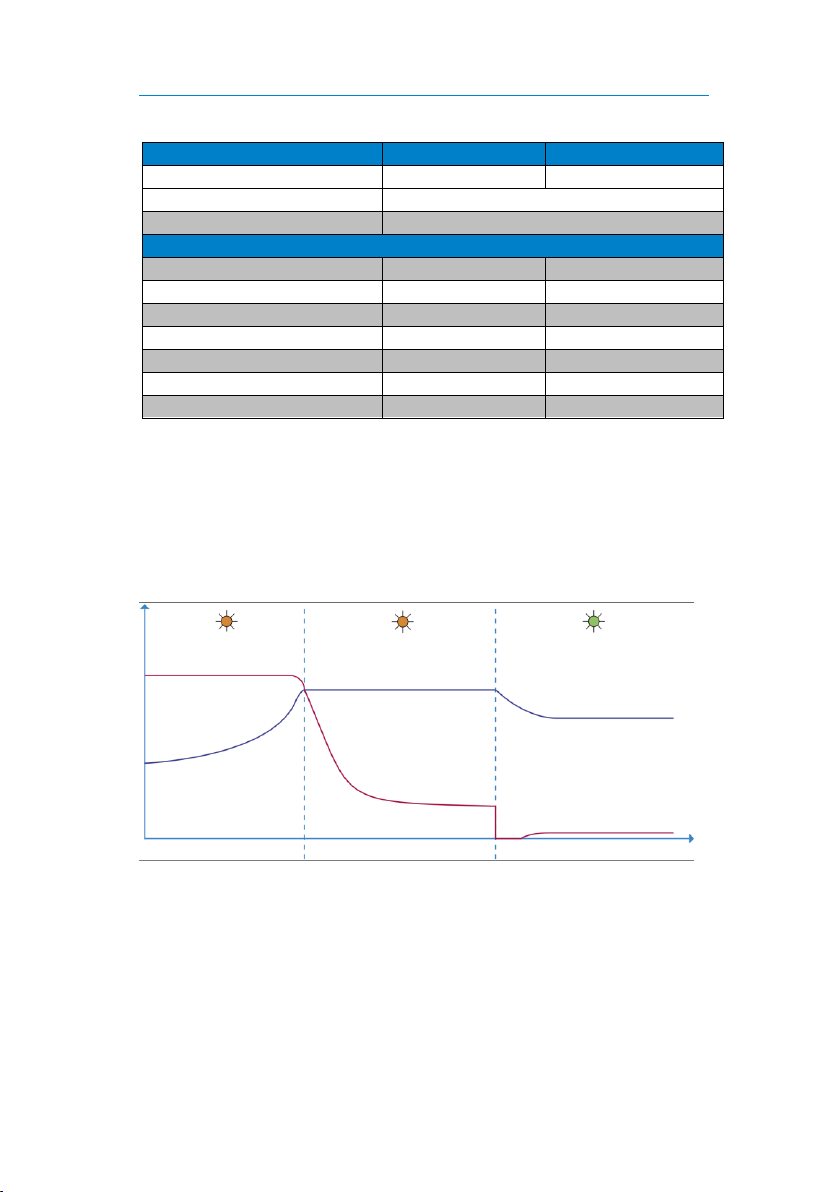
6Charging Characteristics.......................................................................... 8
7Setting Charging Characteristics ............................................................. 9
8Mounting ................................................................................................9
9Installation ............................................................................................10
10 Normal Operation................................................................................. 12
11 LED Display on the Charger...................................................................13
12 Maintenance.........................................................................................14
13 Disposal.................................................................................................14
14 EU Declaration of Conformity ............................................................... 14
1About this Manual
Read this manual carefully and keep it in a safe place. This manual is
intended for professionals in the automotive electrical field.
Throughout the manual, you will be alerted to warnings and safety notices
about potential hazards associated with handling the device. The colours and
signal words indicate the severity of the hazard:
Signal word
Meaning
DANGER
Warns of imminent danger resulting in death or
serious injury.
WARNING
Warns of a potentially dangerous situation that can
result in death or serious injury.
CAUTION
Warns of a potentially dangerous situation that can
result in moderate or minor injuries.
NOTICE
Warns of a potentially dangerous situation that can
result in material and environmental damage.

Installation Instructions General Safety
Page 2 of 14
In this manual you will find the following symbols:
Shows you useful tips and information about the device.
Indicates a mandatory requirement for the following
instruction.
Shows the result of an instruction.
2General Safety
This manual supports safe handling of the device. Use the device solely in
accordance with its intended use:
The ABC charger from LEAB has been developed for permanent installation in
vehicles for charging lead acid batteries. Thanks to their compact design, high
performance and excellent radio interference suppression, LEAB chargers
have been used for many years wherever optimum battery charging is
required.
Any modifications to the device or its components are prohibited and do not
conform to its intended use.
Observe the following safety instructions:
Danger from damaged, frozen or deformed batteries: Before charging,
make sure that the battery is undamaged and the electrolyte is not
frozen.
Only charge batteries in well-ventilated rooms and away from ignition
sources.
When handling batteries, wear acid-proof clothing.
Device defect due to incorrect installation: Install the device in a dry
and cool location.

Installation Instructions About the Battery Charger
Page 3 of 14
3About the Battery Charger
* Only two connections per device possible (see technical data)
4Package Contents
Number
Details
1
Reset button
2
Potentiometer for characteristic curve selection
3
LED (status display)
4
AC cable
5
DC cable
6
CBL* connection
7
Connecting the sensor cable (CTS/TS)*
8
Connecting the remote display*
Package Contents
No.
Battery charger
x1
User Manual
x1
Charging characteristic data sheet
x1

Installation Instructions Technical Specifications
Page 4 of 14
5Technical Specifications
Model
ABC 12100
ABC 12100
ABC 1260
Part number
0101036178
0101036179
0101036170
Battery
Battery type
Lead acid (wet, gel, AGM)
Charging characteristics
15 optional characteristics (see characteristics
sheet)
rec. battery capacity
200 Ah…
1000 Ah
200 Ah…
1000 Ah
150 Ah…
600 Ah
Charging current
Charging current, max.
100 A
60 A
Charging current, duration
100 A
60 A
Ripple
< 3%
Charge voltage
Main charging
14.2 V / 14.4 V
Trickle charging
13.6 V / 13.8 V
Supply voltage (AC)
Input voltage (rated values)
230 V / 50 Hz / 8 A
Input voltage
90 V… 270 V
(< 200 V reduced charging current)
Input frequency
0 Hz …400 Hz
Quiescent current (out of the
battery)
< 2 mA
Switching frequency
100 kHz
recommended mains fuse
B16 A or C16 A
Degree of efficiency, max.
> 88 %
Protection class
I
Operating temperature
-30 °C … +60 °C
IP rating
IP21
Dimension, housing
(L x W x H)
265 mm x 135 mm x 85 mm
Weight (without cable)
2.6 kg
Connections
AC cable
1.5 m, 1 mm²
1.5 m, 1 mm²
1.5 m, 1 mm²
Mains plug
Two-pin
earthed plug
Two-pin
earthed plug
Two-pin
earthed plug
DC cable
2 x 1.5 m,
25 mm²
2 x 1.5 m,
25 mm²
2 x 2 m,
10 mm²
CBL
no
yes
no
CTS/TS
yes
yes
yes

Installation Instructions Technical Specifications
Page 5 of 14
Model
ABC 12100
ABC 12100
ABC 1260
Part number
0101036178
0101036179
0101036170
Remote display
yes
no
yes
On/off switch
no
no
no
Model
ABC 2440
ABC 2450
ABC 2460
Part number
0101036040
0101036050
0101036060
Battery
Battery type
Lead acid (wet, gel, AGM)
Charging characteristics
15 optional characteristics (see characteristics
sheet)
rec. battery capacity
120 Ah …
400 Ah
140 Ah …
500 Ah
150 Ah …
600 Ah
Charging current
Charging current, max.
40 A
50 A
60 A
Charging current, duration
40 A
50 A
60 A
Ripple
< 3%
Charge voltage
Main charging
28.4 V / 28.8 V
Trickle charging
27.2 V / 27.6 V
Supply voltage (AC)
Input voltage (rated values)
230 V / 50 Hz / 8 A
Input voltage
90 V… 270 V
(< 200 V reduced charging current)
Input frequency
0 Hz …400 Hz
Quiescent current (out of the
battery)
< 2 mA
Switching frequency
100 kHz
recommended mains fuse
B16 A or C16 A
Degree of efficiency, max.
> 88 %
Protection class
I
Operating temperature
-30 °C … +60 °C
IP rating
IP21
Dimension, housing (L x W x H)
265 mm x 135 mm x 85 mm
Weight (without cable)
2.6 kg
Connections
AC cable
1.5 m, 1 mm²
1.5 m, 1 mm²
1.5 m, 1 mm²
Mains plug
Two-pin
earthed plug
Two-pin
earthed plug
Two-pin
earthed plug

Installation Instructions Technical Specifications
Page 6 of 14
Model
ABC 2440
ABC 2450
ABC 2460
Part number
0101036040
0101036050
0101036060
DC cable
2 x 2 m,
10 mm²
2 x 2 m,
10 mm²
2 x 2 m,
10 mm²
CBL
no
no
no
CTS/TS
yes
yes
yes
Remote display
yes
yes
yes
On/off switch
no
no
no
Model
ABC 2460
ABC 3640
ABC 4830
Part number
0101036074
0101036340
0101036431
Battery
Battery type
Lead acid (wet, gel, AGM)
Charging characteristics
15 optional characteristics (see characteristics
sheet)
rec. battery capacity
150 Ah …
600 Ah
120 Ah …
400 Ah
90 Ah …
300 Ah
Charging current
Charging current, max.
60 A
40 A
30 A
Charging current, duration
60 A
40 A
30 A
Ripple
< 3%
Charge voltage
Main charging
28.4 V /
28.8 V
40.5 V /
43.2 V
54 V /
57.6 V
Trickle charging
27.2 V /
27.6 V
40.5 V
54 V
Supply voltage (AC)
Input voltage (rated values)
230 V / 50 Hz / 8 A
Input voltage
90 V… 270 V
(< 200 V reduced charging current)
Input frequency
0 Hz …400 Hz
Quiescent current (from the
battery)
< 2 mA
Switching frequency
100 kHz
recommended mains fuse
B16 A or C16 A
Degree of efficiency, max.
> 88 %
Protection class
I
Operating temperature
-30 °C … +60 °C
IP rating
IP21
Dimension, housing (L x W x H)
265 mm x 135 mm x 85 mm

Installation Instructions Technical Specifications
Page 7 of 14
Model
ABC 2460
ABC 3640
ABC 4830
Part number
0101036074
0101036340
0101036431
Weight (without cable)
2.6 kg
Connections
AC cable
1.5 m, 1 mm²
1.5 m, 1 mm²
1.5 m, 1 mm²
Mains plug
Two-pin
earthed plug
Two-pin
earthed plug
Two-pin
earthed plug
DC cable
2 x 2 m,
10 mm²
2 x 2 m,
10 mm²
2 x 2 m,
10 mm²
CBL
yes
no
yes
CTS/TS
yes
yes
yes
Remote display
no
yes
no
On/off switch
no
no
no
Model
ABC 4830
ABC 4830
Part number
0101036437
0101036430
Battery
Battery type
Lead acid (wet, gel, AGM)
Charging characteristics
15 optional characteristics (see characteristics
sheet)
rec. battery capacity
90 Ah …300 Ah
90 Ah …300 Ah
Charging current
Charging current, max.
30 A
30 A
Charging current, duration
30 A
30 A
Ripple
< 3%
Charge voltage
Main charging
54 V / 57.6 V
Trickle charging
54 V
Supply voltage (AC)
Input voltage (rated values)
230 V / 50 Hz / 8 A
Input voltage
90 V… 270 V (< 200 V reduced charging
current)
Input frequency
0 Hz …400 Hz
Quiescent current (from the
battery)
< 2 mA
Switching frequency
100 kHz
recommended mains fuse
B16 A or C16 A
Degree of efficiency, max.
> 88 %
Protection class
I
Operating temperature
-30 °C … +60 °C
IP rating
IP21

Installation Instructions Charging Characteristics
Page 8 of 14
Model
ABC 4830
ABC 4830
Part number
0101036437
0101036430
Dimension, housing (L x W x H)
265 mm x 135 mm x 85 mm
Weight (without cable)
2.6 kg
Connections
AC cable
1.5 m, 1 mm²
1.5 m, 1 mm²
Mains plug
Two-pin earthed plug
DC cable
2 x 2 m, 10 mm²
2 x 2 m, 25 mm²
CBL
yes
no
CTS/TS
no
yes
Remote display
yes
yes
On/off switch
no
no
6Charging Characteristics
The ABC charger contains 15 different charging characteristics which you can
select before connecting to the battery. Battery charging is fully automatic
and micro-processor controlled with a 3-stage IU1U2characteristic curve for
gentle and optimum charging of the batteries.
The available charging characteristics can be found on the characteristics
sheet.
I U1 U2

Installation Instructions Setting Charging Characteristics
Page 9 of 14
7Setting Charging Characteristics
To set a charging characteristic, perform the following steps:
1. Turn the potentiometer to the desired position (see characteristics
sheet).
The arrow in the middle of the potentiometer indicates the
selected characteristic.
2. To prevent accidental adjustment of the charging characteristic, stick
the supplied sticker on the potentiometer.
Ensure that the notch in the sticker is above the LED.
The charging characteristic is set.
8Mounting
To mount the device, perform the following steps:
Choose a cool, dry and well-ventilated mounting site.
Do not mount the device directly next to or above batteries.
Guarantee adequate cooling for an unimpeded supply of
cooling air.
1. Fasten the assembly bracket to
the device using the 4 lateral
holes (5 mm Ø).
NOTICE
Battery defect due to incorrect charging
To protect the battery from damage due to incorrect charging, set a
suitable charging characteristic before installation. Follow the battery
manufacturer's instructions.
The device is mounted.

Installation Instructions Installation
Page 10 of 14
9Installation
Connecting the Battery
To connect the battery, perform the following steps:
1. Disconnect the battery from the vehicle power circuit.
Warning: Disconnect the negative cable first.
2. Secure the positive cable of the device as close as possible to the battery
with a suitable fuse.
Model
ABC 12100
ABC 1260, ABC 2440,
ABC 2450, ABC 2460
ABC 3640
ABC 4830
Fuse
125 A
75 A
50 A
40 A
Cross
section
25 mm2
10 mm2
6 mm2
6 mm2
3. Connect the positive cable of the device to the positive terminal of the
battery.
4. Connect the negative cable of the device to the negative terminal of the
battery.
5. Connect the vehicle battery to the vehicle power circuit again.
The battery is connected.
Connect the Device to the 230-V Mains
To install the device to the 230-V mains, perform the following step:
1. Connect the mains plug to a 230-V mains supply.
The charger is only suitable for connection to fused, earthed
230 V mains supplies.
The device switches on as soon as a voltage of 230 V is
connected.
The charger is connected to the 230-V mains supply.

Installation Instructions Installation
Page 11 of 14
Connect Remote Display (Optional)
The remote display shows the charging status of the battery with an LED.
To connect the remote display, perform the following steps:
1. Plug the connecting cable for the remote display into the connector for
the remote display.
The remote display is connected.
Connect Sensor Cable (Optional)
The sensor cable measures the battery temperature (sensor cable TS) or the
battery temperature and voltage (sensor cable CTS) in order to charge the
battery optimally.When connecting, pay attention to the instructions and
notes in the installation instructions for the sensor cable.
Connecting the CBL Control Relay (Optional)
A potential-free changeover contact is integrated in the ABC chargers, which
switches during charging operation. For easier connection, a corresponding
adapter cable set with plug and three open cables is available. This option
can be used, for example, to implement an electrical start interlock with
230 V connection or charge monitoring.
To connect the CBL control relay, perform the following steps:
Technical Data (Insulation):
Capacity (max. values):
Output to housing: 500 V
Output to ground: 120 V
24 V (DC): 0.5 A
120 V (AC): 0.5 A
1. Plug the Western plug into the CBL relay connector on the back of the
device.
The CBL control relay is connected.
Switching Function of the Changeover
Contact
Pin 1 and Pin 3 connected when
charger is switched off.
Pin 1 and Pin 2 connected when
charger is switched on.

Installation Instructions Normal Operation
Page 12 of 14
10 Normal Operation
Switching on the Device
To switch on the device, perform the following steps:
1. Connect the mains plug to a 230-V mains supply.
The device is switched on.
After establishing the mains connection, the LED flashes red
for 2 seconds (device test).
If the battery is charging, the LED illuminates orange.
If the battery is fully charged, the LED illuminates green.
Charging the Battery
The charger begins to charge the battery as soon as it is switched on.
Resetting the Charging Process
To reset the charging process, perform the following steps:
1. Press the red reset button on the device.
The charging process is reset.
Switching off the Device
To switch off the charger, perform the following step:
1. Disconnect the device from the 230-V mains.
The device is switched off.

Installation Instructions LED Display on the Charger
Page 13 of 14
11 LED Display on the Charger
Status
Description
Measure
Steady
light
orange
Battery is charging. The
charger is in the main
charging phase.
Steady
light
green
Battery is fully charged,
charger is in trickle charge
phase.
Charger can be switched off and the
battery can be used.
Steady
light
red
Error, overheating
Check battery connection
Measure battery voltage
Disconnect the device from the
battery and allow it to cool down
Flashing
red
Timeout in the main
charge phase, charging
interrupted.
Check battery
Select larger charger
Consumer too large: Switch off
consumer when charging

Installation Instructions Maintenance
Page 14 of 14
12 Maintenance
Check the charger as follows before using it each time:
Check the mains cable and mains plug for damage.
Check charging cables and connections for damage.
Check the charger for external damage.
Ensure that the wiring between the charging cable and the charger is
secure.
For battery maintenance, refer to the battery manufacturer's
instructions.
13 Disposal
Dispose of the device in accordance with the Waste Electrical and Electronic
Equipment Regulations (WEEE).
The device must not be disposed of with household waste.
Take it to a recycling point or send it to your point of sale.
14 EU Declaration of Conformity
The LEAB ABC
with the models 12100, 1260, 2440, 2450, 2460,
3640 and 4830
complies with the requirements of the following
directives:
2014/30/EU: EMC
2014/35/EU: NRL
2011/65/EU: RoHS

LEAB Automotive GmbH
Thorshammer 6
DE-24866 Busdorf
Germany
Tel.: +49(0) 4621 9 78 60-0
Fax: +49(0) 4621 9 78 60-260
Web: www.leab.eu
This manual suits for next models
6
Table of contents
Other LEAB Batteries Charger manuals

LEAB
LEAB Clayton Power G3 Combi 1012-50 User manual

LEAB
LEAB ABC SCHUTZKLASSE II User manual

LEAB
LEAB TS 12 User manual

LEAB
LEAB CHAMP 12 V User manual

LEAB
LEAB TS 24/12-06 User manual

LEAB
LEAB CHAMP PRO 24 V User manual

LEAB
LEAB CHAMP 12 V User manual

LEAB
LEAB Champ Pro 1217 User manual

LEAB
LEAB ABC 1215 User manual

LEAB
LEAB 600W Series User manual