Adsl nation X-Modem User manual

www.adslnation.com
USER GUIDE
X-Modem
Ethernet ADSL Modem

Technical Support
TO OBTAIN TECHNICAL SUPPORT. PLEASE RETAIN PROOF OF PURCHASE AND THE
WARRANTY INFORMATION.
To get product support or obtain product information and documentation,
go to http://www.adslnation.com/support.
If you would like to contact technical support by telephone, please call
08456 125 9426 (calls charged at local rate)
01865 761114 (calls charged at operators standard national tarrif)
Technical support is available 9am - 6pm weekdays.
ADSL Nation LTD.
E-mail: [email protected]
www.adslnation.com
©2003 by ADSL Nation LTD. All rights reserved.
ADSL Nation and X-Modem are trademarks or registered trademarks of ADSL Nation LTD. in the United
Kingdom and/or other countries.
Other brand and product names are trademarks or registered trademarks of their respective holders.
Information is subject to change without notice.


Introduction
Congratulations ! You are now the owner of an ADSL Nation X-Modem.
From now on your internet experience will be transformed due to the high
speed that ADSL technology and the X-Modem delivers.
This manual will guide you through setting up your X-modem and provide
a reference point for all the features of your modem.
Safety Instructions
The X-Modem is intended for internal desktop use only.
Climate Conditions
•The maximum ambient temperature must not exceed 40 °C (104°F).
•The modem must not be mounted in a location exposed to direct sunlight
or excessive heat radiation.
•Ensure the modem is not subjected to water or condensation.
Cleaning
Unplug the modem from the mains outlet and wipe with a damp cloth.
Do not use chemical cleaning products or solvents as it may damage the
surface of the modem.
Water and moisture
Do not use this product near water.
Overloading
Do not overload mains outlets and extensions as it can result in re or
electric shock.

What’s in the Box
The following items are supplied with your X-Modem:
X-Modem
Desktop Stand
UK Power Supply Unit
RJ11 - RJ11 Cable often referred to as the telephone cable.
RJ45 Cat 5 Ethernet cable.
X-Modem and LiveIP Technology
The X-modem’s built-in Ethernet connectivity eliminates the need for
specialist drivers allowing the modem to be connected to an Ethernet
equipped computer for instant use.
The X-Modem works on any ADSL service that uses PPPoA or PPPoE that
provides a single static or dynamic IP address. The one exception is AOL,
due to the proprietory AOL client software.
In the default con guration the X-Modem’s employs advanced LiveIP
technology to provides the single public IP address issued by the ISP to
a computer. This makes the X-Modem the perfect soloution for people
who wish to maintain a publicly available live connection to the internet.
Wireless Broadband Routers and Firewall Appliances usually come
equipped with Ethernet interfaces. The X-Modem can be used to connect
many of these devices to your ADSL service. Please note some broad-
band routers are not compatible with LiveIP. Please check our web site
www.adslnation.com for the latest compatibilty information.
The X-modem also includes an optional gateway mode to enable the
modem to be installed on a network or used with devices that are not
compatible with the LiveIP technology used in the X-Modem’s default
modem mode.

X-Modem Overview
Front View
The front pannel of the X-modem includes ve LED indicators
to help determine the modem status.
DATA: ashes when data to indicate data is being sent or
received from the modem.
LINK: Illuminates when the an ADSL signal has been detected
on the line. A ashing link LED indicates that the modem is
probing for an ADSL signal.
100M LAN: Illuminated when a 100Mb Ethernet connection
has been established on the modem’s Ethernet port.
10M LAN: Illuminated when a 100Mb Ethenet connection has
been established on the modem’s Ethernet port.
POWER: Shows that power is being received by the modem.
Rear View
LINE: Telephone jack (RJ-11) to connect to your Telephone Wall
Socket (ADSL line).
F.G: An Earth connection for use in earthed comms cabinet. Not used for
normal home/ofce use.
LAN: 10 / 100 Base-T Ethernet jack (RJ-45) to connect to your
Ethernet Network card.
RESET: To reset your Modem to factory default settings. (All
Customised settings that you have saved will be lost!)
DC 6V: To connect to your Power Outlet via the Power Adapter
that comes with your package.

Before Installing
Gather Con guration Information from your ISP.
When con guring the X-Modem to work with a standard BT Wholesale
provided ADSL line the only con guration information required is the
username and password. For Karoo installations and non UK installations
please refer to the advanced settings section of this guide.
Note: Your ISP should have provided you with a summary sheet of all the
information needed to connect your computer to the Internet. If you
cannot locate the information, you’ll have to contact your ISP. BT
Broadband provide a Login name only and do not issue a passwords.
LOGIN NAME: ___________________________________
PASSWORD: _____________________________________
Note: The login name could be called a user name or account name by
your ISP. The login name and password are case sensitive. You must type
them exactly as given by the ISP.
Computer requirements
The computer that you want to connect to the X-modem to must have
an available RJ-45 Ethernet port (or adapter) and TCP/IP networking
installed.
Note: TCP/IP networking is already installed on most Microsoft Windows
and MacOS computers.
Micro lters
Ensure you have enough ADSL micro lters for your line. At least one
micro lter will be required to connect the modem and any existing
telephone equipment to. If other telephone equipment is used on the line
it must also be connected to a micro lter.
A micro lter prevents high frequency noise from appearing at the
telephone and potentially decreasing voice quality. Second, it prevents
the telephone equipment from interfering with the modem. For more
information on micro lters please visit www.adslnation.com

Connecting the X-Modem to a Computer/Notebook
To connect the X-Modem to your Computer/Notebook, you need to have
an Ethernet port available on your Computer/Notebook. Most Computers/
Notebooks have labels describing the Ports. For the Ethernet Port, you will
see either ETHERNET, ETH, RJ45 or <--> labelled near the Port.
Connecting to the ADSL Line
Connect the RJ11 (phone) cable provided the ADSL to the ADSL/Modem
port of the ADSL Microlter and then connect the opposite end of the
cable to the Line port on the X-Modem.
Plug the microlter in to the telephone socket and connect any telephone
equipment to the phone port on the Microlter.
Note: You will need to ensure that all telephone equipment on the same
line as your X-Modem is also connected to a Microlter. If you do not
have enough microlters remove any unltered telephone equipment.
Microlters can be found in most computer shops or available to order on-
line at www.adslnation.com.
Connect the power to the modem, if an ADSL signal is detected the LINK
LED will illuminate and remain solid green. If the LINK LED continues to
ash the modem is unable to locate a usable ADSL signal. This may be
because the line has not been enabled for ADSL or that a fault condition
has occurred such as an unltered telephone device causing interference
on the line. The ADSL light must be illuminated sold green before
proceeding with the set-up procedure.

Con guring Windows XP Networking
The default network con guration on the computer should already be
suitable for connection to the X-Modem. However if you are uncertain or
any network settings have been changed they will need to be con gured
as follows.
(Instructions are based on default XP Start menu option)
From the Windows desktop, click
Start > All Programs > Accessories >
Communications > Network Connections.
Right-click on the Local Area Connection
icon that re ects the model of your Ethernet Network Card that is
connected to the X-Modem and click Properties.
Ensure that the eld Connect
Using shows the model of
your Ethernet Network Card
that is connected to your
ADSL Ethernet Modem. Select
Internet Protocol (TCP/IP) and
click Properties.
Select the option Obtain an
IP address automatically and
Obtain DNS server address
automatically. Click OK and
close to apply.
Ensure that your Modem is
powered on and restart your
system.

Conguring Windows 2000 Networking
The default network conguration on the computer should already be
suitable for connection to the X-Modem. However if you are uncertain or
any network settings have been changed they will need to be congured
as follows.
Click the Start > Settings and choose “Network & Dial-up Connections”.
At the Network and Dial-up Connections window. Right-click on the Local
Area Connection icon that reects the model of your Ethernet Network
Card that is connected to the X-Modem and click Properties.
Ensure that the eld Connect
Using shows the model of
your Ethernet Network Card
that is connected to your
ADSL Ethernet Modem. Select
Internet Protocol (TCP/IP) and
click Properties.
Select the option Obtain an
IP address automatically and
Obtain DNS server address
automatically. Click OK an OK
again to close.
Ensure that your Modem is
powered on and restart your
system.
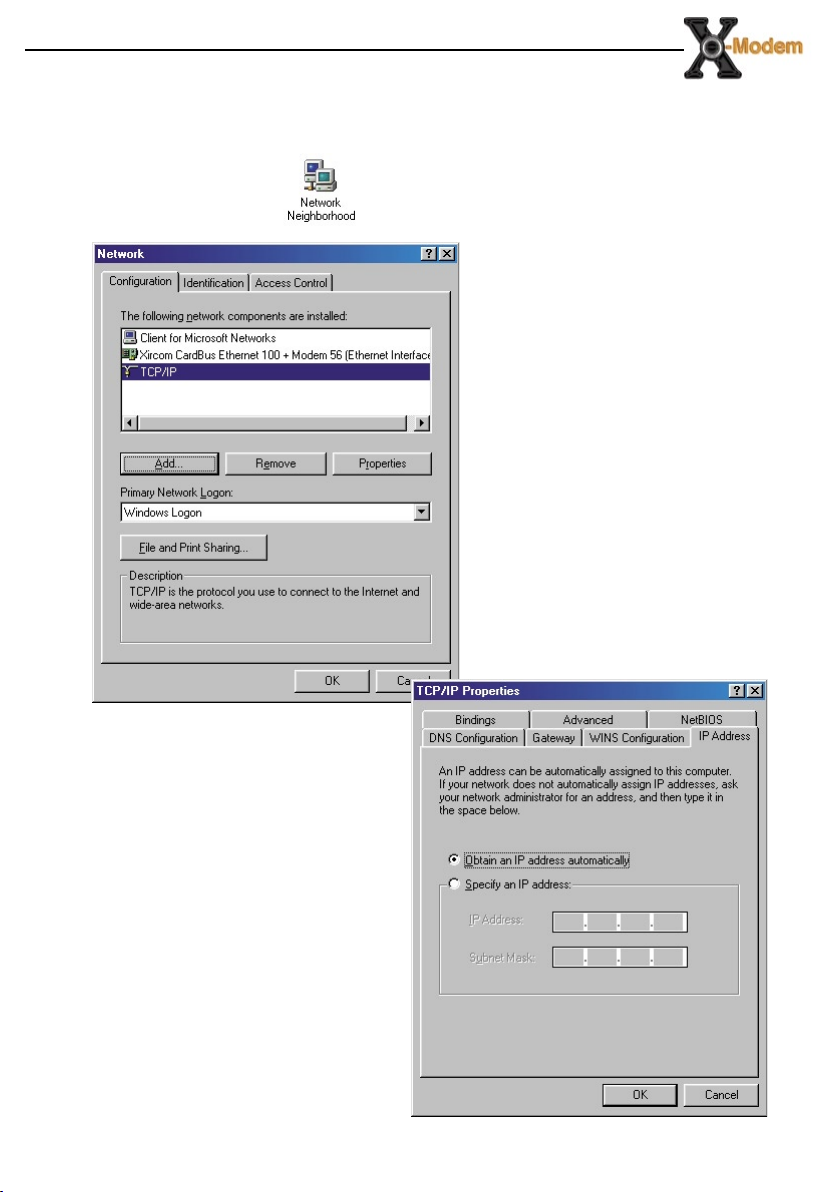
Con guring Windows 98/ME Networking
From your Windows desktop, right-click on the Network Neighbourhood
icon.
Select Properties.
From the Con guration tab,
select TCP/IP-> if multiple
instances of TCP/IP are shown
select the one that refers to the
model of your Ethernet Network
Card that is connected to the
X-Modem.
Click Properties.
Click the option Obtain an IP
address automatically and click
OK to save the settings.
Ensure that your X-Modem is
powered on. Restart your system.

Con guring Mac OS X Networking
Open the System Preferences utility and click on the network icon.
Select New Location from the Location drop down list and name it X-
Modem. Now select Built-In-Ethernet from the Show drop down and click
Apply Now. All default settings are correct.
Ensure that your X-Modem is powered on. Restart your system.
Con guring Mac OS 9 Networking
Open the TCP/IP control panel. You can nd it in the Apple Menu under
the folder “Control Panels.”
Make sure your network card is selected usually “built-in Ethernet” and
set con gure using DHCP.
Close the window and save changes if prompted.
Ensure that your X-Modem is powered on. Restart your system.
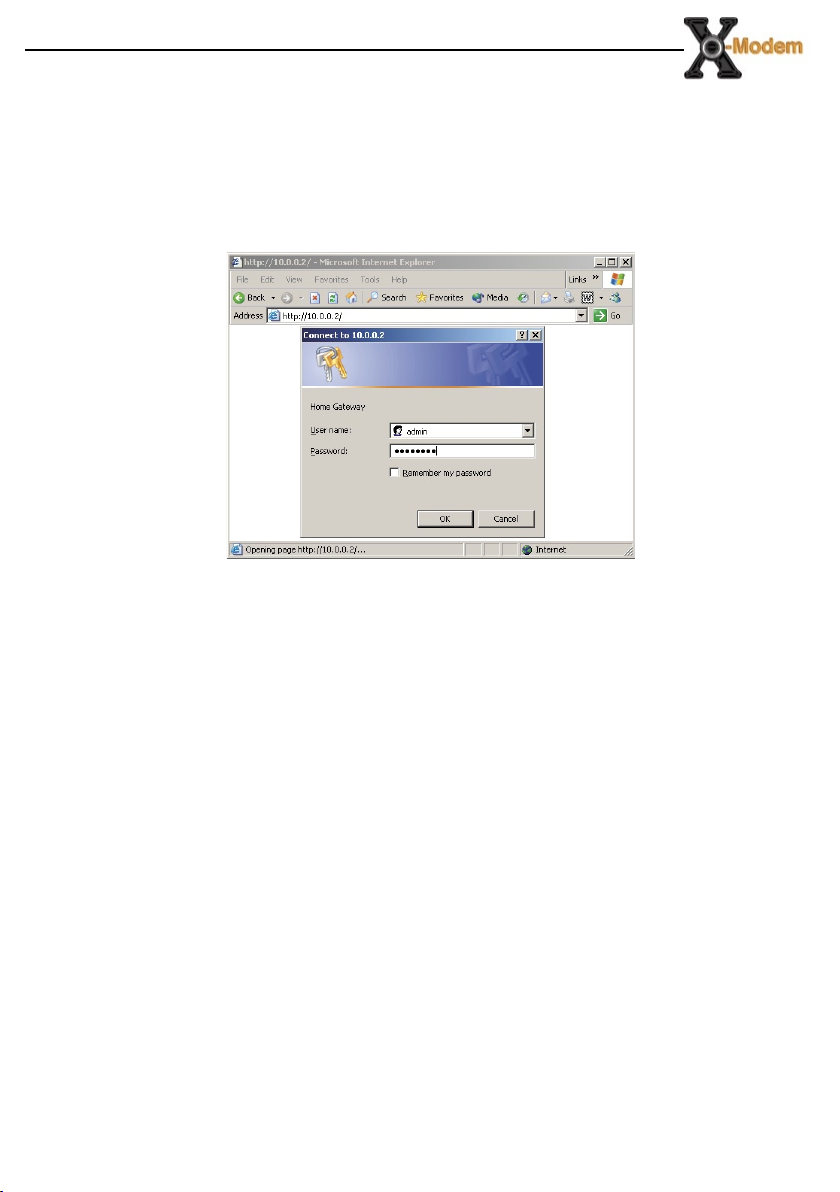
Connecting to the X-modem
The X-Modem provides a web-based (HTML) graphical user interface
allowing users to manage the modem using a standard browser such as
Netscape Navigator or Microsoft Internet Explorer.
To connect to the X-Modem, open your web browser and enter the X-
Modem default IP address http://10.0.0.2 in to the browsers address bar.
When prompted enter the default login User Name and Password.
Default login details
User Name: admin
Password: password
Note: The user name and password prompt may take up to 1 min. the
rst time the modem is accessed. If the prompt does not appear please
check your browsers proxy settings to ensure that no proxy servers are
con gured.

Quick Set-up Procedure
In order to make the installation process quick and easy the X-Modem
comes pre-congured for use on a standard BT phone line in the UK.
If your phone line is not provided by BT some settings may need to be
adjusted.
Click the Account Details button on the welcome to X-Modem screen.
Enter your account details as provided by your Internet Service Provider
and click save and then submit.
The X-Modem will now reboot. After rebooting is complete you will
automatically be connected to the internet.

Testing The Connection
When the modem has been con gured with the ISP account details and
rebooting has completed the connection can be tested.
Note: after reboot it may take up to 2 min for the modem to negotiate a
connection to the ISP depending on the quality of the phone line.
To test the connection click the Diagnostics button, after a short pause
test results will begin to appear.
If no Fail results are reported the modem has successfully connected to
the internet. Further details are available about the meaning of each test
by clicking the help link by each test.
Note: The most common test to fail is the “Test simple PPP session layer
connection. This means that when the modem attempted to login to
the ISP it was rejected. Double check your account details are correct,
remember that both the username and password are case sensitive.
Make sure that you have the full username including the part after the @
symbol. Also it is common practice for passwords to contain numbers so
what looks like the letter l could be the number 1.
Now that the line tests are complete the connection can be veri ed by
visiting a web site such as http://www.adslnation.com
Congratulations you are now on-line !
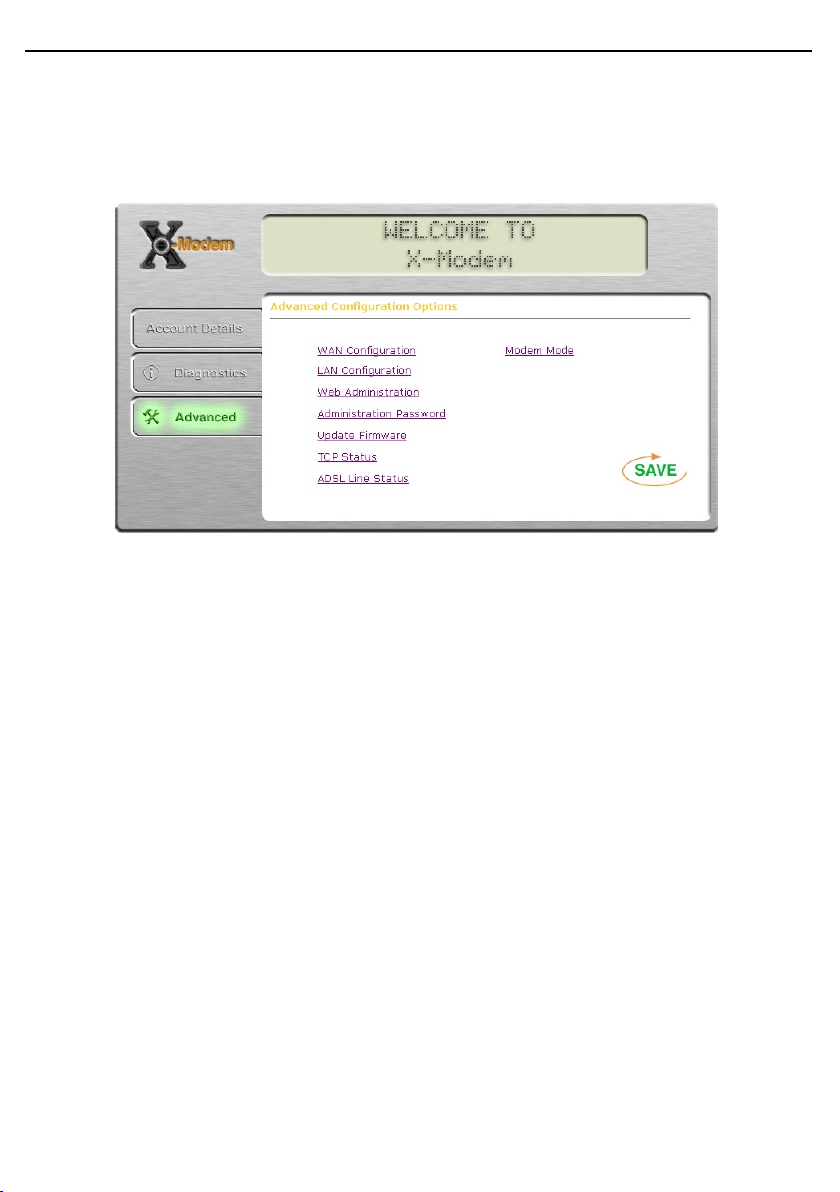
Advanced Conguration Opions
In most circumstances it will not be necessary to change any of the
settings under the advanced options. Users of ADSL outside the UK or lines
not provided by BT may have to change some settings here.
Any modications made in the advances options will require saving before
changes take effect. To save any changes click on the save button. The
Advanced screen can be returned to at any time by clicking the advanced
button.

WAN Con guration
VPI / VCI
The X-Modem sends data packets over ATM virtual circuits. ATM allows
for permanent connections (PVCs) and switched connections (SVCs). Each
PVC is identi ed by its Virtual Path and Connection Identi ers (VPI/VCI).
The VPI/VCI uniquely speci es a path to a remote site and is placed in the
ATM cell header that is used to route each cell through the network. The
default values 0/38 are suitable for all BT Wholesale lines if your telecoms
provider is not BT your ISP should supply these values. Karoo users should
use VPI=1, VCI=50.
Encapsulation
Determines the method used to communicate with the ISP. Default setting
is PPPoA VC-Mux Karoo users should use PPPoA LLC. You must use the
encapsulation type as instructed by the ISP.
MRU/MTU/MSS/
Advanced TCP/IP options that determine the optimum data packet size.
Authentication
If the ISP requires a manual authentication method it should be set here,
otherwise the Auto setting should be used.
Auto Reconnect
With this option set the modem will attempt to reconnect if the
connection to the service is lost. Default setting = on.
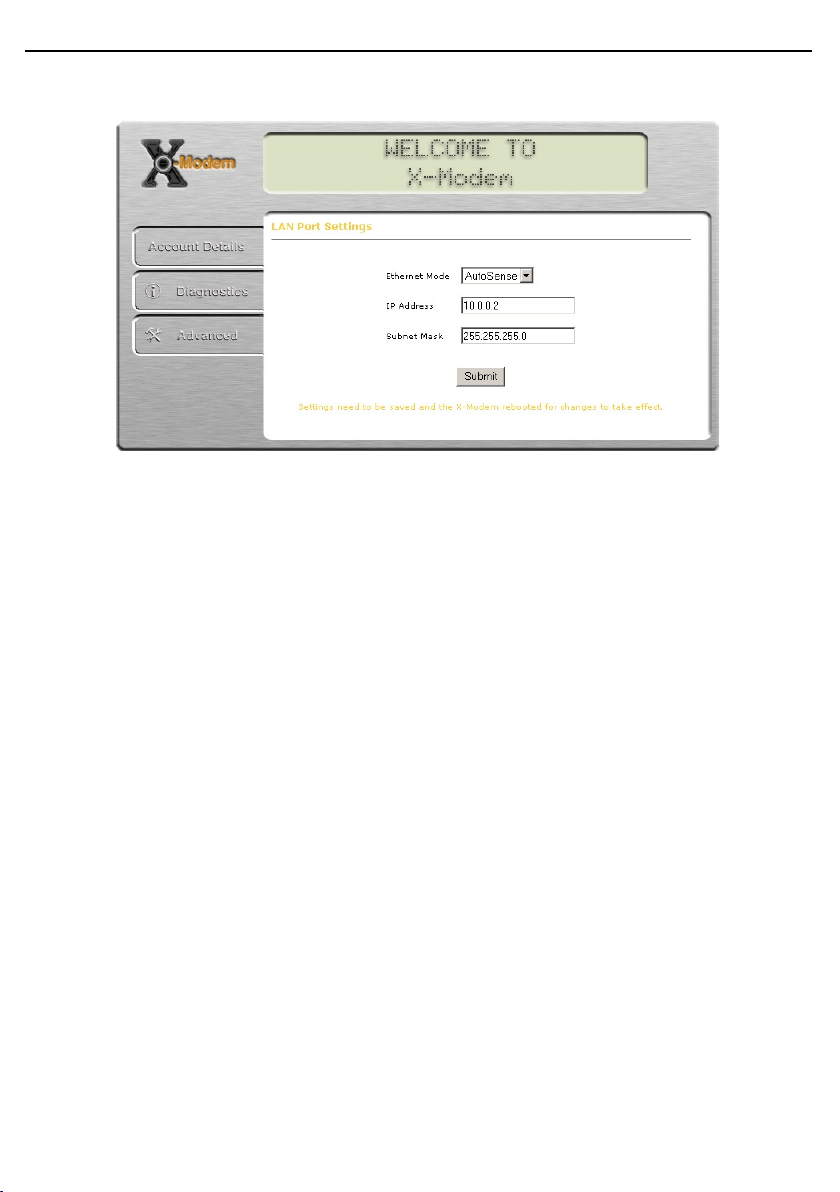
LAN Conguration
Ethernet Mode
Used to manually set the Ethernet port speed and duplex modes.
The default setting attempts to determine a speed that matches the
computer. If the speed and duplex settings are already known then they
should be set here.
Note: Some auto detecting network cards (NIC’s) are unable to properly
detect speed and duplex settings when both computer and modem are
congured for auto negotiation. If a connection can not be made to the
modem then the computers network adaptor should be set manually to
10Mb Half Duplex and the modem will automatically detect the network
adaptor settings.
IP Address
The IP address used to manage the modem, also used as the network
default gateway when the X-Modem is used in gateway mode.
Subnet Mask
Used to determine the size of the local network. The default setting
should be left at 255.255.255.0 unless the modem is being used in
gateway mode and special mask conguration is required.
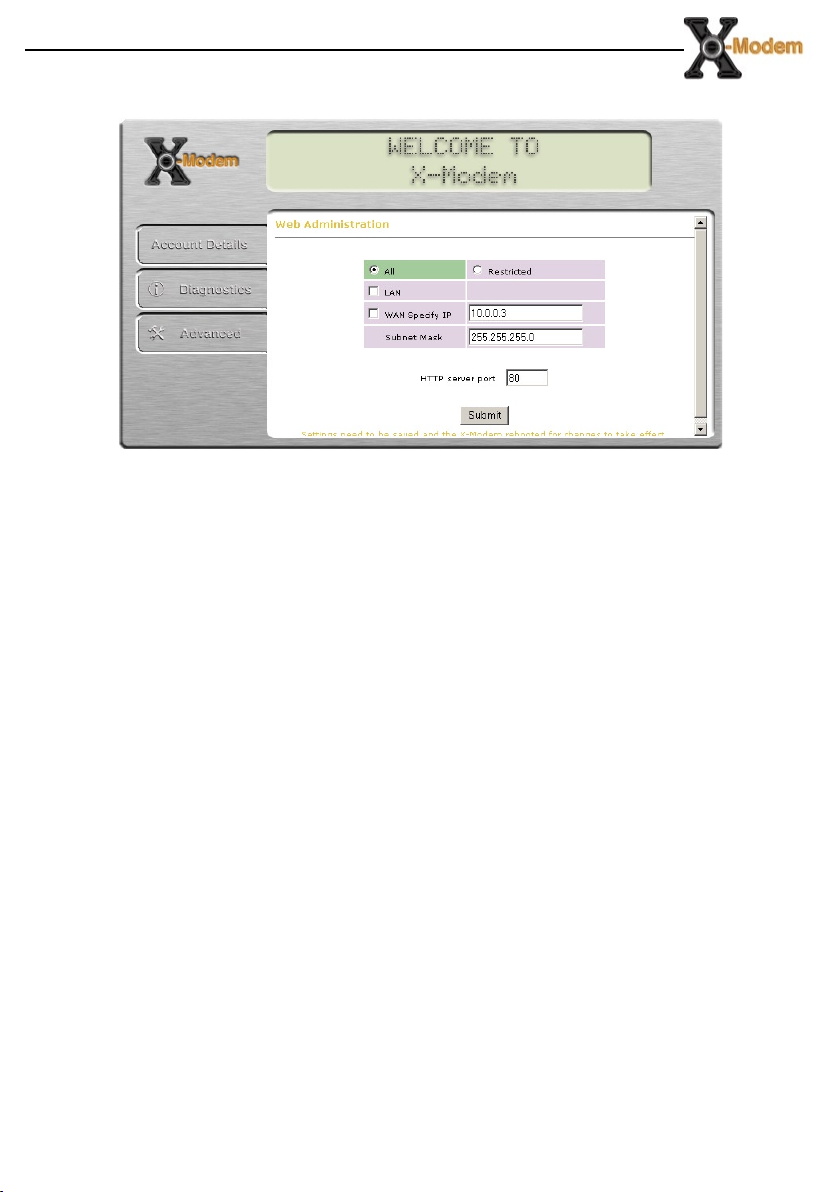
Web Administration
Access Restrictions
Access to the modem’s web administration can be restricted to a local
computer or network. If access restrictions are enabled in modem mode it
will be necessary to disconnect the modem from the line to gain access to
the web interface.
HTTP Port
The port used by the built-in web server to serve the web administration
interface. The port must be changed if access to a public web server
hosted on the computer attached to the X-Modem is required.
Note: When changing the http port the modem will not be able to report
that saving the con guration has been successful. To access the web
interface on a new port it will be necessary to append the new port to the
web address for example http://10.0.0.2:8080 for port 8080.

Update Firmware
Firmware Updates
ADSL Nation may make rmware updates available to download from our
web site.
Detailed instructions are provided with rmware updates.
Note: If the update button has been clicked in error the rmware update
must be cancelled to resume normal operation.
Other manuals for X-Modem
1
Table of contents
Other Adsl nation Modem manuals


Popular Modem manuals by other brands


CommScope
CommScope ARRIS SURFboard SB6183 user guide

AKO
AKO AKO-52043 user manual

SEOWON INTECH
SEOWON INTECH SWC-5100 user manual

Plus
Plus Voyager 105 Setup guide

Radicom Research
Radicom Research RW8300E-a-PR Designer's guide

Diamond Multimedia
Diamond Multimedia SupraMax External SKU SM56E Specification sheet