Advanced Bionics Naida CI Q90 User manual

029-M678-96 Rev A 2017-10-05
Naída CI Q90
Acoustic Earhook
CI-5850
instructions for use
© 2017 Advanced Bionics AG. All Rights Reserved. English, Español, Português
Manufactured by:
Advanced Bionics LLC
California, U.S.A.
+1 661 362 1400
AdvancedBionics.com
Advanced Bionics AG
Laubisrütistrasse 28
8712 Stäfa, Switzerland
+41 58 928 78 00
029-M678-96

1
Symbols Glossary
This table provides an explanation of symbols that may
be found on products and packaging.
SYMBOL SYMBOL MEANING
Model number
Date of manufacture
Manufacturer
Lot Number
Type of Protection: B
Suitable temperature range for transport
and storage
See Instructions for Use
Suitable relative humidity range for
transport and storage
Suitable atmospheric pressure range for
transport and storage
Dispose of in accordance with applicable
national and local regulations
Caution (refer to “Cautions & Warnings”
section for further information)
Fragile

2
Ingress Protection (IP) Rating:
The Naída CI Q90 Acoustic Earhook,
in the expected wearing configuration,
carries a rating of IP54.
IP5X: Protected against access to hazard-
ous parts. Dust protected.
IPX4: Protected against water splashing
from any angle.
Introduction
Carefully read all instructions prior to use. Observe
all warnings and precautions noted throughout these
instructions.
Cautions & Warnings
• CHOKING HAZARD: Acoustic Earhook contains
small parts that could cause choking if swallowed.
• If any parts are swallowed consult a physician or
hospital immediately.
• The Acoustic Earhook should only be used by the
intended recipient and not by any other individual.
• Do not allow children to play with or operate the drying
system unattended.
• Using your Acoustic Earhook contradictory to the intended
use (i.e. mouthing, chewing) may cause bodily harm.
• Remove your sound processor and headpiece before
entering a room where an MRI scanner is located.
• Remove Acoustic Earhook to stop stimulation if
uncomfortably loud sounds are heard.
IP54

3
• If the sound processor or accessories become
unusually hot or warm, discontinue use immediately
and contact your cochlear implant professional.
• Do not expose the Acoustic Earhook to extreme heat,
such as an oven, microwave or hair dryer.
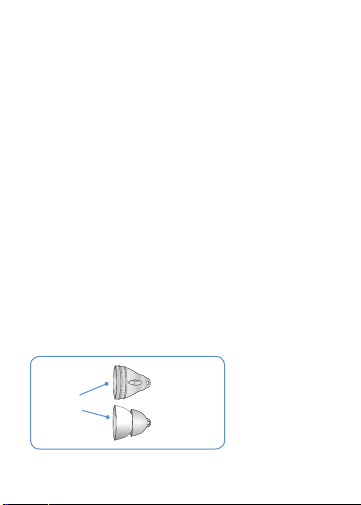
• Do not use the Acoustic Earhook unless the Wax Guard
is properly seated and the appropriate dome is attached.
• In the unlikely event that the dome gets stuck in the
ear canal, it is strongly recommended to seek medical
assistance to safely remove the part.
• Exposure of the receiver to high humidity, sweat, or
water could damage the receiver.
• In the unlikely event that the Wax Guard becomes
dislodged from the receiver while in the ear canal,
contact your cochlear implant professional. Do NOT try
to remove the Wax Guard from your ear canal yourself.
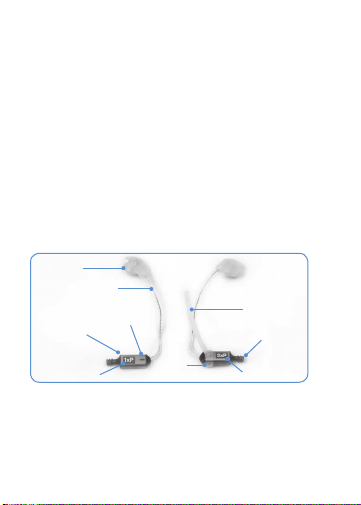
Intended Use
The Naída CI Q90 Acoustic Earhook (Acoustic Earhook)
is intended to provide low frequency amplification to
Advanced Bionics’ cochlear implant recipients.
The Acoustic Earhook is indicated for Advanced
Bionics cochlear implant recipients with unaided air
conduction thresholds less than or equal to 90 dB HL
between 125 Hz and 1600 Hz following surgery. The
Acoustic Earhook should only be used when behavioral
audiometric thresholds can be obtained and the
recipient can provide feedback regarding sound quality.
Speech perception testing should be completed before
and after fitting with the acoustic component to ensure

4
that the recipient performs as well, if not better, with the
acoustic component than without it.
Description of the Device
The Naída CI Q90 Acoustic Earhook allows for the addition
of acoustic amplification to the electrical stimulation
traditionally produced by a cochlear implant. The Acoustic
Earhook attaches to the Naída CI Q90 Sound Processor with
the processor connector. From the processor connector,
a tube extends to the xReceiver Unit that transfers sound
inputs through the sound outlet into the ear’s auditory
canal. The Acoustic Earhook contains a dash on the side
of the xReceiver Unit, that acts as a guide for the loop of the
optional Retention Hook, and a colored indicator on the
xReceiver Unit, blue for the left ear and red for the right ear.
xReceiver
unit Sound
outlet
Dash
Retention
hook
Processor
Connector
Tube
Indicator Loop Indicator
Operating Information
The Naída CI Q90 Acoustic Earhook is compatible with
the Naída CI Q90 Sound Processor only, and SoundWave
software, version 3.1 and later. Please ensure that the
Naída CI Q90 Sound Processor has been programmed

5
properly to delivery acoustic amplification through the
Acoustic Earhook before first use.
Set-up Instructions
The Acoustic Earhook has been provided to you partially
assembled. Before using the Acoustic Earhook you
must ensure:
1. A Wax Guard (e.g. Cerustop) is properly attached to
the Sound Outlet.
2. A Closed Dome or Power Dome is attached to the
Sound Outlet over top of the Wax Guard.
3. The Acoustic Earhook is connected to your Naída CI
Q90 Sound Processor.
4. Your cochlear implant professional has programmed
your Naída CI Q90 Sound Processor for use with
your Naída CI Q90 Acoustic Earhook.
WAX GUARD
Insertion
End
Outer Ring
Removal
End
When using the Wax Guard, it is important that you:
• Do not pry or twist the Wax Guard.
• Do not force the Wax Guard into the Sound Outlet.
• Never reuse a Wax Guard.

6
• Remove and insert another Wax Guard if it fits loosely.
• Discard the Wax Guard after use.
Removing & Inserting Wax Guard on the xReceiver
Unit
Use the empty Removal End of the Wax Guard to
remove the used Wax Guard from the Sound Outlet on
the xReceiver Unit by:
• Inserting the Removal End into the Sound Outlet until
the rim of the Wax Guard is touching the rim of the
Sound Outlet.
• Then slowly pulling the Wax Guard straight out.
Use the Insertion End of the Wax Guard to insert the
new Wax Guard onto the Sound Outlet on the xReceiver
Unit by:
• Pressing the Insertion End straight into the opening
of the Sound Outlet until the Outer Ring of the Wax
Guard sits flat on the Sound Outlet.
• Then pulling the Wax Guard straight out.
CLOSED DOME or POWER DOME
Bottom
Opening
Closed
Power

7
Attaching and Removing Closed Dome or Power Dome
on xReceiver Unit
The Closed Dome or Power Dome should only be at-
tached to the Sound Outlet on the xReceiver Unit if a
Wax Guard is properly inserted on the Sound Outlet.
Attach the dome to the Sound Outlet on the xReceiver
Unit by:
• Gently grasping the xReceiver Unit with one hand
• With the other hand, aligning the bottom opening of
the dome with the Sound Outlet of the xReceiver Unit
• Gently pressing the dome into place until it is securely
attached.
Remove the dome from the Sound Outlet on the xRe-
ceiver Unit by:
• Gently grasping the xReceiver Unit with one hand
• With the other hand, grasping the dome
• Pulling it away from the xReceiver Unit until discon-
nected from the Sound Outlet of the xReceiver Unit.
For a more custom fit, the Phonak SlimTip is an optional
earpiece that may be used in place of the provided
Closed Dome or Power Dome. The SlimTip must be or-
dered from Phonak; it is not provided with the Naída CI
Q90 Acoustic Earhook. Contact your cochlear implant
professional for more details.

8
Connecting & Removing the Acoustic Earhook
Connecting the Naída CI Q90 Acoustic Earhook
• Remove the power source from the Naída CI Q90
Sound Processor.
• Remove the standard Earhook already attached to the
Naída CI Q90 Sound Processor.
• Align the Naída CI Q90 Acoustic Earhook flush with
the Naída CI Q90 Sound Processor.
• Hold the Acoustic Earhook firmly at the top and push
towards the Sound Processor until it meets flush with
the processor.
• Using the provided T-Mic 2 / Earhook tool, place one
of the pins in the small hole on the side of the tool.
This will help to steady the pin as you line it up with
the pin hole on the Acoustic Earhook.
• Line up the pin with the hole in the Acoustic Earhook
and gently push it through the hole. The pin will
move from one side of the Sound Processor, through
the Acoustic Earhook, to the other side of the Sound
Processor, holding the Acoustic Earhook in place. The
pin should not come out of the other side.
• If a small portion of the pin extends beyond the Sound
Processor, use the side of the tool to push the pin in-
wards so its lies flush with the Sound Processor.
• Pull the tool away from the processor, leaving the pin
in place.
Removing the Naída CI Q90 Acoustic Earhook
• Remove the power source from the Naída CI Q90
Sound Processor.

9
• Align the pointed end of the T-Mic 2 / Earhook
removal tool with the hole on the processor that
contains the pin holding the Naída CI Q90 Acoustic
Earhook on the Naída CI Q90 Sound Processor.
• Gently press the tool in the hole, pushing the pin out
the other side.
• The pin does not need to be removed from the
Naída CI Q90 Sound Processor. As long as the tool
is pushed in flush on one side of the Naída CI Q90
Sound Processor, the pin should be displaced enough
to adequately remove the Acoustic Earhook.
• Remove the tool from the Naída CI Q90 Sound
Processor.
• Gently grasp the Acoustic Earhook at the top near
where it connects with the Naída CI Q90 Sound Pro-
cessor and pull forward until it is separated from the
Naída CI Q90 Sound Processor.
Retention Hook
Attaching the Retention Hook to the xReceiver Unit
• Grasp the xReceiver Unit in one hand.
• With the other hand, align the retention hook so that
the loop is in front of the xReceiver Unit, and the
retention hook points forward, away from the Sound
Processor.
• Gently slide the loop of the retention hook into the
xReceiver Unit until the retention hook covers the
dash.

10
Removing the Retention Hook from the xReceiver Unit
• Grasp the xReceiver Unit in one hand.
• With the other hand, grasp the loop of the retention
hook that surrounds the xReceiver Unit and carefully
slide the retention hook away from the tube of the
Acoustic Earhook and off the xReceiver Unit.
It may be necessary to use your nails to get a good grasp
and remove the retention hook.
Do not hold on to or pull the tube while removing the
retention hook.
Operating Instructions
Inserting the xReceiver Unit into the Ear Canal
• Place the Naída CI Q90 Sound Processor behind the
appropriate ear.
• Place the Naída CI Q90 Acoustic Earhook tube be-
tween the thumb and forefinger.
• Insert the Dome deep enough into the ear canal so
that the tube lies flat on the ear.
• If utilizing a retention hook, press it into the bowl of the
ear in order to retain the Dome in the ear canal.
If you have problems inserting the Dome into the ear
canal:
• Use your other hand to gently pull your earlobe down-
wards, as this opens the ear canal a little more.
• Then gradually rotate the Dome until it fits correctly.

11
Removing the xReceiver Unit from the Ear Canal
• Simply grasp the Acoustic Earhook tube and carefully
remove it from your ear.
Operating & Storage Instructions
Recommended Operating Conditions
Temperature: 0oC (32oF) - 45 oC (113 oF)
Relative Humidity: up to 90% RH
Atmospheric Pressure: 70 kPa – 106 kPa
Recommended Storage Conditions
Temperature: -20oC (-4oF) - 55 oC (131 oF)
Relative Humidity: up to 90% RH
Cleaning & Maintenance
For more in depth maintenance instructions or for more
than basic cleaning, please contact your cochlear im-
plant professional.
• Your Acoustic Earhook should be inspected daily for
earwax and moisture deposits.
• If the Acoustic Earhook is exposed to moisture or hu-
midity, it is best to dry it daily.
• If utilizing a Dome, it should be replaced every four
weeks, or sooner if damage is noted.
• Replace the Wax Guard on the xReceiver Unit every
four to eight weeks, or sooner if it becomes visibly dirty,
blocked, or the sound seems quieter or lower.

12
• Remove the Acoustic Earhook before using hair spray
or applying cosmetics, as these products may damage
the Acoustic Earhook.
To clean your Acoustic Earhook:
1. Remove the Dome from the xReceiver Unit
2. Using a lint-free cloth or moist cleansing wipe, gently
clean the Dome and xReceiver Unit. Never use
cleaning agents such as household detergents, soap,
etc. to clean any parts of your Acoustic Earhook.
3. Prior to reattaching the Dome to the xReceiver Unit,
ensure that all parts are completely dry.
User Assistance Information
In the event that you experience any issues with your
product, please contact your cochlear implant profes-
sional or the manufacturer. Do not attempt to service
or modify your product as doing so may compromise
system performance and will void the manufacturer’s
warranty. Products should be serviced only at Advanced
Bionics.

13
Glosario de símbolos
En esta tabla, se proporciona una explicación de los símbolos
que pueden encontrarse en los productos y en el envoltorio.
SÍMBOLO SIGNIFICADO DEL SÍMBOLO
Número de modelo
Fecha de fabricación
Fabricante
Número de lote
Tipo de protección: B
Rango de temperatura adecuado para
transporte y almacenamiento
Consulte las Instrucciones de uso
Rango de humedad relativa adecuado
para transporte y almacenamiento
Rango de presión atmosférica adecuado
para transporte y almacenamiento
Eliminación de acuerdo con las
normativas nacionales y locales aplicables
Precaución (consulte la sección
"Precauciones y advertencias" para
obtener más información)
Frágil

14
Indice de protección contra el acceso (IP):
El gancho acústico Naída CI Q90,
en la configuración de uso prevista,
tiene una clasificación IP54.
IP5X: Protección contra acceso a piezas
peligrosas. Protección contra polvo.
IPX4: Protección contra salpicaduras de
agua desde cualquier ángulo.
Introducción
Lea atentamente todas las instrucciones antes del uso.
Respete todas las advertencias y precauciones que se
encuentran en estas instrucciones.
Precauciones y advertencias
• RIESGO DE ASFIXIA: El gancho acústico contiene
piezas pequeñas que podrían causar asfixia si se tragan.
• En caso de tragar una pieza, consulte inmediatamente
a un médico o acuda al hospital.
• Solo el usuario previsto debe usar el gancho acústico,
no debe usarlo ninguna otra persona.
• No permita que los niños jueguen con el sistema de
secado ni que lo usen sin supervisión.
• El uso del gancho acústico fuera del uso previsto (es decir,
introducirlo en la boca o morderlo) puede causar lesiones.
• Quítese el procesador de sonido y la antena receptora
antes de entrar a una sala donde se encuentre un
escáner de RM.
• Quítese el gancho acústico para detener la estimulación
si escucha sonidos intensos y molestos.
• Si el procesador de sonido o los accesorios se calientan
IP54

15
de forma atípica, interrumpa el uso de inmediato y
póngase en contacto con su profesional especializado
en implantes cocleares.
• No exponga el gancho acústico a calor extremo,
como el que emana un horno, un microondas o un
secador de cabello.
• No use el gancho acústico a menos que la protección
contra cerumen esté debidamente asentada y se haya
conectado la cápsula correspondiente.
• En el improbable caso de que la cápsula se atasque en
el conducto auditivo, se recomienda solicitar asistencia
médica para extraer la pieza de manera segura.
• La exposición del receptor a altos niveles de humedad o
a grandes cantidades de sudor o agua podría dañarlo.
• En el improbable caso de que la protección contra
cerumen se desplace del receptor mientras se
encuentra en el conducto auditivo, póngase en contacto
con su profesional especializado en implantes cocleares.
NO intente extraer la protección contra cerumen
del conducto auditivo usted mismo.
Uso previsto
El gancho acústico Naída CI Q90 (gancho acústico) se
ha diseñado para proporcionar amplificación en bajas
frecuencias a los usuarios de implantes cocleares
Advanced Bionics.
El gancho acústico está indicado para usuarios de
implantes cocleares Advanced Bionics con umbrales
de conducción aérea menores o iguales a 90 dB HL
entre 125 Hz y 1600 Hz no tratados tras la intervención
quirúrgica. El gancho acústico sólo debe utilizarse cuando
puedan obtenerse umbrales audiométricos conductuales

16
y el usuario pueda proporcionar comentarios relativos a la
calidad sonora. Deben completarse pruebas de percepción
del habla antes y después de realizar la adaptación del
componente acústico con el fin de garantizar que el usuario
obtiene el mismo rendimiento, o mejor, con el componente
acústico y sin él.
Descripción del dispositivo
El gancho acústico Naída CI Q90 permite añadir amplifica-
ción acústica a la estimulación eléctrica que produce tradicio-
nalmente un implante coclear. El gancho acústico se conecta
al procesador de sonido Naída CI Q90 a través del conector
del procesador Desde el conector del procesador, se extiende
un tubo hacia la unidad xReceiver que transfiere entradas
de sonido a través de la salida de sonido al canal auditivo del
oído. El gancho acústico tiene un marcador a un lado de la
unidad xReceiver, que sirve de guía para el bucle del gancho
de retención opcional y un indicador de color en la unidad
xReceiver, azul para el oído izquierdo y rojo para el derecho.
Unidad
xReceiver Salida de
sonido
Marca de
referencia
Gancho de
retención
Conector del
procesador
Tubo
Indicador Bucle Indicador
Información sobre el funcionamiento
El gancho acústico Naída CI Q90 es compatible con
el procesador de sonido Naída CI Q90 solamente y con el

17
software SoundWave, versión 3.1 o superior. Asegúrese de
que el procesador de sonido Naída CI Q90 se haya pro-
gramado correctamente para proporcionar amplificación
acústica a través del gancho acústico antes del primer uso.
Instrucciones para la instalación
El gancho acústico se entrega parcialmente montado.
Antes de utilizar el gancho acústico, debe asegurarse
de lo siguiente:
1. Hay una protección contra cerumen (p. ej., Cerustop)
correctamente conectada a la salida de sonido.
2. Hay una cápsula cerrada o Power Dome conectada
a la salida de sonido sobre la parte superior de la
protección contra cerumen.
3. El gancho acústico está conectado al procesador de
sonido Naída CI Q90.
4. Su profesional especializado en implantes cocleares
ha programado el procesador de sonido Naída CI Q90
para su uso con el gancho acústico Naída CI Q90.
PROTECCIÓN CONTRA CERUMEN
Extremo de
inserción
Anillo externo
Extremo de
extracción
Al utilizar la protección contra cerumen, es importante:
• No hacer palanca en la protección contra cerumen
ni retorcerla.
• No forzar la protección contra cerumen al interior de
la salida de sonido.
• Nunca reutilizar una protección contra cerumen.

18
• Si no encaja correctamente y queda floja, extraerla e
insertar otra protección contra cerumen.
• Desechar la protección contra cerumen después de su uso.
Extracción e inserción de la protección contra cerumen
en la unidad xReceiver
Use el extremo de extracción de la protección contra
cerumen para extraerla de la salida de sonido de la
unidad xReceiver, realizando las acciones siguientes:
• Inserte el extremo de extracción de la salida de sonido
hasta que el borde de la protección contra cerumen
toque el borde de la salida de sonido.
• Luego, tire lentamente de la protección contra
cerumen hacia afuera en línea recta.
Use el extremo de inserción de la protección contra
cerumen para insertarla en la salida de sonido de la
unidad xReceiver, realizando las acciones siguientes:
• Ejerza presión en el extremo de inserción en línea recta
hacia el interior de la apertura de la salida de sonido hasta
que el anillo externo de la protección contra cerumen se
asiente completamente sobre la salida de sonido.
• Luego, tire de la protección contra cerumen hacia
afuera en línea recta.
CÁPSULA CERRADA o CÁPSULA POTENTE
Apertura
inferior
Cerrado
Alimentación

19
Conexión y extracción de la cápsula cerrada o cápsula
potente en la unidad xReceiver
La cápsula cerrada o cápsula potente solo debe
conectarse a la salida de sonido de la unidad xReceiver
si se ha insertado correctamente una protección contra
cerumen en la salida de sonido.
Para conectar la cápsula a la salida de sonido en la
unidad xReceiver:
• Sujete con cuidado la unidad xReceiver con una mano
• Con la otra mano, alinee la apertura inferior de la
cápsula con la salida de sonido de la unidad xReceiver
• Ejerza una leve presión sobre la cápsula para hasta
que encaje.
Para extraer la cápsula de la salida de sonido en la
unidad xReceiver:
• Sujete con cuidado la unidad xReceiver con una mano
• Con la otra mano, tome la cápsula
• Tire de ella hacia afuera de la unidad xReceiver hasta
desconectarla de la salida de sonido de la unidad
xReceiver.
Para obtener un ajuste más personalizado, el Phonak
SlimTip es un auricular opcional que puede usarse
en lugar de la cápsula cerrada o cápsula potente
proporcionada. Puede pedir el SlimTip a Phonak; no
se proporciona con el gancho acústico Naída CI Q90.
Póngase en contacto con su profesional especializado
en implantes cocleares si desea conocer más detalles.
Other manuals for Naida CI Q90
3
Table of contents
Languages: