Advanced Wireless Communications RB5000 User manual

1
AWR
User Manual
AWR-RB5000
Advanced Wireless Communications

2
THANK YOU!
Thank you for your purchase of Advanced Wireless Communications’ AWR-RB5000 two-way Base
station. This Base station is a business grade device. Treat it with care, and you will enjoy years of
reliable operation.

3
Product Safety and RF Exposure for Portable Two-Way Radios Compliance with
RF Energy Exposure Standards
NOTICE: This radio is intended for use in occupational/controlled applications where users have
been made aware of the potential for exposure and can exercise control over their exposure. This
radio device is NOT authorized for general population, consumer or similar use.
BEFORE USING THIS RADIO, READ THE TRAINING MATERIAL BELOW WHICH CONTAINS
IMPORTANT OPERATING INSTRUCTIONS FOR SAFE USAGE AND RF ENERGY AWARENESS
AND CONTROL INFORMATION FOR COMPLIANCE WITH RF ENERGY EXPOSURE LIMITS IN
APPLICABLE NATIONAL AND INTERNATIONAL STANDARDS.
Federal Communication Commission (FCC) Regulations
The FCC has established limits for safe exposure to radio frequency (RF) emissions from portable
two-way radios. The FCC requires manufacturers to demonstrate compliance with RF exposure
limits before portable two-way radios can be marketed in the U.S. When two-way radios are
approved for occupational/controlled environment exposure limits, the FCC requires users to be
fully aware of, and exercise control over, their exposure. Awareness and control of RF exposure
can be accomplished by the use of labels, or by education and training through appropriate means
such as information and instructions in user manuals or safety booklets. Your Advanced Wireless
Communications’ two-way radio has an RF exposure information label in the battery compartment.
The training material below includes useful information about RF exposure and helpful instructions
on how to control your RF exposure.

4
Your Advanced Wireless Communications two-way radio is designed and tested to comply with
a number of national and international standards and guidelines (listed below) regarding human
exposure to RF electromagnetic energy. In terms of measuring RF energy for compliance with FCC
exposure guidelines, your radio radiates measurable RF energy only while it is transmitting (during
talking), not when it is receiving (listening) or in standby mode.
Compliance and Control Guidelines and Operating Instructions for Portable Two-Way Radios
To control your exposure and ensure compliance with the occupational/con-trolled environment
exposure limits, always adhere to the following procedures:
*Transmit no more than 50% of the time. To transmit (talk), push the Push-To-Talk (PTT) button. To
receive calls, release the PTT button. Transmitting 50% of the time or less is important since the
radio generates measurable RF energy exposure only when transmitting (in terms of measuring
standards compliance).
* For body-worn operation, always place the radio in an AWC approved belt-clip or similar
accessory that contains no metallic components and provides a minimum separation distance of
1.3 cm between the back of the radio and the user’s body. AWC approved accessories, antennas,
and device combinations comply with the occupational/controlled environment RF exposure limits.
Using non-AWC approved accessories may result in exposure levels which exceed the FCC’s
occupational/controlled environment RF exposure limits. AWC-approved accessories have been
tested and comply with FCC RF exposure requirements.
*If you are not using a body-worn accessory and are not using the radio held in front of the face,
ensure the radio is kept at a minimum of 1.3 cm from the body when transmitting. Keeping the radio

5
at a proper distance is important since RF exposure decreases with increasing distance from the
antenna.
*Use only FCC-approved, supplied or replacement headsets, batteries, and accessories intended
for use with this radio. Use of non-FCC approved headsets, batteries and accessories may exceed
FCC RF exposure guidelines.
FCC License Information
Your Advanced Wireless Communications radio operates on communications frequencies which
are subject to FCC (Federal Communications Commission) Rules & Regulations. FCC Rules
require that all operators using Private Land Mobile radio frequencies obtain a radio license before
operating their equipment. Application for license must be made on FCC main form 601, and
schedules D, E, and H.
FAX: Forms can be obtained by fax from the FCC Fax-On-Demand system. Call 1-202-418-
0177 from your fax machine and request document number 000600 for the form, schedules, and
instructions.
MAIL: Forms can be ordered by telephone, and will be sent to you by rst class mail. Call the FCC
Forms Hotline at 1-800-418-FORM (1-800-418-3676).
INTERNET: Form 601 and instructions can be downloaded from the FCC Forms website at:
http://www.fcc.gov/Forms/Form601/601.html

6
Before lling out your Form 601 application Technical Data section, you must decide which
frequency (or frequencies) you will operate on.
QUESTIONS? Call the FCC for license application questions at 1-888-CALL-FCC
(1-888-225-5322).
If you have any questions, call Advanced Wireless Communications at 1-800-475-5852
Notices To The User:
This device complies with Part 15 of the FCC Rules. Operation is subject to the following two
conditions:
(1) this device may not cause harmful interference, and
(2) this device must accept any interference received, including interference that may cause
undesired operation.
One or more of the following statements may be applicable:
FCC WARNING
This equipment generates or uses radio frequency energy. Changes or modications to this
equipment may cause harmful interference unless the modications are expressly approved in the
instruction manual. The user could lose the authority to operate this equipment if an unauthorized
change or modication is made.

7
User Safety Information
◊ Only qualied technicians are allowed to maintain this product.
◊ To avoid electromagnetic interference, turn o your radio in places where posted notices instruct
you to do so. Hospitals or health care facilities may be using equipment that is sensitive to external
RF energy. When traveling on aircraft, turn o your radio when the airline crew instructs you to do
so.
◊ When in vehicles equipped with an air bag, do not place a portable radio in the airbag deployment
area.
◊ Turn o your radio prior to entering any area with a potentially explosive atmosphere. Do not
remove, install, or charge batteries in such areas.
◊ To avoid possible interference with blasting operations, turn o your radio when you are near
electrical blasting caps.
◊ Do not expose the radio to direct sunlight for long periods of time. Do not place the radio in direct
contact with any heating source.

8
CONTENTS
Thank You! ..........................................................2
FCC Declaration. . . . . . . . . . . . . . . . . . . . . . . . . . . . . . . . . . . . . . . . . . . . . . . . . . . . . . 3
Contents............................................................8
Getting Acquainted ..................................................10
Base Station View .............................................................10
LCD Display Symbols ..........................................................12
Safety and Care Instructions ..........................................14
Safety Precautions ............................................................14
Caring for this product ..........................................................14
Caution .....................................................................15
Getting Started......................................................16
Turn the Unit ON / OFF .........................................................16
Adjusting the Volume...........................................................16
Selecting a Channel ...........................................................16
Transmitting and Receiving ...........................................17
Talk to another Radio. . . . . . . . . . . . . . . . . . . . . . . . . . . . . . . . . . . . . . . . . . . . . . . . . . . . . . . . . . . 17
Keypad Lock .................................................................18

9
VOX Operation ...............................................................18
Monitoring a Channel ......................................................... 20
Scanning ....................................................................21
Wireless Cloning ....................................................24
Local Programming Mode ............................................25
Local Programming Menu .......................................................26
Entering Programming Mode. . . . . . . . . . . . . . . . . . . . . . . . . . . . . . . . . . . . . . . . . . . . . . . . . . . . . 27
Selecting the Main Menu........................................................27
Selecting a Channel ...........................................................29
Programming the Frequency.....................................................31
Programming the Key Function...................................................32
Advanced Features ..................................................34
Limited Menu Feature ................................................35
Frequencies List ....................................................36
CTCSS / DCS Code List ..............................................40
Troubleshooting ....................................................45

10
GETTING ACQUAINTED
BASE STATION VIEW
1. External PTT Jack
2. DC Input
3. S/M Programmable Function Key.
(Default: Menu @ Long Press, Scan
@ Short Press
4. A, Programmable Function Key
(Default: Channel View @ Short
press, Monitor @ Long press)
5. F, Programmable Function Key
(Default: Key Lock @ Long press,
None @ Short press, Exit current
status key in local programming
mode)
6. Volume Adjustment Knob

11
7. External Speaker Jack
8. Antenna Connector
9. LED Indicator (Tx & Busy)
10. Speaker
11. LCD Display
12. ▲ Channel Up Key
(Select item key in local programming mode)
13. Power Switch
14. ▼ Channel Down Key
(Select item key in local programming mode)
15. PTT Key
16. Headset Jack/Programming Cable Jack
17. Bracket with Adjustable Angle
NOTE: The A, S/M, and Fkeys can be
programmed for a variety of functions. See
“Local Programming Mode” menu list later in this
manual. Please contact your dealer for further
details on these functions.
12
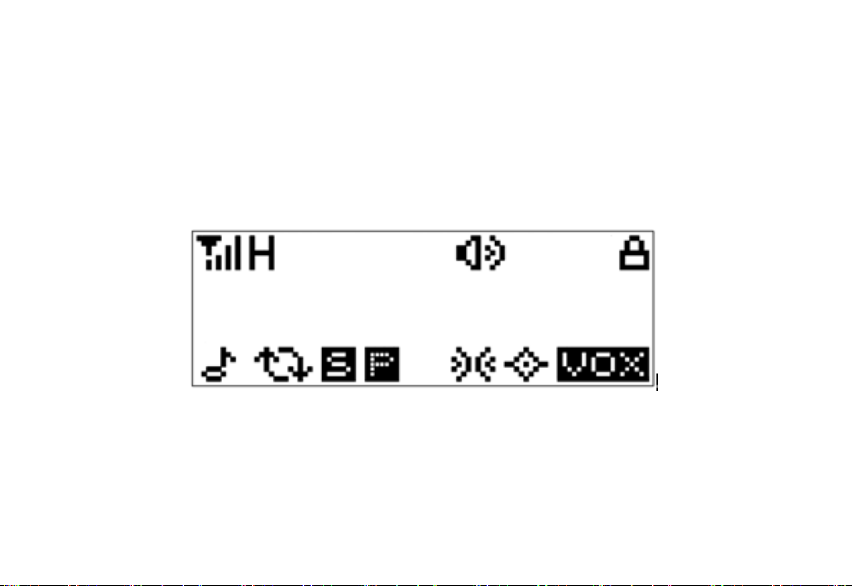
LCD DISPLAYS AND SYMBOLS
RB-5000

13
SYMBOLS FUNCTION
RB-5000 Power on text, it can be channel number/Channel alias/Channel frequency
Received Signal Strength Indicator
High Power: the current channel is high power (H,L)
Monitor indicator
Speaker opened
Speaker function disabled
Keypad Lock
DTMF Signaling Enable
Scan
The current channel is in scan list
The current channel is priority channel
Compander enabled
Scrambler enabled
VOX Enable

14
SAFETY AND CARE INSTRUCTION
SAFETY PRECAUTIONS
• Please observe the following safety precautions when setting up and using this product.
• LCD panel - The LCD panel is made of glass, and may break if the unit is dropped or
impacted.
• Heat sources - Keep the product away from heat sources such as radiators, stoves, heaters,
and other heat-generating products.
• Water and moisture - Do not use the product in or near water or in high moisture areas such as
a bathroom or outdoors when rain is present.
CARING FOR THIS PRODUCT
• To ensure you receive the maximum benet from using this product, please observe the
following guidelines.
• Cleaning - Use a damp cloth. Do not use liquid cleaning agents, benzene, thinner, or aerosols.
• Repair - Do not attempt to repair the product or modify the circuitry by yourself. Only
replacement parts that are recommended by Advanced Wireless Communications (AWC)
should be used. You can contact AWC at 1-800-475-5852.
• Do not scratch hard objects against the LCD display as this may cause damage.

15
CAUTION
• Only replace power adapter with the same or equivalent type recommended by the
manufacturer.
• Do not dispose this product as unsorted municipal waste. Collection of such waste separately
for special treatment is necessary.
• To reduce the risk of electric shock, do not expose equipment to rain or moisture.

16
GETTING STARTED
TURN THE UNIT ON/OFF
Press key to turn the radio on, and press again to turn the radio o. When you turn the radio on,
the radio will chirp and if enabled, speak the channel number. The display briey shows the power
on message and radio rmware version number.
ADJUSTING THE VOLUME
Rotate clockwise the volume adjustment knob to decrease the volume, and counterclockwise to
increase the volume.
SELECT A CHANNEL
To select between channels (maximum 16):
1. Press to increase channel number.
2. Press to decrease channel number

17
TRANSMITTING AND RECEIVING
For best transmission, speak about 12” away from the radio and leave a short pause before speak-
ing once you have pressed the PTT button.
The transmitting and receiving radios must be on the same channel using the same CTCSS code or
DCS code in order for you to communicate with another party.
TALK TO ANOTHER RADIO
1. Press and hold “A” (this button is set to the Monitor function) to check for channel activity. Do
not transmit if someone is speaking on the channel.
2. Press and hold PTT button and speak into the microphone to transmit.
3. Release the PTT button once you have nished speaking to allow other radios to respond. The
radio will automatically hear received transmissions.
Note: The transmit LED located above the speaker is red when transmitting and is green when
receiving.
Signal Strength and Channel Busy Indicators
When there is activity on a frequency, the radio LCD displays and the green LED lights stead
When there is activity on the same frequency and code as your radio (your radio is receiving), the
radio displays and a signal strength from 1 (weakest) to 4 (strongest). This can help determine
when a radio is moving out of range.

18
Note: Obstacles that block the signal path may aect the strength of the incoming signal.
KEYPAD LOCK
To avoid accidentally changing the channel and the unit’s preferred settings, you can lock the
keypad.
To lock or unlock the keypad
Press and hold the F button for 2.0 seconds. Appears on the LCD when the keypad is locked.
Note:
1. The F button Long Press is programmed for key lock (default).
2. While key lock is “on” you can still use the PTT button.
VOX OPERATION
The Voice Activated Transmission (VOX) function allows your voice to activate transmission auto-
matically when the transceiver is used with an optional hands-free microphone / headset. If the unit
is set to VOX sensitivity 1, 2, ... 6, it will automatically detect and transmit your voice through to the
selected channel.
Note: The VOX level and transmission delay time should be set according to your voice
loudness and personal preference.

19
To set up a VOX headset:
1. Turn the radio o.
2. Plug the headset into the accessory jack.
3. Turn the radio back on again. The radio displays .
4. Lower the radio volume BEFORE placing the headset in or near your ear.
5. To transmit, speak into the accessory microphone. To receive, stop talking.
NOTE: This product is compatible with Motorola headsets, please ask your local Account Manager
for further information. Pressing the PTT button disables VOX.

20
MONITORING A CHANNEL
Monitoring allows you to check for activity on a channel. The AWR RB5000 has three monitor
modes. You can choose a mode according to your preference, in local programmable mode (if
enabled).
• Squelch O (Default): In this mode, the speaker is unmuted in any condition so as to receive
any sound on the current channel. When audio signal is received on the channel, audio will be
heard. Otherwise, background noise will be heard.
Operation: Press and hold the Monitor (Default A) key to enter this mode, and release the
key to exit.
• Monitor toggle: In this mode, the receiving party can receive incoming calls from the trans-
mitting party regardless of CTCSS/CDCSS condition. If the channel frequency is not the same,
the receiving party will not receive any incoming calls.
Operation: Press the Monitor key to enter this mode, and press it again to exit.
• Monitor Momentary: Refer to Monitor toggle.
Operation: Hold down the programmed monitor key continuously to enter this mode, and
release the key to exit.
Table of contents
Popular Accessories manuals by other brands


echoflex
echoflex MC-31 installation guide

PCB Piezotronics
PCB Piezotronics PCB-352C33 Installation and operating manual

Futek
Futek USB200 Series troubleshooting guide

Neotherm
Neotherm Futura Z Installation and wire connection manual

Lennox
Lennox 47W36 installation instructions

Waycon
Waycon UFA2 Series installation guide

Gleason Reel
Gleason Reel Universal Hose Reel-Direct Drive UH18 Installation and maintenance instructions

YOKOGAWA
YOKOGAWA CT1000 user manual

Trigano
Trigano Auvents Panoramic 300 Erection Instructions

Grunbeck
Grunbeck GENO-UV-75 Operation manual

turck
turck BI10-G30-Y2X 7M manual

Orbit
Orbit B-hyve owner's manual