AEG Pure Multi 7000 User manual


www.aeg.com2
OPERATING MANUAL
Thank you for choosing the AEG air purifier. Always use original AEG
consumables, accessories and spare parts to get the best results out of
your unit. This appliance is designed with the environment in mind and
hence all plastic parts are marked for recycling purposes.
GENERAL SAFETY INFORMATION
This USER MANUAL provides specific operating instructions for your
model OR series. Use the unit only as instructed in this manual. These
instructions are not meant to cover every possible condition and
situation that may occur. Common sense and caution must be practiced
when installing, operating, and maintaining any appliance.
WARNING! - CHILDREN & VULNERABLE PEOPLE SAFETY
Risk of suffocation, injury or permanent disability. Keep all packaging
away from children.
This appliance can be used by children aged from 8 years and above
and persons with reduced physical, sensory or mental capabilities or
lack of experience and knowledge if they have been given supervision
or instruction concerning use of the unit in a safe way and understand
the hazards involved.
Cleaning and user maintenance shall not be made by children without
supervision. Children shall not play with the unit. Children under 3
years of age should be kept away from the unit unless continuously
supervised.
CAUTION! – AVOID INJURY OR DAMAGE TO THE UNIT OR PROPERTY
Do not direct airflow at fireplaces or other heat related sources as this
could cause flare ups.
Do not climb on or place objects on the unit. Do not hang objects off
the unit.
Do not place containers with liquids on the unit.
Turn OFF the unit at the power source when it will not be used for an
extended period.
Do not block or cover the air intake area, fan area and air outlet grill.
Ensure that any electrical/electronic equipment is at least 30cm away
from the unit.

www.aeg.com 3
INFORMATION ABOUT RADIO
WiFi working frequency and maximum output power: 2.4 GHz; 15dBm
RFID working frequency and maximum output power: 13.56 MHz;
30dBm ± 10% Power consumption of the product in network standby
is less than 2.0W
Electrical Information
WARNING! Avoid fire hazard or electric shock.
This unit can be used in 50Hz or 60Hz power supply without any change. Do not use an extension
cord or an adaptor plug.
Do not remove any prong from the power cord. Do not pinch, bend, or knot the power cord.
Do not cut or damage the power cord. If the supplied power cord is damaged, it should only
be replaced by AEG, its service agent or similarly qualified persons. This unit contains no user
serviceable parts. Always call an authorized AEG servicer for repairs.
If you are not sure the outlet is adequately grounded or protected by a time delay fuse or circuit
breaker, have a qualified electrician install the proper outlet according to the National Electrical
Code OR applicable local codes and ordinances.
Do not store or use gasoline or other flammable vapors and liquids in the vicinity of this or any
other appliance. Read product labels for flammability and other warnings.
Do not let water or any other liquid or flammable detergent enter the unit to avoid electric shock
and/or a fire hazard. Be sure to unplug he unit before cleaning.
Never unplug the unit by pulling on the power cord. Always grip the plug firmly and pull straight
out from the receptacle.
Safety Precautions
Do not insert or place fingers or objects into the air discharge area or front facing grille of the unit.
Do not start or stop the unit by unplugging the power cord or turning OFF the power at the
electrical box.
In the event of a malfunction (sparks, burning smell, etc.), immediately stop the operation,
disconnect the power cord, and call an authorized AEG servicer.
Do not operate the unit with wet hands.
Do not pull on the power cord.
Do not touch the fan blade when removing the filter(s).
BEFORE STARTING
• Read this manual carefully.
• Check that all parts described are included.
• Pay special attention to the safety precautions!
This symbol on the product or on its packaging indicates that the product may not be treated as
household waste. To recycle your product, please take it to an ocial collection point or to an AEG service
center that can remove and recycle the electric parts in a safe and professional way. Follow your country’s
rules for the separate collection of electrical products.
DISPOSAL

www.aeg.com4
21 3 4
11 12 15 13 17 14
21 2522 23 24201916 18
5 6 7
8
10
9
1. Front Panel
2. Mesh pre-filter
3. Ultrafine particle filter
4. VOC odor filter
5. Control panel display
6. Louvres
7. Hood
DESCRIPTION OF YOUR AIR PURIFIER
8. Handle
9. Sensor box
10. Wheel
11. ON/OFF button
12. MODE button
13. Fan speed
14. Louvre swing
15. Air Quality light
16. MODE display
17. FAN SPEED indicator
18. Swing indicator
19. Warning alert icon
20. Filter change icon
21. Wifi icon
22. Ionizer icon
23. Scheduler icon
24. Child lock icon
25. Light sensor
NOTE: Your specific model may not have all the components and features listed within this USER MANUAL.
Please check the product packaging OR the product specification page on our website for exact details of your
model. AEG reserves the right to change information contained herein without notice.

www.aeg.com 5
1
2
6
8
7
3
4
5
9
10
11

www.aeg.com6
12
14
13
15
16 17
Refer to pages 7-10 for further details about the description of the images.
To enjoy peace of mind register your appliance today at www.aeg.com.
Stay updated on better living services, safety notices and shop for accessories that match your appliance.
Features might be added or updated with new app releases.

www.aeg.com 7
UNBOXING & SETUP
Please be careful while unboxing the air purifier. The unit has several detachable components
which may have come loose in transport, so open the box with care and while placed on a large
flat surface on the floor.
1. Remove the front panel by gently pulling it away from the unit with both hands.
2. Take out the mesh pre-filter, ultrafine particle filter and VOC odor filter and remove all plastic
packaging. Discard as per safety and local recycling instructions.
3. Place the filters back into the unit in the same order as originally found (i.e. VOC odor filter goes
in first).
4. Attach the mesh pre-filter and the front panel back to the unit. (refer to image 1&2).
5. Plug the unit’s power cord to the nearest power socket so that the ON/OFF button on the
product control panel gets illuminated.
6. For best results, operate the unit in an enclosed area with doors & windows closed when
feasible.
CONTROL PANEL STATES
7. STANDBY STATE: Once plugged, the unit is on standby state, the indicators on the control panel
are dimmed except POWER button (30%) and Wifi icon (will only blink if activatingonboarding).
8. DAY & NIGHT: The unit is equipped with a light sensor, which measures the light conditions in
the room. The sensor will dim the light intensity of the display and limit the fan speed to fan
speed 2 when using the product in a dark room to give a non-disturb user experience during
night time.
9. INACTIVE STATE: If user does not interact with the control panel for over 15 seconds, the control
panel will enter inactive state where the active buttons and indicators are dimmed to 30%, and
the rest of the display panel will be fully dimmed.
USING YOUR PRODUCT
TURNING ON
10. Press the ON/OFF button to turn ON the air purifier, the unit will run in default setting (SMART
mode and the louvres pointing forward) when used the unit the first time. Next time you start
the unit it will resume the last settings you had before turning OFF the product.
NOTE: When turning ON the air purifier, it will take about 10 seconds for the sensors to calibrate
and analyze the air quality. During this time, the air quality indicator will pulsate slowly in white.
CHANGING MODES & FAN SPEEDS & SWING & HUMIDITY
11. Press the MODE button once to toggle between the two modes: SMART and MANUAL
SMART: This is the default mode the unit will start in. In the SMART mode the unit will utilize
the sensor data as input to decide on the appropriate fan speed and humidification level for
a comfortable air environment ,depending on the temperature in the room. The fan speed
or humidification level, can not be adjusted by the user under this mode. Please see the AIR
QUALITY INDICATOR section for more details.
MANUAL: In the MANUAL mode the unit will utilize the sensor data as input only to show the
air quality level via the air quality indicator but will not self-adjust the fan speed. This mode is
best utilized for a quick burst of cleaning, especially when the user anticipates an increase in
particulate matter in the room due to household chores (e.g. vacuuming).
12. FAN SPEED: While in MANUAL mode, Press the FAN button to adjust the fan speed – the air
purifier has 5 levels fan speed, the fan speed indicator will show the fan speed.
NOTE: The unit will ramp up OR down to chosen speed setting gradually.

www.aeg.com8
13. QUIET Mode: This function can be used in SMART mode to limit the fan speed in daytime, to
avoid disturbances if the PM values are increased. You can activate the QUIET mode via the AEG
App. The display on the product will dim to show that the QUIET Mode has been activated. The
air quality indicator will still function as normal in the QUIET Mode.
You can also activate the QUIET mode on the product display panel by pressing the MODE
button for 3 seconds. To exit the QUIET Mode, just press either the MODE or FAN SPEED button.
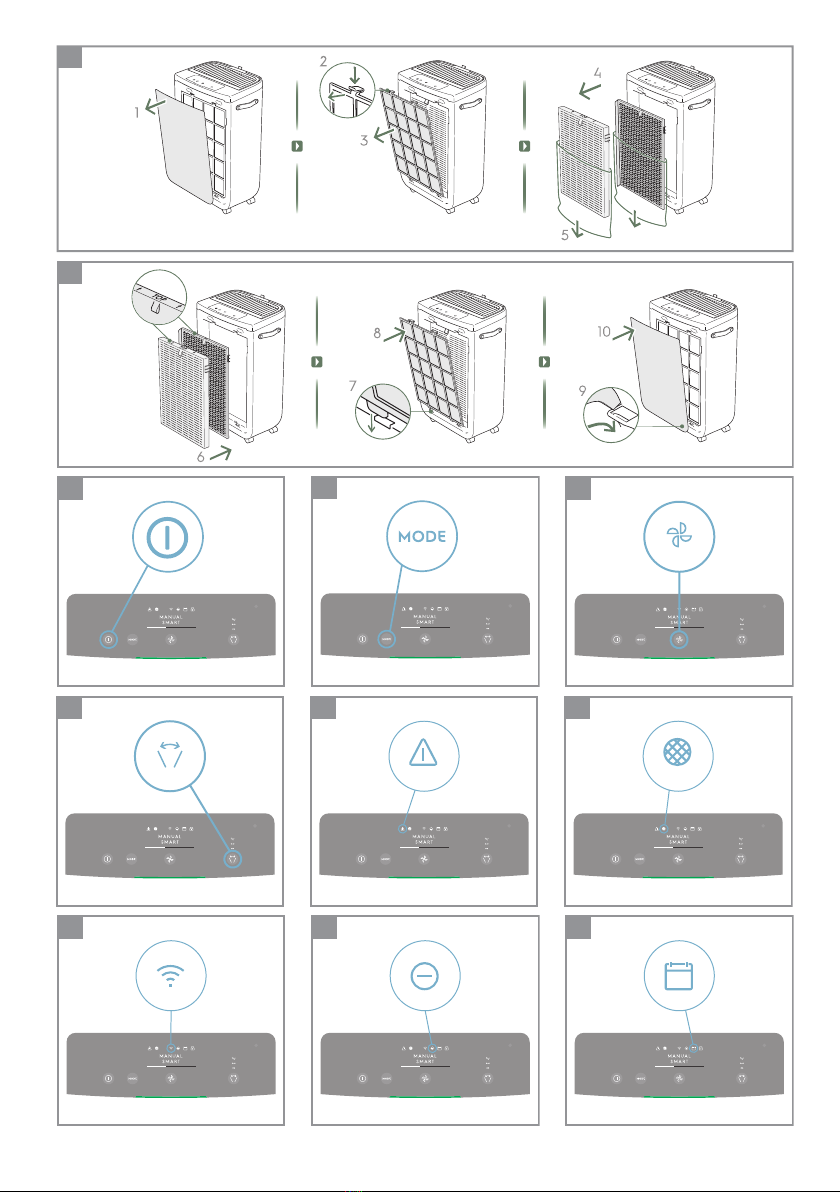
14. SWING: Press SWING button can active Swing feature to get your desired air flow direction.
There have below 3 options:
"" Narrow (Move the fins/louvres in the grill in aconsistent way in a narrow angle range).
" " Wide (Move the fins/louvres in the grill in aconsistent way in a wide angle range).
" " Natural Breeze (Move the fins/louvers in the grill in arandom way back and forth with a
wideangle range).
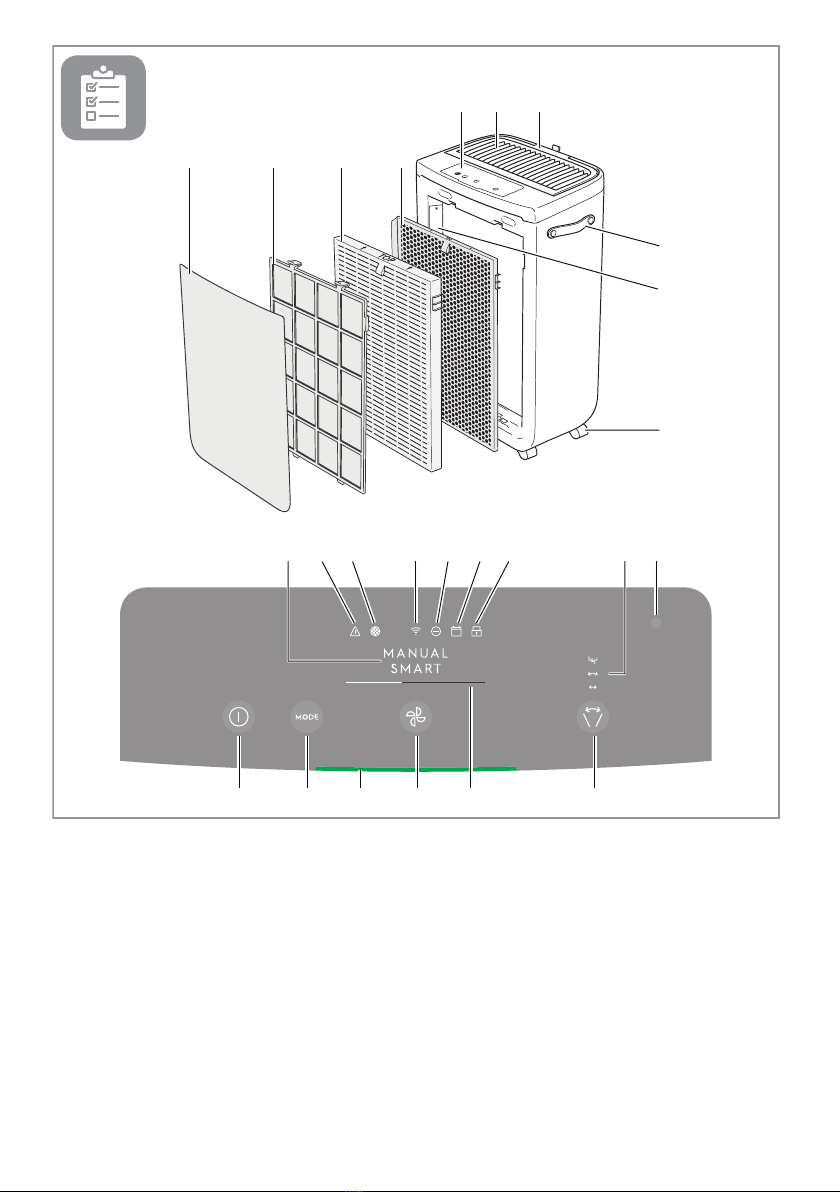
FEATURE ICONS AND INDICATORS
NOTE: Not all indicators OR feature icons might be available on your model. Please consult
packaging information or the product specifications on the website for details on available
features.
15. ALERT: The alert icon will light up to alert you of a possible electrical or electronic error with
your unit. Please refer to the AEG App for details on the error type, component details and any
mitigating actions. More details can also be found in the ERRORS & TROUBLESHOOTING section
below.
16. FILTER CHANGE: The high efficiency filter(s) in the unit cannot be washed, they can only be
replaced. The filter change icon will light up to remind you to change your filter(s). Your air
purifier may equip with more than one filter, so please refer to the AEG App for details on which
filter layer is to be replaced. Always ensure the plastic protective bag is removed before its use
in the unit. After the used filter is replaced, the filter change icon will turn off automatically and
no reset action is needed.
17. WiFi: The unit is equipped with a WiFi module, which enables remote control and access to
many more features including time-based tracking of your indoor air quality data. When the
unit is connected to the home WiFi, this icon will light up. If the icon is blinking, it indicates a
temporary loss of WiFi connectivity – please refer to the AEG App for more details.
NOTE: Download our AEG App and follow the step-step onboarding instructions to bring the
air purifier online.
18. IONIZER: The unit is equipped with an ionizer module, which will enabled generates negative
ions to further improve air purification process. The ionizer is OFF by default, press and hold
MODE & FAN button simultaneously for 3 seconds to activate the ionizer feature. When the
ionizer feature is activated, the ionizer icon will light up. You can also activate the Ionizer via
the App. For more details on how an ionizer helps reduce airborne particles, please refer to the
product information page on the website.
19. SCHEDULER: show a scheduled event from the app is running.
20. CHILD LOCK: The unit is equipped with a safety lock feature to disable the product control
panel to avoid unintended pressing. Press and hold MODE & POWER button simultaneously for
5 seconds to activate the child lock feature. The child lock icon will light up when the feature
is activated. When the control panel is locked, you can only make changes via App.
21. AIR QUALITY INDICATOR: The unit is equipped with an air quality sensor. The laser-based
particulate matter (PM) sensor is a high precision particle sensor that can detect PM1, PM2.5
and PM10 levels. The air quality indicator will visually – with the aid of a color scale - show the
real-time air quality as per table below. When in SMART mode, the air quality level will also
determine the fan speed as per table below.

www.aeg.com 9
LIGHT'S COLOR
Green
Yellow
Orange
Red
PM 2.5 (μg/m3) AIR QUALITY
0-12 Very Good
13-35 Good
36-55 Poor
56-150 Very Poor
NOTE: Please ensure regular cleaning of the sensor window to ensure it does not get clogged
with dust and sensors keep performing accurately. Also ensure optimal humidity levels
(between 35-80%) for accurate reading from the sensors.
HOOD ADJUSTMENT
22. HOOD: The unit is equipped with a hood to give a comfortable air environment. Adjust the air
outlet direction by pulling up the hood manually. The hood can be adjusted in desired angle
between 6˚ - 90˚.
ONBOARDING
NOTE: Some steps in the onboarding flow may have changed, please follow step by step
instructions in the latest version of the App as reference in case of discrepancy. Please ensure
home WiFi is running on 2.4 GHz band, as the 5Ghz band will not be recognized by the air purifier.
23. Please find the AEG App in the iOS App or Google Play store, download it, sign up and login
to the App. Here you will be able to‘add an appliance’in the App and follow the step by step
instructions for onboarding the unit – steps below are indicative.
CLEANING & CARING
NOTE: Always unplug the air purifier before cleaning to prevent shock or fire hazards. Never use
abrasive, harsh detergents OR wax for cleaning the unit. The high efficiency filters cannot be
washed, they must always be replaced when at the end of life.
24. Ensure the sensor window is kept unclogged for optimal performance of the unit. It is natural
for dust to accumulate in this area, hence ensure regular (e.g. once per 4 weeks) vacuuming of
the sensor window with a vacuum cleaner that has a narrow nozzle/brush.
25. The plastic parts of the unit should be cleaned with an oil-free dry cloth. For stains on plastic
parts, use a slightly damp soft microfiber cloth to gently rub against the stain.
26. The fabric attached to the front panel should be wiped with an oil-free dry cloth or by using
a vacuum cleaner with a soft brush. The area around the air inlet on the front of the unit may
accumulate more dust than some other parts and hence may require more frequent cleaning
to ensure optimal performance. The mesh filter should occasionally be wiped off or cleaned
with a vacuum cleaner to avoid loss of performance.
STORAGE
27. When storing the air purifier, besides unplugging the unit, clean the mesh filter, and ensure
that unit, including the fabric front panel, are covered to avoid accumulation of dust.
For the Humidification model make sure to also empty the filter drawer, remove the
humidification filter and let it dry, and empty the water tank before storing the product, to
avoid mold buildup inside the product, which could lead to undesired smells.
Purple
Maroon
151-250
>250
Bad
Very Bad

www.aeg.com10
REPLACING FILTERS
REPLACE HEPA FILTERS
NOTE: The filters – except for the mesh pre-filter and humidification filter - cannot be washed and
must always be replaced when at end of life. The air purifier have a variety of filters to choose from,
tailored to your lifestyle needs. Head over to the AEG App or the product information page on our
website for a guide on choosing the appropriate filter for your needs. Please visit your local AEG
website to order your replacement filter.
28. For the best experience and to secure an uninterrupted use of the air purifier, please monitor
the filter’s remaining lifetime in the AEG App and order a replacement filter in due time before
the remaining filter lifetime reaches 0%. If you have notifications enabled, the AEG App will
inform you when the filter life is close to end of life (e.g. at 5%).
29. When one or more of the filters is at end of life, the filter change icon will light up on the
product control panel to indicate the need for replacement. Please head over to the AEG App
to correctly identify which filter is at end of life and needs replacement. When filter is at end of
life, the unit’s fan speed may be reduced in SMART mode.
30. The used filter might be heavily coated with dust and particulate matter so before opening the
front panel, please ensure a disposable bag or packaging is at hand to place the used filter in.
31. Turn OFF the air purifier or unplug the unit before changing the filters, to ensure that the filter
change icon will be turned OFF. Remove the front panel and the mesh pre-filter and put them
aside. Next remove the filter which is at end of life and place it in the disposable bag at hand.
32. Next, please remove the plastic packaging from the replacement filter and insert the filter in
the appropriate place. Please ensure the VOC odor filter goes in first inside the unit, followed
by the ultrafine particle filter. Reinsert the mesh pre-filter, close the front panel and turn ON the
unit. The filter change icon on the product control panel will no longer be lit and the AEG App
will indicate the same, with a new filter lifetime reading.
NOTE: In case the change is only reflected on the product control panel and not the AEG App,
please restart the App and the unit, before further troubleshooting.
33. Discard the used filter as well as any plastic packaging according to local recycling guidelines.

www.aeg.com 11
TROUBLESHOOTING
ISSUE# NOTES
The air
purifier’s
alert icon is lit.
The air purifier
is running at
max fan speed
all the time
for extended
periods
1
2
If you have just bought the unit OR inserted
new filter(s), please ensure that the filter(s) are
positioned in the correct way for the RFID tags to
be read by the sensor.
Generally, the unit comes with a variety of
sophisticated sensors, electronics and other
electrical components and if one of these is
malfunctioning, you will see the alert icon on the
product control panel light up. For more details on
steps to resolve, please head over to the AEG App
and check for details whenever you see this icon lit.
If in MANUAL mode, please check the fan speed
slider on the product control panel or within AEG
App and adjust it to desired level.
If in SMART mode, please check air quality indicator
on the product control panel or within AEG App
– if all PM values are constantly showing 999-
1000 without any reduction then most likely the
sensor is clogged. Please use a vacuum cleaner to
clean the sensor via the sensor window – detailed
instructions in CLEANING, CARING & STORAGE
section above.
Please have at hand the
unit’s PNC and SERIAL
number if you need to
contact Electrlux service
organisation for support.
The PM sensor in the
unit is highly accurate
and sensitive and it is
normal for the purier to
react to poor air quality
by ramping up the fan
speed – to get your
indoor air quality back
to safe levels.
TROUBLESHOOTING
When fault indicators show that the system is not operating properly, perform the following check.
The table below is only a limited list. For the latest and complete section on troubleshooting, FAQ and
error guide please refer to the corresponding section on our website or the AEG App.
The air purifier
is running at
lowest fan
speed all
the time for
extended
periods
3If in MANUAL mode, please check the fan speed
on the product control panel display or within AEG
App and adjust it to desired level.
If in SMART mode, please check air quality indicator
on the product control panel or within AEG App –
if all PM values are constantly reading very good
without any increase then this is normal behavior
for the unit - your air quality is very good! If the
PM2.5 value is high and the unit is still operating at
lowest fan speed, then please check filter change
icon on the product control panel or within AEG
App and if lit please replace used filter with a new
one, this should resolve the specific fan speed issue.
If neither of the above steps OR instructions in the
AEG App help, please refer to item 9 in the table.
The unit is designed
so that when a filter
is at end of life, it will
discourage usage till
the filter is replaced, by
limiting the fan speed
so as not to reintroduce
the captured particulate
matter back into the air.

www.aeg.com12
The air purifier
produces
a loud or
abnormal
noise
The air purifier
or fan does not
operate
The air
purifier is
running but
the air quality
does not
improve
4
5
6
Please ensure that the plastic bags around the
lters has been removed, ensure the air inlet
(around the front panel) and air outlet grill (top
of the unit) are unobstructed and that there is a
clearance of at least 30 cm between the unit and
the nearest surface.
If neither of the above steps OR instructions in the
AEG App help, please refer to item 12 in the table.
Ensure that the unit is receiving power. If needed,
try pushing the power plug rmly into the wall
socket to check if this resolves the issue. Check that
the fuse of your home has not blown or that the
circuit breaker has been tripped. Replace fuse or
reset circuit breaker if needed.
If neither of the above steps OR instructions in the
AEG App help, please refer to item 12 in the table.
If in SMART mode, closely monitor the difference
in air quality levels within the AEG App for next 20
minutes – if you do not see any improvement of the
air quality values in the AEG App during this period
then follow the step below.
Change to MANUAL mode and adjust the fan speed
to a higher level to see if this helps resolve the issue.
If you still do not see any improvement.
Close any open doors OR windows to the outside
of the room and rerun the unit at the highest fan
speed for 20 minutes. If this resolves the issue, we
recommend that you operate the unit in this sealed
environment as much as possible, till the air quality
is also at a good level.
If there is an abnormal
noise in your product,
even after checking
the steps in the
trouble shoot guide,
please contact an AEG
authorized service
center for further
support.
If the unit is placed in
a room larger than the
recommended size, it
will take longer for the
air quality to improve –
please be patient and
maintain the unit at the
highest feasible speed.
The air purifier
produces or
emits a strange
smell
7The rst time you run the unit, you may perceive a
plastic, glue or paint smell – especially near the air
outlet grill – this is unavoidable in some cases (like
the‘new car smell’) but should disappear quickly.
If you perceive a burning smell, please disconnect
the unit and contact AEG authorized service center
for further support.
The VOC lter is in the end of life. Please change to
a new VOC lter.
Always ensure that the
filters are covered in
appropriate packaging
while stored away
between uses, and that
all parts are dry to avoid
smell or mould build up.
ISSUE# NOTESTROUBLESHOOTING

www.aeg.com 13
I am unable to
connect the
Air purifier to
the App
I have another
issue not listed
here OR none
of the above
steps have
helped resolve
the issue
9
10
If you are unable to onboard the unit and connect
it to the AEG App after a couple of attempts
following the steps in the AEG App and FAQ, then
please contact an AEG authorized service center for
support.
You can search for more troubleshooting and FAQ
guides on our website OR the AEG App under the
product information pages, or directly contact AEG
authorized service center for support. Thank you!
The WiFi chip in the unit
operates only at 2.4Ghz
so please ensure your
home WiFi is operating
at this bandwidth.
Please have the
unit’s PNC and serial
number available when
contacting the AEG
service. This information
can be found on the
rating label which is
located on the main unit
behind the front cover.
The filter icon is
lit, even though
I recently
changed the
filters
8Turn OFF the unit with the ON OFF button, or
unplug and re-plug the unit, to see if the icon
disappears.
It is important to turn
OFF the unit before
changing the filter,
in order to reset the
product.
ISSUE# NOTESTROUBLESHOOTING

www.aeg.com14
НАРЪЧНИК ЗА ЕКСПЛОАТАЦИЯ
Благодарим ви, че избрахте пречиствател за въздух AEG. Винаги
използвайте оригиналните консумативи, аксесоари и резервни
части на AEG, за да постигнете най-добрите резултати. Този уред е
разработен вземайки предвид околната среда и следователно всички
пластмасови части са маркирани за целите на рециклиране.
ОБЩА ИНФОРМАЦИЯ ЗА БЕЗОПАСНОСТ
Настоящият наръчник за експлоатация предоставя конкретни
инструкции за работа с Вашият модел от серия OR. Използвайте
уреда единствено в съответствие с инструкциите в този наръчник.
Настоящите инструкции нямат за цел да покриват всяко възможно
състояние и ситуация, които биха могли да възникнат. Трябва да
се използват разум и внимания при монтирането, оперирането и
поддръжката на уреда.
ПРЕДУПРЕЖДЕНИЕ! - БЕЗОПАСНОСТ НА ДЕЦА И УЯЗВИМИ ЛИЦА
Риск от задушаване, нараняване или трайни увреждания. Дръжте
всички опаковки далеч от деца.
Този уред може да бъде използван от деца на възраст над 8 години,
както и от лица с намалени физически, сензорни или ментални
възможности или липса на опит и познания, ако са под надзор или
бъдат инструктирани относно използването на уреда по безопасен
начин и разбират съответните опасности.
Почистването и поддръжката от потребителя не трябва да се
извършват от деца без надзор. Децата не трябва да играят с уреда.
Деца под 3 годишна възраст не трябва да доближават уреда, освен
ако не са под постоянен надзор.
ВНИМАНИЕ! – ИЗБЯГВАЙТЕ НАРАНЯВАНИЯ ИЛИ ПОВРЕДИ ПО
УРЕДА ИЛИ СОБСТВЕНОСТ
Не насочвайте въздушният поток към камини или други източници на
топлина, тъй като това може да доведе то запалвания.
Не се катерете или поставяйте обекти върху уреда. Не закачайте
обекти на уреда.
Не поставяйте контейнери с течности върху уреда.
Изключете уреда от захранването когато няма да го използвате за
продължителен период.
Не блокирайте или покривайте решетката за входящ въздух, мястото
на вентилатора и решетката за изходящ въздух.
Уверете се, че всички електрически/електронни уреди са на поне
30 см от уреда.

www.aeg.com 15
ИНФОРМАЦИЯ ЗА РАДИОТО
WiFi работна честота и максимална изходна мощност: 2,4 GHz; 15dBm
RFID работна честота и максимална изходна мощност: 13.56 MHz;
30dBm ± 10% Консумацията на електричество на продукта в мрежата
на режим в готовност е по-малко от 2.0W
ИНФОРМАЦИЯ ЗА ЕЛЕКТРИЧЕСКИТЕ ЧАСТИ
ПРЕДУПРЕЖДЕНИЕ! Избягвайте опасност от пожар или токов удар.
Този уред може да се използва при захранване от 50Hz или 60Hz без промяна. Не използвайте
разклонител или адаптор за контакт.
Не отстранявайте зъбци от захранващият кабел. Не продупчвайте, огъвайте или завързвайте
захранващият кабел.
Не режете или увреждайте захранващият кабел. Ако доставеният захранващ кабел е срязан
или повреден, той трябва да бъде сменен само от AEG, негов сервизен агент или лица с
подобна квалификация. Този уред не съдържа части, които да могат да бъдат заменени от
потребителя. За поправки винаги се обаждайте на оторизиран сервиз на AEG.
Ако не сте сигурни дали контактът е подходящо заземен или защитен с предпазител с
отложено време или прекъсвач, накарайте квалифициран електротехник да монтира
подходящия контакт в съответствие с Националния електрически кодекс ИЛИ приложимите
местни кодекси и наредби.
Не съхранявайте или използвайте бензин или други запалими пари и течности в близост до
този или който и да е друг уред. Прочетете продуктовите етикети за запалимост и другите
предупреждения.
Не позволявайте вода или какъвто и да е друг течен или запалим детергент да навлезе в
уреда, за да избегнете токов удар и/или опасност от пожар. Не забравяйте да изключите
уреда от контакта преди почистване.
Никога не изключвайте уреда чрез издърпване на контакта. Винаги хващайте добре контакта
и го издърпвайте от щепсела.
МЕРКИ ЗА БЕЗОПАСНОСТ
Не вкарвайте или поставяйте пръстите си или обекти в пространството за извеждане на
въздуха или в предната решетка на уреда.
Не стартирайте или спирайте уреда като изваждате захранващият му кабел от щепсела или
като изключите захранването на електрическата кутия.
В случай на повреда (искри, миризма на изгоряло и др.), незабавно спрете работа с уреда,
изключете захранващият кабел и се обадете в оторизиран сервиз на AEG.
Не работете с уреда когато сте с мокри ръце.
Не дърпайте захранващият кабел.
Не докосвайте острието на перката при отстраняване на филтъра.
ПРЕДИ ДА ЗАПОЧНЕТЕ
• Внимателно прочетете наръчника.
• Проверете дали всички описани части са включени.
• Обърнете специално внимание на мерките за безопасност!
Този символ на продукта или опаковката му посочва, че продуктът не може да бъде третиран като
битов отпадък. За да рециклирате продукта, моля отнесете го до официален пункт за събиране или
до сервизен център на AEG, който може да отстрани и рециклира батерията и електрическите части
по безопасен и професионален начин. Следвайте правилата в своята страна за разделно събиране
на електрически продукти.
ИЗХВЪРЛЯНЕ

www.aeg.com16
21 3 4
11 12 15 13 17 14
21 2522 23 24201916 18
5 6 7
8
10
9
1. Преден панел
2. Мрежест панел с
предфилтър
3. Филтър за ултрафини
частици
4. VOC филтър за миризми
5. Дисплей на
контролният панел
6. Прозоречни решетки
7. Капак
ОПИСАНИЕ НА ВАШИЯТ ВЪЗДУХОПРЕЧИСТВАТЕЛ
8. Дръжка
9. Сензорна кутия
10. Колела
11. Бутон за включване/
изключване
12. Бутон за РЕЖИМ
13. Скорост на
вентилатора
14. Завъртане на
решетките
15. Светлина за качеството
на въздуха
16. РЕЖИМЕН дисплей
17. Индикатор за
СКОРОСТ НА
ВЕНТИЛАТОРА
18. Индикатор за
завъртане
19. Икона за
предупредителен
сигнал
20. Икона за смяна на
филтъра
21. Икона за WiFi
22. Икона за йонизатора
23. Икона на програмата
за планиране
24. Икона за детско
заключване
25. Светлинен сензор
БЕЛЕЖКА: Вашият конкретен модел може да няма всички компоненти и функции, изброени в
този НАРЪЧНИК НА ПОТРЕБИТЕЛЯ. Моля, проверете опаковката на продукта ИЛИ страницата със
спецификации на продукта на нашия уебсайт за точните подробности за вашия модел. AEG си запазва
правото да променя съдържащата се тук информация без предизвестие.

www.aeg.com 17
1
2
6
8
7
3
4
5
9
10
11

www.aeg.com18
12
14
13
15
16 17
Вижте страници 19-22 за повече подробности относно описанието на изображенията.
За да сте спокойни, регистрирайте своя уред днес на www.aeg.com.
Бъдете в крак с по-добрите услуги за живот, бележки за безопасност и пазарувайте аксесоари, които
отговарят на вашия уред.
Различни характеристики могат да бъдат добавяни или обновявани с пусканията на нови приложения.

www.aeg.com 19
РАЗОПАКОВАНЕ И НАСТРОЙВАНЕ
Моля, внимавайте, докато разопаковате пречиствателя за въздух. Устройството има няколко
разглобяеми компонента, които може да са се разхлабили при транспортиране, така че
отворете кутията внимателно и докато е поставена върху голяма плоска повърхност на пода.
1. Отстранете предния панел, като внимателно го издърпате от устройството с две ръце.
2. Извадете мрежестия панел с предфилтър, филтъра за ултрафини частици и VOC филтъра
за миризми и отстранете всички пластмасови опаковки. Изхвърлете според инструкциите
за безопасност и местните инструкции за рециклиране.
3. Поставете филтрите обратно в уреда в същия ред, в който са били първоначално (т.е. VOC
филтъра за миризми влиза първи).
4. Прикрепете мрежестия панел с предфилтър и предния панел обратно към уреда. (вижте
изображение 1 и 2).
5. Включете захранващия кабел на уреда в най-близкия електрически контакт, така че
бутонът ВКЛ./ИЗКЛ. на контролния панел на продукта да светне.
6. За най-добри резултати работете с уреда в затворено помещение със затворени врати и
прозорци, когато е възможно.
СЪСТОЯНИЯ НА КОНТРОЛНИЯ ПАНЕЛ
7. СЪСТОЯНИЕ НА ГОТОВНОСТ: След като бъде включено, устройството е в състояние на
готовност, индикаторите на контролния панел са затъмнени, с изключение на бутона
POWER (ЗАХРАНВАНЕ) (30%) и иконата Wifi (ще мига само ако активиратевключването).
8. ДЕН И НОЩ: Устройството е оборудвано със светлинен сензор, който измерва
осветеността в помещението. Сензорът ще намали интензитета на светлината на дисплея
и ще ограничи скоростта на вентилатора до скорост на вентилатора 2, когато използвате
продукта в тъмна стая, за да осигури спокойствие на потребителя през нощта.
9. СЪСТОЯНИЕ НА НЕАКТИВНОСТ: Ако потребителят не използва контролния панел повече
от 15 секунди, той ще влезе в неактивно състояние, където активните бутони и индикатори
са затъмнени до 30%, а останалата част от панела на дисплея ще бъде напълно затъмнена.
ИЗПОЛЗВАНЕ НА ПРОДЪКТА ВИ
ВКЛЮЧВАНЕ
10. Натиснете бутона ВКЛ./ИЗКЛ., за да ВКЛЮЧИТЕ пречиствателя за въздух, а уредът ще
работи с настройки по подразбиране (режим SMART и решетките, насочени напред),
когато го използвате за първи път. Следващият път, когато стартирате уреда, той ще
възобнови последните настройки, които сте сложили преди изключване на продукта.
БЕЛЕЖКА: Когато включите пречиствателя на въздух, на сензорите ще са необходими
около 10 секунди, за да калибрират и анализират качеството на въздуха. През това време
индикаторът за качество на въздуха бавно ще пулсира в бяло.
ПРОМЯНА НА РЕЖИМИТЕ, СКОРОСТ НА ВЕНТИЛАТОРА, ЗАВЪРТАНЕ И ВЛАЖНОСТ
11. Натиснете веднъж бутона MODE (РЕЖИМ) , за да превключвате между двата режима:
SMART и РЪЧЕН
SMART: Това е режимът по подразбиране, в който уредът ще стартира. В режим
SMART уредът ще използва данните от сензора като входящи, за да вземе решение за
подходящата скорост на вентилатора и ниво на овлажняване за комфортна въздушна
среда, в зависимост от температурата в помещението. Скоростта на вентилатора или
нивото на овлажняване не могат да се регулират от потребителя в този режим. Моля,
вижте раздела ИНДИКАТОР ЗА КАЧЕСТВОТО НА ВЪЗДУХА за повече подробности.
РЪЧЕН: В РЪЧЕН режим уредът ще използва данните от сензора като входящи само за
показване на нивото на качеството на въздуха чрез индикатора за качество на въздуха,
но няма да регулира самостоятелно скоростта на вентилатора. Този режим се използва
най-добре за бързо почистване, особено когато потребителят очаква увеличаване на
праховите частици в стаята поради домакинска работа (напр. прахосмукачка).
12. СКОРОСТ НА ВЕНТИЛАТОРА: Докато сте в РЪЧЕН режим, натиснете бутона FAN (вентилатор),
за да регулирате скоростта на вентилатора – пречиствателя за въздух има 5 нива на
скорост на вентилатора, индикаторът за скорост на вентилатора ще покаже скоростта му.

www.aeg.com20
БЕЛЕЖКА: Устройството постепенно ще увеличава ИЛИ намалява до избраната настройка
на скоростта.
13. ТИХ режим: Тази функция може да се използва в режим SMART за ограничаване на
скоростта на вентилатора през деня, за да се избегнат смущения, ако стойностите на PM се
повишат. Можете да активирате режима QUIET (тих) чрез приложението AEG. Дисплеят на
продукта ще се затъмни, за да покаже, че режимът QUIET (тих) е активиран. Индикаторът
за качество на въздуха ще продължи да функционира нормално в QUIET (тих) режим.
Можете също така да активирате режима QUIET (тих) на панела на дисплея на продукта,
като натиснете бутона MODE (режим) за 3 секунди. За да излезете от QUIET (тих)режим,
просто натиснете бутона MODE (режим) или FAN SPEED (скорост на вентилатора).
14. ЗАВЪРТАНЕ: Натиснете бутона SWING (завъртане), за да активирате функцията Swing и за
да получите желаната посока на въздушния поток. По-долу има 3 опции:
“”Тесен (Преместете перките/решетките в скарата по последователен начин в тесен
ъглов диапазон).
“ ”Широк (Преместете перките/решетките в скарата по последователен начин в широк
ъглов диапазон).
“ ” Естествен бриз (Преместете перките/отворите в скарата по произволен начин напред
и назад с широк ъглов диапазон).
ИКОНИ НА ФУНКЦИИТЕ И ИНДИКАТОРИ
БЕЛЕЖКА: Не всички индикатори ИЛИ икони на функции може да са налични на вашия модел.
Моля, направете справка с информацията На опаковката или спецификациите на продукта на
уебсайта за подробности относно наличните функции.
15. СИГНАЛ: Сигналната икона ще светне, за да ви сигнализира за възможна електрическа
или електронна грешка в уреда Ви. Моля, направете справка с приложението AEG за
подробности относно типа на грешката, подробностите за компонента и всякакви
смекчаващи действия. Повече подробности можете да намерите и в раздела ГРЕШКИ и
ОТСТРАНЯВАНЕ НА НЕИЗПРАВНОСТИ по-долу.
16. СМЯНА НА ФИЛТЪРА: Високоефективните филтри в уреда не могат да се мият, те могат
само да се сменят. Индикаторът за смяна на филтъра ще светне, за да ви напомни да
смените филтъра(филтрите). Вашият пречиствател за въздух може да е снабден с повече
от един филтър, така че, моля, вижте приложението AEG за подробности кой филтърен
слой трябва да бъде заменен. Винаги се уверявайте, че пластмасовата защитна торбичка
е отстранена, преди да се използва в уреда. След като филтърът бъде сменен, иконата
за смяна на филтъра автоматично ще се изключи автоматично и не са нужни действия за
пренастройване.
17. WiFi: Уредът е оборудван с WiFi модул, който позволява дистанционно управление и
достъп до много повече функции, включително базирано на времето проследяване на
вашите данни за качеството на въздуха в затворени помещения. Когато уредът е свързан
към домашен WiFi, тази икона ще светне. Ако иконата мига това показва временна
загуба на WiFi връзка– моля вижте приложението AEG за повече информация.
БЕЛЕЖКА: Изтеглете нашето приложение AEG и следвайте инструкциите стъпка по стъпка
за свързване на пречиствателя за въздух към приложението.
18. ЙОНИЗАТОР: Устройството е оборудвано с йонизаторен модул, който ще активира
генерирането на отрицателни йони за допълнително подобряване на процеса по
пречистване на въздуха. Йонизаторът е ИЗКЛЮЧЕН по подразбиране, натиснете и
задръжте бутона MODE & FAN (РЕЖИМ и ВЕНТИЛАТОР) едновременно за 3 секунди, за
да активирате функцията на йонизатора. Когато функцията на йонизатора е активирана,
иконата на йонизатора ще светне. Можете да активирате йонизатора и чрез
приложението. За повече подробности как един йонизатор помага за намаляване на
частиците във въздуха, моля, вижте страницата с информация за продукта на уебсайта.
19. Програма за планиране: Показва, че се изпълнява планирано събитие от приложението.
20. ЗАКЛЮЧВАНЕ ЗА ДЕЦА: Устройството е оборудвано с функция за безопасно заключване
за деактивиране на контролния панел на продукта, за да се избегне нежелано натискане.
This manual suits for next models
1
Table of contents
Languages:
Other AEG Air Cleaner manuals
Popular Air Cleaner manuals by other brands

Soleus Air
Soleus Air KJ760F-A02 operating instructions

activTek
activTek DUCTWORX owner's manual

Westinghouse
Westinghouse WH100P Operation manual

Honeywell
Honeywell HAW501E Operation instructions

Aerservice Components
Aerservice Components RECAR227 Installation and use manual

HealthWay
HealthWay SuperV Series manual