AEG SHG 150 Instruction Manual


1
2
4
3
(Dim. in mt.)
Min 10 cm
Min 10 cm
Min
10 cm
90cm 50cm
Min
10 cm
2x
2x2x
2x
1x 5x 4x 2x
1x 5x 4x 2x1x 5x 4x 2x
1x 5x 4x 2x
3x
3x3x
3x

9
7
5
2x
2x2x
2x
4x
4x4x
4x

10
11
13
1
2
12

DEUTSCH
WÄRMEWELLENGERÄT
GEBRAUCHSANWEISUNG
Um Beschädigungen oder Gefahrensituationen zu vermeiden, lesen Sie diese Anweisungen vor dem ersten
Gebrauch des Produktes bitte aufmerksam. Jeder unsachgemäße, nicht in der vorliegenden Anleitung
beschriebene Gebrauch des Produktes, kann Brände, elektrische Gefahren oder Verletzungen verursachen
und macht jegliche Garantie ungültig.
Die Garantie gilt nicht für beliebige Mängel, Abnutzungen, Verletzungen, Verluste oder Beschädigungen, die auf den
unsachgemäßen Gebrauch des Produktes zurückzuführen sind. Die Garantie aller einschlägigen gesetzlichen
Rechte bleibt bestehen. Keine Garantiebestimmung kann die durch staatliche Gesetze reglementierten
Garantiebestimmungen, die aus keinem Grund ausgeschlossen oder geändert werden können, ausschließen oder
ändern.
Vor jedem Vorgang, die Verpackung sorgfältig entfernen und das Produkt auf Unversehrtheit überprüfen. Bei
Auftreten von Mängeln oder Beschädigungen das Gerät nicht installieren oder versuchen es zu reparieren, sondern
sich an den Händler wenden.
Die Verpackung von Kindern fernhalten. Verpackungsteile in Übereinstimmung mit den gültigen Bestimmungen
entsorgen.
1. Ihr Produkt
Außer dem von Ihnen erworbenen Gerät beinhaltet die Verpackung (Siehe Abbildung 1):
•2 Stk. selbstschneidende Schrauben 3.5x50 mm für die Wandbefestigung der oberen Halterung (B);
•1 Stk. selbstschneidende Schraube 3.5x30 mm für die Wandbefestigung des unteren Bügels (F);
•3 Stk. Kunststoffdübel 6.0x25 mm
•5 Stk. selbstschneidende Schrauben 3.0x12 mm für die Wandbefestigung der Abstandstücke (E) und
des Bügels (F) am Produkt;
•4 Stk. Feinstellschrauben M4x8 mm für die Befestigung des Bügels (D) am Produkt;
•2 Stk. Feinstellschrauben M6x5 mm für die Befestigung des Bügels (D) an der Basis (C);
•1 Stk. Wandhalterung (B);
•1 Stk. Sockelbasis (C);
•1 Stk. Sockelstange (D);
•4 Stk. Abstandstücke Kabelaufwicklung (E);
Falls eine Komponente fehlen sollte, wenden Sie sich bitte an Ihren Händler.
2. Zu Ihrer Sicherheit
Dieses Produkt ist für den Hausgebrauch bestimmt und nicht für
die Benutzung in Handels-/Industrieumgebungen oder in
Fahrzeugen, Booten oder Flugzeugen geeignet.
Dieses Gerät darf von Kindern ab dem Alter von 8 Jahren und
von Personen mit verminderten körperlichen, sensorischen oder
geistigen Fähigkeiten oder ohne ausreichende Erfahrungen und
Kenntnisse verwendet werden, wurden diese bezüglich der
sicheren Verwendung des Gerätes betreut oder angewiesen und
sind sie sich der Risiken bewusst. Kinder dürfen nicht mit dem

Gerät spielen. Die Reinigung und Wartung darf nicht
unbeaufsichtigt von Kindern vorgenommen werden.
Kinder unter dem Alter von 3 Jahren sollten von dem Gerät
ferngehalten werden, es sei denn, sie werden kontinuierlich
beaufsichtigt.
Kinder ab dem Alter von 3 und unter 8 Jahren dürfen das Gerät
nur ein- und ausschalten, wurde dieses in seiner vorgesehenen
Betriebsstellung platziert und installiert und wurden sie bezüglich
der sicheren Verwendung des Gerätes betreut oder angewiesen
und sind sich der Risiken bewusst. Kinder ab dem Alter von 3
und unter 8 Jahren dürfen das Gerät nicht anschließen,
regulieren und reinigen oder die Benutzerpflege durchführen.
ACHTUNG: Einige Teile dieses Produktes können sehr heiß
werden und Verbrennungen verursachen. Besondere
Aufmerksamkeit ist in Anwesenheit von Kindern und
schutzbedürftigen Personen erforderlich.
Überzeugen Sie sich, dass die Netzspannung den Angaben auf
dem Leistungsschild entspricht: 230 V~, 50 Hz.
Verlassen Sie Ihre Wohnung nie bei eingeschaltetem Gerät;
überzeugen Sie sich in diesem Fall immer, dass der Schalter in
der Stellung OFF (0) und der Thermostat auf die niedrigste
Stufe (*) eingestellt ist (*).
Gerät während des Betriebes in sicherer Position aufstellen:
-Abstände zu entflammbaren Gegenständen oder
Möbelstücken einhalten (siehe Abbildung 2);
-Falls das Gerät an der Wand angebracht wird, dürfen Sie es
nicht an Wänden aus Kunststoff- oder synthetischem Material
befestigen;
-Das Gerät niemals direkt unterhalb einer Steckdose
positionieren.
Lassen Sie nicht zu, dass Tiere oder Kinder das Gerät berühren
oder damit spielen. Achtung! Während des Betriebs kann das
Luftauslassgitter sehr heiß werden ( über 80 °C = 175 °F);
WICHTIG: Um Überhitzung zu vermeiden, das Gerät nie
abdecken. Niemals Gegenstände oder Decken auf das
eingeschaltete Gerät legen. Dies ist klar und deutlich auf dem
Gerät wiedergegeben oder auf dem folgenden Symbol
veranschaulicht:

Das Gerät nicht reinigen, wenn es eingeschaltet ist und es nicht
in Wasser tauchen.
Achtung: Um das Gerät als tragbares Gerät zu benutzen, muss
zunächst der Sockel montiert und am Gerät befestigt werden.
Das Produkt nicht ohne montierten Sockel auf den Fußboden
legen.
Das Netzanschlusskabel nicht um das Produkt wickeln oder auf
das Produkt legen, wenn es in Betrieb ist.
Das Produkt nicht in Räumen benutzen, die mit explosiven
Gasen oder Dämpfen gesättigt sind, die von Lösungsmitteln und
Lacken oder entflammbaren Substanzen erzeugt wurden.
Wenn ein beschädigtes Kabel auszutauschen ist, führen Sie
diesen Vorgang nicht selbst aus, sondern bringen das Gerät zu
einer autorisierten Reparaturstelle, weil dieser Vorgang, um
jegliche Beschädigungsgefahr zu vermeiden, von Fachpersonal
ausgeführt werden muss.
Bitte benutzen Sie dieses Heizgerät nicht in der unmittelbaren
Umgebung eines Bads, einer Dusche oder eines
Swimmingpools
Das Produkt muss so positioniert werden, dass die
Anschlussdose stets erreichbar ist.
Die Einstellknöpfe dürfen unter keinen Umständen für Personen
zugänglich sein, die sich in der Badewanne oder in der Dusche
aufhalten.
Die Anbringung muss fachgerecht und unter Einhaltung der in
Ihrem Land geltenden Vorschriften erfolgen.
Der Stromanschluss an das Netz muss außerdem die
Benutzung eines zweipoligen Schalters mit einem
Mindestöffnungsabstand zwischen den Kontakten vorsehen, der
die vollständige Abschaltung unter den Bedingungen von
Überspannungskategorie III ermöglicht.
ACHTUNG: Dieses Produkt nicht in kleinen Räumen benutzen,
wenn sich Personen darin aufhalten, die den Raum nicht allein,
bzw. unter Aufsicht einer dritten Person verlassen können.

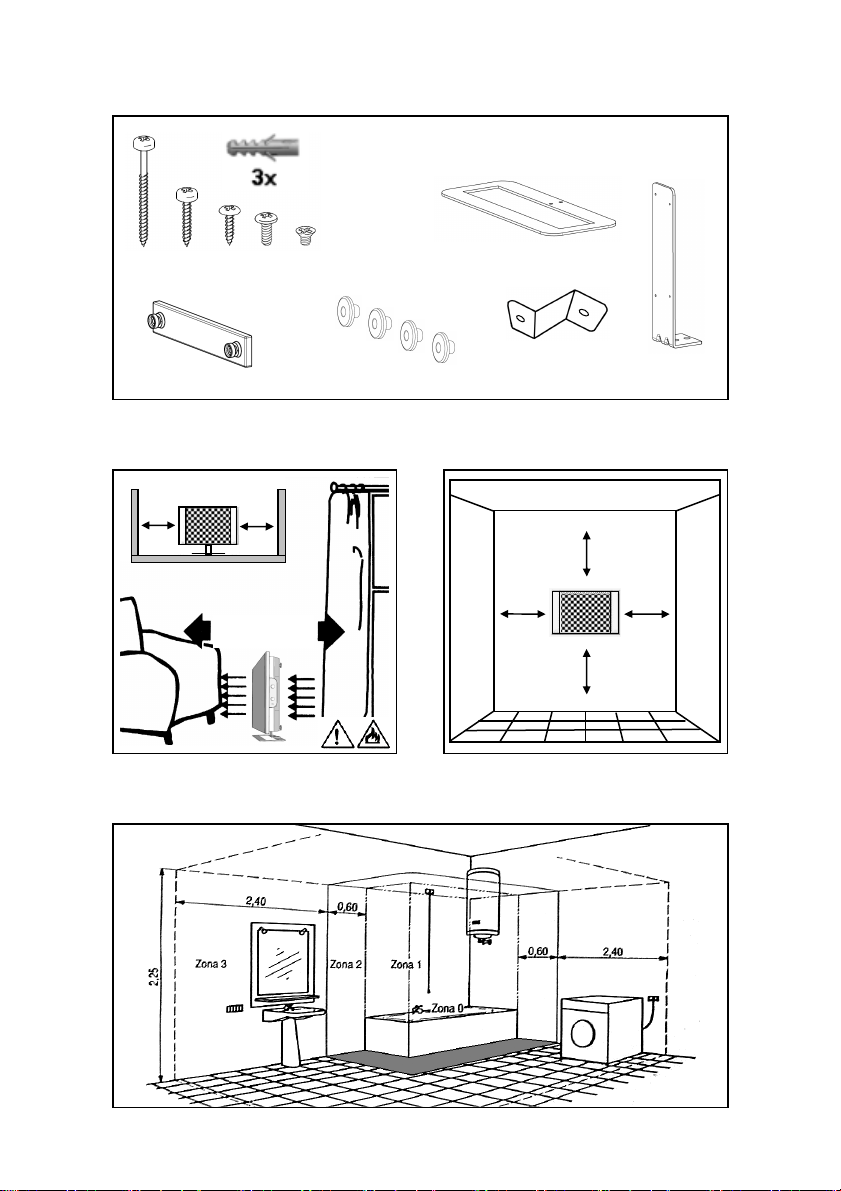
ACHTUNG: Dieses Produkt mit einem Mindestabstand von 1 m
zu Geweben/Vorhängen und/oder jeglichem entflammbaren
Material in Betrieb nehmen.
Wichtiger Warnhinweis
Bei der Erstinbetriebnahme des Heizgerätes oder bei Nutzung des Gerätes nach einem längeren Zeitraum, kann
möglicherweise nach dem Einschalten des Gerätes ein leichter Geruch entstehen.
Grund hierfür ist, dass sich auf die Oberfläche des Heizelementes entweder eine Staubschicht oder sonstige
Unreinheit gelegt hat, die sich dann bei Hitze auflöst. Der Geruch ist absolut ungefährlich für die Gesundheit und
verschwindet nach wenigen Minuten.
3. Sichere Positionierung
Das Gerät nur in waagerechter Lage benutzen.
Wenn Sie es als tragbares Gerät benutzen, immer die auf Abbildung 2 angegebenen Mindestabstände von
jedem entflammbaren Gegenstand einhalten.
Bei der Wandanbringung die auf Abbildung 3 veranschaulichten Mindestabstände von der Decke, vom
Fußboden und von den Seitenwänden einhalten.
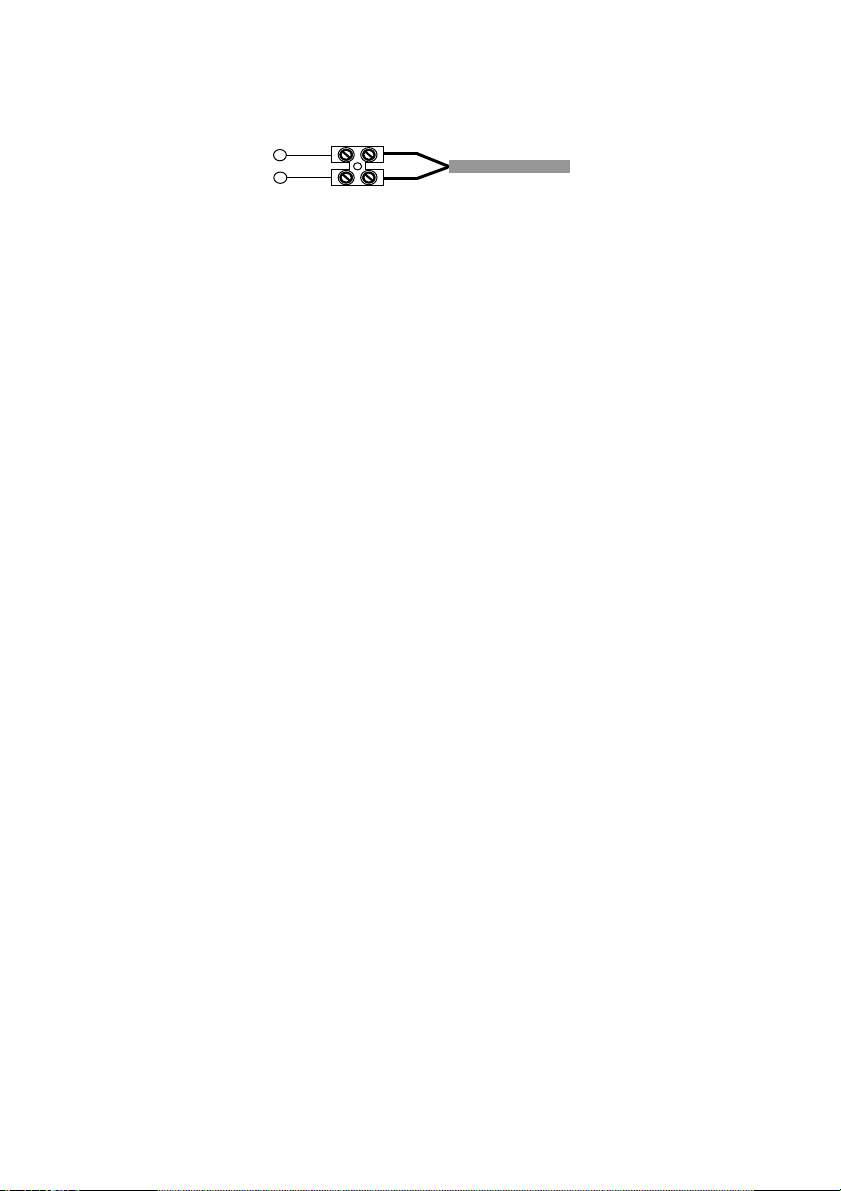
Das Gerät in Badezimmern niemals in den Bereichen 0 oder 1 (s. Abbildung 4) anbringen oder
benutzen.
Die Einstellknöpfe dürfen unter keinen Umständen für Personen zugänglich sein, die sich in der Badewanne
oder in der Dusche aufhalten.
Das Produkt muss ungehindert warme Luft ansaugen und ausstoßen können.
Für die Nutzung als tragbares Gerät:
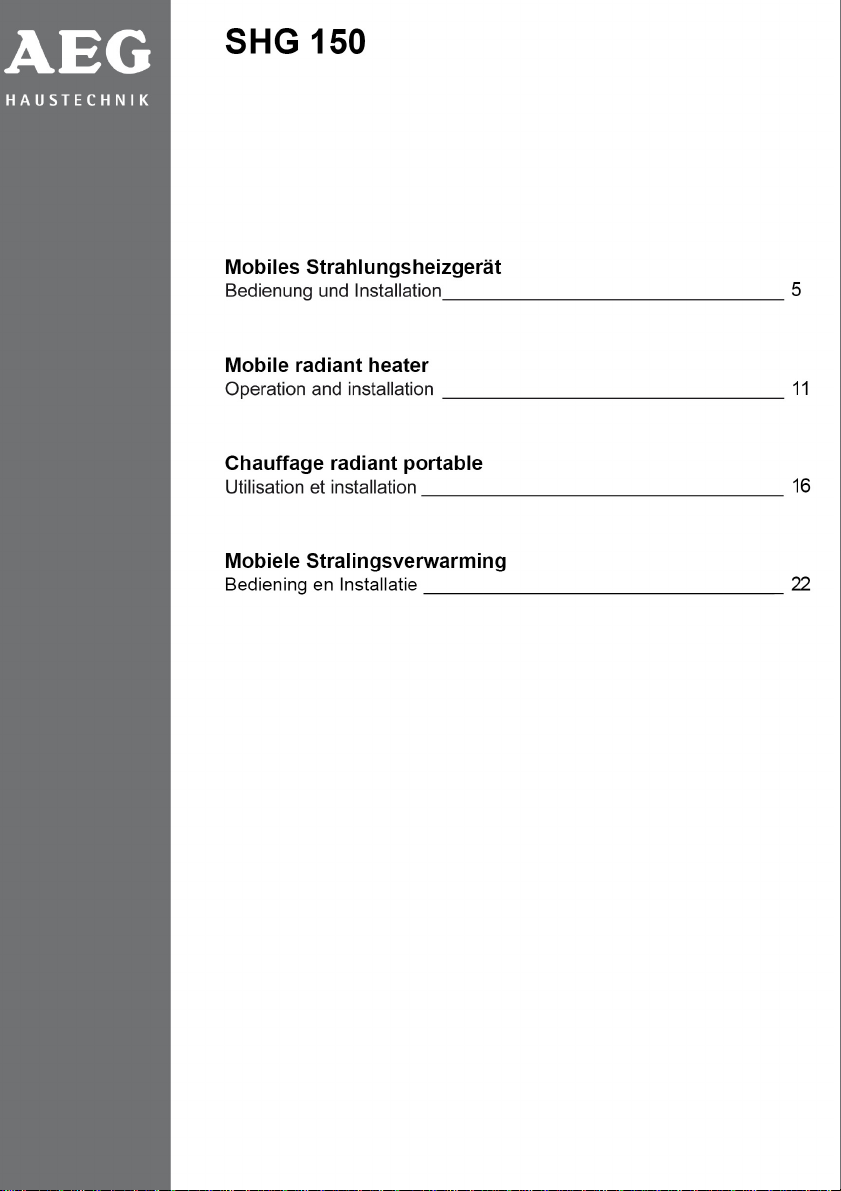
•Montieren Sie den Sockel, indem die Stange (Abbildung 1/D) mit den 2 im Lieferumfang enthaltenen
Senkschrauben (Abbildung 5) an die Basis (Abbildung 1/C) geschraubt wird;
•Führen Sie die Sockelstange in den dafür vorgesehenen rechteckigen Schlitz in der Mitte des unteren
Produktgitters (Abbildung 6) ein;
•Sockel am Produkt befestigen, indem die 4 im Lieferumfang enthaltenen Schrauben an den auf
Abbildung 7 gezeigten Punkten festgeschraubt werden.
Das Produkt ist zweifach elektrisch isoliert und bedarf keiner Erdung.
4. Wandbefestigung
Das Produkt darf nur ohne Sockel und bei Einhaltung der auf Abbildung 3 angegebenen Abstände an der
Wand angebracht werden.
Den unteren Haltebügel mithilfe der im Lieferumfang enthaltenen Schraube, wie auf Abbildung 8 gezeigt, am
Produkt festschrauben;
Wandhalterung befestigen, indem in einem Abstand von 150 mm 2 Bohrungen mit einem 6 mm-Bohrfutter an
der Wand ausgeführt werden. Die 2 Dübel einsetzen und die Wandhalterung wie auf Abbildung 9 gezeigt, mit
den 2 im Lieferumfang enthaltenen Schrauben befestigen.
Das Produkt an die Wandhalterung hängen, indem man es zunächst in Wandrichtung drückt und anschließend
nach unten gleiten lässt (Abbildung 10).
Mit einem Bleistift den Punkt anzeichnen, an dem die Bohrung für die Befestigung der unteren Halterung
ausgeführt werden soll, das Produkt abnehmen, mit einem 6 mm Bohrfutter eine Bohrung an der Wand
ausführen und den im Lieferumfang enthaltenen Dübel einsetzen (Abbildung 11);
Das Produkt wieder an die Kunststoffhalterung hängen und den unteren Bügel mit der dazu bestimmten
Schraube befestigen.
WICHTIG FÜR FRANKREICH:

Wenn das Produkt an der Wand angebracht wird, muss der elektrische Anschluss an das Versorgungsnetz
ausgeführt werden, indem der im Lieferumfang enthaltene Netzstecker abgeschnitten und eine dazu bestimmte
Klemme gemäß des nachfolgend veranschaulichten Plans benutzt wird:
In feuchten Räumen, in Badezimmern oder in Küchen muss die Anschlussklemme mindestens 25 cm vom
Fußboden entfernt angebracht werden.
5. Kabelaufwicklung
Wenn das Produkt nicht benutzt wird, kann das Kabel wie in Abbildung 12 veranschaulicht, aufgewickelt
werden.
Achten Sie darauf, dass das Kabel während der Benutzung des Produktes immer vollständig
abgewickelt ist.
6. Benutzung des Geräts
6.1 Mit Leistungsregler und Thermostat (Abbildung 13)
Dieses Modell hat 2 Drehknöpfe, einen zur Einstellung der Betriebsleistung und einen für den Thermostaten.
Mit dem Leistungsregler können 3 unterschiedliche Betriebsmodi des Produktes gewählt werden:
= AUS
= BETRIEB BEI 750W
= BETRIEB BEI 1500W
Drehen Sie den Thermostatknopf im Uhrzeigersinn, bis Sie ein “Klick” hören. Das Produkt setzt sich bei der
von Ihnen gewählten Leistung in Betrieb.
Der Thermostat behält die gewünschte Raumtemperatur bei, indem er das Gerät automatisch ein- und
abschaltet. Je weiter der Knopf im Uhrzeigersinn in eine Position mit einer höheren Ziffer gedreht wird, desto
höher ist die zugesicherte Temperatur. Der Höchststand des Thermostats entspricht circa 35 °C, der
Mindeststand (*) circa 5 °C.
ACHTUNG: Wenn der Leistungsschalter auf dem Höchststand (Pos. II) steht, darf er nicht weiter im
Uhrzeigersinn gedreht werden.
ACHTUNG: Wenn der Thermostatknopf auf dem Höchststand (Pos. MAX) steht, darf er nicht weiter im
Uhrzeigersinn gedreht werden.
Während des Produktbetriebs kann sich die Oberfläche des Heizelementes innerhalb des Produktes
leicht wellen. Diese Erscheinung ist normal und beeinträchtigt weder den einwandfreien Betrieb des
Gerätes noch seine Zuverlässigkeit.
Der Hersteller haftet nicht für Frostschäden, die auf eine unangemessene Isolierung der Umgebung oder eine
Heizleistung des Gerätes zurückzuführen sind, die nicht auf die Größe der zu beheizenden Umgebung
ausgelegt ist.
6.2 Benutzung des Thermostats
In einem Raum, in dem die Temperatur mehr als 35 °C beträgt, ist es normal, dass das Produkt nicht vom
Thermostat, auch wenn er sich auf dem Höchststand befindet, eingeschaltet wird.
Umgekehrt ist es in einem Raum, in dem die Temperatur zu niedrig ist (unter 5 °C), normal, dass das Ge rät
vom Thermostat, auch wenn er sich auf dem Mindeststand befindet, ständig eingeschaltet bleibt.
Für die bestmögliche Einstellung des Thermostats empfehlen wir wie folgt vorzugehen:
-
Stellen Sie den Thermostat auf den Höchststand und lassen Sie das Gerät bis zum Erreichen einer
angenehmen Temperatur eingeschaltet;
L
N
Netz
Phase = braun
Neutral = blau
Netzanschlusskabel

-
Drehen Sie den Thermostatknopf anschließend so lange gegen den Uhrzeigersinn, bis Sie ein “Klick” hören
und das Gerät sich abschaltet;
-
Drehen Sie den Thermostatknopf danach erneut (ganz wenig) im Uhrzeigersinn;
-
In dieser Stellung behält der Thermostat die von Ihnen zuvor gewählte Raumtemperatur bei.
Wenn das Gerät eingeschaltet ist und die Umgebung heizt, leuchtet die entsprechende Leuchtanzeige.
7. Sicherheit bei Störungen
Bei Überhitzung werden die Heizelemente vom Sicherheitssystem des Geräts automatisch deaktiviert und das
Gerät wird abgeschaltet.
In diesem Fall:
-
Drehen Sie den Thermostatknopf im Uhrzeigersinn, um zu überprüfen, dass der Thermostat das Gerät nicht
einfach abgeschaltet hat, weil eine hohe Raumtemperatur erreicht wurde;
-
Falls das Gerät den einwandfreien Betrieb nicht wieder aufnehmen sollte:
-
Gerät abschalten;
-
Eventuelle Überhitzungsursachen beseitigen (z. B. Hindernisse am Lufteintritts- oder am
Luftauslassgitter);
-
Produkt 15-20 Minuten abkühlen lassen;
-
Produkt wieder einschalten.
Wenn Betriebsstörungen des Heizlüfters, Beschädigungen des Heizelements oder der Hülle festgestellt werden,
das Produkt von der Stromversorgung trennen und den Händler oder die entsprechende Kundendienststelle
benachrichtigen.
8. Wartung
Dieses Gerät bedarf keiner besonderen Wartung.
Wir empfehlen, alle sechs Monate mithilfe eines Staubsaugers den Staub zu entfernen, der sich am
Widerstand sammeln kann.
Bei Bedarf wenden Sie sich bitte ausschließlich an eine autorisierte Kundendienststelle.
Sollte der Austausch des Netzanschlusskabels notwendig sein, weisen wir Sie darauf hin, dass ein Kabel HAR
mod. 2x1 mm
2
H05RR-F oder H05RN-F erforderlich ist.
Entsorgung von Altgeräten in Deutschland
Geräte mit dieser Kennzeichnung gehören
nicht
in die Restmülltonne und sind getrennt zu sammeln und
zu entsorgen.
Die Hersteller sorgen im Rahmen der Produktverantwortung für eine umweltgerechte Behandlung und
Verwertung der Altgeräte.
Im Rahmen des Elektro- und Elektronikgerätegesetzes (ElektroG) und zum Schutz unserer Umwelt ist
eine
kostenlose Rückgabe bei Ihrer kommunalen Sammelstelle
möglich.

ENGLISH
RADIATOR PANEL
INSTRUCTIONS FOR USE
Please read these instructions carefully before using the product in order to avoid damage or any dangerous
situations arising. Any use of the product other than that indicated in this manual may cause fire, electrical
danger, or injury and will make the warranty null and void.
The warranty does not cover any defect, deterioration, loss, injury, or damage that is due to incorrect use of the
product. All legal rights in this regard are guaranteed. No warranty condition can exclude or change the warranty
conditions regulated by State laws that may not be excluded or modified for any reason.
Before doing anything else, remove the packaging carefully and check the integrity of the product. Should any
defects or damage be found, do not install or attempt to repair the equipment, but contact the dealer.
Do not leave the packaging within reach of children and dispose of the parts in compliance with current provisions.
1. Your product
Along with the equipment you have bought, the pack also contains (see figure 1):
- N°1 bag containing:
N°2 self-tapping 3,5 x 50 mm screws for fixing th e upper support (B) to the wall.
N°1 self-tapping 3,5 x 30 mm screw for fixing the lower support (F) to the wall.
N°3 plastic 6,0 x 25 mm plastic anchor plugs.
N°5 self-tapping 3,0 x 12 mm screw for fixing the spacers (E) and bracket (F) to the product.
N°4 metric M4 x 8 mm bolts for fixing the bracket (D) to the product.
N°2 metric M6 x 5 mm bolts for fixing the bracket (D) to the base (C).
- N°1 wall support (B)
- N°1 pedestal base (C)
- N°1 pedestal rod (D)
- N°4 cable winder spacers (E).
Should any part be missing, contact your dealer.
2. For your safety
This appliance is intended for normal household use and not for
use in commercial/industrial environment, in vehicles or on board
ships or aircrafts.
This appliance can be used by children aged from 8 years and
above and persons with reduced physical, sensory or mental
capabilities or lack of experience and knowledge if they have
been given supervision or instruction concerning use of the
appliance in a safe way and understand the hazards involved.
Children shall not play with the appliance. Cleaning and user
maintenance shall not be made by children without supervision.
Children of less than 3 years should be kept away unless
continuously supervised.
Children aged from 3 years and less than 8 years shall only
switch on/off the appliance provided that it has been placed or
installed in its intended normal operating position and they have

been given supervision or instruction concerning use of the
appliance in a safe way and understand the hazards involved.
Children aged from 3 years and less than 8 years shall not plug
in, regulate and clean the appliance or perform user
maintenance.
CAUTION: Some parts of this product can become very hot
and cause burns. Particular attention has to be given where
children and vulnerable people are present.
Make sure the power supply corresponds to the details shown
on the nameplate: 230V~, 50Hz.
Never leave your home with the product still running. If you do
go out make sure that the switch is always in the OFF (0)
position and that the thermostat is in the minimum position (*).
When working, put the product in a safe position:
-Respecting the distances from inflammable or mobile objects
indicated in figure 2.
-If fitted on the wall, do not fix it to walls made of plastic or
synthetic material.
-Never position it immediately below a power socket.
Do not allow animals or children to play with or touch the
product. Warning! When working the air outlet grille can get
very hot (more than 80°C = 175°F).
IMPORTANT: To prevent overheating, never cover the
product. Never put any object or blanket on the equipment
while it is working. This is clearly indicated on the equipment or
illustrated by the symbol:
Do not clean the product while it is working and do not immerse
it in water.
Warning! To use this unit as a portable product, first assemble
the pedestal and fix it to the product. Do not stand the product
on the floor without its pedestal.
Do not coil the power cable around or on the product while it is
working.
Do not use the product in rooms filled with explosive gases or
vapours generated by solvents and paints or that are
inflammable.

If the cable gets damaged and has to be changed, do not do this
yourself – take the equipment to an authorised repair centre
because the work must be done by specialist personnel to avoid
any risk of damage.
Do not use this heater close to showers, baths, water basins or
swimming pools.
The product must be positioned in such a way that the power
supply socket can always be reached.
It must never be possible for people in the bath tub or shower to
reach the adjustment knobs.
This heater must be correctly installed in compliance with the
regulations in force in the country of installation.
The electrical connection to the power supply must also be fitted
with a two-pole switch with a minimum gap between the contacts
that allows complete disconnection according to excess voltage
III category conditions.
WARNING: Do not use this heater in small rooms when they are
occupied by persons not capable of leaving the room on their own,
unless constant supervision is provided.
WARNING: Operate this heater at a distance of 1m from textile,
curtains and/or any flammable materials.
Important warning
If you have purchased a new product or if you have left your product without function for a long period, when
switching it on you may smell an odour.
This is due to the deposit of dust or impurities on the surface of the heating element. The smell is not dangerous for
health and it will disappear in a few minutes
3. Safe positioning
Only use the equipment in a horizontal position.
If used as a portable unit, always respect the minimum distances from any inflammable object indicated in
figure 2.
For wall mounting respect the minimum distances from the ceiling, floor, and side walls shown in figure 3.
In bathrooms never install or use the equipment within zones 0 or 1 shown in figure 4.
The regulating knobs must never be accessible to people in a bath or shower.
The product must be free to take air in and expel it.
For portable use:
•
Assemble the pedestal by screwing the rod (figure 1/D) to the base (figure 1/C) with the 2 countersunk
screws supplied (fig 5).
•
Insert the pedestal rod in the relevant rectangular slot that can be seen in the lower grille on the product
(figure 6).
•
Fix the pedestal to the product using the 4 screws supplied at the points indicated in figure 7.
This product has double electrical insulation and does not require an earth connection.

4. Wall mounting
The product can be wall mounted only if the pedestal is not fitted and respecting the distances shown in figure
3.
Screw the product to the lower support bracket as shown in figure 8 using the screws supplied.
Fix the wall bracket by making 2 holes in the wall 150 mm apart, using a 6 mm drill bit. Insert the 2 wall
anchors and fix the wall bracket using the 2 screws supplied as shown in figure 9.
Hook the product to the wall bracket first pushing it towards the wall and then making it click in downwards
(figure 10).
Use a pencil to mark the point at which to drill the hole for fixing the lower support, remove the product, drill the
hole in the wall using a 6 mm drill bit, and insert the wall anchor supplied (fig 11).
Hook the product to the plastic bracket again and fix the lower bracket using the relevant screws.
IMPORTANT FOR FRANCE:
If the product is to be wall mounted the electrical connection to the power supply must be done by cutting off
the plug supplied and using a suitable terminal as per the diagram shown below:
In wet spaces like bathrooms or kitchens, the connection terminal must be installed at least 25 cm above the
floor.
5. Cable winder
When the product is not in use the cable can be coiled as shown in figure 12.
Remember that when using the product the cable must be completely uncoiled.
6. Using the equipment
6.1 Model with power and thermostat selector (figure 13)
This model has 2 knobs, one for adjusting the operating power and one for the thermostat.
The power regulator can be used to select 3 different operating modes for the product:
= OFF
= 750 W OPERATION
= 1500 W OPERATION
Turn the thermostat knob clockwise until you hear a “click”. The product starts working at the power selected.
The thermostat maintains the ambient temperature required by switching the equipment on and off
automatically. The more the thermostat knob is turned clockwise to a position with a higher number, the higher
the temperature ensured. The maximum thermostat position corresponds to about 35°C, while the minimum (*)
is about 5°C.
WARNING! When the switch knob is at the maximum position (pos. II) do not turn it further clockwise.
WARNING! When the thermostat knob is at the maximum position (pos. MAX) do not turn it further clockwise.
When the product is working, slight undulations may occur on the surface of the heating element
inside the product. This is completely normal and does not affect correct functioning of the equipment
or its reliability over time.
For instructions on using the thermostat, see section 6.2.
6.2 Using the thermostat
In a room in which the temperature exceeds 35°C it is normal that, even when turned to maximum, the product
does not switch on.
On the contrary, in a room in which the temperature is too low (below 5°C) it is normal that, even when turned
to minimum, the thermostat will keep the equipment switched on all the time.
To make the best thermostat setting, we recommend the following:
-
Put the thermostat on maximum and allow the equipment to run until a comfortable temperature is reached.
L
N
Net
Phase = brown
Neutral = blue
Product cable

-
Then turn the thermostat knob anticlockwise until you hear a “click”, and the equipment switches off.
-
Then turn the thermostat knob clockwise again (only a little).
-
In this position the thermostat will maintain the ambient temperature you have chosen.
When the product is working and heating the space, the relevant signal LED switched on.
7. Safety in case of abnormal operation
If the product overheats the protection system will automatically deactivate the heating elements and switch off
the equipment.
If this happens:
-
Turn the thermostat knob clockwise to check that the thermostat has not simply switched off the equipment
because a high ambient temperature has been reached.
-
If the product does not start working normally again:
-
Switch off the equipment
-
Remove whatever is causing the overheating (e.g. obstructions at the air intake or air outlet grilles).
-
Allow the product to cool for 15 – 20 minutes.
-
Switch the product on again.
If you notice irregular operation, damage to the heating element or to the structure of the appliance, disconnect
the product from the mains power supply and contact your technical assistance center or dealer.
8. Maintenance
This product does not require specific maintenance.
Every six months we suggest removing any dust that has accumulated on the coil using a vacuum cleaner.
If you need any assistance, contact an authorised assistance centre.
If you have to change the power supply cable, remember that you have to use an HAR 2 x 1 mm
2
H05RR-F or
H05RN-F model cable.
Environment and recycling
Please help us to protect the environment by disposing of the packaging in accordance with the national
regulations for waste processing.
Recycling of obsolete appliances
Appliances with this label must not be disposed off with the general waste. They must be
collected separately and disposed off according to local regulations.

FRANÇAIS
PANNEAU RAYONNANT
MODE D’EMPLOI
Veuillez lire attentivement ce mode d’emploi avant d’utiliser l’appareil afin de ne pas l’endommager et de ne
créer aucune situation de danger. Tout usage de cet appareil autre que celui indiqué dans ce manuel peut
provoquer un incendie, un risque d’électrocution ou de blessure et annule la garantie.
La garantie ne s’applique à aucun défaut, endommagement, perte, blessure ou préjudice imputable à un usage
impropre de l’appareil. Tous les droits garantis par la loi en la matière restent confirmés. Les conditions de la garantie
ne peuvent en aucun cas exclure ni modifier les conditions de garantie prévues par la loi, qui ne peuvent donc en
aucun cas être exclues ni modifiées.
Avant de procéder à une quelconque opération, retirez l’emballage avec précaution et contrôlez si l’appareil est en
parfait état. Si vous remarquez un quelconque défaut ou endommagement, n’installez pas l’appareil et ne tentez pas
de le réparer ; adressez-vous à votre revendeur.
Ne laissez pas l’emballage à la portée des enfants et débarrassez-vous du matériau d’emballage conformément aux
règlements en vigueur.
1. Votre appareil
Outre l’appareil que vous avez acheté vous trouverez dans l’emballage (cf. figure 1):
- 1 sachet contenant:
•
2 vis autotaraudeuses de 3,5 x 50 mm pour fixer au mur le support supérieur (B).
•
1 vis autotaraudeuse de 3,5 x 30 mm pour fixer au mur la console inférieure (F).
•
3 chevilles en plastique de 6,0 x 25 mm.
•
5 vis autotaraudeuses de 3,0 x 12 mm pour fixer les entretoises (E) et la console (F) sur l’appareil.
•
4 vis métriques M4 x 8 mm pour fixer la console (D) sur l’appareil.
•
2 vis métriques M6 x 5 mm pour monter la console (D) sur la base (C).
- 1 support mural (B).
- 1 base du piédestal (C).
- 1 tige du piédestal (C).
- 4 entretoises enroule-câble (E).
S’il manque un composant, veuillez vous adresser à votre revendeur.
2. Pour votre sécurité
Cet appareil est réservé à un usage domestique. Il n’est pas
prévu pour être utilisé dans un cadre professionnel
(commercial/industriel) ou dans des moyens de transports
(véhicule/bateau/avion)
Cet appareil peut être utilisé par des enfants âgés de 8 ans et
plus et les personnes manquant d’expérience et de
connaissances ou dont les capacités physiques, sensorielles ou
mentales sont réduites, si elles ont été formées et encadrées
quant à l'utilisation de l'appareil d'une manière sûre et
connaissent les risques encourus. Les enfants ne doivent pas
jouer avec l'appareil. Le nettoyage et l’entretien par l'utilisateur

ne doit pas être fait par des enfants à moins qu'ils soient âgés
de 8 ans et plus et supervisés
Les enfants de moins de 3 ans doivent être tenus à l'écart à
moins d’être surveillés en continu.
Les enfants âgés entre 3 ans et 8 ans ne peuvent allumer ou
éteindre l'appareil qu’à condition qu'il ait été placé ou installé
dans sa position normale de fonctionnement et qu’ils aient reçu
l’autorisation ainsi que toutes les instructions concernant
l'utilisation de l'appareil d'une manière sûre et les risques
encourus. Les enfants âgés entre 3 et 8 ans ne peuvent pas
brancher, régler , nettoyer l'appareil ou effectuer la maintenance
utilisateur.
Certaines parties de ce produit peut devenir très chaudes et
causer des brûlures. Il faut prêter attention plus
particulièrement aux personnes vulnérables présentes dans
la pièce, telles que les enfants ou les personnes agées.
Vérifiez si l’alimentation du secteur correspond aux données de
la plaque: 230V~, 50Hz.
Ne quittez jamais votre domicile en laissant l’appareil en marche;
vérifiez toujours si l’interrupteur se trouve sur OFF (0) et si le
thermostat se trouve sur le minimum (*).
Pendant le fonctionnement placez l’appareil dans un endroit
sûr :
-en respectant les distances des objets inflammables ou des
meubles indiquées sur la figure 2.
-en cas d’installation murale, ne le fixez pas sur une cloison en
plastique ou en matériau synthétique.
-ne le placez jamais immédiatement au-dessous d’une prise de
courant.
Faites en sorte que les animaux et les enfants ne puissent ni
jouer, ni toucher l’appareil. Attention! Pendant le fonctionnement
la grille de refoulement de l’air peut devenir très chaude (plus de
80°C = 175 °F).
IMPORTANT: pour éviter tout risque de surchauffe ne
couvrez jamais l’appareil. Ne posez jamais d’objet, ni de
couverture sur l’appareil lorsqu’il est en marche. Ceci est
clairement écrit sur l’appareil ou illustré par le symbole

Ne nettoyez pas l’appareil s’il est en marche et ne le plongez
jamais dans l’eau.
Attention: pour faire un usage mobile de l’appareil, assemblez
au préalable le piédestal et fixez-le sur l’appareil. Ne posez pas
l’appareil au sol sans son piédestal.
N’enroulez pas le câble d’alimentation autour ou au-dessus de
l’appareil lorsqu’il est en marche.
N’utilisez pas l’appareil dans des pièces dont l’atmosphère est
saturée en gaz explosifs ou en vapeurs générées par des
solvants ou de la peinture, ou inflammables.
Si le câble est endommagé ne le remplacez pas vous-même ;
adressez-vous à un service après-vente autorisé car
l’intervention doit être accomplie par du personnel spécialisé afin
d’éviter tout risque de dommage.
N’utilisez pas cet appareil près d’une douche, d’une baignoire,
d’un lavabo ou un piscine.
L’appareil doit être placé de façon à ce que sa prise
d’alimentation soit toujours accessible.
Les appareils de chauffage susceptibles d'être utilisés dans les
salles de bains doivent être installés de façon telle que les
interrupteurs et autres dispositifs de commande ne puissent pas
être touchés par une personne qui se trouve dans la baignoire
ou la douche
L’installation doit être effectuée conformément aux règles de
l’art et en conformité avec la norme en vigueur dans votre pays.
Le branchement électrique sur le secteur doit prévoir en outre un
interrupteur bipolaire, dont la distance minimum d’ouverture
entre les contacts soit en mesure de garantir le débranchement
complet dans les conditions de la catégorie de surtension III.
AVERTISSEMENT: Ne pas utiliser cet appareil dans des
petites pièces occupées par des personnes ne pouvant la quitter
par leurs propres moyens, à moins qu'il y ait une surveillance
constante.
AVERTISSEMENT: Respecter une distance minimum d'1
mètre entre l'appareil en fonctionnement et toute matière textile,
rideaux ou tout objet inflammable.

Avertissement important
Si vous avez acheté un nouveau produit ou si vous avez laissé votre appareil pendant une longue période sans le
faire fonctionner, à la mise en marche de celui-ci, vous pouvez sentir une odeur.
Cela est dû au dépôt de poussières ou d’impuretés à la surface de l'élément chauffant.
L'odeur n'est pas dangereuse pour la santé et il disparaitra en quelques minutes.
3. Mise en place sûre
N’utilisez l’appareil qu’à l’horizontale.
Si vous en faites un usage mobile, respectez toujours les distances minimum des objets inflammables,
indiquées sur la figure 2.
Pour l’installer au mur, respectez les distances minimum du plafond, du sol et des cloisons indiquées sur la
figure 3.
Dans les salles de bains n’installez et n’utilisez jamais l’appareil à l’intérieur des zones 0 et 1 indiquées
sur la figure 4.
Les personnes se trouvant dans la baignoire ou sous la douche ne doivent en aucun cas être en mesure
d’accéder aux molettes de réglage.
L’appareil doit pouvoir aspirer et refouler librement de l’air chaud.
Pour l’usage mobile:
•
assemblez le piédestal en vissant la tige (figure 1/D) sur la base (figure 1/C) à l’aide des 2 vis à tête
évasée fournies (fig. 5);
•
enfilez la tige du piédestal dans la fissure rectangulaire prévue à cet effet, visible au milieu de la grille
inférieure de l’appareil (figure 6) ;
•
fixez le piédestal sur l’appareil en vissant les 4 vis fournies aux endroits indiqués sur la figure 7.
L’appareil est doté d’une double isolation électrique et ne demande aucune mise à la terre.
4. Fixation murale
Vous pouvez fixer l’appareil au mur sans son piédestal, à condition de respecter les distances indiquées sur la
figure 3.
Vissez l’appareil sur la console de support inférieure, de la façon indiquée sur la figure 8, à l’aide de la vis
fournie.
Fixez le support mural en perçant 2 trous dans le mur, espacés de 150 mm, à l’aide d’un foret de 6 mm. Enfilez
les 2 chevilles et fixez le support mural à l’aide des 2 vis fournies, de la façon indiquée sur la figure 9.
Accrochez l’appareil au support mural en le poussant d’abord vers le mur, puis vers le bas jusqu’au déclic
(figure 10).
Marquez au crayon l’endroit où percer le trou de fixation du support inférieur, retirez l’appareil, percez un trou
dans le mur avec un foret de 6 mm et enfilez la cheville fournie (figure 11).
Accrochez à nouveau l’appareil sur le support en plastique et fixez la console inférieur à l’aide de la vis prévue
à cet effet.
IMPORTANT POUR LA FRANCE:
Si l’appareil est fixé au mur, le branchement électrique sur le secteur doit être accompli en coupant la fiche
fournie et en utilisant une borne adéquate, comme le montre le schéma suivant :
Dans les pièces humides, les salles de bains et les cuisines, la borne de branchement doit être montée à 25
cm au moins du sol.
5. Enroule-câble
Lorsque vous n’utilisez pas l’appareil, vous pouvez enrouler le câble de la façon illustrée sur la figure 12.
L
N
Réseau
Phase = brun
Neutre = bleu
câble de l'appareil

N’oubliez pas de dérouler complètement le câble lorsque vous utilisez l’appareil.
6. Utilisation de l’appareil
6.1 Modèle avec sélecteur de puissance et thermostat (figure 13)
Ce modèle a 2 molettes : une pour régler la puissance de fonctionnement et une pour régler le thermostat.
Le régulateur de puissance permet de sélectionner 3 modes différents de fonctionnement de l’appareil:
= ÉTEINT
= FONCTIONNEMENT À 750W
= FONCTIONNEMENT À 1500W
Faites tourner la molette du thermostat en sens horaire jusqu’à ce que vous entendiez un déclic. L’appareil se
met en marche à la puissance sélectionnée.
Le thermostat maintient la température ambiante voulue en allumant et en éteignant automatiquement
l’appareil. Plus vous faites tourner la molette en sens horaire, dans une position ayant un chiffre plus élevé,
plus la température garantie sera élevée. La position maximum du thermostat correspond à environ 35°C, la
minimum (*) à environ 5°C.
ATTENTION: lorsque la molette interrupteur se trouve sur la position maximum (position II) vous devez cesser
de la faire tourner en sens horaire.
ATTENTION: lorsque la molette thermostat se trouve sur la position maximum (position MAX) vous devez
cesser de la faire tourner en sens horaire.
Pendant le fonctionnement de l’appareil de légères ondulations peuvent se produire à la surface de
l’élément chauffant qui se trouve à l’intérieur de l’appareil. Cela est tout à fait normal et ne nuit en rien
au bon fonctionnement de l’appareil, ni à sa fiabilité dans le temps.
Pour savoir comment utiliser le thermostat, consultez le paragraphe 6.2
6.2 Utilisation du thermostat
Dans une pièce où la température dépasse 35°C il est normal que le thermostat, même réglé sur le maximum,
n’allume pas l’appareil.
Vice-versa, dans une pièce où la température est trop basse (moins de 5°C) il est normal que le thermostat
maintienne l’appareil sans cesse allumé, même s’il est réglé sur le minimum.
Pour bien régler la température nous vous conseillons de procéder de la sorte:
-
réglez le thermostat sur le maximum et faites fonctionner l’appareil jusqu’à ce que la température ambiante
soit confortable ;
-
faites ensuite tourner la molette du thermostat en sens antihoraire jusqu’à ce que vous entendiez un déclic et
que l’appareil s’éteigne ;
-
faites ensuite tourner légèrement (très peu) la molette du thermostat en sens horaire.
-
dans cette position, le thermostat maintiendra la température ambiante que vous avez choisie.
Lorsque l’appareil est en marche et qu’il chauffe la pièce, le voyant lumineux s’éclaire.
7. Sécurité en cas de fonctionnement anormal
En cas de surchauffe, le système de protection de l’appareil désactive automatiquement les éléments
chauffants et éteint l’appareil.
Dans ce cas:
-
faites tourner la molette du thermostat en sens horaire pour vérifier si le thermostat n’a pas éteint l’appareil
tout simplement parce qu’une température ambiante élevée a été atteinte;
-
si l’appareil ne se remet pas à fonctionner normalement:
-
éteignez l’appareil;
-
éliminez les éventuelles causes de surchauffe (par ex. obstacles sur la grille d’aspiration de l’air ou sur
celle de refoulement de l’air);
-
laissez refroidir l’appareil pendant 15 à 20 minutes;
-
allumez à nouveau l’appareil.
Si vous notez après ça un fonctionnement encore irrégulier de l’appareil ou des dommages à la structure ou au
corps de l’appareil, déconnectez l’appareil et appelez un service après vente qualifié ou votre revendeur pour
assistance.
Table of contents
Languages:
Other AEG Electric Heater manuals
Popular Electric Heater manuals by other brands

cecotec
cecotec Ready Warm 800 Thermal instruction manual

DeLonghi
DeLonghi HCA 530FTSW Instruction booklet

pleasant hearth
pleasant hearth LI-24 Homeowner's installation and operating instructions

Plein Air
Plein Air Holly 1500 instruction manual

Melissa
Melissa 670104 manual

Dimplex
Dimplex FPE H Mounting and operating instructions