AEG BD741P User manual

USER
MANUAL
EN User Manual
Oven
BD741P
BPE748380B
BPK748380M
GB6080P
GB6080PT

WELCOME TO AEG! THANK YOU FOR CHOOSING
OUR APPLIANCE.
In our drive to be sustainable, we are reducing paper assets and provide full user
manuals online. Access your full user manual at aeg.com/manuals
Get usage advice, brochures, trouble shooter, service and repair information at
aeg.com/support
CONTENTS
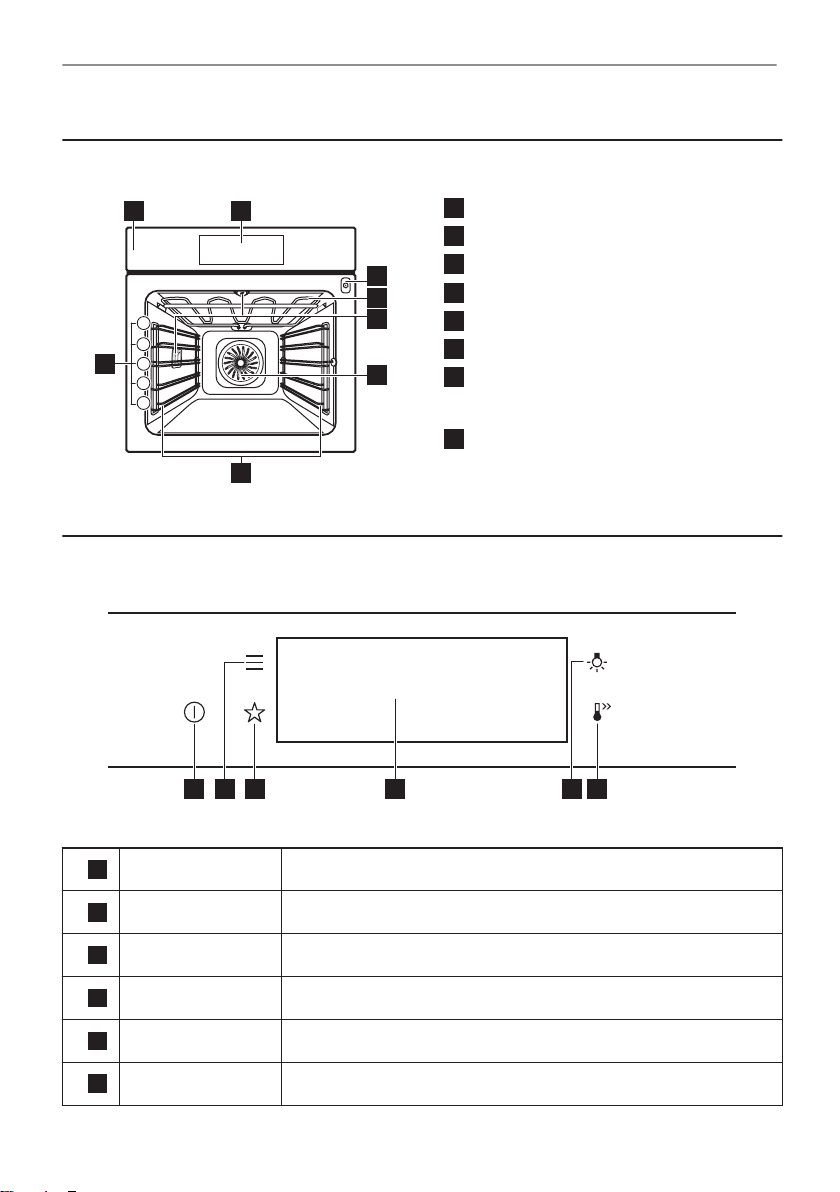
1. PRODUCT DESCRIPTION.......................... 3
1.1 General overview.............................3
2. HOW TO TURN OVEN ON AND OFF......... 3
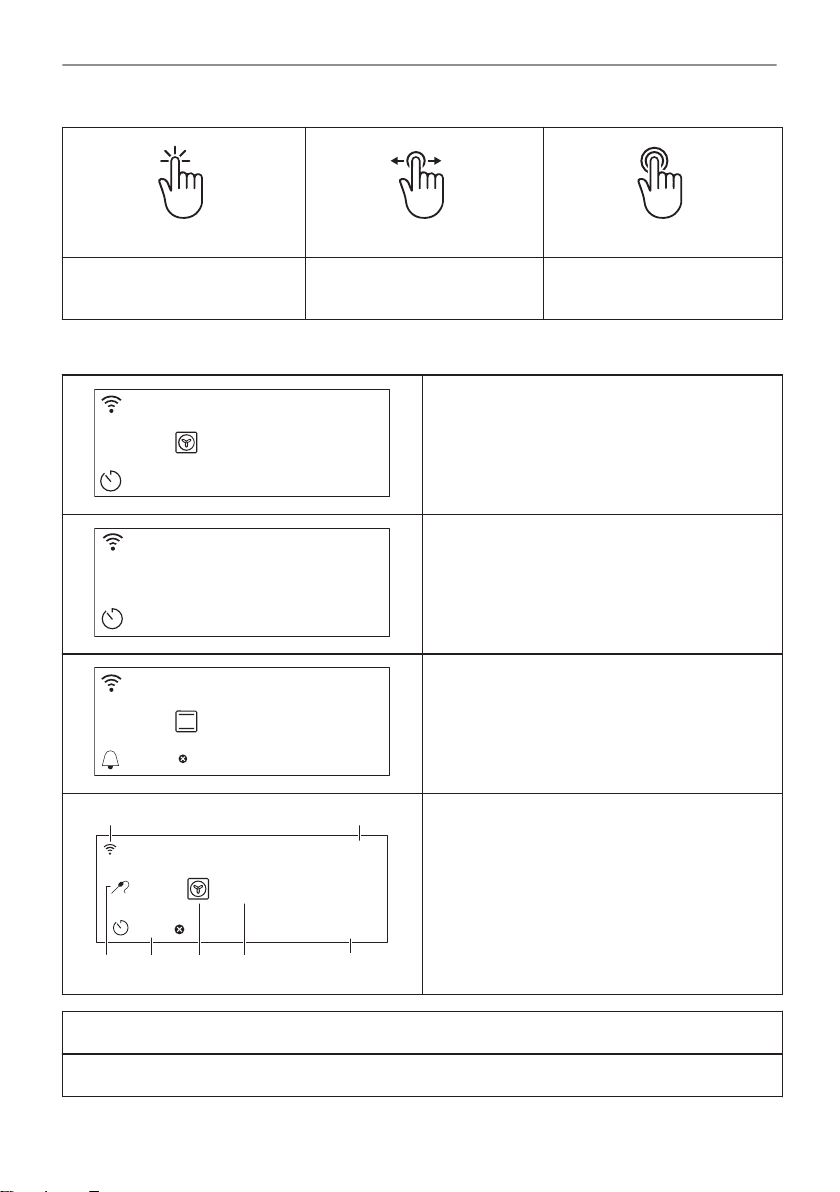
2.1 Control panel................................... 3
2.2 Display............................................. 4
3. BEFORE FIRST USE...................................5
3.1 Initial Cleaning ................................ 5
3.2 First connection............................... 5
3.3 Wireless connection ........................5
3.4 Software licences.............................6
3.5 Initial preheating.............................. 7
4. DAILY USE.................................................. 7
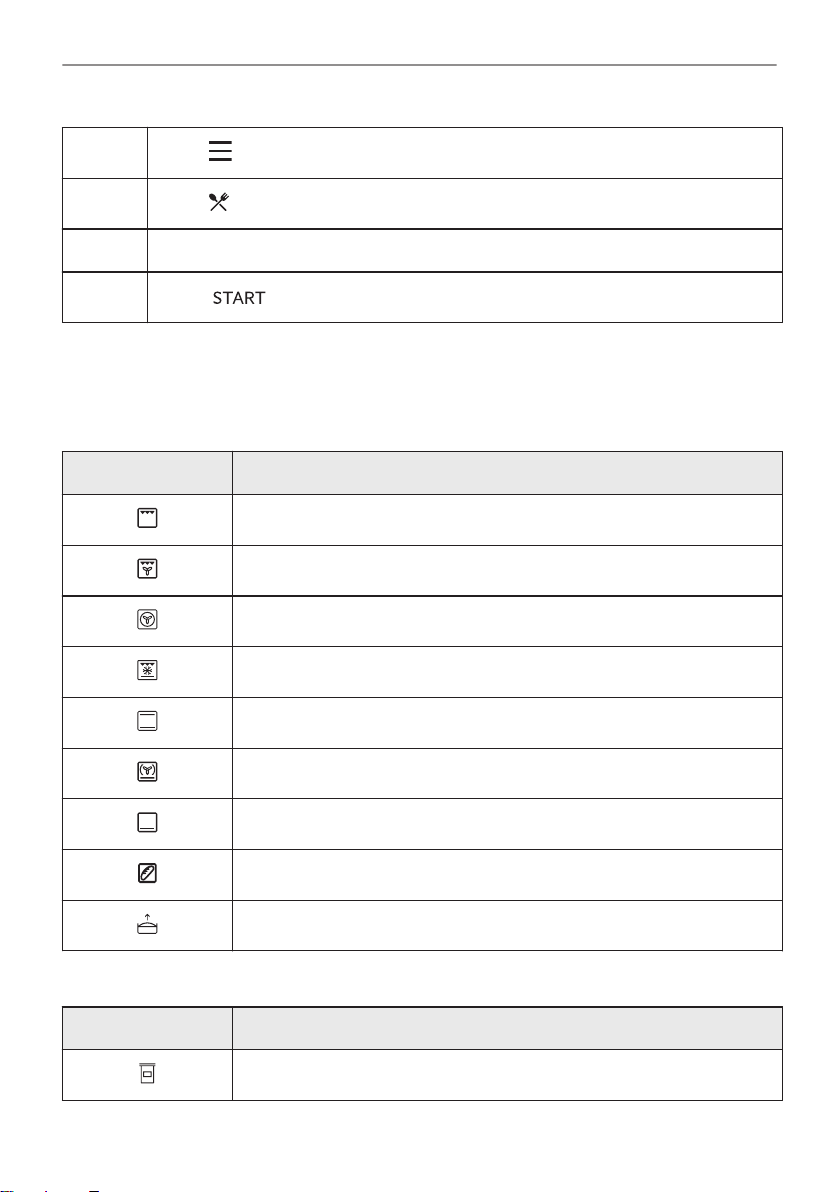
4.1 How to set: Heating functions.......... 7
4.2 How to set: Assisted Cooking.......... 7
4.3 Heating functions............................. 8
4.4 Notes on: Moist Fan Baking.............9
5. CLOCK FUNCTIONS...................................9
5.1 Clock functions description.............. 9
6. HOW TO USE: ACCESSORIES................ 10
6.1 Food Sensor.................................. 10
7. CARE AND CLEANING.............................11
7.1 Notes on cleaning.......................... 11
7.2 How to use: Pyrolytic Cleaning...... 11
8. TROUBLESHOOTING............................... 12
8.1 What to do if...................................13
8.2 How to manage: Error codes......... 14
8.3 Service data...................................15
9. ENERGY EFFICIENCY.............................. 15
9.1 Product Information and Product
Information Sheet*............................... 15
9.2 Energy saving................................ 16
10. MENU STRUCTURE................................17
10.1 Menu............................................17
10.2 Submenu for: Cleaning................ 17
10.3 Submenu for: Options..................18
10.4 Submenu for: Connections.......... 18
10.5 Submenu for: Setup.....................19
10.6 Submenu for: Service.................. 19
11. IT'S EASY!............................................... 19
12. ENVIRONMENTAL CONCERNS.............20
Subject to change without notice.
2/24

1. PRODUCT DESCRIPTION
1.1 General overview
2
7
1
8
4
3
5
6
5
4
3
2
1
Control panel
Display
Socket for the food sensor
Heating element
Lamp
Fan
Shelf support, removable
Shelf positions
2. HOW TO TURN OVEN ON AND OFF
2.1 Control panel
1 2 3 4 5 6
1ON / OFF Press and hold to turn the oven on and off.
2Menu Lists the oven functions.
3Favourites Lists the favourite settings.
4Display Shows the current settings of the oven.
5Lamp switch To turn the lamp on and off.
6Fast Heat Up To turn on and off the function: Fast Heat Up.
3/24
PRODUCT DESCRIPTION

Press Move
3s
Press and hold
Touch the surface with finger‐
tip.
Slide fingertip over the sur‐
face.
Touch the surface for 3 sec‐
onds.
2.2 Display
STARTSTART
12:3012:30
150°C
After turning on, the display shows the main
screen with the heating function and the default
temperature.
12:34
If you do not use the oven for 2 minutes, the
display goes to standby.
11min
12:3012:30
150°C
STOP
When you cook, the display shows the set
functions and other available options.
150°C
12:30
15min START
85°C
G F DE C
A B
Display with key functions set.
A. Wi-Fi
B. Time of day
C. START/STOP
D. Temperature
E. Heating functions
F. Timer
G. Food sensor (selected models only)
Display indicators
Basic indicators - to navigate on the display.
4/24
HOW TO TURN OVEN ON AND OFF

To confirm the selection / set‐
ting.
To go one
level back in
the menu.
To undo the
last action.
To turn the options on and
off.
Sound alarm function indicators - when the set time of cooking ends, the signal sounds.
The function is on. The function is on.
Cooking stops automatically. Sound alarm is off.
Timer indicators
To set the function: Delayed start. To cancel the setting.
Wi-Fi indicator - the oven can be connected to Wi-Fi.
Wi-Fi connection is turned on.
3. BEFORE FIRST USE
3.1 Initial Cleaning
Step 1 Step 2 Step 3
Remove all accessories and
removable shelf supports from
the oven.
Clean the oven and the ac‐
cessories with a soft cloth,
warm water and a mild deter‐
gent.
Place the accessories and the
removable shelf supports in
the oven.
3.2 First connection
The display shows welcome message after the first connection.
You have to set: Language, Display brightness, Key tones, Buzzer volume, Time of day.
3.3 Wireless connection
To connect the oven you need:
• Wireless network with the Internet connection.
5/24
BEFORE FIRST USE

• Mobile device connected to your wireless network.
Step 1 Download the mobile app My AEG Kitchen and follow the instructions for the next
steps.
Step 2 Turn on the oven.
Step 3 Press: . Select: Settings / Connections.
Step 4 - slide or press to turn on: Wi-Fi.
Step 5 The oven wireless module starts within 90 sec.
Frequency 2.4 GHz WLAN 5 GHz WLAN
2400 - 2483.5 MHz 5150 - 5350 MHz
5470 - 5725 MHz
Protocol IEEE 802.11b DSSS,
802.11g/n OFDM
IEEE 802.11 a/n OFDM
Max Power EIRP < 20 dBm (100 mW) EIRP < 23 dBm (200 mW)
Wi-Fi module NIU5-50
Frequency Bluetooth 2400 - 2483.5 MHz
Protocol LE: DSSS
Max Power EIRP < 4 dBm (2.5 mW)
EU member states covered by the provision of Directive 2014/53/EU: Belgium, Bulgaria, Czech
Republic, Denmark, Germany, Estonia, Ireland, Greece, Spain, France, Croatia, Italy, Cyprus,
Latvia, Lithuania, Luxemburg, Hungary, Malta, Netherlands, Austria, Poland, Portugal,
Romania, Slovenia, Slovakia, Finland, Sweden, Norway, Switzerland, United Kingdom, Turkey.
3.4 Software licences
The software in this product contains components that are based on free and open source soft‐
ware. AEG gratefully acknowledges the contributions of the open software and robotics communi‐
ties to the development project.
To access the source code of these free and open source software components whose license
conditions require publishing, and to see their full copyright information and applicable license
terms, please visit: http://aeg.opensoftwarerepository.com (folder NIU5).
6/24
BEFORE FIRST USE

3.5 Initial preheating
Preheat the empty oven before the first use.
Step 1 Remove all accessories and removable shelf supports from the oven.
Step 2 Set the maximum temperature for the function: .
Let the oven operate for 1 h.
Step 3 Set the maximum temperature for the function: .
Let the oven operate for 15 min.
The oven can emit an odour and smoke during preheating. Make sure that the room is ventila‐
ted.
4. DAILY USE
WARNING!
Refer to Safety chapters.
4.1 How to set: Heating functions
Step 1 Turn on the oven. The display shows the default heating function.
Step 2 Press the symbol of the heating function to enter the submenu.
Step 3 Select the heating function and press: . The display shows: temperature.
Step 4 Set: temperature. Press: .
Step 5 Press: .
Food Sensor - you can plug the sensor at any time before or during cooking.
- press to turn off the heating function.
Step 6 Turn off the oven.
4.2 How to set: Assisted Cooking
Step 1 Turn on the oven.
7/24
DAILY USE

Step 2 Press: .
Step 3 Press: . Enter: Assisted Cooking.
Step 4 Choose a dish or a food type.
Step 5 Press: .
4.3 Heating functions
STANDARD
Heating function Application
Grill: Toasting, grilling
Turbo Grilling: Roasting meat, browning
True Fan Cooking: Even baking, tenderness, drying
Frozen Foods: French fries, potato wedges, spring rolls
Conventional Cooking: Traditional baking
Pizza Function: Baking pizza
Bottom Heat: Baking cakes
Bread Baking: Bread, bread rolls
Dough Proving: Proving yeast dough
SPECIALS
Heating function Application
Preserving: Preserving vegetables
8/24
DAILY USE

Heating function Application
Dehydrating: Drying sliced fruit, mushrooms
Plate Warming: Preheating plates
Defrost: Defrosting
Au Gratin: Making gratins, browning
Slow Cooking: Preparing tender roast
Keep Warm: Keeping food warm
Moist Fan Baking: Baking
4.4 Notes on: Moist Fan Baking
This function was used to comply with the energy efficiency class and ecodesign requirements
according to EU 65/2014 and EU 66/2014. Tests according to EN 60350-1.
The oven door should be closed during cooking so that the function is not interrupted and the
oven operates with the highest energy efficiency possible.
When you use this function the lamp automatically turns off after 30 sec.
For the cooking instructions refer to "Hints and tips" chapter, Moist Fan Baking. For general
energy saving recommendations refer to "Energy Efficiency" chapter, Energy Saving.
This function is designed to save energy during cooking. When you use this function, the
temperature in the cavity may differ from the set temperature. The heating power may be
reduced.
5. CLOCK FUNCTIONS
5.1 Clock functions description
Clock function Application
Cooking time To set the length of cooking. Maximum is 23 h 59 min.
End action To set what happens when the timer ends counting.
Delayed start To postpone the start and / or end of cooking.
Time extension To extend cooking time.
9/24
CLOCK FUNCTIONS

Clock function Application
Reminder To set a countdown. Maximum is 23 h 59 min. This function has no ef‐
fect on the operation of the oven.
6. HOW TO USE: ACCESSORIES
6.1 Food Sensor
Food Sensor- measures the temperature inside the food. You can use it with every heating
function.
There are two temperatures to be set:
The oven temperature: minimum 120 °C. The core temperature.
How to use: Food Sensor
Step 1 Turn on the oven.
Step 2 Set a heating function and, if necessary, the oven temperature.
Step 3 Insert: Food Sensor.
Meat, poultry and fish Casserole
Insert the tip of Food Sensor into the centre
of meat, fish, in the thickest part if possible.
Make sure that at least 3/4 of Food Sensor is
inside of the dish.
Insert the tip of Food Sensor exactly in the centre
of the casserole. Use the rim of the baking dish to
support the silicone handle of Food Sensor. The
tip of Food Sensor should not touch the bottom of
a baking dish.
Step 4 Plug Food Sensor into the socket at the front of the oven.
The display shows the current temperature of: Food Sensor.
Step 5 - press to set the core temperature of the sensor.
Step 6 - press to set the preferred option:
• Sound alarm - when food reaches the core temperature, the signal sounds.
• Sound alarm and stop cooking - when food reaches the core temperature, the sig‐
nal sounds and the oven stops.
Step 7 Select the option and repeatedly press: to go to main screen.
10/24
HOW TO USE: ACCESSORIES

Step 8 Press: .
When food reaches the set temperature, the signal sounds. You can choose to stop or
to continue cooking to make sure the food is well done.
Step 9 Remove Food Sensor plug from the socket and remove the dish from the oven.
WARNING!
There is a risk of burns as Food Sensor becomes hot. Be careful
when you unplug it and remove it from the food.
7. CARE AND CLEANING
WARNING!
Refer to Safety chapters.
7.1 Notes on cleaning
Cleaning
Agents
Clean the front of the oven with a soft cloth with warm water and a mild deter‐
gent.
Use a cleaning solution to clean metal surfaces.
Clean stains with a mild detergent.
Everyday Use
Clean the cavity after each use. Fat accumulation or other residue may cause
fire.
Do not store the food in the oven for longer than 20 minutes. Dry the cavity with
a soft cloth after each use.
Accessories
Clean all accessories after each use and let them dry. Use a soft cloth with
warm water and a mild detergent. Do not clean the accessories in a dishwash‐
er.
Do not clean the non-stick accessories using abrasive cleaner or sharp-edged
objects.
7.2 How to use: Pyrolytic Cleaning
Clean the oven with Pyrolytic Cleaning.
WARNING!
There is a risk of burns.
11/24
CARE AND CLEANING

CAUTION!
If there are other appliances installed in the same cabinet, do not use them at the
same time as this function. It can cause damage to the oven.
Before the Pyrolytic Cleaning:
Turn off the oven and wait
until it is cold.
Remove all accessories and
removable shelf supports.
Clean the oven floor and the in‐
ner door glass with warm water,
a soft cloth and a mild detergent.
Step 1 Step 2 Step 3
Turn on the oven. Press: / Cleaning. Select the cleaning mode.
Option Cleaning mode Duration
Pyrolytic cleaning, quick Light cleaning 1 h
Pyrolytic cleaning, normal Normal cleaning 1 h 30 min
Pyrolytic cleaning, intense Thorough cleaning 3 h
When the cleaning starts, the oven door is locked and the lamp is off. The cooling fan works at
a higher speed.
- press to stop the cleaning before it is completed.
Do not use the oven until the door lock symbol disappears from the display.
When the cleaning ends:
Turn off the oven and wait
until it is cold.
Clean the cavity with a soft
cloth.
Remove the residue from the
bottom of the cavity.
8. TROUBLESHOOTING
WARNING!
Refer to Safety chapters.
12/24
TROUBLESHOOTING

8.1 What to do if...
The oven does not turn on or does not heat up
Possible cause Remedy
The oven is not connected to an electrical sup‐
ply or it is connected incorrectly.
Check if the oven is correctly connected to the
electrical supply.
The clock is not set. Set the clock, for details refer to "Clock Func‐
tions" chapter, How to set: Clock functions.
The door is not closed correctly. Fully close the door.
The fuse is blown. Make sure the fuse is the cause of the prob‐
lem. If the problem recurs, contact a qualified
electrician.
The oven Child Lock is on. Refer to "Menu" chapter, Submenu for: Op‐
tions.
Components
Description Remedy
The lamp is burnt out. Replace the lamp, for details refer to "Care and
Cleaning" chapter, How to replace: Lamp.
Power cut always stops cleaning. Repeat cleaning if it's interrupted by power failure.
Problems with Wi-Fi signal
Possible cause Remedy
Trouble with wireless network signal. Check your wireless network and router.
Restart the router.
13/24
TROUBLESHOOTING

Problems with Wi-Fi signal
Possible cause Remedy
New router installed or router configuration
changed.
To configure oven and mobile device again, re‐
fer to "Before first use" chapter, Wireless con‐
nection.
The wireless network signal is weak. Move router as close to the oven as possible.
The wireless signal is disrupted by a micro‐
wave appliance placed near the oven.
Turn off the microwave appliance.
8.2 How to manage: Error codes
When the software error occurs, the display shows error message.
In this section, you will find the list of the problems that you can handle on your own.
Code and description Remedy
C2 - the Food sensor is in the oven cavity dur‐
ing Pyrolytic Cleaning.
Take out the Food sensor.
C3 - the door is not fully closed during Pyrolyt‐
ic Cleaning.
Close the door.
F111 - Food sensor is not correctly inserted in‐
to the socket.
Fully plug Food sensor into the socket.
F240, F439 - the touch fields on the display do
not work properly.
Clean the surface of the display. Make sure
there is no dirt on the touch fields.
F601 - there is a problem with Wi-Fi signal. Check your network connection. Refer to "Be‐
fore first use" chapter, Wireless connection.
F604 - the first connection to Wi-Fi failed. Turn the oven off and on and try again. Refer to
"Before first use" chapter, Wireless connection.
F908 - the oven system cannot connect with
the control panel.
Turn the oven off and on.
When one of these error messages continues to appear on the display, it means a faulty
subsystem may have been disabled. In such a case contact your dealer or an Authorized
14/24
TROUBLESHOOTING

Service Centre. If one of these errors occurs, the rest of the oven functions will continue to work
as usually.
Code and description Remedy
F602, F603 - Wi-Fi is not available. Turn the oven off and on.
8.3 Service data
If you cannot find a solution to the problem yourself, contact your dealer or an Authorised
Service Centre.
The necessary data for the service centre is on the rating plate. The rating plate is on the front
frame of the oven cavity. Do not remove the rating plate from the oven cavity.
We recommend that you write the data here:
Model (MOD.) .........................................
Product number (PNC) .........................................
Serial number (S.N.) .........................................
9. ENERGY EFFICIENCY
9.1 Product Information and Product Information Sheet*
Supplier's name AEG
Model identification
BD741P 944188585
BPE748380B 944188489
BPK748380M 944188490
GB6080P 944188424
GB6080PT 944188540
Energy Efficiency Index 61.2
Energy efficiency class A++
Energy consumption with a standard load, conventional
mode
1.09 kWh/cycle
Energy consumption with a standard load, fan-forced
mode
0.52 kWh/cycle
15/24
ENERGY EFFICIENCY

Number of cavities 1
Heat source Electricity
Volume 71 l
Type of oven Built-In Oven
Mass
BD741P 34.5 kg
BPE748380B 36.0 kg
BPK748380M 35.0 kg
GB6080P 35.5 kg
GB6080PT 35.5 kg
* For European Union according to EU Regulations 65/2014 and 66/2014.
For Republic of Belarus according to STB 2478-2017, Appendix G; STB 2477-2017, Annexes A
and B.
For Ukraine according to 568/32020.
Energy efficiency class is not applicable for Russia.
EN 60350-1 - Household electric cooking appliances - Part 1: Ranges, ovens, steam ovens and
grills - Methods for measuring performance.
9.2 Energy saving
The oven has features which help you save energy during everyday cooking.
Make sure that the oven door is closed when the oven operates. Do not open the oven door too
often during cooking. Keep the door gasket clean and make sure it is well fixed in its position.
Use metal cookware to improve energy saving.
When possible, do not preheat the oven before cooking.
Keep breaks between baking as short as possible when you prepare a few dishes at one time.
Cooking with fan
When possible, use the cooking functions with fan to save energy.
Residual heat
If a programme with the Duration or End Time selection is activated and the cooking time is
longer than 30 min, the heating elements automatically turn off earlier in some oven functions.
The fan and lamp continue to operate. When you turn off the oven, the display shows the
residual heat. You can use that heat to keep the food warm.
When the cooking duration is longer than 30 min, reduce the oven temperature to minimum 3 -
10 min before the end of cooking. The residual heat inside the oven will continue to cook.
Use the residual heat to warm up other dishes.
16/24
ENERGY EFFICIENCY

Keep food warm
Choose the lowest possible temperature setting to use residual heat and keep a meal warm.
The residual heat indicator or temperature appears on the display.
Cooking with the lamp off
Turn off the lamp during cooking. Turn it on only when you need it.
Moist Fan Baking
Function designed to save energy during cooking.
When you use this function the lamp automatically turns off after 30 sec. You may turn on the
lamp again but this action will reduce the expected energy savings.
10. MENU STRUCTURE
10.1 Menu
Press to open Menu.
Menu item Application
Assisted Cooking Lists automatic programmes.
Cleaning Lists cleaning programmes.
Favourites Lists the favourite settings.
Options To set the oven configuration.
Settings Connections To set the network configuration.
Setup To set the oven configuration.
Service Shows the software version and con‐
figuration.
10.2 Submenu for: Cleaning
Submenu Application
Pyrolytic cleaning, quick Duration: 1 h.
Pyrolytic cleaning, normal Duration: 1 h 30 min.
Pyrolytic cleaning, intense Duration: 3 h.
17/24
MENU STRUCTURE

10.3 Submenu for: Options
Submenu Application
Light Turns the lamp on and off.
Child Lock Prevents accidental activation of the oven. When the option
is on, the text "Child Lock" appears on the display when you
turn on the oven. To enable the oven use, choose the code
letters in the alphabetical order. When the Child Lock is on
and the oven is turned off the oven door is locked. Access
to the timer, the remote operation and the lamp is available
with the Child Lock on.
Fast Heat Up Shortens heat up time. It is available only for some of the
oven functions.
Cleaning Reminder Turns the reminder on and off.
Time indication Turns the clock on and off.
Digital clock style Changes the format of the displayed time indication.
10.4 Submenu for: Connections
Submenu Description
Wi-Fi To enable and disable: Wi-Fi.
Remote operation To enable and disable remote control.
Option visible only after you turn on: Wi-Fi.
Auto remote operation To start remote operation automatically after pressing
START.
Option visible only after you turn on: Wi-Fi.
Network To check network status and the signal power of: Wi-Fi.
Forget network To disable current network from auto connection with the
oven.
18/24
MENU STRUCTURE

10.5 Submenu for: Setup
Submenu Description
Language Sets the oven language.
Display brightness Sets the display brightness.
Key tones Turns the tone of the touch fields on and off. It is not possi‐
ble to mute the tone for: .
Buzzer volume Sets the volume of key tones and signals.
Time of day Sets the current time and date.
10.6 Submenu for: Service
Submenu Description
Demo mode Activation / deactivation code: 2468
Software version Information about software version.
Reset all settings Restores factory settings.
11. IT'S EASY!
Before first use you have to set:
Language Display bright‐
ness Key tones Buzzer volume Time of day
Familiarize yourself with the basic icons on the control panel and the display:
ON / OFF Menu Favourites Wi-Fi Timer Food sen‐
sor
/
19/24
IT'S EASY!

Start using the oven
Quick start Turn on the
oven and start
cooking with the
default tempera‐
ture and time of
the function.
Step 1 Step 2 Step 3
Press and hold:
.
- select
the preferred
function.
Press: .
Quick Off Turn off the
oven, any
screen or mes‐
sage at any
time.
- press and hold until the oven turns off.
Start cooking
Step 1 Step 2 Step 3 Step 4 Step 5
- press to turn
on the oven.
- select the heat‐
ing function.
- set the temper‐
ature.
- press to con‐
firm.
- press to start
cooking.
12. ENVIRONMENTAL CONCERNS
Recycle materials with the symbol . Put the packaging in relevant containers to recycle it.
Help protect the environment and human health by recycling waste of electrical and electronic
appliances. Do not dispose of appliances marked with the symbol with the household waste.
Return the product to your local recycling facility or contact your municipal office.
20/24
*
IT'S EASY!
This manual suits for next models
4
Table of contents
Other AEG Oven manuals

AEG
AEG 40006VS User manual

AEG
AEG BPE548070B User manual

AEG
AEG KME861000M User manual

AEG
AEG 7000 Series User manual

AEG
AEG COMPETENCE 520B User manual

AEG
AEG BP501432WM User manual

AEG
AEG B 89090-5 User manual

AEG
AEG COMPETENCE B8871-4 Operation manual

AEG
AEG U25493 B 8139-4-m User manual

AEG
AEG COMPETENCE D2160-1 User manual
Popular Oven manuals by other brands

Sencor
Sencor SEO 2000BK Translation of the original manual

Fornetto
Fornetto PZ-7 operating manual

Miele
Miele H 7140 BM Operating and installation instructions

CONSTRUCTA
CONSTRUCTA CF0312.0 instruction manual

Baumatic
Baumatic MG1 instruction manual

Cookworks
Cookworks KR-E20N-E1Dkh Care & instruction manual