AEG Atlas Copco HBS 65 User manual

GB
D
F
I
E
P
NL
DK
S
SF
TR
RUS
Atlas Copco Electric Tools GmbH
HBS 65
Instructions for use
Please read and save these
instructions.
Gebrauchsanleitung
Bitte lesen und aufbewahren.
Instruction d’utilisation
Prière de lire et de conserver.
Istruzioni d’uso
Si prega di leggere le istruzioni e di
conservarle.
Instrucciones de uso
Lea y conserve estas instrucciones
por favor.
Instruções de serviço
Por favor leia e conserve em seu
poder.
Gebruiksaanwijzing
Lees en let goed op deze adviezen.
Brugsanvisning
Vær venlight at læse og opbevare.
Bruksanvisning
Var god läs och tag tillvara dessa
instruktioner.
Käyttöohje
Lue ja säilytö
Kullanøm kølavuzu
Lütfen okuyun ve saklayin
Èíñòðóêöèÿ ïî
èñïîëüçîâàíèþ
Ïîæàëóéñòà, ïðî÷òèòå è
ñîõðàíèòå íàñòîÿùóþ
èíñòðóêöèþ
65x410mm
2,5x16inch

1
ENGLISH HBS 65
You have high standards and expect to purchase quality goods –quality offered by
Atlas Copco.
We have built a durable and reliable electric power tool for you.
Please read the instructions for use before first operation so you can handle your
power tool effectively and safely.
We are sure that buying an AEG Electric Power Tool from Atlas Copco was the
right choice!
Nominal power 600 W. . . . . . . . . . . . . . . . . . . . .
Belt speed no load 190 m/min. . . . . . . . . . . . . . . . . .
Sanding width 65 mm. . . . . . . . . . . . . . . . . . . . . . .
Belt length 410 mm. . . . . . . . . . . . . . . . . . . . . . . . .
Sanding surface 65x110 mm. . . . . . . . . . . . . . . . .
Weight 2,2 kg. . . . . . . . . . . . . . . . . . . . . . . . . . . .
JPlease pay attention to the safety instructions in the attached leaflet!
JDust that arises when working in wood or using the tool on industrial material can be
dangerous to health. In this case connect the tool to a suction device (e.g. Atlas
Copco absorbtion system AS 3 W).
JAppliances used at many different locations including open air must be connected
via a current surge preventing switch.
JAlways wear goggles when using the machine. It is recommended to wear gloves,
sturdy non slipping shoes and apron.
JSawdust and splinters must not be removed while the machine is running.
JDo not pierce the motor housing as this could damage the double insulation (use
adhesives).
JAlways disconnect the plug from the socket before carrying out any work on the
machine.
Only plug-in when machine is switched off.
JKeep mains lead clear from working range of the machine. Always lead the cable
away behind you.
JWhen sanding metal the dust suction facility should not be used, because of the risk
of fire from flying sparks.
Typically the A-weighted noise levels of the tool are:
Sound pressure level = 89 dB (A).
Sound power level = 102 dB (A).
Wear ear protectors!
Measured values determined according to EN 50 144.
Typically the hand-arm vibration is below 2.5 m/s2.
Measured values determined according to EN 50 144.
Connect only to a single-phase AC current supply and only to the mains voltage
specified on the rating plate. Connection to sockets without earth protection is
possible as the appliance features protective insulation to DIN 57 740/ VDE 0740
and CEE 20. Radio suppression complies with the European standard EN 55014.
When fitting the plug, make sure that the brown (live) wire of this appliance is
connected to the plug terminal marked L or coloured red, and the blue (neutral) wire
of this appliance is connected to the plug terminal marked N or coloured black.
Under no circumstances must the wires of this appliance be connected to the earth
terminal of the plug marked either E, with the earth symbol or coloured green or
green/yellow.
The belt sander can be used for sanding wood, plastics and metal.
Do not use this product in another way as stated for normal use.
Technical Data
Advice for your
safety
Measured sound
value
Measured
vibration value
Mains
connection
Use

2
ENGLISH HBS 65
Prior the changing belt, adjust sanding belt
by turning the belt adjusting screw approx.
2–3 cm in the direction of the open side of
the machine beyond the rollers, whilst the
machine is running, as the new sanding
belt can sometimes brush against the
machine housing.
Always disconnect the plug from the
socket before carrying out any work on the
machine.
1. Pull the clamping lever forwards
2. Remove the worn belt and fit the inside of
the belt is pointing in the same direction as
the arrow on the machine.
3. Push the clamping lever back again
4. Taking a test run, position the sanding belt
with the aid of the belt adjusting screw so
that it is flush with the outer edge of the
sanding belt support.
Brief description
65x410mm
2,5x16inch
Modifications: Text, diagrams and data are correct at the time of
printing. In the interest of continuous improvement of our products,
technical specifications are subject to alteration without prior notice.
Integrated dust removal
Dust bag
Locking button
Clamping lever
On-/off switch
Sanding belt support
Suction connector
Adjusting screw for belt
Changing the
belt
65x410mm
2,5x16inch

3
ENGLISH HBS 65
Intermittent use
Switching on: Press On-/off switch
Switching off: Release On-/off switch
Continuous use
Switching on: Press the On-/off switch and
then the locking button, after that release
on-off switch.
Switching off: Press the On-/off switch and
then release.
Always hold machine firmly with both hand
prior to switching on. Only switch on in
raised position.
Position the connection piece with the dust
bag over the machine outlet.
When suction performance becomes less
effective empty dust bag.
If large quantities of dust are being
produced, a hose-pipe can be connected
to the dustbag connector. Use the 26 mm
diameter Atlas Copco hose-pipe, which fits
the Atlas Copco wet-and-dry vacuum
cleaner as well as ordinary household
vacuum cleaners.
When sanding metal the dust suction
facility should not be used, because of the
risk of fire from flying sparks.
When sanding, guide the machine without applying special pressure. The weight of
the machine itself is quite sufficent for good sanding results.
By ataching the stationary mounting
device, sanding can be carried out both
horizontally and vertically. Screw the two
plastic parts together and fasten the longer
part to the uppermost side of the machine
with the capstan-head screw. Secure the
machine with the two clamps to a work
top.
*Not included in standard equipment,
available as an accessory.
Switching the
machine on and
off
Dust extraction
Advice for
operation
Stationary device
(Accessory*)
2
1
65x410mm
2,5x16inch
HBS 65

4
ENGLISH HBS 65
The ventilation slots of the machine must be kept clear at all times.
In order to guarantee constant readiness for operation, the machine should be
checked for worn carbon brushes at one of the AEG after–sales service agencies.
Use only AEG accessories and spare parts. Should components need to be
replaced which have not been described, please contact one of our AEG service
agents (see our list of guarantee/service addresses).
If needed, an exploded view of the tool can be ordered. Please state the ten–digit
No. as well as the machine type printed on the label and order the drawing at your
local service agents or directly at: Atlas Copco Electric Tools GmbH, Postfach 320,
D–71361 Winnenden.
Further accessories with part numbers are shown in our catalogues.
Maintenance
Accessories

5
DEUTSCH HBS 65
Sie sind anspruchsvoll und erwarten Qualität, die Ihnen Atlas Copco bietet.
Für Sie haben wir ein haltbares und möglichst sicheres Elektrowerkzeug gebaut.
Bitte lesen Sie vor Inbetriebnahme Ihres Gerätes die Gebrauchsanleitung, um Ihr
Elektrowerkzeug effektiv und gefahrlos nutzen zu können.
Wir sind sicher, daßSie mit AEG-Elektrowerkzeugen von Atlas Copco Ihre richtige
Wahl getroffen haben.
Nennaufnahme 600 W. . . . . . . . . . . . . . . . . . . .
Bandgeschwindigkeit Leerlauf 190 m/min. . . . . . . .
Schleifbreite 65 mm. . . . . . . . . . . . . . . . . . . . . . . .
Bandlänge 410 mm. . . . . . . . . . . . . . . . . . . . . . . . .
Schleiffläche 65x110 mm. . . . . . . . . . . . . . . . . . . .
Gewicht 2,2 kg. . . . . . . . . . . . . . . . . . . . . . . . . . .
JSicherheitshinweise der beiliegenden Broschüre beachten!
JBei längerem Bearbeiten von Holz oder bei gewerblichem Einsatz für Materialien, bei
denen gesundheitsgefährdende Stäube entstehen, ist das Elektrowerkzeug an eine
geeignete Absaugvorrichtung anzuschließen (z.B.Atlas Copco Absaugsystem
AS 3 W). (In Deutschland werden für Holzstäube aufgrund TRGS 553 geprüfte
Absaugeinrichtungen gefordert).
Für andere Materialien mußder gewerbliche Betreiber die speziellen Anforderungen
mit der zuständigen Berufsgenossenschaft klären.
JSteckdosen in Außenbereichen müssen mit Fehlerstrom-Schutzschaltern
ausgerüstet sein. Das verlangt die Installationsvorschrift für Ihre Elektroanlage. Bitte
beachten Sie das bei der Verwendung unseres Gerätes –sprechen Sie mit Ihrem
Elektroinstallateur.
JBeim Arbeiten mit der Maschine stets Schutzbrille tragen. Schutzhandschuhe, festes
und rutschsicheres Schuhwerk und Schürze werden empfohlen.
JSpäne oder Splitter dürfen bei laufender Maschine nicht entfernt werden.
JGehäuse der Maschine nicht anbohren, da sonst die Schutzisolierung unterbrochen
wird (Klebeschilder verwenden).
JVor allen Arbeiten an der Maschine Stecker aus der Steckdose ziehen.
Maschine nur ausgeschaltet an die Steckdose anschließen.
JAnschlußkabel stets vom Wirkungsbereich der Maschine fernhalten. Kabel immer
nach hinten von der Maschine wegführen.
JBeim Schleifen von Metall wegen Brandgefahr durch Funkenflug keine
Staubabsaugung verwenden.
Der A-bewertete Geräuschpegel des Gerätes beträgt typischerweise:
Schalldruckpegel = 89 dB (A).
Schalleistungspegel = 102 dB (A).
Gehörschutz tragen!
Meßwerte ermittelt entsprechend EN 50 144.
Die Hand-Arm Vibration ist typischerweise niedriger als 2,5 m/s2.
Meßwerte ermittelt entsprechend EN 50 144.
Nur an Einphasen-Wechselstrom und nur an die auf dem Leistungsschild
angegebene Netzspannung anschließen. Anschlußist auch an Steckdosen ohne
Schutzkontakt möglich, da eine Schutzisolierung nach DIN 57 740/ VDE 0740 bzw.
CEE 20 vorliegt. Die Funkentstörung entspricht der Europanorm EN 55014.
Der Bandschleifer ist geeignet zum Flächenschleifen von Holz, Kunststoff und Metall.
Dieses Gerät darf nur wie angegeben bestimmungsgemäß verwendet werden.
Technische
Daten
Hinweise für
Ihre Sicherheit
Geräusch-
meßwerte
Vibrations-
meßwerte
Netzanschluß
Verwendung

6
DEUTSCH HBS 65
Vor dem Schleifbandwechsel das
Schleifband etwas zur offenen
Maschinenseite hin verstellen, da das
neue Schleifband unter Umständen am
Maschinengehäuse streifen kann; hierzu
Bandjustierschraube bei laufender
Maschine nach links drehen.
Vor allen Arbeiten an der Maschine
Stecker aus der Steckdose ziehen.
1. Entspannhebel nach vorn ziehen.
2. Verbrauchtes Band entnehmen und neues
Band aufziehen. Darauf achten, daßdie
Pfeilrichtung auf der Inneseite des Bandes
mit dem Pfeil auf der Maschine
übereinstimmt.
3. Entspannhebel wieder einklappen.
4. Maschine einschalten und das Schleifband
mit der Bandjustierschraube so ausrichten,
das es mit der äußeren Kante der
Schleifbandauflage abschließt.
Kurzbeschreibung
65x410mm
2,5x16inch
Änderungen: Text, Bild und Daten entsprechen dem technischen
Stand zur Zeit des Drucktermins. Änderungen im Sinne der
Weiterentwicklung unserer Produkte sind vorbehalten.
Integrierte Staubabsaugung
Staubsack
Arretierknopf für Schalterdrücker
Entspannhebel für Schleifbandwechsel
Schalterdrücker
Schleifbandauflage
Absaugstutzen
Justierschraube für Bandlauf
Schleifband
wechseln
65x410mm
2,5x16inch

7
DEUTSCH HBS 65
Momentschaltung
Einschalten: Ein-/Ausschalter drücken.
Ausschalten: Ein-/Ausschalter loslassen.
Dauerschaltung
Einschalten: Ein-/Ausschalter drücken und
dann Arretierknopf drücken,
Ein-/Ausschalter loslassen.
Ausschalten: Ein-/Ausschalter drücken
und loslassen.
Maschine schon vor dem Einschalten fest
mit beiden Händen festhalten.
Einschalten nur in abgehobener Position.
Absaugstutzen mit Staubsack auf den
Ausblaskanal der Maschine stecken.
Bei nachlassender Saugleistung den
Staubsack entleeren.
Bei großen Staubmengen kann an den
Absaugstutzen auch ein Saugschlauch
angeschlossen werden. Hierzu den Atlas
Copco-Saugschlauch ø26 mm, passend
für Naß- und Trockensauger sowie
Haushaltstaubsauger verwenden.
Beim Schleifen von Metall wegen
Brandgefahr durch Funkenflug keine
Staubabsaugung verwenden.
Maschine beim Schleifen ohne Druck führen. Das Eigengewicht der Maschine
genügt für gute Schleifergebnisse.
Durch Anbau der Stationäreinrichtung
kann in horizontaler oder vertikaler Lage
geschliffen werden.
Montage: Die beiden Kunststoffteile
zusammenschrauben und die
Stationäreinrichtung mit den
Knebelschrauben an der Maschine
festschrauben. Mit den Spannzwingen die
Stationäreinrichtung an einer Tischplatte
befestigen.
* Im Lieferumfang nicht enthalten,
empfohlene Ergänzung aus dem
Zubehörprogramm.
Ein-/Ausschalten
Staubabsaugung
Arbeitshinweise
Stationär-
einrichtung
(Zubehör*)
2
1
65x410mm
2,5x16inch
HBS 65

8
DEUTSCH HBS 65
Stets die Lüftungsschlitze der Maschine sauber halten.
Um eine ständige Betriebsbereitschaft zu gewährleisten, sollte die Maschine einmal
jährlich auf abgenutzte Kohlebürsten in einem AEG-Kundendienststützpunkt
untersucht werden.
Nur AEG Zubehör und Ersatzteile verwenden. Bauteile, deren Austausch nicht
beschrieben wurde, bei einer AEG Kundendienststelle auswechseln lassen
(Broschüre Garantie/Kundendienstadressen beachten).
Bei Bedarf kann eine Explosionszeichnung des Gerätes unter Angabe der
Maschinen Type und der zehnstelligen Nummer auf dem Leistungsschild bei Ihrer
Kundendienststelle oder direkt bei Atlas Copco Electric Tools GmbH, Postfach 320,
D–71361 Winnenden angefordert werden.
Weiteres Zubehör mit den Bestellnummern ersehen Sie bitte aus unseren Katalogen.
Wartung
Zubehör

9
FRANÇAIS HBS 65
Vous avez des exigences et vous voulez de la qualité–une qualitéque vous offre
Atlas Copco.
Nous avons mis au point pour vous un outil électrique de longue durée vous offrant
un maximum de sécurité. Avant la mise en service de votre appareil, veuillez lire
attentivement le mode d’emploi afin d’en tirer le plus d’efficacitéet d’éviter tout risque
de danger.
Nous sommes convaincus qu’avec les outils électriques Atlas Copco vous avec fait
le choix qu’il fallait.
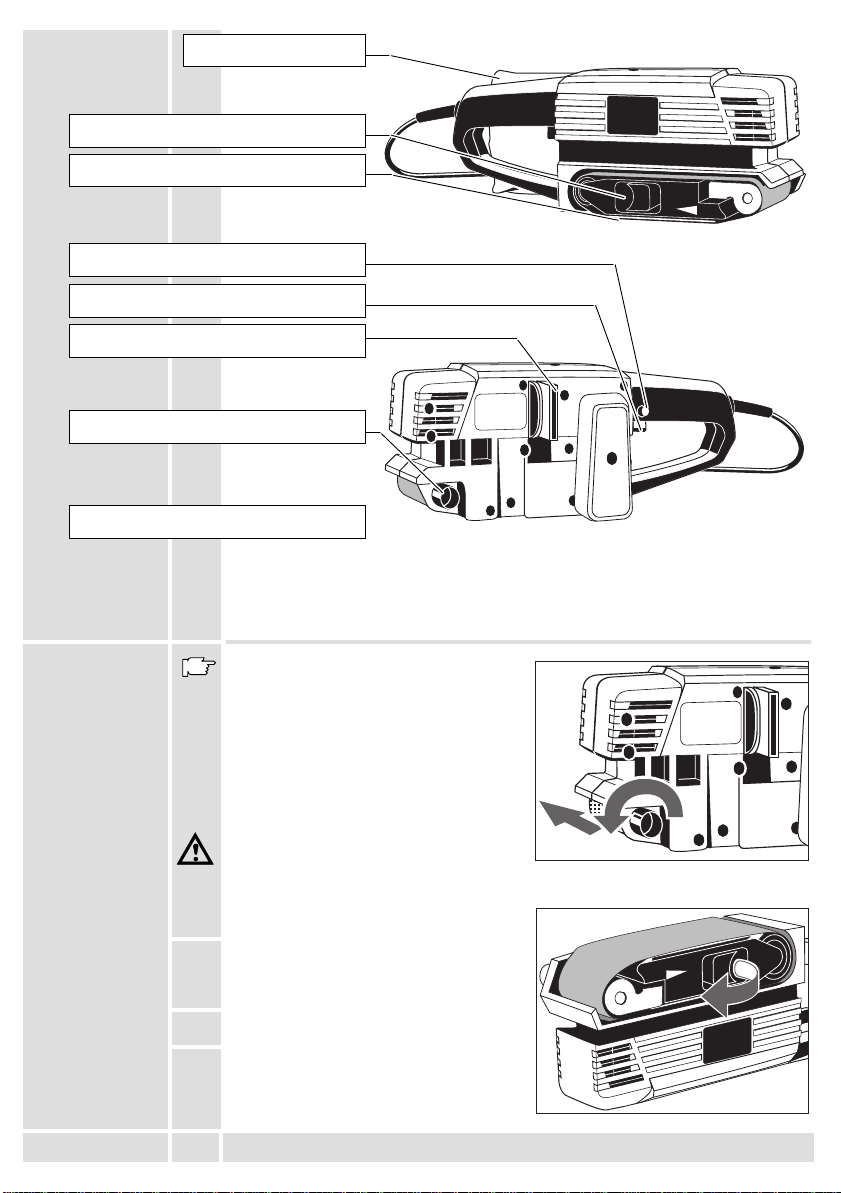
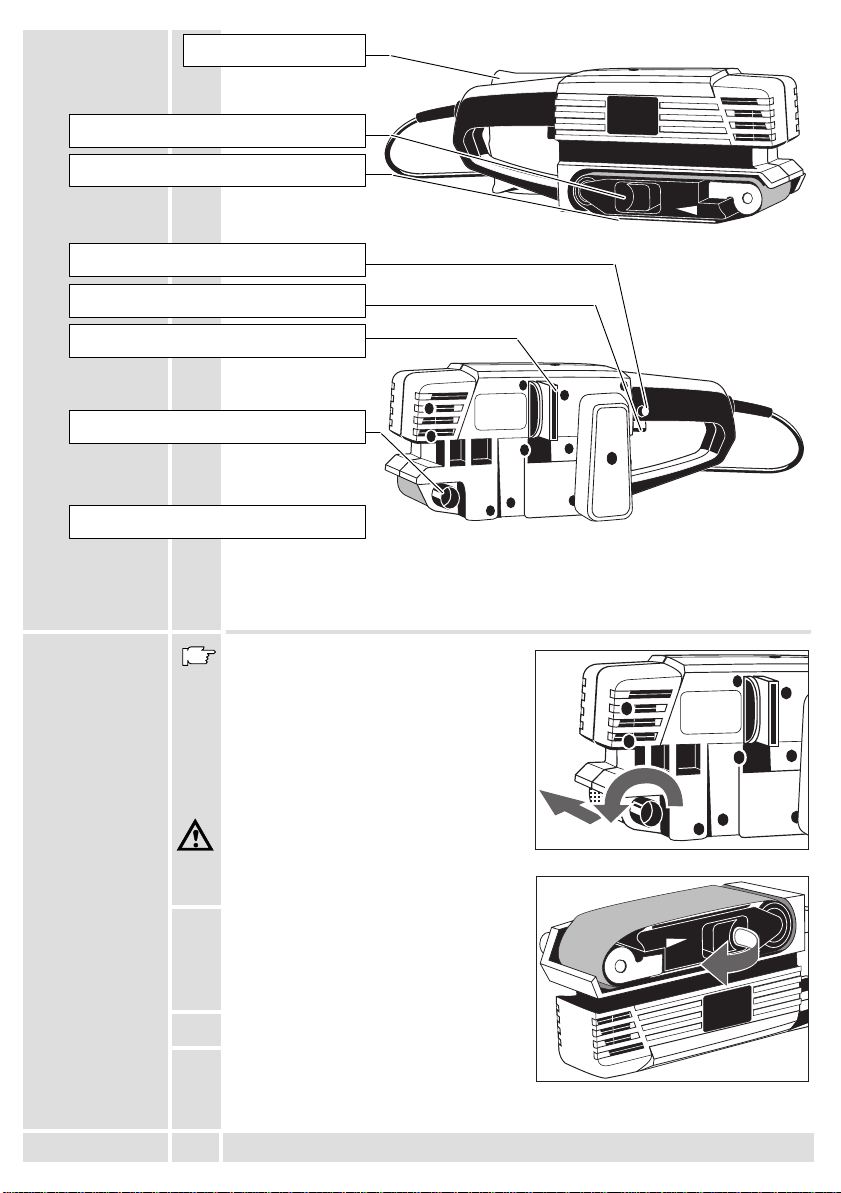
Puissance absorbée 600 W. . . . . . . . . . . . . . . .
Vitesse de bande àvide 190 m/min. . . . . . . . . . . . .
Largeur de la bande 65 mm. . . . . . . . . . . . . . . . .
Longueur de la bande 410 mm. . . . . . . . . . . . . . .
Surface de ponçage 65x110 mm. . . . . . . . . . . . .
Poids 2,2 kg. . . . . . . . . . . . . . . . . . . . . . . . . . . . .
JRespecter les instructions de sécuritése trouvant dans le prospectus ci-joint.
JLors de travaux de ponçage de longue durée, bois ou autres matériaux dégageant
des poussières nocives pour la santé, la machine est àraccorder àun appareil
d’aspiration (Atlas Copco AS 3 W).
JLes prises de courant se trouvant àl’extérieur doivent être équipées de disjoncteurs
de protection, répondant ainsi àla prescription de mise en place de votre installation
électrique. Veuillez, d’une part, en tenir compte lors de l’utilisation de notre appareil
et d’autre part, en parler àvotre électricien.
JToujours porter des lunettes protectrices lorsqu’on travaille avec la machine. Des
gants de sécuritéet un masque de protection sont recommandés.
JNe jamais enlever les copeaux ni les éclats lorsque la machine est en marche.
JNe pas percer le carter de la machine; ceci pourrait entraîner une détérioration de
l’isolation de protection (utiliser des autocollants).
JAvant tous travaux sur la machine extraire la fiche de la prise de courant.
Ne raccorder la machine au réseau que si l’interrupteur est en position arrêt.
JLe câble d’alimentation doit toujours se trouver en dehors du champ d’action de la
machine. Toujours maintenir le câble d’alimentation àl’arrière de la machine.
JEn raison des risques d’incendie, il est déconseilléd’avoir recours au sysréme
d’aspiration pour le ponçage des métaux.
Les mesures réelles (A) des niveaux de bruit de la machine sont:
Intensitéde bruit = 89 dB (A).
Niveau de bruit = 102 dB (A).
Toujours porter des casques protecteurs!
Valeurs de mesures obtenues conformément àla norme européenne 50 144.
La vibration de l’avant–bras est en–dessous de 2,5 m/s2.
Valeurs de mesures obtenues conformément àla norme européenne 50 144.
Nos machines fonctionnent uniquement sur courant alternatif monophasé. S’assurer
que la tension du réseau correspond effectivement àcelle indiquée sur la plaque
signalétique de la machine. Le branchement sur une prise de courant sans mise à
terre est possible du fait de la double isolation selon normes DIN 57 740/VDE 0740
et CEE 20. Antiparasitage selon normes européennes EN 55014.
La ponceuse a bande peut-être utilisée pour poncer le bois, les plastiques et le
métal.
Comme déjàindiqué, cette machine n’est conçue que pour une utilisation normale.
Caractéristiques
techniques
Conseils de
sécurité
Mesure de bruit
Valeur de
vibration
mesurée
Branchement
secteur
Utilisation

10
FRANÇAIS HBS 65
Mettre la machine en route. Tourner la vis
d’ajustage vers la gauche et faire glisser la
bande vers l’extérieur d’environ 2à3cm.
Arrêter la machine.
Avant tous travaux sur la machine extraire
la fiche de la prise de courant.
1. Tirer le lever vers l’avant.
2. Enlever la bande et la remplacer. Veiller à
faire corresspondre le sens des flèches qui
se trouvent sur la bande et sur la machine.
3. Repousser le lever.
4. Mettre en route et positionner la bande au
moyen de la vis.
Description
65x410mm
2,5x16inch
Modifications: Les textes, les illustrations et les données
techniques correspondent àla situation au moment de l’impression.
Toutes modifications techniques sont réservées dans le cadre du
développement technique permanent.
Aspiration intégrée de la poussière
Sac àpoussières
Bouton de blocage
Lever de tension de la bande
Interrupteur
Semelle
Manchon d’aspiration
Vis de réglage de la bande (centrage)
Remplacement
de la bande
65x410mm
2,5x16inch

11
FRANÇAIS HBS 65
Marche momentanée
Mise en marche: appuyer sur l’interrupteur
Marche/Arrêt
Arrêt: lâcher l’interrupteur Marche/Arrêt
Marche continue
Mise en marche: appuyer d’abord sur
l’interrupteur marche/arrêt puis sur le
bouton de blocage, lâcher l’interrupteur
marche/arrêt.
Arrêt: appuyer sur l’interrupteur
marche/arrêt et lâcher.
Avant la mise en route, maintenir la
machine en l’air avec les deux mains.
Mettre en place le manchon d’aspiration et
le sac.
Si le rendement de l’aspiration baisse,
vider le sac.
Si le volume de poussières est
particulièrement important, un aspirateur
peut être raccordésur la buse d’aspiration.
Il convient àcet effet d’utiliser le tuyau
d’aspiration Atlas Copco de 26 mm de
diamètre adaptables sur les aspirateurs
Atlas Copco àsec et humide et sur les
aspirateurs ménagers.
En raison des risques d’incendie, il est
déconseilléd’avoir recours au sysréme
d’aspiration pour le ponçage des métaux.
Il n’est pas nécessaire, lors du ponçage, d’exercer une pression particulière sur la
machine, son propre poids suffit.
En position stationaire, vous pourrez
poncer en position verticale ou horizontale.
Vissez les deux éléments plastique et
vissez la partie la plus longue sur la partie
haute de la machine. Fixez la ponceuse
avec les deux serre-joints sur l’établi.
*Ces pièces ne font pas partie de la
livraison. Il s’agit làde compléments
proposés pour votre machine et énumérés
dans le catalogue d’accessoires.
Mise en
marche/arrêt
Aspiration de la
poussière
Conseils
pratiques
Montage
stationaire
(accessoire*)
2
1
65x410mm
2,5x16inch
HBS 65

12
FRANÇAIS HBS 65
Tenir toujours propre les orifices de ventilation de la partie moteur.
Afin de garantir une disponibilitéde service permanente, il est recommandéde faire
contrôler une fois par an les balais (charbons) auprès d’un service après–vente
AEG.
N’utiliser que des pièces et accessoires AEG. Pour des pièces dont l’échange n’est
pas décrit, s’adresser de préférence aux stations de service après-vente AEG (voir
brochure Garantie/Adresses des stations de service après-vente).
Si besoin est, une vue éclatée de l’appareil peut être fournie. S’adresser, en
indiquant bien le numéro àdix chiffres portésur la plaque signalétique, àvotre
station de service après–vente (voir liste jointe) ou directement àAtlas Copco
Electric Tools GmbH, B.P. 320, D–71361 Winnenden.
Pour d’autres accessoires, consulter notre catalogue.
Entretien
Accessoires

13
ITALIANO HBS 65
La vostra richiesta ed aspettativa èquella di acquistare merce d’elevata qualità-
qualitàofferta da Atlas Copco.
Noi costruiamo per voi utensili elettrici durevoli e affidabili.
Si prega di leggere attentamente le istruzione al primo utilizzo cosicchési possa
utilzzare l’utensile elettrico in modo piùsicuro e corretto.
Siamo sicuri che acquistare gli utensili elettrici AEG di Atlas Copco sia la scelta
migliore.
Potenza assorbita 600 W. . . . . . . . . . . . . . . . . .
Velocitàa vuoto 190 m/min. . . . . . . . . . . . . . . . . . . .
Larghezza levigatura 65 mm. . . . . . . . . . . . . . . . .
Lunghezza nastro 410 mm. . . . . . . . . . . . . . . . . .
Dimensioni levigtura 65x110 mm. . . . . . . . . . . . .
Peso 2,2 kg. . . . . . . . . . . . . . . . . . . . . . . . . . . . .
JSi prega di leggere con attenzione le istruzioni riguardanti la sicurezza, nel volantino
allegato.
JPer lunghe lavorazioni nel legno o con altri materiali che producono poveri dannose
alla salute, e’prescritto l’utilizzo sull’utensile dell’aspirazione polvere (Atlas Copco
AS 3 W).
JGli apparecchi mobili usati all’aperto devono essere collegati interponendo un
interruttore di sicurezza per guasti di corrente.
JDurante l’uso dell’apparecchio utilizzare sempre gli occhiali di protezione. Inoltre si
consiglia di usare sistemi di protezione per la respirazione e per l’udito, oltre ai guanti
di protezione.
JNon rimuovere trucioli o schegge mentre l’utensile èin funzione.
JEvitare di forare la carcassa dell’utensile per non danneggiare l’isolamento.
(Utilizzare placchette adesive).
JPrima di effettuare qualsiasi lavoro sulla macchina togliere la spina dalla presa di
corrente.
Inserire la spina solo con interruttore su posizione “OFF”.
JTenere sempre lontano il cavo di collegamento dall’area di lavoro dell’attrezzo.
JPer levigatura di metallo non aspirare la polvere causa scintille e pericolo di incendio.
La misurazione A del livello di rumorositàdi un utensile èdi solito:
Livello di rumorosità= 89 dB (A).
Potenza della rumorosità= 102 dB (A).
Utilizzare le protezioni per l’udito!
Valori misurati conformemente alla norma EN 50 144.
Le vibrazioni sull’elemento mano-braccio di solito sono inferiori a 2.5 m/s2.
Valori misurati conformemente alla norma EN 50 144.
Alimentazione dell’utensile: corrente alternata monofase. Importante: la tensione
della rete deve corrispondere a quella riportata sulla targhetta dell’utensile. Il
collegamento épossibile anche con prese non munite di contatto di protezione: é
previsto infatti un isolamento di protezione conforme a norme DIN 57740/VDE 0740
(CEE 20). La schermatura contro i radiodisturbi éconforme alla norma
europea EN 55014.
La levigatrice a nastro èadatta per trattare superfici piane di legno, plastica e
metallo.
Utilizzare il prodotto solo per l’uso per cui èprevisto.
Dati tecnici
Norme di
sicurezza
Livello di
rumorosità
Livello di
vibrazione
Collegamento
alla rete
Possibilità’ di
utilizzo

14
ITALIANO HBS 65
Per evitare che il nuovo nastro tocchi
carcassa della levigatrice, girare verso
simistra la vite con apparecchio
funzionante, fare sporgere il nastro da
sosituire ca. 2-3 cm oltre i rulli e verso il
lato esterno dell’apparecchio.
Prima di effettuare qualsiasi lavoro sulla
macchina togliere la spina dalla presa di
corrente.
1. Tirare la leva in avanti, togliere il nastro da
sostituire e montare quello nuova.
2. Fare attenzione che la direzione della
freccia sul lato interno del nastro sia rivolta
nella stessa direzione di quella sulla
levigatrice.
3. Fare ritornare la leva nella posizione
orginale.
4. Con qualche giro di prova e attraverso la
vite di aggiustaggio portare il nastro in
positione da formare linea unica con il lato
esterno dell’appoggio nastro.
Breve indicazione
65x410mm
2,5x16inch
Modifiche: Testo, figure e dati corrispondono allo standard tecnico
aggiornato all’epoca della stampa. Ci riserviamo pertanto eventuali
modifiche tecniche dovute all’ulteriore sviluppo dei nostri prodotti.
Aspirazione integrata
Sacchetto
raccoglipolvere
Blocco interruttore
Leva sboccaggio nastro
Interruttore
Appoggio nastro
Attacco aspirazione
Vite aggiustaggio nasto
Sostituzione
nastro
65x410mm
2,5x16inch

15
ITALIANO HBS 65
Inserimento momentaneo
Accensione: premere l’interruttore.
Fermo: lasciare libero l’interruttore.
Funzionamento continuo
Accensione: premere l’interruttore e
successivamente il blocco interruttore, poi
lasciare libero l’interruttore.
Fermo: premere e poi lasciare libero
l’interruttore.
Ancora prima dell’aziona tenere
l’apparecchio con ambedue le mani.
Avviamento solo con apparecchio
sollevato.
Mettere l’attacco con sacchetto
raccoglipolvere sul bocchettone
espulsione polvere della levigatrice.
In caso di insufficiente aspirazione
svuotare il sacchetto.
Nel caso in cui la polvere sia prodotta in
quantitàelevata, al manicotto di
aspirazione potràessere collegato un tubo
di aspirazione. Utilizzare in tal caso tubi di
aspirazione dell Atlas Copco con diametro
di 26 mm adatti per l’attacco agli aspiratori
a secco e a umido e agli aspirapolvere
domestici della Atlas Copco.
Per levigatura di metallo non aspirare la
polvere causa scintille e pericolo di
incendio.
Durante la levigatura non esercitare molta pressione sull’aparecchio in quanto è
sufficiente il peso proprio.
il dispositivo da banco consente levigatura
orizontale e verticale. Avvitare le due parti
in plastica e con la vite ad alette fissare la
parte piùlunga sulla parte superiore
dell’apparecchio. Fissare poi
l’apparecchio, con i due morsetti, al banco
di lavoro.
* Non incluso nella dotazione standard,
disponibile a parte come accessorio.
Accensione–
Spegnimento
Aspirazione
polvere
Istruzioni d’uso
Accessori da
banco
(Accessorio*)
2
1
65x410mm
2,5x16inch
HBS 65

16
ITALIANO HBS 65
Tener sempre ben pulite le fessure di ventilazione dell’apparecchio.
Al fine di garantire un rendimento costante durante le operazioni le spazzole di
carbone della macchina dovrebbe essere controllate annualmente presso i centri
assistenza AEG.
Utilizzare esclusivamente accessori e pezzi di ricambio AEG. L’installazione di pezzi
di ricambio non specificamente prescritti dall’AEG va preferibilmente effettuata dal
servizio di assistenza clienti AEG (ved. opuscolo Garanzia/Indirizzi Assistenza
tecnica).
In caso di mancanza del disegno esploso, puòessere richiesto al seguente indirizzo:
Atlas Copco Tools Italia Via Fratelli Gracchi 39, 20092 Cinisello Balsamo Mi.
Per la vasta gamma di accessori e relativi codici consultare i nostri cataloghi.
Manutenzione
Accessori

17
ESPAÑOL HBS 65
Usted exige lo mejor y compra calidad –la calidad que ofrece Atlas Copco. Hemos
fabricado para usted una herramienta fiable y duradera. Sólo es posible trabajar de
forma eficaz y sin riesgo para su salud si lee atentamente estas instrucciones
antes de usar la herramienta. Queremos satisfacer a nuestros clientes y nos
gustaría que Vd. volviera a comprar una Herramienta Eléctrica AEG de Atlas
Copco.
Potencia nominal 600 W. . . . . . . . . . . . . . . . . . .
Velocidad de la banda Marcha en vacío 190 m/min
Ancho de la lija 65 mm. . . . . . . . . . . . . . . . . . . . . .
Longitud de la banda 410 mm. . . . . . . . . . . . . . . .
Superficie de lijado 65x110 mm. . . . . . . . . . . . . .
Peso 2,2 kg. . . . . . . . . . . . . . . . . . . . . . . . . . . . .
JPreste atención a las instrucciones de seguridad del libro adjunto.
JEl polvo que se origina cuando se trabaja en madera o cuando la herramienta se
usa en materiales industriales es peligroso para la salud. Evite su inhalación. En
este caso, conecte la herramienta a un aspirador (Atlas Copco AS 3 W (accesorio
opcional)).
JConecte siempre la máquina a una red protegida por interruptor diferencial y
magnetotérmico, para su seguridad personal, según normas establecidas para
instalaciones eléctricas de baja tensión.
JPara trabajar con la máquina, utilizar siempre gafas de protección,guantes, calzado
de seguridad antideslizante, asícomo es recomendable usar protectores auditivos.
JNunca se debe intentar limpiar el polvo o viruta procedente del taladrado con la
máquina en funcionamiento.
JNo perforar la carcasa de la máquina, pues se rompería el doble aislamiento.
JDesconecte siempre el enchufe antes de llevar a cabo cualquier trabajo en la
máquina.
Enchufar la máquina a la red solamente en posición desconectada.
JMantener siempre el cable separado del radio de acción de la máquina.
JCuando lije metales no emplee Vd. aspiratión alguna debido al peligro de incendio
por formación de chispas.
El nivel de ruido de la máquina se eleva normalmente:
Presión acústica = 89 dB (A).
Resonancia acústica = 102 dB (A).
Usar protectores auditivos!
Determinación de los valores de medición según norma EN 50 144.
La vibratión en la mano del operario es normalmente menor de 2.5 m/s2.
Determinación de los valores de medición según norma EN 50 144.
Conectar solamente a corriente alterna monofásica y solo a la tensión indicada en
la placa de características. También se puede conectar a una base de enchufe sin
contacto de protección, ya que el aparato posee un aislamiento según norma DIN
57 740/VDE 0740 correspondientes a CEE 20.
La protección antiparasitaria corresponde a la norma europea EN 55014.
La lijadora de banda estádiseñada para lijar madera, plastico y metal.
Utilizar este producto unicamente para el uso al que estádestinado.
Datos técnicos
Consejos de
seguridad
Valor sonoro
medido
Valor medido de
vibración
Conexión
eléctrica
Uso

18
ESPAÑOL HBS 65
Antes de efectuar la sustitución, desplace
Vd. la banda de lija mediante giro a la
izquierda del tornillo de ajuste de la banda,
con la máquina en marcha, unos 2-3 cm
en dirección al lado abierto de la máquina,
rebasando los rodillos, ya que la nueva
banda de lija a colocar eventualmente
podría rozar la carcasa de la máquina.
Desconecte siempre el enchufe antes de
llevar a cabo cualquier trabajo en la
máquina.
1. Tire Vd. de la palanca de distensión hacia
delante.
2. Preste atención para que la dirección de la
flecha en la cara interior de la cinta
coincida con la flecha que figura en la
máquina.
3. Vuelva la palanca de distensión
nuevamente hacia atrás.
4. Mediante una marcha de prueba aline la
banda de lija con ayuda del tornillo de
ajuste, de tal forma que coincida con el
borde exterior de la plataforma de la
banda de lijar.
Breve descripción
65x410mm
2,5x16inch
Modificaciones: El texto, los diagramas y los datos son correctos
en el momento de imprimir este manual. En interés de la mejora
continua de nuestros productos, las especificaciones técnicas están
sujetas a modificación sin previo aviso.
Extración integrada de polvo
Bolsa para polvo
Botón de retención.
Planca de distensión
Interruptor.
Platforma de la banda de lijado
Bocas de aspiración
Mando de centraje de la banda de lija
Sustitución de la
banda de lija
65x410mm
2,5x16inch

19
ESPAÑOL HBS 65
Conexión momentánea
Conexión: Presionar el interruptor de
co/desconexión.
Desconexión: Soltar el interruptor de
co/desconexión.
Conexión permanente
Conexión: Presionar el interruptor de
co/desconexión y entonces el botón de
bloqueo, soltar el interruptor de
co/desconexión.
Desconexión: Presionar el interruptor de
co/desconexión y entonces soltarlo.
En cualquier caso, antes de conectarla
deberásujetarse la máquina con las dos
manos. Se conectarásolamente cuando
estélevantada, es decir, no apoyada.
Introduzca el racor de aspiración con el
saco de polvo, en el canal de soplado de
la máquina.
Cuando se note disminución de la
potencia aspiradora, vacíar el saco de
polvo.
Para lijados de grandes superficies se
puede conectar al racor una manguera de
aspiración. Asíla manguera ø26 mm sirve
para todos los aspiradores seco-húmedo
de Atlas Copco.
Cuando lije metales no emplee Vd.
aspiratión alguna debido al peligro de
incendio por formación de chispas.
El conductor de conexión, durante los trabajos, se echaráhacia atrás para que no
resulte dañado.
Mediante el adosado del dispositivo
estacionario se puede lijar tanto en el
sentido horizontal, como, también, en
posición vertical. Atornille Vd. juntas las
dos piezas de plástico y sujete la parte
más larga a la parte superior de la
máquina, con la ayuda del tornillo de
muletilla. Sujete la máquina a un tablero
de mesa con ayuda de los dos tornillos de
apriete.
* No incluido en el equipo estándar,
disponible en la gama de accesorios.
Control de
conexión -
desconexión
Trabajar de
manera
ecolólogica
Sugerencias de
trabajo
Instalación
estacionara
(accessorio*)
2
1
65x410mm
2,5x16inch
HBS 65
Table of contents
Languages:
Other AEG Power Tools manuals