AEI SGR-9206-SM User manual

VoIP
VoIP
(DECT)
Phone
SGR-9206-SM /
SGR
SGR-9206-S /
SGR
SGR-7206-S /
SGR
Phone
SGR
-9106-SM
SGR
-9106-S
SGR
-7106-S
QIG v1.1

1
1
O
Ov
ve
er
r
v
vi
ie
ew
w
This phone is a full-
feature telephone that provides voice
operate this product and take advantage of its features.
P
P
c
ck
k
g
ge
e
C
Co
on
nt
te
en
nt
ts
s
When unpacking the phone, ensure all the following items are present and undamaged. If anything appears to e
missing or
roken, contact your dealer for a replacement.
1. B se Unit
2. Corded H ndset
3.
St nd
4.
AC Ad ptor
5. RJ-45 C ble
6. Quick Inst ll tion Guide
(This document)
2
2
P
Pr
ro
od
du
uc
ct
t
D
De
es
sc
cr
ri
i
p
p
The following
contains important information to help you familiarize with the
F
Fr
ro
on
nt
t
V
Vi
ie
ew
w
N me
1
Ring Indicator
2 Dialing Pad
3 Function keys
Mute
Speaker
Volume
4
Speed dial keys
feature telephone that provides voice
communication. Read this QIG
carefully to learn how to
operate this product and take advantage of its features.
When unpacking the phone, ensure all the following items are present and undamaged. If anything appears to e
roken, contact your dealer for a replacement.
(This document)
p
p
t
ti
io
on
n
contains important information to help you familiarize with the
functions of the
VoIP
Description
Ring Indicator
A red light indicator means that you have incoming
calls.
Press the uttons to dial a phone num er or enter
alpha etical characters.
Press to put an active call on hold.
Press to start talk without handset.
Press to increase or decrease the volume of the ringer
tone or speakerphone.
Speed dial keys
Press to dial the preset num er. (a ove Line key)
carefully to learn how to
When unpacking the phone, ensure all the following items are present and undamaged. If anything appears to e
VoIP
phone.
A red light indicator means that you have incoming
Press the uttons to dial a phone num er or enter
Press to increase or decrease the volume of the ringer
N me Description
5 LINE 1 / LINE 2 To indicate a line een used as the following status:
- Idle: No LED indication.
- In call: Red LED.
- In on-hold call: Blinking red LED.
6 End key Press to end a phone call
B
B
c
ck
k
V
Vi
ie
ew
w
NO.
N me
Description
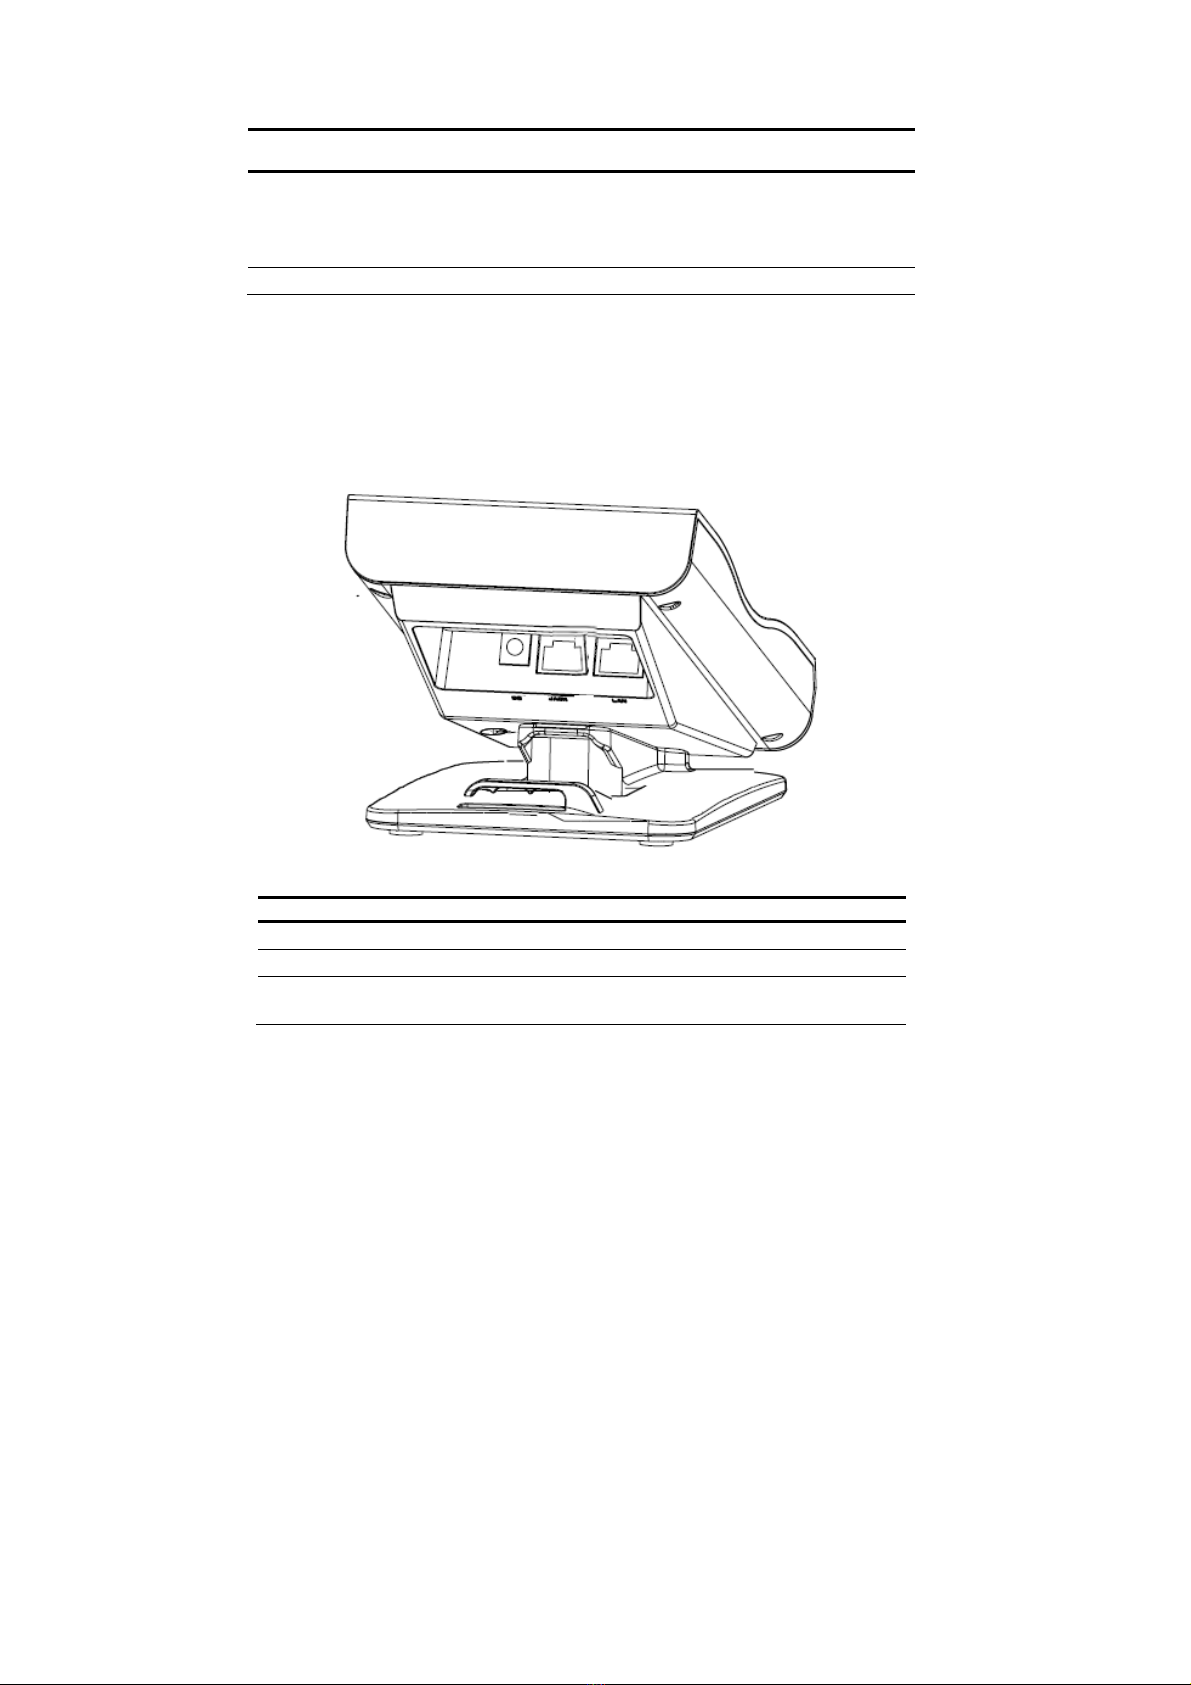
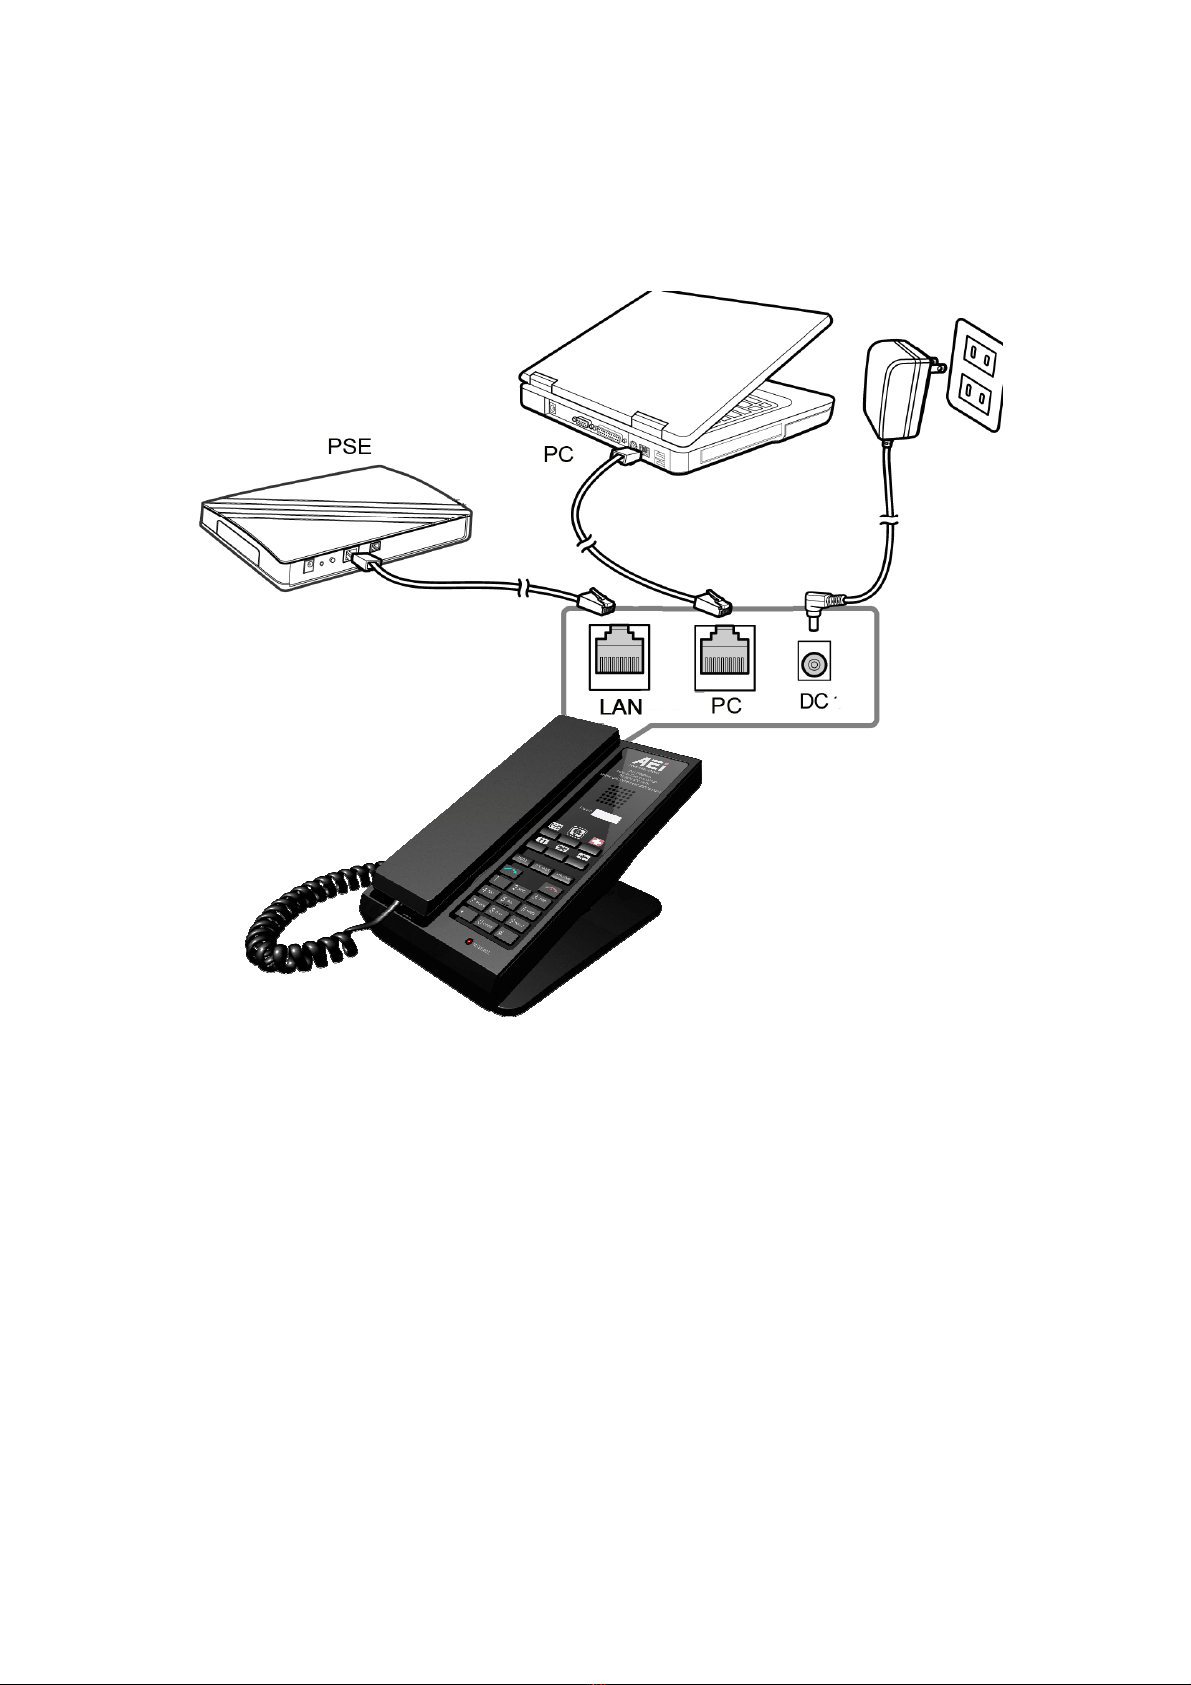
1 LAN port Connects to HUB, ADSL, or Switch(PSE)
2 PC port Connects to computer
3 DC jack Connects to AC power adapter. (Optional. While ase
unit is not powered via a PSE)
C
Co
on
nn
ne
ec
ct
ti
in
ng
g
t
th
he
e
P
Ph
ho
on
ne
e
The following illustration shows how to connect the power, LAN and PC ports of VoIP phone.
Power outlet

The following illustration shows how to install the phone and stand.
3
3
O
Op
pe
er
r
t
ti
io
on
ns
s
A
An
ns
sw
we
er
ri
in
ng
g
C
C
l
ll
l
An incoming call is indicated y a ringing tone and a flashing indicator at the top of oth handset and ase units. You
can answer the call y doing one of the followings:
•Pick up the h ndset to answer the call.
•Press the Line (Line1/Line2) key on the ase or handset to answer the call.
M
M
k
ki
in
ng
g
C
C
l
ll
l
Di ling with the Keyp d
•Enter the telephone num er with the alphanumerical keypad and the call will start automatically.
U
Us
si
in
ng
g
t
th
he
e
S
Sp
pe
ee
ed
d
d
di
i
l
l
k
ke
ey
ys
s
You can use the 6 pre-assigned speed dial hotkeys, to configure the most commonly dialed num ers. Use the function
to dial a num er quickly, instead of keying in a complete num er.
To call a num er using speed dialing, follow the steps elow:
•Press the speed dial hotkey that has een pre-assigned to the phone num er and the call will start automatically.
C
C
l
ll
l
O
Op
pt
ti
io
on
ns
s
While a call is in progress, a num er of additional options are availa le.
U
Us
si
in
ng
g
t
th
he
e
S
Sp
pe
e
k
ke
er
r
P
Ph
ho
on
ne
e
For hands free operation, you can use the uilt-in speaker to talk on the phone. To use the speakerphone, follow the
steps elow:

•While talking on the phone, press the SPEAKER key on the phone to ena le the Speakerphone function.
•Press Speaker key again to terminate the call.
P
Pu
ut
tt
ti
in
ng
g
C
C
l
ll
l
o
on
n
H
Ho
ol
ld
d
You may want to put a call on hold temporarily while doing some work or attending to a second incoming or outgoing
call. To put a call on hold, do one of the following:
•Press the HOLD key on the phone to put the call on hold.
•When you receive a second call, press the next availa le LINE key to attend to the new call, and the first call will e
put on hold automatically.
C
Ch
he
ec
ck
ki
in
ng
g
V
Vo
oi
ic
ce
e
M
Me
es
ss
s
g
ge
es
s
If the mess ge w iting indic tor at top of handset or ase unit lights up in red, it indicates that there are one or more
new messages in voicemail ox.
•Press the MESSAGE key on the phone to retrieve voice messages.
(An external ITSP or PBX must support voice message feature. And you need to set a voice message code efore using
the voice mail feature.)
4
4
S
Su
up
pp
po
or
rt
t
To configure through the we rowser, do the following:
•
Ensure the phone is powered up and connected to a DCHP network.
•
Press HOLD/MUTE *112*113# (HOLD for 2-Line / MUTE for 1-Line) on the ase, the IP address is announced y
the phone. Or Press *112*113 and then “LINE 1” (for 2-line phone) or green utton (for 1- line phone) on the
cordless handset, the IP address is displayed on the LCD screen
•
Open your rowser (such as Chrome, Firefox, etc.) and type in the we address of the phone. For example, http://
IP.address.of.thePhone:8000
•
When the We login front page is displayed. Enter the user name and the password and click Login.
The administrator’s user name and password are “ dmin” and “1234” respectively.
5
5
B
B
t
tt
te
er
ry
y
S
S
f
fe
et
ty
y
I
In
ns
st
tr
ru
uc
ct
ti
io
on
ns
s
•
CAUTION: Use only supplied attery.
•
Do not dispose of the attery in a fire. Check with local waste management codes for special disposal instructions.
•
Do not open or mutilate the attery. Released electrolyte is corrosive and cause urn or injury to the eyes or skin.
The electrolyte may e toxic if swallowed.
•
Exercise care in handling atteries in order not to create a short circuit with conductive materials.
•
Charge the attery provided with or identified for use with this product only in accordance with the instructions
and limitations specified in this guide.
6
6
I
Im
mp
po
or
rt
t
n
nt
t
I
In
nf
fo
or
rm
m
t
ti
io
on
n
•
Only use the attery provided y AEI, may e a risk of explosion if wrong type of attery is used.
•
Use only the power adapter supplied with this product.
•
If you do not use the handset for a long time, disconnect and remove the attery to prevent possi le leakage.
•
You may place the handset into the ase after each call in order to charge the attery.
•
For technical support, please email to support@aeicommunications.com.tw

Model:
SGR-9206-SM / SGR-9106-SM
SGR-9206-S / SGR-9106-S
SGR-7206-S / SGR-7106-S
This manual suits for next models
5
Table of contents
Other AEI IP Phone manuals


 User manual")


Popular IP Phone manuals by other brands


Polycom
Polycom SoundPoint IP 450 quick reference

Grandstream Networks
Grandstream Networks GXP1628 Quick user guide

Patton electronics
Patton electronics SmartLink 4050 Series Specification sheet

Cisco
Cisco SPA 508G quick start guide

Zultys
Zultys ZIP 33i Quick installation guide

Polycom
Polycom CX700 quick start guide


