Aerial MURA PSGC User manual

Aerial Machine and Tool Corp.
4298 JEB Stuart Hwy
Meadows of Dan, VA 24120
www.aerialmachineandtool.com
Phone: 276-952-2006
FAX: 276-952-2231
MURA Release Kit
(PSGC)
November 2013

MURA Release Kit - User’s Manual
Aerial Machine and Tool Corp. Page 2
Copyright Notice
This owner’s manual is copyrighted, all rights reserved. It may not, in whole or in
part, be copied, photocopied, reproduced, translated or reduced to any electronic
medium or machine readable form without prior consent in writing from Aerial
Machine and Tool Corp.
Table of Contents
Section Page
1. Introduction 3
2. PreightInspection 4
3. Functional/Annual Check 4
4. Cleaning 5
5. Assembly (Platform) 6
6. Assembly (Quick Release) 7
7. Assembly (Handle) 12
8. Operation 16
9. Parts List 17
10. Additional Photos for Reference 18

MURA Release Kit - User’s Manual
Aerial Machine and Tool Corp. Page 3
The following symbols are used throughout this manual:
WARNINGS indicate a procedure or situation that may result in serious
injury or death if instructions are not followed correctly.
CAUTIONS indicate any situation or technique that will result in potential
damage to the product, or render the product unsafe if instructions are not
followed correctly.
NOTES are used to emphasize important points, tips, and reminders.
1. Introduction
The MURA Release Kit is designed to be integrated into a vest system for retention to
the Aircraft. The MURAhas a working load of 5,000 lbs and an ultimate load of 8,000
lbs.
Your MURArelease and vest is an important piece of survival equipment. Proper care
and maintenance will ensure your vest will accomplish the level of safety performance it
is designed for. It is important that you become familiar with these instructions to safely
use this MURA re lease.
TheMURAreleasecanbeusedwithotationcollarsandbackpacktypedevicesas
long as the handle and quick release are free of obstructions.
Grooved pins are one time use only! Replace after removal
KEEP YOUR VEST AND RELEASE SYSTEM IN USABLE CONDITION. IMPROPER WEAR
MAY RESULT IN DAMAGE TO THE COLLAR. DO NOT WEAR ANY GARMENT OR
PIECE OF EQUIPMENT OVER THE RELEASE. IMPROPER USE OR NEGLIGENT
CARE OF THIS EQUIPMENT CAN CAUSE SERIOUS INJURY OR DEATH.

MURA Release Kit - User’s Manual
Aerial Machine and Tool Corp. Page 4
2. Preight Inspection
It is the responsibility of the air crewman to inspect the entire release system before
ightoperations.Performapreightinspectionpriortoeachightandatintervalsnot
to exceed 30 days. If damage is found during an inspection, the vest must be grounded
until repaired.
2.1. Inspect the outside of the release system for:
•Cuts,tears,andabrasiondamage
•Functionalityoftherelease
•Contaminationdamage
2.2. Ensure that the handle is attached and secure
2.3. Ensure the MURA performs properly using the thumb release.
2.4. Ensure that the MURA is secured to the vest.
3. Functional/Annual Check
This recommended functional check should be performed on the MURA periodically:
3.1. Remove the release handle from the pocket and pull the cable to actuate the quick
release. Ensure the force required to actuate the quick release is below 5 lbs.
3.2. Check the quick release assembly for cracks and gouges in the metal. Replace the
MURA if cracks or gouges are found. Scratches and chips in the paint are acceptable.
3.3.InspectthefabricandwebbingontheMURAforcutsorsignicantfraying,espe-
cially in areas around other metal components. Ensure stitching is intact and not frayed.
Replace the MURA if damage is found.
Note: Stitches will often have loose threads at the start or termination of the stitch pat-
tern, also known as the back stitches. If part of the thread on the back stitch has come
loose, this is not cause for rejection. Trim any loose back stitch threads to keep the
stitch from unraveling.

MURA Release Kit - User’s Manual
Aerial Machine and Tool Corp. Page 5
4. Cleaning
The MURA may be cleaned using the following methods:
•Thefabricandwebbingmaybewipedorspongedusingsoapsolutionorhousehold
detergent to remove light soil.
•Thequickreleasemaybecleanedbywashingwithastreamofwater.
•Sand,dust,andotherdebrismayberemovedfromthewebbing,fabric,andquickre-
lease using compressed air or soft brushes.
Wear eye protection while using compressed air to remove debris.

MURA Release Kit - User’s Manual
Aerial Machine and Tool Corp. Page 6
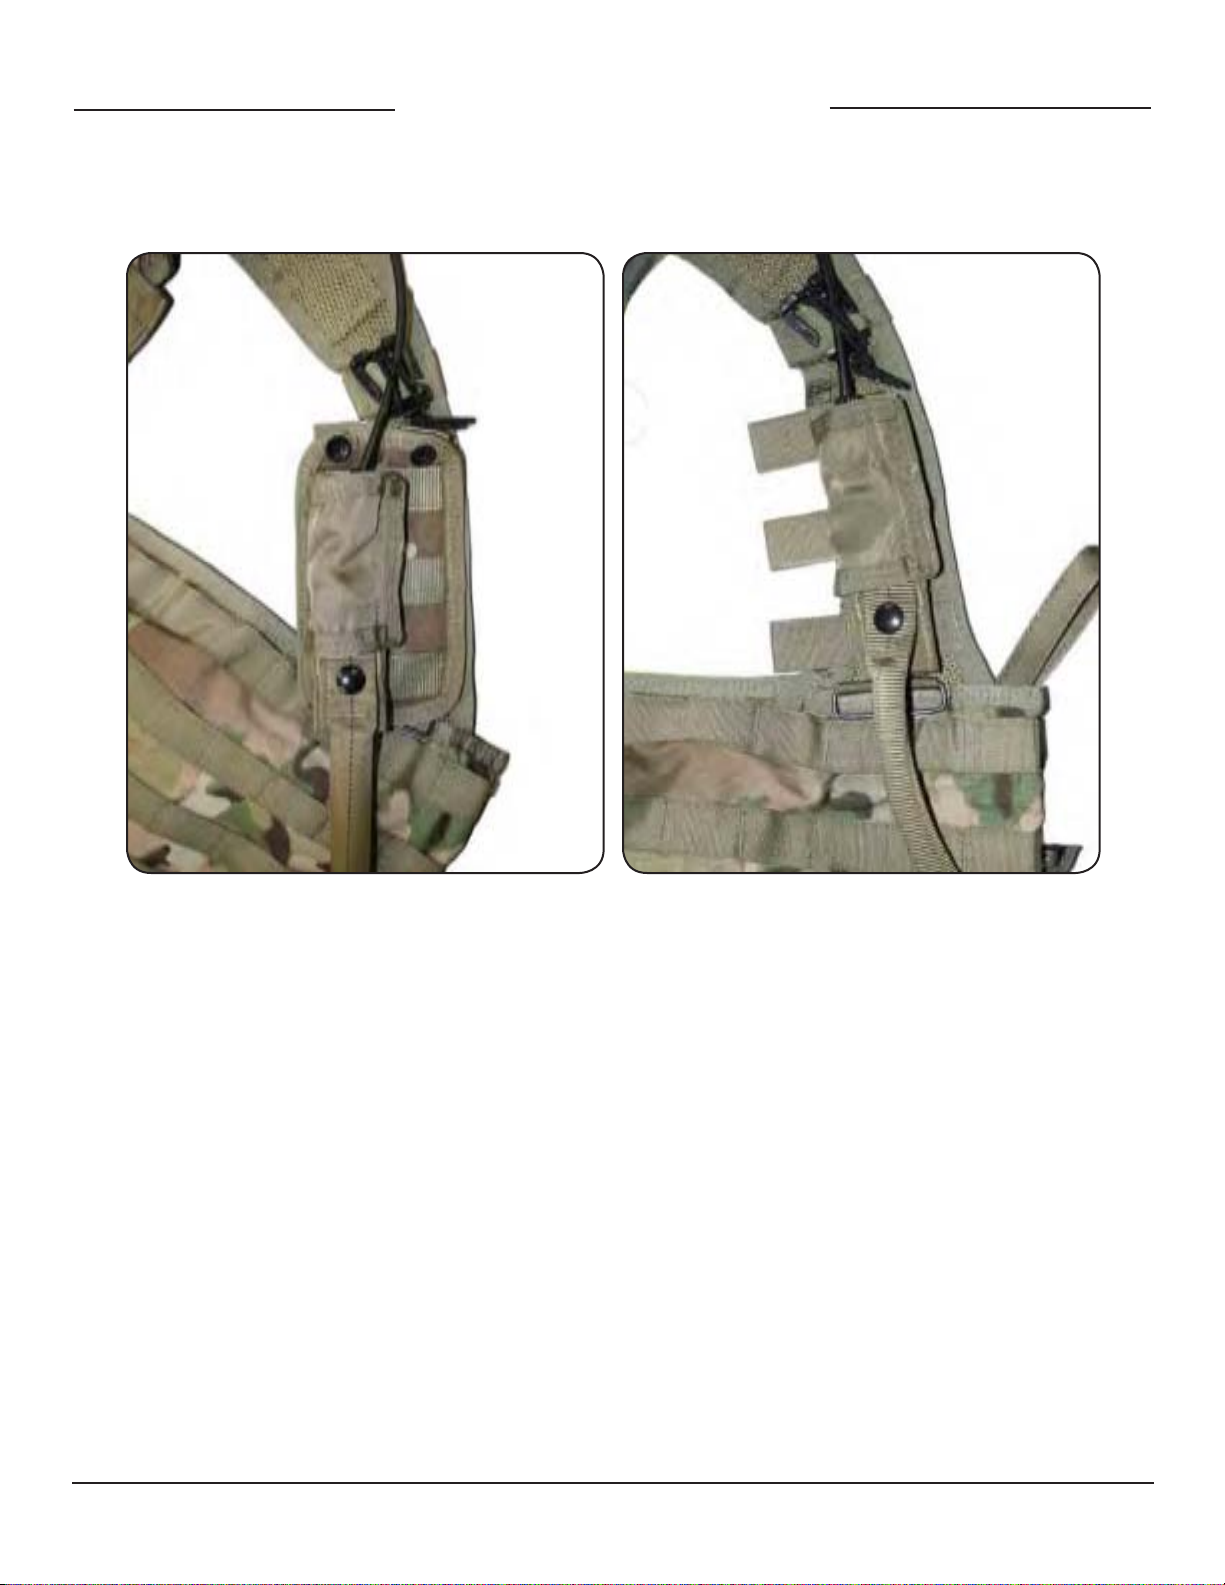
5. Assembly (Platform)
5.1. Attach MOLLE platform to side of vest as shown which is going to have the handle
attached. Snaps should be to the top.
Theplatformisusedtostabilizethehandlewhenotationcollarisalso
attached..
The platform is not needed if using the MURA without a
otationcollar.
The platform can be attached to either side of the vest depending on
handle placement
5.1 Platform mounting
MURA Release Kit - User’s Manual
Aerial Machine and Tool Corp. Page 7
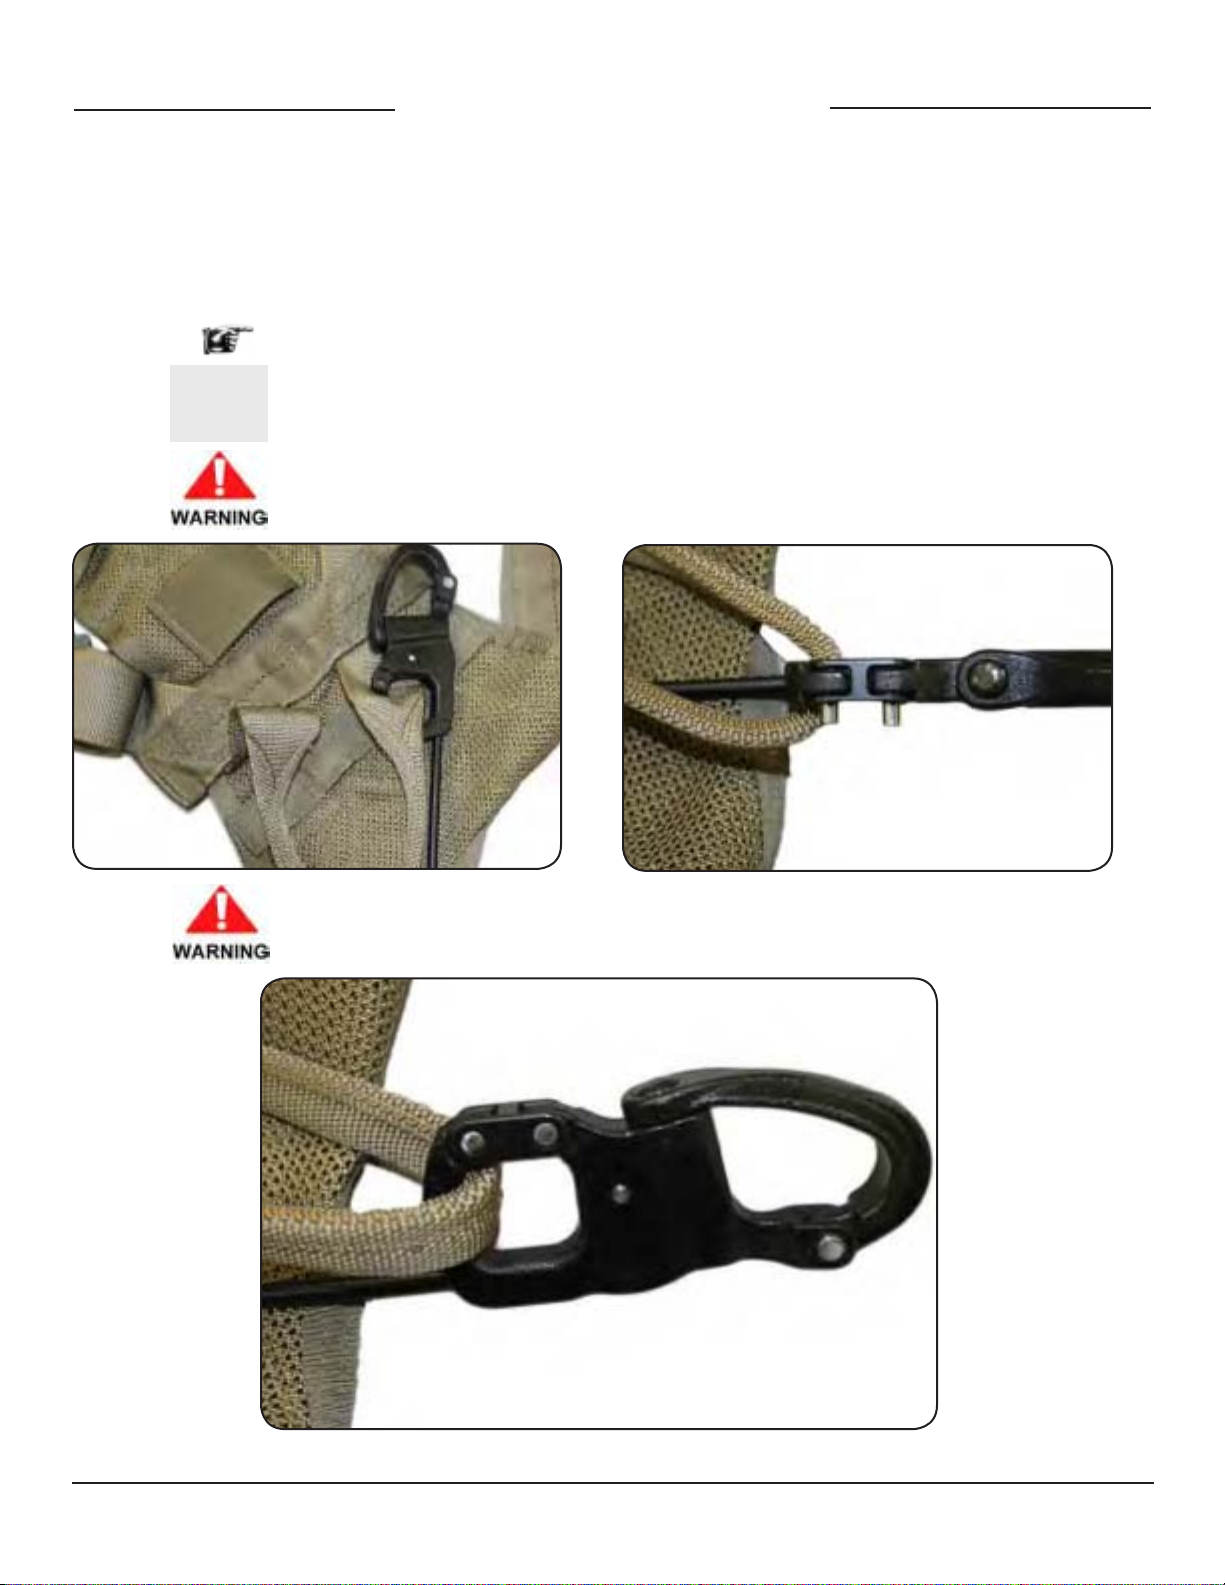
6. Assembly (Release Asembly)
6.1. Insert the quick release into the opening on the drag handle. Install the removable
linkandtwo(2)groovedpinsasshown.Pressthepinintothehousinguntilushwiththe
housing.
Assembly shown with the handle on the wearers right shoulder
Install pins on a smooth hard surface to avoid damaging the clevis arms.
The pins should be pressed into the quick release completely
Grooved pins are one time use only! DO NOT REUSE
6.1 Assembly of MURA to loop
MURA Release Kit - User’s Manual
Aerial Machine and Tool Corp. Page 8
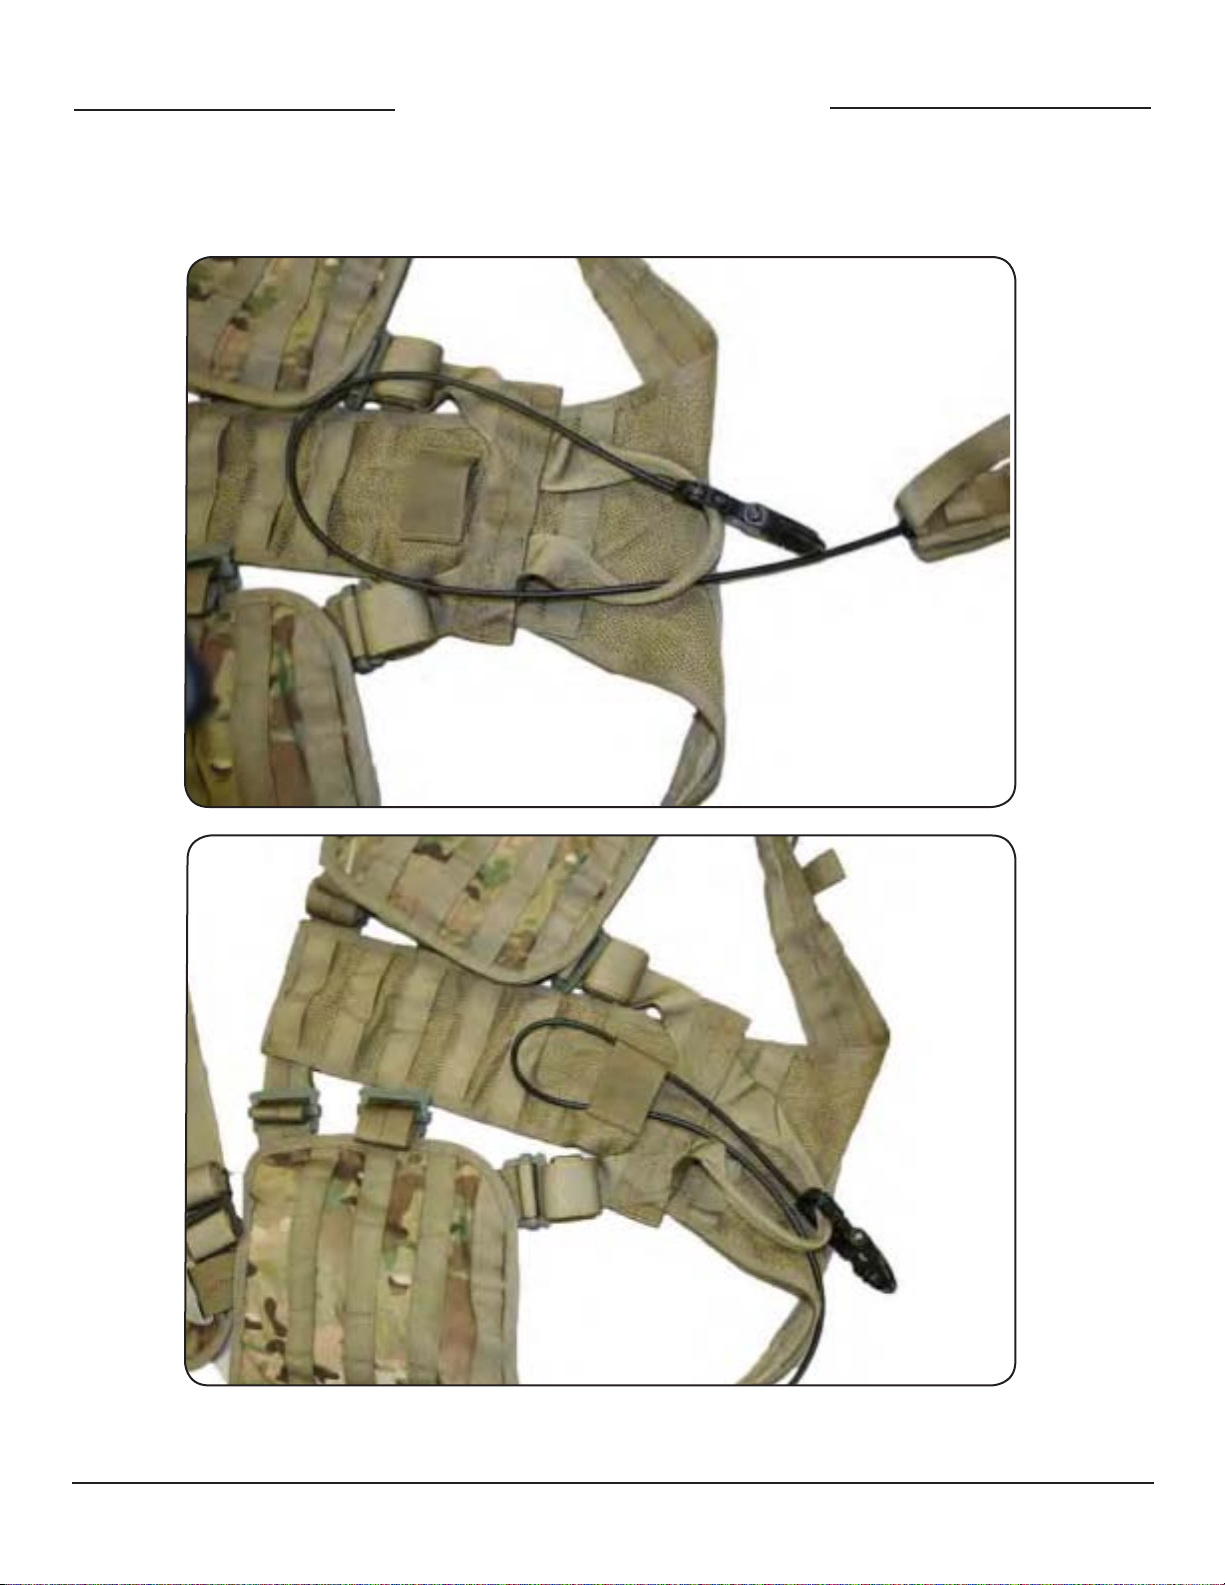
6.2. Route cable down the back of the vest forming a loop. The loop should extend
through the webbing on the back of the harness as shown below.
6.2 Routing of MURA cable through webbing

MURA Release Kit - User’s Manual
Aerial Machine and Tool Corp. Page 9
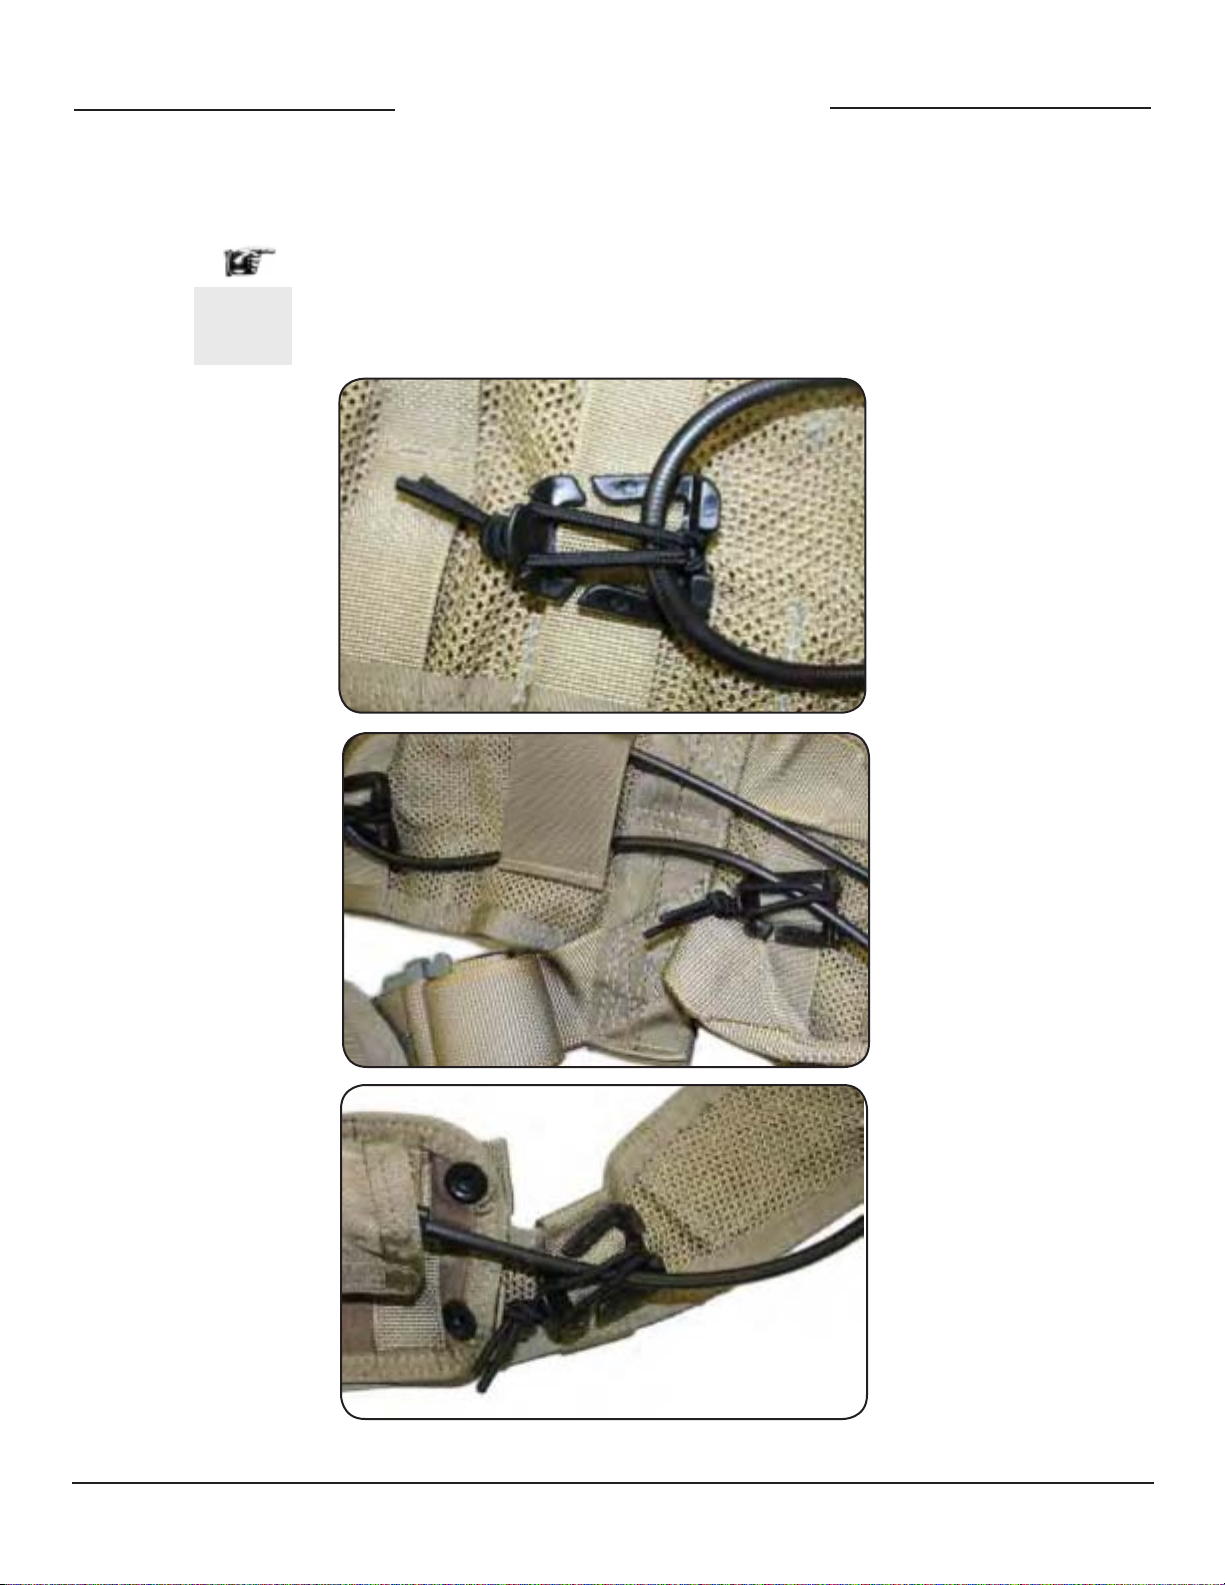
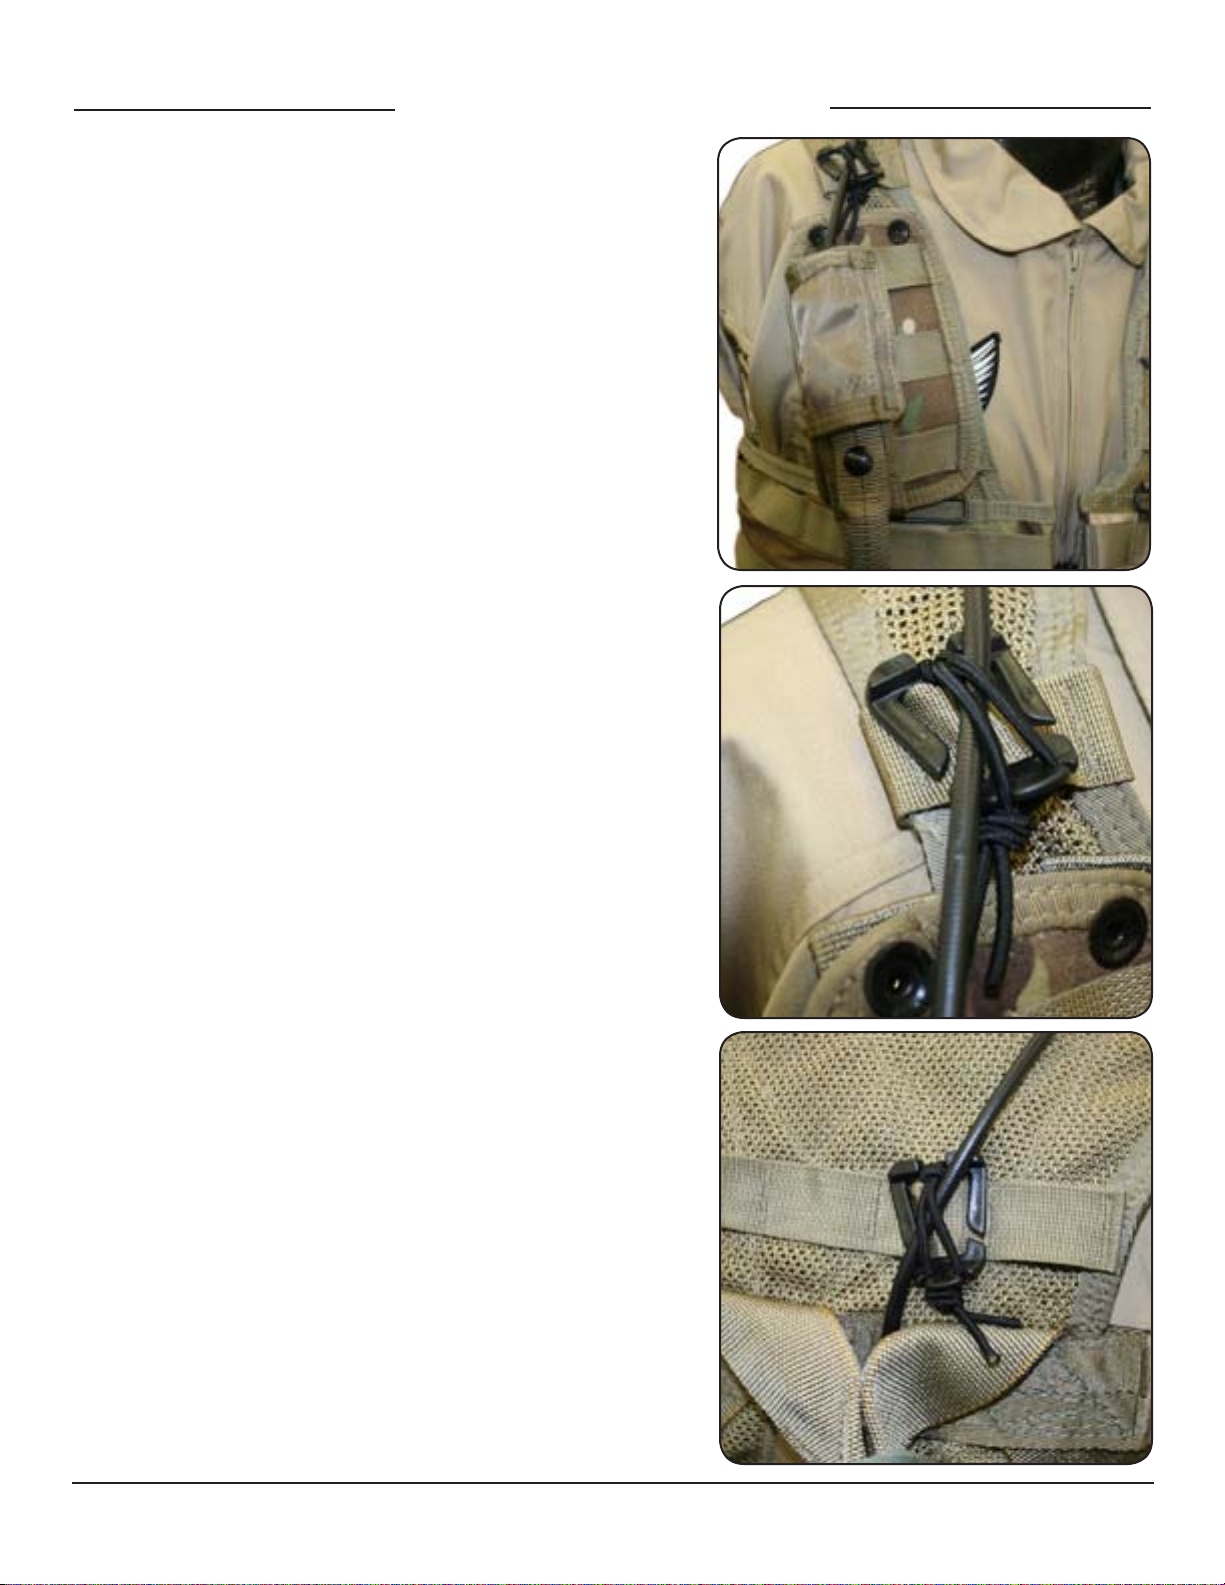
6.3. Attach Web Dominators in three suggested locations as shown. The Web
Dominators can be moved to accommodate the placement of other equipment.
6.3 Attachment and recommened location of Web Dominators
MURA Release Kit - User’s Manual
Aerial Machine and Tool Corp. Page 10
6.4. The bungee loop should go over the cable as shown. The cable should move
freely under the bungee.
6.4 Attachment of cable to Web Dominator
Web Dominators are recommended. Web Dominators can be
subsituted with a heavy duty cord (ie. 6 cord).
Ensure the cable moves freely.

MURA Release Kit - User’s Manual
Aerial Machine and Tool Corp. Page 11
6.5. Pull the quick release to the end of the loop and form a wrap with the Velcro
provided. This will keep the quick release in position at the end of the loop.
The wrap is optional, but recommended
6.5 Optional Velcro wrap

MURA Release Kit - User’s Manual
Aerial Machine and Tool Corp. Page 12
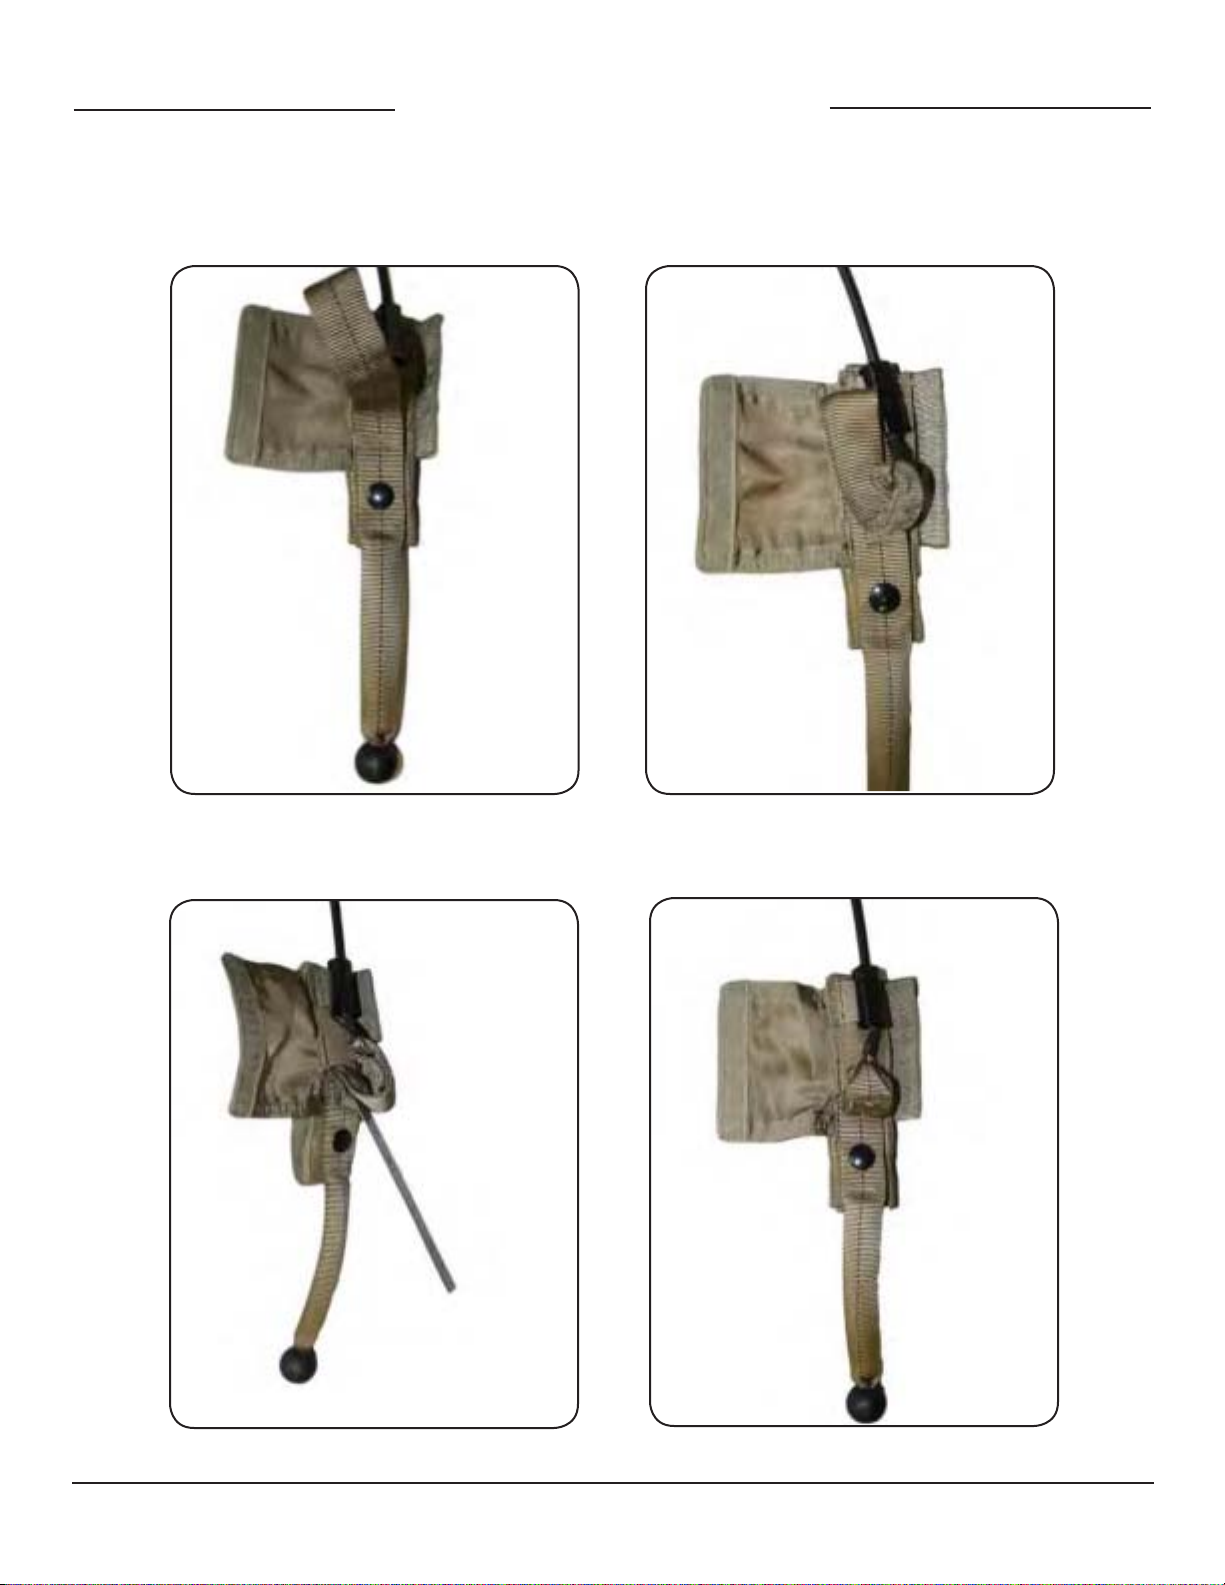
7. Assembly (Handle)
7.1.Laythehandleoutonaatsurface.
7.1 Release handle
7.2 Insert metal tab completely into lower pocket.
7.2 Metal tab into pocket
MURA Release Kit - User’s Manual
Aerial Machine and Tool Corp. Page 13
7.3 Snap the handle to the pocket
7.4 Form a loop on the upper portion of the handle
7.3 Handle snap 7.4 Form loop
7.5 Carefully insert the loop into the upper pocket
7.5 Loop into upper pocket

MURA Release Kit - User’s Manual
Aerial Machine and Tool Corp. Page 14
7.6 Fold cover over to protect assembly
7.6 Handle cover
MURA Release Kit - User’s Manual
Aerial Machine and Tool Corp. Page 15
7.7AttachtheMOLLEhandletotheoutsideoftheplatform.Theotationwillbe
attachedtotheinside.(Ifotationisused)
with platform without platform
7.7 Handle attached

MURA Release Kit - User’s Manual
Aerial Machine and Tool Corp. Page 16
8. Operation
8.1. The MURAis designed to be a one handed release, either right or left. The MURA
release handle can be placed in a variety of locations, but should always be free of any
obstructionsandeasytolocate.TheMURAreleaseisathreestagereleaseidentied
below.
8.1 Grab Handle Lift up to release snap
Lift up to release tab Pull down to activate quick release
MURA Release Kit - User’s Manual
Aerial Machine and Tool Corp. Page 17
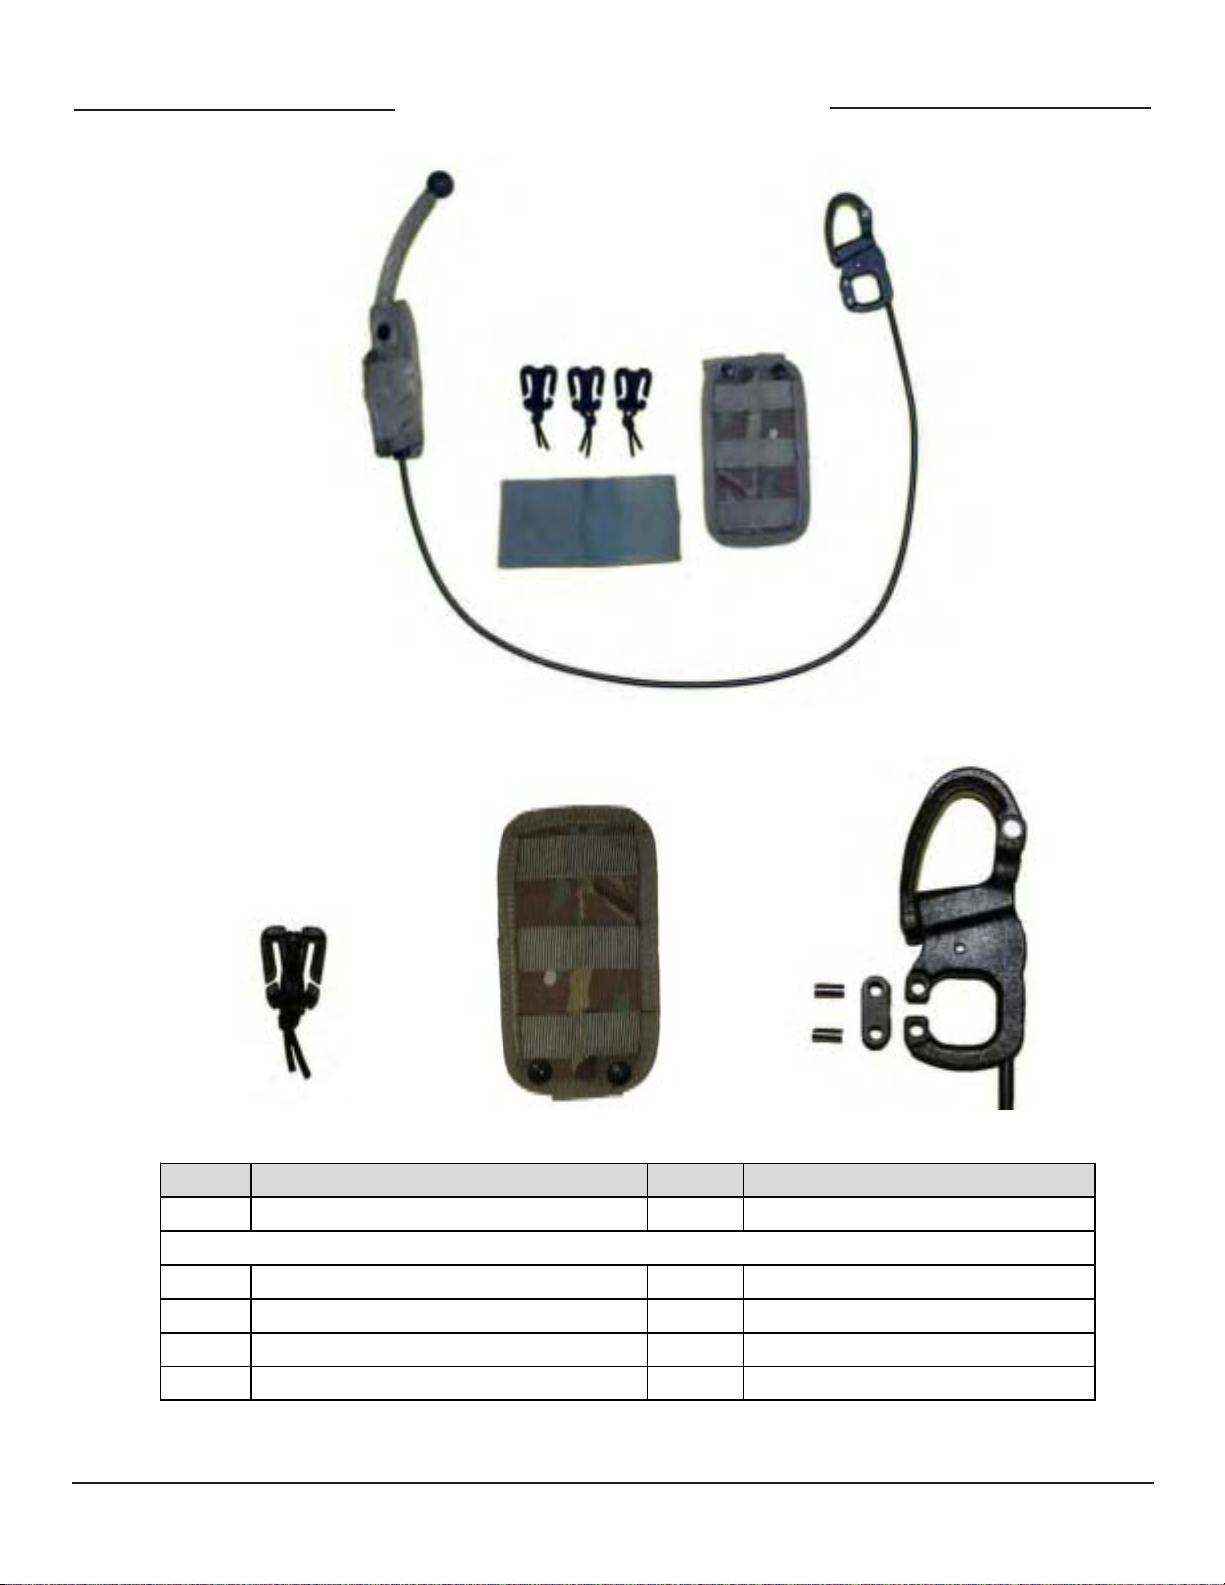
9. Parts List
9.1 Complete Assembly (Includes MURA Realease, three Web Dominators, Platform, and
Velcro wrap.
9.2 Web Dominator 9.3 Platform 9.4 Pins and Link
Item# Description UI PartNumber
9.1 CompleteAssembly EA AMTCK1252*
Includes:MURARelease,3ea.WebDominators,PlatformandVelcrowrap
9.2 WebDominator EA PHW078
9.3 Platform EA AMTCP1428**
9.4 GroovedPin(Qty2required) EA CC401607
9.4 QuickReleaseRemovableLink EA 114207401
Note:*Tan=TAFoliageGreen=FG
**UniversalCamo=UCMultiCam=OCP
MURA Release Kit - User’s Manual
Aerial Machine and Tool Corp. Page 18
Additional Photos

MURA Release Kit - User’s Manual
Aerial Machine and Tool Corp. Page 19
Additional Photos

MURA Release Kit - User’s Manual
Aerial Machine and Tool Corp. Page 20
Additional Photos
Table of contents


