Affinity Clearly Filtered User manual

Quick-Start Guide
®
®

Congrats & Welcome
3
4
5
7
10
11
19
20
21
22
What Makes Us Superior
How Anity® Filtration Technology Works
Our 3-Stage Filtration System Explained
Filter Prep & Replacement
Tested, Trusted, & Transparent
Setup
Quick Tips
Help & Resources
Get More Clean Water
Warranty
page
Congrats on your new Clearly Filtered 3-Stage Under-Sink Filtration System. You’ve made a wise investment
in your health.
Like you, we have high standards for our water. That’s why we developed your system with our renowned
Anity Filtration® Technology; the most powerful ltration technology on the market. At last, you can nally
stop worrying about what’s in your water.

What Makes Clearly Filtered Superior?
Others focus on taste.
Others reduce contaminants.
Others say cleaner.
-
while allowing
benecial minerals to pass
through.
232+<15 2000
3
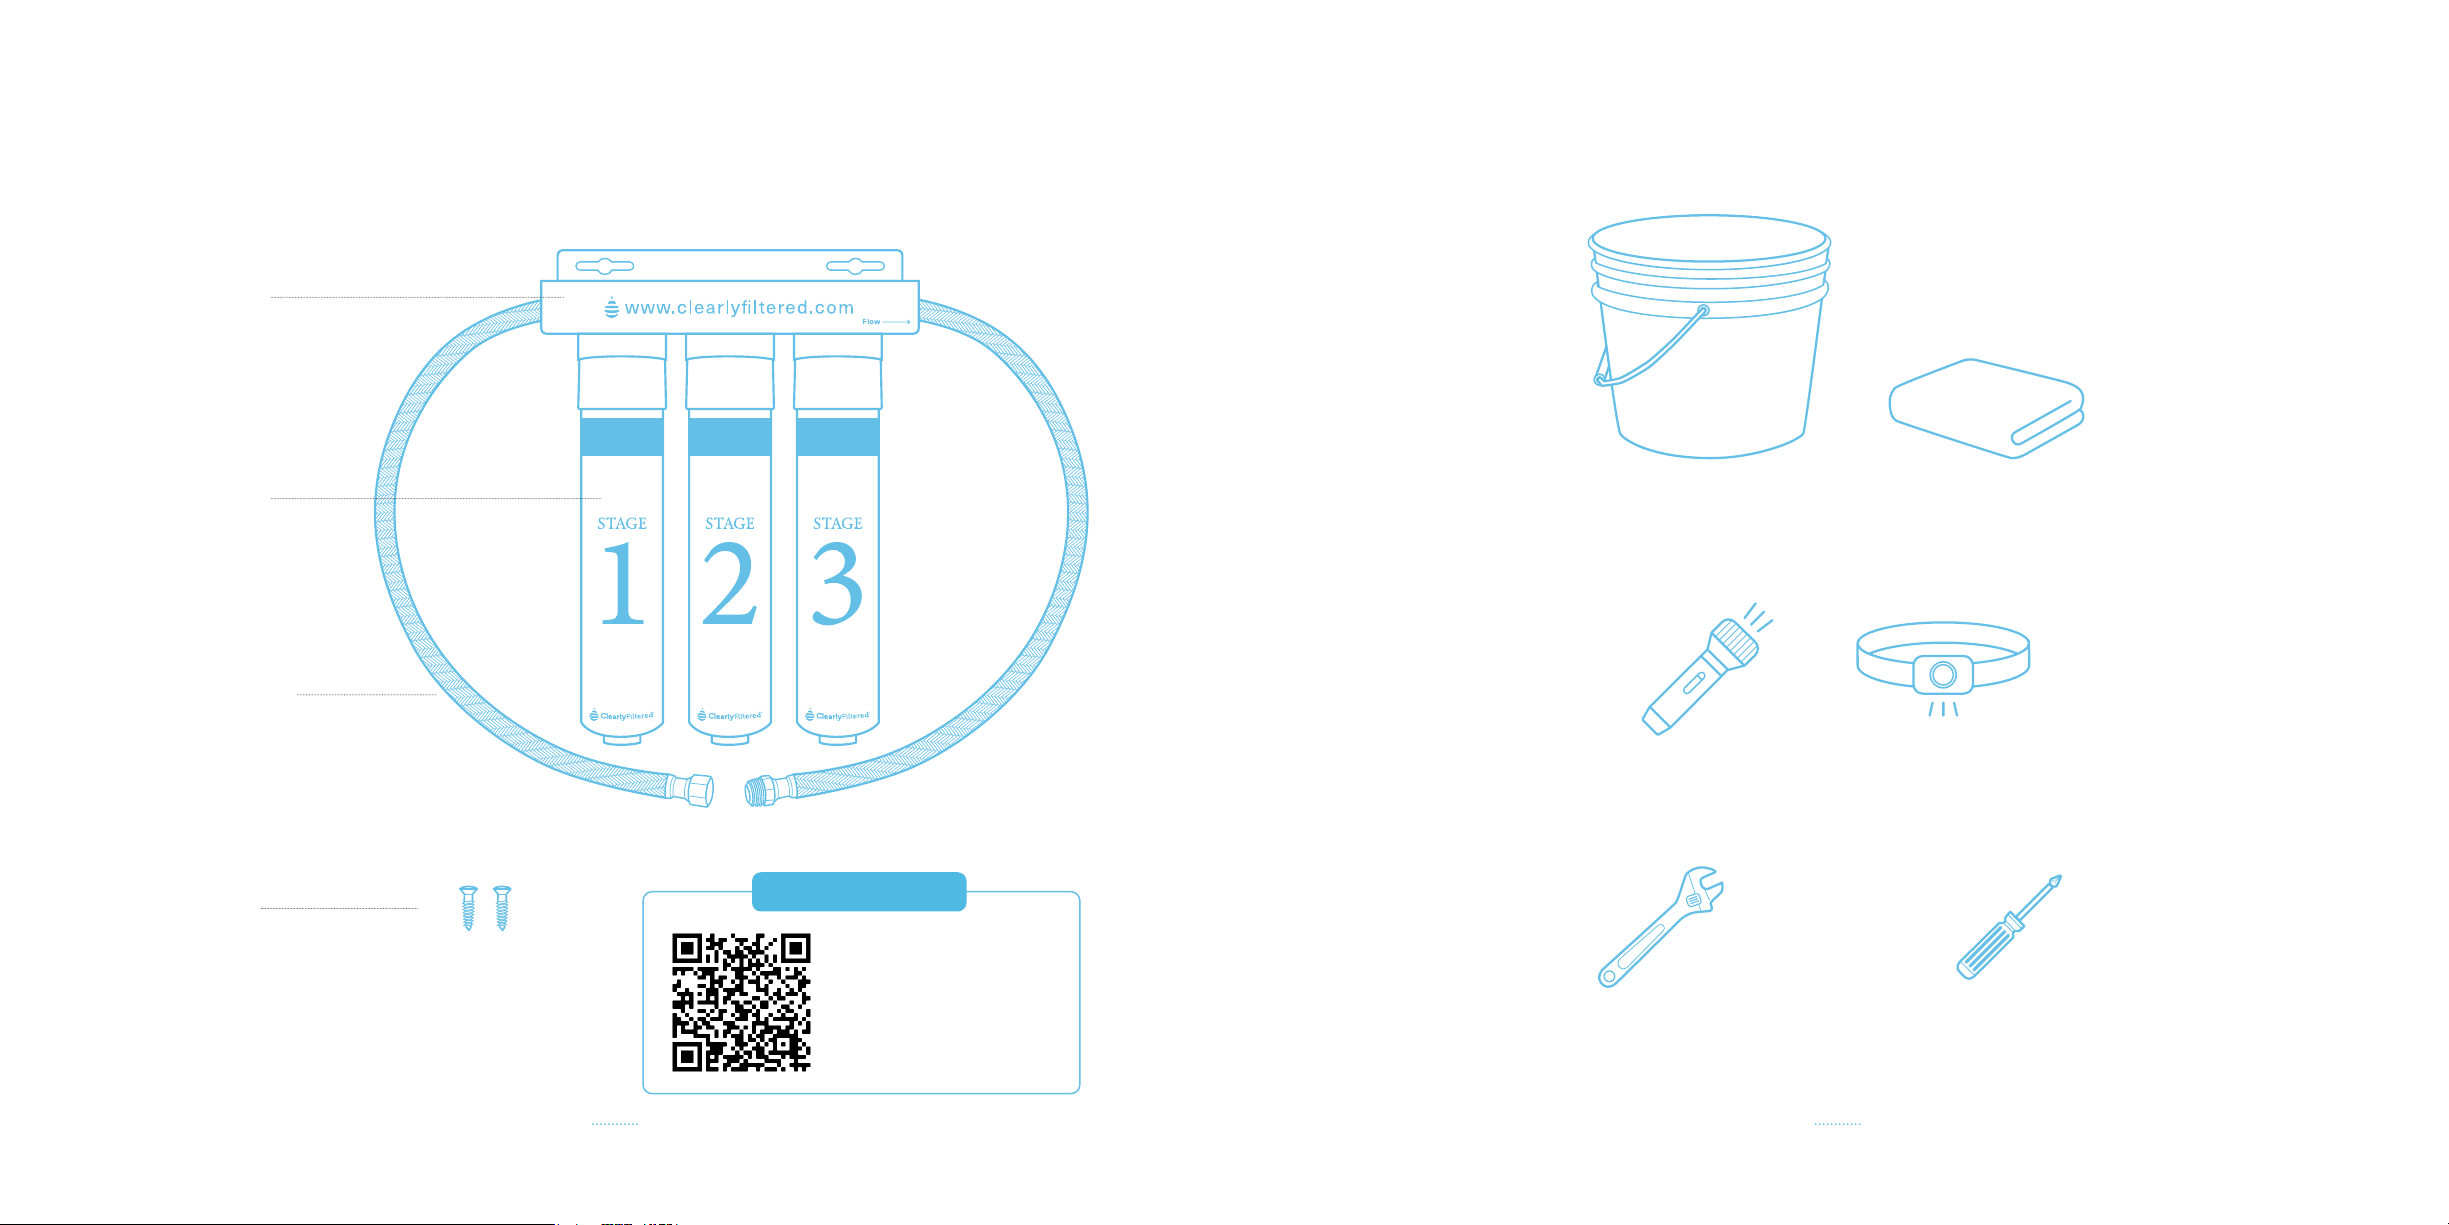
No plumber, power tools,
separate tank, or second
faucet required.
Premium lter cartridges feature
a space-saving design,
and built-in shut-o valves
for easy replacement and mini-
mal maintenance.
How Anity® Filtration Technology Works
In 2017, Anity Filtration Technology made waves as the new standard for water safety.
Thanks to our decade-long journey developing the technology in your lter, “better tasting” and
“better smelling” water is no longer the gold standard of safety. After all, simple carbon or charcoal lters
focus only on removing unpleasant odors and tastes. Their basic technology leaves you vulnerable as
hundreds of harmful contaminants that can’t be seen, smelled, or tasted remain in your water.
Our lters never fall short. The breakthrough technology inside targets and
This includes those dangerous chemicals, metals, and toxins that most lters miss.
Here’s how our technology transforms your water from polluted to pure.
Ultimately, Anity Filtration Technology recognizes what should stay and what should go.
Its one-two punch of structure and magnet-like medias helps snatch up dangerous chemicals, metals,
and toxins other lters can’t.
1
2
4
The maze-like interiors of our lters require water to pass
through twists and turns to give the lter more time to extract contaminants. That alone
means superior performance.
The precise and powerful collection of unique medias
in our lters separate the good and the bad. They identify and bond to dangerous
contaminants, and do not target benecial minerals.

Our 3-Stage Filtration System Explained
Our 3-Stage Under-Sink Filtration System contains the most powerful ltration technology on the market.
Your system is made up of 3 lters that each serve a unique purpose. Together, they deliver a continuous
supply of cold, clean, and safe water straight from your faucet.
This sophisticated coconut carbon pre-lter minimizes sediment and particles with
various micron sizes to prime water for advanced ltration in Stages 2 and 3. The hazards extracted
here impact color, odor, and water tastes, so you can see, smell, and experience the dierence.
Built to eliminate hidden heavy metals, herbicides, pesticides, and more, this advanced
lter removes the covert chemicals and contaminants that most lters miss including lead and radiation.
The breakthrough technology inside this lter removes superior levels of uoride
without relying on typical Reverse Osmosis technology that blindly removes benecial minerals and
produces excess wastewater.
5 6

Your system’s lters work synergistically to provide the cleanest water straight from your faucet.
Filter Prep & Replacement
Every lter set — both new and replacement — be primed before rst use to perform properly. Prim-
ing is the process of preparing the lters by forcing running water through the system. This simple step
pushes air out of the lters, loosens up the ltration media, and ensures the system’s ready for water to
ow through so contaminants are captured and eliminated.
To maintain peak performance, lter changes are recommended at every 2000 gallons ltered*.
If you are not tracking gallons, follow the guidelines below for replacing your lters:
7
Refer to the ‘section on page 11 of this guide for detailed priming instructions.
*Filter life can be impacted by water quality.
Purchase replacement lters and for subscription service at
ClearlyFiltered.com/SinkFilters.
Keep your system performing its best by regularly replacing the lters. Enroll in our lter subscription
service to ensure you always have replacements ready and you never forget to reorder. Filters are mailed
straight to your doorstep at no additional cost and you’re rewarded with a discount on every set.
Subscribing is the simplest, quickest, and most cost-eective way to guarantee you have clean water
year-round and to make the most of your Clearly Filtered experience.
*Go to ClearlyFiltered.com/Subscription for more information.
• on every lter.
• (USA).
• Pick your
•
• .
8

1. of your next purchase.
2. our support team at .
3. with a team member at clearlyltered.com (M-F 9am-4pm PST).
4. our support team at (M-F 9am-4pm PST).
If you purchased your system without a lter subscription and do not need a set of replacement lters
immediately, please contact our support team to create an account and get enrolled.
Our support sta is available Monday-Friday 9am-4pm PST (excluding holidays).
To manage your lter subscription, activate your Clearly Filtered account with the email address you used
to purchase your system. Then go to ClearlyFiltered.com/Account to log in. Here you can update your
address and payment information, pause, skip, or adjust shipping frequency, and cancel your subscription.
As a subscriber, you always have complete control of your account.
9
Tested, Trusted, & Transparent
Our lters have been independently tested to the rigorous NSF and EPA standards by accredited labs. Drink
up and rest easy knowing you are protected by the best lter on the market.
The EPA regulates less than 100 tap water contaminants.
We also keep an eye on unregulated and emerging contaminants. When a new or emerging contaminant is
discovered, we look to test our lters and share the results on our website.
The contaminants we target and remove can be linked to everything from cancer, thyroid conditions, and
bone disease to liver, kidney, and reproductive problems. Our ongoing commitment to clean water ensures
you can count on us to cover your health, your family, and your future.
Tested Trusted Transparent
10

STAINLESS
STEEL HOSES
Setup
11
BRACKET
FILTERS
SCREWS
Scan Here
12
BUCKET or TOWEL
FLASHLIGHT or HEADLAMP
WRENCH PHILLIPS HEAD SCREWDRIVER
if you plan to mount the system.

3
3
Turn on your faucet so a steady stream of cold water
ows into the sink.
Locate the cold water valve. It is typically the valve
on the right and can sometimes be identied by a
blue handle.
Use a ashlight or headlamp to locate the 2 water
valves under your sink.
Shut o the cold water supply by turning the valve’s
handle or knob clockwise until tight.
Place a bucket or towel below the valves.
After you’ve shut o the cold water supply, turn o
your faucet.
13
3
Disconnect the cold water line from the water valve
by twisting with your hand or a wrench.
Refer to the diagram on the front of the bracket to guide you during the following steps.
Connect the stainless-steel hose attached to the
lter’s ‘inlet’ end near lter cartridge 1 (female
tting) to the water valve (male tting). Tighten with a
wrench to create a seal.
Connect the stainless-steel hose attached to the
lter’s ‘outlet’ end near lter cartridge 3 (male tting)
to the water line (female tting). Tighten with a
wrench to create a seal.
14

3
Turn the cold water valve’s handle back to its
original position to turn the cold water supply on.
Check for leaks. If you see any leaking, shut o the
cold water supply then reconnect the system to the
water line and ensure all connections are snug.
If leaking continues, wrap the connections in
plumber’s tape for a stronger seal.
15
Position the bracket so there’s at least 3 inches of
clearance below the bottom of the lter cartridges
and the ground or wall.
Mark the bracket’s two eyelets with a pencil.
Mounting is optional since the system’s performance is not
dependent on placement or orientation. If you don’t mount
your system, it can sit on the ground or lean on the wall.
Pen Mark
16
3To lighten the load, remove the lter cartridges from
the bracket by twisting counterclockwise.

stagestagestage
17
4
4
Use a drill or screwdriver to install the included
mounting screws at the eyelet marks. Hang the
bracket from the mounting screws.
Reattach the lter cartridges to the bracket by
hand-twisting them in sequential order, with
cartridge 3 sitting directly below the word “ow”
on the bracket. Refer to the numbers on each
cartridge and the diagram on the front of the
bracket to guide you.
Run cold water for 5 minutes or until the water
runs clear with few, if any, bubbles.
Drink up and enjoy the convenience of clean water
on demand.
To ensure your system works eciently and eectively,
you must prime it prior to rst use.
18

Quick Tips
Do not connect it to the hot water line.
It does not target
pathogens.
found under your sink. Adapters or splitters are required for any
other size line.
Cold water pressure can be reduced once the system is installed.
However, it can be mounted vertically or horizontally.
so there’s no mess during
replacement.
For most customers, this is once a year.
See the ‘Filter Prep & Replacement’ section of this guide for more details.
They must be installed and replaced together.
to get replacement lters and learn more about our free lter
subscription service.
19
Help & Resources
We have a friendly support team and a library of online resources dedicated to you.
Here are 4 easy and convenient ways to get help:
• Visit our Help & FAQs page at .
• Email our support team at .
• with a team member at clearlyltered.com.
• Call our support team at
*Business Hours: M - F 9am-4pm PST; excluding holidays.
20

Get More Clean Water
Can’t get enough clean water? Visit to learn more about our full line of premium
products.
We have lters for everything including , so you can enjoy the
benets of clean water at home and on the go.
21
Warranty
All Clearly Filtered products are manufactured to the highest standard and are individually inspected prior
to shipping.
To view our full policy, please visit our warranty page at
Stay clear on the latest and greatest by visiting our website at
Connect with us on social media to tap into our Clearly Filtered family:
22

When do I change my filters?
Your lter set must be replaced regularly to deliver superior results. Based on proven performance data,
tracking usage is the best way to determine the right time for a lter set change.
*8 glasses
of water is the
physician-recommended
daily intake
1. Determine how many
people use the lter (Bottom of
chart).
Estimate how many
glasses of water each person
uses per day (Left side of chart).
Trace your inputs to
determine when you’ll need a
lter change (Middle of chart).
Time to change my filter
Filter Installation Date
Use this card to help you know when the time has come to replace your lter set. Simply record
the date you install the lter set. Then record the replacement date that’s best for you using
the Change Tracker Chart on the adjacent page.
Filter Replacement Date
®

®
Clearly Filtered, the Clearly Filtered logo and Anity are registered trademarks of Clearly Filtered Inc. 8/22
www.ClearlyFiltered.com
Table of contents
Popular Water Filtration System manuals by other brands

sanebio
sanebio SaltLine 040 manual

Brita
Brita Fill & Enjoy Fun quick start guide

Spirax Sarco
Spirax Sarco 5800 Series Installation and maintenance instructions

Veolia
Veolia Hydrotech Drumfilter HDF - 16/20V- Value... Operation and maintenance manual

Aquasana
Aquasana Rhino Well 1 Water with UV owner's manual

Simpex Electronic
Simpex Electronic Fandis FF Series Technical description

Whirlpool
Whirlpool WHAROS5 Installation and operation manual

Fluval
Fluval MSF 104 manual

spotzero
spotzero ZTCII2000 User manual & installation guide

A.O. Smith
A.O. Smith waterclinic LTS 75 Series user manual

Royal Prestige
Royal Prestige FP6000CT Use & care manual

BIOLAN
BIOLAN GREYWATER FILTER 125 Instructions for installation, use and maintenance