afloia GALA User manual

AIR
PURIFIER
AIR
PURIFIER
Thank
you
very
much
for
using
our
products.
Please read
the
user
manual
carefully
before
use,
and
keep
it
for
future
reference.
vo
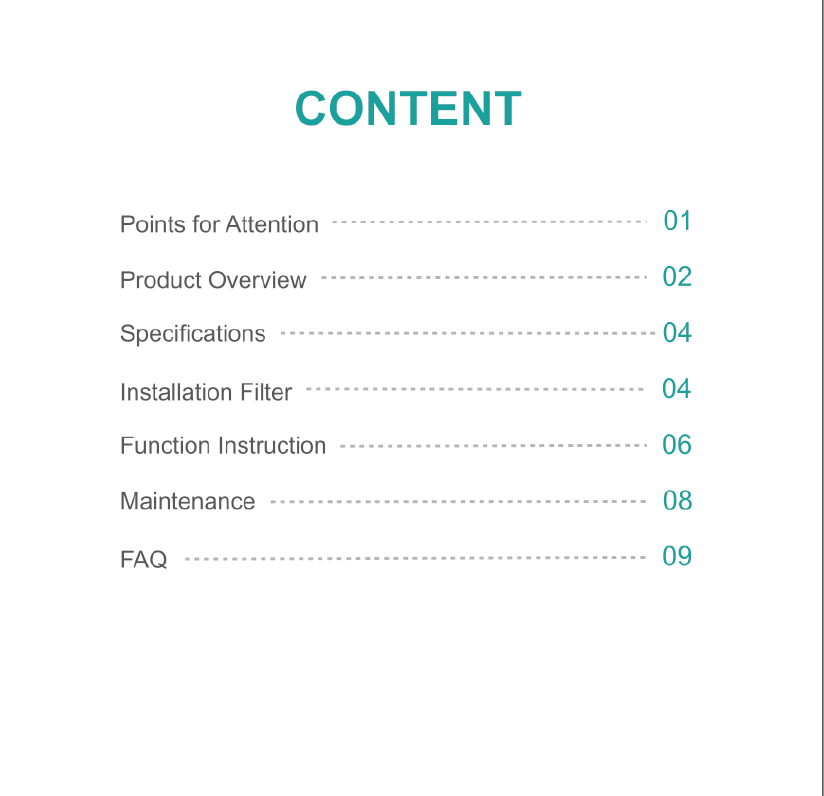
CONTENT
POINTS
FOR
ATTENTION
Before
using,
please
read
this
user manual
carefully
and
keep
it
for
future
reference.
Points
for
Attention ======---x-rsmssees
e
01
Warl
Product
Overview
«-----mmmmmmmmmmmmmms
e
02
1.
To
avoid
electric
shock
and
fire,
do
not
allow
water
,
liquid
or
any
flammable
detergent
to
get
into
or
to
clean
the
product.
Specifications
-
««---roerrmerrnsr
e
04
2.
Do
not
spray
insecticide,
perfume
or
other
flammable
spray
around
the
products.
o
04
3.
Before
connecting
the
power
supply,
please
check
whether
the
voltage
of
the
productis
Installation
Filter
«-----=-rrmrmrmmmrmmmroeemereee
consistent
with
the local
power
supply
voltage.
) )
4.
This
product
can
not
replace
normal
ventilation,
daily
dust
collection
or
oil
pumping
when
cooking.
Function
INStruction
«--«--««-xommmmmmmamaaanns
06
) )
5.
Ensure
the
productis
used
in
condition
of
a
stable
and
horizontal
level.
.
6.
Leave
at
least
30cm
of
space
on
the
back
and
sides
of
the
product,
and
at
least
50cm
of
space
Maintenange
-----==-----ssssssrrrrrnnnnnanaaaaaa
08
i i "
above
the
product
when
using
7.
Ensure
both
the
filter
and
its
cover
are
properly
installed
before
using.
e
B
i
09
properly
9
8.
Do
notinsert
finger
or
other
things
into
the
air
outleinlet
to
prevent
physical
damage
or
trouble.
01
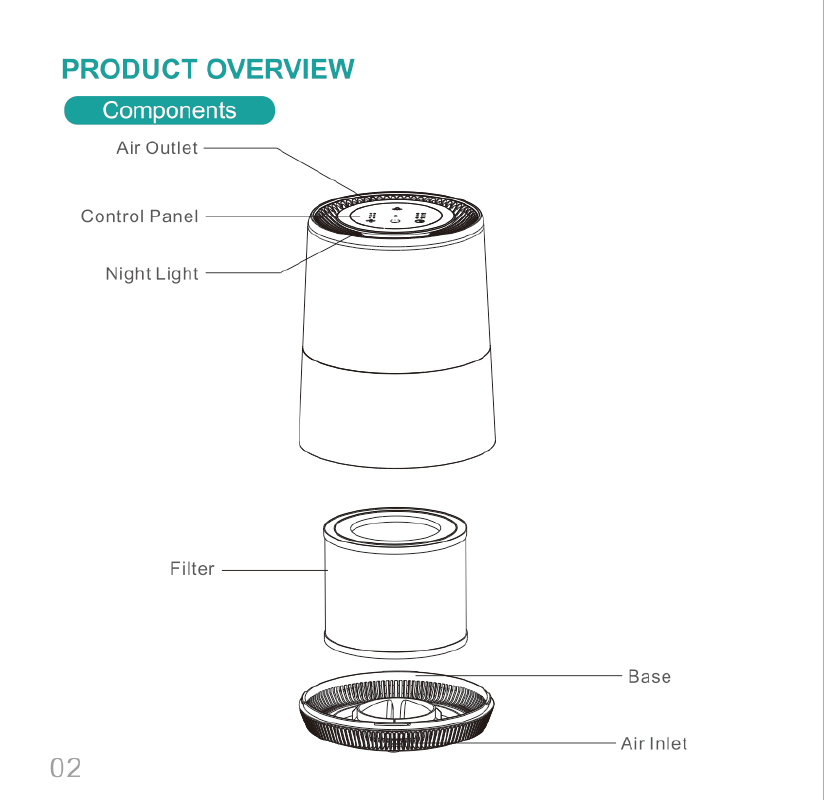
PRODUCT
OVERVIEW
Air
Outlet
Control
Panel
Night
Light
Filter
Base
(')
Power
Button
£
Light
Control
Button
(9
Timer
Button
+
Wind
Speed
Button
Air
Inlet
02
03
SPECIFICATIONS
Steps
of
Installing
er
Model
No.
Gala
Unplug
the
power
socket
of
the
machine
before
replacing
or
installing
the
filter.
Size
226"226*303mm
st
ot
<=y
step2
step3
Net
Weight
1.9kg
Pa
Adapter
Input:
100-240V
50/60Hz
Output:
24V-1.2A
Power
23W
CADR
100m?
Coverage
Area
<12m?
INSTALLATION
FILTER
otice
1.
Invert
the
machine,
and
rotate
the
base
along
the
direction
marked
"OPEN".
2.
Take
out
the
filter
from
the
machine.
©
Please
remove
the
packaging
of
the
filter
before
using
for
the
first
time.
) )
3.
Remove
the
packaging
of
the
filter.
©
Ensure
the
machine
is
unplugged
before
removing
or
installing
the
filter.
)
o
-
4.
Install
the
filter
into
the
machine.
©
When
the
power
indicator
keeps flashing
in
red,
the
filter
should
be
replaced.
N
5.
Then
Install
the
base,
rotate
and
tighten
the
base
along
the
direction
marked
"CLOSE".
®
Please
wipe
the
dust
on
the
filter
regularly,
do
not
wash
or
use
it
repeatedly.
) ) :
Notice:
e
Please
use
the
filter
specially
designed
for
this
product
1.Please
press
the
power
button
for
7s
to
reset
after
installing
a
new
filter
,
and
the red
light
will
stop
flashing.
2.
When
using
the
device
for
the
first
time,
please
remove
the
packing
of
filter
before
04
using
but
please
not
to
reset
the
device.
FUNCTION
INSTRUCTION
Insert
the
plug
into
the
power
socket,
the
buzzer
will
ring for
1
second
which
indicates
the
device
*
Wind
Speed
Button
connects
with
power.
1.In
the
condition
of
working,the
buzzer
will
ring
once
every
time
when
touching
the
wind
speed
button.
2.Itcan
be
set
at
Auto-High-Low
working
modes
and
the
corresponding
indicator
lights
on.
3.In
Auto
mode,the
wind
speed
will
changed
automatically
complying
with
air
quality.
When
the
LED
light
is
turned
on,
it
will
diplay
different
color
LED
light
to
show
the
air
quality
O
Power
Button
(Bule
color
means
that
the
air
quality
is
Good;
Yellow
is
normal:and
Red
is
bad)
.
When
the
air
quality
is
bad,the
wind
speed
will
change
to
High
mode;
1.Touch
the
power
button
to
turn
on
the
air
purifier;
When
the
buzzer
rings
once,
the
power
When
the
air
quality
is
normal,it
will
cahnge
to
Middle
mode;
indicator
,
low-mode
indicator,
and
night
lights
are
on.The device
starts
to
work
at
the
low
When
the
air
quality
is
good,it
will
change
to
Low
mode
mode
by
default
2.Touch
the
power
button
again,
the
buzzer
will
ring
once
and
the
device
will
stop
running
Notice:
The
wind
speed
adjustment
couldn't
operate
in
the
status
of
shutdown.
with
all
lights
off.
Notice:
In
case
of
constant
power
supply
,turn
off
the
device
and
then
turn
on
again,
it
will
default
shutdown
before
the
working
state.
":\‘
Night
Light
Button
1.
Touch
the
light
button,
the
buzzer
will
ring
once,
the
device
enters
softlight
mode.
@
Timer
Button
2.
Touch
it
again,
the
buzzer
will
ring
once
and
the
LED
light
will
turn
into
standard
mode.
3.
Touch
it
one
more
time,
the
LED
light
will
turn
off.
1.1n
the
condition
of
working,
touch
the
timer
button
to
set
2H,
4H
or
8H
with
buzzer
ringing
_
once
,and
the
corresponding
indicator
keeps
on.
Notice:
2.The
device
will
work
continuously
when
the
timer
indicator
turns
off.
1.When
the
device
detects
the
filter
needs
replacing
a
new
one
,the
LED
light
will
3.In
the
status
of
timing,
the
machine
begins
to
count down.
When
the
time
is
up, the
device
will
stop
working
keep
flashing
in
red
color.
2.Please
press
the
power
button
for
7s
after
installing
a
new
filter.
Then the
device
Notice:
The
timer
button
couldn’t
operate
in
the
status
of
shutdown.
will
start
to
countdown
the
lifespan
of
filter.
06
07
MAINTENANCE
FAQ
SITUATION
REASON
o
Is
it
plugged
into
a
power
socket?
s
there
a
power
outage?
«
Ensure
the
machine
is
unplugged
before
maintenance.
)
No
working
o
Is
the
home
leakage
switch
or
fuse
cut
off?
«
Do
not
immerse
the
machine
into
water
or
any
liquid.
«
s the
fiter
replacing
indicator
keep
flashing?
+
Do
not
use
abrasive,
corrosive
or
flammable
cleansers
(such
as
bleach
or
alcohol)
to
clean
Poor
pert
o
Is
there
any
dust
in
the
surface
of
primary
filter?
any
part
of
the
unit.
oor
performance
©
Is
there
any
obstacle
blocking
the
air
inlet/outlet.
+
Don't
use
a
vacuum
cleaner
to
clean
the
filter
or
wash
it
directly.
o
Is
there
anything
stuck
on
the fan
in
the
air
outlet?
o
Is
the
machine
tiited?
o
Please
set
a
lower
grade
of
wind
speed
if
the
noise
is
too
loud
,
or
set
low
grade
of
wind
speed
when
using
in
bedroom
at
night
«
Please
sterilize
the
filter
under
sunlight
regularly.
Significant noise
e
Itis
the
normal
phenomenon
that
the
machine
emits
the
smell
;
of
plastic
for
the
first
time.
Cleaning
&
Storage
The
machine
will
emit
nasty
smell
if
the
filter
is
dusty,
so
in
this
Coming
out
nasty
smell
|~
11€
™
situation,
please
clean
or
replace
the
filter.
®
Ensure
the
machine
is
power-off
and
unplugged.
o
If
the
burning
smell
emits
from
the
machine,
please
unplug
the
@
Use
a
soft
cloth
with
neutral
cleanser
to
clean
away
any
dust
or
debris
from
the
surface
of
the
power
socket
and
contact
with
buyer
or
customer
service
unit
and
air
inlet/outlet.
The
reminder
of
@
After
the
machine
completely
dry
out,
put
on
the
bag and
place
it
in
a
cool
and
wel-ventilated
replacing
filter
after
|
e
Please
press
the
power
button
()
for
7s
to
reset
the
machine
place.
user
have
replaced
and
the
life
counter
of
the
filter
will
start.
@
If
you
do
not
use
it
for
a
long
time,
in
the
basic
of
previous
steps,
please
turn
on
the
machine
anewone.
for
a
few
minutes
from
time
to
time
to
ensure
a
good
performance.
Notice:
If
the
above
FAQ
can
not
solve
your
problems
and
need
maintenance,
please
contact
the
supplier
or
after
sales
service
center.
Please
do
not
disassemble
the
machine
to
maintain
by
yourself.
Notice:
Please
don't
drop
any water
into
the
machine
when
clean
the
air
outlet.
08 09
AIR
PURIFIER
AIR
PURIFIER
Thank
you
very
much
for
using
our
products.
Please read
the
user
manual
carefully
before
use,
and
keep
it
for
future
reference.
vo
CONTENT
POINTS
FOR
ATTENTION
Before
using,
please
read
this
user manual
carefully
and
keep
it
for
future
reference.
Points
for
Attention ======---x-rsmssees
e
01
Warl
Product
Overview
«-----mmmmmmmmmmmmmms
e
02
1.
To
avoid
electric
shock
and
fire,
do
not
allow
water
,
liquid
or
any
flammable
detergent
to
get
into
or
to
clean
the
product.
Specifications
-
««---roerrmerrnsr
e
04
2.
Do
not
spray
insecticide,
perfume
or
other
flammable
spray
around
the
products.
o
04
3.
Before
connecting
the
power
supply,
please
check
whether
the
voltage
of
the
productis
Installation
Filter
«-----=-rrmrmrmmmrmmmroeemereee
consistent
with
the local
power
supply
voltage.
) )
4.
This
product
can
not
replace
normal
ventilation,
daily
dust
collection
or
oil
pumping
when
cooking.
Function
INStruction
«--«--««-xommmmmmmamaaanns
06
) )
5.
Ensure
the
productis
used
in
condition
of
a
stable
and
horizontal
level.
.
6.
Leave
at
least
30cm
of
space
on
the
back
and
sides
of
the
product,
and
at
least
50cm
of
space
Maintenange
-----==-----ssssssrrrrrnnnnnanaaaaaa
08
i i "
above
the
product
when
using
7.
Ensure
both
the
filter
and
its
cover
are
properly
installed
before
using.
e
B
i
09
properly
9
8.
Do
notinsert
finger
or
other
things
into
the
air
outleinlet
to
prevent
physical
damage
or
trouble.
01
PRODUCT
OVERVIEW
Air
Outlet
Control
Panel
Night
Light
Filter
Base
(')
Power
Button
£
Light
Control
Button
(9
Timer
Button
+
Wind
Speed
Button
Air
Inlet
02
03
SPECIFICATIONS
Steps
of
Installing
er
Model
No.
Gala
Unplug
the
power
socket
of
the
machine
before
replacing
or
installing
the
filter.
Size
226"226*303mm
st
ot
<=y
step2
step3
Net
Weight
1.9kg
Pa
Adapter
Input:
100-240V
50/60Hz
Output:
24V-1.2A
Power
23W
CADR
100m?
Coverage
Area
<12m?
INSTALLATION
FILTER
otice
1.
Invert
the
machine,
and
rotate
the
base
along
the
direction
marked
"OPEN".
2.
Take
out
the
filter
from
the
machine.
©
Please
remove
the
packaging
of
the
filter
before
using
for
the
first
time.
) )
3.
Remove
the
packaging
of
the
filter.
©
Ensure
the
machine
is
unplugged
before
removing
or
installing
the
filter.
)
o
-
4.
Install
the
filter
into
the
machine.
©
When
the
power
indicator
keeps flashing
in
red,
the
filter
should
be
replaced.
N
5.
Then
Install
the
base,
rotate
and
tighten
the
base
along
the
direction
marked
"CLOSE".
®
Please
wipe
the
dust
on
the
filter
regularly,
do
not
wash
or
use
it
repeatedly.
) ) :
Notice:
e
Please
use
the
filter
specially
designed
for
this
product
1.Please
press
the
power
button
for
7s
to
reset
after
installing
a
new
filter
,
and
the red
light
will
stop
flashing.
2.
When
using
the
device
for
the
first
time,
please
remove
the
packing
of
filter
before
04
using
but
please
not
to
reset
the
device.
FUNCTION
INSTRUCTION
Insert
the
plug
into
the
power
socket,
the
buzzer
will
ring for
1
second
which
indicates
the
device
*
Wind
Speed
Button
connects
with
power.
1.In
the
condition
of
working,the
buzzer
will
ring
once
every
time
when
touching
the
wind
speed
button.
2.Itcan
be
set
at
Auto-High-Low
working
modes
and
the
corresponding
indicator
lights
on.
3.In
Auto
mode,the
wind
speed
will
changed
automatically
complying
with
air
quality.
When
the
LED
light
is
turned
on,
it
will
diplay
different
color
LED
light
to
show
the
air
quality
O
Power
Button
(Bule
color
means
that
the
air
quality
is
Good;
Yellow
is
normal:and
Red
is
bad)
.
When
the
air
quality
is
bad,the
wind
speed
will
change
to
High
mode;
1.Touch
the
power
button
to
turn
on
the
air
purifier;
When
the
buzzer
rings
once,
the
power
When
the
air
quality
is
normal,it
will
cahnge
to
Middle
mode;
indicator
,
low-mode
indicator,
and
night
lights
are
on.The device
starts
to
work
at
the
low
When
the
air
quality
is
good,it
will
change
to
Low
mode
mode
by
default
2.Touch
the
power
button
again,
the
buzzer
will
ring
once
and
the
device
will
stop
running
Notice:
The
wind
speed
adjustment
couldn't
operate
in
the
status
of
shutdown.
with
all
lights
off.
Notice:
In
case
of
constant
power
supply
,turn
off
the
device
and
then
turn
on
again,
it
will
default
shutdown
before
the
working
state.
":\‘
Night
Light
Button
1.
Touch
the
light
button,
the
buzzer
will
ring
once,
the
device
enters
softlight
mode.
@
Timer
Button
2.
Touch
it
again,
the
buzzer
will
ring
once
and
the
LED
light
will
turn
into
standard
mode.
3.
Touch
it
one
more
time,
the
LED
light
will
turn
off.
1.1n
the
condition
of
working,
touch
the
timer
button
to
set
2H,
4H
or
8H
with
buzzer
ringing
_
once
,and
the
corresponding
indicator
keeps
on.
Notice:
2.The
device
will
work
continuously
when
the
timer
indicator
turns
off.
1.When
the
device
detects
the
filter
needs
replacing
a
new
one
,the
LED
light
will
3.In
the
status
of
timing,
the
machine
begins
to
count down.
When
the
time
is
up, the
device
will
stop
working
keep
flashing
in
red
color.
2.Please
press
the
power
button
for
7s
after
installing
a
new
filter.
Then the
device
Notice:
The
timer
button
couldn’t
operate
in
the
status
of
shutdown.
will
start
to
countdown
the
lifespan
of
filter.
06
07
MAINTENANCE
FAQ
SITUATION
REASON
o
Is
it
plugged
into
a
power
socket?
s
there
a
power
outage?
«
Ensure
the
machine
is
unplugged
before
maintenance.
)
No
working
o
Is
the
home
leakage
switch
or
fuse
cut
off?
«
Do
not
immerse
the
machine
into
water
or
any
liquid.
«
s the
fiter
replacing
indicator
keep
flashing?
+
Do
not
use
abrasive,
corrosive
or
flammable
cleansers
(such
as
bleach
or
alcohol)
to
clean
Poor
pert
o
Is
there
any
dust
in
the
surface
of
primary
filter?
any
part
of
the
unit.
oor
performance
©
Is
there
any
obstacle
blocking
the
air
inlet/outlet.
+
Don't
use
a
vacuum
cleaner
to
clean
the
filter
or
wash
it
directly.
o
Is
there
anything
stuck
on
the fan
in
the
air
outlet?
o
Is
the
machine
tiited?
o
Please
set
a
lower
grade
of
wind
speed
if
the
noise
is
too
loud
,
or
set
low
grade
of
wind
speed
when
using
in
bedroom
at
night
«
Please
sterilize
the
filter
under
sunlight
regularly.
Significant noise
e
Itis
the
normal
phenomenon
that
the
machine
emits
the
smell
;
of
plastic
for
the
first
time.
Cleaning
&
Storage
The
machine
will
emit
nasty
smell
if
the
filter
is
dusty,
so
in
this
Coming
out
nasty
smell
|~
11€
™
situation,
please
clean
or
replace
the
filter.
®
Ensure
the
machine
is
power-off
and
unplugged.
o
If
the
burning
smell
emits
from
the
machine,
please
unplug
the
@
Use
a
soft
cloth
with
neutral
cleanser
to
clean
away
any
dust
or
debris
from
the
surface
of
the
power
socket
and
contact
with
buyer
or
customer
service
unit
and
air
inlet/outlet.
The
reminder
of
@
After
the
machine
completely
dry
out,
put
on
the
bag and
place
it
in
a
cool
and
wel-ventilated
replacing
filter
after
|
e
Please
press
the
power
button
()
for
7s
to
reset
the
machine
place.
user
have
replaced
and
the
life
counter
of
the
filter
will
start.
@
If
you
do
not
use
it
for
a
long
time,
in
the
basic
of
previous
steps,
please
turn
on
the
machine
anewone.
for
a
few
minutes
from
time
to
time
to
ensure
a
good
performance.
Notice:
If
the
above
FAQ
can
not
solve
your
problems
and
need
maintenance,
please
contact
the
supplier
or
after
sales
service
center.
Please
do
not
disassemble
the
machine
to
maintain
by
yourself.
Notice:
Please
don't
drop
any water
into
the
machine
when
clean
the
air
outlet.
08 09

AIR
PURIFIER
AIR
PURIFIER
Thank
you
very
much
for
using
our
products.
Please read
the
user
manual
carefully
before
use,
and
keep
it
for
future
reference.
vo
CONTENT
POINTS
FOR
ATTENTION
Before
using,
please
read
this
user manual
carefully
and
keep
it
for
future
reference.
Points
for
Attention ======---x-rsmssees
e
01
Warl
Product
Overview
«-----mmmmmmmmmmmmmms
e
02
1.
To
avoid
electric
shock
and
fire,
do
not
allow
water
,
liquid
or
any
flammable
detergent
to
get
into
or
to
clean
the
product.
Specifications
-
««---roerrmerrnsr
e
04
2.
Do
not
spray
insecticide,
perfume
or
other
flammable
spray
around
the
products.
o
04
3.
Before
connecting
the
power
supply,
please
check
whether
the
voltage
of
the
productis
Installation
Filter
«-----=-rrmrmrmmmrmmmroeemereee
consistent
with
the local
power
supply
voltage.
) )
4.
This
product
can
not
replace
normal
ventilation,
daily
dust
collection
or
oil
pumping
when
cooking.
Function
INStruction
«--«--««-xommmmmmmamaaanns
06
) )
5.
Ensure
the
productis
used
in
condition
of
a
stable
and
horizontal
level.
.
6.
Leave
at
least
30cm
of
space
on
the
back
and
sides
of
the
product,
and
at
least
50cm
of
space
Maintenange
-----==-----ssssssrrrrrnnnnnanaaaaaa
08
i i "
above
the
product
when
using
7.
Ensure
both
the
filter
and
its
cover
are
properly
installed
before
using.
e
B
i
09
properly
9
8.
Do
notinsert
finger
or
other
things
into
the
air
outleinlet
to
prevent
physical
damage
or
trouble.
01
PRODUCT
OVERVIEW
Air
Outlet
Control
Panel
Night
Light
Filter
Base
(')
Power
Button
£
Light
Control
Button
(9
Timer
Button
+
Wind
Speed
Button
Air
Inlet
02
03
SPECIFICATIONS
Steps
of
Installing
er
Model
No.
Gala
Unplug
the
power
socket
of
the
machine
before
replacing
or
installing
the
filter.
Size
226"226*303mm
st
ot
<=y
step2
step3
Net
Weight
1.9kg
Pa
Adapter
Input:
100-240V
50/60Hz
Output:
24V-1.2A
Power
23W
CADR
100m?
Coverage
Area
<12m?
INSTALLATION
FILTER
otice
1.
Invert
the
machine,
and
rotate
the
base
along
the
direction
marked
"OPEN".
2.
Take
out
the
filter
from
the
machine.
©
Please
remove
the
packaging
of
the
filter
before
using
for
the
first
time.
) )
3.
Remove
the
packaging
of
the
filter.
©
Ensure
the
machine
is
unplugged
before
removing
or
installing
the
filter.
)
o
-
4.
Install
the
filter
into
the
machine.
©
When
the
power
indicator
keeps flashing
in
red,
the
filter
should
be
replaced.
N
5.
Then
Install
the
base,
rotate
and
tighten
the
base
along
the
direction
marked
"CLOSE".
®
Please
wipe
the
dust
on
the
filter
regularly,
do
not
wash
or
use
it
repeatedly.
) ) :
Notice:
e
Please
use
the
filter
specially
designed
for
this
product
1.Please
press
the
power
button
for
7s
to
reset
after
installing
a
new
filter
,
and
the red
light
will
stop
flashing.
2.
When
using
the
device
for
the
first
time,
please
remove
the
packing
of
filter
before
04
using
but
please
not
to
reset
the
device.
FUNCTION
INSTRUCTION
Insert
the
plug
into
the
power
socket,
the
buzzer
will
ring for
1
second
which
indicates
the
device
*
Wind
Speed
Button
connects
with
power.
1.In
the
condition
of
working,the
buzzer
will
ring
once
every
time
when
touching
the
wind
speed
button.
2.Itcan
be
set
at
Auto-High-Low
working
modes
and
the
corresponding
indicator
lights
on.
3.In
Auto
mode,the
wind
speed
will
changed
automatically
complying
with
air
quality.
When
the
LED
light
is
turned
on,
it
will
diplay
different
color
LED
light
to
show
the
air
quality
O
Power
Button
(Bule
color
means
that
the
air
quality
is
Good;
Yellow
is
normal:and
Red
is
bad)
.
When
the
air
quality
is
bad,the
wind
speed
will
change
to
High
mode;
1.Touch
the
power
button
to
turn
on
the
air
purifier;
When
the
buzzer
rings
once,
the
power
When
the
air
quality
is
normal,it
will
cahnge
to
Middle
mode;
indicator
,
low-mode
indicator,
and
night
lights
are
on.The device
starts
to
work
at
the
low
When
the
air
quality
is
good,it
will
change
to
Low
mode
mode
by
default
2.Touch
the
power
button
again,
the
buzzer
will
ring
once
and
the
device
will
stop
running
Notice:
The
wind
speed
adjustment
couldn't
operate
in
the
status
of
shutdown.
with
all
lights
off.
Notice:
In
case
of
constant
power
supply
,turn
off
the
device
and
then
turn
on
again,
it
will
default
shutdown
before
the
working
state.
":\‘
Night
Light
Button
1.
Touch
the
light
button,
the
buzzer
will
ring
once,
the
device
enters
softlight
mode.
@
Timer
Button
2.
Touch
it
again,
the
buzzer
will
ring
once
and
the
LED
light
will
turn
into
standard
mode.
3.
Touch
it
one
more
time,
the
LED
light
will
turn
off.
1.1n
the
condition
of
working,
touch
the
timer
button
to
set
2H,
4H
or
8H
with
buzzer
ringing
_
once
,and
the
corresponding
indicator
keeps
on.
Notice:
2.The
device
will
work
continuously
when
the
timer
indicator
turns
off.
1.When
the
device
detects
the
filter
needs
replacing
a
new
one
,the
LED
light
will
3.In
the
status
of
timing,
the
machine
begins
to
count down.
When
the
time
is
up, the
device
will
stop
working
keep
flashing
in
red
color.
2.Please
press
the
power
button
for
7s
after
installing
a
new
filter.
Then the
device
Notice:
The
timer
button
couldn’t
operate
in
the
status
of
shutdown.
will
start
to
countdown
the
lifespan
of
filter.
06
07
MAINTENANCE
FAQ
SITUATION
REASON
o
Is
it
plugged
into
a
power
socket?
s
there
a
power
outage?
«
Ensure
the
machine
is
unplugged
before
maintenance.
)
No
working
o
Is
the
home
leakage
switch
or
fuse
cut
off?
«
Do
not
immerse
the
machine
into
water
or
any
liquid.
«
s the
fiter
replacing
indicator
keep
flashing?
+
Do
not
use
abrasive,
corrosive
or
flammable
cleansers
(such
as
bleach
or
alcohol)
to
clean
Poor
pert
o
Is
there
any
dust
in
the
surface
of
primary
filter?
any
part
of
the
unit.
oor
performance
©
Is
there
any
obstacle
blocking
the
air
inlet/outlet.
+
Don't
use
a
vacuum
cleaner
to
clean
the
filter
or
wash
it
directly.
o
Is
there
anything
stuck
on
the fan
in
the
air
outlet?
o
Is
the
machine
tiited?
o
Please
set
a
lower
grade
of
wind
speed
if
the
noise
is
too
loud
,
or
set
low
grade
of
wind
speed
when
using
in
bedroom
at
night
«
Please
sterilize
the
filter
under
sunlight
regularly.
Significant noise
e
Itis
the
normal
phenomenon
that
the
machine
emits
the
smell
;
of
plastic
for
the
first
time.
Cleaning
&
Storage
The
machine
will
emit
nasty
smell
if
the
filter
is
dusty,
so
in
this
Coming
out
nasty
smell
|~
11€
™
situation,
please
clean
or
replace
the
filter.
®
Ensure
the
machine
is
power-off
and
unplugged.
o
If
the
burning
smell
emits
from
the
machine,
please
unplug
the
@
Use
a
soft
cloth
with
neutral
cleanser
to
clean
away
any
dust
or
debris
from
the
surface
of
the
power
socket
and
contact
with
buyer
or
customer
service
unit
and
air
inlet/outlet.
The
reminder
of
@
After
the
machine
completely
dry
out,
put
on
the
bag and
place
it
in
a
cool
and
wel-ventilated
replacing
filter
after
|
e
Please
press
the
power
button
()
for
7s
to
reset
the
machine
place.
user
have
replaced
and
the
life
counter
of
the
filter
will
start.
@
If
you
do
not
use
it
for
a
long
time,
in
the
basic
of
previous
steps,
please
turn
on
the
machine
anewone.
for
a
few
minutes
from
time
to
time
to
ensure
a
good
performance.
Notice:
If
the
above
FAQ
can
not
solve
your
problems
and
need
maintenance,
please
contact
the
supplier
or
after
sales
service
center.
Please
do
not
disassemble
the
machine
to
maintain
by
yourself.
Notice:
Please
don't
drop
any water
into
the
machine
when
clean
the
air
outlet.
08 09
AIR
PURIFIER
AIR
PURIFIER
Thank
you
very
much
for
using
our
products.
Please read
the
user
manual
carefully
before
use,
and
keep
it
for
future
reference.
vo
CONTENT
POINTS
FOR
ATTENTION
Before
using,
please
read
this
user manual
carefully
and
keep
it
for
future
reference.
Points
for
Attention ======---x-rsmssees
e
01
Warl
Product
Overview
«-----mmmmmmmmmmmmmms
e
02
1.
To
avoid
electric
shock
and
fire,
do
not
allow
water
,
liquid
or
any
flammable
detergent
to
get
into
or
to
clean
the
product.
Specifications
-
««---roerrmerrnsr
e
04
2.
Do
not
spray
insecticide,
perfume
or
other
flammable
spray
around
the
products.
o
04
3.
Before
connecting
the
power
supply,
please
check
whether
the
voltage
of
the
productis
Installation
Filter
«-----=-rrmrmrmmmrmmmroeemereee
consistent
with
the local
power
supply
voltage.
) )
4.
This
product
can
not
replace
normal
ventilation,
daily
dust
collection
or
oil
pumping
when
cooking.
Function
INStruction
«--«--««-xommmmmmmamaaanns
06
) )
5.
Ensure
the
productis
used
in
condition
of
a
stable
and
horizontal
level.
.
6.
Leave
at
least
30cm
of
space
on
the
back
and
sides
of
the
product,
and
at
least
50cm
of
space
Maintenange
-----==-----ssssssrrrrrnnnnnanaaaaaa
08
i i "
above
the
product
when
using
7.
Ensure
both
the
filter
and
its
cover
are
properly
installed
before
using.
e
B
i
09
properly
9
8.
Do
notinsert
finger
or
other
things
into
the
air
outleinlet
to
prevent
physical
damage
or
trouble.
01
PRODUCT
OVERVIEW
Air
Outlet
Control
Panel
Night
Light
Filter
Base
(')
Power
Button
£
Light
Control
Button
(9
Timer
Button
+
Wind
Speed
Button
Air
Inlet
02
03
SPECIFICATIONS
Steps
of
Installing
er
Model
No.
Gala
Unplug
the
power
socket
of
the
machine
before
replacing
or
installing
the
filter.
Size
226"226*303mm
st
ot
<=y
step2
step3
Net
Weight
1.9kg
Pa
Adapter
Input:
100-240V
50/60Hz
Output:
24V-1.2A
Power
23W
CADR
100m?
Coverage
Area
<12m?
INSTALLATION
FILTER
otice
1.
Invert
the
machine,
and
rotate
the
base
along
the
direction
marked
"OPEN".
2.
Take
out
the
filter
from
the
machine.
©
Please
remove
the
packaging
of
the
filter
before
using
for
the
first
time.
) )
3.
Remove
the
packaging
of
the
filter.
©
Ensure
the
machine
is
unplugged
before
removing
or
installing
the
filter.
)
o
-
4.
Install
the
filter
into
the
machine.
©
When
the
power
indicator
keeps flashing
in
red,
the
filter
should
be
replaced.
N
5.
Then
Install
the
base,
rotate
and
tighten
the
base
along
the
direction
marked
"CLOSE".
®
Please
wipe
the
dust
on
the
filter
regularly,
do
not
wash
or
use
it
repeatedly.
) ) :
Notice:
e
Please
use
the
filter
specially
designed
for
this
product
1.Please
press
the
power
button
for
7s
to
reset
after
installing
a
new
filter
,
and
the red
light
will
stop
flashing.
2.
When
using
the
device
for
the
first
time,
please
remove
the
packing
of
filter
before
04
using
but
please
not
to
reset
the
device.
FUNCTION
INSTRUCTION
Insert
the
plug
into
the
power
socket,
the
buzzer
will
ring for
1
second
which
indicates
the
device
*
Wind
Speed
Button
connects
with
power.
1.In
the
condition
of
working,the
buzzer
will
ring
once
every
time
when
touching
the
wind
speed
button.
2.Itcan
be
set
at
Auto-High-Low
working
modes
and
the
corresponding
indicator
lights
on.
3.In
Auto
mode,the
wind
speed
will
changed
automatically
complying
with
air
quality.
When
the
LED
light
is
turned
on,
it
will
diplay
different
color
LED
light
to
show
the
air
quality
O
Power
Button
(Bule
color
means
that
the
air
quality
is
Good;
Yellow
is
normal:and
Red
is
bad)
.
When
the
air
quality
is
bad,the
wind
speed
will
change
to
High
mode;
1.Touch
the
power
button
to
turn
on
the
air
purifier;
When
the
buzzer
rings
once,
the
power
When
the
air
quality
is
normal,it
will
cahnge
to
Middle
mode;
indicator
,
low-mode
indicator,
and
night
lights
are
on.The device
starts
to
work
at
the
low
When
the
air
quality
is
good,it
will
change
to
Low
mode
mode
by
default
2.Touch
the
power
button
again,
the
buzzer
will
ring
once
and
the
device
will
stop
running
Notice:
The
wind
speed
adjustment
couldn't
operate
in
the
status
of
shutdown.
with
all
lights
off.
Notice:
In
case
of
constant
power
supply
,turn
off
the
device
and
then
turn
on
again,
it
will
default
shutdown
before
the
working
state.
":\‘
Night
Light
Button
1.
Touch
the
light
button,
the
buzzer
will
ring
once,
the
device
enters
softlight
mode.
@
Timer
Button
2.
Touch
it
again,
the
buzzer
will
ring
once
and
the
LED
light
will
turn
into
standard
mode.
3.
Touch
it
one
more
time,
the
LED
light
will
turn
off.
1.1n
the
condition
of
working,
touch
the
timer
button
to
set
2H,
4H
or
8H
with
buzzer
ringing
_
once
,and
the
corresponding
indicator
keeps
on.
Notice:
2.The
device
will
work
continuously
when
the
timer
indicator
turns
off.
1.When
the
device
detects
the
filter
needs
replacing
a
new
one
,the
LED
light
will
3.In
the
status
of
timing,
the
machine
begins
to
count down.
When
the
time
is
up, the
device
will
stop
working
keep
flashing
in
red
color.
2.Please
press
the
power
button
for
7s
after
installing
a
new
filter.
Then the
device
Notice:
The
timer
button
couldn’t
operate
in
the
status
of
shutdown.
will
start
to
countdown
the
lifespan
of
filter.
06
07
MAINTENANCE
FAQ
SITUATION
REASON
o
Is
it
plugged
into
a
power
socket?
s
there
a
power
outage?
«
Ensure
the
machine
is
unplugged
before
maintenance.
)
No
working
o
Is
the
home
leakage
switch
or
fuse
cut
off?
«
Do
not
immerse
the
machine
into
water
or
any
liquid.
«
s the
fiter
replacing
indicator
keep
flashing?
+
Do
not
use
abrasive,
corrosive
or
flammable
cleansers
(such
as
bleach
or
alcohol)
to
clean
Poor
pert
o
Is
there
any
dust
in
the
surface
of
primary
filter?
any
part
of
the
unit.
oor
performance
©
Is
there
any
obstacle
blocking
the
air
inlet/outlet.
+
Don't
use
a
vacuum
cleaner
to
clean
the
filter
or
wash
it
directly.
o
Is
there
anything
stuck
on
the fan
in
the
air
outlet?
o
Is
the
machine
tiited?
o
Please
set
a
lower
grade
of
wind
speed
if
the
noise
is
too
loud
,
or
set
low
grade
of
wind
speed
when
using
in
bedroom
at
night
«
Please
sterilize
the
filter
under
sunlight
regularly.
Significant noise
e
Itis
the
normal
phenomenon
that
the
machine
emits
the
smell
;
of
plastic
for
the
first
time.
Cleaning
&
Storage
The
machine
will
emit
nasty
smell
if
the
filter
is
dusty,
so
in
this
Coming
out
nasty
smell
|~
11€
™
situation,
please
clean
or
replace
the
filter.
®
Ensure
the
machine
is
power-off
and
unplugged.
o
If
the
burning
smell
emits
from
the
machine,
please
unplug
the
@
Use
a
soft
cloth
with
neutral
cleanser
to
clean
away
any
dust
or
debris
from
the
surface
of
the
power
socket
and
contact
with
buyer
or
customer
service
unit
and
air
inlet/outlet.
The
reminder
of
@
After
the
machine
completely
dry
out,
put
on
the
bag and
place
it
in
a
cool
and
wel-ventilated
replacing
filter
after
|
e
Please
press
the
power
button
()
for
7s
to
reset
the
machine
place.
user
have
replaced
and
the
life
counter
of
the
filter
will
start.
@
If
you
do
not
use
it
for
a
long
time,
in
the
basic
of
previous
steps,
please
turn
on
the
machine
anewone.
for
a
few
minutes
from
time
to
time
to
ensure
a
good
performance.
Notice:
If
the
above
FAQ
can
not
solve
your
problems
and
need
maintenance,
please
contact
the
supplier
or
after
sales
service
center.
Please
do
not
disassemble
the
machine
to
maintain
by
yourself.
Notice:
Please
don't
drop
any water
into
the
machine
when
clean
the
air
outlet.
08 09
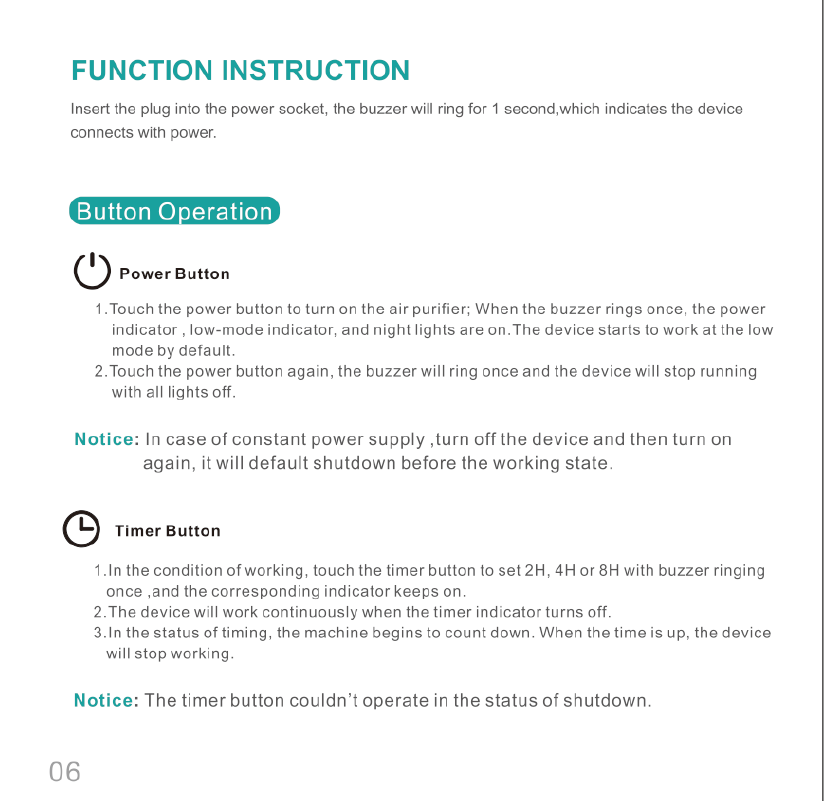
AIR
PURIFIER
AIR
PURIFIER
Thank
you
very
much
for
using
our
products.
Please read
the
user
manual
carefully
before
use,
and
keep
it
for
future
reference.
vo
CONTENT
POINTS
FOR
ATTENTION
Before
using,
please
read
this
user manual
carefully
and
keep
it
for
future
reference.
Points
for
Attention ======---x-rsmssees
e
01
Warl
Product
Overview
«-----mmmmmmmmmmmmmms
e
02
1.
To
avoid
electric
shock
and
fire,
do
not
allow
water
,
liquid
or
any
flammable
detergent
to
get
into
or
to
clean
the
product.
Specifications
-
««---roerrmerrnsr
e
04
2.
Do
not
spray
insecticide,
perfume
or
other
flammable
spray
around
the
products.
o
04
3.
Before
connecting
the
power
supply,
please
check
whether
the
voltage
of
the
productis
Installation
Filter
«-----=-rrmrmrmmmrmmmroeemereee
consistent
with
the local
power
supply
voltage.
) )
4.
This
product
can
not
replace
normal
ventilation,
daily
dust
collection
or
oil
pumping
when
cooking.
Function
INStruction
«--«--««-xommmmmmmamaaanns
06
) )
5.
Ensure
the
productis
used
in
condition
of
a
stable
and
horizontal
level.
.
6.
Leave
at
least
30cm
of
space
on
the
back
and
sides
of
the
product,
and
at
least
50cm
of
space
Maintenange
-----==-----ssssssrrrrrnnnnnanaaaaaa
08
i i "
above
the
product
when
using
7.
Ensure
both
the
filter
and
its
cover
are
properly
installed
before
using.
e
B
i
09
properly
9
8.
Do
notinsert
finger
or
other
things
into
the
air
outleinlet
to
prevent
physical
damage
or
trouble.
01
PRODUCT
OVERVIEW
Air
Outlet
Control
Panel
Night
Light
Filter
Base
(')
Power
Button
£
Light
Control
Button
(9
Timer
Button
+
Wind
Speed
Button
Air
Inlet
02
03
SPECIFICATIONS
Steps
of
Installing
er
Model
No.
Gala
Unplug
the
power
socket
of
the
machine
before
replacing
or
installing
the
filter.
Size
226"226*303mm
st
ot
<=y
step2
step3
Net
Weight
1.9kg
Pa
Adapter
Input:
100-240V
50/60Hz
Output:
24V-1.2A
Power
23W
CADR
100m?
Coverage
Area
<12m?
INSTALLATION
FILTER
otice
1.
Invert
the
machine,
and
rotate
the
base
along
the
direction
marked
"OPEN".
2.
Take
out
the
filter
from
the
machine.
©
Please
remove
the
packaging
of
the
filter
before
using
for
the
first
time.
) )
3.
Remove
the
packaging
of
the
filter.
©
Ensure
the
machine
is
unplugged
before
removing
or
installing
the
filter.
)
o
-
4.
Install
the
filter
into
the
machine.
©
When
the
power
indicator
keeps flashing
in
red,
the
filter
should
be
replaced.
N
5.
Then
Install
the
base,
rotate
and
tighten
the
base
along
the
direction
marked
"CLOSE".
®
Please
wipe
the
dust
on
the
filter
regularly,
do
not
wash
or
use
it
repeatedly.
) ) :
Notice:
e
Please
use
the
filter
specially
designed
for
this
product
1.Please
press
the
power
button
for
7s
to
reset
after
installing
a
new
filter
,
and
the red
light
will
stop
flashing.
2.
When
using
the
device
for
the
first
time,
please
remove
the
packing
of
filter
before
04
using
but
please
not
to
reset
the
device.
FUNCTION
INSTRUCTION
Insert
the
plug
into
the
power
socket,
the
buzzer
will
ring for
1
second
which
indicates
the
device
*
Wind
Speed
Button
connects
with
power.
1.In
the
condition
of
working,the
buzzer
will
ring
once
every
time
when
touching
the
wind
speed
button.
2.Itcan
be
set
at
Auto-High-Low
working
modes
and
the
corresponding
indicator
lights
on.
3.In
Auto
mode,the
wind
speed
will
changed
automatically
complying
with
air
quality.
When
the
LED
light
is
turned
on,
it
will
diplay
different
color
LED
light
to
show
the
air
quality
O
Power
Button
(Bule
color
means
that
the
air
quality
is
Good;
Yellow
is
normal:and
Red
is
bad)
.
When
the
air
quality
is
bad,the
wind
speed
will
change
to
High
mode;
1.Touch
the
power
button
to
turn
on
the
air
purifier;
When
the
buzzer
rings
once,
the
power
When
the
air
quality
is
normal,it
will
cahnge
to
Middle
mode;
indicator
,
low-mode
indicator,
and
night
lights
are
on.The device
starts
to
work
at
the
low
When
the
air
quality
is
good,it
will
change
to
Low
mode
mode
by
default
2.Touch
the
power
button
again,
the
buzzer
will
ring
once
and
the
device
will
stop
running
Notice:
The
wind
speed
adjustment
couldn't
operate
in
the
status
of
shutdown.
with
all
lights
off.
Notice:
In
case
of
constant
power
supply
,turn
off
the
device
and
then
turn
on
again,
it
will
default
shutdown
before
the
working
state.
":\‘
Night
Light
Button
1.
Touch
the
light
button,
the
buzzer
will
ring
once,
the
device
enters
softlight
mode.
@
Timer
Button
2.
Touch
it
again,
the
buzzer
will
ring
once
and
the
LED
light
will
turn
into
standard
mode.
3.
Touch
it
one
more
time,
the
LED
light
will
turn
off.
1.1n
the
condition
of
working,
touch
the
timer
button
to
set
2H,
4H
or
8H
with
buzzer
ringing
_
once
,and
the
corresponding
indicator
keeps
on.
Notice:
2.The
device
will
work
continuously
when
the
timer
indicator
turns
off.
1.When
the
device
detects
the
filter
needs
replacing
a
new
one
,the
LED
light
will
3.In
the
status
of
timing,
the
machine
begins
to
count down.
When
the
time
is
up, the
device
will
stop
working
keep
flashing
in
red
color.
2.Please
press
the
power
button
for
7s
after
installing
a
new
filter.
Then the
device
Notice:
The
timer
button
couldn’t
operate
in
the
status
of
shutdown.
will
start
to
countdown
the
lifespan
of
filter.
06
07
MAINTENANCE
FAQ
SITUATION
REASON
o
Is
it
plugged
into
a
power
socket?
s
there
a
power
outage?
«
Ensure
the
machine
is
unplugged
before
maintenance.
)
No
working
o
Is
the
home
leakage
switch
or
fuse
cut
off?
«
Do
not
immerse
the
machine
into
water
or
any
liquid.
«
s the
fiter
replacing
indicator
keep
flashing?
+
Do
not
use
abrasive,
corrosive
or
flammable
cleansers
(such
as
bleach
or
alcohol)
to
clean
Poor
pert
o
Is
there
any
dust
in
the
surface
of
primary
filter?
any
part
of
the
unit.
oor
performance
©
Is
there
any
obstacle
blocking
the
air
inlet/outlet.
+
Don't
use
a
vacuum
cleaner
to
clean
the
filter
or
wash
it
directly.
o
Is
there
anything
stuck
on
the fan
in
the
air
outlet?
o
Is
the
machine
tiited?
o
Please
set
a
lower
grade
of
wind
speed
if
the
noise
is
too
loud
,
or
set
low
grade
of
wind
speed
when
using
in
bedroom
at
night
«
Please
sterilize
the
filter
under
sunlight
regularly.
Significant noise
e
Itis
the
normal
phenomenon
that
the
machine
emits
the
smell
;
of
plastic
for
the
first
time.
Cleaning
&
Storage
The
machine
will
emit
nasty
smell
if
the
filter
is
dusty,
so
in
this
Coming
out
nasty
smell
|~
11€
™
situation,
please
clean
or
replace
the
filter.
®
Ensure
the
machine
is
power-off
and
unplugged.
o
If
the
burning
smell
emits
from
the
machine,
please
unplug
the
@
Use
a
soft
cloth
with
neutral
cleanser
to
clean
away
any
dust
or
debris
from
the
surface
of
the
power
socket
and
contact
with
buyer
or
customer
service
unit
and
air
inlet/outlet.
The
reminder
of
@
After
the
machine
completely
dry
out,
put
on
the
bag and
place
it
in
a
cool
and
wel-ventilated
replacing
filter
after
|
e
Please
press
the
power
button
()
for
7s
to
reset
the
machine
place.
user
have
replaced
and
the
life
counter
of
the
filter
will
start.
@
If
you
do
not
use
it
for
a
long
time,
in
the
basic
of
previous
steps,
please
turn
on
the
machine
anewone.
for
a
few
minutes
from
time
to
time
to
ensure
a
good
performance.
Notice:
If
the
above
FAQ
can
not
solve
your
problems
and
need
maintenance,
please
contact
the
supplier
or
after
sales
service
center.
Please
do
not
disassemble
the
machine
to
maintain
by
yourself.
Notice:
Please
don't
drop
any water
into
the
machine
when
clean
the
air
outlet.
08 09
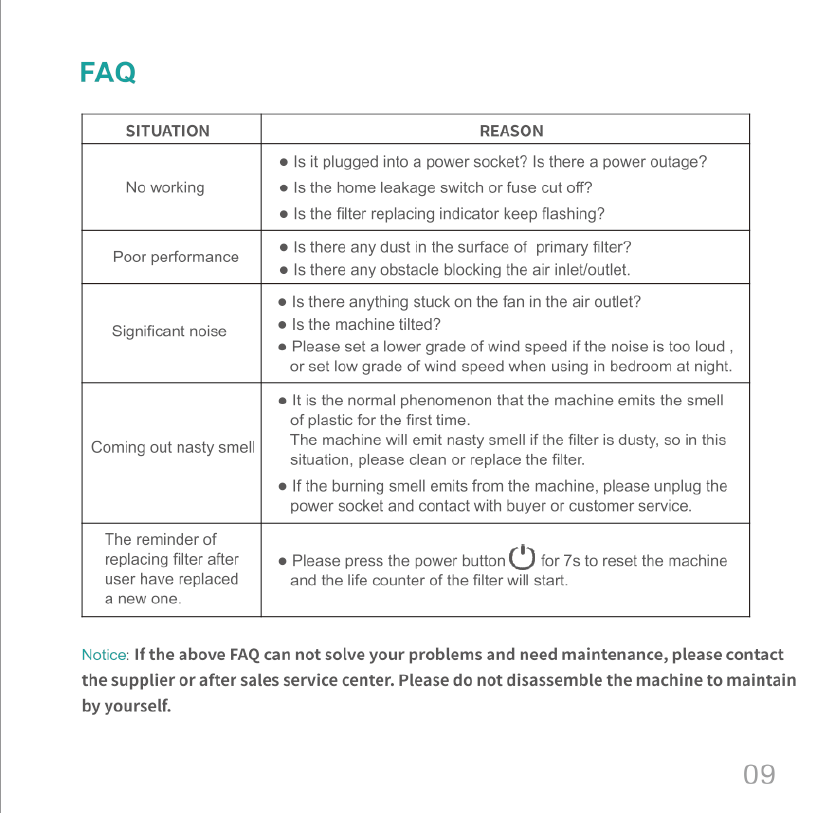
AIR
PURIFIER
AIR
PURIFIER
Thank
you
very
much
for
using
our
products.
Please read
the
user
manual
carefully
before
use,
and
keep
it
for
future
reference.
vo
CONTENT
POINTS
FOR
ATTENTION
Before
using,
please
read
this
user manual
carefully
and
keep
it
for
future
reference.
Points
for
Attention ======---x-rsmssees
e
01
Warl
Product
Overview
«-----mmmmmmmmmmmmmms
e
02
1.
To
avoid
electric
shock
and
fire,
do
not
allow
water
,
liquid
or
any
flammable
detergent
to
get
into
or
to
clean
the
product.
Specifications
-
««---roerrmerrnsr
e
04
2.
Do
not
spray
insecticide,
perfume
or
other
flammable
spray
around
the
products.
o
04
3.
Before
connecting
the
power
supply,
please
check
whether
the
voltage
of
the
productis
Installation
Filter
«-----=-rrmrmrmmmrmmmroeemereee
consistent
with
the local
power
supply
voltage.
) )
4.
This
product
can
not
replace
normal
ventilation,
daily
dust
collection
or
oil
pumping
when
cooking.
Function
INStruction
«--«--««-xommmmmmmamaaanns
06
) )
5.
Ensure
the
productis
used
in
condition
of
a
stable
and
horizontal
level.
.
6.
Leave
at
least
30cm
of
space
on
the
back
and
sides
of
the
product,
and
at
least
50cm
of
space
Maintenange
-----==-----ssssssrrrrrnnnnnanaaaaaa
08
i i "
above
the
product
when
using
7.
Ensure
both
the
filter
and
its
cover
are
properly
installed
before
using.
e
B
i
09
properly
9
8.
Do
notinsert
finger
or
other
things
into
the
air
outleinlet
to
prevent
physical
damage
or
trouble.
01
PRODUCT
OVERVIEW
Air
Outlet
Control
Panel
Night
Light
Filter
Base
(')
Power
Button
£
Light
Control
Button
(9
Timer
Button
+
Wind
Speed
Button
Air
Inlet
02
03
SPECIFICATIONS
Steps
of
Installing
er
Model
No.
Gala
Unplug
the
power
socket
of
the
machine
before
replacing
or
installing
the
filter.
Size
226"226*303mm
st
ot
<=y
step2
step3
Net
Weight
1.9kg
Pa
Adapter
Input:
100-240V
50/60Hz
Output:
24V-1.2A
Power
23W
CADR
100m?
Coverage
Area
<12m?
INSTALLATION
FILTER
otice
1.
Invert
the
machine,
and
rotate
the
base
along
the
direction
marked
"OPEN".
2.
Take
out
the
filter
from
the
machine.
©
Please
remove
the
packaging
of
the
filter
before
using
for
the
first
time.
) )
3.
Remove
the
packaging
of
the
filter.
©
Ensure
the
machine
is
unplugged
before
removing
or
installing
the
filter.
)
o
-
4.
Install
the
filter
into
the
machine.
©
When
the
power
indicator
keeps flashing
in
red,
the
filter
should
be
replaced.
N
5.
Then
Install
the
base,
rotate
and
tighten
the
base
along
the
direction
marked
"CLOSE".
®
Please
wipe
the
dust
on
the
filter
regularly,
do
not
wash
or
use
it
repeatedly.
) ) :
Notice:
e
Please
use
the
filter
specially
designed
for
this
product
1.Please
press
the
power
button
for
7s
to
reset
after
installing
a
new
filter
,
and
the red
light
will
stop
flashing.
2.
When
using
the
device
for
the
first
time,
please
remove
the
packing
of
filter
before
04
using
but
please
not
to
reset
the
device.
FUNCTION
INSTRUCTION
Insert
the
plug
into
the
power
socket,
the
buzzer
will
ring for
1
second
which
indicates
the
device
*
Wind
Speed
Button
connects
with
power.
1.In
the
condition
of
working,the
buzzer
will
ring
once
every
time
when
touching
the
wind
speed
button.
2.Itcan
be
set
at
Auto-High-Low
working
modes
and
the
corresponding
indicator
lights
on.
3.In
Auto
mode,the
wind
speed
will
changed
automatically
complying
with
air
quality.
When
the
LED
light
is
turned
on,
it
will
diplay
different
color
LED
light
to
show
the
air
quality
O
Power
Button
(Bule
color
means
that
the
air
quality
is
Good;
Yellow
is
normal:and
Red
is
bad)
.
When
the
air
quality
is
bad,the
wind
speed
will
change
to
High
mode;
1.Touch
the
power
button
to
turn
on
the
air
purifier;
When
the
buzzer
rings
once,
the
power
When
the
air
quality
is
normal,it
will
cahnge
to
Middle
mode;
indicator
,
low-mode
indicator,
and
night
lights
are
on.The device
starts
to
work
at
the
low
When
the
air
quality
is
good,it
will
change
to
Low
mode
mode
by
default
2.Touch
the
power
button
again,
the
buzzer
will
ring
once
and
the
device
will
stop
running
Notice:
The
wind
speed
adjustment
couldn't
operate
in
the
status
of
shutdown.
with
all
lights
off.
Notice:
In
case
of
constant
power
supply
,turn
off
the
device
and
then
turn
on
again,
it
will
default
shutdown
before
the
working
state.
":\‘
Night
Light
Button
1.
Touch
the
light
button,
the
buzzer
will
ring
once,
the
device
enters
softlight
mode.
@
Timer
Button
2.
Touch
it
again,
the
buzzer
will
ring
once
and
the
LED
light
will
turn
into
standard
mode.
3.
Touch
it
one
more
time,
the
LED
light
will
turn
off.
1.1n
the
condition
of
working,
touch
the
timer
button
to
set
2H,
4H
or
8H
with
buzzer
ringing
_
once
,and
the
corresponding
indicator
keeps
on.
Notice:
2.The
device
will
work
continuously
when
the
timer
indicator
turns
off.
1.When
the
device
detects
the
filter
needs
replacing
a
new
one
,the
LED
light
will
3.In
the
status
of
timing,
the
machine
begins
to
count down.
When
the
time
is
up, the
device
will
stop
working
keep
flashing
in
red
color.
2.Please
press
the
power
button
for
7s
after
installing
a
new
filter.
Then the
device
Notice:
The
timer
button
couldn’t
operate
in
the
status
of
shutdown.
will
start
to
countdown
the
lifespan
of
filter.
06
07
MAINTENANCE
FAQ
SITUATION
REASON
o
Is
it
plugged
into
a
power
socket?
s
there
a
power
outage?
«
Ensure
the
machine
is
unplugged
before
maintenance.
)
No
working
o
Is
the
home
leakage
switch
or
fuse
cut
off?
«
Do
not
immerse
the
machine
into
water
or
any
liquid.
«
s the
fiter
replacing
indicator
keep
flashing?
+
Do
not
use
abrasive,
corrosive
or
flammable
cleansers
(such
as
bleach
or
alcohol)
to
clean
Poor
pert
o
Is
there
any
dust
in
the
surface
of
primary
filter?
any
part
of
the
unit.
oor
performance
©
Is
there
any
obstacle
blocking
the
air
inlet/outlet.
+
Don't
use
a
vacuum
cleaner
to
clean
the
filter
or
wash
it
directly.
o
Is
there
anything
stuck
on
the fan
in
the
air
outlet?
o
Is
the
machine
tiited?
o
Please
set
a
lower
grade
of
wind
speed
if
the
noise
is
too
loud
,
or
set
low
grade
of
wind
speed
when
using
in
bedroom
at
night
«
Please
sterilize
the
filter
under
sunlight
regularly.
Significant noise
e
Itis
the
normal
phenomenon
that
the
machine
emits
the
smell
;
of
plastic
for
the
first
time.
Cleaning
&
Storage
The
machine
will
emit
nasty
smell
if
the
filter
is
dusty,
so
in
this
Coming
out
nasty
smell
|~
11€
™
situation,
please
clean
or
replace
the
filter.
®
Ensure
the
machine
is
power-off
and
unplugged.
o
If
the
burning
smell
emits
from
the
machine,
please
unplug
the
@
Use
a
soft
cloth
with
neutral
cleanser
to
clean
away
any
dust
or
debris
from
the
surface
of
the
power
socket
and
contact
with
buyer
or
customer
service
unit
and
air
inlet/outlet.
The
reminder
of
@
After
the
machine
completely
dry
out,
put
on
the
bag and
place
it
in
a
cool
and
wel-ventilated
replacing
filter
after
|
e
Please
press
the
power
button
()
for
7s
to
reset
the
machine
place.
user
have
replaced
and
the
life
counter
of
the
filter
will
start.
@
If
you
do
not
use
it
for
a
long
time,
in
the
basic
of
previous
steps,
please
turn
on
the
machine
anewone.
for
a
few
minutes
from
time
to
time
to
ensure
a
good
performance.
Notice:
If
the
above
FAQ
can
not
solve
your
problems
and
need
maintenance,
please
contact
the
supplier
or
after
sales
service
center.
Please
do
not
disassemble
the
machine
to
maintain
by
yourself.
Notice:
Please
don't
drop
any water
into
the
machine
when
clean
the
air
outlet.
08 09
Table of contents
Other afloia Air Cleaner manuals


