afloia Miro pro User manual
AIR PURIFIER & HUMIDIFIER MIRO PRO
USER MANUAL
STO P
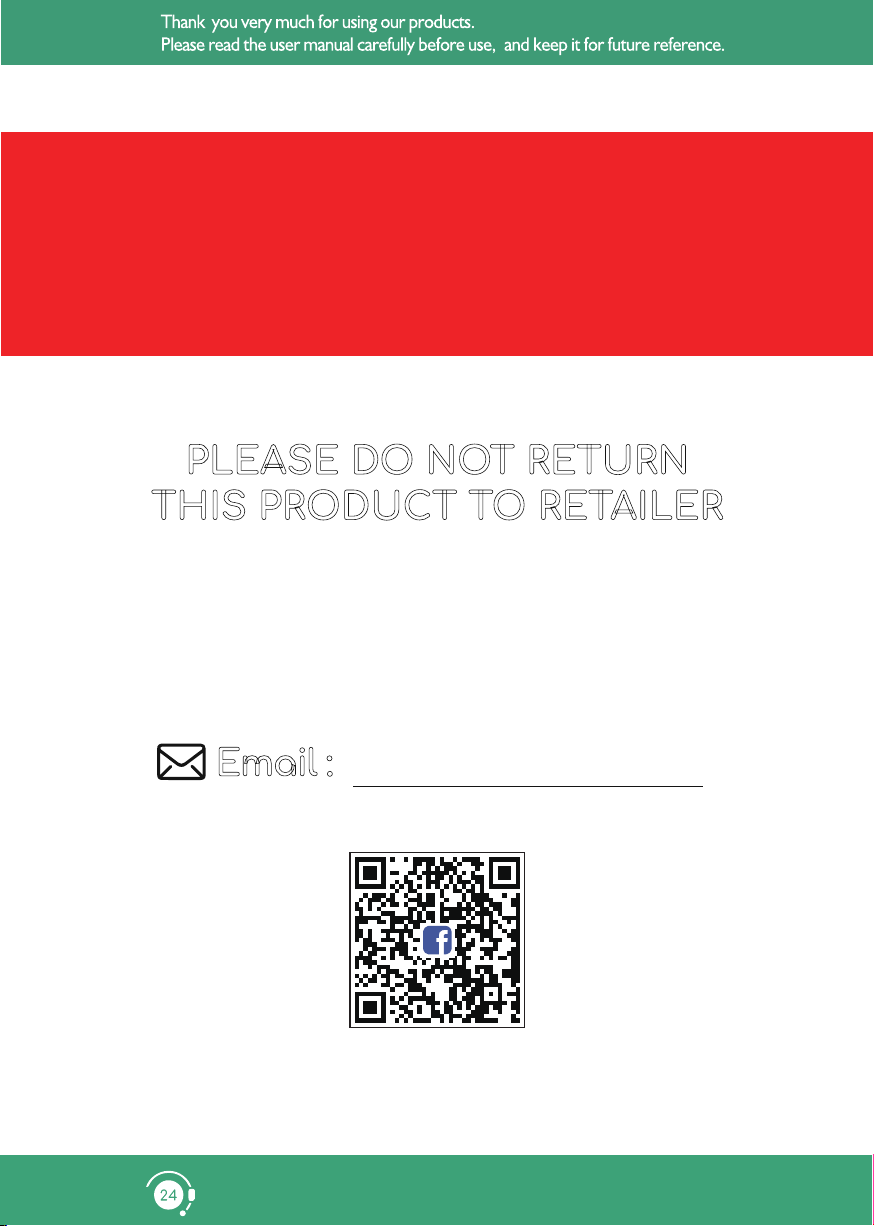
PLEASE DO NOT RETURN
THIS PRODUCT TO RETAILER
Facebook messenger
If you are missing parts, have ANY
issues when operating this product,
need replacement parts or need
assistance please contact:
24/12 LIVE CHAT SUPPORT
Email : service@afloia.com

2
Dear customers,
Please keep this User Manual for your reference.
This manual will guide you if you have any questions or
troubleshooting problems.
Air Purification
Air purifier has a 3-stage filtration system. Improved Filter with larger expansion area and
longer length than others.
Please read the instructions carefully before using the product and keep them properly.
7 Color LED Light
There are 3 light modes you can option: seven color cycle, current color, and light o.
Filter Replacement Indicator
The built-in replacement indicator reminds user when the filter is needed to be replaced.
Humidification
MIRO-PRO is adopting the principle of natural evaporation, the evaporating humid air
does not contain impurities, and the water-free mist will not accumulate dust, it’s real
pure humidification without mist.
Top Features of Afloia Air Purifier
Thank you for purchasing Afloia Air Purifier.
Timer Setting
You can set the timer from 2 to 8 hours depending on preference.
Adjustable Fan Speed
You may choose among 3 levels of fan speed. The fan at the lowest noise level will run
quietly, silently cleans the room air during your sleep.

●
Top Features of Afloia Air Purifier
Description of Parts
●How to Replace Filter
Names and Functions of Control Panel
About the Filter
Caution / Attention
●Troubleshooting
●
Before Use
During Use
Before Asking for
Support
Service Information
2
4
5~6
7~8
9~10
11~12
About the Humidification Module 10
13~14
15
CONTENTS
Product Specifications and Inquiry about
Malfunction
Unboxing
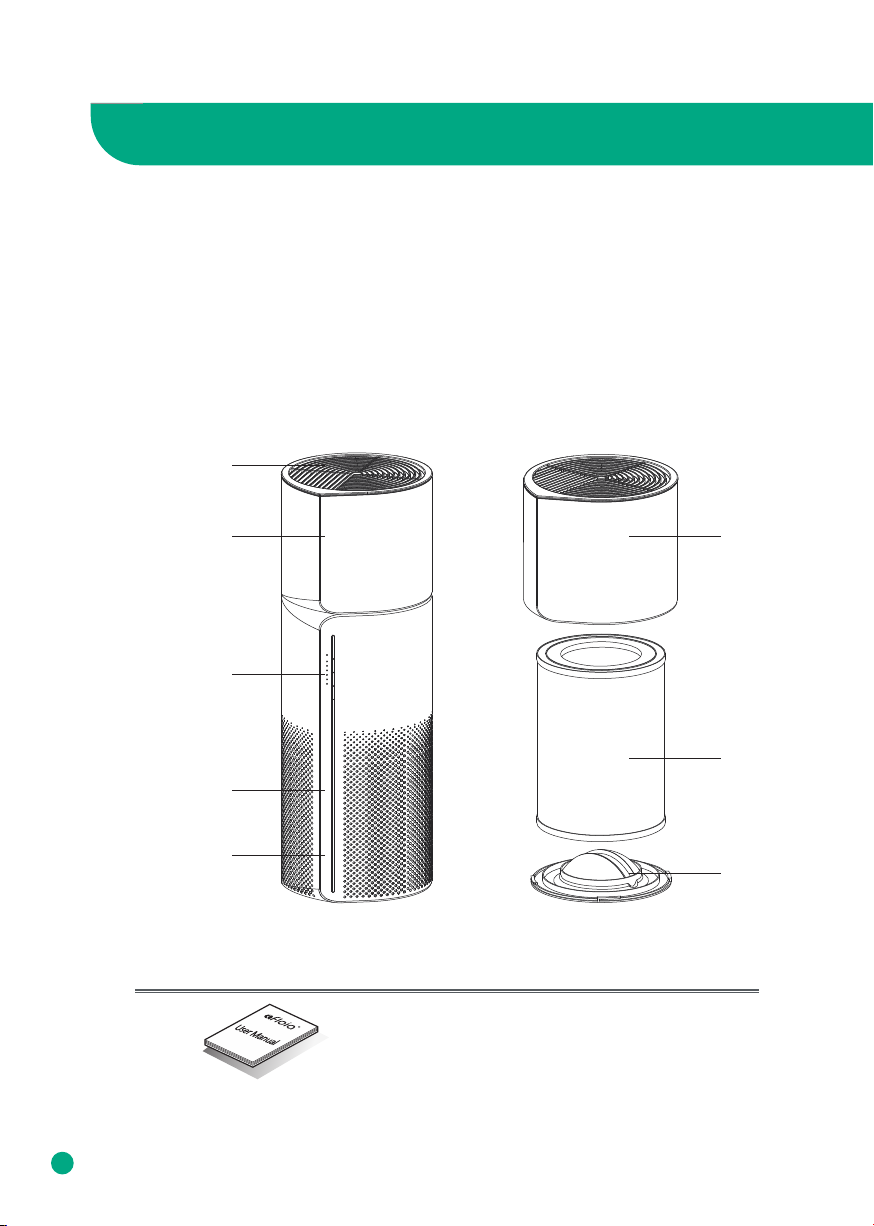
Description of Parts
Description of Parts
4
Accessories
User Manual
※ The picture may dier from the actual product.
Control Panel
Air Outlet
Filter
Base
Air Inlet
LED Light
Water TankWater Tank
To unbox the air purifier & humidifier, open the box, take out the foam lining, and take out
the internal accessories and user manual.
Pull the air purifier & humidifier out of the box and pull down the plastic covering surround-
ing it.
Keep the product box in a safe location for future use. After clearing the inner packaging of
the air purifier, open the base of the air purifier, take out the filter and remove its plastic
packaging.
5
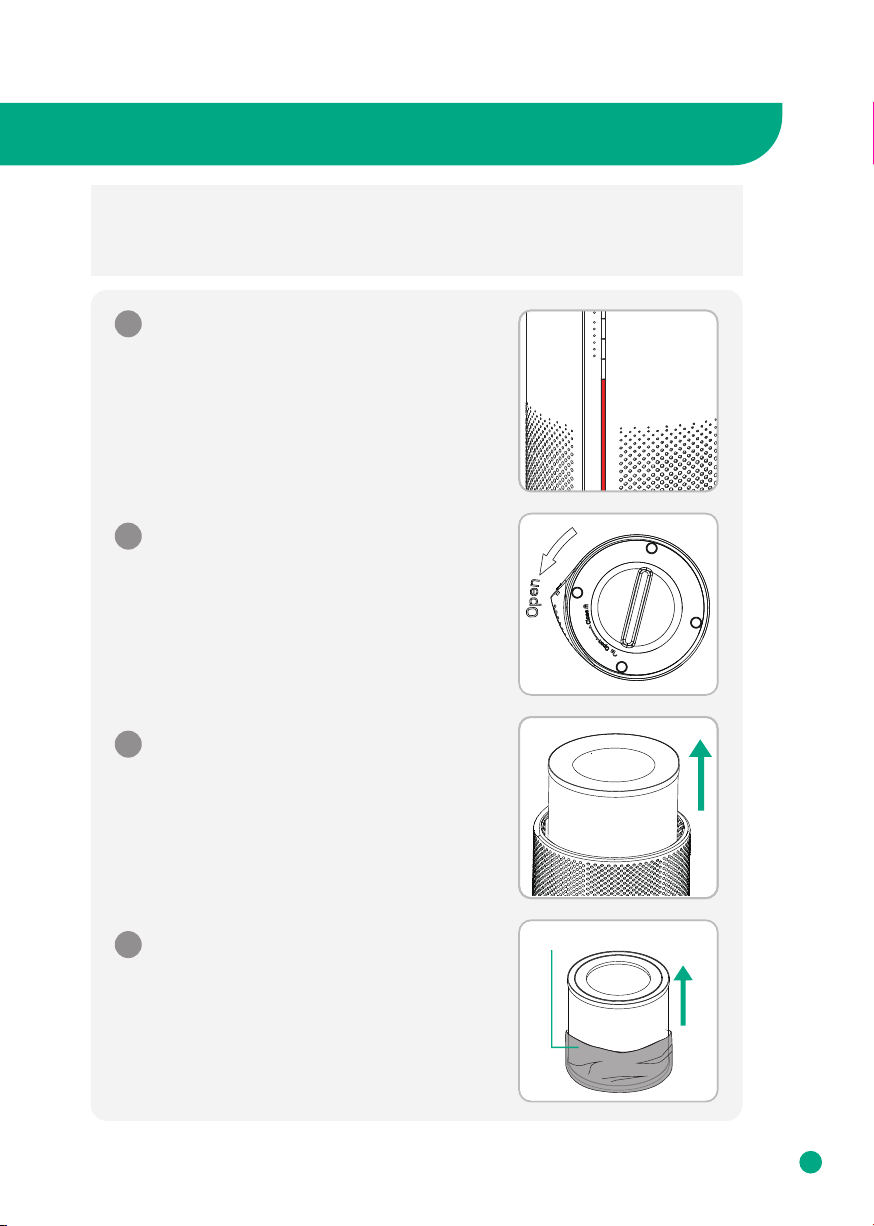
How to Replace Filter
* Note :
• Please remove the packaging from the filter before using it.
• Ensure the machine is unplugged before removing or installing the filter.
• Please wipe the dust on the filter regularly, do not wash or use it repeatedly.
• Please do not use other filters that are not designed for this air purifier.
1
Invert the machine, and rotate the base
along the direction marked "OPEN".
2
Take out the old filter from the air purifier.
3
Remove the packaging around the new filter.
4
Packaging
When the LED light keeps flashing in red,
it means the filter needs to be changed.
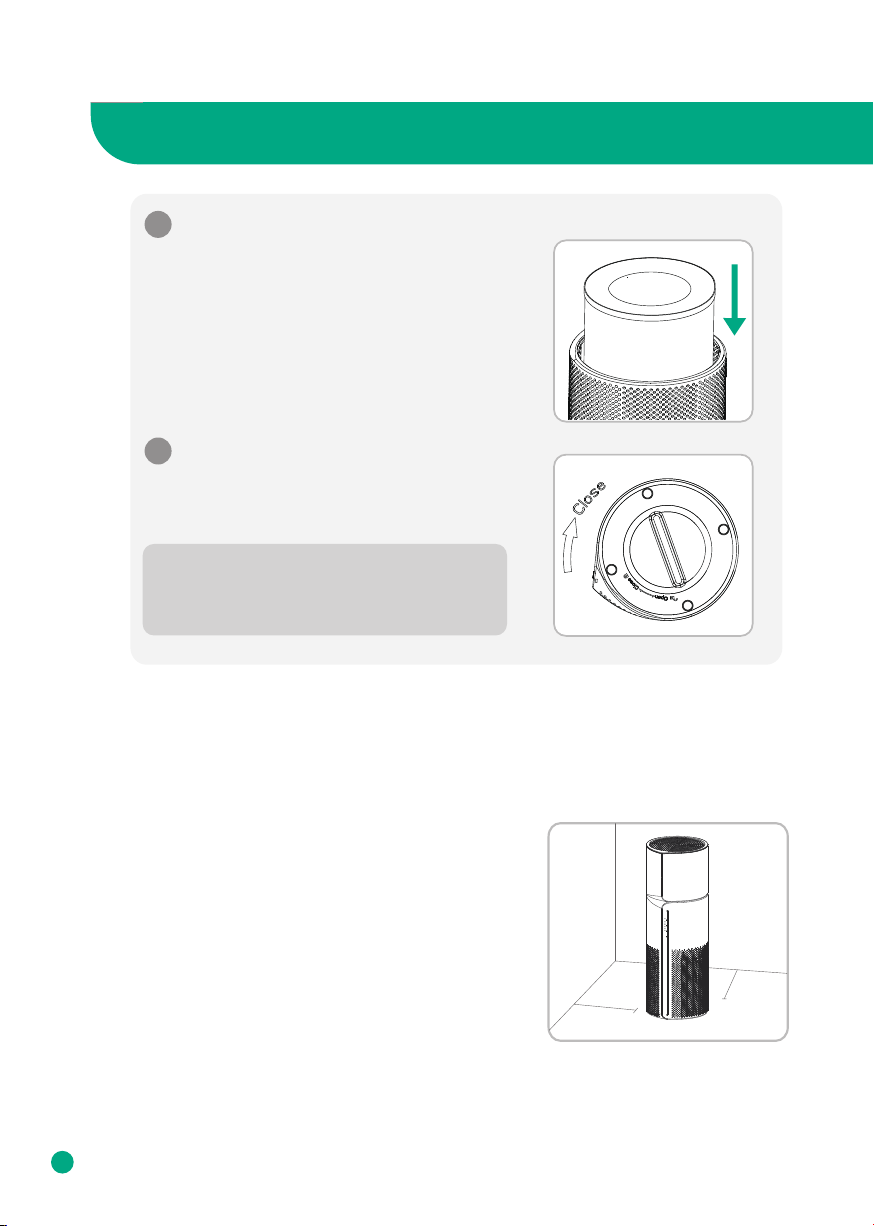
In order to keep the best purification eect, it is
recommended to keep the air purifier standing
on the floor and keep it at least 1ft (30cm) away
from the wall.
Resetting the Filter Replacement Alert
Install the filter into the machine.
Then install the base, rotate and tighten the
base along the direction marked "CLOSE".
5
6
Maximum Purification Eciency
How to Replace Filter
6
* Note
Failure to properly place the filter and base
on the air purifier, may result in air purifier
not working properly.
When the air purifier detects that the filter reaches the saturation value, the LED light
keeps flashing in red.
Please press the power button for 7 seconds to reset the filter replacement alert after
installing a new filter.
If it is the first time using the machine, do not reset it.
1 ft (30cm)
1 ft (30cm)
Button Description
7
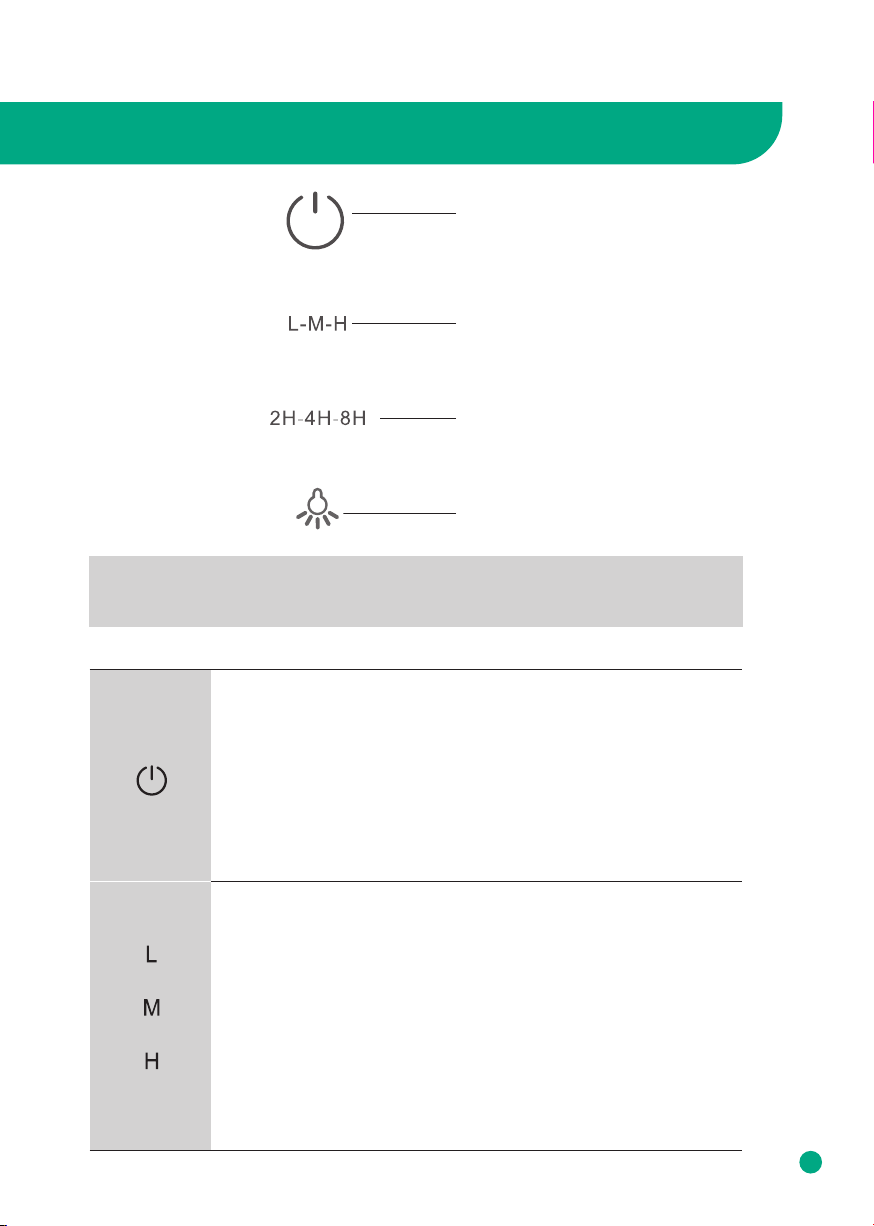
Names and Functions of Control Panel
Timer Button
Light Control Button
Fan Speed Button
Power Button
* Note
When the machine connects to the power outlet, it will beep for once, the lamp will turn
on for 1 second and then turn o, this means that the air purifier is powered on.
Power Button
1. Touch the power button for once to turn on the air purifier, it will beep
for once, the lamp will turn on, the default fan speed will be low.
2. Touch the power button again, the air purifier will beep for once, then
turn o, the fan will stop working.
(Note: Without unplugging the power plug, turn o the air purifier and
turn it on again, the fan speed defaults to the working state before
shutting down.)
Fan Speed Button
There are 3 options for fan speed. H or High, is the fastest fan speed. M
or Moderate, is the second fastest fan speed. L or Low, is the lowest fan
speed and most quiet.
To switch the fan speed, press again to adjust the wind speed among
the circulation of L, M, and H mode, the corresponding indicator will be
on.
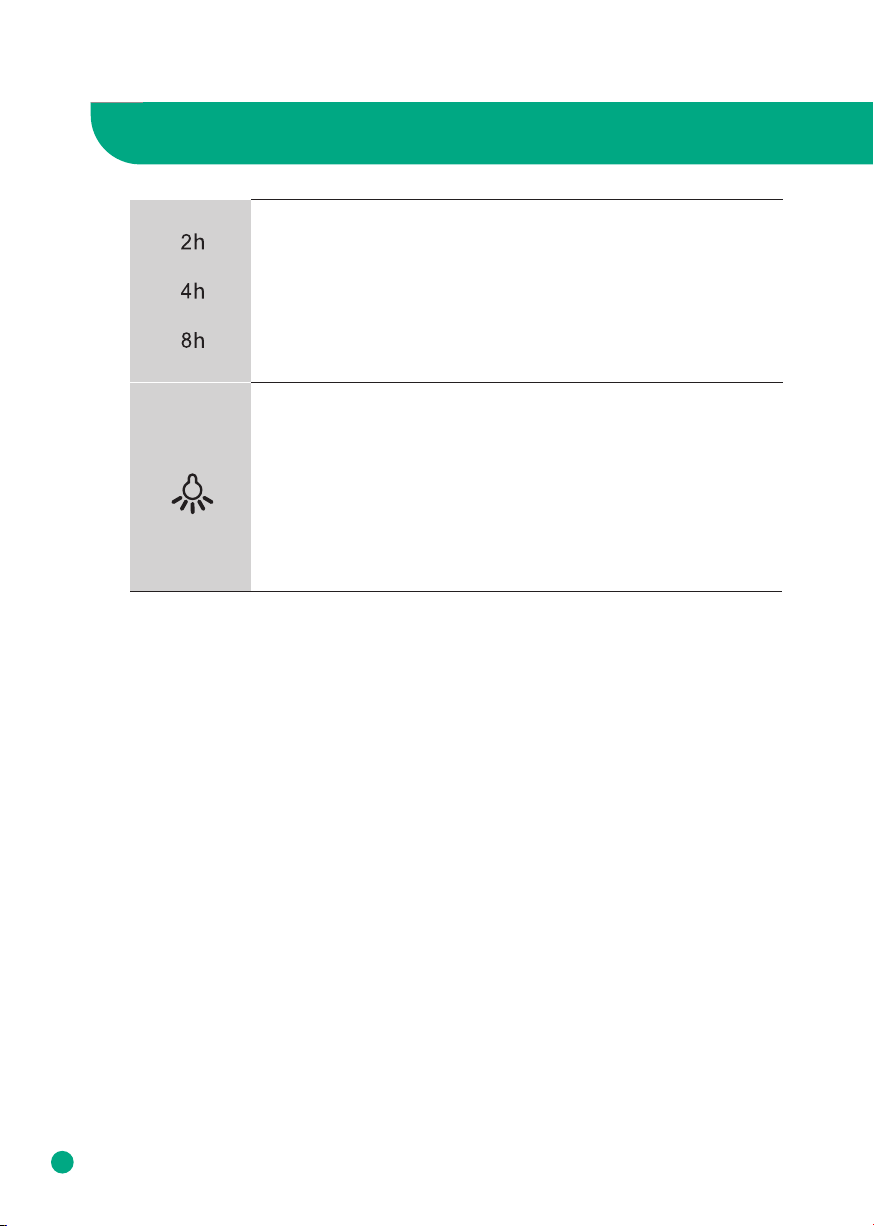
Timer Button
1. To use the timer, press the timer button to set among the circulation
of 2H, 4H and 8H timer with buzzer rang, and the corresponding indica-
tor will be on.
2. When the timer is up, the air purifier will turn o, the fan will stop
working.
(Note: if switch o the timer indicator, the air purifier will work continu-
ously.)
Light Control Button
There are 3 light brightness modes you can option: seven color cycle,
current color, and light o.
1. Press the light button in the standby state, the buzz will ring for one
time and the light will cycle between blue-cyan-green-yellow-or-
ange-red-purple.
2. Press for second time, the buzzer will ring for one time and the LED
light will hold the current color.
3. Press it again, the LED light will be o.
Connect the Power
Names and Functions of Control Panel
8
Please confirm that the input voltage is 100-240V 50/60Hz, and ensure that the power plug
and your hands are dry before you insert the power cord plug into the outlet.
Note: Contact Customer Service when the power cord or plug is damaged or the power outlet
is loose.
We strongly recommend that the damaged parts be repaired or replaced.
To replace the damaged power cord or plug, please visit Afloia website and contact Custom-
er Service.
9
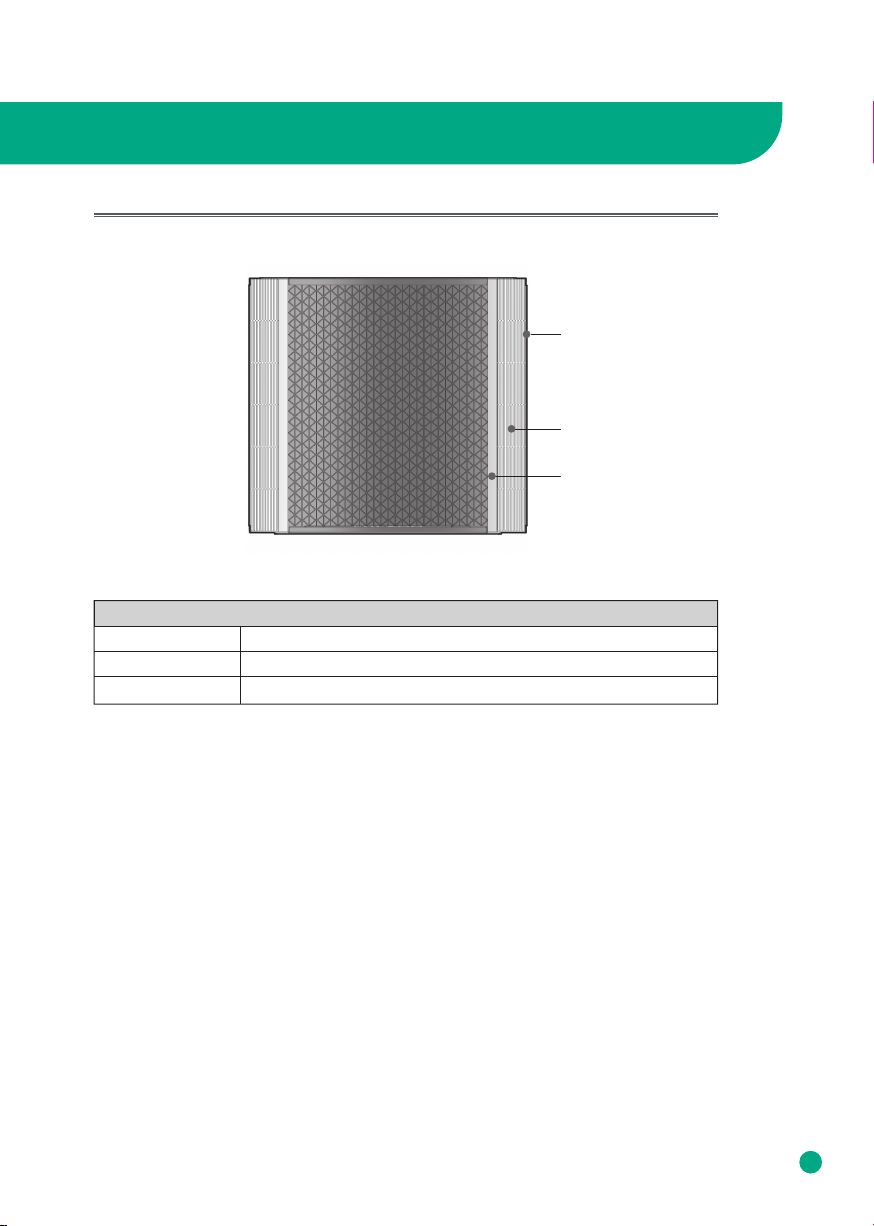
About the Filter
※ The picture may dier from the actual product.
True HEPA 3-Stage Filter
Stage 1 Pre Filter
Stage 2 H13 True HEPA
Stage 3 Active Carbon Filter
Air Purification
H13 True HEPA
Pre-Filter
Active Carbon Filter

We recommend replacing the filter every 3-6 months. However, you may need to
change your filters sooner or later depending on use frequency and air quality.
For buying more filters, please visit Afloia website and contact Afloia customer service.
• Ensure the product is unplugged before maintenance.
• Do not immerse the air purifier into water or any liquid.
• Do not use abrasive, corrosive or flammable cleansers (such as bleach or alcohol) to
clean any part of the unit.
• Do not wash the filter.
• Do not use a vacuum cleaner to clean the filter.
• Ensure the product is powered-o and unplugged.
• Use a soft cloth with neutral cleanser to clean away any dust or debris from the
surface of the product and air intake/vent.
• If you do not use it for a long time, please turn on the product for a few minutes from
time to time to ensure a good performance.
• Please do not drop any water into the product when cleaning the air outlet.
Maintenance
• Before use, please remove the packing material of the humidifier filter.
• Remove the humidification module and place it on a flat surface, peel o the water
tank cover, and place the humidifier filter in the water tank
• Add an appropriate amount of water to the water tank below the overflow hole, do
not exceed the overflow holes on sides
• Close the cover of the water tank and place the humidification module on the grill of
the air outlet of the air purifier.
• After use, please keep the humidifier filter dry.
Humidification Module Instruction
Cleaning and Storage
About the Filter
About the Humidification Module
10
Filter Replacement Cycle
Note: Because the humidifier filter is aected by the environment, it will be slightly yellow
during use, which is normal. It is recommended to use a new wet curtain in a timely
manner after 3 months of use or severe yellowing.
11
Caution
Safety Instructions
Introduction
* Please comply with the ‘Caution’ as they are provided to ensure safe and proper use of
the product and prevent accidents and dangerous situations.
Thank you for choosing a device from Afloia.
Intended use
• The device is used exclusively for cleaning the ambient air indoors.
• Please read these operating instructions before using the machine
and please follow the safety instructions.
The operating instructions must be kept available at all times.
Safety instructions
• Keep packing material, such as plastic wrapping, away from
children!
(Risk of suocation)
• Please follow the safety instructions to prevent fire or electric shock.
Only use the device indoors.
• Only use a socket that supplies the correct voltage
(see rating plate).
• Do not modify or repair the device.
• Do not use the device if the power cable or mains plug is damaged
or if the connection at the socket is not stable.
• Make sure that the power cable does not get crushed while you are
using the device and that it cannot be damaged in any other way.
Place the cable so that no one will trip over it.
Do not pull the power cable tight.
• Disconnect the plug from the socket for cleaning purposes and
whenever the device is not in use for a significant period of time.
• Do not touch the plug or the device if you have wet hands.
• Do not spray any insect repellent.
• Do not use in rooms where the device may come into contact with
fuel vapour, oil vapour or metal dust.
• Do not use any volatile liquids, petroleum, kerosene, paint thinner or
polishing paste to clean the device. Such liquids may damage the
surface of the device.
• Do not expose the device to rain, water, moisture or high humidity,
and do not set it up in a bathroom or kitchen next to a sink.
• Make sure that no foreign objects get into the outlet grilles.
• Do not use near a naked flame or sparks.
• The device is not suitable for removing harmful gases (carbon
monoxide, e.g. from heating appliances).
• Unless they are supervised, the device must not be used by those(in-
cluding children) with reduced, physical, sensory and mental abilities
or who do not have the required experience and knowledge.
• Do not block the air intake or outlet.
• Do not expose the air purifier to direct sunlight, a naked flame or
heat.
• Only use the air purifier in living quarters and within the specified
technical parameters. Improper usage may pose a threat to life and
health.
• Do not use the device near a smoke detector. Air blowing towards a
smoke detector could delay the alarm or not trigger at all.
Risk of injury due to electric shock.
Always disconnect the mains plug prior to :
• Maintenance and cleaning
• Moving the device
• Changing the filter
• Do not use any spray cans with flammable contents near to the air
purifier!
• Do not use any flammable cleaning agents
Caution
12
Safety Instructions
Safety instructions
Caution
Caution
Caution

Not following this user manual may result in your device not working.
Please read the following measures accordingly if you are having problems with your device.
If you are still having problems, please contact our Customer Service Centers.
▼
13
Troubleshooting
Problem RecommendationChecklist
The product won’t work
even if I press the Power
button.
Are you in a black out?
Is the power cord plugged
into the power outlet?
Check the power supply.
Put the power plug in a power
outlet.
Is there material blocking
the intake or air vent?
Remove material from vent/in-
take.
Check if plastic packaging
has been removed from filter.
Is the air purifier placed
where the intake or blocked
preventing air from moving
freely?
Remove objects blocking the air
purifier or place it elsewhere.
Air purifier is on but fan does
not work.
Unplug from the wall and
contact Afloia customer
service: service@afloia.com
Is there anything stuck in the
fan or air intake/vent?
Please remove any objects you
see from the fan intake/vent.
Is the air purifier tilted on its
side?
Make sure the base is level on a
flat surface.
Is the fan really loud? Set your air purifier to a lower
fan speed to reduce the noise.
No air is blowing out.
Loud Noises

16
Troubleshooting
14
Problem RecommendationChecklist
Coming out nasty smell
The air purifier is not
purifying the area well.
The filter replacement
alert is still blinking after I
changed the filter.
Is the air purifier in a place
with a lot of smoke and odor?
The performance of the air
purifier may decrease over time
if there is excessive smoke and
odor in the area. To remedy this,
please air out the room before
using the air purifier.
Should I clean or replace
my filter?
Check the filter replacement
indicator and clean or replace
the filter if necessary.
Do you smell plastic?
It is common that in the first
uses the smell of plastic will be
emitted.
It will eventually go away. If not,
please contact our customer
service centers.
Is there a burning smell?
Turn o your air purifier, unplug
it from the wall and contact our
customer service center.
The air purifier may be
placed in an area with no
ventilation, or there is an
obstacle near it.
Ventilate the room and then use
the product. Use the product in
an area not exceeding its cover-
age limit.
(Avoid placing the device where
it is well ventilated like a door or
window.)
Is there any dust in the
pre-filter? Wipe the Pre-Filter
Are there any objects
blocking the air intake/vent?
Have you removed the filter
from it's packaging?
The plastic bag of the filter may
not have been removed, so
please open the cover and check
if the plastic bag is removed.
Is the filter dusty? Maybe it is
time to replace the filter.
Change the filter if it looks like it
needs to be replaced.
Is intake/vent dusty? Clean the air vent/intake.
Have you reset the filter
change button?
Press and hold the power button
for 7 seconds to reset the filter
replacement alert.
Please remove any objects from
the intake/vent.
Note : If these suggestions do not work accordingly, please contact Afloia customer service and
await instructions. Do not disassemble, repair or fix anything by yourself.
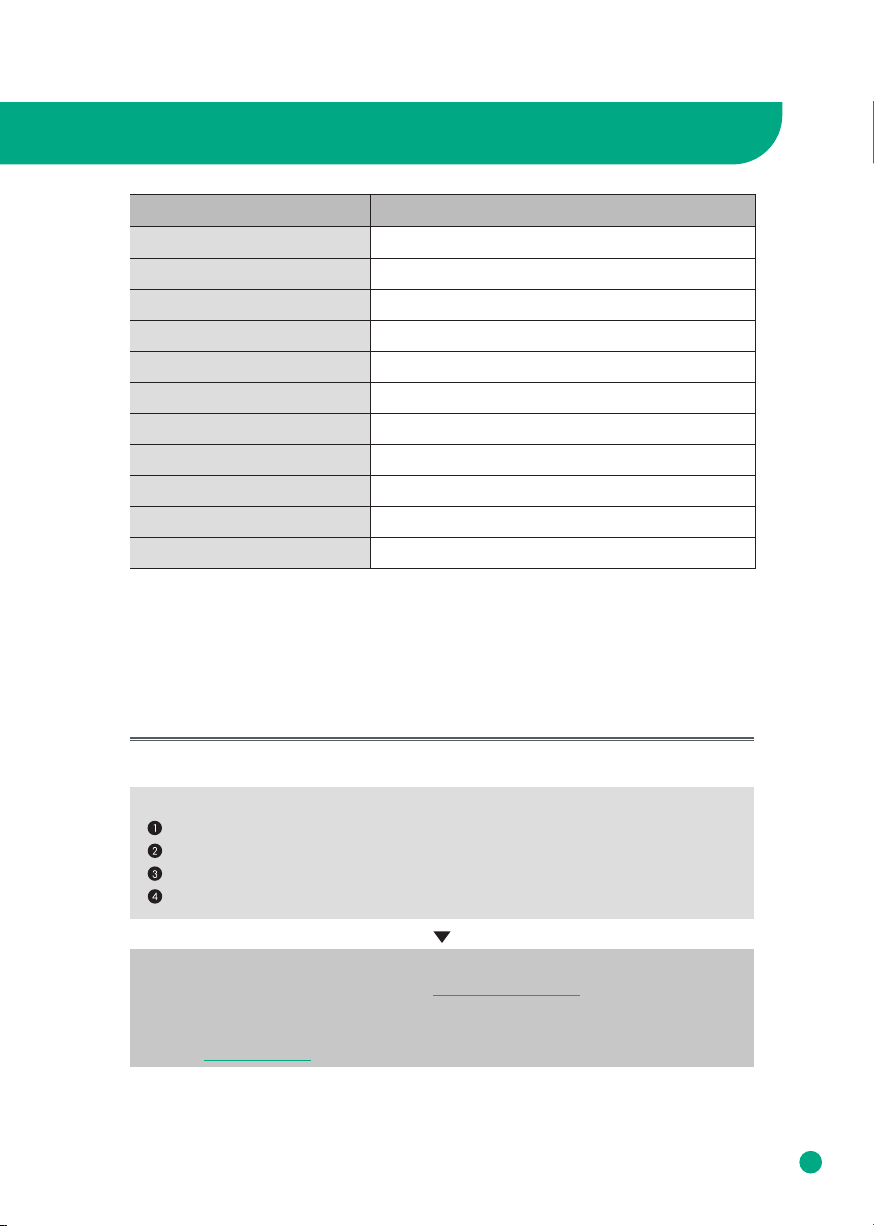
Miro Pro
Input: 100-240V 50/60Hz Output: 24V-1.2A
23W
24-55 dB
219ft²/20m²
Mechanical dust collecting method
D7.6 × W7.6 × H21.8 inch / D195 × W195 × H555 mm
5.7 lbs / 2.6kg
For indoors
15
Product Specifications
Category Air Purifier & Humidifier
Inquiry about Malfunction
Model
Power Supply
Rated Power Input
1.9L
Water Tank Capacity
150ml/h
Mist Output
Noise
Coverage Area**
Dust Collecting Method
Product Size
Product Weight
Place for Use
1.The information (exterior, design, and specifications) provided in this User Manual is
subject to change without prior notice to improve the quality of the device.
2.Room coverage** based on the Air Change Per Hour or ACPH which is how many times
per hour the air in your room will be fully purified.
Product parts may wear out due to heat, moisture, dust and other causes over time,
which may cause malfunction of the product.
In the case that
Please stop using the product.
Please unplug the product and contact service@afloia.com
Warranty
For questions about our warranty or to look at our other products, please visit our
website: www.afloia.com
1.Something other than the symptoms coming under “Troubleshooting”;
2.You can feel electricity when you touch the product with your hands;
3.The power is supplied, but the fan does not work;
4.Other malfunctions occur.

MEMO

MEMO

We provide satisfying consultation and services concerning your complaints, suggestions, and
recommendations upon receiving your troubled product model name, status, and contact
information.
·After reading this manual, keep it in a place easily accessible to the user for future reference.
·Caution : Please read this manual carefully to ensure safety and a longer product lifespan.
www.afloia.com service@afloia.com
AIR PURIFIER & HUMIDIFIER MIRO PRO
USER MANUAL
MIRO PRO USA-SMS-20211105-V01-P8
Table of contents
Other afloia Air Cleaner manuals


