AGA marvel 61HK User manual

Installation
Operation
and
Maintenance
Instructions
Keg Dispenser
61HK (Marvel)
6OHK (Outdoor)
NOTE
CONTENTS
Unpacking your refrigerator....................
.....
..................
Removing interior packaging......................................
Warranty Registration.....................
.........
....................
Installing your refrigerator........................
.
..........
.
..........
Selecting the location..........................
.....
..................
Cabinet Clearances..................................
........
..........
Outdoor installation........................
.................
...........
Leveling legs..............................
...........
.....................
Electrical Connection .....................
...........
...................
Setting the temperature control.........
.................
...........
Using Your Refrigerator
...........................
............
.........
Shelving ....................................................................
Tap equipment and assembly ...................................
CO2 Regulator
Adjusting Pressures
Drain kit ..............................
..................
.....................
Care and Cleaning..................................
.
.....................
Cleaning and maintaining dispensing system ...........
Tap cleaning kit .........................................................
Faucet cleaning ........................................................
Keg coupler cleaning ................................................
Cabinet ......................................................................
Interior .......................................................................
Care of unit ................................................................
Energy Saving Tips ......................................................
Dimensions For 61HK Solid Door..................................
Recommended Rough in Opening Dimensions
For Model 61HK Solid Door...
.....
................................
Dimensions for 6OHK-SS Solid Door............................
Recommended Rough in Opening Dimensions
For Model 6OHK-SS Solid Door..................................
Dimensions For Model 61HK Solid Overlay Door.
.
.......
Recommended Rough in Opening Dimensions
For Model 61HK Solid Overlay Door.
........
..................
Dimensions For Model 6OHK-SSX Solid Door.
.......
.....
Full Overlay Panel Installation Instructions..
..........
.......
Troubleshooting Guide.........................
.....
...................
Obtaining Service.............................
........
....................
Household Product Warranty................
...............
..........
Important Safety Instructions
Warnings and safety instructions appearing in this guide
are not meant to cover all possible conditions and situa-
tions that may occur. Common sense, caution, and care
must be exercised when installing, maintaining, or operat-
ing this appliance.
Recognize Safety Sym-
bols, Words, and Labels.
3
3
3
4
4
4
4
4
5
5
6
6
7
10
10
11
12
12
12
12
12
13
13
13
13
14
14
15
15
16
16
17
18
21
22
23
WARNING-Hazards or unsafe practices with
high probability of personal injury or property / prod-
uct damage.
CAUTION-Hazards or unsafe practices which could
result in personal injury or property or product damage.
NOTE-Important information to help assure a problem
free installation and operation.
2
is committed to building a quality product
in an environmentally friendly manner. Our processes are
tightly controlled and closely monitored. We have achieved
certications in ISO 9001 for quality assurance, ISO 14001
for environmental management, and OHSAS 18001 for oc-
cupational health and safety from Lloyd’s Register Quality
Assurance.

UNPACKING YOUR REFRIGERATOR
Remove Interior Packaging
Your refrigerator has been packed for shipment with all
parts that could be damaged by movement securely fas-
tened. Remove internal packing materials and any tape
holding internal components in place. The owners manual
is shipped inside the product in a plastic bag along with the
warranty registration card, and other accessory items.
Important
Keep your carton and packaging until your refrigerator has
been thoroughly inspected and found to be in good condi-
tion. If there is damage, the packaging will be needed as
proof of damage in transit. Afterwards please dispose of all
items responsibly in particular the plastic bags which can
be a suffocation hazard.
Note to Customer
This merchandise was carefully packed and thoroughly
inspected before leaving our plant. Responsibility for its
safe delivery was assumed by the retailer upon acceptance
of the shipment. Claims for loss or damage sustained in
transit must be made to the retailer.
DO NOT RETURN DAMAGED MERCHANDISE TO THE
MANUFACTURER - FILE THE CLAIM WITH THE RE-
TAILER.
It is important you send in your warranty registration card
immediately after taking delivery of your refrigerator.
The following information will be required when registering
your unit.
Service Number
Serial Number
Date of Purchase
Dealer’s name and address
The service number and serial number can be found on the
serial plate which is located inside the cabinet on the left
side near the top. See gure 1.
Warranty Registration
Figure 1
Help Prevent Tragedies
Child entrapment and suffocation are not problems of the
past. Junked or abandoned refrigerators are still dangerous
- even if they sit out for "just a few days".
If you are getting rid of your old refrigerator, please follow
the instructions below to help prevent accidents.
Before you throw away your old refrigerator or freezer:
• Take off the doors or remove the drawers.
• Leave the shelves in place so children may not easily
climb inside.
If the unit was shipped or has been laying on its back for
any period of time allow the refrigerator to sit upright for a
period of at least 24 hours before plugging in. This will as-
sure oil returns to the compressor. Plugging the refrigerator
in immediately may cause damage to internal parts.
3
EXCESSIVE WEIGHT HAZARD
Use two or more people to move product.
Failure to do so can result in back or other injury.
INSTALLING YOUR REFRIGERATOR
Select Location
The proper location will ensure peak performance of your
appliance. We recommend a location where the unit will
be out of direct sunlight and away from heat sources. To
assure your product performs to specications the recom-
mended installation location temperature range is from 65
to 80°F (18 to 27°C) for built-in units and 65 to 90°F (18 to
32°C) for freestanding units.
Cabinet Clearance
Ventilation is required from the bottom front section of the
unit. Keep this area open and clear of any obstructions.
Adjacent cabinets and counter top can be installed around
the unit as long as the front grille remains unobstructed.
Outdoor Installation
Only the 6OHK model is suitable for outdoor installations.
Building codes may require a ground fault circuit interrupter
electrical receptacle to supply electrical power to the refrig-
erator for outdoor applications. (See "Electrical Connec-
tion").
Do not install in a location where the unit will be exposed
to direct sun exposure as this may result in unsatisfactory
performance.
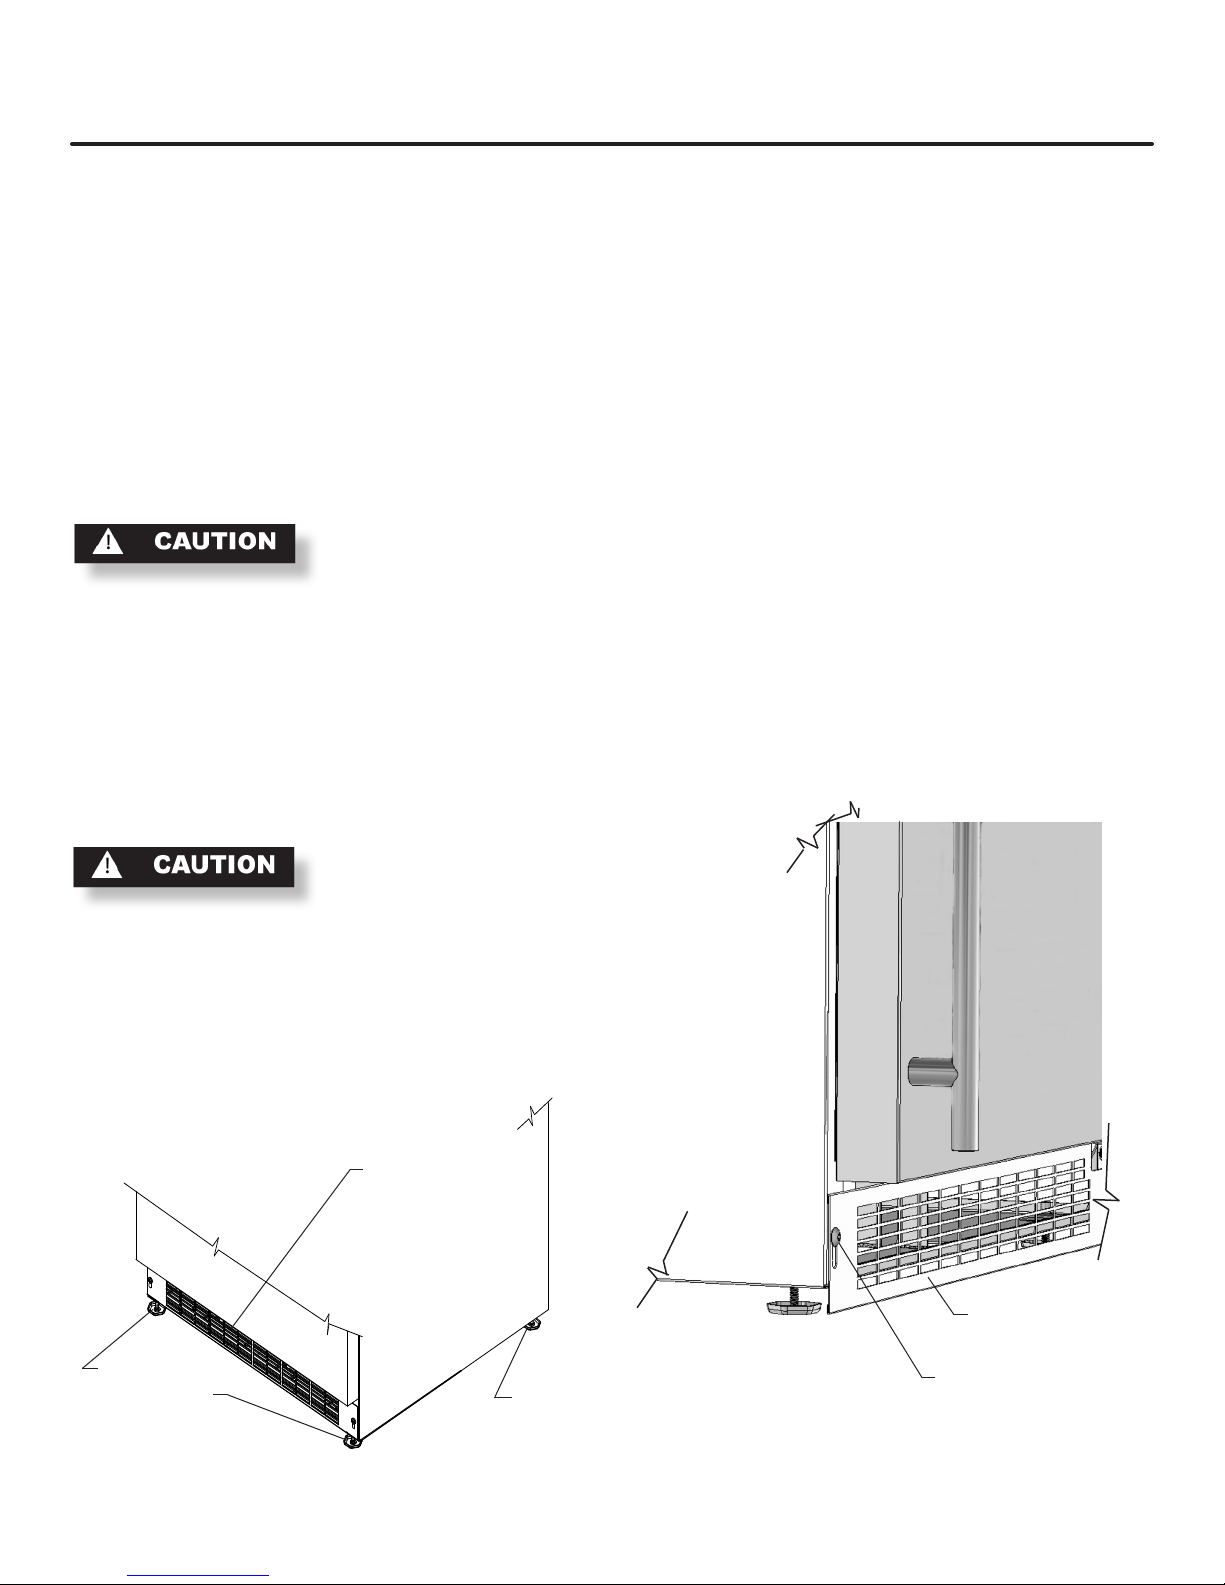
Leveling Legs
Adjustable legs at the front and rear corners of the unit
should be set so the unit is rmly positioned on the oor
and level from side to side and front to back. The overall
height of your Marvel refrigerator may be adjusted from
333⁄4" (85.7cm) with the leveling legs turned in, and up to
343⁄4" (88.3cm) with the leveling legs extended.
To adjust the leveling legs, place the refrigerator on a solid
surface and protect the oor beneath the legs to avoid
scratching the oor. With the assistance of another person,
lean the refrigerator back to access the front leveling legs.
Raise or lower the legs to the required dimension by turn-
ing the legs. Repeat this process for the rear by tilting the
refrigerator forward using caution to prevent the door from
opening. On a level surface check the refrigerator for level-
ness and adjust accordingly.
The front grille screws may be loosened and the grille ad-
justed to the desired height. When adjustment is complete
tighten the two front grille screws. (See Figure 3).
Front Grille
Do not obstruct the front grille. The openings within the
front grille allow air to ow through the condenser heat ex-
changer. Restrictions to this air ow will result in increased
energy usage and loss of cooling capacity. For this reason
it is important this area to not be obstructed and the grille
openings kept clean. AGA MARVEL does not recommend
the use of custom made grilles as air ow may be restricted
because of inadequate openings. (See Figure 2).
Figure 2
Figure 3
Front Grille
Front grille screw
Front
leveling legs
Front Grille,
keep this area
open.
Rear
leveling
legs
4
NOTE
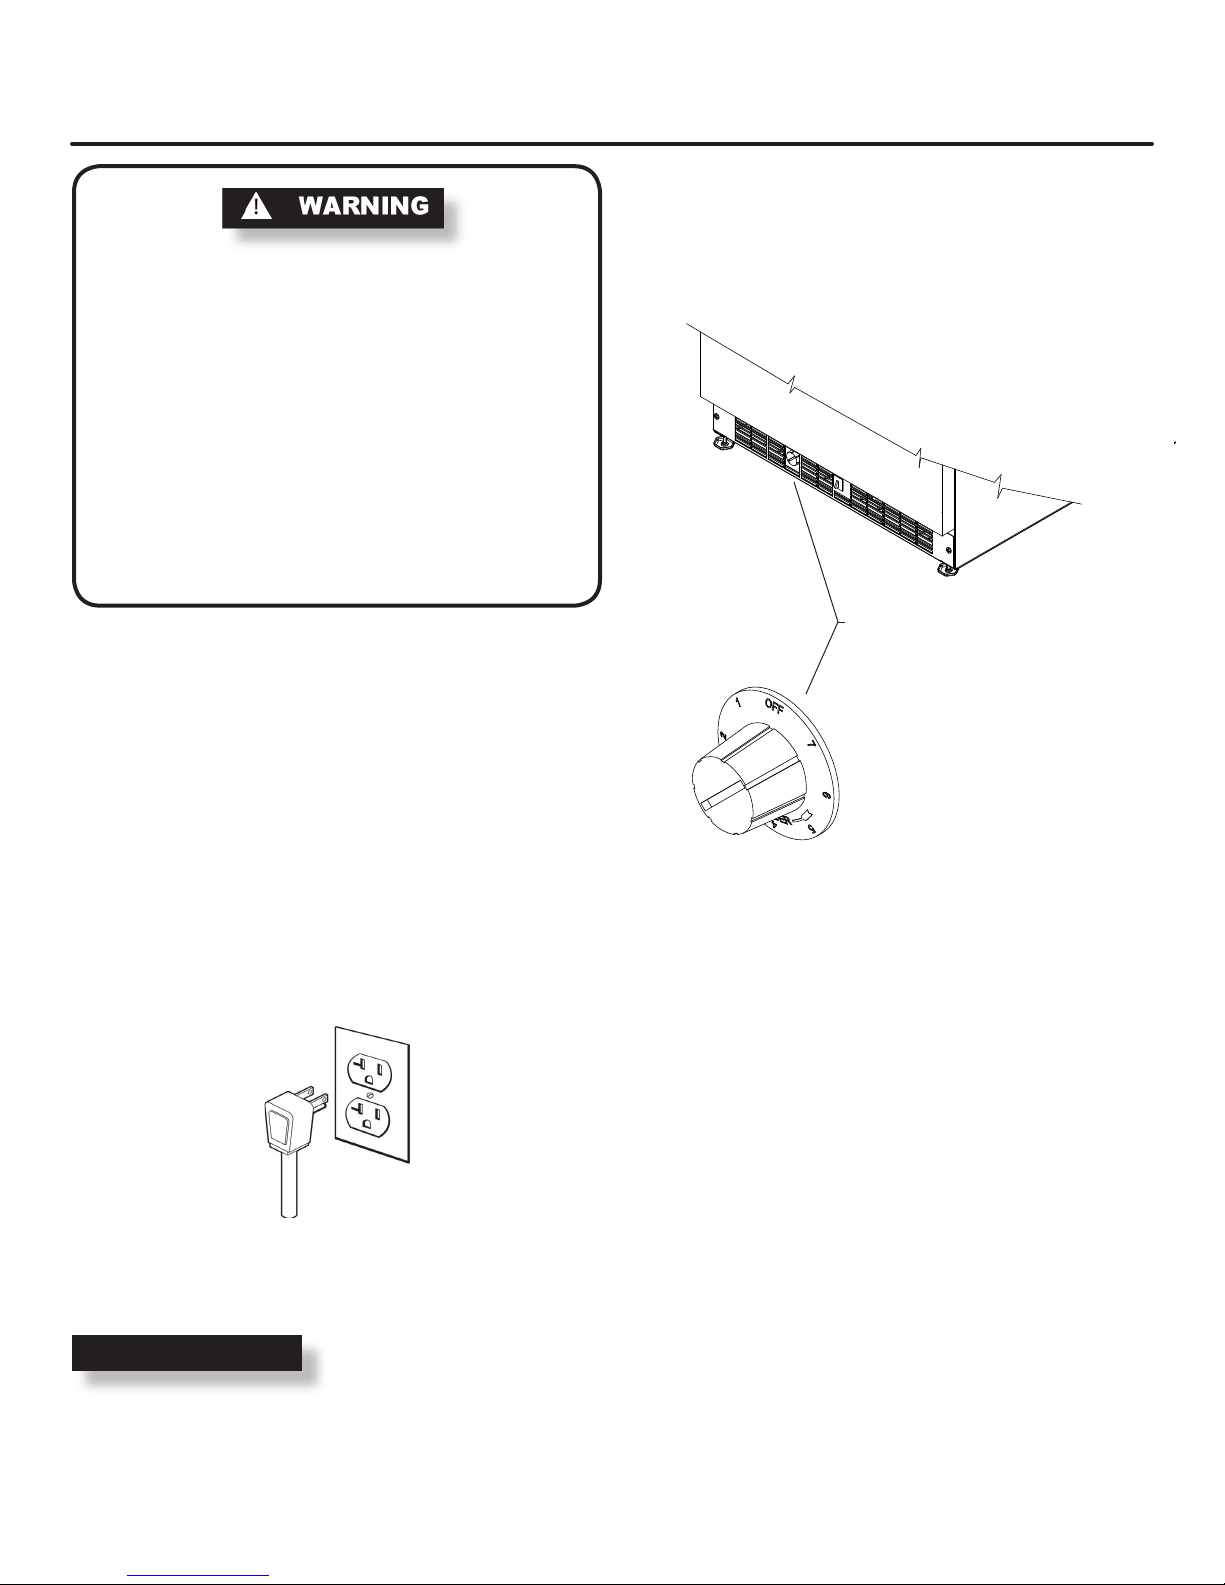
Electrical Connection
A grounded 115 volt, 15 amp dedicated circuit is required.
(A separate circuit serving only this appliance).
This product is factory equipped with a power supply
cord that has a three-pronged, grounded plug. It must be
plugged into a mating grounding type polarized receptacle
located near the product. The product and receptacle
should be installed in accordance with the National Electri-
cal Code and applicable local codes and ordinances (see
Figure 4). If the circuit does not have a grounding type
receptacle, it is the responsibility and obligation of the cus-
tomer to provide the proper power supply.
ELECTRICAL CONNECTION AND USING YOUR REFRIGERATOR
Figure 4
Ground Fault Circuit Interrupters (GFCI) are prone to
nuisance tripping which will cause the unit to shut down.
GFCI’s are generally not used on circuits with power equip-
ment that must run unattended for long periods of time, un-
less required to meet local building codes and ordinances.
5
Setting the temperature control:
Initially set the cold control midway between the numbers
three (3) and four (4). After at least 2 hours adjust to the
temperature that suits you. The higher the number you
select, the cooler the temperature. (See gure 5). The tem-
perature range of the refrigerator is from 33° to 52°F
(1° to 11°C).
Cold control
underneath door
in grille
Figure 5
Electrical Shock Hazard
• Do not use an extension cord with this ap-
pliance. They can be hazardous and cause
decient operation.
• This unit should not, under any circumstances,
be installed to an un-grounded electrical supply.
• Do not remove the grounding prong from the
power cord.
• Do not use an adapter.
• Do not splash or spray water from a hose on
the appliance. Doing so may cause an electri-
cal shock, which may result in severe injury or
death.
This manual suits for next models
1
Table of contents
Languages:
Other AGA marvel Dispenser manuals

Popular Dispenser manuals by other brands

BOWMAN
BOWMAN CL003-0111 manual

SIKA
SIKA Power Cure operating instructions

Silver King
Silver King Majestic SK12MAJ Technical manual and replacement parts list

Franke
Franke F3Dn Twin Service manual

HURAKAN
HURAKAN HKN-MT1 manual

STIEBEL ELTRON
STIEBEL ELTRON UltraHot Plus Operation and installation instructions


