AGA marvel Refrigerated Wine Cellar 3SWCE User manual

and
Maintenance
Refrigerated Champagne
and Wine Cellars
3SWCE
6SWCE
8SWCE
3SWCCE
6SDZE

CONTENTS
.........
.......
......................
.........
.............
.......................
.....................
.........
......................
.........
........
.........
.........
.........
......................
...........
...........
...................
........
..........
...
.......
.........
...........
...............
.................
....................
.....
........................
.......
....
..........
....................
...........
.....................
....................
....................
.....
...........
.
......
Features .................................................................................
Care and Cleaning .................................
................
....
............
...........
..............
..........
..............
...........
............
...........
..............
............
..........
..
...........
...........
...................
................
........................
............
.......................
...........
3
3
3
4
4
4
4
4
5
6
8
8
9
9
10
10
11
11
12
12
13
13
14
14
15
15
16
16
17
17
18
18
19
22
23
24
24
24
24
24
24
24
24
26
26
27
2
-

UNPACKING YOUR WINE CELLAR
Remove Packaging
-
Important
-
unit.
-
Warranty Registraon
Help Prevent Tragedies
inside.
Important Safety Instrucons
Recognize Safety Symbols,
Words, and Labels.
WARNING-
CAUTION-
NOTE
NOTE--
Note to Customer
the retailer.
-
3
Figure 1

INSTALLING YOUR WINE CELLAR
Select Locaon
-
Outdoor Installaon
-
mance.
Cabinet Clearance
Figure 2
Figure 3
with access
Leveling Legs
-
-
4
Front Grille
-

• Do not splash or spray water from a hose on the wine
cellar. Doing so may cause an electrical shock, which may
result in severe injury or death.
• This unit should not, under any circumstances, be installed
to an un-grounded power supply.
Electrical Connecon
-
-
Figure 5
Do not use an extension cord with
this appliance.
ELECTRICAL CONNECTION
Figure 4
5
NOTE
-
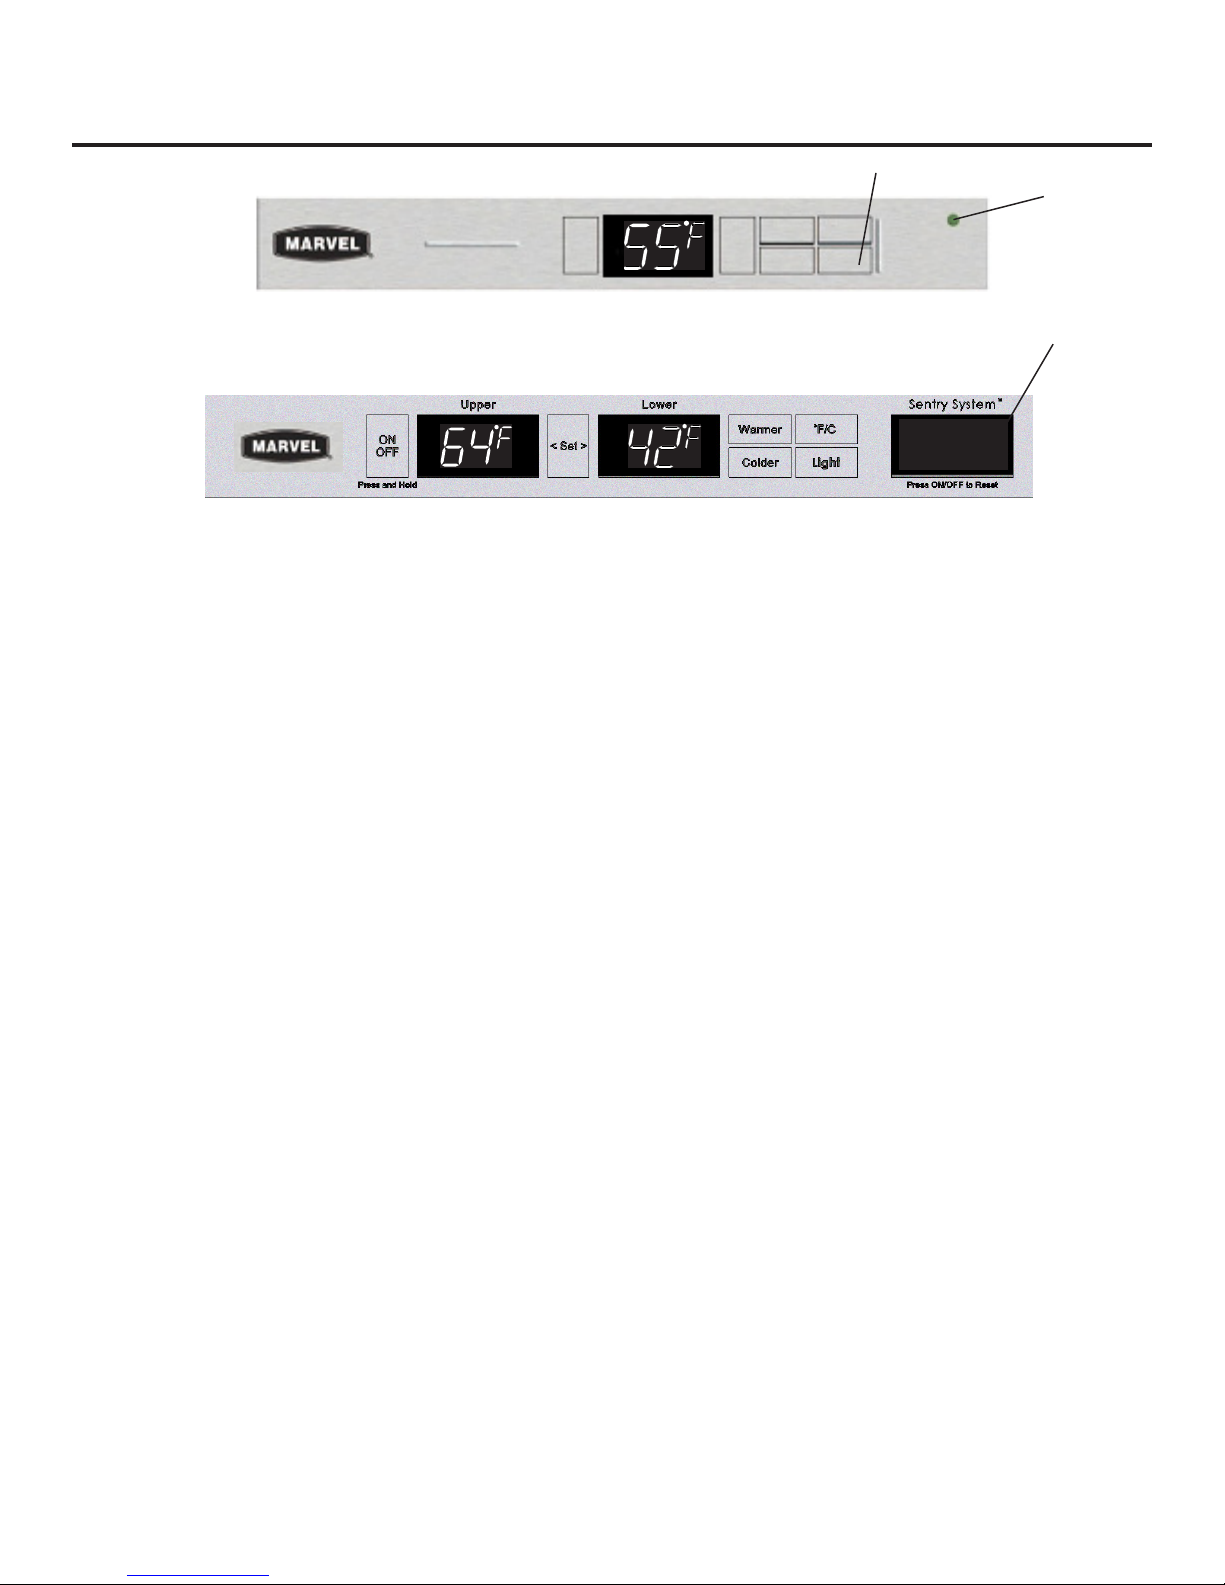
USING YOUR SENTRY SYSTEM™ CONTROL
Status
LED
6
ON OFF Door Ajar
Power Failure
Hi / Low Temp Upper
Hi / Low Temp Lower
Status
message
Inial Power-Up:
-
-
Set Display Temperature Units:
-
Set Your Desired Storage Compartment Temperature:
-
• Single-Zone Models, (Figure 6)
-
• Dual-Zone Models, (Figure 7)
-
• All Models:
-
Interior Lighng:
-
ON
OFF
Press and hold
Set
Warmer
Colder
F/C
Light
Sentry System™
Power Failure-Flashing Amber
High/Low Temp-Red
Press ON/OFF-Reset
Alarms OFF-Steady Amber

USING YOUR SENTRY SYSTEM™ CONTROL
7
Alarms:
-
-
-
-
Sabbath Mode:
-
-
Turning O Refrigeraon:
Dual-Zone models
Single-Zone
models
-
Error Codes:
-
-

DIMENSIONS FOR 3SWCE & 3SWCCE GLASS DOOR
ROUGH IN OPENING DIMENSIONS, FOR 3SWCE & 3SWCCE GLASS DOOR
depth
when installing electrical and unit.
8

DIMENSIONS FOR 3SWCE & 3SWCCE GLASS OVERLAY DOOR
ROUGH IN OPENING DIMENSIONS FOR 3SWCE & 3SWCCE GLASS OVERLAY DOOR
depth
when installing electrical and unit.
9

DIMENSIONS FOR 3SWCE & 3SWCCE SOLID OVERLAY DOOR
ROUGH IN OPENING DIMENSIONS FOR 3SWCE & 3SWCCE SOLID OVERLAY DOOR
depth
-
ing electrical and unit.
10

DIMENSIONS FOR 6SWCE GLASS DOOR
ROUGH IN OPENING DIMENSIONS FOR 6SWCE GLASS DOOR
depth
when installing electrical and unit.
11

DIMENSIONS FOR 6SWCE GLASS OVERLAY DOOR
ROUGH IN OPENING DIMENSIONS FOR 6SWCE GLASS OVERLAY DOOR
depth
when installing electrical and unit.
12

DIMENSIONS FOR 6SWCE SOLID OVERLAY DOOR
ROUGH IN OPENING DIMENSIONS FOR 6SWCE SOLID OVERLAY DOOR
depth
when installing electrical and unit.
13

DIMENSIONS FOR 6OSWCE SOLID DOOR
ROUGH IN OPENING DIMENSIONS FOR 6OSWCE SOLID DOOR
depth
when installing electrical and unit.
14

ROUGH IN OPENING DIMENSIONS FOR 8SWCE GLASS DOOR
DIMENSIONS FOR 8SWCE GLASS DOOR
depth
-
-
when installing electrical and unit.
15

DIMENSIONS FOR 8SWCE GLASS OVERLAY DOOR
ROUGH IN OPENING DIMENSIONS FOR 8SWCE GLASS OVERLAY DOOR
depth
16

depth
-
ing electrical and unit.
ROUGH IN OPENING DIMENSIONS FOR 6SDZE GLASS DOOR
DIMENSIONS FOR 6SDZE GLASS DOOR
17

RECOMMENDED ROUGH IN OPENING FOR 6SDZE GLASS OVERLAY DOOR
DIMENSIONS FOR 6SDZE GLASS OVERLAY DOOR
depth
when installing electrical and unit.
18

FULL OVERLAY PANEL INSTALLATION INSTRUCTIONS
Figure 8
Step 2: Remove door
-
Step 3: Remove gasket
Step 4: Cut overlay panel
-
H
W
panel
Figure 9
NOTE
NOTE
-
-
Model W H
3SWCE
6SWCE
19
Step 1: Verify door alignment
-
W
panel Figure 10
Sides
H

FULL OVERLAY PANEL INSTALLATION INSTRUCTIONS
Material Type Pilot Hole for #8 Wood Screw
NOTE
Step 7: Mark and drill lock hole.
-
Step 8: Assemble the lock parts
-
Figure 12
SECTION A-A
SCALE 1 : 1
LOCK
NUT
BRASS EXTENSION
CAM
PHILLIPS SCREW
13/16 COUNTER
BORE 7/16 DEEP
15/32 HOLE
3/4 INCH
WOOD PANEL
SPRING WASHER
INNER
DOOR
Model W H
3SWCE
6SWCE
8SWCE
6SDZE
adapter
hinge adapter
Figure 11
20
Step 5: Drill hinge clearance holes in overlay panel
-
-
Step 6: Drill panel mounng holes
This manual suits for next models
5
Table of contents
Languages:
Other AGA marvel Wine Cooler manuals

AGA marvel
AGA marvel 6BARM Manual

AGA marvel
AGA marvel MP15WS Manual

AGA marvel
AGA marvel 6SDZE Manual

AGA marvel
AGA marvel ML24WSG0 Series Manual

AGA marvel
AGA marvel MP24WSG0LS Manual

AGA marvel
AGA marvel MP24WSG0 Manual

AGA marvel
AGA marvel M18SZ Manual
 Manual")
AGA marvel
AGA marvel 30WCM (Marvel) Manual

AGA marvel
AGA marvel 3BARM Manual
 Manual")
AGA marvel
AGA marvel 61WCM (Marvel) Manual


