AGM WOLF-7 PRO User manual

USER MANUAL
WOLF-7 PRO
NIGHT VISION GOGGLES

© 2022 AGM Global Vision, LLC. All rights reserved.
This documentation is subject to change without notice.
No parts of this manual, in whole or in part, may be copied, photocopied, translated, or transmitted
by any electronic medium or in machine-readable form without the prior written permission of
AGM Global Vision, LLC.
If you have questions that are not covered in this manual, or need service, contact AGM Global
Vision customer support for additional information prior to returning a product.
AGM Global Vision, LLC
173 West Main Street
PO Box 962
Springerville, AZ 85938
Tel. 928.333.4300
support@agmglobalvision.com
www.agmglobalvision.com
EXPORT INFORMATION
Buyer acknowledges that all products supplied by AGM Global Vision, LLC are subject to U.S. export control
laws,including,butnot limitedto,theExportAdministrationRegulations,the InternationalEconomic Emergency
Powers Act, and various U.S. embargoes and sanctions. AGM Global Vision products may not be exported, re-
exported, or transferred contrary to U.S. export control laws. In particular, AGM Global Vision products may
not be exported, re-exported, or transferred to prohibited countries, individuals, organizations, or entities,
including but not limited to those individuals and entities listed on the List of Specially Designated Nationals
and Blocked Persons administered or maintained by the U.S. Office of Foreign Assets Control (“OFAC”), the
various lists maintained by the Bureau of Industry and Security of the Department of Commerce, and the U.S.
State Department and Buyer represents and warrants that neither Buyer nor any of its officers, directors, or
employees are on such lists. Distribution or resale by Buyer to such countries, individuals, organizations, or
entities is expressly prohibited. Buyer has and will maintain a positive process to ensure compliance with this
Section.
2022.04.18

3Wolf-7 PRO USER MANUAL
LIST OF CONTENTS
TITLE PAGE
Safety Summary 4
SECTION 1. GENERAL INFORMATION 6
1.1 System Description 6
1.2 Key Features 7
1.3 Standard Components 7
1.4 Optional Equipment 8
SECTION 2. OPERATING INSTRUCTIONS 9
2.1 Installation and mounting 9
2.2 Controls and Indicators 11
2.3 Operating Procedures 12
SECTION 3. MAINTENANCE INSTRUCTIONS 15
3.1 Cleaning Procedures 15
3.2 Troubleshooting 15
3.3 Preparation for Extended Storage 16
SECTION 4. WARRANTY INFORMATION 17
4.1 Warranty Information and Registration 17
SECTION 5. SPECIFICATIONS 19
5.1 Specifecations 19

4AGM Global Vision
SAFETY SUMMARY
• Read and follow all instructions
• Read all warnings
• Only use the attachments/accessories specified by the manufacturer
• All service must be provided by the manufacturer
WARNING:
This product contains natural rubber latex, which may cause potentially fatal allergic reactions! If
you are allergic to latex, it is important that you strictly avoid exposure to products that contain it.
WARNINGS:
The intensifier’s phosphor screen contains toxic materials.
Please note:
• If the intensifier tube breaks, be extremely careful to avoid inhaling the phosphor screen
material. DO NOT allow the material to come in contact with your mouth, eyes, or any open
wounds on the skin.
• If the phosphor screen material comes in contact with your skin, wash it off immediately with
soap and water.
• If you inhale or swallow any phosphor screen material, drink a lot of water, induce vomiting, and
seek medical attention as soon as possible.
WARNINGS:
• When used in total darkness, the light from the unit’s infrared (IR) illuminator is invisible to the
naked eye. However, the light can be detected by other Night Vision Devices (NVD).
• To reduce the risk of detection by another NVD, avoid prolonged use of the IR illuminator.
• Light from the IR illuminator is more easily detected by other NVDs when used in fog, smoke,
and rain. Avoid prolonged use of the IR illuminator in these conditions.
• Do not use contaminated eyecup. If it is contaminated, it must be replaced.

5Wolf-7 PRO USER MANUAL
CAUTIONS:
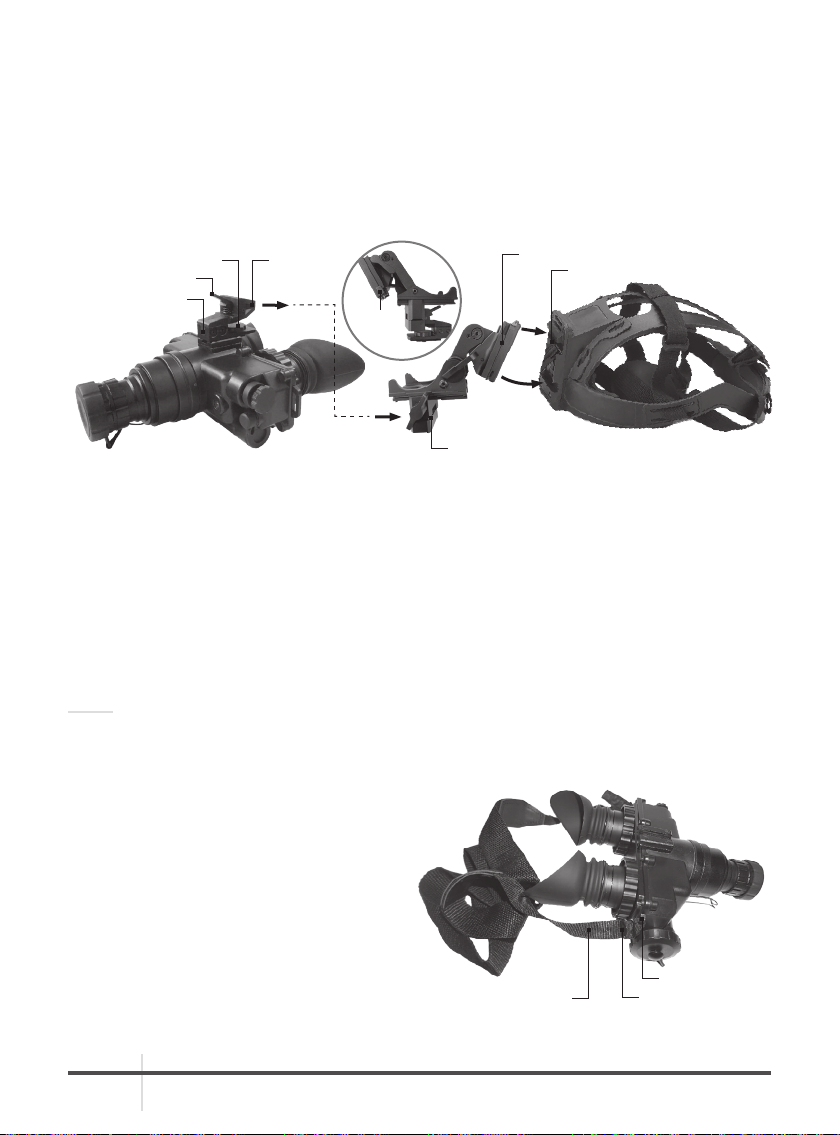
Wolf-7 PRO night vision goggles are precision electro-optical instruments and require careful
handling. Please follow the below instructions of safe use:
• Do not disassemble the unit.
• Keep the unit clean; protect it from moisture, sudden temperature drops and shocks.
• Be careful not to touch the glass surfaces. If you leave finger-prints on, or contaminate the
glass surfaces, use only clean and soft materials to clean it.
• Protect the unit from excessive lighting. Do not turn the goggles on in daylight with the front
lens cap off. Do not point the goggles at the bright light source (a fire, car headlights, lanterns,
street lamps, room lights, etc.).
• Do not test the device in daylight conditions even with the daylight filter/lens cap on for more
than ten (10) minutes.
• Do not leave the unit in on position during stops in operation.
• Remove the batteries from the unit when it is planned to store for over 3 days. Failure to do so
may damage the unit.
EQUIPMENT LIMITATIONS
To avoid injuries and equipment damage from using the Wolf-7 PRO, carefully read and consider
the following equipment limitations.
• The built-in IR illuminator is meant to provide additional illumination when needed, while
viewing scenes at close distances (up to 3 meters).
• The equipment requires some night light (moonlight, starlight, etc.) to operate. The level of
equipment performance depends upon the level of light.
• Night light reduces by passing through the clouds, while operating under trees, under the
shadows of houses, etc.
• The device results less effective in peering into shadows and other darkened areas.
• The device results less effective in viewing through rain, fog, sleet, snow or smoke.
• The equipment will not “see” through the dense smoke.
• Under starlight conditions low contrast environments (such as snow-covered territory, sandy
deserts, large bodies of water or grassy hills) degrade visibility thereby disguising or masking
changes in terrain.
• Under too low-light conditions the goggles loses some of the resolution that it has under full
moon.

6AGM Global Vision
1 GENERAL INFORMATION
1.1 SYSTEM DESCRIPTION
The Wolf-7 PRO is a bi-ocular night vision goggle system that enables mobility in moonlit or starlit
conditions. The Wolf-7 PRO provides bright and clear night vision images, even in the most trying
conditions.
The Wolf-7 PRO includes a built-in short-range IR light source and offers a wide variety of
accessories such as 3X, 5x and 8X magnification lenses for mid-to-long-range viewing, head or
helmet mounts for hands-free operation, and additional, high-powered IR illuminator for long-
range use. The unit features objective lens focus, eyepiece focus, and interpupillary distance
adjustment.
Waterproof, rugged, light, and compact, the Wolf-7 PRO is the perfect device for a variety of tough
operations. This includes driving, use of weapons, short-range surveillance, map reading, vehicle
maintenance, and administering first aid.
TABLE 1-1. WOLF-7 PRO SYSTEM DESCRIPTION
ITEM DESCRIPTION ITEM DESCRIPTION
1 Objective Lens Assembly 7 Function Switch Knob
2 Lens Focus Ring 8 External Battery Connector
3Mounting Rail 9IR Illuminator
4Diopter Adjustment Ring 10 Battery Cap
5Eyepiece Assembly 11 High Light Cut-Off Sensor
6Eyecup 12 Lens Cap
FIGURE 1-1. WOLF-7 PRO MAIN PARTS
12
2
1
3
4
6
456
5
7
8
10
11
9

7Wolf-7 PRO USER MANUAL
1.2 KEY FEATURES
• Compact, rugged design
• Waterproof
• Head or helmet-mountable for hands-free operation
• Ergonomic, simple, easy-to-operate controls
• Highlight overload protection
• Built-in Infrared illuminator
• External power supply capability
• Limited 3-year warranty
1.3 STANDARD COMPONENTS
The standard components of the Wolf-7 PRO are shown in Figure 1-2 and listed in Table 1-2.
The ITEM column indicates the number used to identify items in Figure 1-2.
TABLE 1-2. WOLF-7 PRO STANDARD COMPONENTS
ITEM DESCRIPTION QUANTITY
1 Night Vision Goggles 1
2 Lens Cap 1
3Eyecup 2
4Headgear Assembly 1
5Transfer Adapter 1
6Head/Helmet Mount 1
7 Neck Strap 1
8 Lens Cloth 1
9User Manual 1
10 Safety Case 1
FIGURE 1-2. WOLF-7 PRO STANDARD COMPONENTS
3
3
4 5 6
7
8
910
1
2

8AGM Global Vision
1.4 OPTIONAL EQUIPMENT
The optional equipment of the Wolf-7 PRO is shown in Figure 1-3 and listed in Table 1-3.
The ITEM column indicates the number used to identify items in Figure 1-3.
TABLE 1-3. WOLF-7 PRO OPTIONAL EQUIPMENT
ITEM DESCRIPTION PART NO.
1 AGM 3X Afocal Lens for Wolf-7 PRO 6102WP31
2 AGM 5X Afocal Lens for Wolf-7 PRO 6102WP51
3 AGM 8X Catadioptric Lens for Wolf-7 PRO 6101WP81
4Sioux850 Long-Range Infrared Illuminator comes included
with Mount, Rechargeable Battery, Charger 501SIOUW850IR1
5Hard Case for Storage/Transportation 6110W7P1
FIGURE 1-3. WOLF-7 PRO OPTIONAL EQUIPMENT
5
123
4

9Wolf-7 PRO USER MANUAL
2 OPERATING INSTRUCTIONS
2.1. INSTALLATION AND MOUNTING
CAUTION:
To protect the intensifier tube when the sight is not in use or when it is being operated in daylight,
keep the protective lens cap securely fitted over the lens.
2.1.1 BATTERY INSTALLATION
To install batteries:
1. Turn the battery cap counterclockwise and remove it.
2. Verify that the O-ring is present. If it’s not, replace it.
3. Following the polarity markings on the outside of the battery compartment, insert either two AA
(1.5 V) batteries into the battery compartment, positive (+) end first (see Figure 2-1).
4. Secure the battery cap back on by placing it over the compartment and turning it clockwise.
Verify that it is secure to ensure a watertight seal.
2.1.2 INSTALLATION OF THE EYECUPS
To install the eyecups (refer to Figure 2-1):
1. Carefully press each eyecup over the diopter cell retainer.
2. Rotate each eyecup into the proper viewing position. Adjust for the best fit. The eyecups must
seal around your eyes and prevent the green light from showing outside of the eyepieces.
AA BATTERIES
BATTERY CUP
EYECUP
FIGURE 2-1. BATTERY AND EYE CAP INSTALLATION

10 AGM Global Vision
2.1.3 MOUNTING THE WOLF-7 PRO TO HEADGEAR ASSEMBLY
Adjust the headgear first before attaching the Wolf-7 PRO to it.
1. Loosen all the straps and place the headgear on your head.
2. Fit the headgear to your head size. Tighten the straps until the headgear fits firmly.
3. Remove the already adjusted headgear from your head.
4. Install the transfer adapter (Figure 2-2) to mounting rail on the goggles body and fix adapter with
the fixing screw.
5. Align the prism of the transfer adapter to the head mount socket. Hold the latch lever down
while installing the goggles into the head mount socket. Release the latch when the goggles is
fully engaged in the socket.
6. Align the head mount with the headgear bracket. Insert the top edge of the mount under the
keeper on the heaggear bracket and rotate it downward until the latch clicks into place.
To release the mount from the bracket, press the release lever on the side of head mount.
To dismount the Wolf-7 PRO from the head mount, push down on the latch lever and remove the
unit.
NOTE:
The included head/helmet adapter can be used to attach the Wolf-7 PRO to headgear or helmet
mount. The transfer adapter also can be used to attach the Wolf-7 PRO to standard PVS headset/
helmet mounts.
2.1.4 NECK STRAP INSTALLATION
Slip the ends neck strap into the eyelets on
thegogglesbody.Threadthe strapthrough
the buckles as shown on the Figure 2-3.
FIXING SCREW PRISM
HEAD MOUNT SOCKET
RELEASE
LEVER
HEAD MOUNT
HEADGEAR BRACKET
TRANSFER ADAPTER
LATCH LEVER
FIGURE 2-2. MOUNTING WOLF-7 PRO TO HEADGEAR ASSEMBLY
FIGURE 2-3. NECK STRAP INSTALLATION
STRAP BUCKLE
EYELET

11Wolf-7 PRO USER MANUAL
2.1.5 OPTIONAL LENS INSTALLATION
The goggles can be used as a long-range viewer with an optional 3x, 5x afocal lens, or 8X
catadioptric lens.
The 3x or 5x afocal lens can be installed directly onto the objective lens. Slip on the afocal lens
over the end of the 1x objective lens of the goggles.
To mount the 8x lens, unscrew the existing 1x objective lens of the Wolf-7 PRO and screw an
accessory lens in its place.
The 8x lens is equipped with a Picatinny rail for mounting a long-range IR illuminator and a socket
for mounting the device on a tripod.
2.2 CONTROLS AND INDICATORS
2.2.1 CONTROLS AND INDICATORS
The Wolf-7 PRO is adjustable to accommodate different users and will correct for most differences
in eyesight. The controls and indicators for the Wolf-7 PRO are shown or described in Figure 2-5
and Table 2-1.
FIGURE 2-4. LENSES INSTALLATION
AFOCAL LENS 8X LENS PICATINNY RAIL
FIGURE 2-5. WOLF-7 PRO CONTROLS
2
3
4
4
5
1
6
7

12 AGM Global Vision
TABLE 2-1. CONTROLS AND INDICATORS
ITEM CONTROLS AND
INDICATORS FUNCTIONS
1 Function Switch Knob
(OFF-ON-IR) Controls goggles and IR light power ON or OFF.
OFF:Same as system OFF.
ON:Goggles activated.
IR:Activates goggles and IR. Illuminates LED indicator in left
eyepiece.
2 Objective Focus Ring Focuses the objective lens. Adjusts for the sharpest image.
3Mounting Rail Used to install the transfer adapter for mounting goggles on
a headgear or helmet.
4Diopter Adjustment
Rings Focuses the eyepiece lens for each eye (user will not need
glasses). Adjusts for sharper image on intensifier screen.
5Interpupillary
Adjustment Adjusts the distance between each eyepiece by sliding them
together or apart, allowing for each eye to observe the entire
field at the same time.
6 External Battery
Connector Used to connect a cable from an external power source.
7Battery/Polarity
Indicator The polarity icons are engraved into the Wolf-7 PRO battery
housing, and show the proper orientation of the batteries.
8 LED ON Indicator
(Not Shown) When illuminated (appears in the left eyepiece), this light
indicates that the IR illumination is on.
9 Low Battery Indicator
(Not Shown) When illuminated (appears in the right eyepiece), this light
indicates a low battery, with less than 30 minutes of power
remaining.
2.3 OPERATING PROCEDURES
2.3.1 OPERATING PROCEDURES
1. Verify that the battery is installed properly.
CAUTION:
Only operate the goggles in dark environments. If it necessary to operate the device in daylight,
always cover the objective lens with the cap. The pinhole at the centre of the lens cap will allow
the user to check operational capabilities in daylight conditions.
2. Remove the lens cap.
3. Turn the function switch ON. After a slight delay, a green or white glow will appear in the eyepiece
of the unit.
4. Adjust the interpupillary distance by sliding the eyepieces together or apart so that each eye can
observe the entire field of view at the same time. The eyepieces adjust independently.
5. Observe the scene. Adjust the diopter by rotating the adjustment rings.
6. Adjust the focus. Rotate the focus ring until the image is clear and sharp.

13Wolf-7 PRO USER MANUAL
NOTE:
The sharpest image will only be visible when the objective lens and eyepiece lens are both
properly focused.
Bright Light Cutoff. The device will automatically shut off after 70 (±30) seconds of operation in
daylight or bright room light. Individual bright lights (headlights, flashlights, or other concentrated
light sources) will not activate this function, unless the high light detector on the front of the device
is pointed directly at the light source. To turn the device back on in the event that this function is
triggered, flip the function switch to OFF position and then back to ON again.
2.3.2 IR ILLUMINATOR OPERATIONS
NOTE:
The built-in IR illuminator provides additional illumination (when needed) while viewing scenes or
targets from a short distance (up to 3 meters).
To turn built-in IR Illuminator on, pull the operation switch out and turn it from ON to the IR position.
LED indicator in field of view will appear and indicate the IR illuminator is operating.
Rotate the switch to ON position to deactivate the IR.
NOTE:
When you turn off the goggles, the IR illuminator will also turn off.
2.3.3 HEAD-MOUNTED OPERATION
Perform the following procedures for head-mounted operation.
1. Put the head mount on per the instructions in Paragraph 2.1.4.
NOTE:
Before attaching the goggles, loosen the eye relief locking knob and slide the head mount socket
all the way forward; this will make it easier to align the goggles, eyecups, and eyepiece lenses
with your eyes.
2. To set your eye relief, loosen the eye relief adjustment locking knob (Figure 2-6). Move the
goggles back towards your eyes until the eyecups are comfortably sealed around your eyes.
Tighten the locking knob.
HEAD MOUNT
SOCKET
RELEASE LEVER
EYE RELIEF ADJUSTMENT
LOCKING KNOB
TILT ADJUSTMENT KNOB
VERTICAL ADJUSTMENT
LOCKING KNOB
FIGURE 2-6.HEAD/HELMET MOUNT ADAPTER OPERATION

14 AGM Global Vision
3. Turn the goggles ON. Adjust the tilt using the tilt adjustment knob, until you obtain a comfortable
viewing angle.
4. Adjust the vertical position of the goggles. Loosen the vertical adjustment locking knob of the
head mount and move device up/down until the goggles is properly aligned with your eyes.
Tighten the locking knob.
5. Adjust the diopter for the clearest view of the image intensifier screen.
NOTE:
Any adjustment for eye relief requires adjustment of the diopter.
6. While looking at an object, adjust the objective lens focus until the image becomes clear and
sharp.
7. To flip the device up, place your hand under the goggles. Grasp and rotate them up and backwards
until the latch clicks into place.
8. To flip the device down, grasp the goggles and rotate them down and forwards until the latch
clicks into place.
2.3.4 WOLF-7 PRO SHUTDOWN
1. Turn the function switch OFF. The green glow of the viewing area will fade to black.
2. Secure the lens cap over the objective lens.
3. If necessary, remove the unit from the goggle kit or helmet mount.
4. Store the unit and all accessories in the case.
NOTE:
Do not store the unit with the battery still in it.

15Wolf-7 PRO USER MANUAL
3 MAINTENANCE INSTRUCTIONS
3.1 CLEANING PROCEDURES
Wipe the housing with a damp cloth as needed.
CAUTION:
Do not use abrasives or solvents to clean the housing, lens, or display window of the device. Do
not use ammonia-based cleaning products to clean the lens. Doing so may damage the anti-
reflective coating of the lens.
The Wolf-7 PRO lens is designed for the harsh outdoor environment and has a coating for durability
and anti-reflection, but it may require occasional cleaning. Avoid scratching the lens and/or leaving
fingerprints on the optics. Improper cleaning can damage the optics. Clean the lens according to
the instructions below.
Do not use abrasive materials, such as paper or scrub brushes, as this can scratch or otherwise
damage the lens. Only wipe the lens clean when there is visible contamination on the surface.
Preferred Method for Cleaning the Lens
Materials:
• Optical-grade cloth
• Pure water (deionized or other)
• Isopropyl alcohol (IPA)
Saturate a piece of the lens tissue with water and drape it over the lens. Let the surface tension
of the water pull the tissue onto the lens surface. Drag the tissue across the lens surface. Repeat
several times with different pieces of tissue.
Repeat the same step using isopropyl alcohol instead of water. Drag the final piece of tissue over
the lens several times to prevent pooling, which may leave a residue behind.
3.2 TROUBLESHOOTING
Table 3-1 lists the most common malfunctions that may occur with your equipment. Perform the
tests, inspections, and corrective actions in the order they appear in the table.
This table does not list all the malfunctions that may occur with your device, or all of the tests,
inspections,andcorrectiveactions that maybe necessarytofix them. If the equipment malfunction
is not corrected by the suggested actions, or a problem occurs that is not listed in this table, please
contact AGM Global Vision’s Customer Support center or your retailer.

16 AGM Global Vision
TABLE 3-1. TROUBLESHOOTING
MALFUNCTION PROBABLE CAUSE/ TEST/
INSPECTION CORRECTIVE ACTION
Goggles fails to
activate. Batteries are dead, missing or
improperly installed. Replace the batteries or install it
correctly.
Battery contact surfaces or
contact springs are dirty or
corroded.
Clean the contact surfaces with a
pencil eraser and/ or alcohol and
cotton swabs.
Defective image intensifier. Please contact Customer Support.
IR illuminator fails to
activate. Turn the IR illuminator on in a
dark area. Visually estimate
whether or not the observed
scene is illuminated.
If the IR illuminator fails to activate,
please contact Customer Support.
LED indicators fail to
activate. Visual inspection. Please contact Customer Support.
Poor image quality. Check objective lens or
eyepieces focus. Refocus the lens.
Check for fogging or dirt on
the lenses. Clean the lenses as detailed in Part
3.1. If image quality is still poor, please
contact Customer Support.
Damaged optical components. Please contact Customer Support
Light is visible
around the eyecup. Check the eye-relief distance. Readjust for proper eye-relief
distance.
Check the eyecup resilience. If the eyecup is defective, please
contact Customer Support.
Focusing ring cannot
be moved. Check to see if the focusing
ring is bent or broken. If damaged, please contact Customer
Support.
Eyepiece ring cannot
be moved. Check to see if the eyepiece
ring is bent or broken. If damaged, please contact Customer
Support.
3.3 PREPARATION FOR EXTENDED STORAGE
1. Unscrew the battery cap and remove the batteries from the goggles.
2. Inspect the battery compartment for corrosion or moisture. Clean and dry if necessary.
3. Replace the battery cap.
4. Remove the unit from the headgear or helmet mount, if installed.
NOTE:
Prior to placing the Wolf-7 PRO and its accessories into the carrying case, ensure that the goggles
and case are free of dirt, dust, and moisture.
5. Place the goggles and accessories into the carrying case.

17Wolf-7 PRO USER MANUAL
4 WARRANTY INFORMATION
4.1 WARRANTY INFORMATION AND REGISTRATION
4.1.1 WARRANTY INFORMATION
This product is guaranteed to be free from manufacturing defects in material and workmanship
under normal use for a period of three (3) years from the date of purchase. In the event that a
defect covered by the warranty below occurs during the applicable period stated above, AGM
Global Vision, at its discretion, will either repair or replace the product; such action on the part of
AGM Global Vision shall be the full extent of AGM Global Vision’s liability, and the Customer’s sole
and exclusive reparation. This warranty does not cover a product if it has been (a) used in ways
other than its normal and customary manner; (b) subjected to misuse; (c) subjected to alterations,
modifications or repairs by the Customer or by any party other than AGM Global Vision without
prior written consent of AGM Global Vision; (d) is the result of a special order or categorized as
“close-out” merchandise or merchandise sold “as-is” by either AGM Global Vision or the AGM
Global Vision dealer; or (e) merchandise that has been discontinued by the manufacturer and
either parts or replacement units are not available due to reasons beyond the control of AGM
Global Vision. AGM Global Vision shall not be responsible for any defects or damage that in
AGM Global Vision’s view are a result from the mishandling, abuse, misuse, improper storage or
improper operation of the device, including use in conjunction with equipment that is electrically or
mechanically incompatible with, or of inferior quality to, the product, as well as failure to maintain
the environmental conditions specified by the manufacturer. This warranty is extended only to
the original purchaser. Any breach of this warranty shall be enforced unless the customer notifies
AGM Global Vision at the address noted below within the applicable warranty period.
The customer understands and agrees that except for the foregoing warranty, no other warranties
written or oral, statutory, expressed or implied, including any implied warranty of merchantability
or fitness for a particular purpose, shall apply to the product. All such implied warranties are
hereby and expressly disclaimed.
4.1.2 LIMITATION OF LIABILITY
AGM Global Vision will not be liable for any claims, actions, suits, proceedings, costs, expenses,
damages, or liabilities arising out of the use of this product. Operation and use of the product
are the sole responsibility of the Customer. AGM Global Vision’s sole undertaking is limited to
providing the products and services outlined herein in accordance with the terms and conditions
of this Agreement. The provision of products sold and services performed by AGM Global Vision
to the Customer shall not be interpreted, construed, or regarded, either expressly or implied, as
being for the benefit of or creating any obligation toward any third party of legal entity outside
AGM Global Vision and the Customer; AGM Global Vision’s obligations under this Agreement
extend solely to the Customer. AGM Global Vision’s liability hereunder for damages, regardless
of the form or action, shall not exceed the fees or other charges paid to AGM Global Vision by the
customer or customer’s dealer. AGM Global Vision shall not, in any event, be liable for special,
indirect, incidental, or consequential damages, including, but not limited to, lost income, lost
revenue, or lost profit, whether such damages were foreseeable or not at the time of purchase,

18 AGM Global Vision
and whether or not such damages arise out of a breach of warranty, a breach of agreement,
negligence, strict liability, or any other theory of liability.
4.1.3 PRODUCT REGISTRATION
In order to validate the warranty on your product, the customer must complete and submit AGM
Global Vision PRODUCT REGISTRATION FORM on our website (www.agmglobalvision.com/
customer-support).
4.1.4 OBTAINING WARRANTY SERVICE
To obtain warranty service on your unit, the End-user (Customer) must notify the AGM Global
Vision service department via e-mail. Send any requests to support@agmglobalvision.com to
receive a Return Merchandise Authorization number (RMA). When returning any device, please
take the product to your retailer, or send the product, postage paid and with a copy of your sales
receipt, to AGM Global Vision’s service center at the address listed above. All merchandise must
be fully insured with the correct postage; AGM Global Vision will not be responsible for improper
postage or merchandise that becomes lost or damaged during shipment. When sending product
back, please clearly write the RMA# on the outside of the shipping box. Please include a letter
that indicates your RMA#, the Customer’s Name, a Return Address, reason for the return, contact
information (valid telephone numbers and/or an e-mail address), and proof of purchase that will
help us to establish the valid start date of the warranty. Product merchandise returns that do not
have an RMA# listed may be refused, or a significant delay in processing may occur. Estimated
Warranty service time is 10-20 business days. The End-user/Customer is responsible for
postage to AGM Global Vision for warranty service. AGM Global Vision will cover return postage/
shipping after warranty repair to the End-user/Customer only if the product is covered by the
aforementioned warranty. AGM Global Vision will return the product after warranty service by
domestic UPS Ground service and/or domestic mail. Should any other requested, required, or
international shipping methods be necessary, the postage/shipping fee will be the responsibility
of the End-user/Customer.
For service, repair or replacement, please contact:
AGM Global Vision, LLC
173 West Main Street
PO Box 962
Springerville, AZ 85938
Tel. 928.333.4300
support@agmglobalvision.com
www.agmglobalvision.com

19Wolf-7 PRO USER MANUAL
5 SPECIFICATIONS
5.1 SPECIFICATIONS
TABLE 5-1. WOLF-7 PRO SPECIFICATIONS
ITEM DATA
Magnification 1x (3x, 5x and 8x optional)
Lens System 24.7mm; F/1.2
FOV 40°
Focus Range 0.25 m to Infinity
Eye Relief 15 mm
Output Pupil Diameter 15 mm
Diopter Adjustment -4 to +5 dpt
LED Indicators (in the FOV) Low Battery; IR On
Automatic Brightness Control Yes
Bright Light Cut-Off Yes
Infrared Illuminator Yes
Battery Type Two AA Alkaline
Battery Life (Operating) - Up to 40hrs (IR off)
- Up to 30hrs (IR on)
Operating Temperature Range -40°C to +50°C (-40°F to +122°F)
Storage Temperature Range -50°C to +70°C (-58°F to +158°F)
Waterproof Yes (IP65)
Weight 510 g (1.1 lb)
Overall Dimensions 183 × 132 × 58 mm (7.2 × 5.2 × 2.3 in)
NOTE:
All data are subject to change without notice.

AGMglobalvision.com
AGM Global Vision, LLC
MAIN OFFICE
173 West Main Street
PO Box 962
Springerville, AZ 85938
USA
Tel. +1.928.333.4300
info@agmglobalvision.com
www.agmglobalvision.com
EUROPEAN OFFICE
#6 Andrey Lyapchev Blvd
Sofia, P.C. 1756
Bulgaria
Tel. +35.988.412.5573
info@agmglobalvision.eu
www.agmglobalvision.eu
Table of contents
Other AGM Accessories manuals
Popular Accessories manuals by other brands

Tecnosens
Tecnosens NCL Series Assembly instructions

Forma Scientific
Forma Scientific 3546 operating manual

Festo
Festo SFAB-PNLK Series Operating instruction

Beper
Beper 90.041 use instructions

TWINBIRD
TWINBIRD SC-UE15 Operation manual

Outdoor Revolution
Outdoor Revolution CompactAirLite Annexe Instructions & care manual