Agrident AWR300 User manual

User Guide and Instructions for using
1) AWR Link Software & 2) Select Sheepware
From TGM Software Solutions Ltd


Contents
A new type of EID Stick...........................................................................1
Before you start......................................................................................2
Operating the AWR ................................................................................ 3
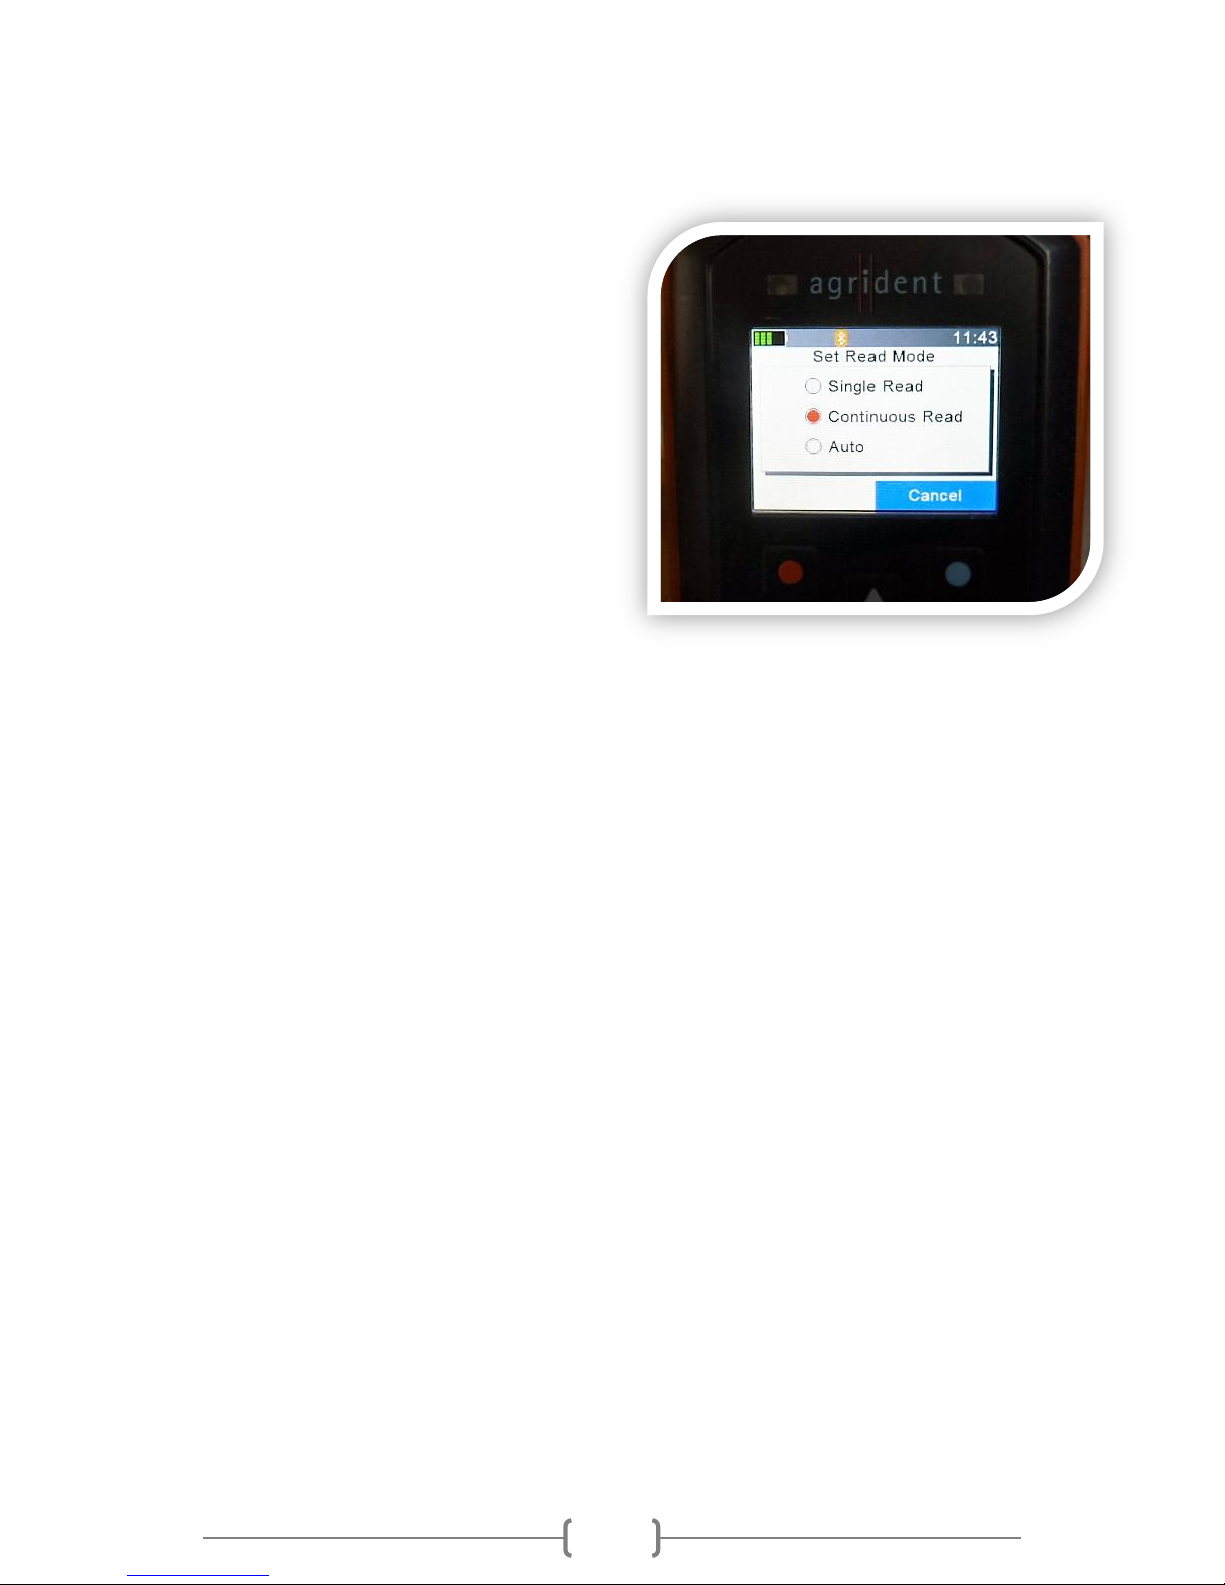
Setting Tag Read Mode ..........................................................................4
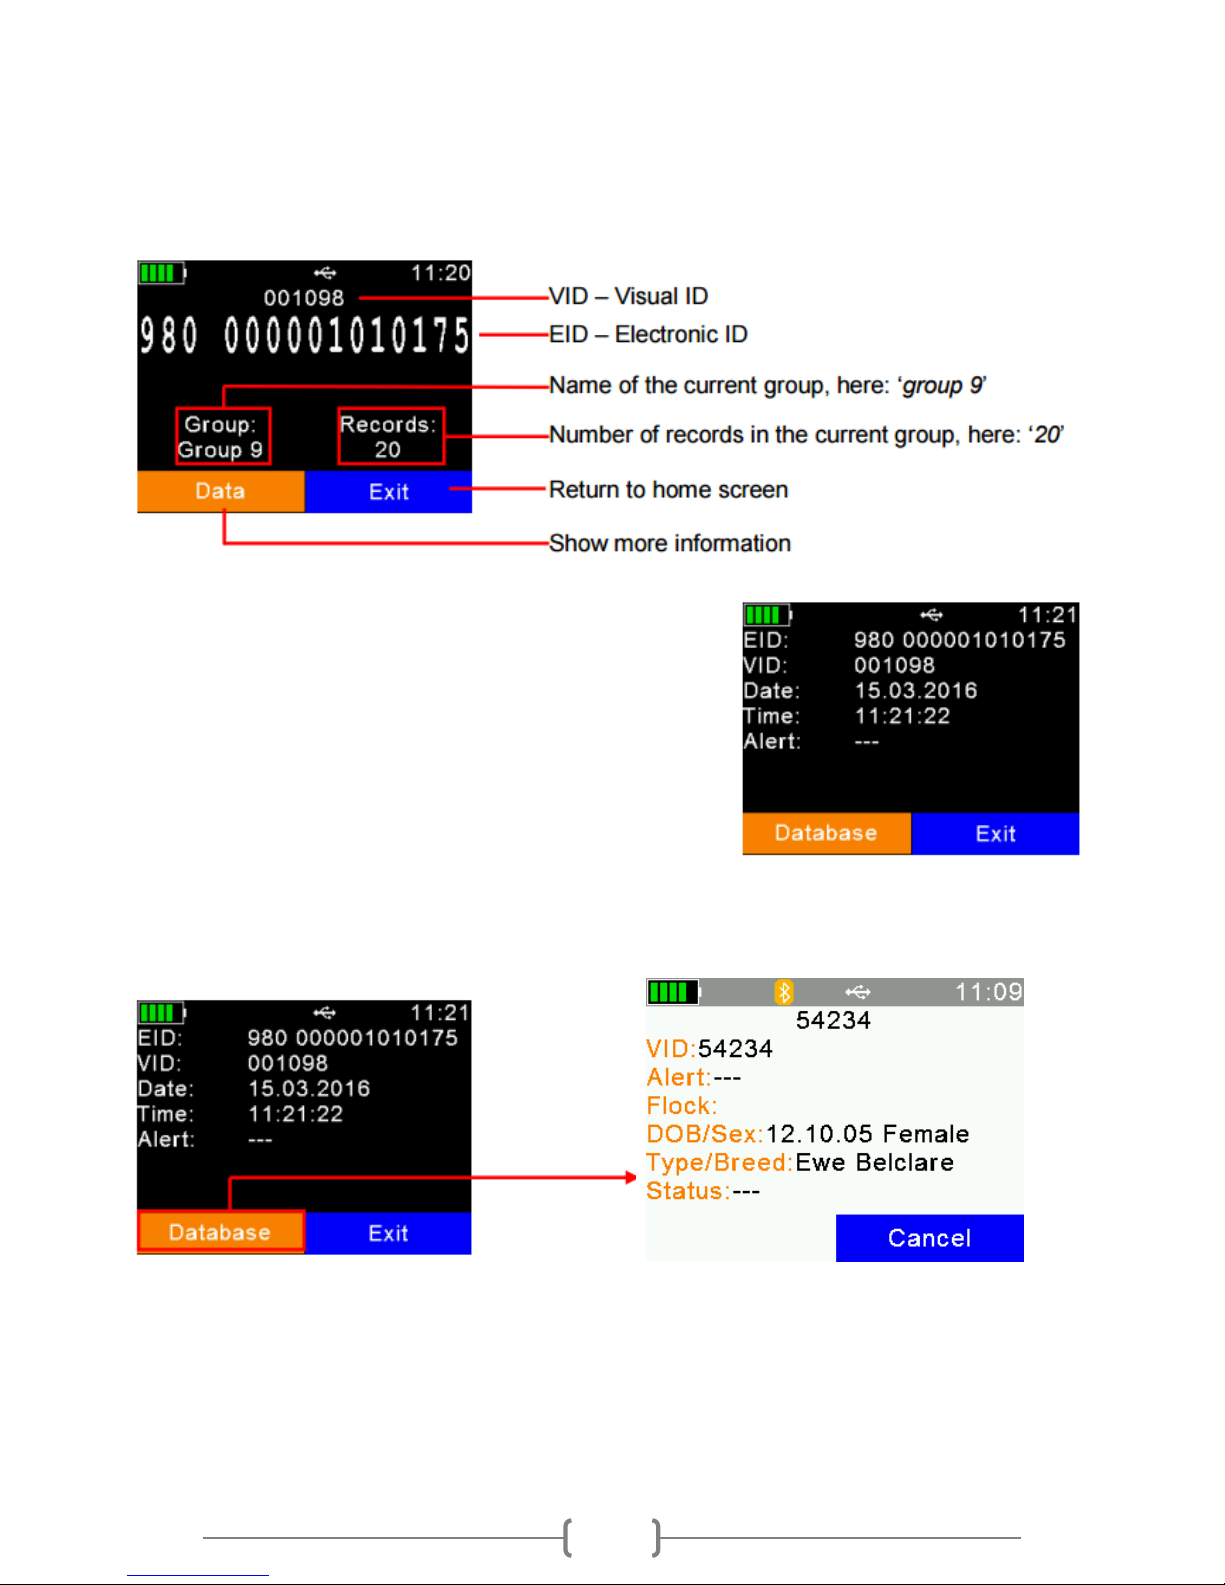
Reading a Tag .........................................................................................5
Starting a New Group.............................................................................8
Printing from the Stick and Bluetooth Options ......................................9
-Interface Setup ...................................................................................9
-Printer Setup.......................................................................................9
-Printer Connection..............................................................................9
-Printing Lists........................................................................................ 9
-Reconnection after Power-off .......................................................... 10
-Printing Barcodes..............................................................................10
-Switching quickly between Bluetooth devices..................................10
-Setting Bluetooth Passkey ................................................................10
Task Mode............................................................................................ 11
-Choosing the type of task .................................................................11
-Starting a new Task...........................................................................11
-Single/Multiple .................................................................................11
-Editing Lists.......................................................................................11
Task Scenario Examples........................................................................12
1. Add / Retag / Death / Purchase / Sale / Temporary Movement....12
2. Birth or Abort .................................................................................12
3. Alert / Comments........................................................................... 13
4. Fostering ........................................................................................13

5. Groups............................................................................................13
6. Medicine ........................................................................................13
7. Milk Recording ...............................................................................13
8. Tupping / Scan................................................................................14
9. Weight / Muscle............................................................................. 14
Synchronising the stick with AWR Link Software (V2.1).......................15
-Download Tag Lists ........................................................................... 17
-Using Task Mode...............................................................................23
-Initialising Tasks ................................................................................24
-Downloading Task Data ....................................................................25
-Medicine record keeping .................................................................. 26
1) View Quality Assurance Report......................................................26
2) Print Medicine Purchase Report ....................................................27
3) Add a New Line to the grid.............................................................27
4) Modify Medicines used.................................................................. 27
5) Modify Medicines Purchased......................................................... 28
-Printing .............................................................................................29
-Spreadsheets .................................................................................... 30
-Database........................................................................................... 31
Synchronising the stick with Select Sheepware.................................... 33
Appendix: ............................................................................................. 39
-Menu Structure...................................................................................39

1
A new type of EID Stick
We believe this is the only stick reader available on the market
with the ability to have a built in database for under
£650/€800.
This new reader offers exciting possibilities for farmers. As
well as having superb reach for scanning batches of sheep,
management information can also be recorded.
For the first time we can give farmers the potential to link
lambs to ewes and rams, record weights and medicine
treatments as well as the facility to look up an animal’s history
or add new animals with a stick reader. Using this data
informed decisions can be made to improve flock performance
and efficiency.
Connections to electronic weight scales, phones and printers
are possible using the built in Bluetooth option and the reader
is both light and robust making it ideal for many flocks. The
internal database in the stick has the ability to show not only
current information on the sheep, but details of past lamb
crops.
While it functions like other EID sticks for example reading in
lists of tags and allocating to groups, the ability of the AWR
300 to provide full management recording now, or in the
future, at no extra cost sets this stick apart from all other
similarly priced sticks on the market.

2
Before you start
You should fully charge the internal high-capacity lithium-ion battery
prior to the first use. Use the provided Y-Cable and power adapter.
Please connect the Y-Cable to the bayonet connector at the bottom of
the reader and the power supply to the circular connector of the Y-
Cable. A full charge from empty will take approximately 3 ½ hours
To connect the cable, line up the
White Arrow with the narrow slot,
push tight and twist the end of the
collar clockwise (1/8 of a turn) to
lock into position

3
Operating the AWR
Tip lights up 3 colours:
Green = Successful Read
Blue = Duplicate Read
Red = Searching for Tag in
continuous Read Mode
The Stick will vibrate for a brief moment when a
tag is read successfully to let you know the tag was
definitely recorded.
The Home Screen Displays current battery charge,
time, Reading status, and 2 options which
correspond to the Red and Blue soft-keys below
them.
The Directional Arrows are used for scrolling
through each screen and also for entering data.
The Green Enter button in the middle is used to:
Turn on the Stick, Read a Tag, confirm a Selection
and move to next screen in Task Mode.
Holding the down arrow for more than 2 seconds
will turn the reader off.
Hold in the blue button to get a list of quick options.
1. New Group
2. Set Bluetooth Mode
3. Animal Counter on/Off
4. Set Read Mode.
If you find it more convenient, you can change the
function of the blue HotKey to one of these 4 options by
pressing ‘Set HotKey’.

4
Setting Tag Read Mode
The stick can read tags individually or continuously.
To change Read Mode press
Menu, Setup, Reader Settings, Set
Read Mode and pick either Single
Read or Continuous Read.
For individual reading of tags the user must press the Enter button
each time they want to read a tag. For recording management
information about individual animals, this mode is much better.
For continuous reading of tags the user only has to press the Enter
button once to start reading tags and it will keep recording as each tag
comes into range. This is much faster for certain situations where
speed is critical, for example recording a batch of animals as they run
onto a lorry for sale, or, where you are recording the same event in
Task Mode for a batch of animals such as a Medicine treatment for the
whole flock.
In continuous mode, if no tags are read after 60 seconds, it will stop
attempting to read and return to the main screen.

5
Reading a Tag
After you press the Green button to read a tag you will see the
following data about the animal....
Press the Red soft-key to see the Tag-data
(EID, Visual ID, Date and Time of reading
and Alert text (if one has been recorded).
Press the Red soft-key again to enter the
full Database record for the animal (if it is
already in the Database)

6
Here you can see: Visual ID, EID, Alert, Flock, Date of Birth, Sex, Type,
Breed, Sire, Dam, Batch, Feed Group, Lambs Alive/Dead, Previous
Births*, Weights History* and Medicine History*for the animal.
Use the arrows to scroll through each database screen.
ID, DOB, Sex, Type, Breed
Last 2 recorded comments
Parents, Groups
Last 3 recorded medicines and reasons
Lambs from Last Lambing and their tags
Last 6 recorded weights and DLWG

7
(*Only visible when Select Sheepware Management Software is
installed on your PC)
Download a trial from
www.tgmsoftware.com

8
Starting a New Group
To start a new group either:
Press New Group (Blue soft-key) on the main screen
Or
Press Menu (Red soft-key) then New Group
You can Name the Group by using the Arrow and Enter Keys
-Initially Red soft-key deletes characters and
Blue soft-key cancels to Main Screen
-If you Press the Left Arrow followed by the Up
Arrow, a Keyboard will be displayed
-Press the Enter Button to choose each
character of the Group Name
-When you have finished Press the Blue soft-
key to close the Keyboard and then Enter Key to Save the Group Name.
-You are now ready to start reading EID tags.

9
Printing from the Stick and Bluetooth Options
Firstly you need to setup the Printer to communicate with the stick.
-Interface Setup
Press Menu, Setup, Interface Setup, Bluetooth
Set Bluetooth Mode as Master mode
Press Back and choose Setup Printer
-Printer Setup
Press Set Printer Type and pick your own Printer name from the list
Press Set Printer Interface and choose Bluetooth
-Printer Connection
Press Search BT Printer
Searching Devices please wait will be
displayed
Then pick the Printer Device Name from the search results
-Printing Lists
Press Menu then Print
You have 3 options: Print Last Group, Select Group, Print All Groups
If you choose Select Group, you can pick a group by Group Name and
the number of tags in the group will be shown in brackets
e.g. Group 1 (23)
EWES triplets (3)
Ram lambs (15)

10
-Reconnection after Power-off
The stick remembers the last device it was connected to by Bluetooth.
So if it or the Printer turns off to save battery, once they’re turned on
again they will automatically connect to each other.
-Printing Barcodes
If you need for any reason to Print a barcode
Press Print then Print Barcode and scan a
tag. The Barcode will be sent automatically
to the Printer. This may be useful for
example if you were sending away wool or
faecal egg samples for individual animals
and you needed a sticky label to put on
each sample. Rolls of sticky back paper are available.
-Switching quickly between Bluetooth devices
The stick keeps a history of each Bluetooth device it has been
connected to. So if you need to switch quickly between devices, rather
than searching all over again you can. Press Menu, Setup, Interface
Setup, Bluetooth, BT Device History and choose the other device from
the list.
-Setting Bluetooth Passkey
Some Bluetooth devices require a Passkey to allow them to connect to
other devices. You can set the Bluetooth Passkey of the stick by
pressing Menu, Setup, Interface Setup, Bluetooth, Set BT Passkey. By
default the Passkey is 0000. If you wish to change the Passkey, use the
Up/Down arrow keys to increase/decrease each number and the
right/left arrow keys to scroll across each number. The Passkey can be
up to 8 digits long.

11
Task Mode
The AWR300 becomes a much more powerful tool than the average
stick when you use Task Mode, allowing you to record a series of
common tasks about your animals.
-Choosing the type of task
Press Menu, Tasks, Choose another Task, scroll to the desired Task and
press Enter.
-Starting a new Task
Press Menu, Tasks, New Task Entry.
Each task has various options to choose from. Use the Arrow and Enter
button to move through and Select the desired option. (See examples
on next page).
-Single/Multiple
Single and Multiple refers to the number of animals you are recording.
If you choose Multiple, the same event details will be saved for each
animal to speed up the process.
For example, you have just purchased a group of 50 Ewes and 2 Rams
(one Texel and one Suffolk) from your neighbour. We know the Ewes
are all roughly 2 years old, Texel, from the same supplier, going into
the same Batch and Feed groups. Use Multiple to record identical data
for each purchased Ewe with a unique EID number. Use Single to
record the 2 Ram’s data, as they are a different breed.
-Editing Lists
To add/edit/remove from lists you need to use the AWR link software
on the PC. See instructions on page 23. If you are using the full Select
Sheepware program, set up the lists in the ‘System’ menu.

12
Task Scenario Examples
To change the type of task you are recording. Press Menu, Tasks,
Choose another Task (pick from the list of 9 tasks).
Now choose New Task Entry.
You would be advised to set up your lists of common breeds, suppliers, customers, flocks,
death reasons, illnesses, locations, medicines, batches, feed groups etc in the AWR Link
program (page 23) before you start recording tasks intensively on the reader. If you are
using the full Select Sheepware program, set up the lists in the ‘System’ menu.
Below are some scenario examples for some of the 9 tasks.....
1. Add / Retag / Death / Purchase / Sale / Temporary Movement
You have just purchased 25 lambs. You want to add them into the Database.
Press New Task Entry, Purchase, Choose Flock, Choose Multiple, Choose Animal Type, Enter
Event Date, Enter Approximate Date of Birth, Choose Supplier, Choose Breed, Choose Batch
Group and Choose Feed Group.
Stick now enters Speed Mode and you can run along the 25 lambs scanning each tag.
After the last Tag is read, Press Cancel and Press Yes.
2. Birth or Abort
A ewe has just lambed and you want to
record the birth event.
Press New Task Entry, Either use arrow
keys to enter Dam Farm Tag or Press
Enter to read Ewe’s EID. Press OK,
Enter Date, Choose Breed, Choose
Lambing Difficulty, Choose
Motherability, Choose Birth Type e.g.
Double. Enter Lamb 1’s Sex, Enter Lamb
size, Enter Lamb Farm tag, Press Enter
to record an EID, Choose Sire, Choose
Viability, Now Enter the same details for the second lamb, Enter Comment, Press Red Soft-
key to save task.

13
3. Alert / Comments
You spot a Ewe with bad feet and you want to record a comment about her. Press New
Task Entry. Choose Single, either use arrow keys to enter Farm Tag or Press Enter to read
EID, Choose Comment, Press Red Soft-key to save task.
4. Fostering
You want to foster a lamb onto another ewe. Press New Task Entry. Either use arrow keys to
enter Lamb Farm Tag or Press Enter to read Lamb’s EID. Now either use arrow keys to enter
Foster Dam Farm Tag or Press Enter to read Foster Dam’s EID. Choose Comment. Press Red
Soft-key to save task.
5. Groups
You want to Add/Remove some sheep from a batch or feed group. Press New Task Entry.
Choose Multiple, Choose Batch or Feed Group, Choose Batch Add or Batch Remove, Choose
which Batch to add to or remove from, Choose Comment.
Stick now enters Speed Mode and you can run along the sheep scanning each tag.
After the last Tag is read, Press Cancel and Press Yes.
6. Medicine
You are treating all the lambs with 2
medicines. Press New Task Entry. Choose
Multiple, Choose Administrator, Choose
first drug used, use the arrow keys to
enter a batch number of the medicine,
Choose illness, Enter quantity given,
Enter days treated, Choose Method,
Choose Prescribed by, Choose if you want
to enter a second drug and repeat the
above steps. After entering the second
drug choose not to enter another, Stick
now enters Speed Mode and you can run along the sheep scanning each tag.
After the last Tag is read, Press Cancel and Press Yes.
7. Milk Recording
You are recording the day’s First Milking records. Press New Task Entry, choose First
Milking, Press Enter to read Ewe’s EID, Use the arrow keys to choose the Yield & Press
Enter, Press OK, then Press Yes to move on to the next animal to be recorded. Later in the
day, choose Second or Third Milking so a complete daily yield can be calculated.

14
8. Tupping / Scan
You are scanning ewes for number of lambs. Press
New Task Entry. Choose Multiple, either use arrow
keys to enter Farm Tag or Press Enter to read EID,
Choose Preg Scan, Choose number of lambs (for
example 2) , Choose Comment. Stick now enters
Speed Mode and you can run along all the sheep
scanned for twins reading each tag.
After the last Tag is read, Press Cancel and Press
Yes.
9. Weight / Muscle
1. You are recording weights only. Press New Task Entry, Choose Weight, Press Enter to read
EID, Use the arrow keys to enter Weight, Choose Comment, Press Enter to Save.
2. You are recording weights and conditions scores. Press New Task Entry, Choose
Weight + Score, Press Enter to read EID, Use the arrow keys to enter Weight, Muscle Depth,
Fat Depth and Condition Score, Choose Comment, Press Enter to Save.
3. You are recording weights from a Bluetooth enabled weigh scale. Press New Task Entry,
Choose Scale Weight, Press
Enter to read EID, Press Enter
to request weight from scale,
weight will pop in to the stick,
Choose Comment, Press Enter
to Save. Press Yes to record
the next sheep and repeat the
steps above.
4. Fast Scale weight - the user
has less button-pressing to do
between each weighing. You
cannot enter a comment in
Fast Scale Weight Mode.
(See the separate booklet on
how to use the reader as a
substitute panel reader as
shown here)

15
Synchronising the stick with AWR Link Software
(V2.1)
(Turn to page 33 for instructions on how to use with Select Sheepware.)

16
Connect the stick to the computer via the cable or enable Bluetooth on
the computer and connect to the stick via Bluetooth. On your
computer, for the first connection, you must switch on Bluetooth,
search for devices, choose to pair with the AWR and enter pairing
number 1234.
Thereafter, connection should be automatically made when you
choose to Download from Stick from within the software.
Version 2.1 of AWRLink is a move away from spreadsheet only recording. It is
much easier to use than Version 1.0. Improvements include:
A user may view previously recorded data, currently imported
data from the current import, and all data (current and previous).
Users can filter, sort, and print, without ever opening a
spreadsheet. No MS Excel experience is required, so Version 2.1 is
much easier to use for the user who is not very confident with MS
Excel.
Spreadsheets are saved during sync for the more advanced user
who wants to copy and paste from these sheets to their own
recording system.
Users can print directly from the task and database views, without
opening MS Excel.
The print function will print currently filtered data. So it is easy to
filter some selected sheep and then print the result of the filter.
Sorting may be done on any column in task or database view, by
clicking on the column heading. It is now easy to sort sheep in
order of weights, weigh gain, number of lambs alive, Birth date …..
Printing retains the sort order, so the animals are printed in the
same order as shown on screen.
Version 2.1 has been translated into 6 languages.
Full Medicine records can now be kept and easily modified to
produce Quality Assurance Reports for inspections.
EID search & multi-select grid feature to modify records/Alerts.
Other manuals for AWR300
1
Table of contents