agrifac PYTHON User manual

1
PYTHON
Manual & Partsbook 2010


MANUAL & PARTS BOOK
FOR
PYTHON
DRAIN CLEANER
2010-en
Revision 0
April 22, 2010
Postal address : Agrifac Machinery b.v., P.O. box 78, 8330 AB Steenwijk, the Netherlands
Visitor address : Agrifac Machinery b.v., Eesveenseweg 15, 8332 JA Steenwijk, the Netherlands
Telephone : +31 (0)521-527210
Fax : +31 (0)521-517328
Internet : www.agrifac.com


EC declaration of conformity
(directive 2006/42/EC, Annex IIA)
We,
AGRIFAC MACHINERY B.V.
P.O. Box 78, 8330 AB Steenwijk, the Netherlands,
declare entirely under own responsibility that the product:
DRAIN CLEANER, type “PYTHON”
complies with the directive 2006/42/EC on machinery.
Steenwijk, April 2010.
D. Blaauw
Technical director Agrifac Machinery B.V.


TABLE OF CONTENTS
Chapter Page
1. Description.......................................................................1
2. Operation.........................................................................5
3. Safety instructions ...........................................................7
4. Frost protection................................................................9
5. Maintenance..................................................................11
6. Failures..........................................................................13
7. Technical specifications.................................................15
8. Options..........................................................................17
9. Spare parts lists.............................................................19


Drain cleaner
1
1. Description
The drain cleaner consists of the following parts:
•Frame
•Reel
•Side arm with hose drive
•Guide arm
•Hydraulic system
•Water plumbing
Frame
A strong frame that can be attached to the three-point linkage of the tractor and that has
place for: - reel
- pump
- inserting mechanism
- hydraulic system
- lighting
The frame also has standard pick up points for the use of a fork-lift truck.
Reel
The reel has an extra large diameter. The advantage is that the hose will be less bended.
Because of that the friction is as little as possible, so that the decrease of pressure is
limited. Because of the narrow high construction of the reel it can coil a long hose (up to
500 m) without guidance.
Side arm with hose drive
The side arm can be moved up and down with a hydraulic cylinder so that the bottom side
of the guide arm can be placed right in front of the drain. The hose drive consists of two
hydraulic driven rubber rolls of Ø 200 mm. They are constructed in such a way that they
have a maximum traction on the hose. The counter pressure rolls are suspended in a
pivoting system so that a connecting coupling can also go through the drive. With the
pivoting part and the adjusting bolt, the pressure of the counter pressure rolls on the hose
can be adjusted. When the pressure is too low the drive on the hose can start to slip and
the hose will damage too fast. When the pressure is too high the hose will also damage.
Metre counter: Behind the drive rolls you will find a metre counter. This counter will register
how many metres of hose are in the drain and can indicate the location of the blockage.
Guide arm
The guide arm is constructed in such a way that it is possible to work over a fence. The
inserting bend of the arm can be turned, so that it can also be inserted on the other side of
the ditch. For transport on the road the guide arm can be taken off the side arm and can
be put away on the back of the frame.
Hydraulic system
The hydraulic system can be connected with the double-acting valve of the tractor or with
the single-acting valve with a free return. During your work with the drain cleaner the
system must be under continuous pressure. The machine is operated with the triple valve
block. This valve block can also be mounted on the rear side or in the cabin. Should the
machine work in the opposite direction of rotation the pressure and the return pipe must be

Drain cleaner
2
exchanged or the hydraulic lever in the tractor must be put in the other position. The
hydraulic motors on the reel and the side arm are connected in such a way, that the hose
will stay tight on the reel during both coiling and uncoiling. The coiling and uncoiling speed
can be adjusted with the speed control valve next to the valve block.
Water plumbing
Pump
The COMET APS 145 water pump has a capacity of 132 l/min and a maximum pressure of
50 bar. This is an ample reciprocating diaphragm pump driven by the drive shaft of the
tractor. This pump is not sensitive for polluted water. The pump is constructed in such a
manner that all the parts that are liable to wear can be easily replaced. The maximum
number of revolutions of the pump is 550 rev/min., but may never be under 300 rev/min.
When using a drive shaft with 1000 or 750 revolutions you can keep the engine speed of
the tractor lower. This will save fuel and give less noise. Because the pump is ample, you
will be able to work with a lower engine speed.
Pressure regulating
The water pressure can be regulated with the turning knob on top of the pressure
regulator. With a lever on the pressure regulator the pump can be relieved, for example
while you are placing the guide arm in front of the drainpipe.
The optimum working pressure is 30 to 35 bar. With a higher pressure the PE hose will be
overloaded and will have a shorter life. Because of the friction in the hose a higher
pressure will hardly bring more delivery.
A lower pressure will not bring enough water to the nozzle, which leads to bad cleaning.
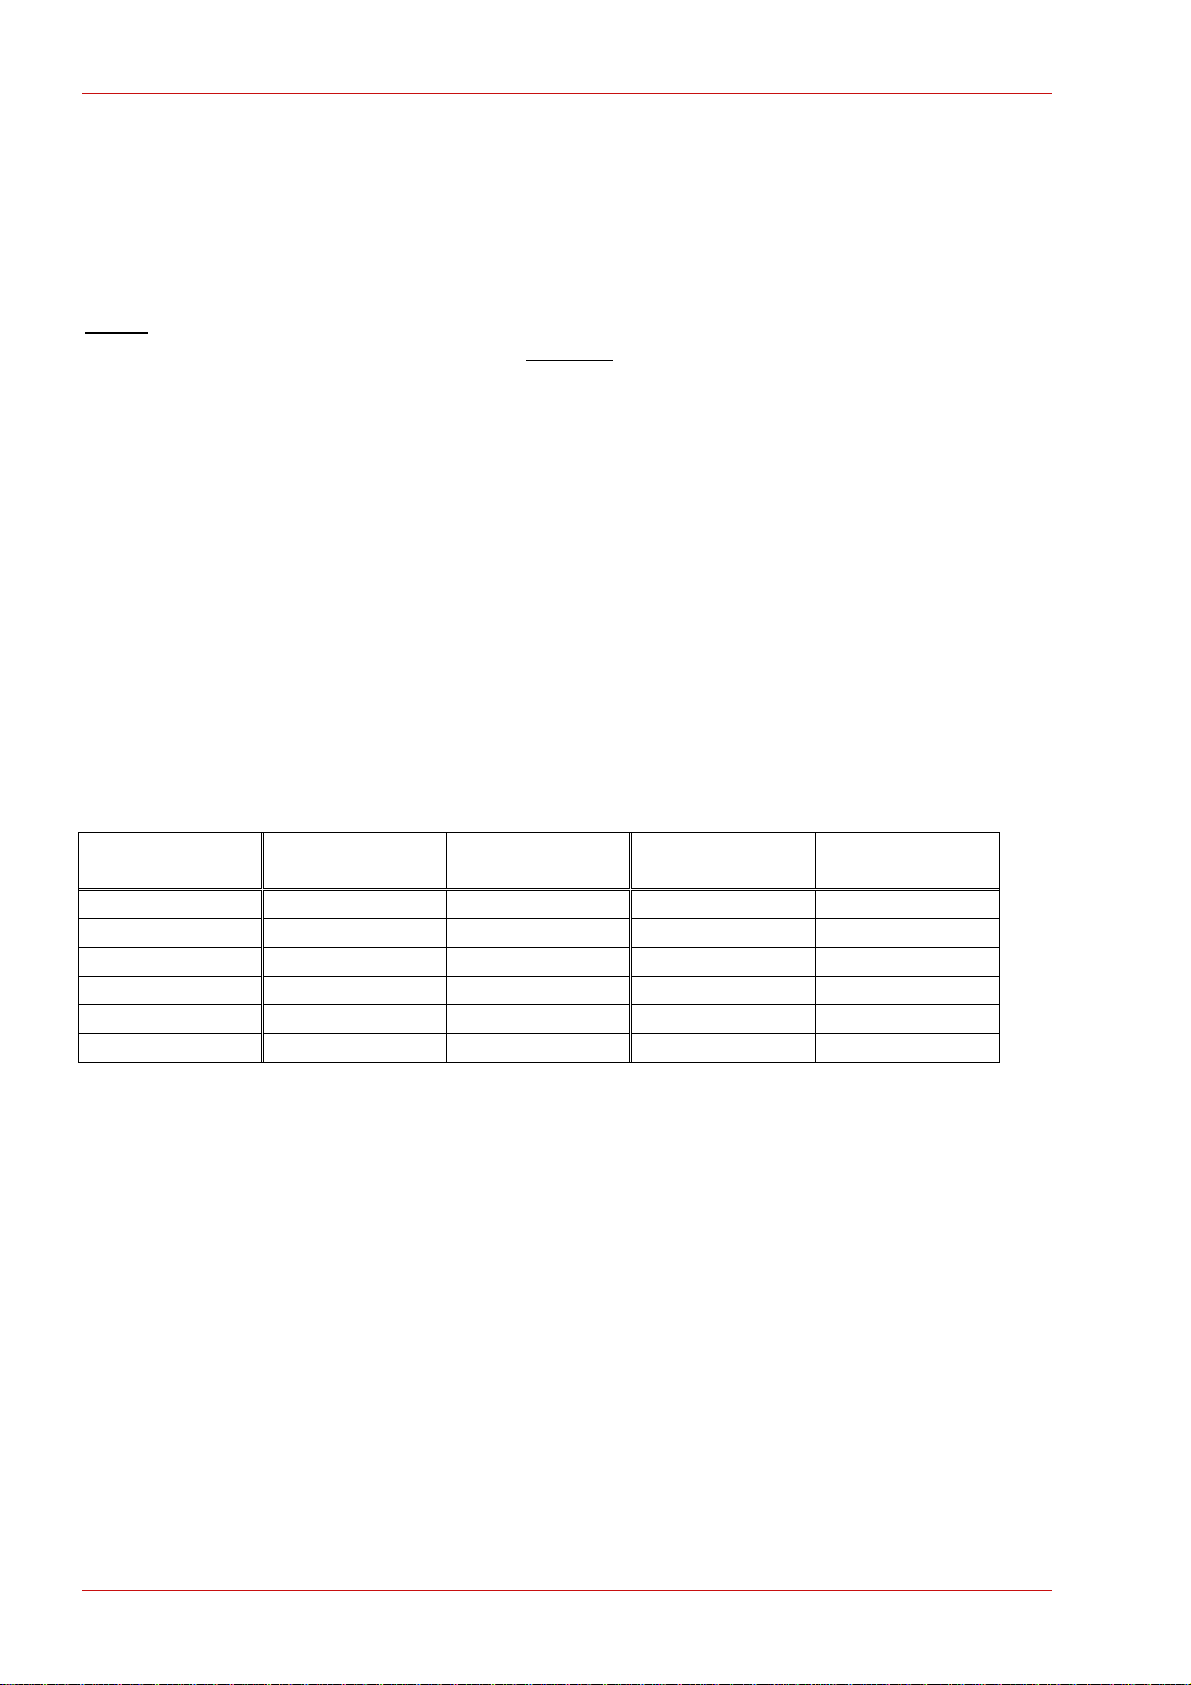
Pump
pressure
Nozzle
pressure
L/min at 315 m
Nozzle
pressure
L/min at 400 m
20 bar 6.0 bar 49,4 5 bar 47,4
25 bar 8.5 bar 56,1 7,4 bar 53,3
30 bar 10 bar 61,6 8,5 bar 58,8
35 bar 12.5 bar 67,4 11,3 bar 63,2
40 bar 14.5 bar 71,4 12,9 bar 68,6
45 bar 16.5 bar 75,7 14,8 bar 72,5
The return water of the pressure regulator will be connected to the upper side of the guide
arm. The hose is lubricated with this water in the inserting arm. During withdrawal the hose
is cleaned again.
Filters
The suction filter is 10 m long and has a ditch filter at the end. In front of the pump you find
the main filter.

Drain cleaner
3
Hose
The hose is a PE polyethylene hose with an outer diameter of 27 mm and a thickness of
3,3 mm. This hose is flexible and strong. A bigger diameter has too much friction in the
pipe. Because this pipe has a specific gravity lower than 1 it can float on the water. This
hose is delivered in a standard size of 315 m. As an option there are the following lengths:
350, 400, 450 and 500 m. Longer lengths only on demand.
Pipe resistance hose 27 mm
Litre per minute 50 60 70 80 90 100
Pipe resistance per 100 m 3,6 5 6.5 8.25 10,2 12,2
Hose connection
When the hose is damaged the damaged part can be replaced. The hose can be put
together with a hose connection (number 8200361) and two clamping bushes (number
9820211.0). The hose connection and the two clamping bushes are delivered with the
drain cleaner.
Flexible hose part
A flexible hose part is mounted between the spraying hose and the nozzle to facilitate the
searching of the nozzle, and to keep the nozzle in the middle of the drainpipe as much as
possible. At the end we find a thread 5/8" to which all types of nozzles can be mounted.
Nozzle
The standard nozzle on the machine has 13 holes of Ø 2 mm: 1 hole to the front and 12
holes to the back under an angle of 15º. This is the perfect angle to clean the drain shell
and to rinse the dirt without damaging the drain shell or the protective sheathing. The hole
to the front is for soaking the dirt or for boring out a very dirty drain. When the dirt sticks
fast to the shell it is possible to use a nozzle with holes under an angle of 30° to the back.
In rich clay it is possible to use a nozzle with 3 holes to the back and 1 hole to the front to
be able to soak this clay. For larger pipe diameters you can use special nozzles with
guidance. These nozzles can be delivered in the following sizes: 60, 75, 100 and 125 mm.

Drain cleaner
4

Drain cleaner
5
2. Operation
•Please pay attention that the drive shaft is not too long when you connect the drain
cleaner to the tractor. Lift the drain cleaner high enough that the shaft is in a horizontal
position.
3
A
B
2
A
B
1
A
B
•Put pressure on the hydraulic system when you are in the field. Detach the chain of
the side arm that is pinned to the frame. Lower the arm by putting lever 3 in position A.
With the speed control valve, the lowering speed of the cylinder can be adjusted.
•Put the guide arch on the side arm. Mount the suction hose and hang it over the
brackets on the guide arm. Put the return hose of the pressure regulator on the
overflow connection on top of the guide arm.
•Adjust the inserting speed of the hose on slow by turning the speed control valve to
the left. Insert the hose through the guide arch by placing lever 1 in position B. Adjust
the pressure of the drive rolls on the hose with the adjusting bolt on the pivoting part.
The drive rolls may not slip on the hose.
•Put the meter counter on zero.
•Disengage the pressure regulator.
•Drive the machine in front of the drain. Place the guide arch right in front of the drain,
with the end of the arch at a maximum of 20 cm from the drain. If the distance is too
far, it is possible that during insertion, when there is more friction, the hose will bend
and damage. As a safety measure the guide arch must always be secured with the
pin.

Drain cleaner
6
•Engage the drive shaft with about 540 rev/min. Wait until the pump draws plenty of
water and tighten the pressure regulator and adjust the pressure to a maximum of 35
bar. When a new machine is put into operation the polyethylene hose is still empty, it
will need about 1 minute to fill up. Make sure that water runs through the overflow
hose along the guide arch. This way the PE hose will be wet when it enters the
drainpipe, which will give less friction. The hose is cleaned on withdrawal.
•Place lever 1 in position B, so that the hose enters the drainpipe. Set the correct speed
with the speed control valve: about 25 to 30 metres per minute. This depends on
pollution, kind of soil, ground water level, drain type and operating pressure. If
necessary increase the pressure of the drive rolls on the hose with the adjusting bolt
on the pivoting part.
WHEN THE HOSE IS INSERTED THE MACHINE MUST BE UNDER CONSTANT
SURVEILLANCE! This way it is possible to reverse, withdraw or stop when the
end of the drain has been reached or in case of malfunction. Slip may cause the
hose to wear through. Remain alert!!
•On the metre counter you can see how far the nozzle is in the drainpipe.
•Withdraw the hose by putting lever 1 in position A. Adjust the speed slower at
maximum 20 metres per minute.
WITHDRAWAL MUST ALWAYS BE DONE AT SLOWER SPEED THAN
INSERTION!
•If the nozzle gets stuck in the drain during insertion because of an obstruction, switch
lever 1 from B to A. Withdraw the hose 5 to 10 metres and try again to penetrate the
hose into the drain pipe. Repeat this procedure a few times until the obstruction is
gone.
•If the nozzle gets stuck in the drainpipe after about 50 metres because of strong
pollution, the hose has to be withdrawn completely so that the dirt is removed from the
drainpipe. Clean the next part of the drainpipe in the same way, to avoid that the
nozzle with the hose gets stuck in the drainpipe.
NEVER STOP EITHER THE WATER PRESSURE OR THE PUMP WHILE THE
NOZZLE WITH THE HOSE IS STILL IN THE DRAIN. The hose may get stuck
because of the sand and it will be impossible to get it out again.
•When the drainpipe has been cleaned, totally withdraw the hose until the nozzle is out
of the drain. Slowly disengage the pressure regulator with the lever. Because the
pressure is taken from the hose it is possible that the reel starts to reverse. If this
happens hold the reel with your hand. Disengage the drive shaft, lift the side arm and
drive to the next drain.
•After use always reduce the pressure of the drive rolls on the hose by disengaging the
pressure regulator with the adjusting bolt on the pivoting part.

Drain cleaner
7
3. Safety instructions
•The tractor and the machine are to be driven and operated only by qualified
persons.
•Starting and running of the tractor, either with or without the machine, in a closed
room is prohibited.
•Switch off the tractor engine during repairs on the tractor or the machine.
•During transport take the guide arch of the side arm and place it on the back of the
frame on the appropriate brackets.
•During transport fully lift the side arm and lock it on the frame with the chain.
•Comply with the safety instructions when the machine is running.

Drain cleaner
8

Drain cleaner
9
4. Frost protection
If it is not possible to put the machine in a frost-free place, please follow the next
instructions:
1. Drain off the suction filter on the machine, by loosening the swivel ring and
emptying the filter.
2. Fasten the polyethylene hose and the nozzle on the reel.
3. Engage the pump and suck some air.
4. Engage the pressure regulator and turn the control button fully in.
5. Slowly coil the reel, by putting lever 1 in position A. Water will now spray from the
nozzle. After about 4 or 5 minutes the hose will be empty and only air escapes from
the nozzle, so than you can stop. Put lever 1 in position 0 switch off the pump.
6. Disengage the pressure regulator.
7. Fill up the pump with antifreeze agent by dismounting the suction coupling from the
pump.
8. Turn the pump shaft a few times so that the antifreeze agent will spread through the
pump.

Drain cleaner
10

Drain cleaner
11
5. Maintenance
•Grease the lubricator nipple on the drive wheels and hinge points every week.
•Oil the nylon rolls after use to prevent rusting of the shafts.
•Oil the shaft of the metre counter every day to prevent rusting.
•After the first 5 working hours the bolts and nuts must be retightened.
•Clean the suction filter on the machine daily or more times a day if necessary.
•Flush the pump regularly with clean water (pumping). Especially when you have to
pump from a dirty or shallow ditch.
•Check the oil-level of the pump regularly.
•Renew the pump oil (see chapter "Technical specifications") after every 200
working hours or once a year. While draining, turn the pump shaft a few times until
the oil flow has stopped.
•Grease the reel bearings once a year.
In case of an independent hydraulic pack:
•Renew the oil (see chapter "Technical specifications") of the gearbox (between the
water and hydraulic pump) once a year.

Drain cleaner
12
Table of contents
Popular Ultrasonic Jewelry Cleaner manuals by other brands

E-MAG
E-MAG Emmi HC Series Operating instruction

Good Way
Good Way AQ Series operating & maintenance manual

Silvercrest
Silvercrest SUR 46 A1 Operation and safety notes

Silvercrest
Silvercrest SUR 46 B1 operating instructions

Plasma Made
Plasma Made TAC120 manual

Ewbank
Ewbank Steam Dynamo SC1000 Care and use instructions