AHA ASP-19 User manual

•Before using the product, please read this manual carefully and keep it for later.
•Image drawings and notations in this document may slightly differ from the actual product.
•The contents of this document are subject to change without notice.
English
User’s Manual
Smart Pass
(AIoT Face Recognition & Temperature Measurement for Access Control System )
Copyright ©2020 AHA INC CO.,LTD. All Rights Reserved
www.ahatouch.com
Model :
Stand Assembly Manual
Rev.2.6
ASP-19
Desk stand
Floor stand
Wall bracket

1. Smart Pass Overview.………………………………………………………………………………..…...………...
1.1 Smart Pass Introduction..…………………………..……………………………..…...………...….
2. How to use Smart Pass...………………………………………………………………………………………….
2.1 How to run Smart Pass.……………………………………………………………………..............
2.2 How to use Smart Pass.……………………………………………………………………..............
3. Smart Pass screen description………………..……………………………………………............………...
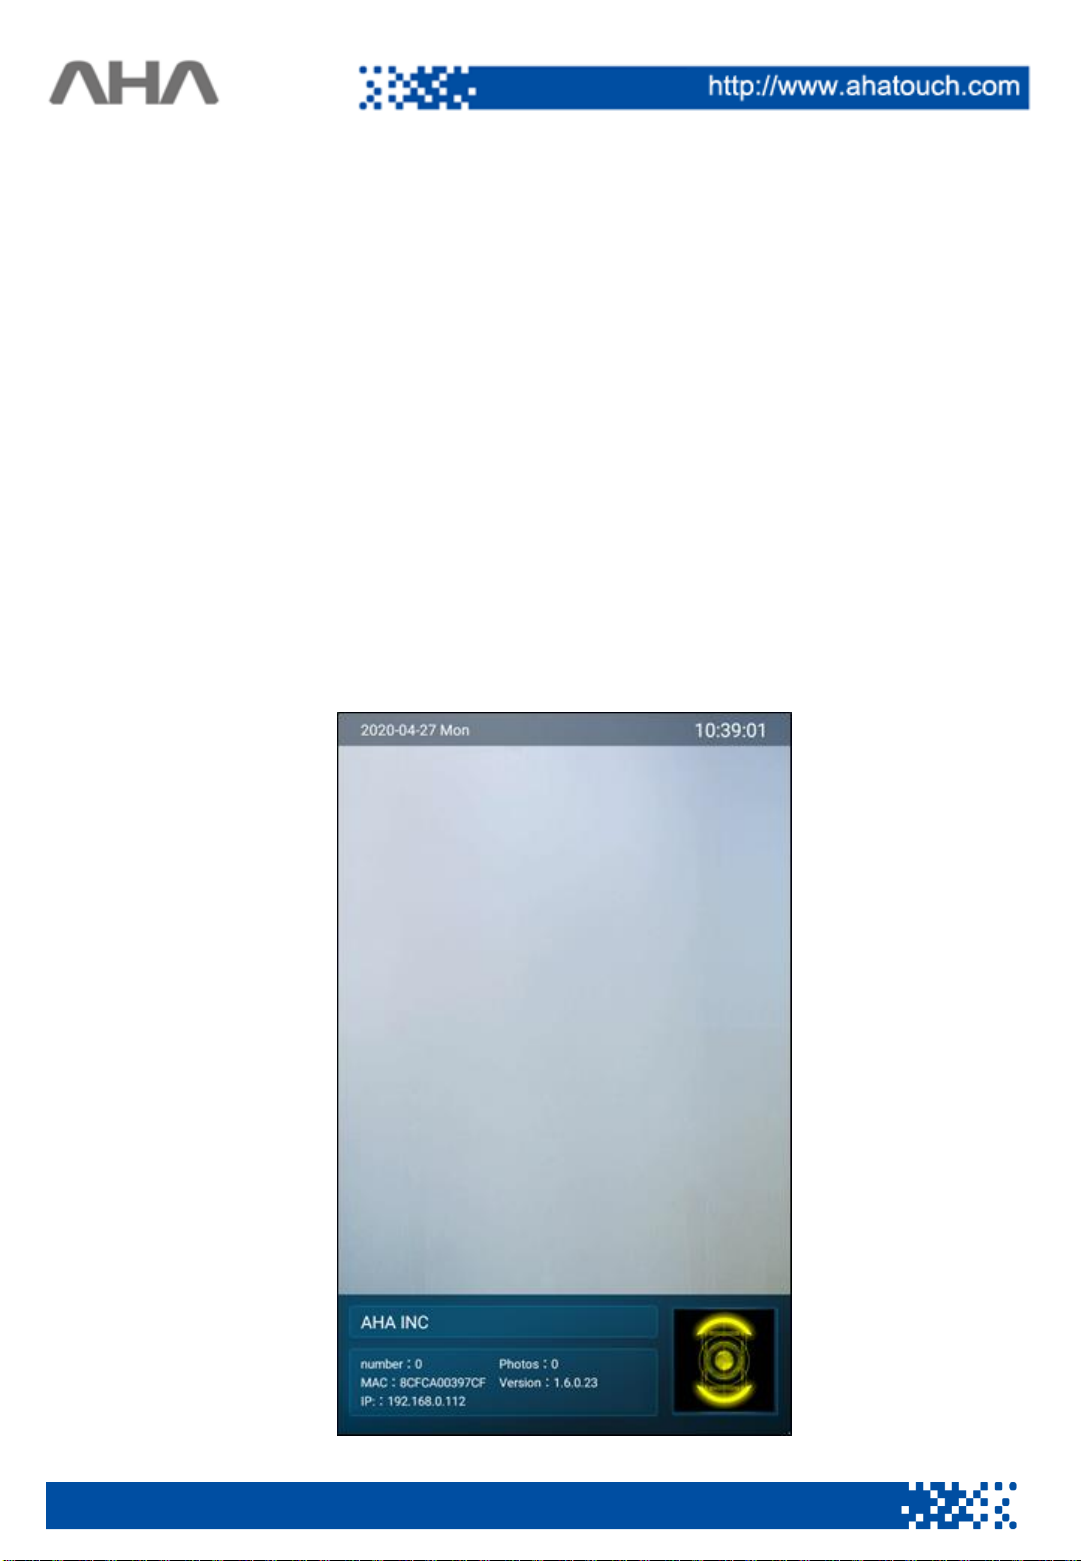
3.1 Initial screen...………………………………………………………………………………………..……..
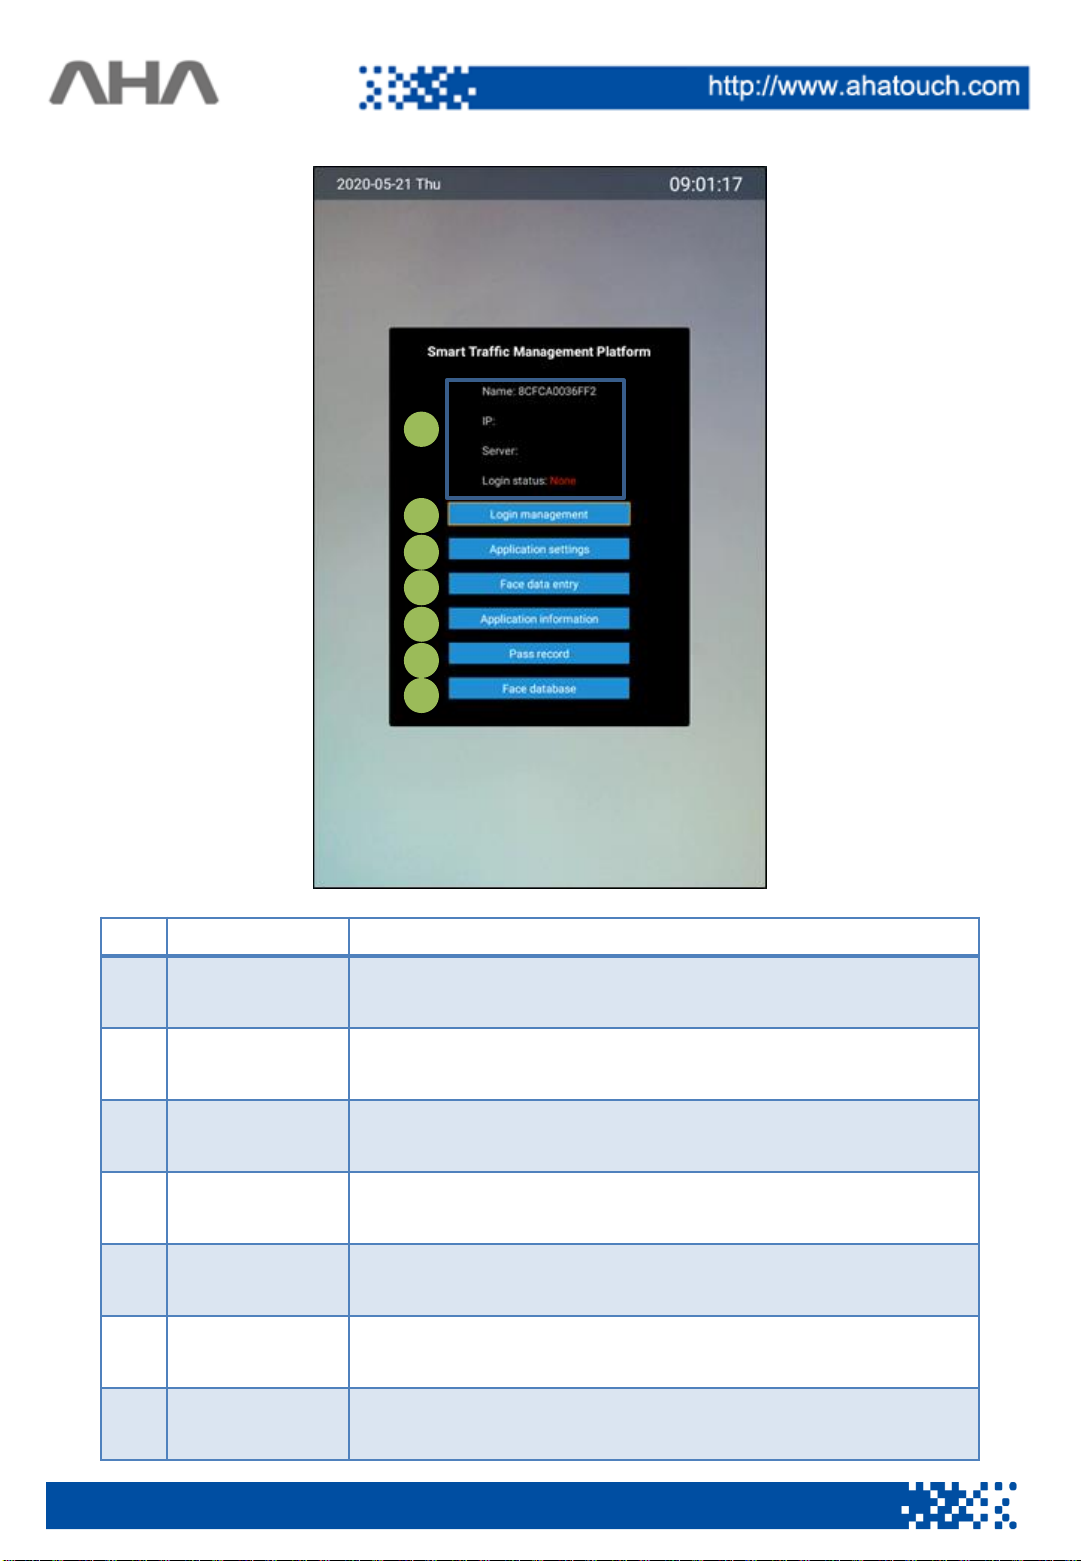
3.2 Main menu..………………………………….……………………………..……………………………….
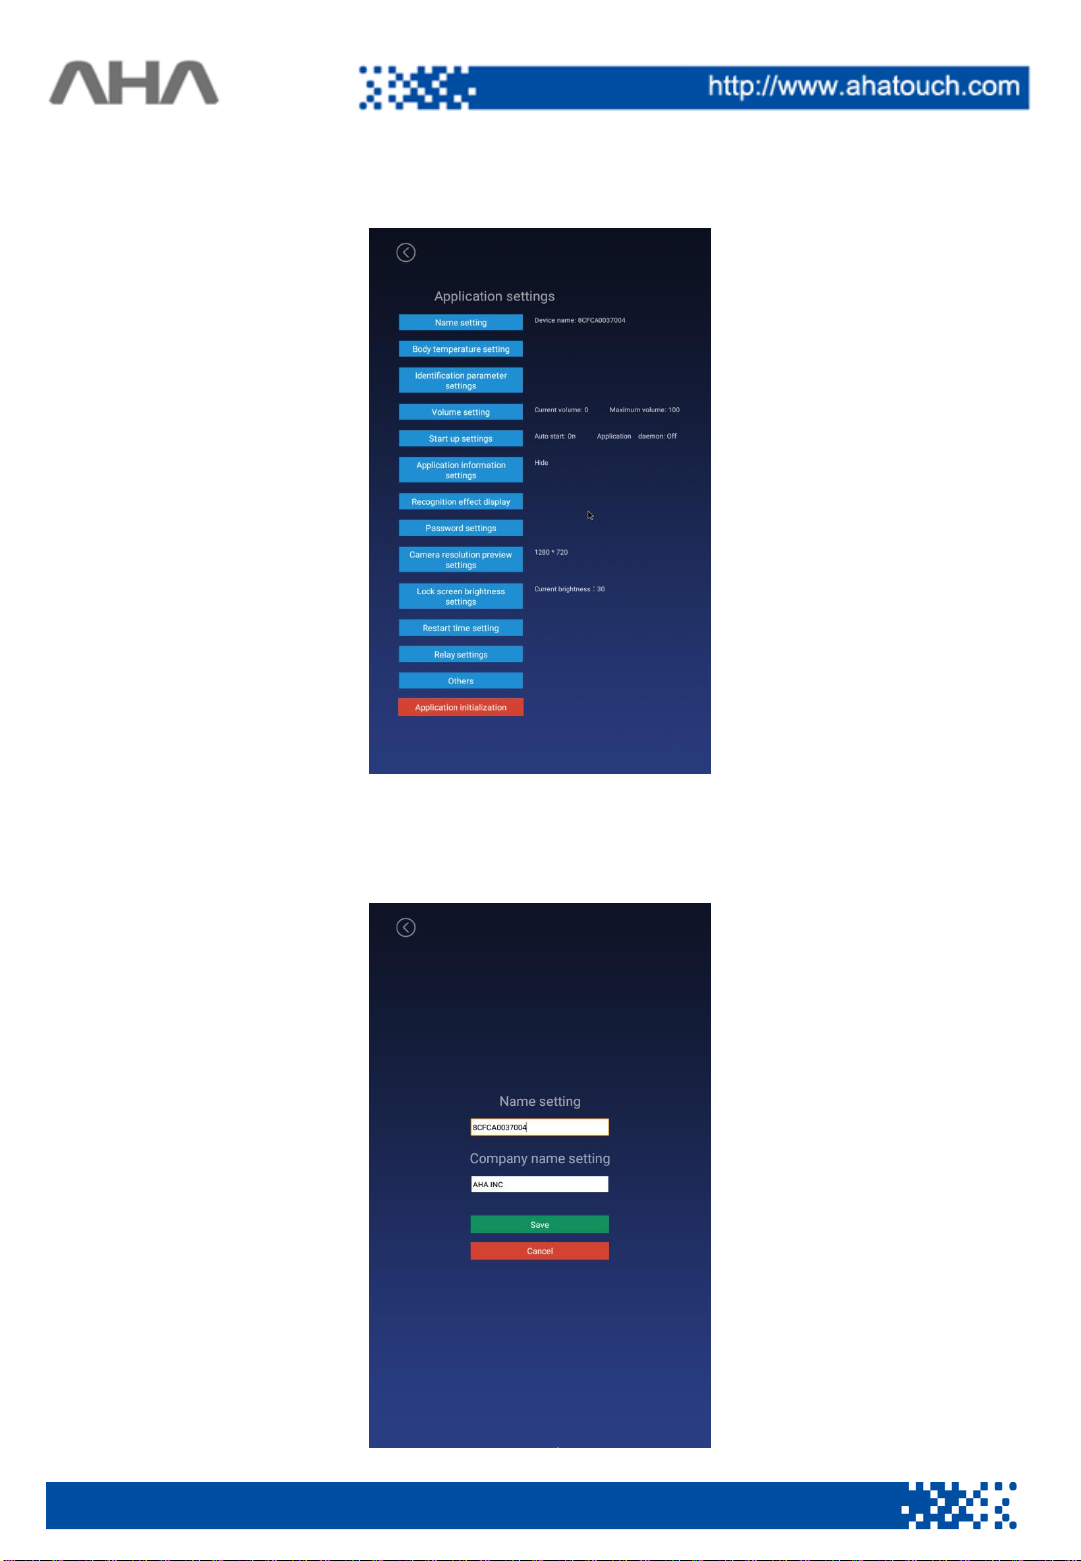
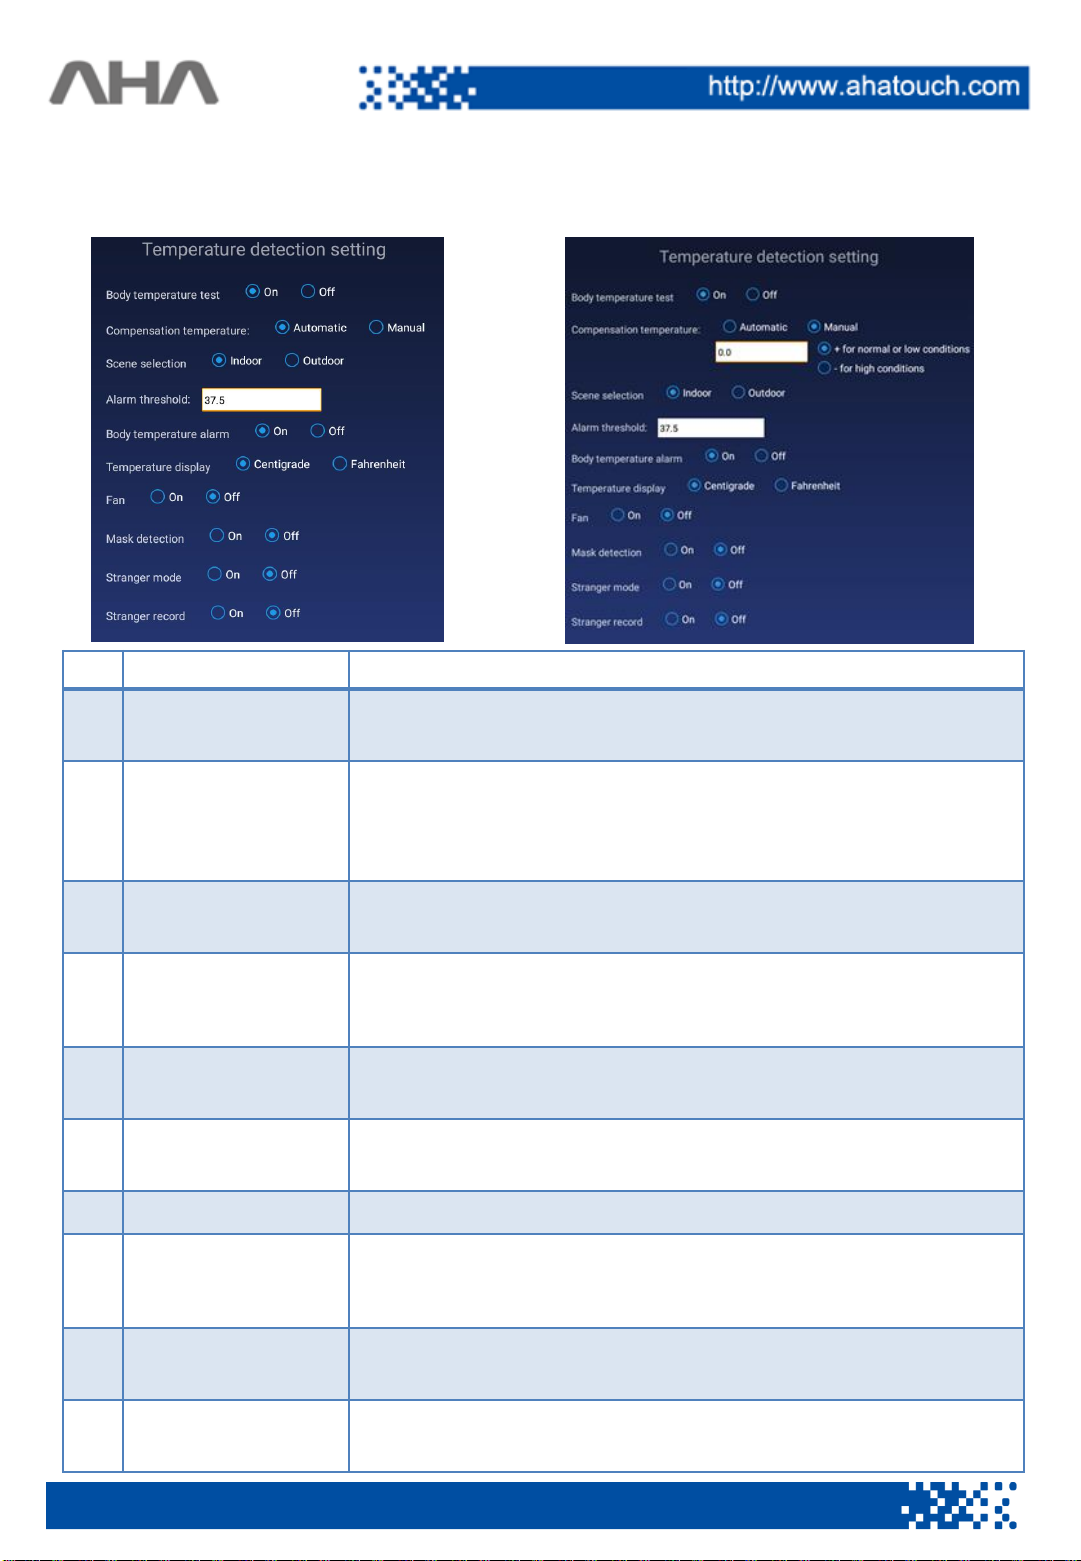
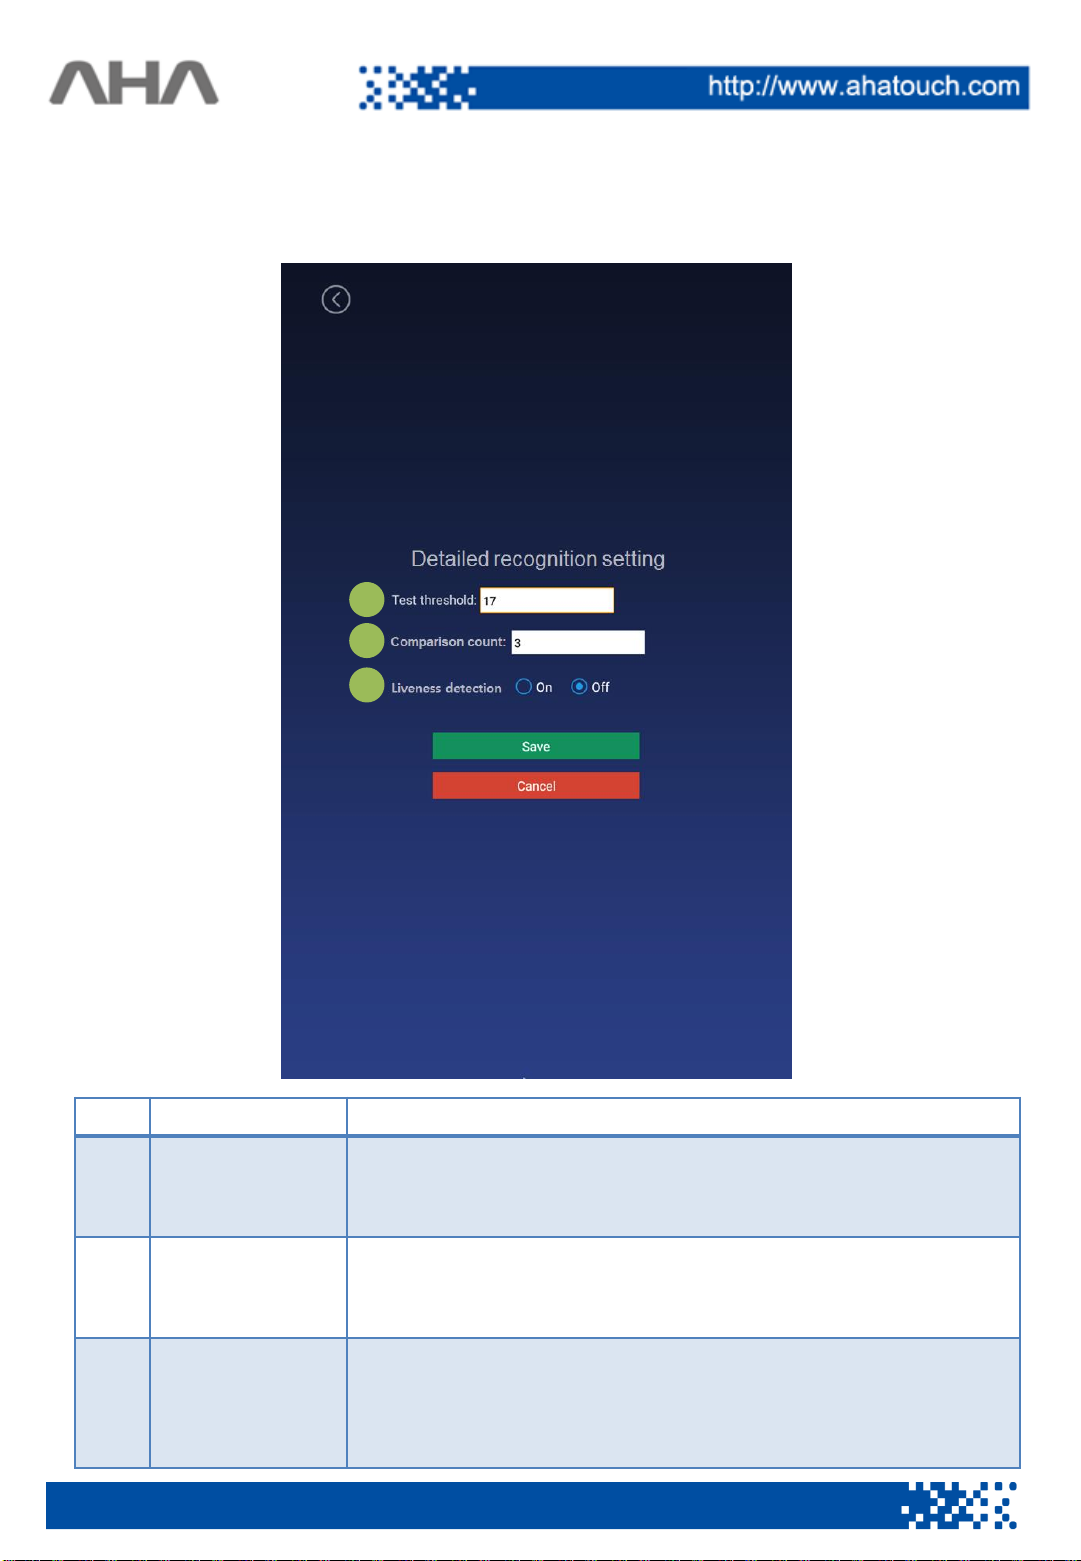
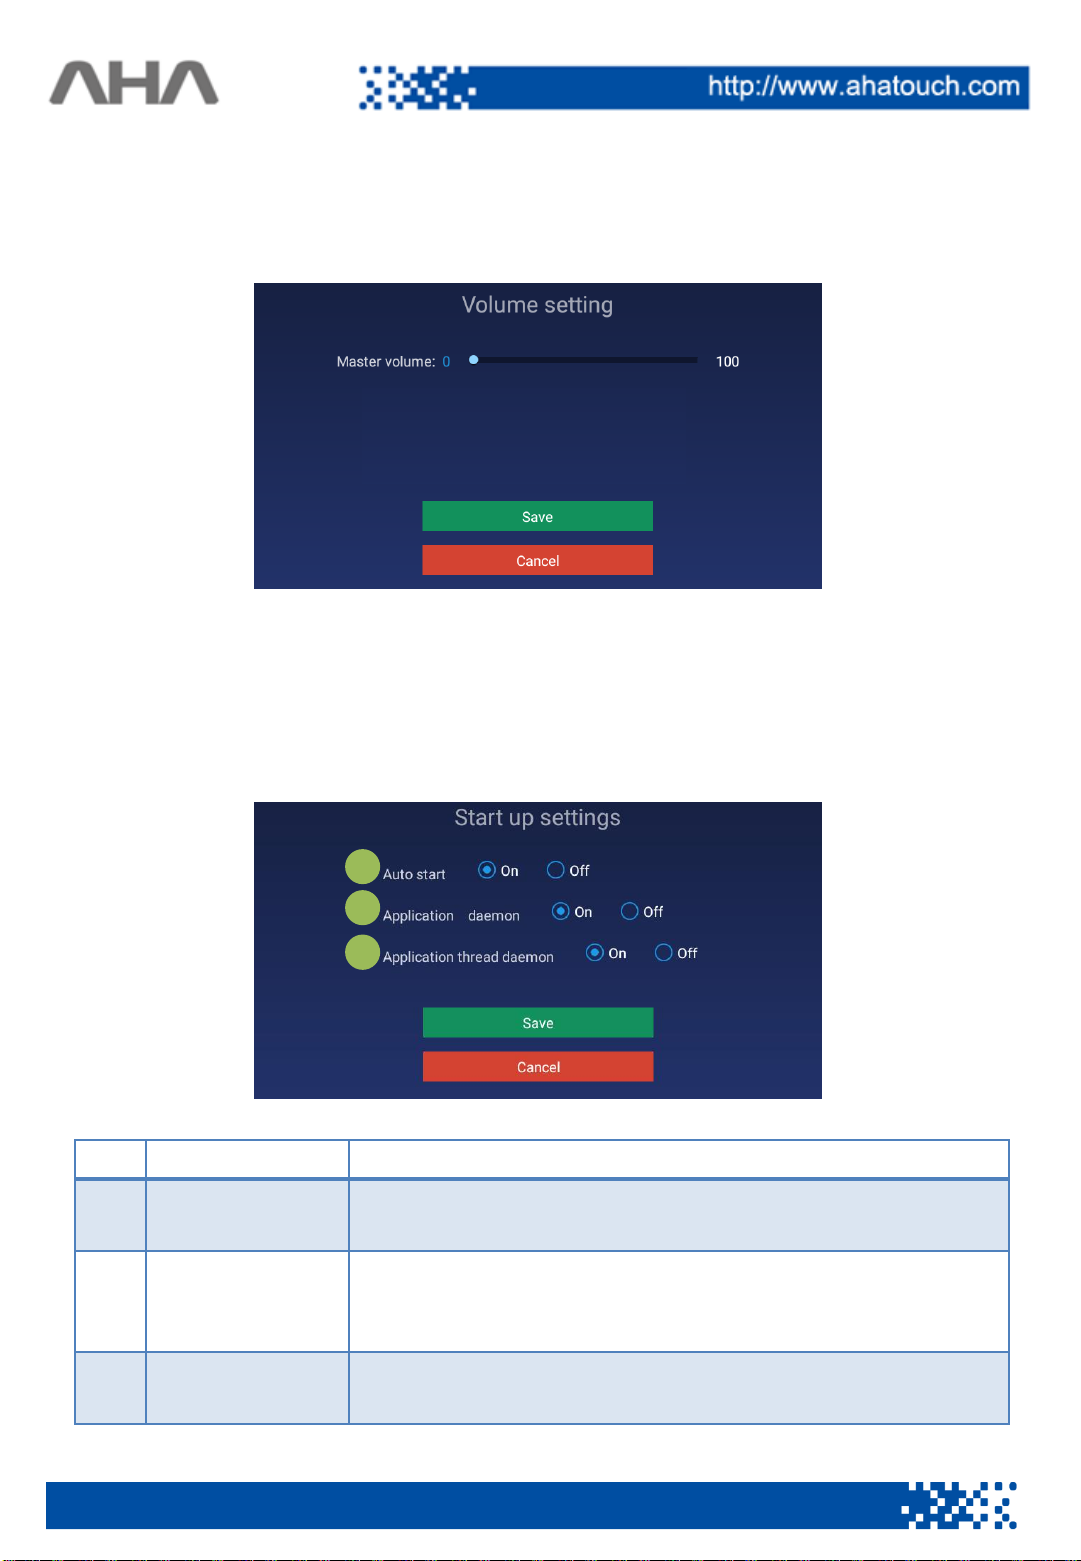
3.3 Setting……………...…………………………………………………………….......................................
3.4 Registration of access information …………….……………….……………………………..
3.5 Device information………………………………………………………………………………………..
3.6 Access record……………….……………………………….……………………………………………...
3.7 List of registrants …………………………..…………………………………...................................
4. Countermeasure………………………………………………………………………………..................................
5. Product specification.…………………………………………………………..………….…………………........
6. Product diagram…………………………………………………………………….……………..………………….
7. Product description(display) …………….…………………………………………………………………….
8. Product description…….......................…..……………………………………………………………..……….
9. Product port description ..…………………………………………..………………………………………….
10. Maintenance ………………………………………………………..…………………………….………………
11. Installation Manual (Main unit + Stand) ………………………………………………………………….
3
3
3
3
4
5
5
5
7
18
19
20
21
22
24
25
26
27
28
29
30
2
Contents

1. Smart Pass Overview
1.1 Smart Pass Introduction
Smart Pass is an advanced AI (Artificial Intelligence) face recognition and heat check
access control system that accurately identifies a person and measures body
temperature even if the mask covers part of the face or wears glasses and a mask at
the same time with advanced deep learning technology.
2. How to use Smart Pass
2.1 How to run Smart Pass
1) When the power is connected, the device turns on. The app is installed on the
device, so there is no need for a separate installation process.
2) Turn on your device and wait for a while to launch the app and it takes about 30
seconds to use it.
3) In order to use a stable device, connect the power to the device and wait about
3 minutes before using it.
3

2.2 How to use Smart Pass
The camera recognizes a person by standing in front of the camera in line with
the line displayed on the screen. As soon as a person is recognized, the
temperature is measured and displayed on the screen. If your body temperature is
normal, you will be informed by voice. If the body temperature is high, a warning
tone is displayed and the entry is prohibited.
The mask detection function allows you to display the access only when you are
wearing a mask. If you are not wearing a mask, you will be asked to wear a mask,
and a warning sign will be displayed.
4

3. Smart Pass screen description
3.1 Initial screen
This is a screen for face recognition and body temperature measurement.
The current date & time are displayed at the top.
When a person is detected, contextual phrases or body temperature measurement
results are displayed. Depending on the setting, information such as IP, company
name, and version may be displayed at the bottom of the screen.
3.2 Main menu
When the mouse is connected and the wheel button is pressed, the password
input window appears, and when the correct password is entered, the main menu
is displayed on the screen. ※ The initial password is '123456'.
5

No. Name Description
1Status
information
The set device name, IP, user name, and login status
are displayed.
2Log In
Management
Used to connect the device to a network (not
currently supported)
3Application
settings Open the Smart Pass detailed settings menu.
4Face
registration
Capture a person's face and register it in the database.
5Application
information Check various information of the device.
6 Pass record Displays a list of people who have measured the
temperature.
7Face
database Shows a list of people registered in the database.
1
2
3
6
4
5
6
7

3.3 Setting
This is a detailed menu for setting up a Smart Pass.
(1) Name setting
Set the device name and company name.
7

(2) Inspection setting
This is a detailed setting menu related to face recognition and body temperature
measurement.
8
No. Name Description
1
Body temperature
test Turns the body temperature test function on or off.
2Temperature
compensation
It is used to calibrate the temperature when measured different
from the actual body temperature by the external temperature.
In case of manual setting, detailed input field appears. Input
value is between 0 ~ 1 ℃.
3 Scene selection Setting whether the device is installed indoors or
outdoors.
4 Alarm threshold
If the measured body temperature is higher than the entered
value, an alarm message is displayed.
When the body temperature alarm is on, a beep sounds.
5
Body temperature
alarm Enable or disable the Alarm.
6Temperature
display
Change the temperature display format to Celsius (℃) or
Fahrenheit (℉).
7 Fan It set the operation of the fan for heat dissipation.
8 Mask detection
Measure your body temperature and check whether wear a
mask or not. When a person without a mask is detected,
display a no-access sign and you can hear the voice.
9 Stranger mode When it detects a person who is not registered in the
database, it notifies them that it is a stranger.
10 Stranger record
When a stranger is detected, the captured picture is saved
separately.

(3) Detailed recognition setting
When checking whether it is a stranger or registered in the database, the accuracy
and the number of identifications are set.
1
2
3
9
No. Name Description
1 Test threshold
Determines the precision of comparison with photos in
the database. The lower the number, the more precise the
comparison. Input value is 10 ~ 20.
2Comparison
count
Compare and check the number of times entered. The
bigger the number of comparisons, the more accurately a
person can be judged. Up to 0~99 can be entered.
3
Facial Liveness
Detection(Face
Biometric
Authentication):
This is to detect if a person in front of camera is a real
person or manipulated image (photo) and stop spoofing
attempts. The default is off.

(4) Volume setting
Adjust the volume level for voice guidance and warning sounds.
(5) Startup setting
Change the behavior or program settings when the device is turned on.
No. Name Description
1 Auto start Set whether the app turns on automatically when the
device is turned on.
2Application
daemon
When the setting is on, the app will automatically
appear on the screen after 30 seconds even if the app is
not on the screen.
3Application
thread daemon
If the setting is on, the camera function will restart if an
error occurs while the camera is on.
1
2
3
10

(6) Application information settings
Set whether to display information such as MAC address, IP, and company name on
the initial screen.
< Hide / Show app info setting >
11

(7) Recognition effect display
Set the change of screen or light when a person is recognized.
No. Name Description
1Recognition
success
When a person registered in the database is recognized,
a picture of the person is displayed, or the name of the
person is displayed.
2Recognition
failure
Choose whether to turn the light to red when the
person not registered in the database is recognized or
the mask is not worn. If the dimmer setting is a single
light, this setting is not visible.
3Photo flood
lamp
Set whether to use all colors such as
white / red / green
lights or only white light.
12

(8) Password setting
This menu is for changing the password. ※ The default password value is '123456'.
(9) Camera resolution setting
Change the camera captured screen resolution. There are 640 * 480 resolution and
1280 * 720 resolution.
13

(10) Screen protection brightness setting
Set the screen brightness when the screen is switched to the screen protection state
because no person is detected for a certain period of time.
(11) Restart time setting
Enter the hour in the upper column and the minute in the lower column on
a 24-hour basis.
Reboot or shut down the device at the specified time.
14

(12) Relay setting
Set relay mode and delay time
Relay is a kind of switch and operates according to the mode setting as follows.
Relay mode is used to operate the external door lock, warning light, alarm buzzer, etc.
according to the recognition result.
Maximum driving current and voltage: 2A 30VDC, 0.28A 220VAC
Excessive use of the maximum drive current and voltage may cause product defects.
No.Mode Description
1 Mode 0 Disable relay
2 Mode 1
When the relay is open, it is closed for the set 'delay time' and
then opened again.
3 Mode 2
The relay is closed and opened for the set “delay time” and
then closed again.
4Delay
time
Set the operation time of the relay.
The initial value is 5 seconds, and the setting is from 0 to 63
seconds.
15

(13) Others
You can configure firmware upgrade or server communication related settings.
No. Name Description
1
Temperature
module firmware
upgrade
You can manually upgrade the firmware by connecting
the USB containing the firmware upgrade file.
The file name should be “updateTemp.bin
” and it should
be at the top of the USB path.
2 Callback setting If you select On, a field for entering content appears.
Enter if callback setting is required.
3Communication
address setting
If you select On, a field for entering content appears.
Enter the IP and port number of the server to
communicate with. The format is IP: PORT
16

(14) Program initialization
This function returns the program settings to the initial state.
When the button is pressed, the above warning appears, and when the OK button is
pressed, various settings are initialized and all information and records registered in
the database are lost.
※ Once the program initialization function is activated, it cannot be reversed.
※ Back up data before initialization.
17

3.4 Registration of access information
This is a function to take a person and register it in the face database.
Press the Gather button at the top to take a picture. The picture which was taken is
scaled to fit the person's face. Enter ID and name, select gender and click Save to
save it to the Face database.
18

3.5 Device information
Displays information about apps and devices.
Information such as firmware version, memory, brightness, and volume is displayed.
19

3.6 Access record
You can see who measured your body temperature with Smart Pass.
This record contains name, identity , checking time, body temperature and photo
at the time of measurement.
If the detected person is not in the face database, it is displayed as 'Stranger'.
Enter the time zone you want to see and press the 'query' button to retrieve only
the records for that time.
If you connect a USB storage device and press the 'Export' button, you can save
the records currently in the list separately.
20
Table of contents
Other AHA IP Access Controllers manuals