manuals.online logo
Brands
  1. Home
  2. •
  3. Brands
  4. •
  5. AHI Hardware
  6. •
  7. Door Lock
  8. •
  9. AHI Hardware TLM1661 User manual

AHI Hardware TLM1661 User manual

This manual suits for next models

1

Popular Door Lock manuals by other brands

Dorma MUNDUS PREMIUM US 10 Mounting instruction

Dorma

Dorma MUNDUS PREMIUM US 10 Mounting instruction

Defiant LG600BRA4BGT Instructions for installation

Defiant

Defiant LG600BRA4BGT Instructions for installation

TRU-BOLT M1740024 manual

TRU-BOLT

TRU-BOLT M1740024 manual

Opera ARCA SLIDE installation instructions

Opera

Opera ARCA SLIDE installation instructions

tell CODELOCK CL5500 Series installation instructions

tell

tell CODELOCK CL5500 Series installation instructions

ABH LR6000 installation instructions

ABH

ABH LR6000 installation instructions

Assa Abloy effeff 827A-IP Mounting instructions

Assa Abloy

Assa Abloy effeff 827A-IP Mounting instructions

Iseo MA1A installation guide

Iseo

Iseo MA1A installation guide

ID Lock 150 user manual

ID Lock

ID Lock 150 user manual

Lockly ACCESS TOUCH PRO user manual

Lockly

Lockly ACCESS TOUCH PRO user manual

iLoq G50S user guide

iLoq

iLoq G50S user guide

SDC Z7835 installation instructions

SDC

SDC Z7835 installation instructions

ilco 452 Installation

ilco

ilco 452 Installation

Samsung shs-h705 user guide

Samsung

Samsung shs-h705 user guide

TRU-BOLT 08102017 user manual

TRU-BOLT

TRU-BOLT 08102017 user manual

CDVI 500-LADJ quick start guide

CDVI

CDVI 500-LADJ quick start guide

Igloohome Deadbolt 2S Metal Grey Installer/user guide

Igloohome

Igloohome Deadbolt 2S Metal Grey Installer/user guide

eSSL FL-300 user manual

eSSL

eSSL FL-300 user manual

manuals.online logo
manuals.online logoBrands
  • About & Mission
  • Contact us
  • Privacy Policy
  • Terms and Conditions

Copyright 2025 Manuals.Online. All Rights Reserved.

TOWARDS
DOOR EDGE
BOTTOM
TOP
FIGURE 1
Drill 2 1/8” hole at correct
backset using included
template
FIGURE 3FIGURE 2
Prepare frame for strike.
AHI HARDWARE
7548 Cote de Liesse St-Laurent,
Qc H4T 1E7, Canada
Tel. 514 335-8281
Tel. 877-339-8281
[email protected]
www.ahi-arch.com
1
2
To install the mag latch into
the door, make sure that the
privacy lock switch in
centered and that the
threaded side (see g 4) is
facing the interior
FIGURE 4
1.
1.
ø2 ⁄”
2 ¼” ø1”
1”
In order to center the lock switch, the
latch must be extended. To achieve this,
place the latch near the strike box
FIGURE 6
Insert the sub rose into the 2 1/8” hole respecting the above orientation
Place the levers onto the spindle but do not tighten the lever set screw
Use the supplied screws (choose correct size based on door trim) and tighten
into sub rose assembly
Remove the levers
2 1/8” PRE-BORED HOLE
1.
2.
3.
FIGURE 5
Before installing the spindle, unscrew it 2 turns from the fully
tightened position, if the provided spindle does not have a center
screw, skip to gure 6
NOTE: The spindle must be inserted into the latch such that the stopper
disc rests against the latch on the interior side of the door, and that the
thin wall side of the spindle will align with the levers’ set screws
1.
2.
INTERIOREXTERIOR INTERIOREXTERIOR
STOPPER DISC
STOPPER DISC
THIN WALL SIDE
Magnetic Latch Privacy Installation Instructions
lock switch
1“ X 2 ¼”
⁄“ X ⁄”
1.
2.
FIGURE 7
Snap metal cap onto both sides of the sub-rose paying attention to line up the tab on the sub-rose with the slot in the rose
Screw the privacy pin into the hole in the rose
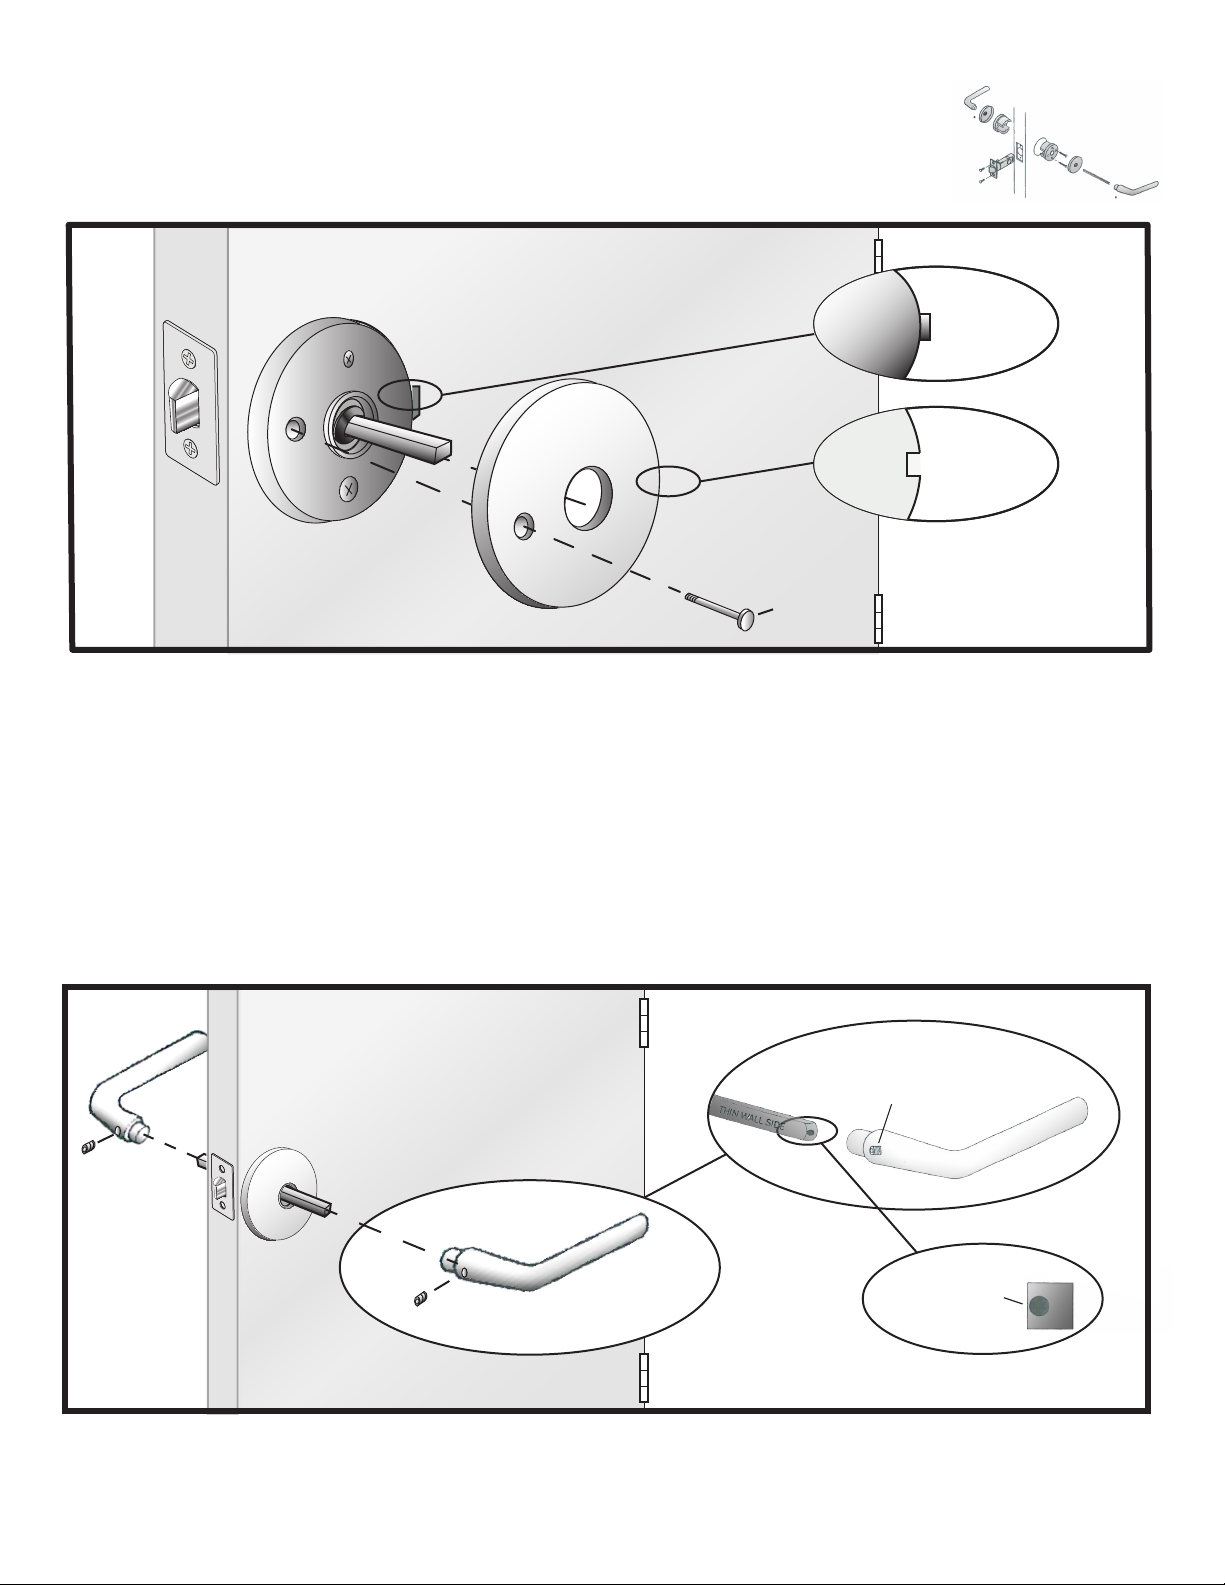
FIGURE 8
1.
2.
Place the levers on each side of the spindle and tighten each set screw until it pierces the thin wall side of the spindle. Note that the spindle
MUST be installed such that the lever’s set screw aligns with the THIN WALL SIDE of the spindle.
After piercing the spindle, keep tightening the set screw until it is rmly tightened
SET SCREW
THIN WALL SIDE OF
SPINDLE
PRIVACY PIN
Magnetic Latch Privacy Installation Instructions
AHI HARDWARE
7548 Cote de Liesse St-Laurent,
Qc H4T 1E7, Canada
Tel. 514 335-8281
Tel. 877-339-8281
[email protected]
www.ahi-arch.com
FOR THE SIG204 SUARE ROSE:
A – Place the square rose on the spindle followed by the lever.
B – Once the lever and rose are in position, take a carpenter’s square and make sure that the rose is square with the door edge.
C – With the rose perfectly squared, apply a little pressure to the rose so that the tacks leave small marks on the door.
D – Remove the lever and rose, and drill the marked spots – this will allow the tacks to penetrate the door without bending. Use a
drill bit size which is slightly smaller than the diameter of the tack.
E – Once the holes are drilled, replace the rose and press it rmly into place. If necessary, gently tap the rose with a soft mallet.
Protect the rose with a clean cloth to avoid scratching.
F – Attach the lever and secure it in place by tightening the set screw. Remember to refer to the set screw instructions – in order to
properly attach the lever, the set screw must pierce the spindle.