AHOOGA (e)Bike User manual

© Copyright Ahooga 2016
1
AHOOGA (e)Bike
QUICK START GUIDE

© Copyright Ahooga 2016
2
Quick Start Guide
Introduction
Dear Customer, we sincerely thank
you and congratulate you for
owning an Ahooga (e)Bike and
contributing to the dissolution of
obstacles to happy cities!
After purchasing your Ahooga
(e)Bike, it is advisable to register
your bike at www.ahooga.bike to
record the details of your bike; that
way, if your bike is stolen or we have
any need to contact you, we will
have a record to refer to. You will be
asked to enter your serial number
located on a label below the bottom
bracket. Note that if you purchased
your Ahooga (e)Bike online at
shop.ahooga.bike, this step is not
necessary as already taken care of.
The information remains in the
Ahooga database and will not be
passed on to third parties. If you
carry out any adjustments or
maintenance work yourself, please
read the relevant sections of the
User Manual first, in order not to
get things wrong, to impair the
folding process or damage your
bike.
This manual contains some tips and
advice for using your Ahooga
(e)Bike but if you are ever unsure of
how to maintain your bike, visit a
serious bike workshop or an
authorized Ahooga dealer/service
center for expert advice. For a list of
dealers and service centers, please
visit our website: www.ahooga.bike.
Oh, one more thing. Since you’re a
Ahooger now, you have a duty:
shouting AhOOooOooGAaaaaa each
time you bump into another
Ahooger. It’s part of the project as it
puts joy in the streets ☺
Unbox Your Ahooga (Skip
This Part If Picked Up At
A Store)
1. Remove carefully all components
from the box.
2. With a 15mm spanner or
adjustable wrench, screw the
right pedal to the right crank. The
pedal threading on the drivetrain
side is regular, this means you’ll
need to turn the wrench clockwise
to attach the pedal.
Tools:
or
Tools:
3. With a 6mm hex wrench (or Allen
key), attach the saddle rails to the
saddle clamp located at the top of
the seat post. Tighten the
setscrews securely when you're
satisfied with the position.

© Copyright Ahooga 2017
3
3. Pull up the folding handlebar
stem and tightly close the stem
security. Close the caliper coma in
order to reposition your brake
pads closer to the rim.
4. Push the top tube down and
backwards. This will tilt your
Ahooga (e)Bike, lift the rear wheel
up against the top tube, and free
the way for the seat post (cf. next
step).
5. While holding the top tube down,
pull the saddle up. Tightly close
the clamp of the seat post.
6. Grab the saddle and lift the bike,
allowing the rear frame and wheel
to rotate in their unfolded
position;
7. Pull the pedals triggers to unfold
them.
8. Enjoy your ride!
Click the icon to watch a video
tutorial (video available on our
YouTube Channel: Folding And
Unfolding The Ahooga Bike)
Unfold Your Ahooga
(e)Bike
After some practice it will require
you 10-15 seconds.
1. The front wheel rests on the hook
mounted on the right chain stay
(tube on the right side of the rear
triangle of the frame of your bike),
remove it after making sure the
long coma of the super quick
release system is open; Remove
the wheel and open the second
coma of the super quick release
system.
2. Orient the fork diagonally (as if
you were turning right). Position
the front wheel on the ground
below the fork, at the front of your
bike, rest the lugs of the fork
exactly on the axis of the wheel,
tightly close the super quick
release system of the wheel (first
the short coma and second the
long coma);
1
2
1
2
1
2
1
2
1
2
Quick Start Guide

© Copyright Ahooga 2017
4
Fold Your Ahooga (e)Bike 6. Fold the handlebar stem by
unlocking the security;
Pull the trigger up, this will free
the lever
Push the lever all the way down
until releasing the lock
Fold the handlebar
7. Open the front caliper brakes with
the caliper coma. Remove the
front wheel by completely
unlocking the front release
system at the level of the axis,
first the long coma, then the short
coma.
8. Rest the front wheel on the small
hook mounted on the right chain
stay (the rear tube next to the
chain); To do so, pre-close the
short coma and leave the long
coma open. Press the long coma
like a syringe, this will create
space for the hook on the short
coma side. Once the wheel is
rested on the hook, close the
second (long) coma.
9. Fold each pedal by pulling the
triggers.
After some practice it will require
you 10 seconds.
1. Set your Ahooga (e)Bike on the
appropriate speed, that is 4. This
is for optimal chain tension and
derailleur position when folded.
Make sure your mudguards are
rolled in.
2. Step on the rear wheel (tire or
chain stay) and lift your bike for
unfixing the seat stays (the rear
triangle) from the seat tube;
3. Swing the rear triangle and wheel
below the frame while slightly
turning the front wheel diagonally
(as if you were turning to the
right) so that the front wheel
doesn’t stay in the way of the
folded rear wheel;
4. Push the top tube down and
backwards. This will tilt your
Ahooga (e)Bike and free the way
for the seat post (cf. next step)
5. Slide down the seat post by
unlocking the clamp;
1
2
1
2
1
2
1
2
1
2
1
2
Quick Start Guide

© Copyright Ahooga 2017
5
•Your Ahooga (e)Bike is equipped
with unique recoiling fenders that
keep the rain, chemicals and mud
off your back.
•High strength and memory
material enable to extend into
sleek fenders and to recoil back
into a tight circle under your
saddle or top tube with the gentle
press of your fingers, adapting
perfectly to your Ahooga folding
bicycle.
Fenders/Mudguards Unfolding Folding
Quick Start Guide

© Copyright Ahooga 2017
6
For Your Safety, Before
Riding Your Ahooga
(e)Bike, Check That:
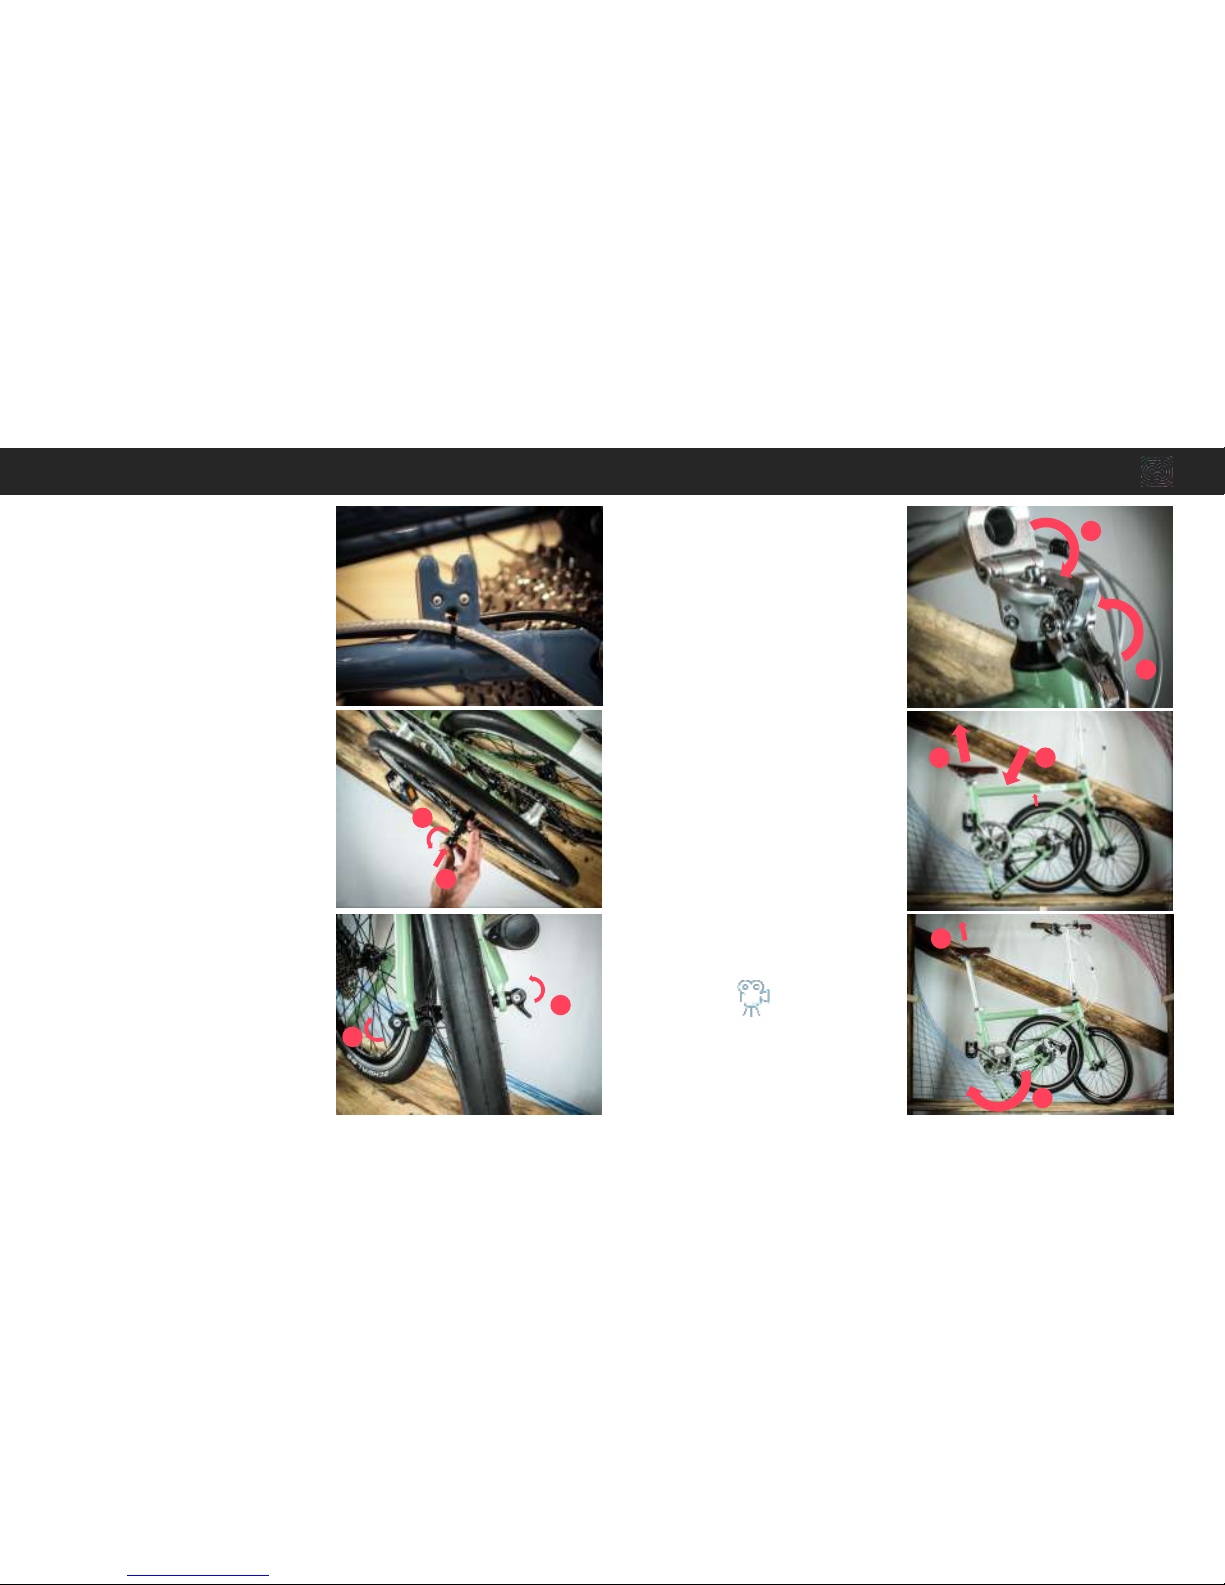
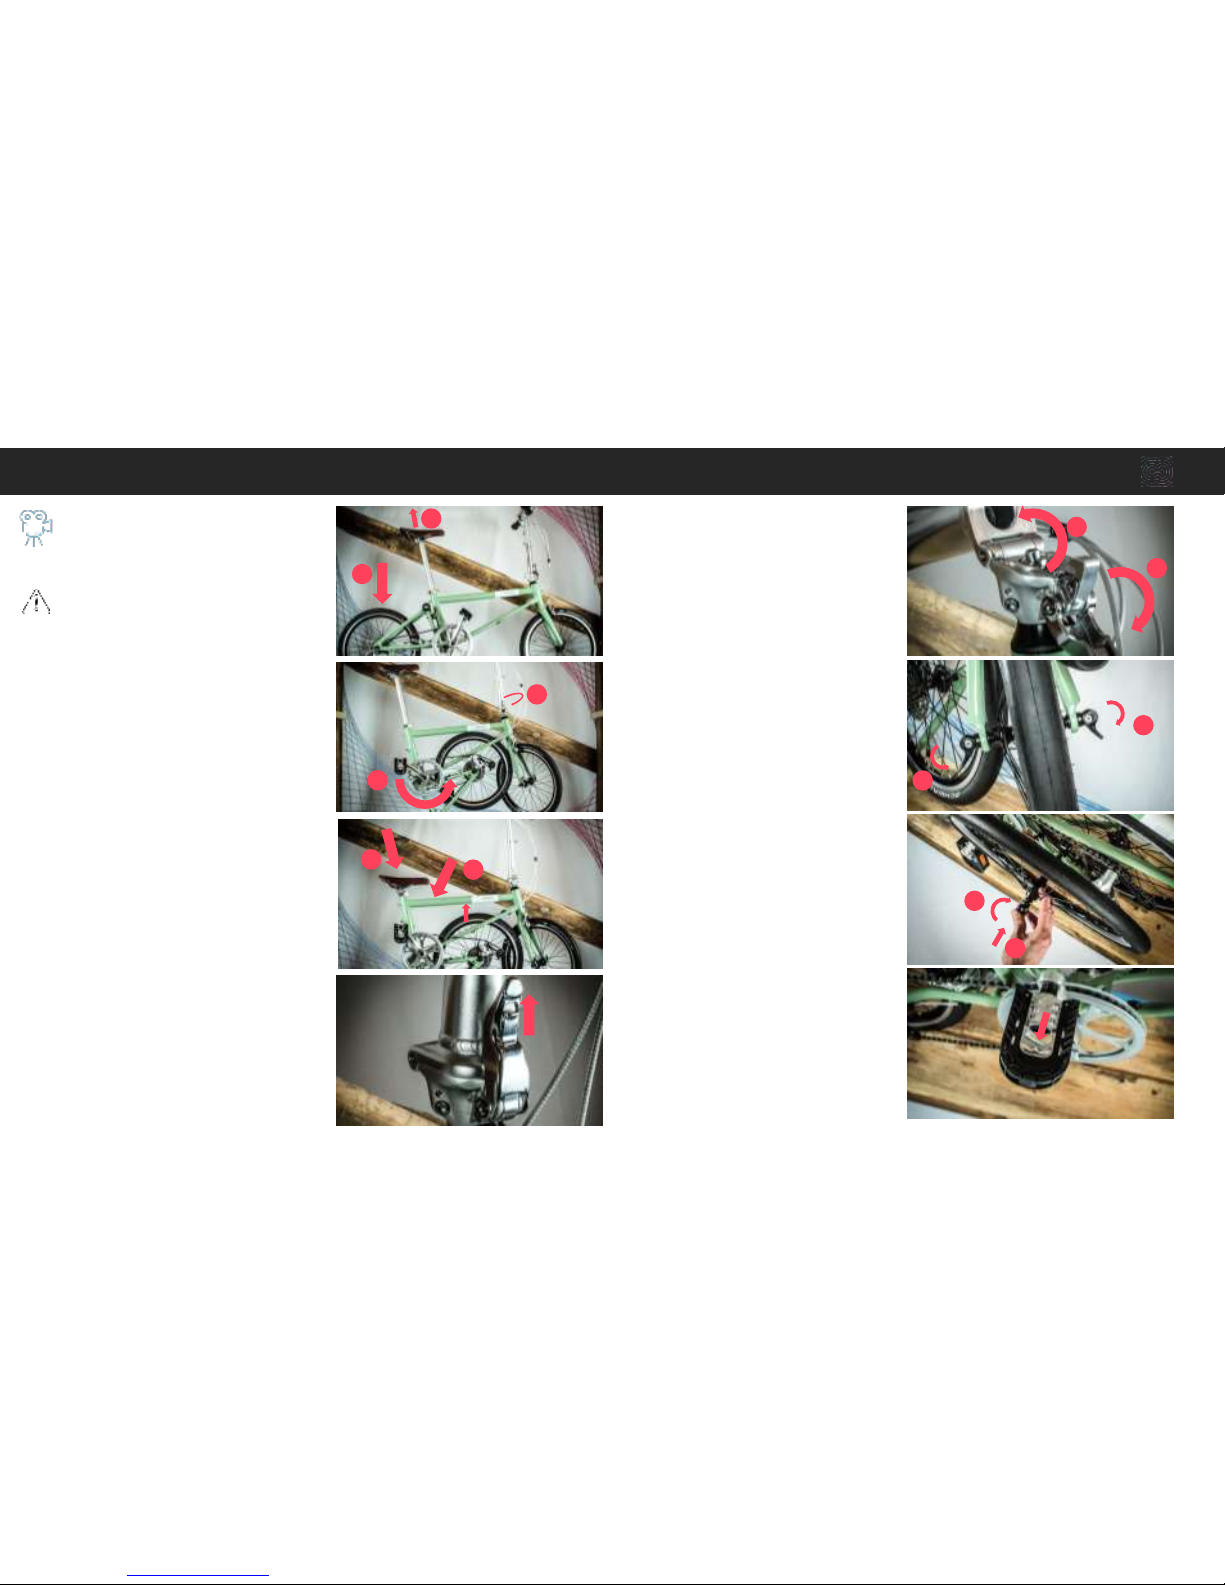
1. the handlebar stem is tightly
closed;
2. the front wheel is firmly attached
and the quick release system is
tightly locked and the 2 comas
pointing the same direction (up
preferably);
3. the saddle is adjusted at the
perfect level for your height so as
to secure an optimal riding
experience;
4. the seatpost clamp is tightly
locked;
5. the brakes work perfectly;
6. the tires are well inflated for
increasing their life expectancy,
improving your riding experience
and limiting the risk of puncture;
7. the battery is sufficiently charged
(in the case of an eBike.) Keep in
mind anyway that you can still
ride your ultra-lightweight Ahooga
with an empty battery.
Using The Electrical
Assistance:
•The electrical assistance of your
Ahooga eBike applies to the EN
15194+A1 standard.
•With your Ahooga eBike any hilly
city simply becomes as flat as a
calm sea!
•Since your Ahooga eBike is
extremely light, fast and
comfortable, you need the
electrical assistance only for
uphill roads.
•Before you leave, switch on the
electrical assistance by pushing
the red button on the top of the
water bottle-shaped battery
mounted on the seat tube.
•Pedaling (or moving your bike
backward a few inches) will
trigger the thumb controller
display, which is by default set on
3.
•Set the power of the electrical
assistance on 0 by pushing the
minus sign on the thumb
controller mounted on the left
hand side of the handlebar.
•Start pedaling.
•When you foresee the need for the
electrical assistance (for instance
before climbing a hill) set the
electrical assistance on 1, 2, 3, 4
or 5 by pushing the plus sign on
the control in order to climb any
hill with no extra effort.
•A short delay is to be expected
before the assistance turns on.
The optimal mechanical speeds
for benefiting from the electric
assistance are 3, 4 or 5.
•After reaching the top of the hill
you can decrease the power of the
electrical assistance and set it
back on 0 by pushing the minus
sign on the control.
•Note: for your safety and in order
to comply with the EN 15194+A1
norm of the European Union, the
electrical assistance of your
Ahooga eBike is limited to 20
km/h and works only when you
are pedaling. Stop pedaling and
the electrical assistance will
automatically stop as well. A
short delay is to be expected
before the assistance actually
stops.
Quick Start Guide

© Copyright Ahooga 2017
7
•After reaching your destination,
switch off the electrical
assistance by pushing the red
button on the top of the water
bottle-shaped battery mounted on
the seat tube.
•The battery of your Ahooga eBike
applies to the EN 15194+A1
standard.
•This lithium battery is extremely
light and its autonomy depends
on several factors: the height
difference of the road, your
weight, and the wind. On a journey
with a combination of flat,
downhill and uphill roads, the
autonomy is 50+ km. On a
constantly steep uphill road, the
autonomy is limited to 20-25 km,
enough for climbing the legendary
Mont Ventoux in the Tour de
France!
Charging The Battery •For charging the battery, plug the
adapter plug of the power cable
into the outlet on top of the
battery, then plug the connector
plug of the charger to a wall
outlet.
•The LED on the charger should
turn red.
•The battery can be fully charged
in 2-3 hours.
•The LED of the charger will turn
green when the battery is fully
charged.
•When the battery is fully charged,
unplug the charger from the
power outlet and then from the
battery.
•The battery charge status can be
checked at any time by pressing
the small button on the battery
near the 4 small LED. These 4 LED
indicate in percent the battery
charge status.
•It is advised to apply charge
recommandations for Li-Ion
batteries as it will preserve your
battery longer (recharge only
when the battery has reached the
25% LED charge status, avoid
charging overnight, avoid fully
emptying the battery…)
Quick Start Guide

© Copyright Ahooga 2017
8
Quick Start Guide
1. Weekly: clean your bike with a
soft towel.
2. Monthly: fully charge the battery,
inflate the tires, brush and
lubricate the chain.
3. Semi-yearly: bring your bike to a
well famed workshop for a full
maintenance session.
4. Yearly: if needed replace the tires,
the brake pads, the chain, and the
cables.
Basic Maintenance Tips: After 150 km or 3 Months
Of Use, Have Your Bike
Maintained:
•Your bike « lives » as you ride it
and some components
sometimes need to be adjusted
again (screws, speeds, brakes,
stem…). This is perfectly normal.
•After 150 km or 3 months of use,
bring your bike to a well famed
workshop, Ahooga Store or
Ahooga Service Center for a
routine maintenance session.
•Visit www.ahooga.bike to find
recommended workshops, stores
or service centers.
Things You Should Know:
1. Before folding your bike
a) set it on the appropriate
mechanical speed, that is 4.
b) Make sure your mudguards
are rolled in.
2. Preserve the stem spring by only
using the stem lever when it is
disconnected from the stem hook
3. Check the pressure of your tires
1x per month (4.5 bar for the front
wheel, 5.5 bar for the rear wheel).
4. Before each use, check your
brakes and make sure your front
wheel is secured.
5. Since the Ahooga eBike is made
of electric components, and
however you can ride through
rain, please avoid as much as
possible tropical rains. It is not
recommended to clean your bike
with a water or high pressure
hose.

© Copyright Ahooga 2017
9
Parts Description
Parts Description (1)
1. Frame
2. Top tube
3. Head tube
4. Twin down tubes
5. Seat tube
6. Bottom bracket
7. Seat stays
8. Chain stays
9. Vertical stays
10.Handlebar
11.Right grip
12.Rear brake lever
13.Speed shifter
14.Bell
15.Electrical assistance thumb
controller
16.Front brake lever
17.Left grip
18.Speeds cable
19.Brakes cables
20.Electric assistance cable
21.Folding telescopic stem
22.Folding telescopic stem security
release
23.Folding telescopic stem height
clamp
1
23
4
5
6
9
8
7
10
15
20
21
22
11 12
13
14
16
17
18
19
23

© Copyright Ahooga 2017
10
Parts Description
Parts Description (2)
24.Front caliper brake
25.Front mudguard
26.Front wheel
27.Tire
28.Rim
29.Valve
30.Spokes
31.Nipples
32.Hub
33.Super quick release system
34.Saddle
35.Seat post
36.Seat post clamp
37.Battery
38.Rear mudguard
39.Folding pedals
40.Cranks
41.Chain ring
42.Chain guard
43.Chain
44.Suspension block
45.Small rolling wheels
46.Rear caliper brake
47.7 speed cassette
48.Derailleur
49.Moto
50.Long coma open
51.Short coma open
52.Long coma closed
53.Short coma closed
24
25
26
27
28
29
30
31
32
33
34
35
36
37
38
39
40
41
42
43
44
45
46
47
48
49 50
51
53
52
33
Table of contents