manuals.online logo
Brands
  1. Home
  2. •
  3. Brands
  4. •
  5. AIC
  6. •
  7. Storage
  8. •
  9. AIC StudioRAID e Series User manual

AIC StudioRAID e Series User manual

StudioRAID e-Series
RBOD Subsystem
Quick Start Guide
Model
Description
StudioRAID 5Te
SAS/SATA 5-Bay Tower RBOD
StudioRAID 10Re
SAS/SATA 1U 10-Bay RBOD
StudioRAID 16Re
SAS/SATA 3U 16-Bay RBOD
Document
XT-MAN-QG-SRE-A2
Version
1.07
Date
11/22/10
Congratulations on your recent purchase of Xtore StudioRAID
subsystem product!
StudioRAID enclosures are pre-configured with RAID-5 for your convenience.
Please verify that no part is missing from the packaging.
Warning: Enclosure may emit loud noise from the fan module. Please do not
place the unit in a room with subdued environment.
This Quick Start Guide will show you how to setup Xtore StudioRAID enclosure
for the first time.
Please follow the instructions to ensure a correct setup.
P/N: H88TD55680-00002-0
Your new StudioRAID order includes:
Item
#
Description
Image
Qty
1
RBOD
Enclosure
Chassis
1
2
Drive trays
*Depends on
the model
5/10/
16*
3
Printed Quick
Start Guide
1
4
Manual and
Utility CD
1
5
Power Cable
(US or EU)
*for 16Re model
1/2*
6
Screw Set for
Mounting
Drives
1 set
7
Serial Cable
1
8
Slide Rail and
Bracket Set
*For
StudioRAID
16Re model only
1
set*
9
Bezel
*For
StudioRAID
16Re model only
1*
10
RAID5
preconfigured
hard drives
Drives capacity
depends on the
SKU
configuration
*Depends on the
model
5/10/
16*
11
Host Bus
Adapter
LSI9200-8e
(Sold in separate
packaging)
1
If any items are missing,
please contact your authorized reseller or sales representative.
Install HBA to the Host. For workstation that requires
Host Adapter, make sure to have an HBA installed inside the host. For Mac
Workstation, install to PCI-e port-3; for Windows workstation, install to PCI-e
port-4. Refer to User’s Manual for detail.
Connect Enclosure to the Host by connecting
a SAS cable from the UP port of the enclosure to the port of HBA in the
host. Make sure that the host is not powered on during this step.
Xtore StudioRAID 5Te
Xtore StudioRAID 16Re
OR
Install SATA Hard Drivesinto the enclosure
with the drives properly secured to the hard drive trays. Insert the HDD
trays into the enclosure and snap the lock mechanism securely.
Plug in the Power Cord(s)to the AC receptacle
on the back of the unit.
Press the Power Buttonon the front of the unit
(for 5Te) or on the back of the unit (for 10Re and 16Re), hold the power
button for 2-3 seconds and wait a couple of minutes until the unit is ready
to use.
Marketing
Leslie Tran
2011.01.19
2011.01.19
產品企劃三部
EricChen
2011.01.19
產品企劃三部
HelenYang
PM
Erico Sie
2011.01.19
2011.01.20
Marketing
Suya Yu
2011.01.24
文管中心
發行
Power up the Host.Please follow Option A for Mac
Workstation, and Option B for Windows Workstation.
===== Option A: Mac Workstation =====
Install the HBA Driverby inserting the StudioRAID CD
and navigate to Drivers & Utilities > LSI 9200-8e Drivers > Mac. Double-click
the pkg. and follow the onscreen instructions to install the driver.
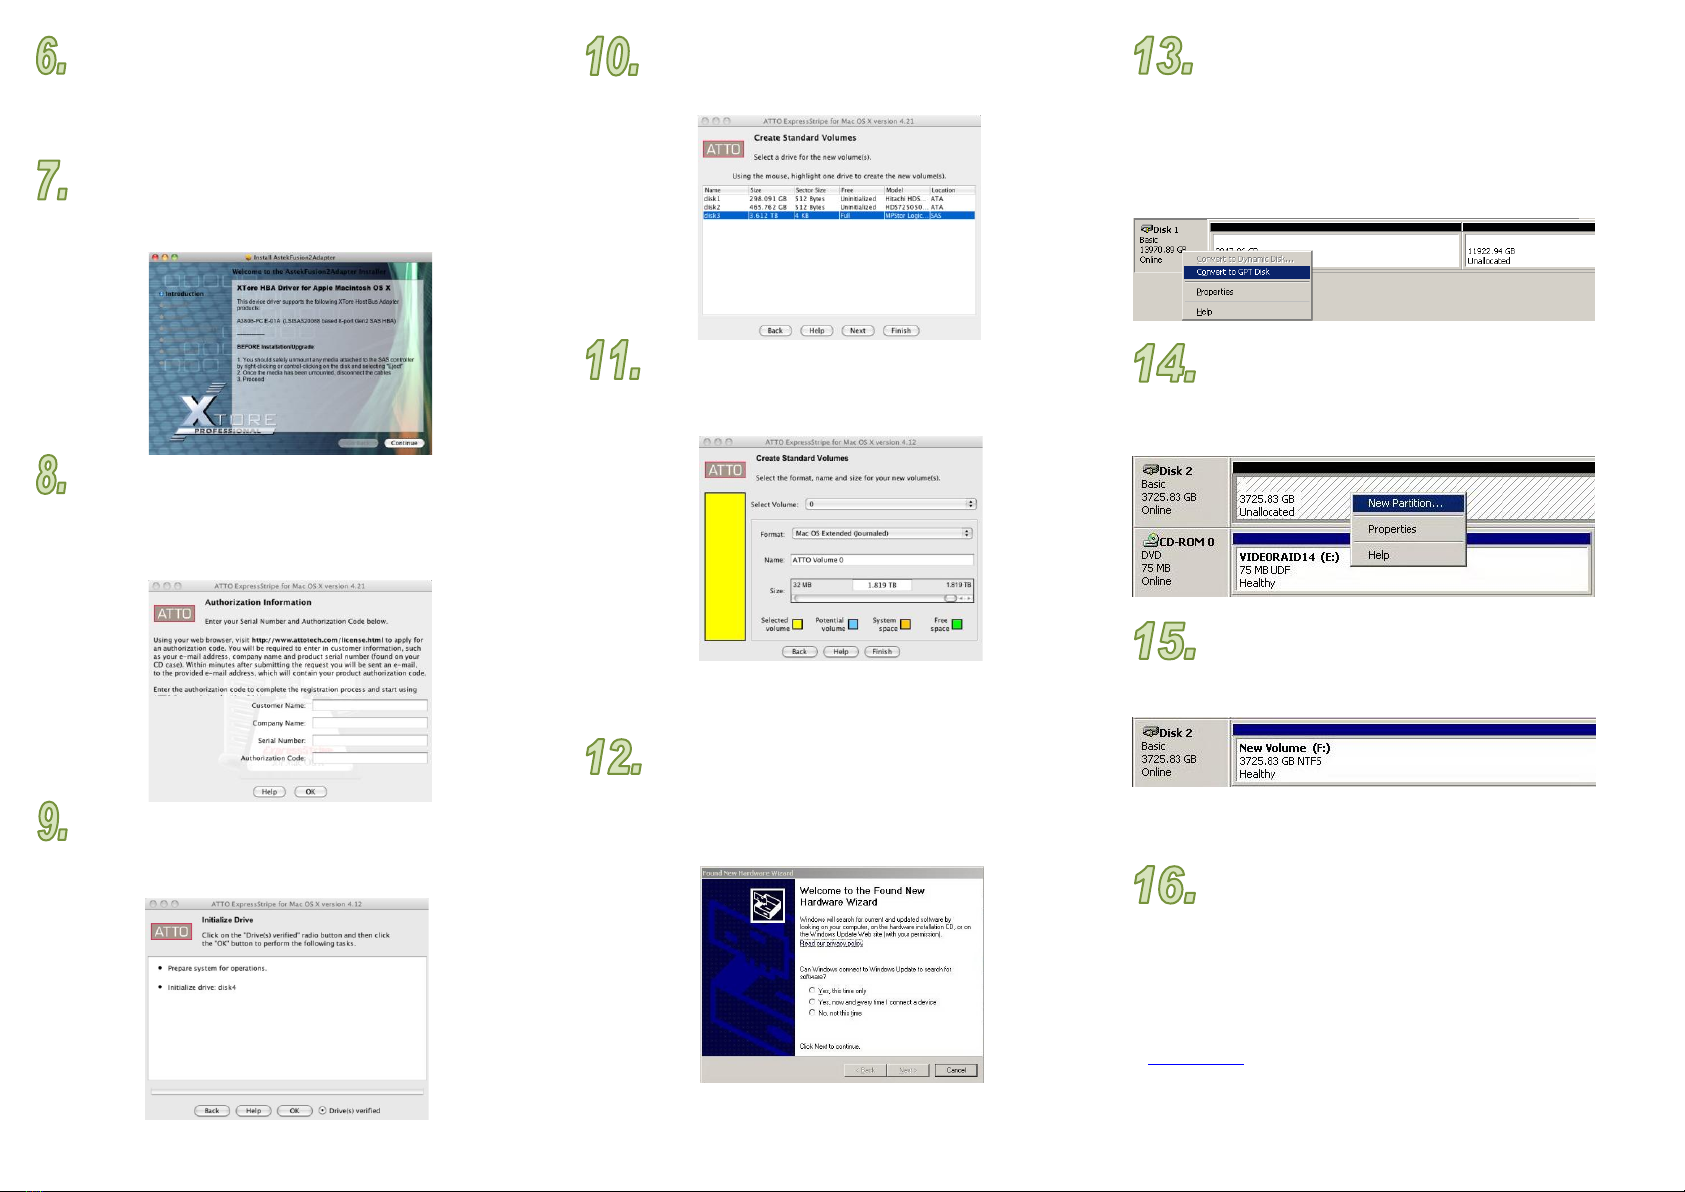
ExpressStripeutility is used to format, partition,
and stripe your drives on a Macintosh operating system. On the StudioRAID CD,
navigate to Drivers & Utilities > Utilities > Express stripe and double-click the
Express Stripe installer. Follow the on screen instructions to install and launch the
application. Use the Authentication Document to login and Authorize the software.
Initialize the Logical Volume. In Express Stripe, select
Delete > Initialize, and then select the MPStor drive. Click Next, then select the
Driver Verified radio button and click OK. Select Continue when the initialization
is complete.
Create Disk. In Express Stripe select Create > Standard > Select
the MPStor drive and hit Next; click Next.
Create Standard Volume.Change the Format to “Mac
OS Extended (Journaled)” and name the volume; then click Finish and then OK.
Your StudioRAID enclosure is now ready to perform I/O operation.
=== Option B: Windows Workstation ===
Install the HBA Driver.A new device notification will
appear on your OS. To install the driver for the LSI Adapter, follow the on screen
instructions, and when prompted, select “Install from a list or specific location” 
“Search the best driver in these location” and browse to StudioRAID CD > Drivers &
Utilities > LSI 9200-8e > select the folder with your OS. Select the LSI driver to
finish installation.
Initialize the Logical Volume by right-
clicking on “My Computer” and select “Manage” to enter Computer
Management window.
Under Computer Management, go to Storage Disk Management. The new
RAID-5 logical volume will be present there.
Right click on it to initialize the logical volume (optional).
Right click and select “Convert to GPT Disk” to convert the volume into one
big volume.
Create New Partition to the initialized logical
volume. Right click on the Unallocated Volume and select New Partition or
simple volume. Follow the setup wizard and create drive letter if desired. OS
will then format the volume as the last step.
Your RAID-5 Volume is Readyto use. After
formatting is complete, your StudioRAID enclosure is now ready to perform I/O
operation.
========== End of Options =========
What’s Next?
This concludes the basic hardware setup of Xtore StudioRAID product.
To utilize our product further (i.e. accessing the GUI, using Avid Media
Composer) please refer to respective user’s manual.
If you have any technical questions, please contact your authorized dealer
before contacting us.
For more information (i.e. product registration, warranty) please visit our website
at www.xtore.com

This manual suits for next models

3

Other AIC Storage manuals

AIC J2012-01 User manual

AIC

AIC J2012-01 User manual

AIC 12Gb/s SAS JBOD Series User manual

AIC

AIC 12Gb/s SAS JBOD Series User manual

AIC J2024-01 User manual

AIC

AIC J2024-01 User manual

AIC RSC-15 User manual

AIC

AIC RSC-15 User manual

AIC SB405-PV User manual

AIC

AIC SB405-PV User manual

AIC Buffex D 300 Manual

AIC

AIC Buffex D 300 Manual

AIC J4024-02 User manual

AIC

AIC J4024-02 User manual

AIC J4060-01 User manual

AIC

AIC J4060-01 User manual

Popular Storage manuals by other brands

SIGURO SGR-WB-K450SU Translation of the operating instructions

SIGURO

SIGURO SGR-WB-K450SU Translation of the operating instructions

National Semiconductor LSE039R2 user manual

National Semiconductor

National Semiconductor LSE039R2 user manual

Western Digital My Book Pro Technical support

Western Digital

Western Digital My Book Pro Technical support

Western Digital WD1002FBYS Technical reference manual

Western Digital

Western Digital WD1002FBYS Technical reference manual

Dolphin STOREXPRESS DSE4XM1 user guide

Dolphin

Dolphin STOREXPRESS DSE4XM1 user guide

Sony DDS-4 Product description manual

Sony

Sony DDS-4 Product description manual

Thecus N4100+ manual

Thecus

Thecus N4100+ manual

Kingston Technology DataTraveler DT400 quick start guide

Kingston Technology

Kingston Technology DataTraveler DT400 quick start guide

Fujitsu MAA3182SC Oem manual

Fujitsu

Fujitsu MAA3182SC Oem manual

INTILION scalestac power Assembly manual

INTILION

INTILION scalestac power Assembly manual

Adtron 610200094 Operation manual

Adtron

Adtron 610200094 Operation manual

Seagate Medalist 630xe installation guide

Seagate

Seagate Medalist 630xe installation guide

Hitachi DK32DJ-MC Quick installation guide

Hitachi

Hitachi DK32DJ-MC Quick installation guide

ADIC SNC 6101 release note

ADIC

ADIC SNC 6101 release note

Buffalo TeraStation 3010 user manual

Buffalo

Buffalo TeraStation 3010 user manual

HP XP7 Configuration guide

HP

HP XP7 Configuration guide

Newer Technology Guardian Maximus Assembly manual & user guide

Newer Technology

Newer Technology Guardian Maximus Assembly manual & user guide

Hitachi 3.5-INCH HDS725050KLA360 Specifications

Hitachi

Hitachi 3.5-INCH HDS725050KLA360 Specifications

manuals.online logo
manuals.online logoBrands
  • About & Mission
  • Contact us
  • Privacy Policy
  • Terms and Conditions

Copyright 2025 Manuals.Online. All Rights Reserved.