manuals.online logo
Brands
  1. Home
  2. •
  3. Brands
  4. •
  5. Air-Met
  6. •
  7. Laboratory Equipment
  8. •
  9. Air-Met AirMetER-AX User manual

Air-Met AirMetER-AX User manual

airmet.com.auairmet.com.au
NEED HELP? CONTACT US!
If you have any problems with your product or questions during the assembly, please contact 1800 000 744 or
contact our team via email at [email protected].
Alternatively, scan the QR code to nd your nearest Air-Met Scientic o󰀩ce.
HEATED INLET INSTALLATION GUIDE
AirMetER-AX & AirMetER-DX
1
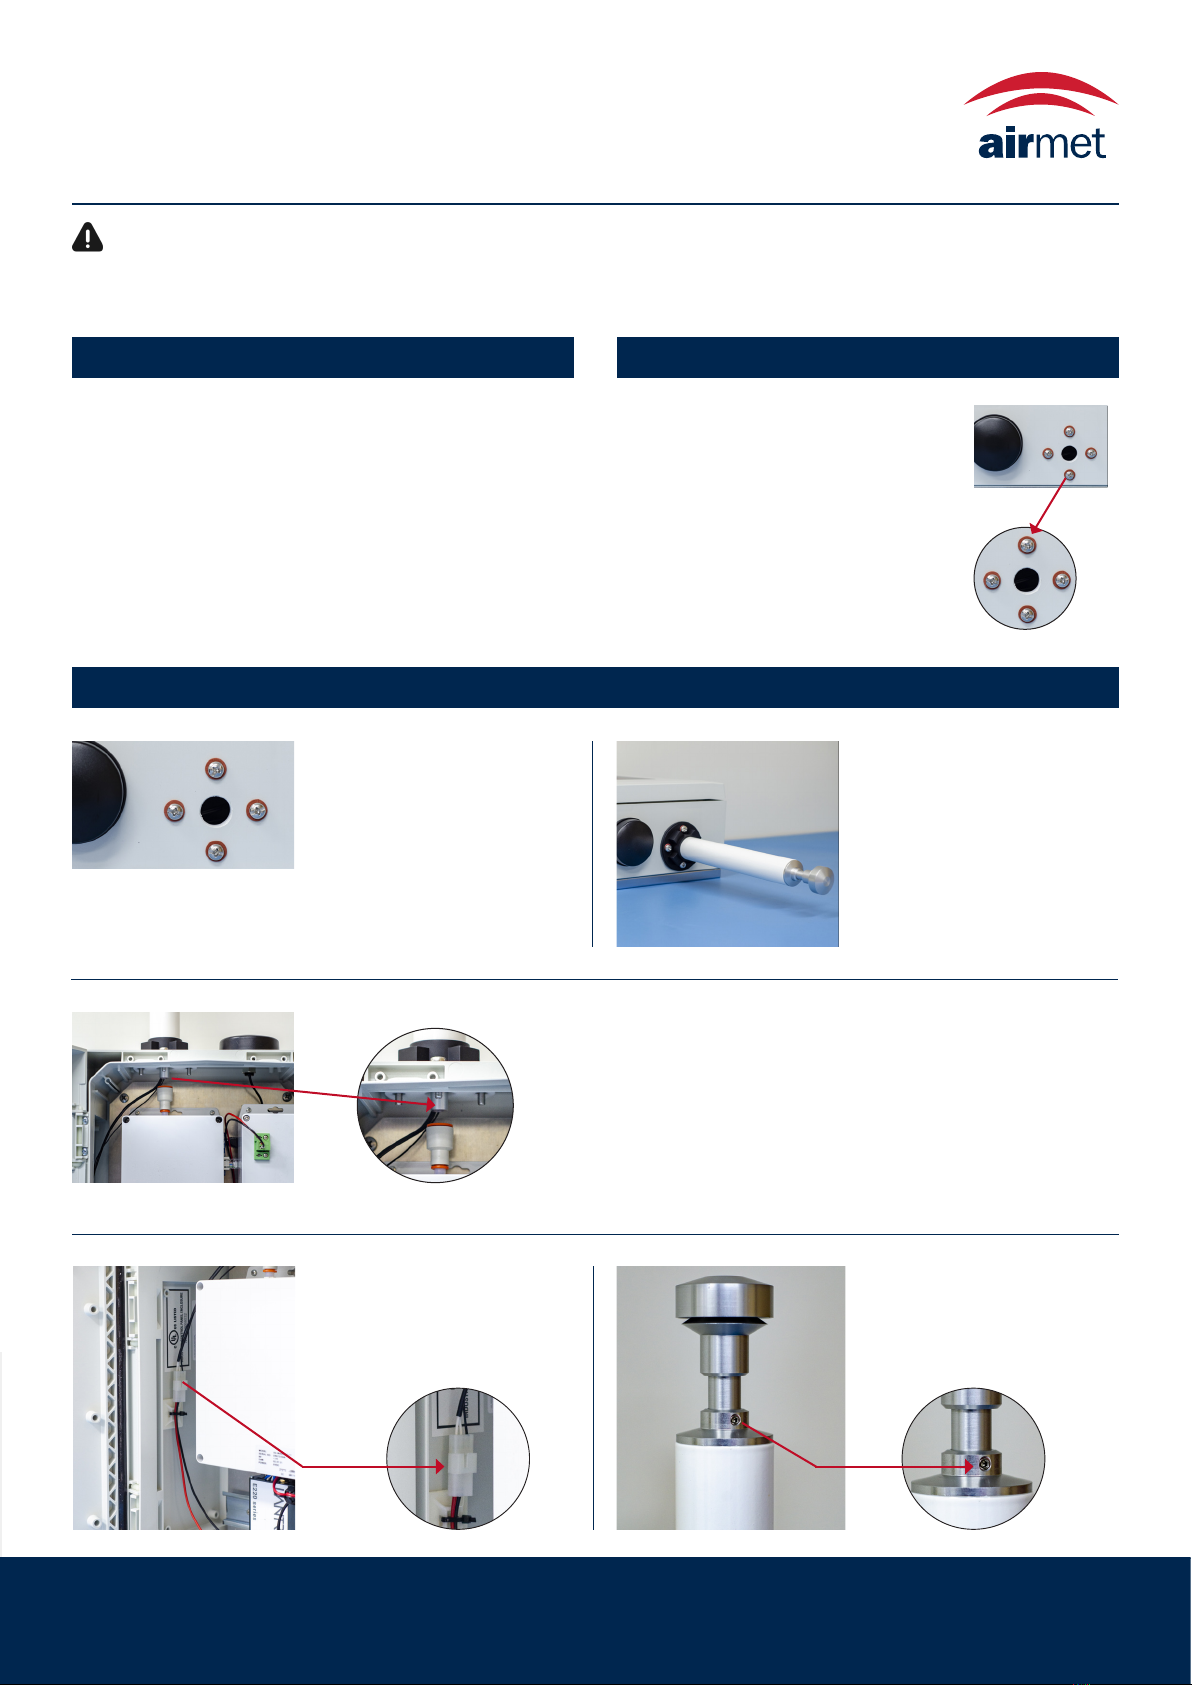
EQUIPMENT REQUIRED PARTS SUPPLIED
To prevent damage to the instrument, do not use a power drill to attach the heated inlet screws.
WARNING
> Veried Rotameter capable of displaying 2Lpm
> 3⁄8” exible tubing capable of connecting the heated inlet to
the rotameter (shown in step 6)
N.B. We recommend purchasing the DX-SERVKIT / AX-
SERVKIT which contains everything you’ll need for the annual
eld servicing of your instrument , including the rotameter and
tubing described above
> Heated inlet assembly with TSP head
> AirMetER-DX / AirMetER-AX
> PH screwdriver
> 2mm allen key
> 4 x M6 PH screws
> 4 x M6 washers
N.B. The M6 PH screws and M6 washers can
be found installed on the top of the enclosure
to prevent them from being misplaced.
ASSEMBLY INSTRUCTIONS
1. Remove the four M6 PH
screws and M6 washers
from the enclosure
2. Install the heated inlet onto
the top of the enclosure
with the four screws and
washers removed in the last
step. These should screw
into the retaining nuts on
the internal inlet adapter
pre-installed on the inside of
the enclosure.
3. Push the TSP head down to slide the heated inlet into the
tube adapter ensuring it clicks and properly seals.
Try and remove the heated inlet from the tube adapter by
pulling the indicated part upwards. If the tube on the bottom
of the tube adapter starts to slide away from the AirMetER
AX-11 module then the adapter is properly sealed with the
tube adapter. Push the top of the TSP head back down to
slide the tube back towards the AirMetER AX-11 module.
4. Plug the heated inlet cable
into the connector that is
cable tied to the left side of
enclosure.
5. Using a 2mm allen key,
tighten the grub screw to
ensure the heated inlet
does not slide out of place
and create a leak.
airmet.com.auairmet.com.au
NEED HELP? CONTACT US!
If you have any problems with your product or questions during the assembly, please contact 1800 000 744 or
contact our team via email at [email protected].
Alternatively, scan the QR code to nd your nearest Air-Met Scientic o󰀩ce.
HEATED INLET INSTALLATION GUIDE
AirMetER-AX & AirMetER-DX
V0721
2
When preparing the instrument for transporting, follow
these steps in reverse to ensure the heated inlet does
not get damaged in transit.
TRANSPORTING/FREIGHT TIP:
6. Connect the instrument to a
veried rotameter as shown
and turn the instrument on.
The rotameter should display
2Lpm ±0.5.
If the rotameter does not
display the required ow rate,
check the internals of the
instrument and the heated
inlet for any obvious leaks and
correct any if found. If there
are no leaks present and the
ow rate is still not within the
specied range, go to the ow
rate calibration section of the
user manual to learn how to
adjust the pump’s ow rate.
The heated inlet is now installed,
and the unit is ready to be turned on
and begin sampling.
When the instrument is in operation,
make sure that at all times, the
TSP head is installed to prevent
any moisture entering the heated
inlet and potentially damaging the
internals of the instrument.
For more information about the AirMetER-AX and AirMetER-DX Monitor, please refer to the User Manual

Other manuals for AirMetER-AX

1

This manual suits for next models

1

Other Air-Met Laboratory Equipment manuals

Air-Met AirMetER-DX User manual

Air-Met

Air-Met AirMetER-DX User manual

Air-Met AirMetER-AX User manual

Air-Met

Air-Met AirMetER-AX User manual

Popular Laboratory Equipment manuals by other brands

ASP sterrad NX Service & troubleshooting guide

ASP

ASP sterrad NX Service & troubleshooting guide

Diesse cube 30 touch user manual

Diesse

Diesse cube 30 touch user manual

Heidolph EKT Hei-Con operating instructions

Heidolph

Heidolph EKT Hei-Con operating instructions

Safelab AIRONE DS instruction manual

Safelab

Safelab AIRONE DS instruction manual

Metrohm 726 manual

Metrohm

Metrohm 726 manual

Metrohm Professional IC Vario 940 manual

Metrohm

Metrohm Professional IC Vario 940 manual

BURREL 077-870-0300 operating manual

BURREL

BURREL 077-870-0300 operating manual

Labnet VorTemp 1550 instruction manual

Labnet

Labnet VorTemp 1550 instruction manual

Thermo Scientific OWL HEP-1 Operating and maintenance manual

Thermo Scientific

Thermo Scientific OWL HEP-1 Operating and maintenance manual

Grace Medical 990-001 quick start guide

Grace Medical

Grace Medical 990-001 quick start guide

IKA RC 5 basic operating instructions

IKA

IKA RC 5 basic operating instructions

Microsemi PWR-INJ60GO/AC-NA installation instructions

Microsemi

Microsemi PWR-INJ60GO/AC-NA installation instructions

CAB A1000 Operator's manual

CAB

CAB A1000 Operator's manual

JPE CRYO STAGE 02 user manual

JPE

JPE CRYO STAGE 02 user manual

Labconco Protector Premier 10040 Series user manual

Labconco

Labconco Protector Premier 10040 Series user manual

Centurion Scientific Pro-Research instruction manual

Centurion Scientific

Centurion Scientific Pro-Research instruction manual

FA-TECH VEGA MB-97 Operator's manual

FA-TECH

FA-TECH VEGA MB-97 Operator's manual

Hettich EBA 21 Series operating instructions

Hettich

Hettich EBA 21 Series operating instructions

manuals.online logo
manuals.online logoBrands
  • About & Mission
  • Contact us
  • Privacy Policy
  • Terms and Conditions

Copyright 2025 Manuals.Online. All Rights Reserved.