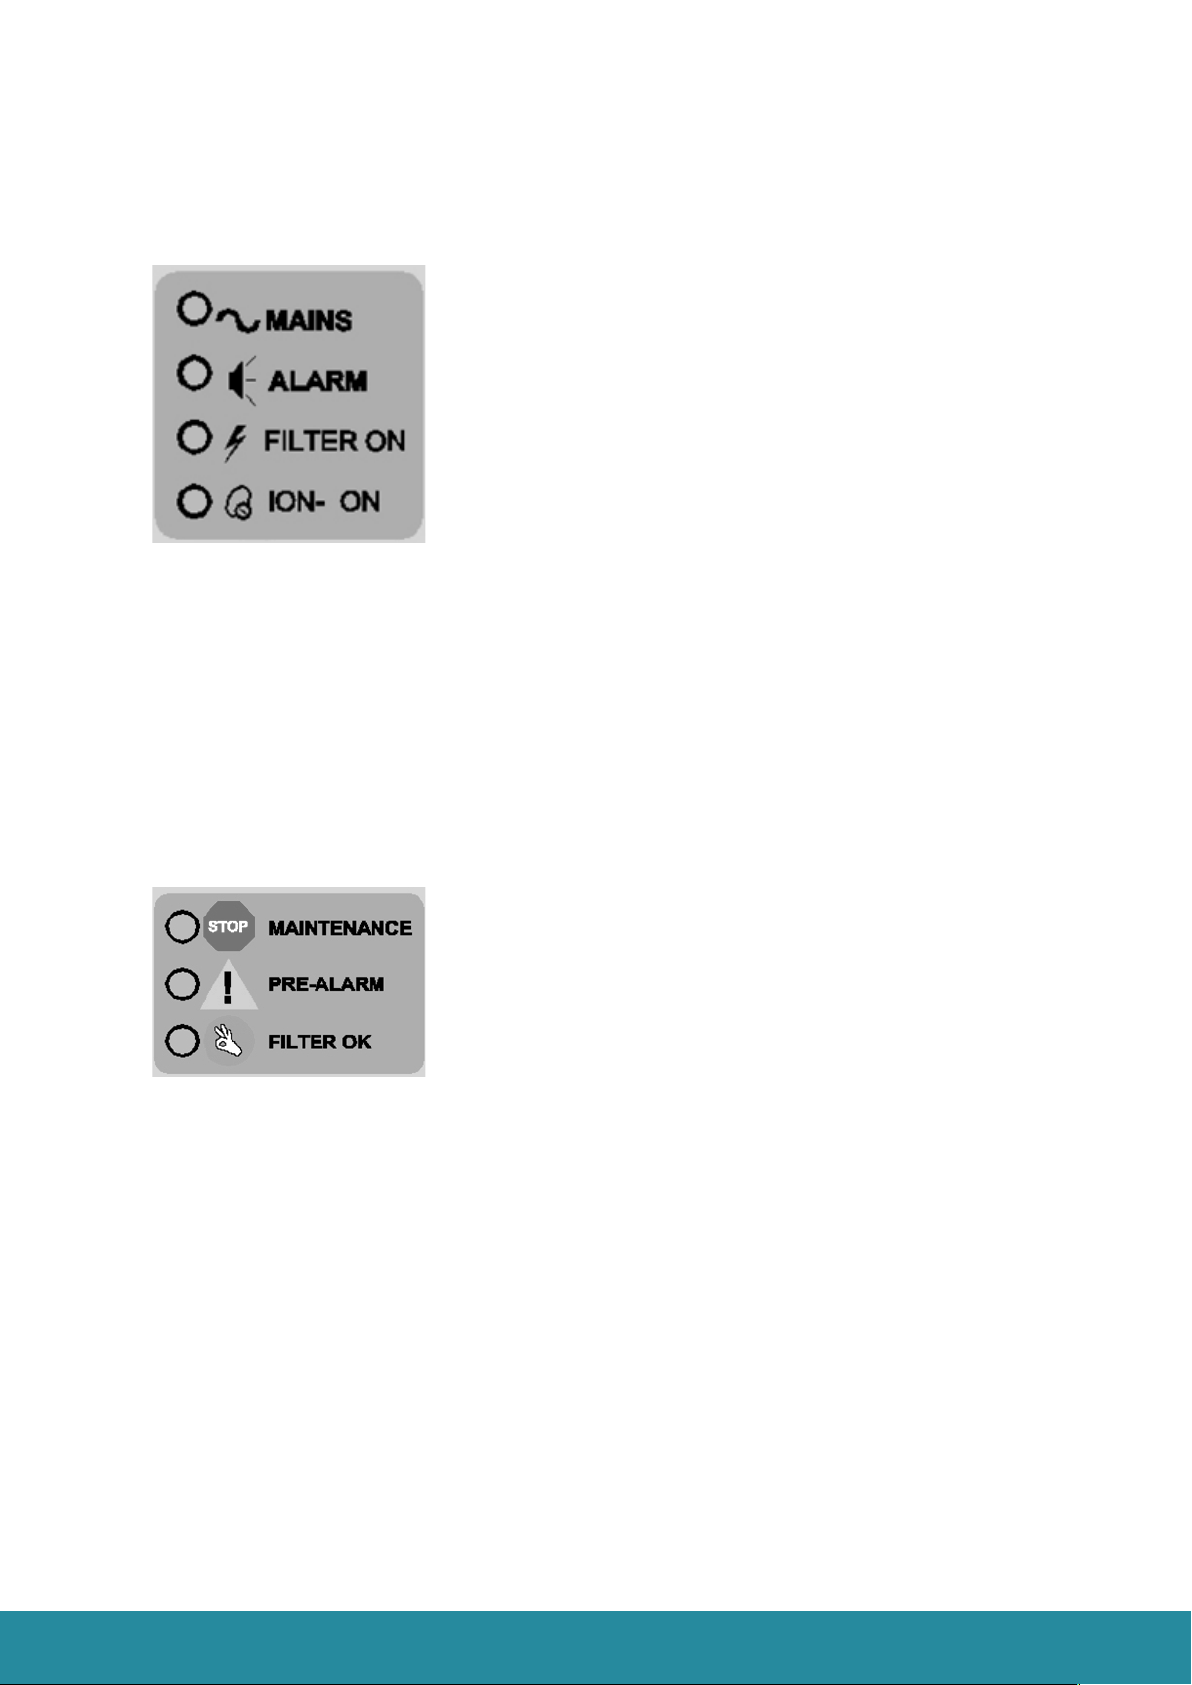
AirLabs AirHavn Pro User manual

1
www.airlabs.com
©2020 AirLabs
USER GUIDE
User guide 1
Before You Start 2
Introduction to the AirHAVN PRO 2
Important Safety Warnings 3
Environmental 4
Performance 4
Installation and operation 5
Components 5
Installation 6
Operation 7
Service and maintenance Information 10
Troubleshooting 19
Warranty Information 21
Return and Warranty Policy 21
Technical Specifications 23
Legal 23
Simplified EU Declaration of Conformity 23

2
www.airlabs.com
©2020 AirLabs
BEFORE YOU START
INTRODUCTION TO THE AIRHAVN PRO
Thank you very much for purchasing the AirHavn Pro. Nearly all of us are affected by poor air quality
caused by airborne pollution and contamination: in traffic, in cities, outdoors, indoors, and inside the
car. AirLabs’ mission is to minimise air pollution exposure for people around the world and to drive
down the number of air pollution related deaths. The AirHavn Pro in-building air cleaning unit floods
rooms with large amounts of clean air, reducing exposure to airborne pollutants, contamination and
viruses.
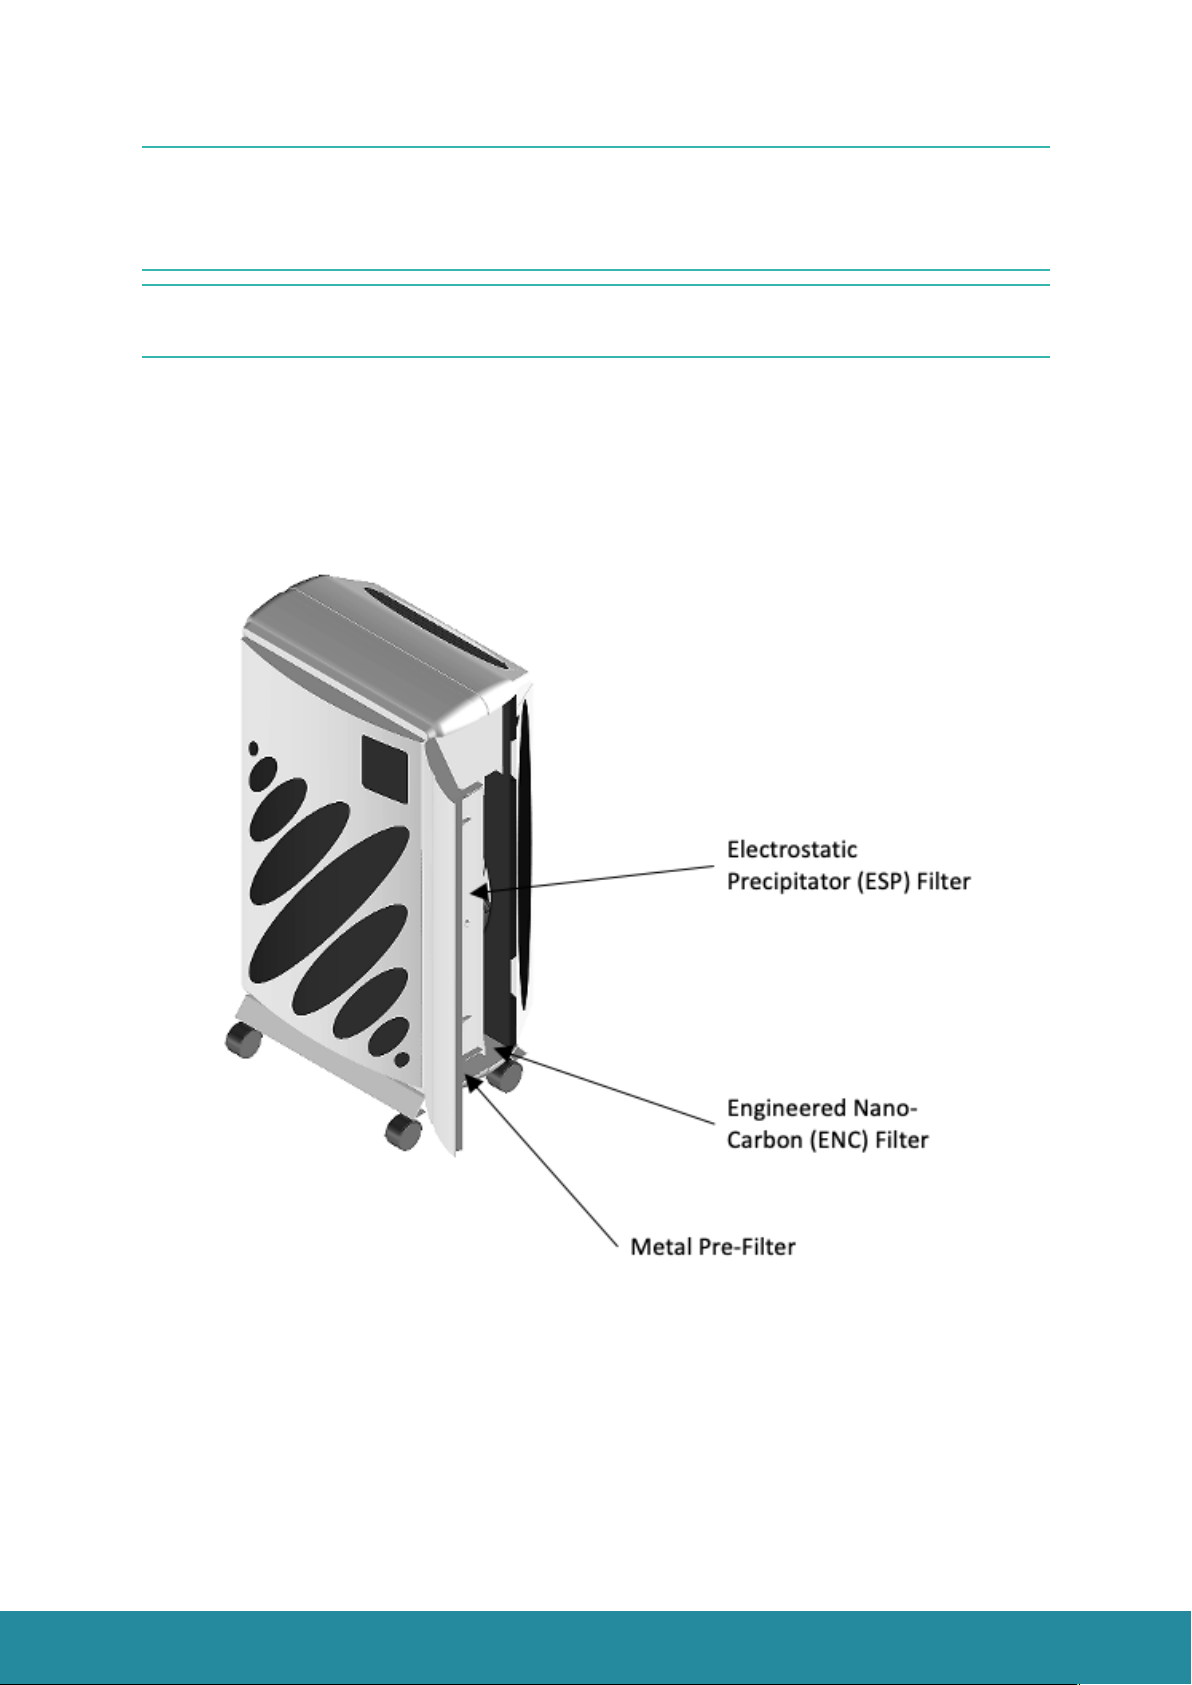
The three-stage layer filtration system uses a metal pre-filter, a high-grade electrostatic precipitator
filter, to remove fine airborne particles, and an engineered nano-carbon filter, developed by AirLabs
in partnership with the University of Copenhagen, to remove gas pollution.
AirHavn Pro creates a healthier indoor environment for all occupants by removing up to 99% of indoor
airborne particles and gases. Particulate matter can include pollen, mould spores, soot, dander and
can vary in size from PM10 (10μm) and PM2.5 (2.5μm) down to particles below 0.1μm in diameter. It
removes the smallest nanoparticles, thought to be the greatest risk to health, along with particles
which carry bacteria or viruses. In addition to these particulates, the patented nano-carbon filter
element will remove up to 95% of nitrogen dioxide, ozone and sulphur dioxide, along with many
volatile organic compounds.
The AirHavn Pro is a portable stand-alone unit that requires no changes to the room’s ventilation
system or interior configuration and is easily installed within minutes. The AirHavn Pro is powered by
mains electricity using the power lead provided.
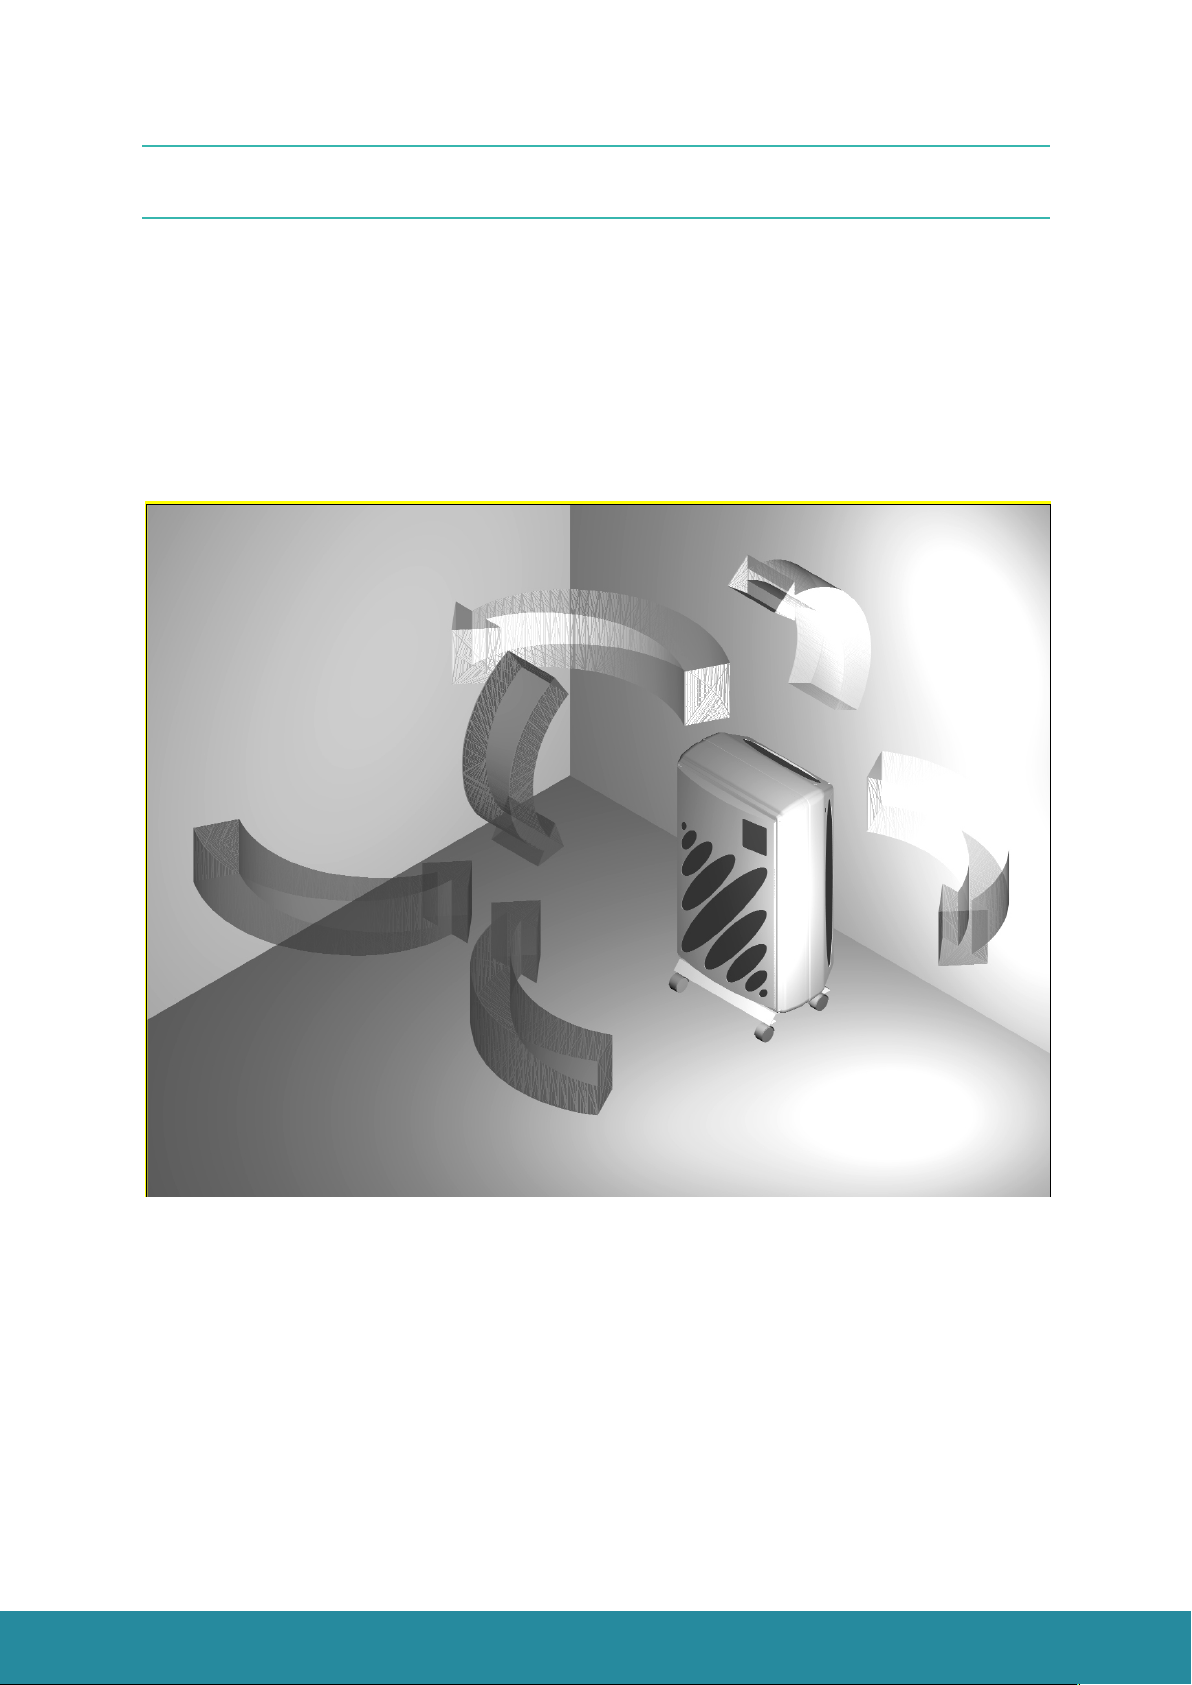
Air is drawn into the AirHavn Pro, cleaned, and then specifically directed around the room providing
clean air to anyone within the space. The design of the AirHavn Pro ensures that the clean air
efficiently reaches all areas of the room. It is equipped with a powerful fan that is capable of delivering
up to 705 cubic meters of clean air per hour.
Please read this user guide thoroughly before installation and operation and retain it for future
reference.
Register your AirHavn Pro at www.airlabs.com/register.

3
www.airlabs.com
©2020 AirLabs
IMPORTANT SAFETY WARNINGS
Your AirHavn Pro should only be installed and used as described in this User Guide. In addition to this,
the following safety directions must be followed.
• Position the AirHavn Pro on a stable, level floor, making sure all 4 wheels are supporting the
weight of the unit.
• Use only the power cable provided to power the unit in conjunction with a suitable mains
power connection.
• Switch off the main power when the unit is not in use. Disconnect the power plug from the
power outlet when you do not intend to use the unit for a longer period of time.
• Do not expose the unit to nearby objects that radiate heat to avoid damage to the unit.
• Do not place the unit in moist and humid environments, specifically do not place it in
condensing environments. Also, please ensure that the AirHavn Pro is not exposed to dripping
or splashing by liquids of any type. Do not touch the power plug with wet hands.
• Never submerge the AirHavn Pro, power supply or cable in water.
• Do not press foreign objects into the airflow outlets or inlets.
• Do not drop the AirHavn Pro or subject it to impacts.
• Please ensure the ventilation holes are not covered to avoid overheating and malfunction.
• Clean the AirHavn Pro according to the istructions. Ensure the AirHavn Pro is powered off
before cleaning.

4
www.airlabs.com
©2020 AirLabs
ENVIRONMENTAL
The AirHavn Pro and packaging consists of a cardboard outer box internally lined with polystyrene to
protect the unit from any damage in transit. Please observe the local regulations regarding the
disposal of packaging materials. You can dispose of your engineered nano-carbon filter in your regular
household or commercial waste.
The AirHavn Pro is designed and manufactured with high quality materials and components, which
can be recycled and reused. The crossed-out wheelie bin symbol on the product, literature, or
packaging reminds you that all electrical and electronic products must be taken to separate collection
at the end of their working life. Do not dispose of these products as unsorted municipal waste, check
with your local waste authority for information about your nearest recycling point.
PERFORMANCE
Performance
Clean Air
Delivery
Rate
Air
Exchanges
Removal Efficiency
Noise
m3/hr
#/hr*
PM2.5
NO2
Ozone
dB
Speed 1
305
4
96
95
95
39
Speed 2
425
6
96
80
89
41
Speed 3
705
10
99
65
81
51
* Based on a room size of 30m2 (with typical ceiling height of 2.4m)

5
www.airlabs.com
©2020 AirLabs
INSTALLATION AND OPERATION
COMPONENTS
The following contents are included in the box.
1. AirHavn Pro main unit and filters
2. Mains power cable and plug
3. User Guide

6
www.airlabs.com
©2020 AirLabs
INSTALLATION
The AirHavn Pro is designed for in-building use and can be situated anywhere within the internal space
where clean air is required. For best performance results the recommended location is against a flat
wall with the back of the unit facing the wall and the front of the unit facing out into the room.
During operation, air is drawn into the front of the AirHavn Pro and through the filter system. Clean
air is delivered into and around the room from the two outlet vents on the sides of the unit and from
the outlet vent on the top.
Do not obstruct the air flow of the unit by blocking any of the vents.
Commercial spaces are required to ensure a minimum standard of fresh air is introduced within
enclosed spaces in order to provide a safe and healthy working environment for people within the
room. These requirements must be adhered to regardless of using an AirHavn Pro to clean the air.

7
www.airlabs.com
©2020 AirLabs
OPERATION
The AirHavn Pro is operated using the control panel on the front of the unit which also provides
information on the status of the unit.
On/Off
To switch on the AirHavn Pro, just plug it in and the unit will power on in Standby mode with the speed
setting showing 0.
To switch the AirHavn Pro off, just unplug it. The AirHavn Pro uses very little power while in Standby
mode, but we still recommend unplugging it when not in use to save energy.
Note: When the AirHavn Pro is first switched on from new, or occasionally during operation, a sparking
noise can be heard within the unit. This is the normal operation of the filter created by particle
contamination on the electrostatic plates of the filter and is completely safe.

8
www.airlabs.com
©2020 AirLabs
Operation Cycles and Modes
The MANUAL button allows the air flow to be modified manually (0-1-2-3)
with setting 3 being the highest air flow speed. The setting is memorised and
maintained even if there is a power failure.
The machine can be turned off by turning the speed control to 0 (fan off).
The TEST button will test the operation of the electrical system of the unit.
The correct operation of the unit is indicated by the illumination of all the
indicator lights on the control panel. If any lights do not illuminate, please
review the troubleshooting section.
The ON-OFF FILTER button is for activating/deactivating the Electrostatic
Precipitator Filter that performs the particle filtration function. It can be
turned off in order to completely dry the ESP filtering unit after washing, or
when only the fan and the gas filtration is required.
The RESET button is used to turn off the ALARM signal if the circuit protection
device has tripped within the electrostatic cells. If the alarm persists after
resetting, contact the service centre. For further details on the ALARM
function – see Operation and Filter Status.

9
www.airlabs.com
©2020 AirLabs
Operation Status
These four LED lights indicate the operating status of the unit:
- MAINS (green):
Indicates that the unit is powered and
switched on
- ALARM (red):
- FILTER ON (yellow):
- ION- ON (yellow):
Indicates a problem with the ESP
filtration unit. The particle filtration
function is not operating and the service
centre should be contacted.
Indicates that filtering is on.
Not used on this model.
Filter Status
The filtering status for the electrostatic precipitator filter is indicated by the three LED lights within
the panel. If the filter is switched off using the ON-OFF FILTER button on the control panel then no LED
lights will be displayed on the filter status panel. The pre-filter and engineered nano-carbon filter do
not show a status indication.
- MAINTENANCE (red):
- PRE-ALARM (yellow):
- FILTER OK (green):
The ESP filter must be cleaned and
has been switched off. The ENC filter
should be replaced at the same time.
The ESP filter is in need of cleaning
but is still operating correctly.
The ESP filter is operating correctly.

10
www.airlabs.com
©2020 AirLabs
SERVICE AND MAINTENANCE INFORMATION
THE AIRHAVN PRO MUST ALWAYS BE DISCONNECTED FROM THE POWER SUPPLY BEFORE ANY
SERVICE OR MAINTENANCE IS CARRIED OUT.
Access to the service elements of the unit is via the access door on the right hand side of the unit. The
door opening includes a finger pull mechanism and also incorporates a safety microswitch which cuts
the power supply to the unit if the door is opened before the power is disconnected at the mains plug.
The microswitch must not be modified for any reason, and must not be used in the closed position in
any way so as to compromise safety. If the microswitch is broken the unit will stop functioning. Contact
AirLabs support for the replacement of this component.
The AirHavn Pro uses 3 stages of filter systems to provide clean air within an indoor space. The 3
filters used in these stages are defined below and require periodic cleaning and replacement. The
control panel of the unit will indicate when the filter system needs servicing – see Filter Status
section for more information:

11
www.airlabs.com
©2020 AirLabs
Metal Pre-Filter
The metal pre-filter is designed to trap larger particles present in the air and for creating a uniform
airflow into the next stage of filtering.
During operation, the metal pre-filter must always be inserted correctly into the location slot.
During maintenance, the filter must be handled with care to prevent damage.
Electrostatic Precipitator (ESP) Filter
The filter works by using a high voltage power source to apply an electrical charge to any particles
within the airflow and then trap those charged particles on collection plates within the unit. Particles
can include pollen, mould spores, soot, dander and can vary in size from PM10 and PM2.5 down to
particles below 0.1μm in diameter.
The ESP filter is fully insulated from the rest of the unit by high-quality ceramic insulators and connects
to the power supply with a contact terminal strip when the unit is inserted correctly into the seating
location.

12
www.airlabs.com
©2020 AirLabs
Engineered Nano-Carbon (ENC) Filter
The ENC filter is designed to remove harmful gases from the air including Ozone, Nitrogen Dioxide
(NO2), Sulphur Dioxide (SO2) and Volatile Organic Compounds (VOCs). The filter material is held in
place within a metal frame
Filter Maintenance
To carry out maintenance of the filter systems it is necessary to remove all the filter units from the
main body of the AirHavn Pro.
When removing the filter systems from the unit the user should wear proper personal protective
equipment (PPE) including grade N95 dust mask, goggles over the eyes, and gloves. At the end of
the cleaning procedure, remove and dispose of PPE and wash hands.
The filter units are removed individually by sliding out through the access door opening.

13
www.airlabs.com
©2020 AirLabs
The ESP filter and metal pre-filter can be maintained through regular cleaning.
Cleaning Process: ESP & Metal Pre-Filter
Equipment required:
1) Two plastic or stainless steel trays with minimum dimensions L-600mm x W-500mm x D-300mm.
a) Stage 1 tray used for washing with the base raised 2-3 cm to separate the filter from the
removed contaminant.
b) Stage 2 tray used for neutralising any residual washing detergent
2) Non-corrosive detergent for washing the ESP filter. See www.airlabs.com for a list of suitable
cleaning detergents.
3) A hose pipe for rinsing the filters.
4) Acetic acid such as household vinegar.
Prepare the stage 1 tray with warm water (max 45°C). Dilute the detergent in the proportions
indicated on the label of the detergent itself.
Prepare the stage 2 tray with water and vinegar diluted at a ratio of 1 litre of acetic acid for every 20
litres of water.

14
www.airlabs.com
©2020 AirLabs
ESP Filter Cleaning
Slide the ESP filter from the unit and proceed to clean the filter as follows:
1. Immerse the filter cell in the stage 1 tray with the detergent and soak until the dirt is dissolved.
2. Remove the electrostatic cell and rinse thoroughly with running water, taking care not to
break the ionisation wires.

15
www.airlabs.com
©2020 AirLabs
3. Immerse the cell in the stage 2 tray containing the water and vinegar and leave to soak for 5-
10 minutes.
4. Remove the cell and leave it to dry in a warm place, keeping it raised from the ground by
wooden blocks (unit can be dried in an oven with a maximum temperature of 60°C).
5. Examine the state of the ionisation wires, stretching them slightly to check their mechanical
strength. Use a cotton flock and methylated spirits to remove any residual traces of dirt.
6. Ensure that the cell is thoroughly clean and dry before reinstalling it.
Metal Pre-Filter Cleaning
Remove the metal pre-filter from the unit and use a vacuum cleaner to remove any dust deposited on
the surface. Then proceed with washing as follows:
1. Immerse the pre-filter in the stage 1 tray containing the detergent diluted in warm water and
leave to soak for about half an hour.
2. Remove the pre-filter from the tray and rinse thoroughly with water.
3. Leave to dry in a warm ventilated environment.

16
www.airlabs.com
©2020 AirLabs
ENC Filter
The ENC filter cannot be cleaned and must be replaced with a new filter at the same time as the ESP
filter is cleaned.
The ENC filter is located behind the ESP filter and is removed from the unit by sliding out the metal
holding frame.
The filter retaining bars can be removed to provide access to the filter material for replacement. The
new filter material should be placed in the frame and the retainng bars reassembled.

17
www.airlabs.com
©2020 AirLabs
Filter Inspection
The condition of the filters must be inspected every time they are washed so as to ensure correct
operation and performance of the AirHavn Pro.
Filter
Inspection
Fault
Operation
Metal Pre-Filter
Metal frame and filter
mesh
Damage to the frame or
mesh. Filter wires
protruding from the
filtration mesh
Replace the filter. Please
contact support via the
www.airlabs.com website.
ESP Filter
Ionisation wires
Broken wire
Ionisation wire must be
replaced. Please contact
support via the
www.airlabs.com website.
Surface roughness with
material deposits
Clean the wire with cloth
soaked in alcohol cleaning
solution or replace the wire.
Please contact support via
the www.airlabs.com
website.
Ceramic insulators
Material deposits and dirt
Repeat the washing process
until clean
Broken insulator or sign of
crack
Insulators must be replaced.
Please contact support via
the www.airlabs.com
website.
High voltage contact
terminal strip
High voltage spark erosion
or burning
High voltage contact terminal
must be replaced. Please
contact support via the
www.airlabs.com website.
ENC Filter
Metal frame
Damage to the frame
Replace the filter frame.
Please contact support via
the www.airlabs.com
website.
Filter material and
containment bag
Damage to the
containment bag
Replace the filter. Please
contact support via the
www.airlabs.com website.
Cleaning The Unit Housing
Disconnect the unit from the power supply.
To clean the outside, use a cloth and neutral detergent.
Use a brush with soft bristles to clean the air outlet fins.
To clean the inlet grill, use a vacuum cleaner with a brush attachment.

18
www.airlabs.com
©2020 AirLabs
Electronic Circuit Protection Devices
The electronic circuit is provided with a series of protection devices that automatically disconnects
the high voltage power supply if a malfunction is detected. There is a thermal fuse inside the unit that
will cut the power supply if a short circuit occurs within the power system.
Blown fuses must be replaced with the correct rated fuse and must be carried out by the AirLabs
authorised service team.

19
www.airlabs.com
©2020 AirLabs
TROUBLESHOOTING
The AirHavn Pro does
not turn on
Check that there is power from the outlet you are using and the wall switch is
on.
Make sure the power cable is connected to the unit.
Make sure the fuse in the plug has not blown.
If the AirHavn Pro still does not turn on, please contact support via the
www.airlabs.com website.
A sparking sound can be
heard while the unit is
running
Occasionally, or when the unit is new, particle contamination in the ESP filter can
cause a short circuit between the wires and plates within the ESP. This is normal
and completely safe. If the sparking continues, turn off the AirHavn Pro at the
wall socket and inspect the ESP filter for obvious signs of contamination. If
necessary, undertake the ESP cleaning process.
The AirHavn Pro turns
off momentarily
The AirHavn Pro incorporates circuit protection should high levels of particle
contamination cause a short circuit within the ESP filter. The unit will restart
automatically.
The Alarm is activated
Power off the unit at the wall and power on again. If the problem persists, please
contact support via the www.airlabs.com website.
The AirHavn Pro fan
stops running
Power off the unit at the wall and power on again. If the problem persists, please
contact support via the www.airlabs.com website.
The fan runs without
any speed indication on
the display
Please contact support via the www.airlabs.com website.
Unable to change the
fan speed
Power off the unit at the wall and power on again. If the problem persists,
please contact support via the www.airlabs.com website.
The fan is making a
louder noise than usual
Remove the filters and check for anything impacting the fan. If the noise persists,
please contact support via the www.airlabs.com website.
One or more LED llights
do not illuminate when
the TEST button is
pressed.
Please contact support via the www.airlabs.com website.
More than one of the
filter efficiency LED light
is illuminated at the
same time
Please contact support via the www.airlabs.com website.
The letter ‘P’ or ‘N’ on
the display is shown
Disconnect the power supply and wait 5-10 seconds before connecting it back in.

20
www.airlabs.com
©2020 AirLabs
Alarm Notifications
TYPE OF ALARM
CAUSE
OPERATION
yellow LED on
PRE-ALARM or
letter F on the display
ESP filter needs to be cleaned
Carry out normal maintenance. See service
information.
yellow LED on
PRE-ALARM
ESP filter is not completely clean
If small areas of contamination remain, repeat the
washing process again. See service information.
yellow LED on
PRE-ALARM
ESP filter damp
Dry the filter cell thoroughly and particularly in the
around the insulators using an absorbent cloth or run
the unit with the filter turned off.
yellow LED on
PRE-ALARM
ESP filter is not fully rinsed
There may be detergent on the insulators; the filter
cell must be thoroughly rinsed again.
yellow LED on
PRE-ALARM
Small particle bodies trapped
between the collection plates
The particles deposited on the plates must be
removed. See service information.
red LED on
MAINTENANCE
ESP filter must be cleaned. Filter
will be switched off.
Carry out normal maintenance as soon as possible. See
service information.
red LED on
MAINTENANCE and
ALARM
ESP filter ionisation wire is broken
The wire must be removed and replaced immediately
by a qualified support technician.
red LED on
MAINTENANCE and
ALARM
ESP filter short circuited due to
damaged collection blade
The blade must be straightened (call a service
technician)
red LED on
MAINTENANCE and
ALARM
ESP filter short circuited by
contamination trapped between
the plates
Contamination must be removed using a cloth soaked
in alcohol, taking care not to break the ionisation wires
letter F on the display
Ionisation wires dirty or oxidised
Clean the wires with a cloth soaked in alcohol; if the
problem persists, the wires must be replaced
Table of contents