AirLive AM-100E User manual

User’sManual
A
M
-
100E
Wired Ethernet ADSL Modem
English ●●●
Español ●●●
1
14

1
1
English
Wired Ethernet ADSL Modem
AM
-
100
E
Basic Information
POWER Lights up when the Ethernet ADSL Modem is powered on.
LINK/ACT Blinking when the Ethernet ADSL Modem is
Sending/Receiving data.
Blinking when the Ethernet ADSL Modem system is ready.
ADSL Lights up when a successful ADSL connection is
established.
READY Lights up when a PPP connection is established.
ADSL Port for connecting to the ADSL Service Provider.
LAN 10/100Mbps Ethernet Ports for connecting to the network
devices.
RESET Restore the Ethernet ADSL Modem AM-100E to factory default
setting.
POWER 9V AC/1A or 12V DC/1A Power adapter connector.
Port Layout
Default Setting:
IP Address: 192.168.1.254
Subnet Mask: 255.255.255.0
Login: admin
Password: airlive
The function of ADSL modem is to let users connect broadband device (such as
broadband router) behind the AM-100E (to the LAN port). Therefore, it does not handle
PPPoE dialup, PPTP dial-up, or DHCP functions. These functions should be handled
by the broadband router/device.
English

2
2
English
Wired Ethernet ADSL Modem
AM
-
100
E
Setting Up TCP IP (Win98/ME)
1
1.
.
Right Click on “My Network
Places”to highlight it and select
“Properties”on the Desktop
OvisLink ATX
OvisLink ATX
O
2
2.
.
The Network dialog box will
open. Click on Internet
Protocol (TCP/IP) to highlight
it and then click on
Properties.
3
3.
.
The TCP/IP Properties dialog box
will open, in IP address section,
select Specify an IP address(IP
address:192.168.1.10, Subnet
Mask:255.255.255.0)
4
4.
.
Click on Gateway, and in
Gateway section, erase all
previous settings.
5
5.
.
Click on DNS configuration,
make sure DNS is disabled.
6
6.
.
Click OK to close all networking
dialog boxes.
English

3
3
English
Wired Ethernet ADSL Modem
AM
-
100
E
Setting Up TCP IP (Win2000/XP)
1. Click on the Start button and
select Settings then click on
Control Panel.
2. Click on Network Connections
to open the network control
panel.
3. Right Click on the Local Area
Connection to highlight it and
select Properties. 1
2
3
4
4. The Local Area Connection
Properties dialog box will
open. Click on Internet
Protocol (TCP/IP) to
highlight it and then click on
Properties.
5. Manually enter your IP
address(192.168.1.10),
Gateway and DNS Server
address settings which your
ISP provide for you, then click
OK to save the settings. 5
6
English

4
4
English
Wired Ethernet ADSL Modem
AM
-
100
E
Web Confi
g
uration
1
1.
.
Please make sure you have set your PC’s IP address as indicated in
the previous sections and connect your PC directly to the LAN port of
the modem.
2
2.
.
Open your web browser and type in router’s IP address (default:
192.168.1.254) in the Address field.
3
3.
.
When asked for login and password.Press enter “admin” for login,
“airlive” for password.
4
4.
.
Once you press enter, you should see the following page:
Automatic Setup: Set up the router base on country and ISP
selection.
Manual Setup: Set up the router by entering the ADSL setting
manually. Use this if your country is not listed or if the automatic
setup doesn’t work
Basic Setup: To configure the basic option of the modem
Advance Setup: To configure the advance option of the modem
English

5
5
English
Wired Ethernet ADSL Modem
AM
-
100
E
Web Configuration
Automatic Setup
*The automatic setup is base on current available databa se of worldwide
ISPs. Since ISP might change its settings without notice. Please contact
with your ISP about the correct setting if Automatic Setup function fails.
1. Click on “Automatic Setup” in the main menu.
2. Select your country.
3. Select your ISP (Some countries do not need this option).
4. Now your ISP will display the Encapsulation, VPI, and VCI settings
in its database. Please take a look at the Encapsulation field:
•1483 Bridge
Press the Next button to enter the “Setup-Bridge” screen,
please make sure Bridge mode option is Enabled.
•1483 Routed
Press the Next button to enter the “Setup-Bridge” screen,
please Disable the Bridge mode option
English

6
6
English
Wired Ethernet ADSL Modem
AM
-
100
E
After finishing the EZ-setup, please make sure to refer to
the 1483 Routed Additional Settings section to do
additional settings.
•PPPoA:
Press the “Next” button will enter the “Setup PPP” page.
Enter the username and password information from your
ISP.
After finishing the EZ-setup, please make sure to refer to
the Setting Half Bridge section to turn on the “Half
Bridge” option.
5. Press the “Save” button and your router will reboot to the new
settings. Please wait for 30 seconds for the modem to reboot
6. If your ISP is using PPPoA encapsulation. Please don’t forget to
go to the “Setting Half Bridge” section.
7. You can now attach a broadband router to AM-100E’s LAN port.
For 1483 Bridge Users, please enter your ISP’s Fixed IP
information to the router’s WAN port (if you do not have a
broadband router and you connect your PC directly to
AM-100E. Then configure your PC’s IP address according to IP
given by your ISP).
For 1483 Routed Users, please go to “1483 Routed
Additional Settings” section.
For PPPoA users, please setup the Router’s WAN port to
DHCP. (If you do not have a broadband router and you connect
your PC directly toAM-100E. Then configure your PC’s IP
address to “Obtain IP automatically).
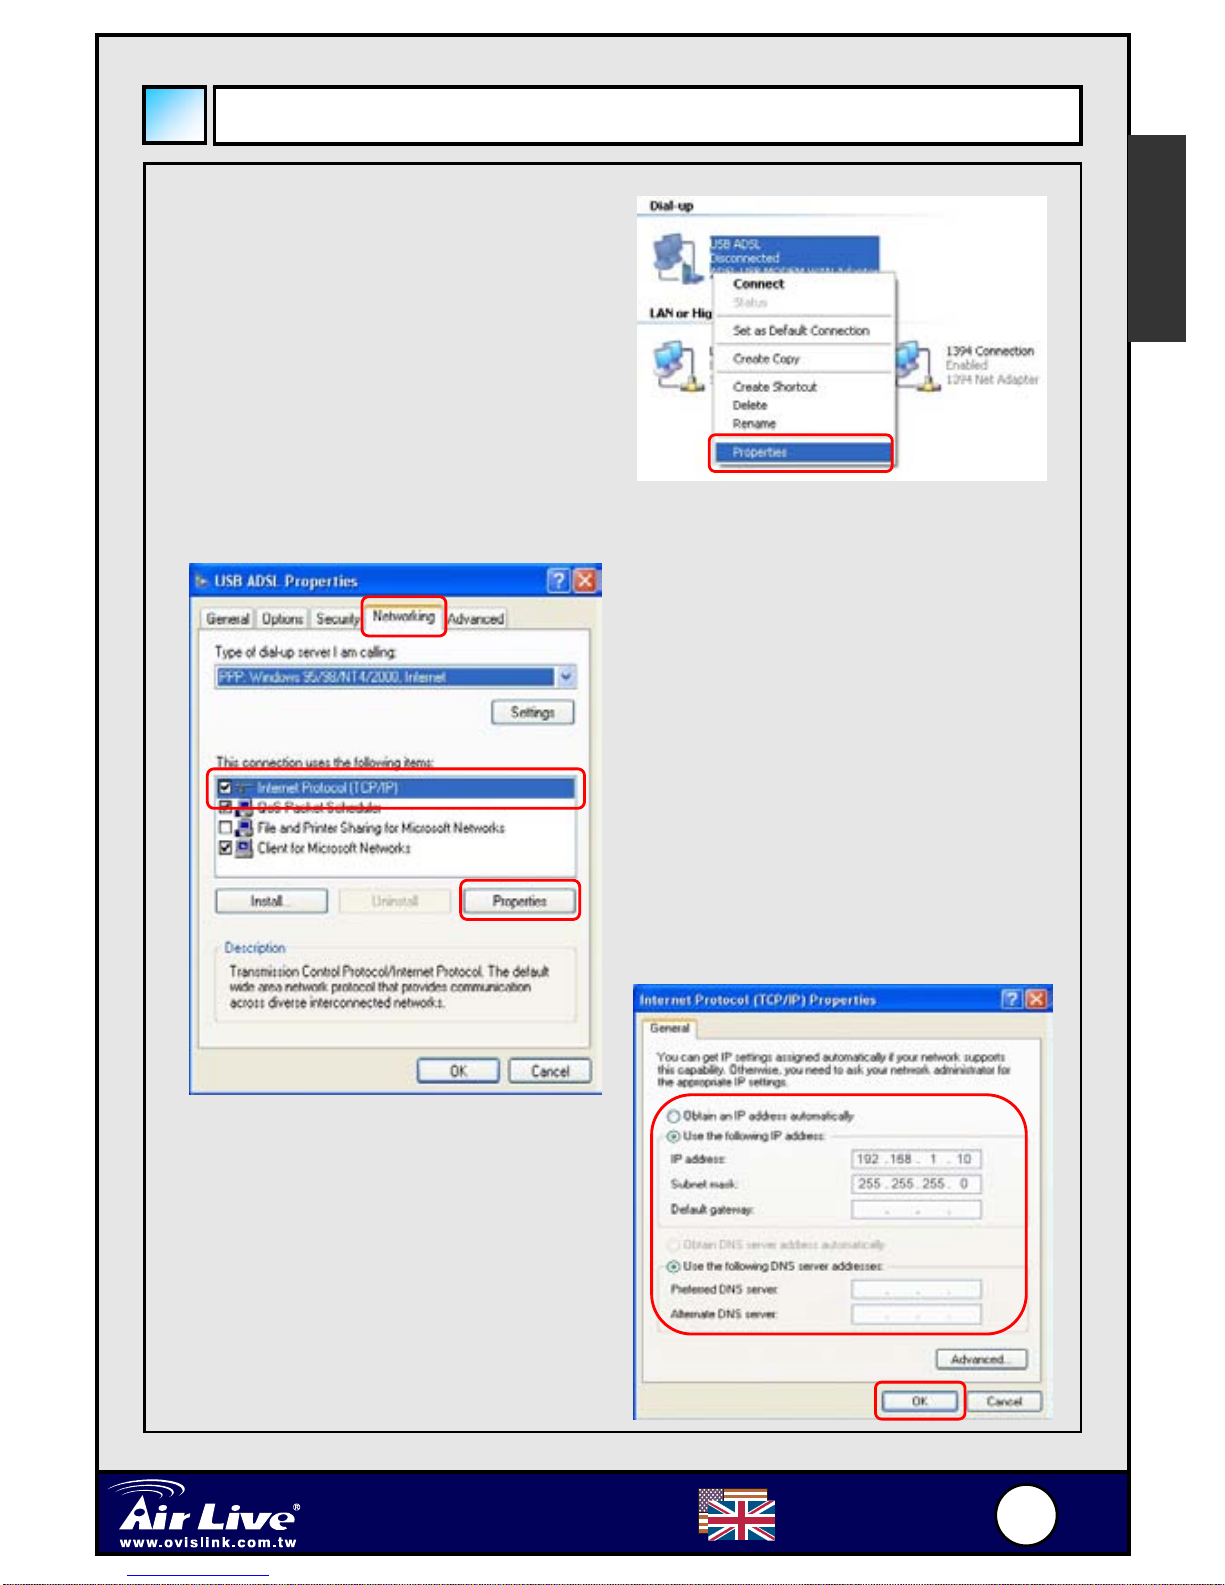
8. After you finish all settings on the AM-100E, please refer “Restore
TCP/IP Configuration” to restore your PC’s IP settings
English

7
7
English
Wired Ethernet ADSL Modem
AM
-
100
E
Manual Setup
If ISP is not on the list or if Automatic setup doesn’t work, please
use the Manual Setup.
Please obtain the Encapsulation, VPI, VCI information from your ISP.
Different Encapsulation type will bring up different setup screen.
A. For ISP with the following “Encapsulation”.
;PPPoA-LLC
;PPPoA VC-Mux2
1. Please enter the Encapsulation, VPI, VCI information from your ISP
and press “Next”
2. Enter your “Service Name”(not required for some ISP), “User
Name” and “Password” from Service Provider (ISP).
3. Click “SAVE” after setup. Please wait for 30 seconds for the
modem to reboot.
4. Go to the “Setting Half Bridge” section.
5. After finish all AM-100E settings, please refer “Restore TCP/IP
Configuration” to restore your PC’s IP settings
If your ISP use PPPoE for connection and you want the AM-100E to
function as a modem only. Please change the Encapsulation as
followed:
•PPPoE LLC -> 1483 Bridge LLC
•PPPoE VcMUX -> 1483 Bridge VcMUX
(If you are unsure whether it’s LLC or VcMUX, please use LLC)
Then follow the 1483 Bridge instruction in method B. The PPPoE
authentication should be done by broadband routers (connected
below the AM-100E).
English

8
8
English
Wired Ethernet ADSL Modem
AM
-
100
E
B. For ISP with the following “Encapsulation”. Please enter the correct
Encapsulation and VPI/VCI information in the manual setup page.
Then you will enter into the Setup - Bridge window
;1483 Bridged IP LLC
;1483 Bridged IP VC-Mux
;1483 Routed IP LLC
;1483 Router IP VC-Mux
;Classical IP over ATM
•1483 Bridge and Classic IP over ATM
Please make sure Bridge mode option is Enabled.
•1483 Routed
Please Disable the Bridge mode option
After finishing the EZ-setup, please make sure to refer to the 1483
Routed Additional Settings section to do.
•Press the “Save” button and your router will reboot to the new
settings. Please wait for 30 seconds for the modem to reboot.
•You can now attach a broadband router to the LAN port.
6. You can now attach a broadband router toAM-100E’s LAN port.
Please set the Router’s WAN port to DHCP mode.
English

9
9
English
Wired Ethernet ADSL Modem
AM
-
100
E
Setting Half Bridge
If your ISP use PPPoA encapsulation. And you want to connect
broadband device to theAM-100E. Then, you need to set your
AM-100E to Half Bridge mode. If your ISP uses other
Encapsulation type, please ignore this section.
1. Please open your web browser to get intoAM-100E’s web
management page (Default IP: 192.168.1.254).
2. On the left menu bar. Click on ADVANCE->Misc Configuration ->
PPP Half Bridge.
3. Enable the “PPP Half Bridge” option
4. Cllick on “Submit to make changes”
For 1483 Bridge Users, please enter your ISP’s Fixed IP
information to the router’s WAN port.
For 1483 Routed Users, please go to “1483 Routed Additional
Settings” section.
After you have finished all settings on the AM-100E, please refer “Restore
TCP/IP Configuration” to restore your PC’s IP settings
*note: if you do not have a broadband router and you connect your PC directly to
AM-100E. Then configure your PC’s IP address according to IP given by your ISP
English

1
10
0
English
Wired Ethernet ADSL Modem
AM
-
100
E
1483 Routed Additional Settin
g
s
If your ISP use 1483 Routed encapsulation. And you want to connect
broadband device to theAM-100E. Please follow the instructions in
this section. If your ISP uses other Encapsulation type, please ignore
this section.
1. Please open your web browser to get intoAM-100E’s web
management page (Default IP: 192.168.1.254).
2. On the left menu bar. Click on ADVANCE->Configuration ->
NAT and disable the NAT option. Press “Submit” to continue.
3. On the left menu bar. Click on ADVANCE->Configuration -> LAN
•In the “Lan IP” field. Please enter the WAN Gateway IP
provided by your ISP.
•In the Subnet Mask field, please enter the WAN Subnet
mask provided by your ISP
•Please Disable the DHCP server
4. Press “Submit” to make the changes.
If you want to connect broadband router to the AM-100E. Please set the
Broadband Router’s WAN port IP address, gateway, and DNS to that
provided by your ISP.
English

1
11
1
English
Wired Ethernet ADSL Modem
AM
-
100
E
Restore TCP/IP Configuration
Windows ME / 98
Step 1: Click Start →Settings →
Control Panel.
Step 2:Double-click the
Network.
Step 3: Go to Configuration icon,
select network adapter installed
and click Properties.
Step 4: Go to IPAddress icon
and select Obtain an IP address
automatically.
2
1
1
Step 5: Go to Gateway icon and
erase all previous setting. Step 6: Go to DNS Configuration
icon, select Disable DNS and
click OK.
English

1
12
2
English
Wired Ethernet ADSL Modem
AM
-
100
E
Windows 2000
Step 1: Click Start →Settings →
Control Panel.
Step 2: Double-click the Network
and Dial-up Connections. Step 3: Right Click the Local Area
Connection and select Properties.
Step 4: Select Internet Protocol
(TCP/IP) and click Properties. Step 5: Select Obtain an IP
address automatically and DNS
server address automatically.
Then, click OK
2
1
1
1
2
2
English

1
13
3
English
Wired Ethernet ADSL Modem
AM
-
100
E
Windows xp
Step 1: Click Start→Control
Panel→Classic View.
Step 2: Double-click the Network
Connections. Step 3: Right Click on the Local
Area Connection and select
Properties.
Step 4: Go to General icon, select
Internet Protocol (TCP/IP) and
click Properties.
Step 5: Go to General icon, select
Obtain an IP address automatically
and DNS server address
automatically. Then, click OK.
2
1
1
1
2
2
3
English

1
14
4
AirLive
®
Wired Ethernet ADSL Modem
AM
-
100
E
Deutsch
Wichtige Informationen
POWER Leuchtet wenn das Ethernet-ADSL-Modem eingeschaltet
ist.
LINK/ACT Blinkt beim Senden/Empfangen von Daten.
Blinkt wenn das Ethernet-ADSL-Modem bereit ist.
ADSL Leuchtet wenn eineADSL-Verbindung erfolgreich
aufgebaut wurde.
READY Leuchtet wenn eine PPP-Verbindung aufgebaut wurde.
ADSL Anschluss zur Verbindung mit Ihrem ADSL-Serviceprovider.
LAN 10/100Mbps Ethernet-Port zumAnschluss von
Netzwerkgeräten.
RESET Resettaster zum Zurücksetzen des AM-100E Ethernet-ADSL-
Modems auf die Werkseinstellungen.
POWER 9V AC/1A oder 12V DC/1ANetzteilanschluss
Anzeigen und Anschlüsse
Werkseinstellungen:
IP-Adresse: 192.168.1.254
Subnetzmaske: 255.255.255.0
Login: admin
Passwort: airlive
DieAufgabe einesADSL-Modems besteht darin, am LAN-Port angeschlossene
Breitbandgeräte (wie z.B. einen Breitband-Router) an denADSL-Anschluss Ihres
Serviceproviders anzubinden. Somit bietet es nicht Funktionen wie PPPoE- und
PPTP-Einwahl oder DHCP. Diese sollten durch das Breitbandgerät ausgeführt werden.
Deutsch

1
15
5
AirLive
®
Wired Ethernet ADSL Modem
AM
-
100
E
Deutsch
Einrichtung von TCP/IP (Win98/ME)
1
1.
.
Rechtsklicken Sie im Desktop
Sie auf “Meine
Netzwerkumgebung”und
wählen Sie “Eigenschaften”.
OvisLink ATX
OvisLink ATX
O
2
2.
.
Es öffnet sich die Dialogbox
fürs Netzwerk. Klicken Sie
auf “Internet-Protokoll
(TCP/IP)”um es
hervorzuheben, dann klicken
Sie auf “Eigenschaften”.
3
3.
.
Es öffnet sich die Dialogbox für
“Eigenschaften von TCP/IP”.
Wählen Sie im Reiter
“IP-Adresse” “Folgende
IP-Adresse verwenden”:
(IP-Adresse:192.168.1.10,
Subnetzmaske:255.255.255.0)
4
4.
.
Löschen Sie unter “Gateways”,
alle vorherigen Einstellungen.
5
5.
.
Verfahren Sie ebenso in der
“DNS-Konfiguration”.
6
6.
.
Kliken Sie auf “OK”um die
Einstellungen zu bestätigen.
Deutsch

1
16
6
AirLive
®
Wired Ethernet ADSL Modem
AM
-
100
E
Deutsch
Einrichtung von TCP/IP (Win2000/XP)
1. Klicken Sie auf den Start-Button
und wählen Sie “Einstellungen”.
Dann klicken Sie auf
“Systemsteuerung”.
2. Doppelklicken Sie auf “Netzwerk-
und DFÜ-Verbindungen“.
3. Rechtsklicken Sie auf
“LAN-Verbindung“und dann auf
“Eigenschaften“. 1
2
3
4
4. Es öffnet sich die Dialogbox
“Eigenschaften von
LAN-Verbindung”. Klicken
Sie auf „Internetprotokoll
(TCP/IP)“und dann auf
“Eigenschaften“.
5. Geben Sie die IP-Adresse
192.168.1.10 und als
Subnetzmaske
255.255.255.0 ein. DNS und
Gateway bleiben leer. Klicken
Sie auf “OK”um die
Einstellun
g
en zu s
p
eichern. 5
6
Deutsch

1
17
7
AirLive
®
Wired Ethernet ADSL Modem
AM
-
100
E
Deutsch
W
eb-Konfi
g
uration
1
1.
.
Vergewissern Sie sich bitte, dass die IP-Adresse so wie im vorherigen
Abschnitt beschrieben eingestellt ist. Verbinden Sie nun Ihren PC
direkt mit dem LAN-Anschluss des ADSL-Modems.
2
2.
.
Starten Sie Ihren Webbrowser und geben Sie im Adressfeld die
IP-Adresse (Default:
192.168.1.254)
Ihres ADSL-Modems ein.
Dann drücken Sie auf
Enter (Bestätigungstaste).
3
3.
.
Im darauf erscheinenden Anmeldefenster geben Sie bitte den
Default-Benutzernamen „admin”and als Passwort “airlive”ein.
4
4.
.
Nach einer Bestätigung mit Enter sollten Sie die folgende Seite
sehen:
“Automatic Setup”: Auf Land und ISP basierende Einstellungen für
das Modem.
“Manual Setup”:Manuelle Einstellung derADSL-Parameter für das
Modem. Benutzen Sie dies, falls Ihr Land nicht aufgeführt ist oder die
Konfiguration durch das automatische Setup nicht funktioniert.
“Basic Setup”: Basiskonfiguration für das Modem.
“Advance Setup”: Erweiterte Konfiguration für das Modem.
Deutsch

1
18
8
AirLive
®
Wired Ethernet ADSL Modem
AM
-
100
E
Deutsch
Web-Konfiguration
Automatisches Setup (“Automatic Setup”)
*Das automatische Setup basiert auf einer weltweiten Datenbank derzeit
tätiger Internetprovider (ISP). Da ein ISP seine Einstellungen ohne
Benachrichtigung ändern kann ist es möglich, dass das automatische
Setup fehlschlägt. Fragen Sie in diesem Fall bitte Ihren ISP nach den
korrekten Einstellungen.
1. Klicken Sie im Hauptmenü auf “Automatic Setup”.
2. Wählen Sie Ihr Land aus.
3. Wählen Sie Ihren ISP. (In manchen Ländern wird diese Option nicht
benötigt.)
4. Nun sehen Sie die aus der Datenbank entnommenen Einstellungen
Ihres ISPs für “Encapsulation”, VPI, und VCI. Werfen Sie bitte
einen Blick auf das “Encapsulation“-Feld:
•1483 Bridge
Drücken Sie auf den “Next“-Button um auf den
“Setup-Bridge”-Dialog zu gelangen und vergewissern
Sie sich, dass der “Bridge Mode“auf “Enabled“steht.
Deutsch

1
19
9
AirLive
®
Wired Ethernet ADSL Modem
AM
-
100
E
Deutsch
Nach Beenden des EZ-Setup sehen Sie sich bitte das
Kapitel ”1483 Routed – zusätzliche Einstellungen” an.
•PPPoA:
Drücken Sie den “Next”-Button um auf die Seite “Setup
PPP” zu gelangen. Geben Sie hier den Benutzernamen
und das Passwort ein, welche Sie von Ihrem ISP erhalten
haben.
Nach Beendem des EZ-Setup sehen Sie sich bitte das
Kapitel “Einstellungen für Half-Bridge” an um die “Half
Bridge”-Option anzustellen.
5. Drücken Sie jetzt den “Save”-Button: Ihr Router wird durch einen
Neustart (ca 30 Sekunden) die neuen Einstellungen aktivieren.
6. Falls Ihr ISP PPPoA-Kapselung benutzt, so vergessen Sie bitte
nicht, das Kapitel “Einstellungen für Half-Bridge” zu beachten.
7. Nun können Sie einen Breitband-Router am LAN-Port des
AM-100E anschließen:
Benutzer von ”1483 Bridge” geben bitte die vom ISP zugeteilte
statische IP-Adresse für den WAN-Port ihres
Breitband-Routers ein. (Wenn Sie keinen Breitband-Router
einsetzen und Ihren PC direkt mit dem AM-100E verbinden, so
konfigurieren Sie bitte Ihren PC mit dieser IP-Adresse.)
Benutzer von ”1483 Routed”sehen sich bitte das Kapitel “1483
Routed, zusätzliche Einstellungen”an.
Benutzer von “PPPoA” setzen bitte den WAN-Port ihres
Routers auf DHCP. (Wenn Sie keinen Breitband-Router
einsetzen und Ihren PC direkt mit dem AM-100E verbinden, so
stellen Sie bitte die IP Ihres PCs auf “IP-Adresse automatisch
beziehen.”)
8. Nachdem Sie sämtliche Einstellungen für Ihren AM-100E
vorgenommen haben, gehen Sie bitte gemäß dem Abschnitt
“TCP/IP-Konfiguration wiederherstellen” vor.
Deutsch
Table of contents
Languages:
Other AirLive Modem manuals