AIROS AIROS 8 Operating manual

OPERATING
INSTRUCTIONS
FOR USE GUIDE
AIROS 8
Sequential Compression Device
www.airosmedical.com
1.866.991.6956


A8IFU.0001 REV C
Table of Contents
Indications for Use & Contraindications . . . . . . . . . . . . . . . . . . . . . . 1
Overview & Description of Symbols . . . . . . . . . . . . . . . . . . . . . . . . 2
General Equipment Specications . . . . . . . . . . . . . . . . . . . . . . . . . 3
Environmental Conditions . . . . . . . . . . . . . . . . . . . . . . . . . . . . . . 3
Device Description & Operating Principles . . . . . . . . . . . . . . . . . . . . 4
Front Panel: Button Functions . . . . . . . . . . . . . . . . . . . . . . . . . . . 5
Front Panel: Display Overview . . . . . . . . . . . . . . . . . . . . . . . . . . . 5
Back Panel: Power Switch, Fuse & Plug . . . . . . . . . . . . . . . . . . . . . . 6
Garment Overview . . . . . . . . . . . . . . . . . . . . . . . . . . . . . . . . . . 7
Device Operation Specications . . . . . . . . . . . . . . . . . . . . . . . . . . 8
Operating Instructions . . . . . . . . . . . . . . . . . . . . . . . . . . . . . . . . 9
Troubleshooting . . . . . . . . . . . . . . . . . . . . . . . . . . . . . . . . . . . 18
Error Messages/Alarms . . . . . . . . . . . . . . . . . . . . . . . . . . . . . . 18
Attaching & Detaching Garments . . . . . . . . . . . . . . . . . . . . . . . . . 19
Fuse Replacement . . . . . . . . . . . . . . . . . . . . . . . . . . . . . . . . . 19
Garment Care & Cleaning Instructions . . . . . . . . . . . . . . . . . . . . . 20
Garment Sizes . . . . . . . . . . . . . . . . . . . . . . . . . . . . . . . . . . . . 20
Device Disposal . . . . . . . . . . . . . . . . . . . . . . . . . . . . . . . . . . . 21
Warranty & Service Information . . . . . . . . . . . . . . . . . . . . . . . . . 21
Product Classication . . . . . . . . . . . . . . . . . . . . . . . . . . . . . . . 22
Guidance & Manufacturer’s Declarations . . . . . . . . . . . . . . . . . . . . 23

1
A8IFU.0001 REV C
Indications for Use
The AIROS 8 Sequential Compression Device utilizes gradient pneumatic
compression, which is intended for treatment of patients with the following
conditions:
• Lymphedema
• Venous stasis ulcers
• Venous insufciency
• Peripheral edema
The device is safe for both home and hospital use.
Contraindications
Pneumatic compression IS NOT recommended for use in patients with the
following conditions:
• Infections in the limb, including cellulitis without appropriate antibiotic
coverage
• Presence of lymphangiosarcoma
• Deep Vein Thrombosis (DVT)
• Inammatory phlebitis or episodes of pulmonary embolism
• Congestive Heart Failure (CHF)
• Any local conditions in which garments would interfere, including: Untreated
wounds, infected wounds, gangrene, recent skin graft, or dermatitis

2
Overview & Description of Symbols
NOTE: Refer to Accompanying Documents for more
information regarding the system use or description.
Type BF - Applied Part
Dangerous Voltage – Electrical Shock Hazard
Disconnect Line Cord before servicing. Refer
servicing to a qualied service representative.
Class II Equipment
Protected against solid foreign objects of 12.5mm Ø
and greater. Protection against vertically falling water
drops.
Date of Manufacture
Serial Number
Prescription Use Only
Model/Catalog Number
Manufacturer
Waste Electrical Goods Recycled

3
A8IFU.0001 REV C
Dimension 10.2” W x 10.5” D x 4.3” H
(260 mm W x 267 mm D x 110 mm H)
Weight 6.7 lbs. (3.05 kg)
Ination User Set
Deation 12 Seconds
Cycle Time User Set
Electrical 120 VAC, 60 Hz, 100VA MAX
Fuse Rated 2.5 AMP T250VACH SLO-BLO
Applied Part Type BF - Applied Part
Protection Against Electrical Shock Class II
Operation Mode CONTINUOUS
Protection Against Water IP21
TEMPERATURE
Operating Temperature 41°F (5°C) - 104°F (40°C)
Storage Temperature -13°F (-25°C) – 158°F (70°C)
Transportation Temperature -13°F (-25°C) – 158°F (70°C)
HUMIDITY
Operating Humidity 15 - 93% RH
Storage Humidity <93% RH
Transportation Humidity <93% RH
ATMOSPHERIC PRESSURE
Operating Pressure 70kPa - 106kPa
Storage Pressure 50kPa - 106kPa
Transportation Pressure 50kPa - 106kPa
General Equipment Specications
Environmental Conditions

4
Device Description &
Operating Principles
Overview
The AIROS 8 Sequential Compression device is a gradient pneumatic compression
device. The device is used for treatment and management of venous or lymphatic
disorders. TThe application of gradient sequential compression increases blood
ow and encourages extracellular uid clearance.
The AIROS 8 system consists of the device and 8-chambered garments. The device
provides cycles of compressed air at certain adjustable pressures, and sequentially
inates the garments from distal to proximal. The pressure at each chamber can be
individually adjusted to accommodate different therapy needs.
Box Contents
• 1 AIROS 8 Sequential Compression Device
• 1 Power Cord
• 1 Air Blocker (for use during unilateral therapy)
• 1 AIROS 8 Operating Instructions for Use Guide
• 1 Warranty Registration Card

5
A8IFU.0001 REV C
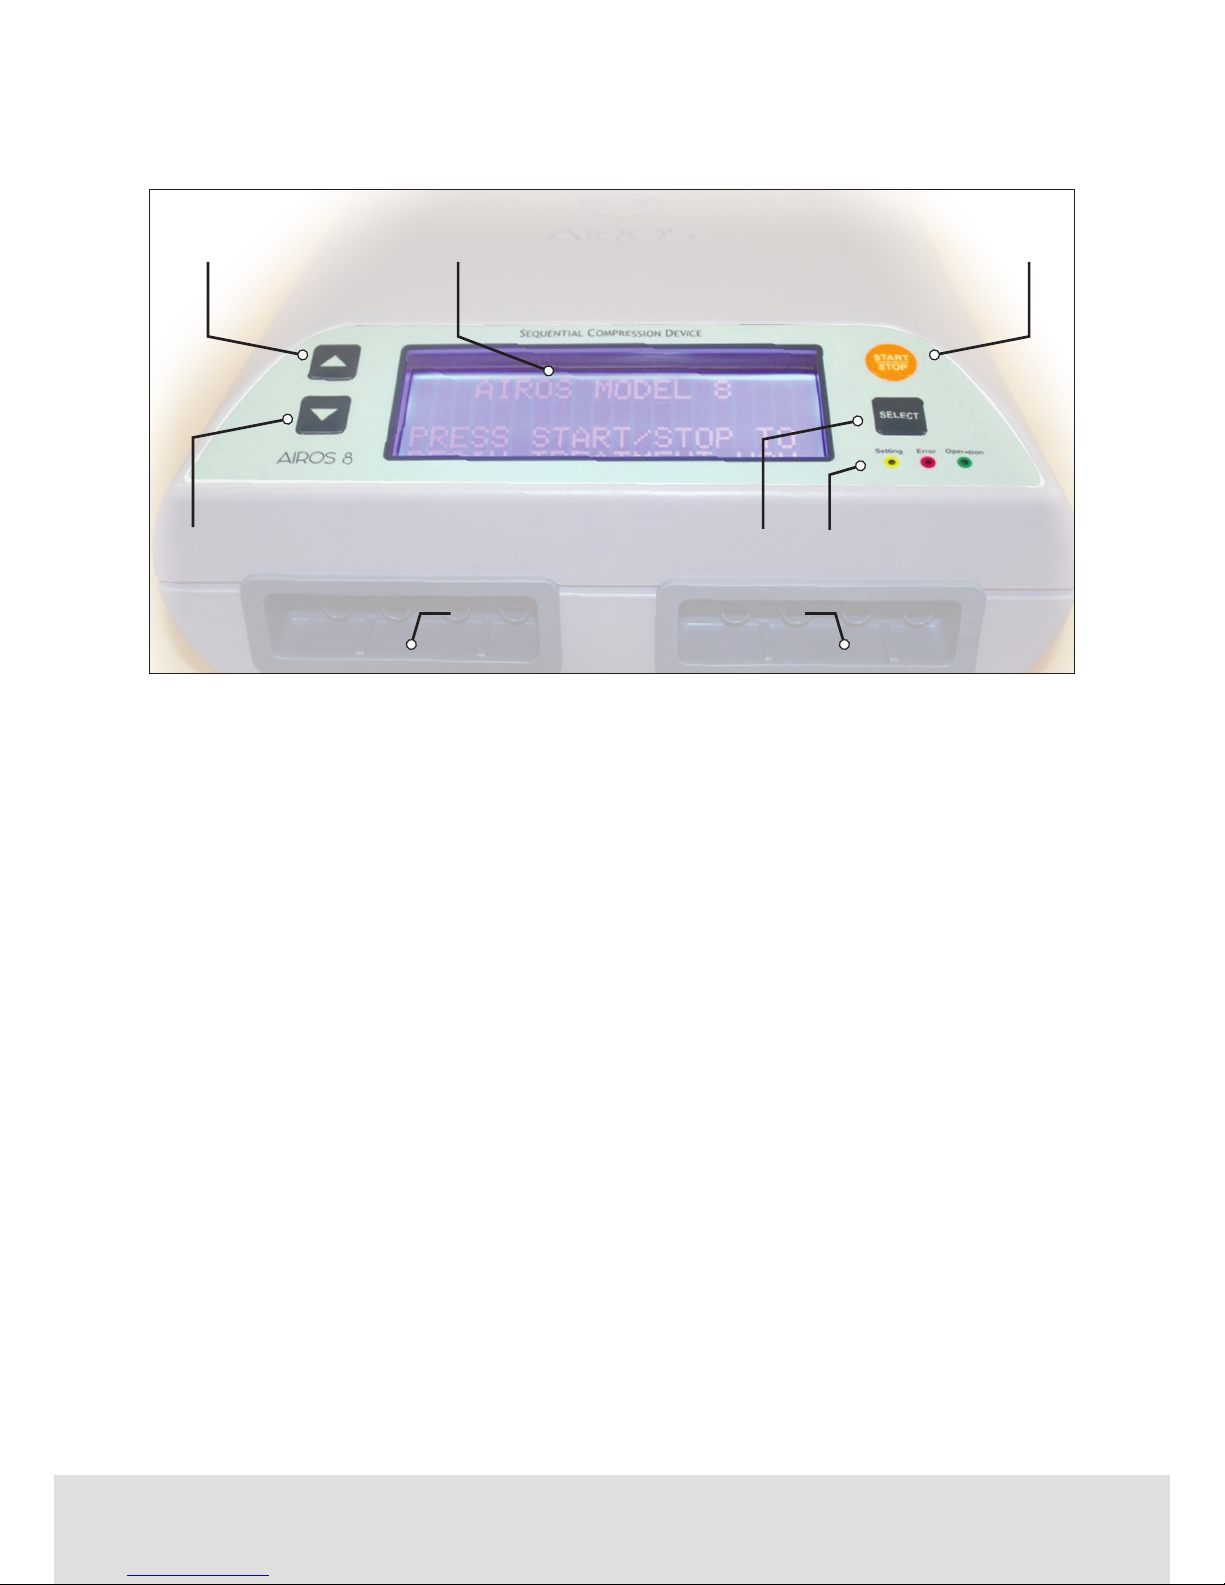
Device Panels: Front Panel
Button Functions
• START|STOP BUTTON: Allows
user to begin and end treatment.
• SELECT BUTTON: Allows user to
select options displayed on the
LCD screen.
• UP BUTTON: Allows user to scroll
up to options displayed on the
LCD screen.
• DOWN BUTTON: Allows user to
scroll down to options displayed
on the LCD screen.
Display
• LCD Screen: Shows user settings
information, chamber pressure,
treatment time remaining, and
other real-time device information.
• LCD Specication: 5 volts
DC, max 0.5 amp, 4 lines x 20
characters per line presentation.
Status Indication
• Green LED: Indicates that
treatment is being administered.
• Yellow LED: Indicates that settings
are being changed on the device.
• Red LED: Indicates there is an
error in operation.
Garment Connector Ports
The Garment Connector Ports are
xed on the device and match with
the Garment Connectors on the
detachable garments used with this
system.
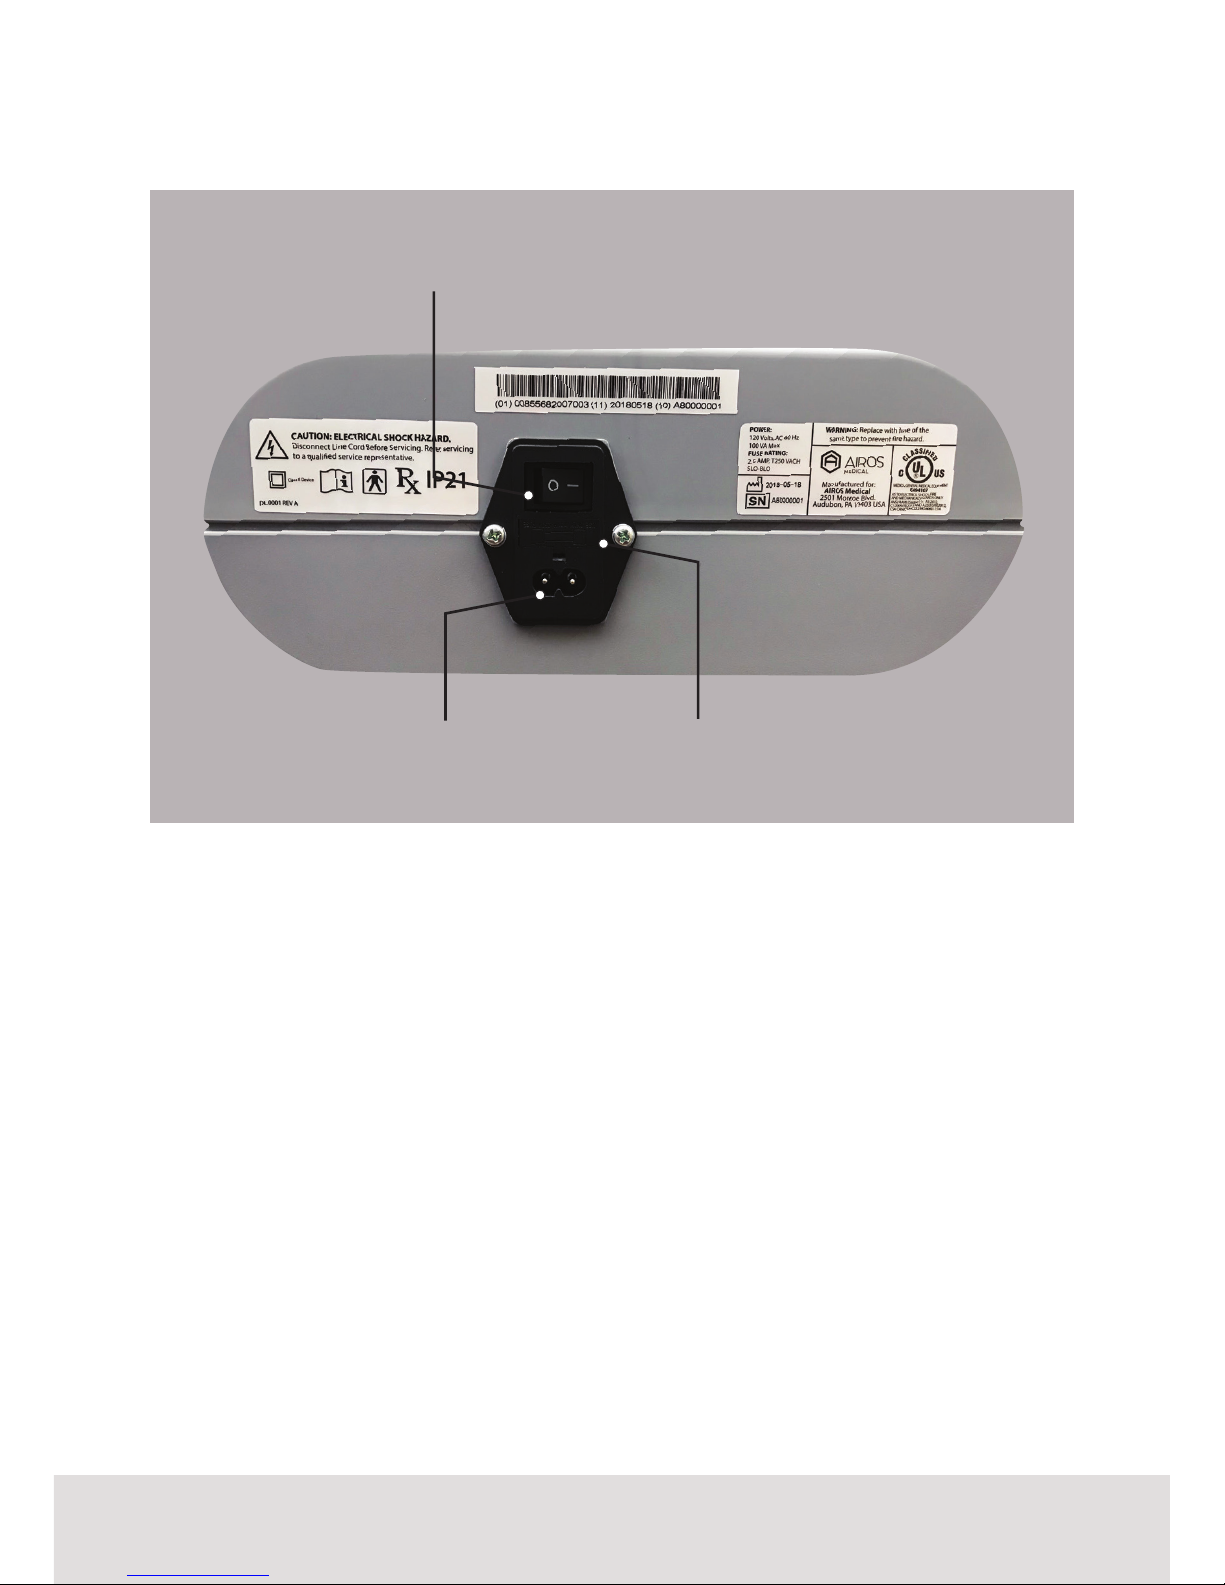
• Air Blocker: The Air Blocker is
used to block air passage to the
unit.
UP BUTTON
DOWN BUTTON
GARMENT CONNECTOR PORTS
LCD SCREEN START|STOP BUTTON
SELECT BUTTON STATUS LED LIGHTS

6
• MAIN POWER SWITCH:
Power can be turned on or off.
• FUSE:
One (1) time-delayed fuse inside for
protection against electrical short circuit.
• POWER PLUG:
Power source.
Device Panels: Back Panel
MAIN POWER SWITCH
POWER PLUG FUSE

7
A8IFU.0001 REV C
8-Chamber Garment
The segments within the garments are constructed to prevent ‘ridging.’ (Ridging
occurs if there is a gap between two compressed areas of tissue. Tissue is forced
towards the gap causing a creased area with restricted blood ow.)
The design of the garments ensures high patient comfort.
8-CHAMBER
GARMENT
TUBES
GARMENT
CONNECTOR
• 8-Chamber Garment:
Applied part for treatment. Garment
has 8 separate chambers.
• Tubes:
Guide the air.
• Garment Connector:
Detachable from the device.
Matches with the Garment
Connector Port on the Front Panel.

8
Device Operation Specications
Overview
Primary Operating Mode
The AIROS 8 can be used in two primary Operating Modes: Gradient Mode or
Pressure Mode.
• Gradient Mode: User can set the starting pressure in Chamber 1 on the
garment, the most distal chamber. Pressure decreases at a xed gradient of 4%
moving distally to proximally.
• Pressure Mode: User can set the pressure in each of the 8 chambers in the
garment. The default gradient is 4%. Once a setting is changed in a chamber,
the following chamber pressures will automatically be updated to a value
equaling a 4% pressure gradient.
NOTE: User may operate the AIROS 8 using the factory default
settings. The factory default settings are Gradient Mode operation
with 45mmHg of pressure in the distal chamber; a 60-minute therapy
time; a 60-second cycle time; Lymphedema Preparation Treatment
(LPT) Mode set to OFF; and no chambers skipped.
PRIMARY OPERATING MODE SETTINGS GRADIENT MODE PRESSURE MODE
Pressure Range (set in distal chamber) 30-80mmHg (increments of 1mmHg) 35-80mmHg (increments of 1mmHg)
Cycle Time 40 or 60 seconds 40 or 60 seconds
Deation 12 seconds 12 seconds
Therapy Time 15, 30, 45 or 60 minutes 15, 30, 45 or 60 minutes
Gradient 4% (xed) 4% (default; can be changed by user)
Skip Chamber Option Yes (1 chamber) Yes (1 chamber)
Secondary Lymphedema Preparation Treatment
(LPT) Mode Option Focal or Clearing Focal or Clearing
SECONDARY LYMPHEDEMA PREPARATION
TREATMENT (LPT) MODE SETTINGS FOCAL MODE CLEARING MODE
Pressure Options 40, 45 or 50mmHg 15 or 20mmHg
Chamber Selection 1-4, 2-5, 3-6, 4-7 or 5-8 -
Therapy Time 10 or 15 minutes -

9
A8IFU.0001 REV C
Device Operation Specications (cont.)
Secondary Operating Modes
The AIROS 8 can also be used in two secondary Operating Modes: Focal Mode or
Clearing Mode.
• Focal Mode: User can choose to utilize this mode to tenderize the tissue in
a limb or limbs affected by Lymphedema Fibrosis. Treatment can be applied
using four specic chambers in the garment (1-4, 2-5, 3-6, 4-7 or 5-8, selected
by the user). Focal Mode can be used prior to Gradient Mode therapy or
Pressure Mode therapy.
• Clearing Mode: User can utilize this mode to mimic manual lymphatic
drainage. Clearing Mode can be used prior to Gradient Mode therapy or
Pressure Mode therapy.
Operating Instructions
1. Unpacking the Equipment
1.1. Open the shipping box and remove the device.
1.2. Remove the protective foams and bag.
1.3. Remove the garments from the bag.
1.4. Unroll the tubes and unroll the garment by spreading it out at.
2. Preparing for Operation
2.1. Place the device on a at, sturdy surface in close proximity to where the
user will utilize therapy.
2.2. Secure the proper end of the POWER CORD to the POWER PLUG on the
Back Panel of the device. Secure the other end of the POWER CORD to a
safe outlet. Outlet should be 120 VAC, 60 Hz.
2.3. Attach GARMENT CONNECTORS of the garment to the GARMENT
CONNECTOR PORTS on the Front Panel of the device.
NOTE: For unilateral therapy (applying treatment to only one arm or
one leg), place the AIR BLOCKER in the other GARMENT CONNECTOR
PORT that is unused.

10
2.4. Directions for Applying Leg Garment(s)
Unzip the garment all the way. Place foot at the bottom end of the
garment and pull up the zipper while supporting the garment. Ensure
that the garment wraps completely around the leg.
2.5. Directions for Applying Arm Garment(s)
Slide the arm through the internal part of the garment.
CAUTION: The detachable power supply cord may pose a risk of
strangulation.
3. Treatment Therapy
NOTE: Device settings can only be modied or restored before or in
between treatment sessions.
NOTE: Prior to the start of therapy, the garment(s) will briey "prell"
with air to aid in removing any wrinkles or creases and to allow for any
minor adjustments in garment positioning. The LCD screen will read
"PREFILL".
Operating Instructions (continued)

11
A8IFU.0001 REV C
Operating Instructions (continued)
3.1 START-UP SCREEN Press the MAIN POWER SWITCH located on the Rear Panel
of the device to the “ON” position. The device’s screen will
illuminate. The START-UP SCREEN will appear.
To use the device for the rst time and begin treatment
immediately with Factory Default settings, press the
orange START|STOP BUTTON. Proceed to 3.2 for further
instructions to begin treatment.
If the device has been used before, press the orange
START|STOP BUTTON. Treatment will begin immediately
using settings that have been programmed previously.
To view or change settings before treatment, access the
MAIN MENU SCREEN by pressing and holding down the
SELECT BUTTON for 5 seconds. Proceed to 3.3.
3.2 START-UP SCREEN NOTE: After selecting the number of sleeves for treatment
the rst time, the device will remember this selection. The
user will not need to select the number of sleeves the next
time they operate the device. To change the number of
sleeves for treatment, the user must reset the device to
Factory Default settings. Refer to the instructions in 3.10.
Press the UP or DOWN buttons to move the arrow on
the screen next to “1 Sleeve” for unilateral treatment with
one leg or arm, or “2 Sleeves” for bilateral treatment with
two legs or arms. Press the SELECT button to conrm your
selection.
Treatment will begin immediately.
3.3 MAIN MENU SCREEN This is the MAIN MENU SCREEN.
To select your therapy mode and adjust settings, press UP
DOWN to scroll to THERAPY MODES. Press SELECT
to conrm and proceed to 3.4
To view usage data, press UP or DOWN to scroll to
USAGE DATA. Press SELECT to conrm and proceed to 3.9.
To reset the settings on the device to Factory Default
settings, press UP or DOWN to scroll to RESET TO
DEFAULT. Press SELECT to conrm and proceed to 3.10.
To begin treatment therapy, press UP or DOWN to
scroll to BEGIN TREATMENT. Refer to 3.2 for additional
instructions to begin treatment.
AIROS MODEL 8
PRESS START/STOP TO
BEGIN TREATMENT NOW
SELECT # OF SLEEVES
FOR USE IN TREATMENT
1 SLEEVE
2 SLEEVES
THERAPY MODES
USAGE DATA
RESET TO DEFAULT
BEGIN TREATMENT

12
3.4 THERAPY MODE
SELECTION SCREEN
This is the THERAPY MODE SELECTION SCREEN.
To utilize Gradient Mode therapy, press UP or DOWN
to scroll to GRADIENT MODE. Press SELECT to conrm and
proceed to 3.5.
To utilize Pressure Mode, press UP or DOWN to scroll
to PRESSURE MODE. Press SELECT to conrm and proceed
to 3.8
To go back to the MAIN MENU SCREEN, press UP or
DOWN to scroll to BACK TO MAIN MENU. Press SELECT
to conrm.
3.5 GRADIENT MODE SET-UP
SCREEN
NOTE: Press UP or DOWN to scroll to MORE or
PREVIOUS to view additional settings options.
The gradient cannot be changed and is xed at 4%.
To set the Pressure, press UP or DOWN to scroll to
PRESSURE. Press SELECT to conrm. The pressure will
begin blinking. Press UP or DOWN to scroll from 30-80
mmHg, in increments of 1 mmHg. Press SELECT to conrm.
The pressure will be updated and stop blinking.
To set the Cycle Time, press UP or DOWN to scroll to
CYCLE TIME. Press SELECT to conrm. The cycle time will
begin blinking. Press UP or DOWN to scroll to 40 or
60 seconds. Press SELECT to conrm. The cycle time will be
updated and stop blinking.
GRADIENT MODE
PRESSURE MODE
BACK TO MAIN MENU
GRADIENT: 4%
PRESSURE: 45mmHg
CYCLE TIME: 60 sec
MORE
Operating Instructions (continued)
PREVIOUS
THERAPY TIME: 60 min
SKIP CHAMBER: OFF
MORE
PREVIOUS
LPT MODE: CLEARING
BACK TO MAIN MENU
BEGIN TREATMENT

13
A8IFU.0001 REV C
3.5 To set the Therapy Time, press UP or DOWN to scroll
to THERAPY TIME. Press SELECT to conrm. The therapy
time will begin blinking. Press UP or DOWN to scroll
to 15, 30, 45, or 60 minutes. Press SELECT to conrm. The
cycle time will be updated and stop blinking.
To select a chamber in which to skip pressure, press UP
or DOWN to scroll to SKIP CHAMBER. Press SELECT to
conrm. The skip chamber setting will begin blinking. Press
UP or DOWN to scroll through the settings, including
OFF, 1, 2, 3, 4, 5, 6, 7, or 8. Press SELECT to conrm. The
skip chamber setting will be updated and stop blinking.
To operate an optional Lymphedema Preparation Treatment
(LPT) mode before Gradient Mode therapy, press UP or
DOWN to scroll to LPT MODE. Press SELECT to conrm.
The LPT Mode option will begin blinking. Press UP or
DOWN to scroll through the settings, including OFF,
CLEARING, and FOCAL.
If you select FOCAL THERAPY, proceed to 3.6.
If you select CLEARING THERAPY, proceed to 3.7.
If you do not wish to run an LPT Mode option, scroll to OFF.
Press SELECT to conrm. The LPT Mode setting will be
updated and stop blinking.
To go back to the MAIN MENU SCREEN, press UP or
DOWN to scroll to BACK TO MAIN MENU. Press SELECT
to conrm.
To begin treatment therapy, press UP or DOWN to
scroll to BEGIN TREATMENT. NOTE: If this is the rst time
the device is being used, you may be asked to select the
number of sleeves to be used for therapy. Refer to 3.2 for
additional instructions.
If this is not the rst time the device is being used, you may
not be asked to select the number of sleeves. Treatment will
begin immediately.
Operating Instructions (continued)

14
3.5 To set the Therapy Time, press UP or DOWN to scroll
to THERAPY TIME. Press SELECT to conrm. The therapy
time will begin blinking. Press UP or DOWN to scroll
to 15, 30, 45, or 60 minutes. Press SELECT to conrm. The
cycle time will be updated and stop blinking.
To select a chamber in which to skip pressure, press UP
or DOWN to scroll to SKIP CHAMBER. Press SELECT to
conrm. The skip chamber setting will begin blinking. Press
UP or DOWN to scroll through the settings, including
OFF, 1, 2, 3, 4, 5, 6, 7, or 8. Press SELECT to conrm. The
skip chamber setting will be updated and stop blinking.
To operate an optional Lymphedema Preparation Treatment
(LPT) mode before Gradient Mode therapy, press UP or
DOWN to scroll to LPT MODE. Press SELECT to conrm.
The LPT Mode option will begin blinking. Press UP or
DOWN to scroll through the settings, including OFF,
CLEARING, and FOCAL.
If you select FOCAL THERAPY, proceed to 3.6.
If you select CLEARING THERAPY, proceed to 3.7.
If you do not wish to run an LPT Mode option, scroll to OFF.
Press SELECT to conrm. The LPT Mode setting will be
updated and stop blinking.
To go back to the MAIN MENU SCREEN, press UP or
DOWN to scroll to BACK TO MAIN MENU. Press SELECT
to conrm.
To begin treatment therapy, press UP or DOWN to
scroll to BEGIN TREATMENT. NOTE: If this is the rst time
the device is being used, you may be asked to select the
number of sleeves to be used for therapy. Refer to 3.2 for
additional instructions.
If this is not the rst time the device is being used, you may
not be asked to select the number of sleeves. Treatment will
begin immediately.
3.6 FOCAL THERAPY MODE
SET-UP SCREEN
To set the Pressure, press UP or DOWN to scroll to
PRESSURE. Press SELECT to conrm. The pressure will
begin blinking. Press UP or DOWN to choose from 40,
45, or 50 mmHg. Press SELECT to conrm. The pressure will
be updated and stop blinking.
To select the number of Chambers for therapy, press UP
or DOWN to scroll to CHAMBERS. Press SELECT to
conrm. The pressure will begin blinking. Press UP or
DOWN to choose from 1-4, 2-5, 3-6, 4-7, or 5-8. Press
SELECT to conrm. The pressure will be updated and stop
blinking.
To set the Therapy Time, press UP or DOWN to scroll
to THERAPY TIME. Press SELECT to conrm. The pressure
will begin blinking. Press UP or DOWN to choose from
10 or 15 minutes. Press SELECT to conrm. The pressure will
be updated and stop blinking.
To exit and return to a therapy mode set-up screen, press
UP or DOWN to scroll to EXIT. Press SELECT to
conrm.
3.7 CLEARING THERAPY MODE
SET-UP SCREEN
To set the Pressure, press UP or DOWN to scroll to
PRESSURE. Press SELECT to conrm. The pressure will
begin blinking. Press UP or DOWN to choose from 15
or 20 mmHg. Press SELECT to conrm. The pressure will be
updated and stop blinking.
To exit and return to a therapy mode set-up screen, press
UP or DOWN to scroll to EXIT. Press SELECT to
conrm.
PREVIOUS
THERAPY TIME: 15 min
SAVE/EXIT
FOCAL THERAPY
PRESSURE: 40 mmHg
CHAMBERS: 1-4
MORE
CLEARING THERAPY
PRESSURE: 20 mmHg
SAVE/EXIT
Operating Instructions (continued)

15
A8IFU.0001 REV C
3.8 PRESSURE MODE SET-UP
SCREEN
INDIVIDUAL PRESSURE
SET-UP SCREEN
NOTE: Press UP or DOWN to scroll to MORE or
PREVIOUS to view additional settings options.
To set the Pressure in each chamber, press UP or
DOWN to scroll to SET PRESSURE. Press SELECT to
conrm. NOTE: Refer to the INDIVIDUAL PRESSURE SET-UP
SCREEN below.
To set the pressure in Chamber 1, press UP or
DOWN to scroll to CHAMBER 1. The pressure setting will
begin blinking. Press UP or DOWN to scroll from 35-80
mmHg, in increments of 1 mmHg. Press SELECT to conrm.
The percentage will be updated and stop blinking. Repeat
these steps to set the pressure in the rest of the chambers.
To save your changes, press UP or DOWN to scroll to
SAVE/EXIT. Press SELECT to conrm.
To set the Cycle Time, press UP or DOWN to scroll to
CYCLE TIME. Press SELECT to conrm. The cycle time will
begin blinking. Press UP or DOWN to scroll to 40 or
60 seconds. Press SELECT to conrm. The cycle time will be
updated and stop blinking.
To set the therapy Time, press UP or DOWN to scroll to
THERAPY TIME. Press SELECT to conrm. The therapy time
will begin blinking. Press UP or DOWN to scroll to 15, 30,
45, or 60 minutes. Press SELECT to conrm. The cycle time
will be updated and stop blinking.
To select a chamber in which to skip pressure, press UP
or DOWN to scroll to SKIP CHAMBER. Press SELECT to
conrm. The skip chamber setting will begin blinking. Press
UP or DOWN to scroll through the settings, including
OFF, 1, 2, 3, 4, 5, 6, 7, or 8. Press SELECT to conrm. The skip
chamber setting will be updated and stop blinking.
To go back to the MAIN MENU SCREEN, press UP or
DOWN to scroll to BACK TO MAIN MENU. Press SELECT
to conrm.
To operate an optional Lymphedema Preparation Treatment
(LPT) mode before Pressure Mode therapy, press UP or
DOWN to scroll to LPT Mode. Press SELECT to conrm.
The LPT Mode option will begin blinking. Press UP or
DOWN to scroll through the settings, including OFF,
CLEARING, and FOCAL.
PREVIOUS
LPT MODE: CLEARING
BEGIN TREATMENT
PREVIOUS
SKIP CHAMBER: OFF
BACK TO MAIN MENU
MORE
SET PRESSURE: 1-8
CYCLE TIME: 60 sec
THERAPY TIME: 60 min
MORE
CHAMBER 1: 60mmHg
CHAMBER 2: 57mmHg
CHAMBER 3: 54mmHg
MORE
PREVIOUS
CHAMBER 4: 51mmHg
CHAMBER 5: 48mmHg
MORE
PREVIOUS
CHAMBER 8: 39mmHg
SAVE/EXIT
PREVIOUS
CHAMBER 6: 45mmHg
CHAMBER 7: 42mmHg
MORE
Operating Instructions (continued)

16
Operating Instructions (continued)
3.8 If you select FOCAL THERAPY, refer to 3.6 before
continuing.
If you select CLEARING THERAPY, refer to 3.7 before
continuing.
If you do not wish to run an LPT Mode option, scroll to OFF.
Press SELECT to conrm. The LPT MODE setting will be
updated and stop blinking.
To begin treatment therapy, press UP or DOWN to
scroll to BEGIN TREATMENT. NOTE: If this is the rst time
the device is being used, you may be asked to select the
number of sleeves to be used for therapy. Refer to 3.2 for
additional instructions.
If this is not the rst time the device is being used, you may
not be asked to select the number of sleeves. Treatment will
begin immediately.
3.9 USAGE DATA SCREEN This screen shows the amount of total time the device has
been in used.
To go back to the MAIN MENU SCREEN, press UP or
DOWN to scroll to BACK TO MAIN MENU. Press SELECT
to conrm.
3.10 RESET TO DEFAULT SCREEN To reset the device to the Factory Default settings, press UP
or DOWN to scroll to RESET TO FACTORY DEFAULT
SETTINGS. Press SELECT to conrm.
To cancel and return to the MAIN MENU SCREEN, press
UP or DOWN to scroll to CANCEL. Press SELECT to
conrm.
TOTAL USAGE TIME
HOURS: 0
MINUTES: 0
BACK TO MAIN MENU
RESET TO FACTORY
DEFAULT SETTINGS
CANCEL

17
A8IFU.0001 REV C
Operating Instructions (continued)
4. End of Therapy
4.1. Therapy will end after the treatment time has elapsed. The user can also
stop therapy at any time during a treatment session by pressing the
START|STOP BUTTON
4.2. When therapy is ended, the device will vacuum air out of the garment for
three minutes (180 seconds).
4.3. At the end of this deation session, the screen will display: “DO YOU
WANT TO EXTEND DEFLATION?” If there is still air in the garment
making it difcult to remove, press UP or DOWN to scroll to YES.
Press SELECT to conrm. The device will run another deation session
for ve minutes (300 seconds). At the end of this deation session, the
START-UP SCREEN will appear.
4.4. If you do not need to run another deation selection, press UP
or DOWN to scroll to NO. Press SELECT to conrm. The START-UP
SCREEN will appear.
4.5. If you do not make a selection within one minute (60 seconds), the
START-UP SCREEN will appear.
4.6. Upon completion of treatment and deation sessions, press the
MAIN POWER SWITCH located on the Rear Panel of the device to the
“OFF” position. The device’s screen will go dark.
4.7. Unzip your garment(s) and remove.
4.8. Remove the garment(s) from the Front Panel of the device.
4.9. Unplug the power cord from the wall
Table of contents
Popular Medical Equipment manuals by other brands

ISO Preferred
ISO Preferred OA DUAL UPRIGHT FLEXION/EXTENSION KNEE BRACE instructions

Otto Bock
Otto Bock Malleo Direxa Stirrup 50S9 Instructions for use

Ortus
Ortus Aeonmed VG70 Unboxing and setup instructions

Posture Pump
Posture Pump Disc Hydrator 2000 instructions

Body Clock Health Care
Body Clock Health Care Elle TENS + Instructions for use

inhealth
inhealth Blom-Singer Instructions for use

7E Wellness
7E Wellness MYOLIFT MD Operation manual

AGFA
AGFA D2RS user manual

MiiS
MiiS Horus+ EOC 100 user manual

Great Bear Healthcare
Great Bear Healthcare Libra Leg Bag Series user guide

Unicare Health
Unicare Health ANSA Instruction & safety manual

CYMEDICA Orthopedics
CYMEDICA Orthopedics QB1 user manual