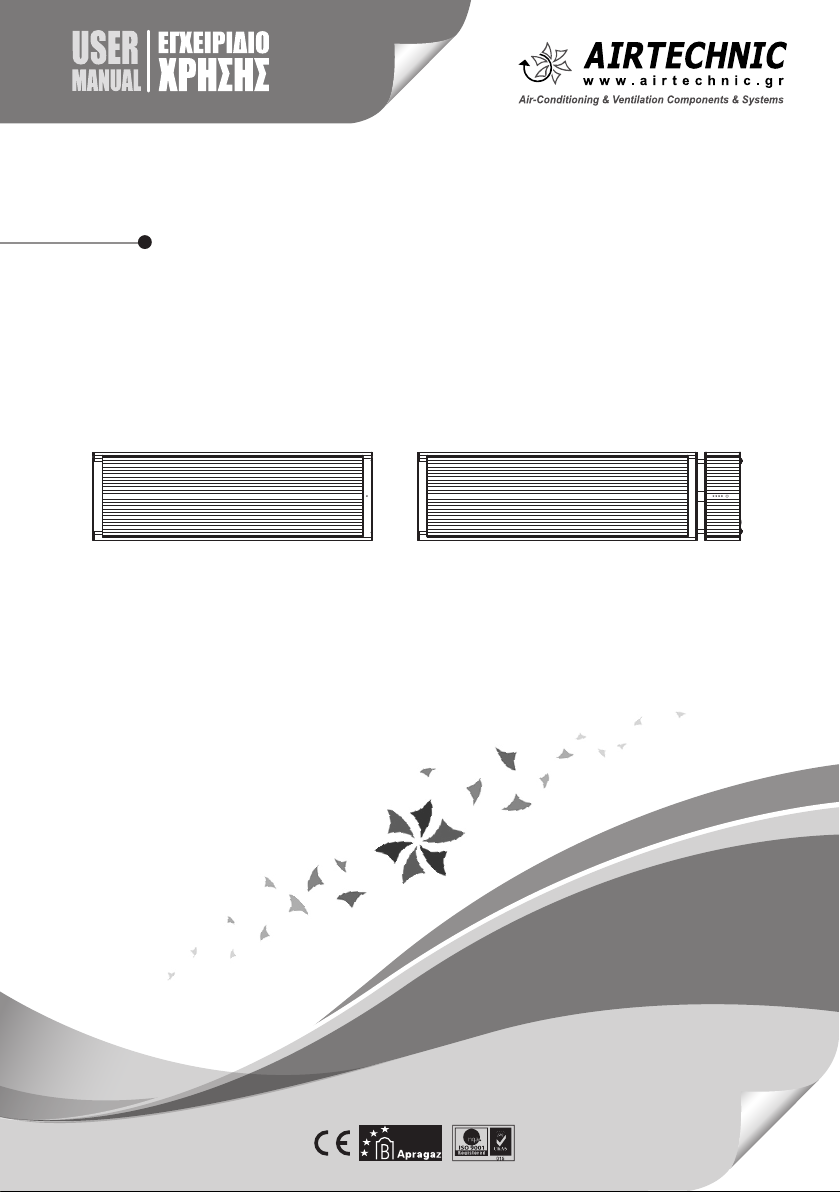
AirTechnic AHB 18 B User manual

INFRARED HEATER
V. 4
AHB

2
Infrared Heater AHB
This manual provides you with important information needed for setup,
operate and maintain your ABH radiant heater.
Failure to follow these instructions
may damage and/or impair its operation and void the warranty.
Infrared Heater AHB

3
Infrared Heater AHB
This manual provides you with important information needed for setup,
operate and maintain your ABH radiant heater.
Failure to follow these instructions
may damage and/or impair its operation and void the warranty.
Infrared Heater AHB
1. INFRARED HEATER THEORY
2. PERFORMANCE FEATURES
3. WORKING CONDITIONS
Far-infrared radiant heaters are produced with unique design and manufacturing technique. Using
a specially coated aluminium panel, the heat generated by the heating element is transferred
radiantly to people and objects with maximum eciency. The heat radiated from the panel surface,
is absorbed by people, walls, oors, furniture etc.
Infrared heating will not lead to air movement, making the air cleaner, as dust and particles are not
disturbed and circulated. Traditional convection heating relies on air movement to distribute the
heat. The air remains less humid and gives you a sense of fresh and comfortable warmth, similar
to the warmth felt from the sun.
Comfortable : No wind, light or odor will be produced during the running of this product, so the
indoor air is clean without oating dust.
Energy - saving : High heat generation and excellent heat distribution, use less energy than
traditional heating methods.
Reliable : The indoor temperature can be adjusted freely, without being limited by seasonal temperatures.
Physical therapy : The heat radiant can change body microcirculation and cell organization under the
skin producing resonance, cleaning the barrier of microcirculation, adjusting and balancing the nervous
system, promoting metabolism and increasing body physical power. It is very good for people’s health.
Ambient temperature : -30 ⁰C ÷ +30 ⁰C
Rated voltage : 220 ÷ 240V
Rated frequency : 50 ÷ 60 Hz
Relative humidity : less than 95%
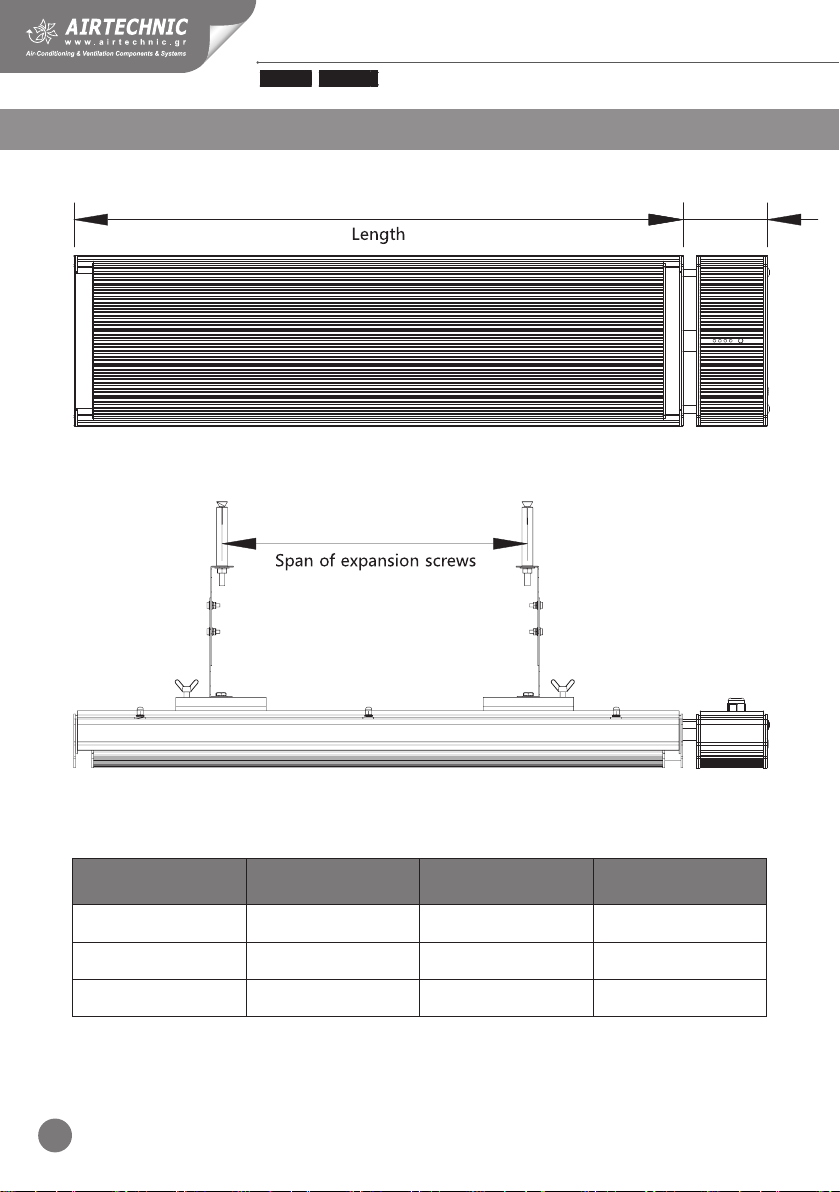
4. INSTALLATION REQUIREMENTS
Model Power
[W]
Rated Current
[A]
Voltage
[V]
Cable length
[mm]
AHB 18 B 1.800 7,8 220 ÷ 240 2.000
AHB 24 B 2.400 10,4 220 ÷ 240 2.000
AHB 32 B 3.200 13,9 220 ÷ 240 500
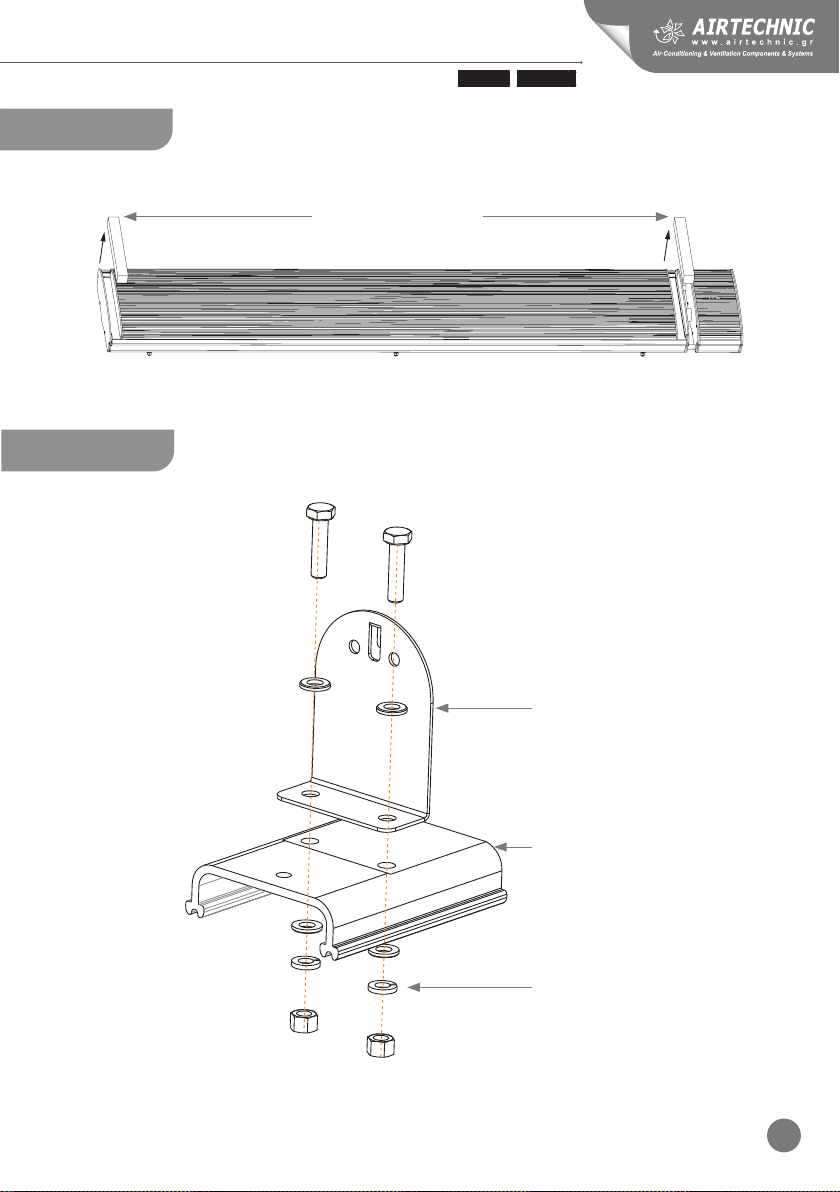
1. Qualied installer :
The installation must be carried out by trained personnel.
2. Installation conditions :
(I) Supply voltage uctuation range should be within ± 10%. If not, please revise before installation.
(II) If there is serious security risk within the user’s electrical network, the installation must not
proceed, until all problems are resolved.
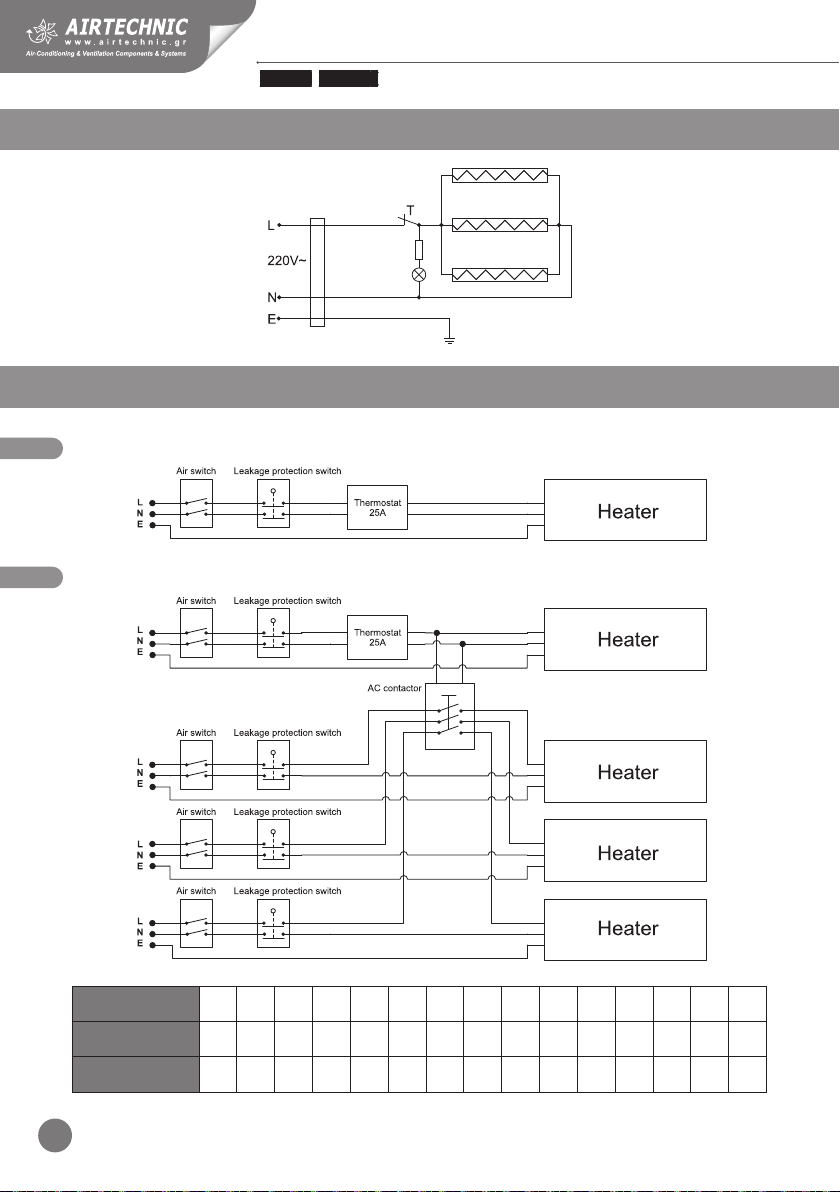
(III) All electrical wiring must be equipped with earth leakage protection devises and master switch.
(IV) Ground wiring must be connected to the building’s grounding device. If not, please consult with
a professional installer. Do not connect ground wires to gas pipes, water pipes, lightning rods or
telephone ground wiring.

4
Infrared Heater AHB
A C
B(min)
5. INSTALLATION INSTRUCTIONS
Model A [mm] B [mm] C [mm]
AHB 18 B 1.000 700 95
AHB 24 B 1.500 1.200 95
AHB 32 B 2.000 1.700 95
A C
B(min)

5
Infrared Heater AHB
Step 1 Remove packing of both ends of heater.
Step 2 Connect adjusted bracket to sliding bracket.
PACKING MATERIAL
ADJUSTING BRACKET
SLIDING BRACKET
SCREW
+ FLAT WASHER
+ SPRING WASHER
+ NUT
(Spec.: M6)

6
Infrared Heater AHB
Step 3 Installation of sliding bracket & heater, as arrow points.
Step 4 Fix adjusting bracket into the wall by expansion screws.
ADJUSTING BRACKET
EXPANSION SCREWS

7
Infrared Heater AHB
Step 5 Installation of two adjusting brackets; make sure lock brackets tight by buttery
hand screw.
45°
75 mm
2.200 mm
Ceiling
Ground
Ground
200 mm
2.200 mm
140 mm
200 mm
Can not place with
other objects within 1.000 mm
45°
75 mm
2.200 mm
Ceiling
Ground
Ground
200 mm
2.200 mm
140 mm
200 mm
Can not place with
other objects within 1.000 mm
SCREW
+ FLAT WASHER
+ SPRING WASHER
+ NUT
(Spec.: M5)
BUTTERFLY HAND SCREW
6. INSTALLATION DIAGRAM
WALL INSTALLATION CEILING INSTALLATION

8
Infrared Heater AHB
7. INTERNAL WIRE DIAGRAM
8. WIRE DIAGRAM
Follow wiring instruction as follows :
1. One unit control
2. Several units control
Wire
diameter [mm2]1,5 2,5 4 6 10 16 25 35 50 70 95 120 150 185 240
Current [A] 13 18 24 32 45 61 85 105 124 160 201 235 275 323 381
Air swicth [A] 16 20 25 32 50 63 100 125 125 160 250 250 500 400 400

9
Infrared Heater AHB
9. REMOTE CONTROL OPERATION
1234 5
Temperature controller parts
LED
1 - 4 : Indicator light
1234 5
Heater LED indicator lights.
There are 4 indicator lights on the temperature controller parts (above image). These 4 lights show
the heater’s operation level. No 5 is the infrared receiver.
Attention : No 1 indicator light has two color states, “red” and “green”.
1. The indicator lights illuminate when the heater is o, even if it’s connected to power supply.
Press (ON / OFF button) to turn on the heater.
Please note: The heater by default runs at 100% power.
2. Press (LEVEL button) to adjust heater power.
3. Press (CLOCK button) to adjust the “auto o” timer settings.

10
Infrared Heater AHB
Power levels
No 1 indicator light has two color states, “red” and “green”.
RED color : No2 to No 4 lights show in power settings.
GREEN color : No2 to No 4 lights show in clock settings (time settings).
Power level 25%
Power level 50%
Power level 75%
Power level 100%
Operation without timer settings.
Heater will turn o automatically
after 2 hours.
Heater will turn o automatically
after 4 hours.
Heater will turn o automatically
after 8 hours.
Light turned o RED light illuminates GREEN light illuminates
STANDBY
LEVEL
HEAT
TIMER ON
TIMER OFF
WiFi FAST - HOT
BATTERY LEVEL
POWER
TIME
Remote controller Remote controller LED display
“ON / OFF” button
Press the ON / OFF button to turn on / o the heater.
“CLOCK” button
Remote is powered on (as shown is picture 2-1), default time is 00:00 and time setup as following :
(1) Press the “clock” button once and the hour will ash (as shown in picture 2-2). Press “up” or
“down” button to adjust the hour.
(2) Press the “clock” button again and the minutes will ash (as shown in picture 2-3). Press “up” or
“down” button to adjust the minutes.
(3) Press the “clock” button again and the seconds will ash (as shown in picture 2-4). Press “up” or
“down” button to adjust the seconds.
(4) Press the “clock” button again and all ashing stops and the setup is nalized.

11
Infrared Heater AHB
“LEVEL” button
Press LEVEL button to adjust the power when the heater is on (as shown in picture 3-1).
“FAST-HOT” button
Press FAST-HOT button to turn on / o the fast-hot function.
Fast-hot function runs the heater at full power for a certain time, to achieve rapid heating.
“TIMER ON” button
1. Press the “TIMER ON” button and the symbol “ON” will appear (as shown in picture 5-1).
2. Press “up” or “down” button to adjust the hour (as shown in picture 5-2).
3. Press the “Timer ON” button again and the minutes ash. Press “up” or “down” button to adjust
the minutes (as shown in picture 5-3).
4. Press the “Timer ON” button again and the setup nalizes. It will show the current time, for
example 16:30 and the “ON” symbol (as shown in picture 5-4).

12
Infrared Heater AHB
“TIMER OFF” button
1. Press the “TIMER OFF” button and the symbol “OFF” will appear (as shown in picture 6-1).
2. Press “up” or “down” button to adjust the hour (as shown in picture 6-2).
3. Press the “Timer OFF” button again and the minutes ash. Press “up” or “down” button to adjust
the minutes (as shown in picture 6-3).
4. Press the “Timer OFF” button again and the setup nalizes. It will show the current time, for
example 16:30 and the “OFF” symbol (as shown in picture 6-4).
10. IMPORTANT NOTES BEFORE 1st OPERATION
Items to be checked Situation caused
by improper installation
Is the installation stable? The equipment may fall o or shake.
Is the heat insulation adequate? Damage to objects in close proximity.
Is the power voltage compatible
according to the specications? Equipment failure.
Are all wire connections correct? Equipment failure.
Is the ground wiring properly connected? Electricity leakage
that can cause damage or injury.
Is the wiring correct
according to regulations? Equipment failure or circuit damage.
Due to thermal expansion and contraction, the heater would make noise when turned on
or o. It’s a normal phenomenon and won’t aect the operation or eciency of the heater.
11. SAFETY NOTES BEFORE OPERATION
1. Do not connect the power supply before the installation is completed.
2. All wire connections are correct and secure.
3. No scattered objects are on the heater’s body.
4. Connect power and check if the heater is operating properly.

13
Infrared Heater AHB
12. GENERAL SAFETY NOTES
1. DO NOT connect multiple heaters or other appliances on the same socket. Danger of overload.
2. Disconnect the power supply when not in use.
3. If the heater does not operate properly, or the wiring is damaged, DISCONNECT THE POWER
SUPPLY IMMEDIATELY and contact an authorized technician.
4. DO NOT install the heater directly below the power outlet.
5. The heater must be installed at least 2.2 m above ground level as the heating panel is extremely
hot during operation and MUST NOT BE TOUCHED.
6. DO NOT cover the heating panel and/or hang object from the heater.
7. A distance of 150 mm is required between the rear of the heater and the ceiling. Allow 200 mm
from the sides of the heater and do not place any object within 1.000 mm directly in front of the
heater.
8. When cleaning the heater, disconnect the power supply and don’t submerge in liquid.
9. DO NOT install or operate the heater in an area where ammable, explosive or easily ignited
materials are present.
10. DO NOT insert metal or any foreing objects into the heater.
11. DO NOT operate the heater when it’s surface is wet.
13. BOX CONTENTS
ITEM QUANTITY
HEATER 1 pc
ADJUSTING BRACKET 1 set
SLIDING BRACKET 2 pc
FASTENER 1 set
USER’s MANUAL 1 copy
14. SPECIFICATIONS
MODEL DIMENSIONS
[mm]
PACKAGE SIZE
[mm]
NET WEIGHT
[Kg]
GROSS WEIGHT
[Kg]
AHB 18 B 1.095 x 189 x 67 1.190 x 250 x 145 6,8 8
AHB 24 B 1.595 x 189 x 67 1.690 x 250 x 145 9,4 11,2
AHB 32 B 2.095 x 189 x 67 2.190 x 250 x 145 12,2 14,2

This manual suits for next models
2
Table of contents
Other AirTechnic Heater manuals
Popular Heater manuals by other brands

Heatstore
Heatstore HSP500SSE Installation & Control Guide

Riello
Riello HYDROLINE RK N Series Instructions for installation, use and maintenance

SOLIS
SOLIS CERAMIC 704 user manual

cecotec
cecotec READYWARM 6190 CERAMIC ROTATE SMART instruction manual

Alpina
Alpina AF261M instruction manual

Diamond
Diamond GLO-RAY DRHL-54P Installation and operating manual